#
https://www.oschina.net/news/91924/10-open-source-technology-trends-2018
http://www.iteye.com/news/32843
JAX-RS 2比JAX-RS 1增加了过滤器、拦截器、异步处理等特性。@import url(http://www.blogjava.net/CuteSoft_Client/CuteEditor/Load.ashx?type=style&file=SyntaxHighlighter.css);@import url(/css/cuteeditor.css);
JAXRSClientSpringBoot
CXFSpringBoot
Restfull Webservice书源码
JAX-RS 2.0 REST客户端编程实例
本人的DEMO
设计文档模板:
- 系统背景和定位
- 业务需求描述
- 领域语言整理,主要是整理领域中的各种术语的定义,名词解释
- 领域划分(分析出子域、核心域、支撑域)
- 系统用例图
- 每个子域的领域模型设计(实体、值对象、聚合、领域事件,需要注意的是:领域模型是需要抽象的,要分析业务本质,而不是简单的直接对需求进行建模)
- 领域模型详细说明(如为什么这样设计的原因、模型内对象的关系、各种业务规则、数据一致性规则等)
- 领域服务、仓储、工厂设计
- Saga业务流程设计
- 关键聚合根的状态流转图
- 场景走查(讲述如何通过领域模型、领域服务、仓储、Saga流程等完成系统用例以及关键业务流程的)
- 架构设计(如传统三层架构、经典四层架构、CQRS/ES架构)
一些其他的思考:
- 去除一切花俏的建模技巧,我觉得最重要的方向就是去努力分析问题和事物的本质,针对这个本质进行领域建模。这个领域建模,最主要的还是锻炼的人的事物抽象能力。10个人,建出来的领域模型都不同。本质原因就是大家对同一个问题的理解不同,对事物的本质的理解不同。虽然最终都能解决当前的问题,但是对适应未来需求变化的能力却是不同。
- 所以,我们要把时间花在多理解业务上,让自己成为领域专家,只有这样,才能充分理解业务。多理解一点业务,你才能更好的抽象出业务本质背后的领域模型。很少有人能做到很快理解业务,并很快针对业务设计出正确的领域模型,至少我是不行。
- 领域建模需要时间,是一个迭代的过程,人无完人。而时间很多时候也不会很充足,所以,不太可能一步到位把领域设计做的很完美。我们在整体项目规划的时候可能会有个大的架构设计、业务大图(边界思维),但是不可能达到领域设计的粒度,只能是一期一期的完善,到最后可能才会有完整的上面的目录内容。每一期都需要考虑支持的场景约束、上下文、系统边界、持续集成的相关设计。设计product, not project。
从遇到问题开始
当人们要做一个软件系统时,一般总是因为遇到了什么问题,然后希望通过一个软件系统来解决。
比如,我是一家企业,然后我觉得我现在线下销售自己的产品还不够,我希望能够在线上也能销售自己的产品。所以,自然而然就想到要做一个普通电商系统,用于实现在线销售自己企业产品的目的。
再比如,我是一家互联网公司,公司有很多系统对外提供服务,面向很多客户端设备。但是最近由于各种原因,导致服务经常出故障。所以,我们希望通过各种措施提高服务的质量和稳定性。其中的一个措施就是希望能做一个灰度发布的平台,这个平台可以提供灰度发布的服务。然后,当某个业务系统做了一些修改并需要发布时,可以使用我们的灰度发布平台来非常方便的实现灰度发布的功能。比如在灰度发布平台上方便的定制允许哪些特定的客户端才会访问新服务,哪些客户端继续使用老服务。灰度发布平台可以提供各种灰度的策略。有了这样的灰度发布机制,那即便系统的新逻辑有什么问题,受影响的面也不会很大,在可控范围内。所以,如果公司里的所有对外提供服务的系统都接入了灰度平台,那这些系统的发布环节就可以更加有保障了。
总之,我们做任何一个软件系统,都是有原因的,否则就没必要做这个系统,而这个原因就是我们遇到的问题。所以,通过问题,我们就知道了我们需要一个什么样的系统,这个系统解决什么样的问题。最后,我们就很自然的得出了一个目标,即知道了自己要什么。比如我要做一个论坛、一个博客系统、一个电商平台、一个灰度发布系统、一个IDE、一个分布式消息队列、一个通信框架,等等。
DDD切入点1 - 理解概念
DDD的全称为Domain-driven Design,即领域驱动设计。下面我从领域、问题域、领域模型、设计、驱动这几个词语的含义和联系的角度去阐述DDD是如何融入到我们平时的软件开发初期阶段的。要理解什么是领域驱动设计,首先要理解什么是领域,什么是设计,还有驱动是什么意思,什么驱动什么。
什么是领域(Domain)?
前面我们已经清楚的知道我们现在要做一个什么样的系统,这个系统需要解决什么问题。我认为任何一个系统都会属于某个特定的领域,比如论坛是一个领域,只要你想做一个论坛,那这个论坛的核心业务是确定的,比如都有用户发帖、回帖等核心基本功能。比如电商平台、普通电商系统,这种都属于网上电商领域,只要是这个领域的系统,那都有商品浏览、购物车、下单、减库存、付款交易等核心环节。所以,同一个领域的系统都具有相同的核心业务,因为他们要解决的问题的本质是类似的。
因此,我们可以推断出,一个领域本质上可以理解为就是一个问题域,只要是同一个领域,那问题域就相同。所以,只要我们确定了系统所属的领域,那这个系统的核心业务,即要解决的关键问题、问题的范围边界就基本确定了。通常我们说,要成为一个领域的专家,必须要在这个领域深入研究很多年才行。因为只有你研究了很多年,你才会遇到非常多的该领域的问题,同时你解决这个领域中的问题的经验也非常丰富。很多时候,领域专家比技术专家更加吃香,比如金融领域的专家。
什么是设计(Design)?
DDD中的设计主要指领域模型的设计。为什么是领域模型的设计而不是架构设计或其他的什么设计呢?因为DDD是一种基于模型驱动开发的软件开发思想,强调领域模型是整个系统的核心,领域模型也是整个系统的核心价值所在。每一个领域,都有一个对应的领域模型,领域模型能够很好的帮我们解决复杂的业务问题。
从领域和代码实现的角度来理解,领域模型绑定了领域和代码实现,确保了最终的代码实现就一定是解决了领域中的核心问题的。因为:1)领域驱动领域模型设计;2)领域模型驱动代码实现。我们只要保证领域模型的设计是正确的,就能确定领域模型可以解决领域中的核心问题;同理,我们只要保证代码实现是严格按照领域模型的意图来落地的,那就能保证最后出来的代码能够解决领域的核心问题的。这个思路,和传统的分析、设计、编码这几个阶段被割裂(并且每个阶段的产物也不同)的软件开发方法学形成鲜明的对比。
什么是驱动(Driven)?
上面其实已经提到了,就是:1)领域驱动领域模型设计;2)领域模型驱动代码实现。这个就和我们传统的数据库驱动开发的思路形成对比了。DDD中,我们总是以领域为边界,分析领域中的核心问题(核心关注点),然后设计对应的领域模型,再通过领域模型驱动代码实现。而像数据库设计、持久化技术等这些都不是DDD的核心,而是外围的东西。
领域驱动设计(DDD)告诉我们的最大价值我觉得是:当我们要开发一个系统时,应该尽量先把领域模型想清楚,然后再开始动手编码,这样的系统后期才会很好维护。但是,很多项目(尤其是互联网项目,为了赶工)都是一开始模型没想清楚,一上来就开始建表写代码,代码写的非常冗余,完全是过程是的思考方式,最后导致系统非常难以维护。而且更糟糕的是,出来混总是要还的,前期的领域模型设计的不好,不够抽象,如果你的系统会长期需要维护和适应业务变化,那后面你一定会遇到各种问题维护上的困难,比如数据结构设计不合理,代码到处冗余,改BUG到处引入新的BUG,新人对这种代码上手困难,等。而那时如果你再想重构模型,那要付出的代价会比一开始重新开发还要大,因为你还要考虑兼容历史的数据,数据迁移,如何平滑发布等各种头疼的问题。所以,就导致我们最后天天加班。
虽然,我们都知道这个道理,但是我也明白,人的习惯很难改变的,大部分人都很难从面向过程式的想到哪里写到哪里的思想转变为基于系统化的模型驱动的思维。我想,这或许是DDD很难在中国或国外流行起来的原因吧。但是,我想这不应该成为我们放弃学习DDD的原因,对吧!
概念总结:
- 领域就是问题域,有边界,领域中有很多问题;
- 任何一个系统要解决的那个大问题都对应一个领域;
- 通过建立领域模型来解决领域中的核心问题,模型驱动的思想;
- 领域建模的目标针对我们在领域中所关心的问题,即只针对核心关注点,而不是整个领域中的所有问题;
- 领域模型在设计时应考虑一定的抽象性、通用性,以及复用价值;
- 通过领域模型驱动代码的实现,确保代码让领域模型落地,代码最终能解决问题;
- 领域模型是系统的核心,是领域内的业务的直接沉淀,具有非常大的业务价值;
- 技术架构设计或数据存储等是在领域模型的外围,帮助领域模型进行落地;
DDD切入点2 - 理解领域、拆分领域、细化领域
理解领域知识是基础
上面我们通过第一步,虽然我们明确了要做一个什么样的系统,该系统主要解决什么问题,但是就这样我们还无法开始进行实际的需求分析和模型设计,我们还必须将我们的问题进行拆分,需求进行细化。有些时候,需求方,即提出问题的人,很可能自己不清楚具体想要什么。他只知道一个概念,一个大的目标。比如他只知道要做一个股票交易系统,一个灰度发布系统,一个电商平台,一个开发工具,等。但是他不清楚这些系统应该具体做成什么样子。这个时候,我认为领域专家就非常重要了,DDD也非常强调领域专家的重要性。因为领域专家对这个领域非常了解,对领域内的各种业务场景和各种业务规则也非常清楚,总之,对这个领域内的一切业务相关的知识都非常了解。所以,他们自然就有能力表达出系统该做成什么样子。所以,要知道一个系统到底该做成什么样子,到底哪些是核心业务关注点,只能靠沉淀领域内的各种知识,别无他法。因此,假设你现在打算做一个电商平台,但是你对这个领域没什么了解,那你一定得先去了解下该领域内主流的电商平台,比如淘宝、天猫、京东、亚马逊等。这个了解的过程就是你沉淀领域知识的过程。如果你不了解,就算你领域建模的能力再强,各种技术架构能力再强也是使不上力。领域专家不是某个固定的角色,而是某一类人,这类人对这个领域非常了解。比如,一个开发人员也可以是一个领域专家。假设你在一个公司开发和维护一个系统已经好几年了,但是这个系统的产品经理(PD)可能已经换过好几任了,这种情况下,我相信这几任产品经理都没有比你更熟悉这个领域。
拆分领域
上面我们明白了,领域建模的基础是要先理解领域,让自己成为领域专家。如果做到了这点,我们就打好了坚实的基础了。但是,有时一个领域往往太复杂,涉及到的领域概念、业务规则、交互流程太多,导致我们没办法直接针对这个大的领域进行领域建模。所以,我们需要将领域进行拆分,本质上就是把大问题拆分为小问题,然后各个击破的思路。然后既然把一个大的领域划分为了多个小的领域(子域),那最关键的就是要理清每个子域的边界;然后要搞清楚哪些子域是核心子域,哪些是非核心子域,哪些是公共支撑子域;然后,还要思考子域之间的联系是什么。那么,我们该如何划分子域呢?我的个人看法是从业务相关性的角度去思考,也就是我们平时说的按业务功能为出发点进行划分。还是拿经典的电商系统来分析,通常一个电商系统都会包含好几个大块,比如:
- 会员中心:负责用户账号登录、用户信息的管理;
- 商品中心:负责商品的展示、导航、维护;
- 订单中心:负责订单的生成和生命周期管理;
- 交易中心:负责交易相关的业务;
- 库存中心:负责维护商品的库存;
- 促销中心:负责各种促销活动的支持;
上面这些中心看起来很自然,因为大家对电子商务的这个领域都已经非常熟悉了,所以都没什么疑问,好像很自然的样子。所以,领域划分是不是就是没什么挑战了呢?显然不是。之所以我们觉得子域划分很简单,是因为我们对整个大领域非常了解了。如果我们遇到一个冷门的领域,就没办法这么容易的去划分子域了。这就需要我们先去努力理解领域内的知识。所以,我个人从来不相信什么子域划分的技巧什么的东西,因为我觉得这个工作没有任何诀窍可以使用。当我们不了解一个东西的时候,如何去拆解它?当我们对整个领域有一定的熟悉了,了解了领域内的相关业务的本质和关系,我们就自然而然的能划分出合理的子域了。不过并不是所有的系统都需要划分子域的,有些系统只是解决一个小问题,这个问题不复杂,可能只有一两个核心概念。所以,这种系统完全不需要再划分子域。但不是绝对的,当一个领域,我们的关注点越来越多,每个关注点我们关注的信息越来越多的时候,我们会不由自主的去进一步的划分子域。比如,也许我们一开始将商品和商品的库存都放在商品中心里,但是后来由于库存的维护越来越复杂,导致揉在一起对我们的系统维护带来一定的困难时,我们就会考虑将两者进行拆分,这个就是所谓的业务垂直分割。
细化子域
通过上面的两步,我们了解了领域里的知识,也对领域进行了子域划分。但这样还不够,凭这些我们还无法进行后续的领域模型设计。我们还必须再进一步细化每个子域,进一步明确每个子域的核心关注点,即需求细化。我觉得我们需要细化的方面有以下几点:
- 梳理领域概念:梳理出领域内我们关注的概念、概念的关系,并统一交流词汇,形成统一语言;
- 梳理业务规则:梳理出领域内我们关注的各种业务规则,DDD中叫不变性(invariants),比如唯一性规则,余额不能小于零等;
- 梳理业务场景:梳理出领域内的核心业务场景,比如电商平台中的加入购物车、提交订单、发起付款等核心业务场景;
- 梳理业务流程:梳理出领域内的关键业务流程,比如订单处理流程,退款流程等;
从上面这4个方面,我们从领域概念、业务规则、交互场景、业务流程等维度梳理了我们到底要什么,整理了整个系统应该具备的功能。这个工作我觉得是一个非常具有创造性和有难度的工作。我们一方面会主观的定义我们想要什么;另一方面,我们还会思考我们要的东西的合理性。我认为这个就是产品经理的工作,产品经理必须要负起职责,把他的产品充分设计好,从各个方面去考虑,如何设计一个产品,才能更好的解决用户的核心诉求,即领域内的核心问题。如果对领域不够了解,如果想不清楚用户到底要什么,如果思考问题不够全面,谈何设计出一个合理的产品呢?
关于领域概念的梳理,我觉得可以采用四色原型分析法,这个分析法通过系统的方法,将概念划分为不同的种类,为不同种类的概念标注不同的颜色。然后将这些概念有机的组合起来,从而让我们可以清晰的分析出概念和概念之间的关系。有兴趣的同学可以在网上搜索下四色原型。
注意:上面我说的这四点,重点是梳理出我们要什么功能,而不是思考如何实现这些功能,如何实现是软件设计人员的职责。
DDD切入点3 - 领域模型设计
这部分内容,我想学习DDD的人都很熟悉了。DDD原著中提出了很多实用的建模工具:聚合、实体、值对象、工厂、仓储、领域服务、领域事件。我们可以使用这些工具,来设计每一个子域的领域模型。最终通过领域模型图将设计沉淀下来。要使用这些工具,首先就要理解每个工具的含义和使用场景。不要以为很简单哦,比如聚合的划分就是一个非常具有艺术的活。同一个系统,不同的人设计出来的聚合是完全不同的。而且很有可能高手之间的最后设计出来的差别反而更大,实际上我认为是世界观的相互碰撞,呵呵。所以,要领域建模,我觉得每个人都应该去学学哲学知识,这有助于我们更好的认识世界,更好的理解事物的本质。
关于这些建模工具的概念和如何运用我就不多展开了,我博客里也有很多这方面的介绍。下面我再讲一下我认为比较重要的东西,比如到底该如何领域建模?步骤应该是怎么样的?
领域建模的方法
通过上面我介绍的细化子域的内容,现在再来谈该如何领域建模,我觉得就方便很多了。我的主要方法是:
- 划分好边界上下文,通常每个子域(sub domain)对应一个边界上下文(bounded context),同一个边界上下文中的概念是明确的,没有任何歧义;
- 在每个边界上下文中设计领域模型,具体的领域模型设计方法有很多种,如以场景为出发点的四色原型分析法,或者我早期写的这篇文章;这个步骤最核心的就是找出聚合根,并找出每个聚合根包含的信息;关于如何设计聚合,可以看一下我写的这篇文章;
- 画出领域模型图,圈出每个模型中的聚合边界;
- 设计领域模型时,要考虑该领域模型是否满足业务规则,同时还要综合考虑技术实现等问题,比如并发问题;领域模型不是概念模型,概念模型不关注技术实现,领域模型关心;所以领域模型才能直接指导编码实现;
- 思考领域模型是如何在业务场景中发挥作用的,以及是如何参与到业务流程的每个环节的;
- 场景走查,确认领域模型是否能满足领域中的业务场景和业务流程;
- 模型持续重构、完善、精炼;
领域模型的核心作用:
- 抽象了领域内的核心概念,并建立概念之间的关系;
- 领域模型承担了领域内的状态的维护;
- 领域模型维护了领域内的数据之间的业务规则,数据一致性;
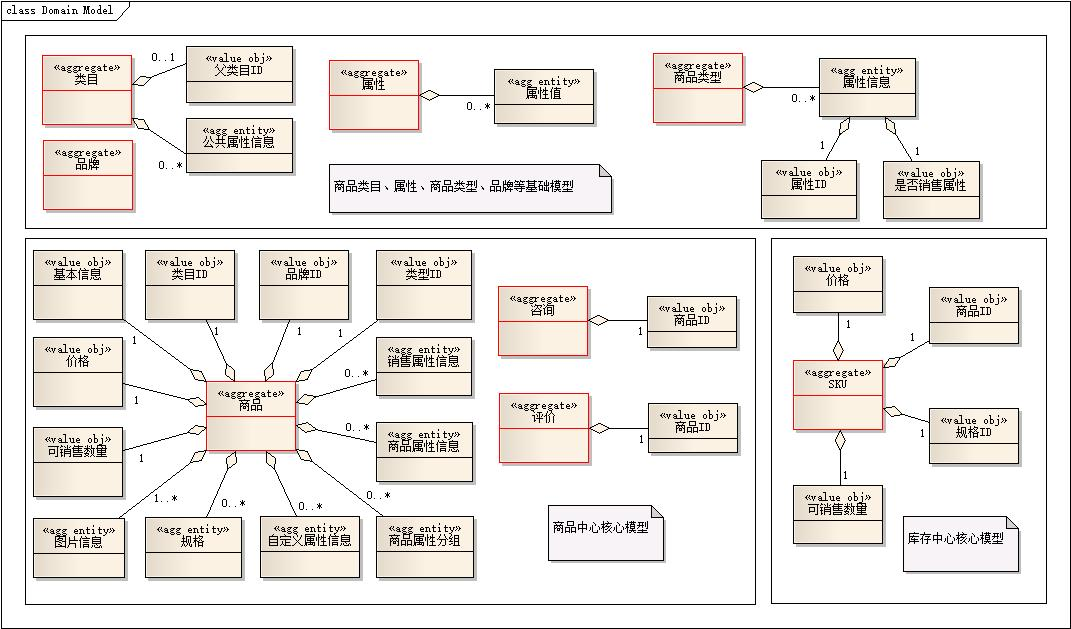
下图是我最近做个一个普通电商系统的商品中心的领域模型图,给大家参考:
领域模型设计只是软件设计中的一小部分
需要特别注意的是,领域模型设计只是整个软件设计中的很小一部分。除了领域模型设计之外,要落地一个系统,我们还有非常多的其他设计要做,比如:
- 容量规划
- 架构设计
- 数据库设计
- 缓存设计
- 框架选型
- 发布方案
- 数据迁移、同步方案
- 分库分表方案
- 回滚方案
- 高并发解决方案
- 一致性选型
- 性能压测方案
- 监控报警方案
等等。上面这些都需要我们平时的大量学习和积累。作为一个合格的开发人员或架构师,我觉得除了要会DDD领域驱动设计,还要会上面这么多的技术能力,确实是非常不容易的。所以,千万不要以为会DDD了就以为自己很牛逼,实际上你会的只是软件设计中的冰山一角而已。
总结
本文的重点是基于我个人对DDD的一些理解,希望能整理出一些自己总结出来的一些感悟和经验,并分享给大家。我相信很多人已经看过太多DDD书上的东西,我总是感觉书上的东西看似都太”正规“,很多时候我们读了之后很难消化,就算理解了书里的内容,当我们想要运用到实践中时,总是感觉无从下手。本文希望通过通俗易懂的文字,介绍了一部分我对DDD的学习感悟和实践心得,希望能给大家一些启发和帮助。
最近几年,在DDD的领域,我们经常会看到CQRS架构的概念。我个人也写了一个ENode框架,专门用来实现这个架构。CQRS架构本身的思想其实非常简单,就是读写分离。是一个很好理解的思想。就像我们用MySQL数据库的主备,数据写到主,然后查询从备来查,主备数据的同步由MySQL数据库自己负责,这是一种数据库层面的读写分离。关于CQRS架构的介绍其实已经非常多了,大家可以自行百度或google。我今天主要想总结一下这个架构相对于传统架构(三层架构、DDD经典四层架构)在数据一致性、扩展性、可用性、伸缩性、性能这几个方面的异同,希望可以总结出一些优点和缺点,为大家在做架构选型时提供参考。
前言
CQRS架构由于本身只是一个读写分离的思想,实现方式多种多样。比如数据存储不分离,仅仅只是代码层面读写分离,也是CQRS的体现;然后数据存储的读写分离,C端负责数据存储,Q端负责数据查询,Q端的数据通过C端产生的Event来同步,这种也是CQRS架构的一种实现。今天我讨论的CQRS架构就是指这种实现。另外很重要的一点,C端我们还会引入Event Sourcing+In Memory这两种架构思想,我认为这两种思想和CQRS架构可以完美的结合,发挥CQRS这个架构的最大价值。
数据一致性
传统架构,数据一般是强一致性的,我们通常会使用数据库事务保证一次操作的所有数据修改都在一个数据库事务里,从而保证了数据的强一致性。在分布式的场景,我们也同样希望数据的强一致性,就是使用分布式事务。但是众所周知,分布式事务的难度、成本是非常高的,而且采用分布式事务的系统的吞吐量都会比较低,系统的可用性也会比较低。所以,很多时候,我们也会放弃数据的强一致性,而采用最终一致性;从CAP定理的角度来说,就是放弃一致性,选择可用性。
CQRS架构,则完全秉持最终一致性的理念。这种架构基于一个很重要的假设,就是用户看到的数据总是旧的。对于一个多用户操作的系统,这种现象很普遍。比如秒杀的场景,当你下单前,也许界面上你看到的商品数量是有的,但是当你下单的时候,系统提示商品卖完了。其实我们只要仔细想想,也确实如此。因为我们在界面上看到的数据是从数据库取出来的,一旦显示到界面上,就不会变了。但是很可能其他人已经修改了数据库中的数据。这种现象在大部分系统中,尤其是高并发的WEB系统,尤其常见。
所以,基于这样的假设,我们知道,即便我们的系统做到了数据的强一致性,用户还是很可能会看到旧的数据。所以,这就给我们设计架构提供了一个新的思路。我们能否这样做:我们只需要确保系统的一切添加、删除、修改操作所基于的数据是最新的,而查询的数据不必是最新的。这样就很自然的引出了CQRS架构了。C端数据保持最新、做到数据强一致;Q端数据不必最新,通过C端的事件异步更新即可。所以,基于这个思路,我们开始思考,如何具体的去实现CQ两端。看到这里,也许你还有一个疑问,就是为何C端的数据是必须要最新的?这个其实很容易理解,因为你要修改数据,那你可能会有一些修改的业务规则判断,如果你基于的数据不是最新的,那意味着判断就失去意义或者说不准确,所以基于老的数据所做的修改是没有意义的。
扩展性
传统架构,各个组件之间是强依赖,都是对象之间直接方法调用;而CQRS架构,则是事件驱动的思想;从微观的聚合根层面,传统架构是应用层通过过程式的代码协调多个聚合根一次性以事务的方式完成整个业务操作。而CQRS架构,则是以Saga的思想,通过事件驱动的方式,最终实现多个聚合根的交互。另外,CQRS架构的CQ两端也是通过事件的方式异步进行数据同步,也是事件驱动的一种体现。上升到架构层面,那前者就是SOA的思想,后者是EDA的思想。SOA是一个服务调用另一个服务完成服务之间的交互,服务之间紧耦合;EDA是一个组件订阅另一个组件的事件消息,根据事件信息更新组件自己的状态,所以EDA架构,每个组件都不会依赖其他的组件;组件之间仅仅通过topic产生关联,耦合性非常低。
上面说了两种架构的耦合性,显而易见,耦合性低的架构,扩展性必然好。因为SOA的思路,当我要加一个新功能时,需要修改原来的代码;比如原来A服务调用了B,C两个服务,后来我们想多调用一个服务D,则需要改A服务的逻辑;而EDA架构,我们不需要动现有的代码,原来有B,C两订阅者订阅A产生的消息,现在只需要增加一个新的消息订阅者D即可。
从CQRS的角度来说,也有一个非常明显的例子,就是Q端的扩展性。假设我们原来Q端只是使用数据库实现的,但是后来系统的访问量增大,数据库的更新太慢或者满足不了高并发的查询了,所以我们希望增加缓存来应对高并发的查询。那对CQRS架构来说很容易,我们只需要增加一个新的事件订阅者,用来更新缓存即可。应该说,我们可以随时方便的增加Q端的数据存储类型。数据库、缓存、搜索引擎、NoSQL、日志,等等。我们可以根据自己的业务场景,选择合适的Q端数据存储,实现快速查询的目的。这一切都归功于我们C端记录了所有模型变化的事件,当我们要增加一种新的View存储时,可以根据这些事件得到View存储的最新状态。这种扩展性在传统架构下是很难做到的。
可用性
可用性,无论是传统架构还是CQRS架构,都可以做到高可用,只要我们做到让我们的系统中每个节点都无单点即可。但是,相比之下,我觉得CQRS架构在可用性方面,我们可以有更多的回避余地和选择空间。
传统架构,因为读写没有分离,所以可用性要把读写合在一起综合考虑,难度会比较更大。因为传统架构,如果一个系统的高峰期的并发写入很大,比如为2W,并发读取也很大,比如为10W。那该系统必须优化到能同时支持这种高并发的写入和查询,否则系统就会在高峰时挂掉。这个就是基于同步调用思路的系统的缺点,没有一个东西去削峰填谷,保存瞬间多出来的请求,而必须让系统不管遇到多少请求,都必须能及时处理完,否则就会造成雪崩效应,造成系统瘫痪。但是一个系统,不会一直处在高峰,高峰可能只有半小时或1小时;但为了确保高峰时系统不挂掉,我们必须使用足够的硬件去支撑这个高峰。而大部分时候,都不需要这么高的硬件资源,所以会造成资源的浪费。所以,我们说基于同步调用、SOA思想的系统的实现成本是非常昂贵的。
而在CQRS架构下,因为CQRS架构把读和写分离了,所以可用性相当于被隔离在了两个部分去考虑。我们只需要考虑C端如何解决写的可用性,Q端如何解决读的可用性即可。C端解决可用性,我觉得是更加容易的,因为C端是消息驱动的。我们要做任何数据修改时,都会发送Command到分布式消息队列,然后后端消费者处理Command->产生领域事件->持久化事件->发布事件到分布式消息队列->最后事件被Q端消费。这个链路是消息驱动的。相比传统架构的直接服务方法调用,可用性要高很多。因为就算我们处理Command的后端消费者暂时挂了,也不会影响前端Controller发送Command,Controller依然可用。从这个角度来说,CQRS架构在数据修改上可用性要更高。不过你可能会说,要是分布式消息队列挂了呢?呵呵,对,这确实也是有可能的。但是一般分布式消息队列属于中间件,一般中间件都具有很高的可用性(支持集群和主备切换),所以相比我们的应用来说,可用性要高很多。另外,因为命令是先发送到分布式消息队列,这样就能充分利用分布式消息队列的优势:异步化、拉模式、削峰填谷、基于队列的水平扩展。这些特性可以保证即便前端Controller在高峰时瞬间发送大量的Command过来,也不会导致后端处理Command的应用挂掉,因为我们是根据自己的消费能力拉取Command。这点也是CQRS C端在可用性方面的优势,其实本质也是分布式消息队列带来的优势。所以,从这里我们可以体会到EDA架构(事件驱动架构)是非常有价值的,这个架构也体现了我们目前比较流行的Reactive Programming(响应式编程)的思想。
然后,对于Q端,应该说和传统架构没什么区别,因为都是要处理高并发的查询。这点以前怎么优化的,现在还是怎么优化。但是就像我上面可扩展性里强调的,CQRS架构可以更方便的提供更多的View存储,数据库、缓存、搜索引擎、NoSQL,而且这些存储的更新完全可以并行进行,互相不会拖累。理想的场景,我觉得应该是,如果你的应用要实现全文索引这种复杂查询,那可以在Q端使用搜索引擎,比如ElasticSearch;如果你的查询场景可以通过keyvalue这种数据结构满足,那我们可以在Q端使用Redis这种NoSql分布式缓存。总之,我认为CQRS架构,我们解决查询问题会比传统架构更加容易,因为我们选择更多了。但是你可能会说,我的场景只能用关系型数据库解决,且查询的并发也是非常高。那没办法了,唯一的办法就是分散查询IO,我们对数据库做分库分表,以及对数据库做一主多备,查询走备机。这点上,解决思路就是和传统架构一样了。
性能、伸缩性
本来想把性能和伸缩性分开写的,但是想想这两个其实有一定的关联,所以决定放在一起写。
伸缩性的意思是,当一个系统,在100人访问时,性能(吞吐量、响应时间)很不错,在100W人访问时性能也同样不错,这就是伸缩性。100人访问和100W人访问,对系统的压力显然是不同的。如果我们的系统,在架构上,能够做到通过简单的增加机器,就能提高系统的服务能力,那我们就可以说这种架构的伸缩性很强。那我们来想想传统架构和CQRS架构在性能和伸缩性上面的表现。
说到性能,大家一般会先思考一个系统的性能瓶颈在哪里。只要我们解决了性能瓶颈,那系统就意味着具有通过水平扩展来达到可伸缩的目的了(当然这里没有考虑数据存储的水平扩展)。所以,我们只要分析一下传统架构和CQRS架构的瓶颈点在哪里即可。
传统架构,瓶颈通常在底层数据库。然后我们一般的做法是,对于读:通常使用缓存就可以解决大部分查询问题;对于写:办法也有很多,比如分库分表,或者使用NoSQL,等等。比如阿里大量采用分库分表的方案,而且未来应该会全部使用高大上的OceanBase来替代分库分表的方案。通过分库分表,本来一台数据库服务器高峰时可能要承受10W的高并发写,如果我们把数据放到十台数据库服务器上,那每台机器只需要承担1W的写,相对于要承受10W的写,现在写1W就显得轻松很多了。所以,应该说数据存储对传统架构来说,也早已不再是瓶颈了。
传统架构一次数据修改的步骤是:1)从DB取出数据到内存;2)内存修改数据;3)更新数据回DB。总共涉及到2次数据库IO。
然后CQRS架构,CQ两端加起来所用的时间肯定比传统架构要多,因为CQRS架构最多有3次数据库IO,1)持久化命令;2)持久化事件;3)根据事件更新读库。为什么说最多?因为持久化命令这一步不是必须的,有一种场景是不需要持久化命令的。CQRS架构中持久化命令的目的是为了做幂等处理,即我们要防止同一个命令被处理两次。那哪一种场景下可以不需要持久化命令呢?就是当命令时在创建聚合根时,可以不需要持久化命令,因为创建聚合根所产生的事件的版本号总是为1,所以我们在持久化事件时根据事件版本号就能检测到这种重复。
所以,我们说,你要用CQRS架构,就必须要接受CQ数据的最终一致性,因为如果你以读库的更新完成为操作处理完成的话,那一次业务场景所用的时间很可能比传统架构要多。但是,如果我们以C端的处理为结束的话,则CQRS架构可能要快,因为C端可能只需要一次数据库IO。我觉得这里有一点很重要,对于CQRS架构,我们更加关注C端处理完成所用的时间;而Q端的处理稍微慢一点没关系,因为Q端只是供我们查看数据用的(最终一致性)。我们选择CQRS架构,就必须要接受Q端数据更新有一点点延迟的缺点,否则就不应该使用这种架构。所以,希望大家在根据你的业务场景做架构选型时一定要充分认识到这一点。
另外,上面再谈到数据一致性时提到,传统架构会使用事务来保证数据的强一致性;如果事务越复杂,那一次事务锁的表就越多,锁是系统伸缩性的大敌;而CQRS架构,一个命令只会修改一个聚合根,如果要修改多个聚合根,则通过Saga来实现。从而绕过了复杂事务的问题,通过最终一致性的思路做到了最大的并行和最少的并发,从而整体上提高系统的吞吐能力。
所以,总体来说,性能瓶颈方面,两种架构都能克服。而只要克服了性能瓶颈,那伸缩性就不是问题了(当然,这里我没有考虑数据丢失而带来的系统不可用的问题。这个问题是所有架构都无法回避的问题,唯一的解决办法就是数据冗余,这里不做展开了)。两者的瓶颈都在数据的持久化上,但是传统的架构因为大部分系统都是要存储数据到关系型数据库,所以只能自己采用分库分表的方案。而CQRS架构,如果我们只关注C端的瓶颈,由于C端要保存的东西很简单,就是命令和事件;如果你信的过一些成熟的NoSQL(我觉得使用文档性数据库如MongoDB这种比较适合存储命令和事件),且你也有足够的能力和经验去运维它们,那可以考虑使用NoSQL来持久化。如果你觉得NoSQL靠不住或者没办法完全掌控,那可以使用关系型数据库。但这样你也要付出努力,比如需要自己负责分库分表来保存命令和事件,因为命令和事件的数据量都是很大的。不过目前一些云服务如阿里云,已经提供了DRDS这种直接支持分库分表的数据库存储方案,极大的简化了我们存储命令和事件的成本。就我个人而言,我觉得我还是会采用分库分表的方案,原因很简单:确保数据可靠落地、成熟、可控,而且支持这种只读数据的落地,框架内置要支持分库分表也不是什么难事。所以,通过这个对比我们知道传统架构,我们必须使用分库分表(除非阿里这种高大上可以使用OceanBase);而CQRS架构,可以带给我们更多选择空间。因为持久化命令和事件是很简单的,它们都是不可修改的只读数据,且对kv存储友好,也可以选择文档型NoSQL,C端永远是新增数据,而没有修改或删除数据。最后,就是关于Q端的瓶颈,如果你Q端也是使用关系型数据库,那和传统架构一样,该怎么优化就怎么优化。而CQRS架构允许你使用其他的架构来实现Q,所以优化手段相对更多。
结束语
我觉得不论是传统架构还是CQRS架构,都是不错的架构。传统架构门槛低,懂的人也多,且因为大部分项目都没有什么大的并发写入量和数据量。所以应该说大部分项目,采用传统架构就OK了。但是通过本文的分析,大家也知道了,传统架构确实也有一些缺点,比如在扩展性、可用性、性能瓶颈的解决方案上,都比CQRS架构要弱一点。大家有其他意见,欢迎拍砖,交流才能进步,呵呵。所以,如果你的应用场景是高并发写、高并发读、大数据,且希望在扩展性、可用性、性能、可伸缩性上表现更优秀,我觉得可以尝试CQRS架构。但是还有一个问题,CQRS架构的门槛很高,我认为如果没有成熟的框架支持,很难使用。而目前据我了解,业界还没有很多成熟的CQRS框架,java平台有axon framework, jdon framework;.NET平台,ENode框架正在朝这个方向努力。所以,我想这也是为什么目前几乎没有使用CQRS架构的成熟案例的原因之一。另一个原因是使用CQRS架构,需要开发者对DDD有一定的了解,否则也很难实践,而DDD本身要理解没个几年也很难运用到实际。还有一个原因,CQRS架构的核心是非常依赖于高性能的分布式消息中间件,所以要选型一个高性能的分布式消息中间件也是一个门槛(java平台有RocketMQ),.NET平台我个人专门开发了一个分布式消息队列EQueue,呵呵。另外,如果没有成熟的CQRS框架的支持,那编码复杂度也会很复杂,比如Event Sourcing,消息重试,消息幂等处理,事件的顺序处理,并发控制,这些问题都不是那么容易搞定的。而如果有框架支持,由框架来帮我们搞定这些纯技术问题,开发人员只需要关注如何建模,实现领域模型,如何更新读库,如何实现查询,那使用CQRS架构才有可能,因为这样才可能比传统的架构开发更简单,且能获得很多CQRS架构所带来的好处。

这是一个使用Spring Boot和Axon以及Docker构建的Event Sorucing源码项目,技术特点:
1.使用Java 和Spring Boot实现微服务;
2.使用命令和查询职责分离 (CQRS) 和 Event Sourcing (ES) 的框架Axon Framework v2, MongoDB 和 RabbitMQ;
3.使用Docker构建 交付和运行;
4.集中配置和使用Spring Cloud服务注册;
5.使用Swagger 和 SpringFox 提供API文档
项目源码:
GitHub工作原理:
这个应用使用CQRS架构模式构建,在CQRS命令如ADD是和查询VIEW(where id=1)分离的,在这个案例中领域部分代码已经分离成两个组件:一个是属于命令这边的微服务和属性查询这边的微服务。
微服务是单个职责的功能,自己的数据存储,每个能彼此独立扩展部署。
属于命令这边的微服务和属性查询这边的微服务都是使用Spring Boot框架开发的,在命令微服务和查询微服务之间通讯是事件驱动,事件是通过RabbitMQ消息在微服务组件之间传递,消息提供了一种进程节点或微服务之间可扩展的事件载体,包括与传统遗留系统或其他系统的松耦合通讯都可以通过消息进行。
请注意,服务之间不能彼此共享数据库,这是很重要,因为微服务应该是高度自治自主的,这样反过来有助于服务能够彼此独立地扩展伸缩规模。
CQRS中命令是“改变状态的动作”。命令的微服务包含所有领域逻辑和业务规则,命令被用于增加新的产品或改变它们的状态,这些命令针对某个具体产品的执行会导致事件Event产生,这会通过Axon框架持久化到MongoDB中,然后通过RabbitMQ传播给其他节点进程或微服务。
在event-sourcing中,事件是状态改变的原始记录,它们用于系统来重新建立实体的当前状态(通过重新播放过去的事件到当前就可以构建当前的状态),这听上去会很慢,但是实际上,事件都很简单,执行非常快,也能采取‘快照’策略进行优化。
请注意,在DDD中,实体是指一个聚合根实体。
上面是命令这边的微服务,下面看看查询这边的微服务:
查询微服务一般扮演一种事件监听器和视图角色,它监听到命令那边发出的事件,然后处理它们以符合查询这边的要求。
在这个案例中,查询这边只是简单建立和维持了一个 ‘materialised view’或‘projection’ ,其中保留了产品的最新状态,也就是产品id和描述以及是否被卖出等等信息,查询这边能够被复制多次以方便扩展,消息可以保留在RabbitMQ队列中实现持久保存,这种临时保存消息方式可以防止查询这边微服务当机。
命令微服务和查询微服务两者都有REST API,提供外界客户端访问。
下面看看如何通过Docker运行这个案例,需要 Ubuntu 16.04:
1.Docker ( v1.8.2)
2.Docker-compose ( v1.7.1)
在一个空目录,执行下面命令下载docker-compose:
$ wget https://raw.githubusercontent.com/benwilcock/microservice-sampler/master/docker-compose.yml
注意:不要更改文件名称。
启动微服务:只是简单一个命令:
$ docker-compose up
你会看到许多下载信息和日志输出在屏幕上,这是Docker image将被下载和运行。一共有六个docker,分别是: ‘mongodb’, ‘rabbitmq’, ‘config’, ‘discovery’, ‘product-cmd-side’, 和 ‘product-qry-side’.
使用下面命令进行测试增加一个新产品:
$ curl -X POST -v --header "Content-Type: application/json" --header "Accept: */*" "http://localhost:9000/products/add/1?name=Everything%20Is%20Awesome"
查询这个新产品:
$ curl http://localhost:9001/products/1
Microservices With Spring Boot, Axon CQRS/ES, and Docker