#
GET、PUT是ONLINE的操作,MAPREDUCE是OFFLINE的操作
HDFS写流程
客户端收到要保存文件的请求后,将文件以64M为单位拆成若干份BLOCK,形成一个列表,即由几个BLOCK组成,将这些信息告诉NAME NODE,我要保存这个,NAME NODE算出一个列表,哪段BLOCK应该写到哪个DATA NODE,客户端将第一个BLOCK传到第一个节点DATA NODE A,通知其保存,同时让它通知DATA NODE D和DATA NODE B也保存一份,DATA NODE D收到信息后进行了保存,同时通知DATA NODE B保存一份,DATA NODE B保存完成后则通知客户端保存完成,客户端再去向NAME NODE中取下一个BLOCK要保存的位置,重复以上的动作,直到所有的BLOCK都保存完成。
HDFS读流程
客户端向NAME NODE请求读一个文件,NAME NODE返回这个文件所构成的所有BLOCK的DATA NODE IP及BLOCK ID,客户端并行的向各DATA NODE发出请求,要取某个BLOCK ID的BLOCK,DATA NODE发回所要的BLOCK给客户端,客户端收集到所有的BLOCK后,整合成一个完整的文件后,此流程结束。
MAPREDUCE流程
输入数据 -- 非多线程了,而是多进程的挑选数据,即将输入数据分成多块,每个进程处理一块 -- 分组 -- 多进程的汇集数据 -- 输出
HBASE表结构
HBASE中将一个大表数据分成不同的小表,每个小表叫REGION,存放REGION的服务器叫REGIONSERVER,一个REGIONSERVER可以存放多个REGION。通常REGIONSERVER和DATA NODE是在同一服务器,以减少NETWORK IO。
-ROOT-表存放于MASTER SERVER上,记录了一共有多少个REGIONSERVER,每个REGION SERVER上都有一个.META.表,上面记录了本REGION SERVER放有哪几个表的哪几个REGION。如果要知道某个表共有几个REGION,就得去所有的REGION SERVER上查.META.表,进行汇总才能得知。
客户端如果要查ROW009的信息,先去咨询ZOOPKEEPER,-ROOT-表在哪里,然后问-ROOT-表,哪个.META.知道这个信息,然后去问.META.表,哪个REGION有这个信息,然后去那个REGION问ROW009的信息,然后那个REGION返回此信息。
HBASE MAPREDUCE
一个REGION一个MAP任务,而任务里的map方法执行多少次,则由查询出来的记录有多少条,则执行多少次。
REDUCE任务负责向REGION写数据,但写到哪个REGION则由那个KEY归属哪个REGION管,则写到哪个REGION,有可能REDUCE任务会和所有的REGION SERVER交互。
在HBASE的MAPREDUCE JOB中使用JOIN
REDUCE-SIDE JOIN
利用现有的SHUTTLE分组机制,在REDUCE阶段做JOIN,但由于MAP阶段数据大,可能会有性能问题。
MAP-SIDE JOIN
将数据较少的一表读到一公共文件中,然后在MPA方法中循环另一表的数据,再将要的数据从公共文件中读取。这样可以减少SHUTTLE和SORT的时间,同时也不需要REDUCE任务。
1) 在Reduce阶段进行Join,这样运算量比较小.(这个适合被Join的数据比较小的情况下.)
2) 压缩字段,对数据预处理,过滤不需要的字段.
3) 最后一步就是在Mapper阶段过滤,这个就是Bloom Filter的用武之地了.也就是需要详细说明的地方.
下面就拿一个我们大家都熟悉的场景来说明这个问题: 找出上个月动感地带的客户资费的使用情况,包括接入和拨出.
(这个只是我臆想出来的例子,根据实际的DB数据存储结构,在这个场景下肯定有更好的解决方案,大家不要太较真哦)
这个时候的两个个数据集都是比较大的,这两个数据集分别是:上个月的通话记录,动感地带的手机号码列表.
比较直接的处理方法有2种:
1)在 Reduce 阶段,通过动感地带号码来过滤. 优点:这样需要处理的数据相对比较少,这个也是比较常用的方法.
缺点:很多数据在Mapper阶段花了老鼻子力气汇总了,还通过网络Shuffle到Reduce节点,结果到这个阶段给过滤了.
2)在 Mapper 阶段时,通过动感地带号码来过滤数据. 优点:这样可以过滤很多不是动感地带的数据,比如神州行,全球通.这些过滤的数据就可以节省很多网络带宽了.
缺点:就是动感地带的号码不是小数目,如果这样处理就需要把这个大块头复制到所有的Mapper节点,甚至是Distributed Cache.(Bloom Filter就是用来解决这个问题的)
Bloom Filter就是用来解决上面方法2的缺点的.
方法2的缺点就是大量的数据需要在多个节点复制.Bloom Filter通过多个Hash算法, 把这个号码列表压缩到了一个Bitmap里面. 通过允许一定的错误率来换空间, 这个和我们平时经常提到的时间和空间的互换类似.详细情况可以参考:
http://blog.csdn.net/jiaomeng/article/details/1495500
但是这个算法也是有缺陷的,就是会把很多神州行,全球通之类的号码当成动感地带.但在这个场景中,这根本不是问题.因为这个算法只是过滤一些号码,漏网之鱼会在Reduce阶段进行精确匹配时顾虑掉.
这个方法改进之后基本上完全回避了方法2的缺点:
1) 没有大量的动感地带号码发送到所有的Mapper节点.
2) 很多非动感地带号码在Mapper阶段就过滤了(虽然不是100%),避免了网络带宽的开销及延时.
继续需要学习的地方:Bitmap的大小, Hash函数的多少, 以及存储的数据的多少. 这3个变量如何取值才能才能在存储空间与错误率之间取得一个平衡.
NAME NODE起保存DATA NODE上文件的位置信息用,主要有两个保存文件:FsImage和EditLog,FsImage保存了上一次NAME NODE启动时的状态,EditLog则记录每次成功后的对HDFS的操作行为。当NAME NODE重启时,会合并FsImage和EditLog成为一个新的FsImage,清空EditLog,如果EditLog非常大的时候,则NAME NODE启动的时间会非常长。因此就有SECOND NAME NODE。
SECOND NAME NODE会以HTTP的方式向NAME NODE要这两个文件,当NAME NODE收到请求时,就会韦一个新的EditLog来记录,这时SECOND NAME NODE就会将取得的这两个文件合并,成一个新的FsImage,再发给NAME NODE,NAME NODE收到后,就会以这个为准,旧的就会归档不用。
SECOND NAME NODE还有一个用途就是当NAME NODE DOWN了的时候,可以改SECOND NAME NODE的IP为NAME NODE所用的IP,当NAME NODE用。
secondary namenoded 配置很容易被忽视,如果jps检查都正常,大家通常不会太关心,除非namenode发生问题的时候,才会想起还有个secondary namenode,它的配置共两步:
- 集群配置文件conf/master中添加secondarynamenode的机器
- 修改/添加 hdfs-site.xml中如下属性:
<property>
<name>dfs.http.address</name>
<value>{your_namenode_ip}:50070</value>
<description>
The address and the base port where the dfs namenode web ui will listen on.
If the port is 0 then the server will start on a free port.
</description>
</property>
这两项配置OK后,启动集群。进入secondary namenode 机器,检查fs.checkpoint.dir(core-site.xml文件,默认为${hadoop.tmp.dir}/dfs/namesecondary)目录同步状态是否和namenode一致的。
如果不配置第二项则,secondary namenode同步文件夹永远为空,这时查看secondary namenode的log显示错误为:
2011-06-09 11:06:41,430 INFO org.apache.hadoop.hdfs.server.common.Storage: Recovering storage directory /tmp/hadoop-hadoop/dfs/namesecondary from failed checkpoint.
2011-06-09 11:06:41,433 ERROR org.apache.hadoop.hdfs.server.namenode.SecondaryNameNode: Exception in doCheckpoint:
2011-06-09 11:06:41,434 ERROR org.apache.hadoop.hdfs.server.namenode.SecondaryNameNode: java.net.ConnectException: Connection refused
at java.net.PlainSocketImpl.socketConnect(Native Method)
at java.net.PlainSocketImpl.doConnect(PlainSocketImpl.java:351)
at java.net.PlainSocketImpl.connectToAddress(PlainSocketImpl.java:211)
at java.net.PlainSocketImpl.connect(PlainSocketImpl.java:200)
at java.net.SocksSocketImpl.connect(SocksSocketImpl.java:366)
at java.net.Socket.connect(Socket.java:529)
at java.net.Socket.connect(Socket.java:478)
at sun.net.NetworkClient.doConnect(NetworkClient.java:163)
at sun.net.www.http.HttpClient.openServer(HttpClient.java:394)
at sun.net.www.http.HttpClient.openServer(HttpClient.java:529)
at sun.net.www.http.HttpClient.<init>(HttpClient.java:233)
at sun.net.www.http.HttpClient.New(HttpClient.java:306)
at sun.net.www.http.HttpClient.New(HttpClient.java:323)
at sun.net.www.protocol.http.HttpURLConnection.getNewHttpClient(HttpURLConnection.java:970)
at sun.net.www.protocol.http.HttpURLConnection.plainConnect(HttpURLConnection.java:911)
at sun.net.www.protocol.http.HttpURLConnection.connect(HttpURLConnection.java:836)
at sun.net.www.protocol.http.HttpURLConnection.getInputStream(HttpURLConnection.java:1172)
at org.apache.hadoop.hdfs.server.namenode.TransferFsImage.getFileClient(TransferFsImage.java:151)
at org.apache.hadoop.hdfs.server.namenode.SecondaryNameNode.downloadCheckpointFiles(SecondaryNameNode.java:256)
at org.apache.hadoop.hdfs.server.namenode.SecondaryNameNode.doCheckpoint(SecondaryNameNode.java:313)
at org.apache.hadoop.hdfs.server.namenode.SecondaryNameNode.run(SecondaryNameNode.java:225)
at java.lang.Thread.run(Thread.java:662)
可能用到的core-site.xml文件相关属性:
<property>
<name>fs.checkpoint.period</name>
<value>300</value>
<description>The number of seconds between two periodic checkpoints.
</description>
</property>
<property>
<name>fs.checkpoint.dir</name>
<value>${hadoop.tmp.dir}/dfs/namesecondary</value>
<description>Determines where on the local filesystem the DFS secondary
name node should store the temporary images to merge.
If this is a comma-delimited list of directories then the image is
replicated in all of the directories for redundancy.
</description>
</property>
采用Cloudera版本的hadoop/hbase:
hadoop-0.20.2-cdh3u0
hbase-0.90.1-cdh3u0
zookeeper-3.3.3-cdh3u0
默认已支持FairScheduler调度算法.
只需改配置使期用FairSchedule而非默认的JobQueueTaskScheduler即可.
配置fair-scheduler.xml (/$HADOOP_HOME/conf/):
<?xml version="1.0"?>
<property>
<name>mapred.fairscheduler.allocation.file</name>
<value>[HADOOP_HOME]/conf/fair-scheduler.xml</value>
</property>
<allocations>
<pool name="qiji-task-pool">
<minMaps>5</minMaps>
<minReduces>5</minReduces>
<maxRunningJobs>
<maxRunningJobs>5</maxRunningJobs>
<minSharePreemptionTimeout>300</minSharePreemptionTimeout>
<weight>1.0</weight>
</pool>
<user name="ecap">
<maxRunningJobs>
<maxRunningJobs>6</maxRunningJobs>
</user>
<poolMaxJobsDefault>10</poolMaxJobsDefault>
<userMaxJobsDefault>8</userMaxJobsDefault>
<defaultMinSharePreemptionTimeout>600
</defaultMinSharePreemptionTimeout>
<fairSharePreemptionTimeout>600</fairSharePreemptionTimeout>
</allocations>
配置$HADOOP_HOME/conf/mapred-site.xml,最后添加:
<property>
<name>mapred.jobtracker.taskScheduler</name>
<value>org.apache.hadoop.mapred.FairScheduler</value>
</property>
<property>
<name>mapred.fairscheduler.allocation.file</name>
<value>/opt/hadoop/conf/fair-scheduler.xml</value>
</property>
<property>
<name>mapred.fairscheduler.assignmultiple</name>
<value>true</value>
</property>
<property>
<name>mapred.fairscheduler.sizebasedweight</name>
<value>true</value>
</property>
然后重新运行集群,这样有几个Job(上面配置是5个并行)并行运行时,不会因为一个Job把Map/Reduce占满而使其它Job处于Pending状态.
可从: http://<masterip>:50030/scheduler查看并行运行的状态.
挺有意思的题目。
1. 给你A,B两个文件,各存放50亿条URL,每条URL占用64字节,内存限制是4G,让你找出:A,B文件共同的URL。 解法一:Hash成内存大小的小块文件,然后分块内存内查交集。
解法二:Bloom Filter(广泛应用于URL过滤、查重。参考http://en.wikipedia.org/wiki/Bloom_filter、http://blog.csdn.net/jiaomeng/archive/2007/01/28/1496329.aspx)
2. 有10个文件,每个文件1G, 每个文件的每一行都存放的是用户的query,每个文件的query都可能重复。要你按照query的频度排序。解法一:根据数据稀疏程度算法会有不同,通用方法是用Hash把文件重排,让相同query一定会在同一个文件,同时进行计数,然后归并,用最小堆来统计频度最大的。
解法二:类似1,但是用的是与简单Bloom Filter稍有不同的CBF(Counting Bloom Filter)或者更进一步的SBF(Spectral Bloom Filter,参考http://blog.csdn.net/jiaomeng/archive/2007/03/19/1534238.aspx)
解法三:MapReduce,几分钟可以在hadoop集群上搞定。参考http://en.wikipedia.org/wiki/MapReduce
3. 有一个1G大小的一个文件,里面每一行是一个词,词的大小不超过16个字节,内存限制大小是1M。返回频数最高的100个词。解法一:跟2类似,只是不需要排序,各个文件分别统计前100,然后一起找前100。
摘取了一部分,全文请查看
http://blog.sina.com.cn/s/blog_633f4ab20100r9nm.html
背景
“这是最好的时代,也是最坏的时代。”
每个时代的人都在这么形容自己所处的时代。在一次次IT浪潮下面,有人觉得当下乏味无聊,有人却能锐意进取,找到突破。数据存储这个话题自从有了计算机之后,就一直是一个有趣或者无聊的主题。上世纪七十年代,关系数据库理论的出现,造就了一批又一批传奇,并推动整个世界信息化到了一个新的高度。而进入新千年以来,随着SNS等应用的出现,传统的SQL数据库已经越来越不适应海量数据的处理了。于是,这几年NoSQL数据库的呼声也越来越高。
在NoSQL数据库当中,呼声最高的是HBase和Cassandra两个。虽然严格意义上来说,两者服务的目的有所不同,侧重点也不尽相同,但是作为当前开源NoSQL数据库的佼佼者,两者经常被用来做各种比较。
去年十月,Facebook推出了他的新的Message系统。Facebook宣布他们采用HBase作为后台存储系统。这引起了一片喧哗声。因为Cassandra恰恰是Facebook开发,并且于2008年开源。这让很多人惊呼,是否是Cassandra已经被Facebook放弃了?HBase在这场NoSQL数据库的角力当中取得了决定性的胜利?本文打算主要从技术角度分析,HBase和Cassandra的异同,并非要给出任何结论,只是共享自己研究的一些结果。
选手简介
HBase
HBase是一个开源的分布式存储系统。他可以看作是Google的Bigtable的开源实现。如同Google的Bigtable使用Google File System一样,HBase构建于和Google File System类似的Hadoop HDFS之上。
Cassandra
Cassandra可以看作是Amazon Dynamo的开源实现。和Dynamo不同之处在于,Cassandra结合了Google Bigtable的ColumnFamily的数据模型。可以简单地认为,Cassandra是一个P2P的,高可靠性并具有丰富的数据模型的分布式文件系统。
分布式文件系统的指标
根据UC Berkeley的教授Eric Brewer于2000年提出猜测- CAP定理,一个分布式计算机系统,不可能同时满足以下三个指标:
Consistency 所有节点在同一时刻保持同一状态Availability 某个节点失败,不会影响系统的正常运行Partition tolerance 系统可以因为网络故障等原因被分裂成小的子系统,而不影响系统的运行
Brewer教授推测,任何一个系统,同时只能满足以上两个指标。
在2002年,MIT的Seth Gilbert和Nancy Lynch发表正式论文论证了CAP定理。
而HBase和Cassandra两者都属于分布式计算机系统。但是其设计的侧重点则有所不同。HBase继承于Bigtable的设计,侧重于CA。而Cassandra则继承于Dynamo的设计,侧重于AP。
。。。。。。。。。。。。。。。。。。。
特性比较
由于HBase和Cassandra的数据模型比较接近,所以这里就不再比较两者之间数据模型的异同了。接下来主要比较双方在数据一致性、多拷贝复制的特性。
HBase
HBase保证写入的一致性。当一份数据被要求复制N份的时候,只有N份数据都被真正复制到N台服务器上之后,客户端才会成功返回。如果在复制过程中出现失败,所有的复制都将失败。连接上任何一台服务器的客户端都无法看到被复制的数据。HBase提供行锁,但是不提供多行锁和事务。HBase基于HDFS,因此数据的多份复制功能和可靠性将由HDFS提供。HBase和MapReduce天然集成。
Cassandra
写入的时候,有多种模式可以选择。当一份数据模式被要求复制N份的时候,可以立即返回,可以成功复制到一个服务器之后返回,可以等到全部复制到N份服务器之后返回,还可以设定一个复制到quorum份服务器之后返回。Quorum后面会有具体解释。复制不会失败。最终所有节点数据都将被写入。而在未被完全写入的时间间隙,连接到不同服务器的客户端有可能读到不同的数据。在集群里面,所有的服务器都是等价的。不存在任何一个单点故障。节点和节点之间通过Gossip协议互相通信。写入顺序按照timestamp排序,不提供行锁。新版本的Cassandra已经集成了MapReduce了。
相对于配置Cassandra,配置HBase是一个艰辛、复杂充满陷阱的工作。Facebook关于为何采取HBase,里面有一句,大意是,Facebook长期以来一直关注HBase的开发并且有一只专门的经验丰富的HBase维护的team来负责HBase的安装和维护。可以想象,Facebook内部关于使用HBase和Cassandra有过激烈的斗争,最终人数更多的HBase team占据了上风。对于大公司来说,养一只相对庞大的类似DBA的team来维护HBase不算什么大的开销,但是对于小公司,这实在不是一个可以负担的起的开销。
另外HBase在高可靠性上有一个很大的缺陷,就是HBase依赖HDFS。HDFS是Google File System的复制品,NameNode是HDFS的单点故障点。而到目前为止,HDFS还没有加入NameNode的自我恢复功能。不过我相信,Facebook在内部一定有恢复NameNode的手段,只是没有开源出来而已。
相反,Cassandra的P2P和去中心化设计,没有可能出现单点故障。从设计上来看,Cassandra比HBase更加可靠。
关于数据一致性,实际上,Cassandra也可以以牺牲响应时间的代价来获得和HBase一样的一致性。而且,通过对Quorum的合适的设置,可以在响应时间和数据一致性得到一个很好的折衷值。
Cassandra优缺点
主要表现在:
配置简单,不需要多模块协同操作。功能灵活性强,数据一致性和性能之间,可以根据应用不同而做不同的设置。 可靠性更强,没有单点故障。
尽管如此,Cassandra就没有弱点吗?当然不是,Cassandra有一个致命的弱点。
这就是存储大文件。虽然说,Cassandra的设计初衷就不是存储大文件,但是Amazon的S3实际上就是基于Dynamo构建的,总是会让人想入非非地让Cassandra去存储超大文件。而和Cassandra不同,HBase基于HDFS,HDFS的设计初衷就是存储超大规模文件并且提供最大吞吐量和最可靠的可访问性。因此,从这一点来说,Cassandra由于背后不是一个类似HDFS的超大文件存储的文件系统,对于存储那种巨大的(几百T甚至P)的超大文件目前是无能为力的。而且就算由Client手工去分割,这实际上是非常不明智和消耗Client CPU的工作的。
因此,如果我们要构建一个类似Google的搜索引擎,最少,HDFS是我们所必不可少的。虽然目前HDFS的NameNode还是一个单点故障点,但是相应的Hack可以让NameNode变得更皮实。基于HDFS的HBase相应地,也更适合做搜索引擎的背后倒排索引数据库。事实上,Lucene和HBase的结合,远比Lucene结合Cassandra的项目Lucandra要顺畅和高效的多。(Lucandra要求Cassandra使用OrderPreservingPartitioner,这将可能导致Key的分布不均匀,而无法做负载均衡,产生访问热点机器)。
所以我的结论是,在这个需求多样化的年代,没有赢者通吃的事情。而且我也越来越不相信在工程界存在一劳永逸和一成不变的解决方案。当你仅仅是存储海量增长的消息数据,存储海量增长的图片,小视频的时候,你要求数据不能丢失,你要求人工维护尽可能少,你要求能迅速通过添加机器扩充存储,那么毫无疑问,Cassandra现在是占据上风的。
但是如果你希望构建一个超大规模的搜索引擎,产生超大规模的倒排索引文件(当然是逻辑上的文件,真实文件实际上被切分存储于不同的节点上),那么目前HDFS+HBase是你的首选。
就让这个看起来永远正确的结论结尾吧,上帝的归上帝,凯撒的归凯撒。大家都有自己的地盘,野百合也会有春天的!
http://www.jdon.com/38244最近因为项目原因,研究了Cassandra,Hbase等几个NoSQL数据库,最终决定采用HBase。在这里,我就向大家分享一下自己对HBase的理解。
在说HBase之前,我想再唠叨几句。做互联网应用的哥们儿应该都清楚,互联网应用这东西,你没办法预测你的系统什么时候会被多少人访问,你面临的用户到底有多少,说不定今天你的用户还少,明天系统用户就变多了,结果您的系统应付不过来了了,不干了,这岂不是咱哥几个的悲哀,说时髦点就叫“杯具啊”。
其实说白了,这些就是事先没有认清楚互联网应用什么才是最重要的。从系统架构的角度来说,互联网应用更加看重系统性能以及伸缩性,而传统企业级应用都是比较看重数据完整性和数据安全性。那么我们就来说说互联网应用伸缩性这事儿.对于伸缩性这事儿,哥们儿我也写了几篇博文,想看的兄弟可以参考我以前的博文,对于web server,app server的伸缩性,我在这里先不说了,因为这部分的伸缩性相对来说比较容易一点,我主要来回顾一些一个慢慢变大的互联网应用如何应对数据库这一层的伸缩。
首先刚开始,人不多,压力也不大,搞一台数据库服务器就搞定了,此时所有的东东都塞进一个Server里,包括web server,app server,db server,但是随着人越来越多,系统压力越来越多,这个时候可能你把web server,app server和db server分离了,好歹这样可以应付一阵子,但是随着用户量的不断增加,你会发现,数据库这哥们不行了,速度老慢了,有时候还会宕掉,所以这个时候,你得给数据库这哥们找几个伴,这个时候Master-Salve就出现了,这个时候有一个Master Server专门负责接收写操作,另外的几个Salve Server专门进行读取,这样Master这哥们终于不抱怨了,总算读写分离了,压力总算轻点了,这个时候其实主要是对读取操作进行了水平扩张,通过增加多个Salve来克服查询时CPU瓶颈。一般这样下来,你的系统可以应付一定的压力,但是随着用户数量的增多,压力的不断增加,你会发现Master server这哥们的写压力还是变的太大,没办法,这个时候怎么办呢?你就得切分啊,俗话说“只有切分了,才会有伸缩性嘛”,所以啊,这个时候只能分库了,这也是我们常说的数据库“垂直切分”,比如将一些不关联的数据存放到不同的库中,分开部署,这样终于可以带走一部分的读取和写入压力了,Master又可以轻松一点了,但是随着数据的不断增多,你的数据库表中的数据又变的非常的大,这样查询效率非常低,这个时候就需要进行“水平分区”了,比如通过将User表中的数据按照10W来划分,这样每张表不会超过10W了。
综上所述,一般一个流行的web站点都会经历一个从单台DB,到主从复制,到垂直分区再到水平分区的痛苦的过程。其实数据库切分这事儿,看起来原理貌似很简单,如果真正做起来,我想凡是sharding过数据库的哥们儿都深受其苦啊。对于数据库伸缩的文章,哥们儿可以看看后面的参考资料介绍。
好了,从上面的那一堆废话中,我们也发现数据库存储水平扩张scale out是多么痛苦的一件事情,不过幸好技术在进步,业界的其它弟兄也在努力,09年这一年出现了非常多的NoSQL数据库,更准确的应该说是No relation数据库,这些数据库多数都会对非结构化的数据提供透明的水平扩张能力,大大减轻了哥们儿设计时候的压力。下面我就拿Hbase这分布式列存储系统来说说。
一 Hbase是个啥东东?
在说Hase是个啥家伙之前,首先我们来看看两个概念,面向行存储和面向列存储。面向行存储,我相信大伙儿应该都清楚,我们熟悉的RDBMS就是此种类型的,面向行存储的数据库主要适合于事务性要求严格场合,或者说面向行存储的存储系统适合OLTP,但是根据CAP理论,传统的RDBMS,为了实现强一致性,通过严格的ACID事务来进行同步,这就造成了系统的可用性和伸缩性方面大大折扣,而目前的很多NoSQL产品,包括Hbase,它们都是一种最终一致性的系统,它们为了高的可用性牺牲了一部分的一致性。好像,我上面说了面向列存储,那么到底什么是面向列存储呢?Hbase,Casandra,Bigtable都属于面向列存储的分布式存储系统。看到这里,如果您不明白Hbase是个啥东东,不要紧,我再总结一下下:
Hbase是一个面向列存储的分布式存储系统,它的优点在于可以实现高性能的并发读写操作,同时Hbase还会对数据进行透明的切分,这样就使得存储本身具有了水平伸缩性。
二 Hbase数据模型
HBase,Cassandra的数据模型非常类似,他们的思想都是来源于Google的Bigtable,因此这三者的数据模型非常类似,唯一不同的就是Cassandra具有Super cloumn family的概念,而Hbase目前我没发现。好了,废话少说,我们来看看Hbase的数据模型到底是个啥东东。
在Hbase里面有以下两个主要的概念,Row key,Column Family,我们首先来看看Column family,Column family中文又名“列族”,Column family是在系统启动之前预先定义好的,每一个Column Family都可以根据“限定符”有多个column.下面我们来举个例子就会非常的清晰了。
假如系统中有一个User表,如果按照传统的RDBMS的话,User表中的列是固定的,比如schema 定义了name,age,sex等属性,User的属性是不能动态增加的。但是如果采用列存储系统,比如Hbase,那么我们可以定义User表,然后定义info 列族,User的数据可以分为:info:name = zhangsan,info:age=30,info:sex=male等,如果后来你又想增加另外的属性,这样很方便只需要info:newProperty就可以了。
也许前面的这个例子还不够清晰,我们再举个例子来解释一下,熟悉SNS的朋友,应该都知道有好友Feed,一般设计Feed,我们都是按照“某人在某时做了标题为某某的事情”,但是同时一般我们也会预留一下关键字,比如有时候feed也许需要url,feed需要image属性等,这样来说,feed本身的属性是不确定的,因此如果采用传统的关系数据库将非常麻烦,况且关系数据库会造成一些为null的单元浪费,而列存储就不会出现这个问题,在Hbase里,如果每一个column 单元没有值,那么是占用空间的。下面我们通过两张图来形象的表示这种关系:
上图是传统的RDBMS设计的Feed表,我们可以看出feed有多少列是固定的,不能增加,并且为null的列浪费了空间。但是我们再看看下图,下图为Hbase,Cassandra,Bigtable的数据模型图,从下图可以看出,Feed表的列可以动态的增加,并且为空的列是不存储的,这就大大节约了空间,关键是Feed这东西随着系统的运行,各种各样的Feed会出现,我们事先没办法预测有多少种Feed,那么我们也就没有办法确定Feed表有多少列,因此Hbase,Cassandra,Bigtable的基于列存储的数据模型就非常适合此场景。说到这里,采用Hbase的这种方式,还有一个非常重要的好处就是Feed会自动切分,当Feed表中的数据超过某一个阀值以后,Hbase会自动为我们切分数据,这样的话,查询就具有了伸缩性,而再加上Hbase的弱事务性的特性,对Hbase的写入操作也将变得非常快。
上面说了Column family,那么我之前说的Row key是啥东东,其实你可以理解row key为RDBMS中的某一个行的主键,但是因为Hbase不支持条件查询以及Order by等查询,因此Row key的设计就要根据你系统的查询需求来设计了额。我还拿刚才那个Feed的列子来说,我们一般是查询某个人最新的一些Feed,因此我们Feed的Row key可以有以下三个部分构成<userId><timestamp><feedId>,这样以来当我们要查询某个人的最进的Feed就可以指定Start Rowkey为<userId><0><0>,End Rowkey为<userId><Long.MAX_VALUE><Long.MAX_VALUE>来查询了,同时因为Hbase中的记录是按照rowkey来排序的,这样就使得查询变得非常快。
三 Hbase的优缺点
1 列的可以动态增加,并且列为空就不存储数据,节省存储空间.
2 Hbase自动切分数据,使得数据存储自动具有水平scalability.
3 Hbase可以提供高并发读写操作的支持
Hbase的缺点:
1 不能支持条件查询,只支持按照Row key来查询.
2 暂时不能支持Master server的故障切换,当Master宕机后,整个存储系统就会挂掉.
关于数据库伸缩性的一点资料:
http://www.jurriaanpersyn.com/archives/2009/02/12/database-sharding-at-netlog-with-mysql-and-php/http://adam.blog.heroku.com/past/2009/7/6/sql_databases_dont_scale/
- 将INPUT通过SPLIT成M个MAP任务
- JOB TRACKER将这M个任务分派给TASK TRACKER执行
- TASK TRACKER执行完MAP任务后,会在本地生成文件,然后通知JOB TRACKER
- JOB TRACKER收到通知后,将此任务标记为已完成,如果收到失败的消息,会将此任务重置为原始状态,再分派给另一TASK TRACKER执行
- 当所有的MAP任务完成后,JOB TRACKER将MAP执行后生成的LIST重新整理,整合相同的KEY,根据KEY的数量生成R个REDUCE任务,再分派给TASK TRACKER执行
- TASK TRACKER执行完REDUCE任务后,会在HDFS生成文件,然后通知JOB TRACKER
- JOB TRACKER等到所有的REDUCE任务执行完后,进行合并,产生最后结果,通知CLIENT
- TASK TRACKER执行完MAP任务时,可以重新生成新的KEY VALUE对,从而影响REDUCE个数
- 假设远程HADOOP主机名为ubuntu,则应在hosts文件中加上192.168.58.130 ubuntu
- 新建MAVEN项目,加上相应的配置
pom.xml
<project xmlns="http://maven.apache.org/POM/4.0.0" xmlns:xsi="http://www.w3.org/2001/XMLSchema-instance"
xsi:schemaLocation="http://maven.apache.org/POM/4.0.0 http://maven.apache.org/xsd/maven-4.0.0.xsd">
<modelVersion>4.0.0</modelVersion>
<groupId>com.cloudputing</groupId>
<artifactId>bigdata</artifactId>
<version>1.0</version>
<packaging>jar</packaging>
<name>bigdata</name>
<url>http://maven.apache.org</url>
<properties>
<project.build.sourceEncoding>UTF-8</project.build.sourceEncoding>
</properties>
<dependencies>
<dependency>
<groupId>junit</groupId>
<artifactId>junit</artifactId>
<version>3.8.1</version>
<scope>test</scope>
</dependency>
<dependency>
<groupId>org.springframework.data</groupId>
<artifactId>spring-data-hadoop</artifactId>
<version>0.9.0.RELEASE</version>
</dependency>
<dependency>
<groupId>org.apache.hbase</groupId>
<artifactId>hbase</artifactId>
<version>0.94.1</version>
</dependency>
<!-- <dependency>
<groupId>org.apache.hbase</groupId>
<artifactId>hbase</artifactId>
<version>0.90.2</version>
</dependency> -->
<dependency>
<groupId>org.apache.hadoop</groupId>
<artifactId>hadoop-core</artifactId>
<version>1.0.3</version>
</dependency>
<dependency>
<groupId>org.springframework</groupId>
<artifactId>spring-test</artifactId>
<version>3.0.5.RELEASE</version>
</dependency>
</dependencies>
</project>
-
hbase-site.xml
<?xml version="1.0"?>
<?xml-stylesheet type="text/xsl" href="configuration.xsl"?>
<!--
/**
* Copyright 2010 The Apache Software Foundation
*
* Licensed to the Apache Software Foundation (ASF) under one
* or more contributor license agreements. See the NOTICE file
* distributed with this work for additional information
* regarding copyright ownership. The ASF licenses this file
* to you under the Apache License, Version 2.0 (the
* "License"); you may not use this file except in compliance
* with the License. You may obtain a copy of the License at
*
* http://www.apache.org/licenses/LICENSE-2.0
*
* Unless required by applicable law or agreed to in writing, software
* distributed under the License is distributed on an "AS IS" BASIS,
* WITHOUT WARRANTIES OR CONDITIONS OF ANY KIND, either express or implied.
* See the License for the specific language governing permissions and
* limitations under the License.
*/
-->
<configuration>
<property>
<name>hbase.rootdir</name>
<value>hdfs://ubuntu:9000/hbase</value>
</property>
<!-- 在构造JOB时,会新建一文件夹来准备所需文件。
如果这一段没写,则默认本地环境为LINUX,将用LINUX命令去实施,在WINDOWS环境下会出错 -->
<property>
<name>mapred.job.tracker</name>
<value>ubuntu:9001</value>
</property>
<property>
<name>hbase.cluster.distributed</name>
<value>true</value>
</property>
<!-- 此处会向ZOOKEEPER咨询JOB TRACKER的可用IP -->
<property>
<name>hbase.zookeeper.quorum</name>
<value>ubuntu</value>
</property>
<property skipInDoc="true">
<name>hbase.defaults.for.version</name>
<value>0.94.1</value>
</property>
</configuration>
- 测试文件:MapreduceTest.java
package com.cloudputing.mapreduce;
import java.io.IOException;
import junit.framework.TestCase;
public class MapreduceTest extends TestCase{
public void testReadJob() throws IOException, InterruptedException, ClassNotFoundException
{
MapreduceRead.read();
}
}
-
MapreduceRead.java
package com.cloudputing.mapreduce;
import java.io.IOException;
import org.apache.hadoop.conf.Configuration;
import org.apache.hadoop.fs.FileSystem;
import org.apache.hadoop.fs.Path;
import org.apache.hadoop.hbase.HBaseConfiguration;
import org.apache.hadoop.hbase.client.Result;
import org.apache.hadoop.hbase.client.Scan;
import org.apache.hadoop.hbase.io.ImmutableBytesWritable;
import org.apache.hadoop.hbase.mapreduce.TableMapReduceUtil;
import org.apache.hadoop.hbase.mapreduce.TableMapper;
import org.apache.hadoop.hbase.util.Bytes;
import org.apache.hadoop.io.Text;
import org.apache.hadoop.mapreduce.Job;
import org.apache.hadoop.mapreduce.lib.output.NullOutputFormat;
public class MapreduceRead {
public static void read() throws IOException, InterruptedException, ClassNotFoundException
{
// Add these statements. XXX
// File jarFile = EJob.createTempJar("target/classes");
// EJob.addClasspath("D:/PAUL/WORK/WORK-SPACES/TEST1/cloudputing/src/main/resources");
// ClassLoader classLoader = EJob.getClassLoader();
// Thread.currentThread().setContextClassLoader(classLoader);
Configuration config = HBaseConfiguration.create();
addTmpJar("file:/D:/PAUL/WORK/WORK-SPACES/TEST1/cloudputing/target/bigdata-1.0.jar",config);
Job job = new Job(config, "ExampleRead");
// And add this statement. XXX
// ((JobConf) job.getConfiguration()).setJar(jarFile.toString());
// TableMapReduceUtil.addDependencyJars(job);
// TableMapReduceUtil.addDependencyJars(job.getConfiguration(),
// MapreduceRead.class,MyMapper.class);
job.setJarByClass(MapreduceRead.class); // class that contains mapper
Scan scan = new Scan();
scan.setCaching(500); // 1 is the default in Scan, which will be bad for MapReduce jobs
scan.setCacheBlocks(false); // don't set to true for MR jobs
// set other scan attrs
TableMapReduceUtil.initTableMapperJob(
"wiki", // input HBase table name
scan, // Scan instance to control CF and attribute selection
MapreduceRead.MyMapper.class, // mapper
null, // mapper output key
null, // mapper output value
job);
job.setOutputFormatClass(NullOutputFormat.class); // because we aren't emitting anything from mapper
// DistributedCache.addFileToClassPath(new Path("hdfs://node.tracker1:9000/user/root/lib/stat-analysis-mapred-1.0-SNAPSHOT.jar"),job.getConfiguration());
boolean b = job.waitForCompletion(true);
if (!b) {
throw new IOException("error with job!");
}
}
/**
* 为Mapreduce添加第三方jar包
*
* @param jarPath
* 举例:D:/Java/new_java_workspace/scm/lib/guava-r08.jar
* @param conf
* @throws IOException
*/
public static void addTmpJar(String jarPath, Configuration conf) throws IOException {
System.setProperty("path.separator", ":");
FileSystem fs = FileSystem.getLocal(conf);
String newJarPath = new Path(jarPath).makeQualified(fs).toString();
String tmpjars = conf.get("tmpjars");
if (tmpjars == null || tmpjars.length() == 0) {
conf.set("tmpjars", newJarPath);
} else {
conf.set("tmpjars", tmpjars + ":" + newJarPath);
}
}
public static class MyMapper extends TableMapper<Text, Text> {
public void map(ImmutableBytesWritable row, Result value,
Context context) throws InterruptedException, IOException {
String val1 = getValue(value.getValue(Bytes.toBytes("text"), Bytes.toBytes("qual1")));
String val2 = getValue(value.getValue(Bytes.toBytes("text"), Bytes.toBytes("qual2")));
System.out.println(val1 + " -- " + val2);
}
private String getValue(byte [] value)
{
return value == null? "null" : new String(value);
}
}
}
界面:
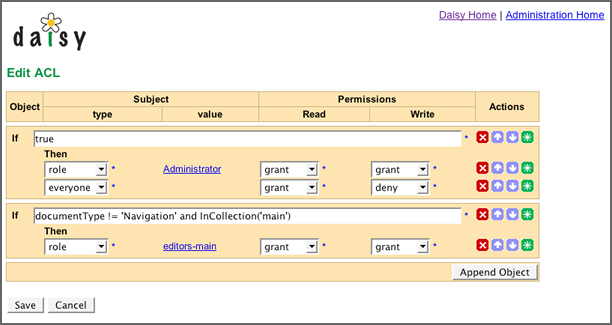
算法:

说明:
http://lilyproject.org/books/daisy_docs_book--2_3/publications/html-chunked/output/s182.html
注意:
此处的ACL可以是一个系统多个的,如某些情况用不同的ACL。
资源:可以指文档ID,页面ID之类的,由于文档可能很多个,因此用表达式代替之。
角色:指ROLE/USER之类的。
动作(PERMISSION):指操作类型,如读、写、删除等。
结果(ACTION):指GRANT、DENNY等。
具体实现方式:根据表达式进行运算,看哪个表达式为TRUE,则用哪个,再传入PERMISSION 类型,角色,看ACTION是GRANT还是DENNY,如果是GRANT则授权通过,DENNY则授权不通过。