|
2006年5月18日
#
curl -s https://packagecloud.io/install/repositories/rabbitmq/rabbitmq-server/script.rpm.sh | sudo bash
rabbitmq.config [{rabbit, [{cluster_partition_handling, autoheal},{loopback_users, []}]}].
#!/bin/sh # # Startup script for ovirt-agent # # chkconfig: 2345 85 20 # description: ovirt-agent # processname: ovirt-agent # pidfile: /var/run/tomcat.pid # config:# Source function library. . /etc/rc.d/init.d/functions # Source networking configuration. . /etc/sysconfig/network # Check that networking is up. export OVIRT_AGENT_HOME=/opt/ovirt-agent [ -f $OVIRT_AGENT_HOME/bin/startServer.sh ] ||?exit 0 [ -f $OVIRT_AGENT_HOME/bin/stopServer.sh ] ||?exit 0 # See how we were called. case "$1" in start) # Start daemon. echo ?"Starting OVirt-agent: " $OVIRT_AGENT_HOME/bin/startServer.sh $OVIRT_AGENT_HOME/conf/ovirt-agent.xml touch /var/lock/subsys/ovirt-agent ;; stop) # Stop daemons. echo ?"Shutting down OVirt-agent: " $OVIRT_AGENT_HOME/bin/stopServer.sh rm -f /var/lock/subsys/ovirt-agent ;; restart) $0 stop $0 start ;; status) status ovirt-agent ;; *) echo "Usage: $0 {start|stop|restart|status}" exit 1 esac exit 0
docker
run -d --name="srdesktop1" -p 80:80 -p 8888:8888 -p 8000:8000 -p
8009:8009 -p 8081:8081 -p 3306:3306 -p 19:22 -v /opt/html:/var/www -v
/opt/ssdb-master:/opt/ssdb-master -v
/opt/apache-tomcat-7.0.53:/opt/apache-tomcat-7.0.53 -v /opt/mule-standalone-3.5.0:/opt/mule-standalone-3.5.0
-v /opt/mysql/data:/var/lib/mysql --privileged=true srdesktop/ubuntu
/bin/bash -exec 'echo -e
"192.168.1.93 ovirt-manage\n192.168.1.243 www.engin.org\n127.0.0.1 localhost" >>
/etc/hosts && service mysql start
&& /etc/init.d/guaca start && rm
/opt/ssdb-master/var/ssdb.pid && /opt/ssdb-master/ssdb-server -d /opt/ssdb-master/ssdb.conf &&
export JAVA_HOME=/opt/jdk1.7.0_51 && export PATH=$JAVA_HOME/bin:$PATH
&& /opt/apache-tomcat-7.0.53/bin/startup.sh && service apache2
start && /opt/mule-standalone-3.5.0/bin/mule'
pptpsetup
--create myvpn --server www.yanlingyi.com
--username vpn --password mincloud --encrypt --start
docker
run -d --name="rabbitmq_master" -p 200:22 -p 25672:25672 -p
15672:15672 -p 5672:5672 -p 4369:4369 -p 10051:10050 rabbitmq/ubuntu /bin/bash
-exec 'echo -e "172.20.20.10 rabbitmq-master\n127.0.0.1 localhost"
> /etc/hosts && /etc/init.d/rabbitmq-server start &&
/usr/sbin/sshd -D'
# Generated by ovirt-engine installer#filtering rules *filter :INPUT ACCEPT [0:0] :FORWARD ACCEPT [0:0] :OUTPUT ACCEPT [0:0] -A INPUT -i lo -j ACCEPT -A INPUT -p icmp -m icmp --icmp-type any -j ACCEPT -A INPUT -m state --state RELATED,ESTABLISHED -j ACCEPT #drop all rule COMMIT
http://www.cocoachina.com/ios/20150417/11595.html
https://www.igreenjsq.info/user-xianlu.html
http://www.csdn.net/article/2014-01-02/2817984-13-tools-let-hadoop-fly 好用的数据工具 http://blog.itpub.net/7816530/viewspace-1119924/
netsh interface ipv4 show subinterfaces netsh interface ipv4 set subinterface "本地连接" mtu=1480 store=persistent
http://www.ovirt.org/Java-sdk
http://m.blog.csdn.net/blog/ebay/43529401
So now you have: - The elapsed wall clock time (this period's time, minus last period's time) Call this X
- The elapsed process cpu time (this period's time, minus last period's time) Call this Y
- The number of CPUs. Call this C
The percent utilization will be Y / (X x C) * 100 import java.lang.management.*;
import java.util.concurrent.*;
osx = ManagementFactory.getOperatingSystemMXBean();
cores = osx.getAvailableProcessors(); // Factorial to keep the process busy so we can see some actual activity
factorial = { n -> int fact = 1; int i = 1; while(i <= n) { i++; fact *= i; } return fact; }
long elapsedTime = -1, startTime = -1; long elapsedCpu = -1, startCpu = -1;;
for(i in 0..20) { startTime = System.nanoTime(); startCpu = osx.getProcessCpuTime(); CountDownLatch latch = new CountDownLatch(cores); for(x in 1..cores) { Thread.startDaemon() { factorial(1000000); latch.countDown(); } } latch.await(); elapsedTime = System.nanoTime()-startTime; elapsedCpu = osx.getProcessCpuTime()-startCpu; percUsage = (elapsedCpu / (elapsedTime* cores)) *100; println "Percent Usage:$percUsage %"; }
http://www.linuxidc.com/Linux/2014-08/105422.htm
http://www.tuicool.com/articles/amQNvuq
http://www.ibm.com/developerworks/cn/java/j-quartz/index.html
运行yum makecache生成缓存 eple源: rpm -Uvh http://ftp.sjtu.edu.cn/fedora/epel/6/i386/epel-release-6-8.noarch.rpm docker 安装: You will need RHEL 6.5 or higher, with a RHEL 6 kernel version 2.6.32-431 or higher as this has specific kernel fixes to allow Docker to work. CentOS 6.5已经是2.6.32-431内核了,所以最好安装这个版本。 yum -y install docker-io 升级:yum -y update docker-io 手动升级: wget https://get.docker.io/builds/Linux/x86_64/docker-latest -O docker mv -f docker /usr/bin/docker 升级完成 启动: service docker start 开机启动: chkconfig docker on
http://blog.fens.me/vpn-pptp-client-ubuntu/ ip route add 192.168.20.0/24 via 192.168.20.1 dev ppp0 http://blog.163.com/monk...popo/blog/static/208680220111014101233949/
http://docs.docker.com/articles/host_integration/
172.20.20.8 mysql-mm1 172.20.20.11 mysql-mm2 172.20.20.10 mysql-data1 172.20.20.9 mysql-data2 172.20.20.10 mysql-sql1 172.20.20.9 mysql-sql2 mysql-mm1: docker run -d --name="mysql_mm1" --net=host -v /opt/mysql:/usr/local/mysql mysql_mm/ubuntu /bin/bash -exec 'echo -e "172.20.20.7 mysql-mm1\n172.20.20.10 mysql-mm2\n172.20.20.8 mysql-data1\n172.20.20.9 mysql-data2\n172.20.20.8 mysql-sql1\n172.20.20.9 mysql-sql2\n127.0.0.1 localhost" > /etc/hosts && ndb_mgmd -f /usr/local/mysql/data/mysql-cluster/config.ini && /usr/sbin/sshd -D' mysql-mm2: docker run -d --name="mysql_mm2" --net=host -v /opt/mysql:/usr/local/mysql mysql_mm/ubuntu /bin/bash -exec 'echo -e "172.20.20.7 mysql-mm1\n172.20.20.10 mysql-mm2\n172.20.20.8 mysql-data1\n172.20.20.9 mysql-data2\n172.20.20.8 mysql-sql1\n172.20.20.9 mysql-sql2\n127.0.0.1 localhost" > /etc/hosts && ndb_mgmd -f /usr/local/mysql/data/mysql-cluster/config.ini && zabbix_agentd && /usr/sbin/sshd -D' mysql-data1: docker run -d --name="mysql_data1" --net=host -v /opt/mysql:/usr/local/mysql mysql_data/ubuntu /bin/bash -exec 'echo -e "172.20.20.7 mysql-mm1\n172.20.20.10 mysql-mm2\n172.20.20.8 mysql-data1\n172.20.20.9 mysql-data2\n172.20.20.8 mysql-sql1\n172.20.20.9 mysql-sql2\n127.0.0.1 localhost" > /etc/hosts && /usr/local/mysql/bin/ndbd && zabbix_agentd && /usr/sbin/sshd -D' mysql-data2: docker run -d --name="mysql_data2" --net=host -v /opt/mysql:/usr/local/mysql mysql_data/ubuntu /bin/bash -exec 'echo -e "172.20.20.7 mysql-mm1\n172.20.20.10 mysql-mm2\n172.20.20.8 mysql-data1\n172.20.20.9 mysql-data2\n172.20.20.8 mysql-sql1\n172.20.20.9 mysql-sql2\n127.0.0.1 localhost" > /etc/hosts && /usr/local/mysql/bin/ndbd && zabbix_agentd && /usr/sbin/sshd -D' mysql-sql1: docker run -d --name="mysql_sql1" --net=host -v /opt/mysql:/usr/local/mysql mysql_sql/ubuntu /bin/bash -exec 'echo -e "172.20.20.7 mysql-mm1\n172.20.20.10 mysql-mm2\n172.20.20.8 mysql-data1\n172.20.20.9 mysql-data2\n172.20.20.8 mysql-sql1\n172.20.20.9 mysql-sql2\n127.0.0.1 localhost" > /etc/hosts && /usr/local/mysql/bin/mysqld_safe --user=mysql' mysql-sql2: docker run -d --name="mysql_sql2" --net=host -v /opt/mysql:/usr/local/mysql mysql_sql/ubuntu /bin/bash -exec 'echo -e "172.20.20.7 mysql-mm1\n172.20.20.10 mysql-mm2\n172.20.20.8 mysql-data1\n172.20.20.9 mysql-data2\n172.20.20.8 mysql-sql1\n172.20.20.9 mysql-sql2\n127.0.0.1 localhost" > /etc/hosts && /usr/local/mysql/bin/mysqld_safe --user=mysql' haproxy && nginx: docker run -d --name="loadbalancer_master" -p 8888:8888 -p 6080:6080 -p 8089:8089 -p 8774:8774 -p 9696:9696 -p 9292:9292 -p 8776:8776 -p 5000:5000 -p 8777:8777 -p 11211:11211 -p 11222:11222 -p 5672:5672 -p 35357:35357 -p 8181:2181 -p 10389:10389 -p 2222:22 -p 80:80 -p 1936:1936 -p 3306:3306 -p 10052:10052 -p 10051:10051 -p 8080:8080 -v /opt/etc/nginx/conf:/usr/local/nginx-1.0.6/conf -v /opt/etc/haproxy:/etc/haproxy loadbalancer/ubuntu /bin/bash -exec 'echo -e "127.0.0.1 localhost" > /etc/hosts && service haproxy start && /usr/local/nginx-1.0.6/sbin/nginx && zabbix_agentd && /usr/sbin/sshd -D' redis_master: docker run -d --name="redis_master" -p 18:22 -p 6379:6379 -p 6380:6380 redis_master/ubuntu /bin/bash -exec '/usr/local/webserver/redis/start.sh && /usr/sbin/sshd -D' redis_slave: docker run -d --name="redis_slave1" -p 18:22 -p 6379:6379 -p 6380:6380 redis_slave/ubuntu /bin/bash -exec 'echo -e "172.20.20.10 redis-master\n127.0.0.1 localhost" > /etc/hosts && /usr/local/webserver/redis/start.sh && /usr/sbin/sshd -D' rabbitmq: docker run -d --name="rabbitmq_master" -p 2222:22 -p 25672:25672 -p 15672:15672 -p 5672:5672 -p 4369:4369 -p 10051:10050 rabbitmq/ubuntu /bin/bash -exec 'echo -e "172.20.20.10 rabbitmq-master\n127.0.0.1 localhost" > /etc/hosts && /etc/init.d/rabbitmq-server start && /usr/sbin/sshd -D' mule: docker run -d --name="mule1" -p 5005:5005 -p 2222:22 -p 9999:9999 -p 9003:9003 -p 9000:9000 -p 9001:9001 -p 9004:9004 -v /opt/mule:/opt/mule-standalone-3.5.0_cloud mule/ubuntu /bin/bash -exec 'echo -e "192.168.1.180 lb-master\n192.168.1.180 controller-node\n127.0.0.1 localhost" >> /etc/hosts && /usr/sbin/sshd && export JAVA_HOME=/opt/jdk1.7.0_51 && export PATH=$JAVA_HOME/bin:$PATH && /opt/mule-standalone-3.5.0_cloud/bin/mule' zentao: docker run -d --name="zentao" -p 22222:22 -p 10008:80 -v /opt/www/html/zentaopms:/opt/zentao --privileged=true zentao/ubuntu /bin/bash -exec 'service apache2 start && /usr/sbin/sshd -D' websocket-tomcat: docker run -d --name="websocket_tomcat1" -p 8888:8080 -p 2222:22 -v /opt/apache-tomcat-8.0.15:/opt/apache-tomcat websocket-tomcat/ubuntu /bin/bash -exec 'echo -e "192.168.1.180 lb-master\n127.0.0.1 localhost" > /etc/hosts && export JAVA_HOME=/opt/jdk1.7.0_51 && /opt/apache-tomcat/bin/startup.sh && /usr/sbin/sshd -D'
docker run -d --name="guacamole1" -p 8088:8088 -p 38:22 -v /opt/apache-tomcat-7.0.53:/opt/apache-tomcat guacamole/ubuntu /bin/bash -exec 'echo -e "192.168.1.150 lb-master\n127.0.0.1 localhost" > /etc/hosts && /etc/init.d/guacd start && /opt/apache-tomcat/bin/start-tomcat.sh && /usr/sbin/sshd -D'
http://www.docin.com/p-558099649.html
ステップ1 /etc/yum.repos.d/virt7-testing.repo というファイルを作ります。/etc/yum.repos.d/virt7-testing.repo [virt7-testing] name=virt7-testing baseurl=http://cbs.centos.org/repos/virt7-testing/x86_64/os/ enabled=0 gpgcheck=0 ステップ2 インストールします。sudo yum --enablerepo=virt7-testing install docker 確認します。 $ docker --version Docker version 1.5.0, build a8a31ef/1.5.0 やったーー!! ※ご利用は自己責任でお願いします。 http://billpaxtonwasright.com/installing-docker-1-5-0-on-centos-7/
在虚拟机的配置文件中增加: <input type=’tablet’ bus=’usb’/>
(该句位于<devices>配置中)
Linux:
在终端中输入: xset -m 0 Windows:进入控制面板 -> 鼠标 -> 指针选项,去掉“提高指针精确度”前面的勾。
http://docs.openstack.org/image-guide/content/virt-install.html
http://blog.csdn.net/hackerain/article/details/38172941
http://blog.csdn.net/anhuidelinger/article/details/9818693
https://docs.docker.com/installation/ubuntulinux/#ubuntu-trusty-1404-lts-64-bit
http://my.oschina.net/guol/blog/271416
http://www.tuicool.com/articles/RrmAru
http://www.elesos.com/index.php?title=Nginx%E6%90%AD%E5%BB%BAHTTPS%E6%9C%8D%E5%8A%A1%E5%99%A8
<?xml version="1.0" encoding="UTF-8"?> <mule xmlns:amqp="http://www.mulesoft.org/schema/mule/amqp" xmlns="http://www.mulesoft.org/schema/mule/core" xmlns:doc="http://www.mulesoft.org/schema/mule/documentation" xmlns:spring="http://www.springframework.org/schema/beans" version="EE-3.5.2" xmlns:xsi="http://www.w3.org/2001/XMLSchema-instance" xsi:schemaLocation="http://www.springframework.org/schema/beans http://www.springframework.org/schema/beans/spring-beans-current.xsd http://www.mulesoft.org/schema/mule/core http://www.mulesoft.org/schema/mule/core/current/mule.xsd http://www.mulesoft.org/schema/mule/amqp http://www.mulesoft.org/schema/mule/amqp/current/mule-amqp.xsd"> <amqp:connector name="AMQP_Connector" validateConnections="true" host="192.168.199.21" doc:name="AMQP Connector"/> <amqp:endpoint exchangeName="test" queueName="test_queue" exchangeType="direct" name="AMQP" responseTimeout="10000" doc:name="AMQP" queueDurable="true"/> <flow name="testFlow1" doc:name="testFlow1"> <amqp:inbound-endpoint responseTimeout="10000" exchange-pattern="request-response" connector-ref="AMQP_Connector" ref="AMQP" doc:name="AMQP"/> <byte-array-to-string-transformer doc:name="Transform bytearray message to String"/> <logger message="I recived a direct message from AMQP: #[payload]" level="INFO" doc:name="Logger"/> </flow> </mule>
[{rabbit, [{cluster_partition_handling, autoheal},{loopback_users, []}]}].
http://rhomobi.com/topics/49
nginx为了实现反向代理的需求而增加了一个ngx_http_proxy_module模块。其中proxy_set_header指令就是该模块需要读取的配置文件。在这里,所有设置的值的含义和http请求同中的含义完全相同,除了Host外还有X-Forward-For。
        Host的含义是表明请求的主机名,因为nginx作为反向代理使用,而如果后端真是的服务器设置有类似防盗链或者根据http请求头中的host字段来进行路由或判断功能的话,如果反向代理层的nginx不重写请求头中的host字段,将会导致请求失败【默认反向代理服务器会向后端真实服务器发送请求,并且请求头中的host字段应为proxy_pass指令设置的服务器】。
        同理,X_Forward_For字段表示该条http请求是有谁发起的?如果反向代理服务器不重写该请求头的话,那么后端真实服务器在处理时会认为所有的请求都来在反向代理服务器,如果后端有防攻击策略的话,那么机器就被封掉了。因此,在配置用作反向代理的nginx中一般会增加两条配置,修改http的请求头:
proxy_set_header Host $http_host;
proxy_set_header X-Forward-For $remote_addr;

这里的$http_host和$remote_addr都是nginx的导出变量,可以再配置文件中直接使用。如果Host请求头部没有出现在请求头中,则$http_host值为空,但是$host值为主域名。因此,一般而言,会用$host代替$http_host变量,从而避免http请求中丢失Host头部的情况下Host不被重写的失误。
http://jasig.github.io/cas/4.0.x/protocol/OAuth-Protocol.html http://www.tuicool.com/articles/VrERzy http://www.tuicool.com/articles/Ar2EBz
http://www.mulesoft.org/documentation/display/current/Creating+an+OAuth+2.0a+Web+Service+Provider
http://zh.wikipedia.org/wiki/%E9%A2%84%E5%86%99%E5%BC%8F%E6%97%A5%E5%BF%97 http://zookeeper.apache.org/doc/r3.3.6/bookkeeperStarted.html http://zookeeper.apache.org/bookkeeper/docs/r4.0.0/bookkeeperProgrammer.html http://zookeeper.apache.org/bookkeeper/docs/r4.0.0/apidocs/index.html?org/apache/bookkeeper/client/BookKeeper.html
http://nileader.blog.51cto.com/1381108/932156
http://ssdb.io/docs/ssdb-cli.html
对于防火墙的选择:
http://blog.sina.com.cn/s/blog_92dc41ea0101j5l1.html
http://www.lupaworld.com/article-218506-1.html openvpn: http://grantcurell.com/2014/07/22/setting-up-a-vpn-server-on-ubuntu-14-04/ pfsense防火墙: http://www.docin.com/p-88103814.html ssl vpn:openvpn ipsec:sprongswan 代理服务器:squid stunnel:tcp加密 Panabit流控引擎:
http://www.panabit.com/html/product/std/2014/0924/86.html Panabit标准版是目前国内开放度最高、免费、专业的应用层流量管理系统,特别针对P2P应用的识别与控制,截止2009年03月25日,已经支持实际主流应用240种以上,并以两周更新一次特征库的速度持续更新(包括已支持协议和新增协议两方面的更新,Panabit支持协议列表请关注Panabit网站首页"支持协议")。Panabit在精确识别协议即对应用分类的基础上,根据用户自定义策略,提供灵活方便的流量管理机制:带宽限速、带宽保证、带宽预留,并可基于协议/协议组、IP/IP组进行参数化的策略设置。Panabit采用创新的"节点跟踪"技术与"加密协议深度识别"技术提高识别效率和准确度,如对使用加密协议的eMule、Skype等精确识别。Panabit区别于一些同类设备,在不能精确识别协议的情况下,限制客户端并发连接数非科学的做法,易造成误判或影响正常用户。Panabit是一款真正的应用层流控系统,能做限速控制;如果是疑似识别、不能准确定位具体应用的系统,是不敢做限速控制,起不到实际应用层流控效果。
root@proxzone-project-4:/usr/local/mysql/bin# ndb_mgm -e show Connected to Management Server at: localhost:1186 Cluster Configuration --------------------- [ndbd(NDB)] 2 node(s) id=3 @172.21.21.108 (mysql-5.6.21 ndb-7.3.7, Nodegroup: 0) id=4 @172.21.21.109 (mysql-5.6.21 ndb-7.3.7, Nodegroup: 0, *)
[ndb_mgmd(MGM)] 2 node(s) id=1 @172.21.21.107 (mysql-5.6.21 ndb-7.3.7) id=2 @172.21.21.110 (mysql-5.6.21 ndb-7.3.7)
[mysqld(API)] 2 node(s) id=5 @172.21.21.108 (mysql-5.6.21 ndb-7.3.7) id=6 @172.21.21.109 (mysql-5.6.21 ndb-7.3.7)
https://github.com/alfss/zabbix-rabbitmq https://github.com/jasonmcintosh/rabbitmq-zabbix
#!/bin/bash #written by lenwood #mail:ccyhaoran@live.cn diskarray=(`cat /proc/diskstats |grep -E "\bsd[abcdefg]\b|\bxvd[abcdefg]\b"|grep -i "\b$1\b"|awk '{print $3}'|sort|uniq 2>/dev/null`) length=${#diskarray[@]} printf "{\n" printf '\t'"\"data\":[" for ((i=0;i<$length;i++)) do printf '\n\t\t{' printf "\"{#DISK_NAME}\":\"${diskarray[$i]}\"}" if [ $i -lt $[$length-1] ];then printf ',' fi done printf "\n\t]\n" printf "}\n"
http://dev.mysql.com/doc/refman/5.1/en/create-tablespace.html http://dev.mysql.com/doc/refman/5.1/en/mysql-cluster-disk-data-objects.html
5.1.37-ndb-7.0.8a-cluster-gpl MySQL Cluster Server (GPL)
create a table with tablespace set.
* tablespace creation *
CREATE TABLESPACE ts_1 ADD DATAFILE '/home/db/mysql-cluster/data/data_1.dat' USE LOGFILE GROUP lg_1 INITIAL_SIZE = 26843545600 ENGINE NDB;
ALTER TABLESPACE ts_1 ADD DATAFILE '/home/db/mysql-cluster/data/data_2.dat' INITIAL_SIZE 26843545600 ENGINE NDB;
ALTER TABLESPACE ts_1 ADD DATAFILE '/home/db/mysql-cluster/data/data_3.dat' INITIAL_SIZE 26843545600 ENGINE NDB;
ALTER TABLESPACE ts_1 ADD DATAFILE '/home/db/mysql-cluster/data/data_4.dat' INITIAL_SIZE 26843545600 ENGINE NDB;
* table creation *
CREATE TABLE `TABLE` (
`A` date NOT NULL,
`B` varchar(30) NOT NULL,
`C` varchar(50) NOT NULL,
`D` varchar(50) NOT NULL,
`E` varchar(50) NOT NULL,
`F` varchar(255) DEFAULT NULL
) TABLESPACE ts_1 STORAGE DISK ENGINE=ndbcluster DEFAULT CHARSET=utf8
PK, index generated without the table and insert the data(40G),
I'm Using logs as the following index numbers are still high. (mgm log)
The actual number of memory ndb also giving you an upward trend ... Why?
2009-11-17 16:54:58 [MgmtSrvr] INFO -- Node 8: Index usage is 4%(30707 8K pages of total 655392)
2009-11-17 16:55:25 [MgmtSrvr] INFO -- Node 8: Data usage is 8%(20603 32K pages of total 229376)
1,不支持创建临时表(temporary tables); 2,创建索引和键的限制: (1),在列上创建索引长度超过3072bytes会成功,但是只能使用索引的前3072bytes。并且会显示警告信息"specified key was too long,max key lenght is 3072 keys" 不支持的特征 1,在NDB创建create table时,一定要指定tablespace. For NDB tables, beginning with MySQL Cluster NDB 6.2.5 and MySQL Cluster NDB 6.3.2, it is also possible to specify whether the column is stored on disk or in memory by using a STORAGE clause. STORAGE DISK causes the column to be stored on disk, and STORAGE MEMORY causes in-memory storage to be used. The CREATE TABLE statement used must still include a TABLESPACE clause:
mysql> CREATE TABLE t1 (
-> c1 INT STORAGE DISK,
-> c2 INT STORAGE MEMORY
-> ) ENGINE NDB;
ERROR 1005 (HY000): Can't create table 'c.t1' (errno: 140)
mysql> CREATE TABLE t1 (
-> c1 INT STORAGE DISK,
-> c2 INT STORAGE MEMORY
-> ) TABLESPACE ts_1 ENGINE NDB;
Query OK, 0 rows affected (1.06 sec) //NDB参数解释 ---from 《mysql性能调优和架构设计》 1) [NDBD DEFAULT]中的配置项:
NoOfReplicas:定义在Cluster 环境中相同数据的分数,通俗一点来说就是每一份数据存放NoOfReplicas 份。如果希望能够冗余,那么至少设置为2(一般情况来说此参数值设置为2 就够了),最大只能设置为4。另外,NoOfReplicas 值得大小,实际上也就是nodegroup 大小的定义。NoOfReplicas 参数没有系统默认值,所以必须设定,而且只能设置在[NDBD DEFAULT]中,因为此数值在整个Cluster 集群中一个node group 中所有的NDBD 节点都需要一样。另外NoOfReplicas 的数目对整个Cluster 环境中NDB 节点数量有较大的影响,因为NDB 节点总数量是NoOfReplicas * 2 * node_group_num;DataDir:指定本地的pid 文件,trace 文件,日志文件以及错误日志子等存放的路径,无系统默认地址,所以必须设定; DataMemory:设定用于存放数据和主键索引的内存段的大小。这个大小限制了能存放的数据的大小,因为ndb 存储引擎需属于内存数据库引擎,需要将所有的数据(包括索引)都load 到内存中。这个参数并不是一定需要设定的,但是默认值非常小(80M),只也就是说如果使用默认值,将只能存放很小的数据。参数设置需要带上单位,如512M,2G 等。另外,DataMemory 里面还会存放UNDO 相关的信息,所以,事务的大小和事务并发量也决定了DataMemory 的使用量,建议尽量使用小事务;
IndexMemory:设定用于存放索引(非主键)数据的内存段大小。和DataMemory类似,这个参数值的大小同样也会限制该节点能存放的数据的大小,因为索引的大小是随着数据量增长而增长的。参数设置也如DataMemory 一样需要单位。IndexMemory 默认大小为18M;实际上,一个NDB 节点能存放的数据量是会受到DataMemory 和IndexMemory 两个参数设置的约束,两者任何一个达到限制数量后,都无法再增加能存储的数据量。如果继续存入数据系统会报错“table is full”。
FileSystemPath:指定redo 日志,undo 日志,数据文件以及meta 数据等的存放位置,默认位置为DataDir 的设置,并且在ndbd 初始化的时候,参数所设定的文件夹必须存在。在第一次启动的时候,ndbd 进程会在所设定的文件夹下建立一个子文件夹叫ndb_id_fs,这里的id 为节点的ID 值,如节点id 为3 则文件夹名称为ndb_3_fs。当然,这个参数也不一定非得设置在[NDBD DEFAULT]参数组里面让所有节点的设置都一样(不过建议这样设置),还可以设置在[NDBD]参数组下为每一个节点单独设置自己的FileSystemPath值;
BackupDataDir:设置备份目录路径,默认为FileSystemPath/BACKUP。接下来的几个参数也是非常重要的,主要都是与并行事务数和其他一些并行限制有关的参数设置。
MaxNoOfConcurrentTransactions:设置在一个节点上面的最大并行事务数目,默认为4096,一般情况下来说是足够了的。这个参数值所有节点必须设置一样,所以一般都是设置在[NDBD DEFAULT]参数组下面;
MaxNoOfConcurrentOperations:设置同时能够被更新(或者锁定)的记录数量。一般来说可以设置为在整个集群中相同时间内可能被更新(或者锁定)的总记录数,除以NDB节点数,所得到的值。
MaxNoOfLocalOperations:此参数默认是MaxNoOfConcurrentOperations * 1.1的大小,也就是说,每个节点一般可以处理超过平均值的10%的操作记录数量。但是一般来说,MySQL 建议单独设置此参数而不要使用默认值,并且将此参数设置得更较大一些;
以下的三个参数主要是在一个事务中执行一条query 的时候临时用到存储(或者内存)的情况下所使用到的,所使用的存储信息会在事务结束(commit 或者rollback)的时候释放资源;
MaxNoOfConcurrentIndexOperations:这个参数和MaxNoOfConcurrentOperations参数比较类似,只不过所针对的是Index 的record 而已。其默认值为8192,对伊一般的系统来说都已经足够了,只有在事务并发非常非常大的系统上才有需要增加这个参数的设置。当然,此参数越大,系统运行时候为此而消耗的内存也会越大;
MaxNoOfFiredTriggers:触发唯一索引(hash index)操作的最大的操作数,这个操作数是影响索引的操作条目数,而不是操作的次数。系统默认值为4000,一般系统来说够用了。当然,如果系统并发事务非常高,而且涉及到索引的操作也非常多,自然也就需要提高这个参数值的设置了;
TransactionBufferMemory:这个buffer 值得设置主要是指定用于跟踪索引操作而使用的。主要是用来存储索引操作中涉及到的索引key 值和column 的实际信息。这这个参数的值一般来说也很少需要调整,因为实际系统中需要的这部分buffer 量非常小,虽然默认值只是1M,但是对于一般应用也已经足够了;
下面要介绍到的参数主要是在系统处理中做table scan 或者range scan 的时候使用的一些buffer 的相关设置,设置的恰当可以既节省内存又达到足够的性能要求。
MaxNoOfConcurrentScans:这个参数主要控制在Cluster 环境中并发的table scan和range scan 的总数量平均分配到每一个节点后的平均值。一般来说,每一个scan 都是通过并行的扫描所有的partition 来完成的,每一个partition 的扫描都会在该partition所在的节点上面使用一个scan record。所以,这个参数值得大小应该是“scan record”数目* 节点数目。参数默认大小为256,最大只能设置为500;
MaxNoOfLocalScans:和上面的这个参数相对应,只不过设置的是在本节点上面的并发table scan 和range scan 数量。如果在系统中有大量的并发而且一般都不使用并行的话,需要注意此参数的设置。默认为MaxNoOfConcurrentScans * node 数目;
BatchSizePerLocalScan:该参用于计算在Localscan(并发)过程中被锁住的记录数,文档上说明默认为64;
LongMessageBuffer:这个参数定义的是消息传递时候的buffer 大小,而这里的消息传递主要是内部信息传递以及节点与节点之间的信息传递。这个参数一般很少需要调整,默认大小为1MB 大小;
下面介绍一下与LOG 相关的参数配置说明,包括LOG level。这里的LOG level 有多种,从0 到15,也就是共16 种。如果设定为0,则表示不记录任何LOG。如果设置为最高level,也就是15,则表示所有的信息都会通过标准输出来记录LOG.由于这里的所有信息实际上都会传递到管理节点的cluster LOG 中,所以,一般来说,除了启动时候的LOG级别需要设置为1 之外,其他所有的LOG level 都只需要设置为0 就可以了。
NoOfFragmentLogFiles:这个参数实际上和Oracle 的redo LOG 的group 一样的。其实就是ndb 的redo LOG group 数目,这些redo LOG 用于存放ndb 引擎所做的所有需要变更数据的事情,以及各种checkpoint 信息等。默认值为8;
MaxNoOfSavedMessages:这个参数设定了可以保留的trace 文件(在节点crash的时候参数)的最大个数,文档上面说此参数默认值为25。
LogLevelStartup:设定启动ndb 节点时候需要记录的信息的级别(不同级别所记录的信息的详细程度不一样),默认级别为1;
LogLevelShutdown:设定关闭ndb 节点时候记录日志的信息的级别,默认为0;
LogLevelStatistic:这个参数是针对于统计相关的日志的,就像更新数量,插入数量,buffer 使用情况,主键数量等等统计信息。默认日志级别为0;
LogLevelCheckpoint:checkpoint 日志记录级别(包括local 和global 的),默认为0;
LogLevelNodeRestart:ndb 节点重启过程日志级别,默认为0;
LogLevelConnection:各节点之间连接相关日志记录的级别,默认0;
LogLevelError:在整个Cluster 中错误或者警告信息的日志记录级别,默认0;
LogLevelInfo:普通信息的日志记录级别,默认为0。这里再介绍几个用来作为LOG 记录时候需要用到的Buffer 相关参数,这些参数对于性能都有一定的影响。当然,如果节点运行在无盘模式下的话,则影响不大。
UndoIndexBuffer:undo index buffer 主要是用于存储主键hash 索引在变更之后产生的undo 信息的缓冲区。默认值为2M 大小,最小可以设置为1M,对于大多数应用来说,2M 的默认值是够的.当然,在更新非常频繁的应用里面,适当的调大此参数值对性能还是有一定帮助的。如果此参数太小,会报出677 错误:Index UNDO buffers overloaded;
UndoDataBuffer:和undo index buffer 类似,undo data buffer 主要是在数据发生变更的时候所需要的undo 信息的缓冲区。默认大小为16M,最小同样为1M。当这个参数值太小的时候,系统会报出如下的错误:Data UNDO buffers overloaded,错误号为891;
RedoBuffer:Redo buffer 是用redo LOG 信息的缓冲区,默认大小为8M,最小为1M。如果此buffer 太小,会报1221 错误:REDO LOG buffers overloaded.
此外,NDB 节点还有一些和metadata 以及内部控制相关的参数,但大部分参数都基本上不需要任何调整,所以就不做进一步介绍。如果有兴趣希望详细了解,可以根据MySQL官方的相关参考手册,手册上面都有较为详细的介绍。
3、SQL 节点相关配置说明
1) 和其他节点一样,先介绍一些适用于所有节点的[MySQLD DEFAULT]参数ArbitrationRank:这个参数在介绍管理节点的参数时候已经介绍过了,用于设定节点级别(主要是在多个节点在处理相关操作时候出现分歧时候设定裁定者)的。一般来说,所有的SQL 节点都应该设定为2;
ArbitrationDelay:默认为0,裁定者在开始裁定之前需要被delay 多久,单位为毫秒。一般不需要更改默认值。
BatchByteSize:在做全表扫描或者索引范围扫描的时候,每一次fatch 的数据量,默认为32KB;
BatchSize:类似BatchByteSize 参数,只不过BatchSize 所设定的是每一次fetch的record 数量,而不是物理总量,默认为64,最大为992(暂时还不知道这个值是基于什么理论而设定的)。在实际运行query 的过程中,fetch 的量受到BatchByteSize 和BatchSize两个参数的共同制约,二者取最小值;
MaxScanBatchSize:在Cluster 环境中,进行并行处理的情况下,所有节点的BatchSize 总和的最大值。默认值为256KB,最大值为16MB。
2) 每个节点独有的[MySQLD]参数组,仅有id 和hostname 参数需要配置,在之前各类节点均有介绍了,这里就不再累述。
转自http://www.cnblogs.com/alang85/archive/2011/11/18/2253900.html
一、循环插入数据时出现
table is full 二、在mgm>all report memoryusage 查看 Node 2: Data usage is 22%(2305 32K pages of total 10240) 使用率到最后98%以上这时出现啦table is full 基于以上两种情况,其实是一种情况的我的解决方法是: 根据硬件配置必须根据硬件配置修改my.cnf文件和config.ini文件 1.config.ini
[ndbd default]
NoOfReplicas=2
MaxNoOfConcurrentOperations=10000
DataMemory=320M
IndexMemory=96M
TimeBetweenWatchDogCheck=30000
MaxNoOfOrderedIndexes=512 2.my.cnf
[mysqld]
ndbcluster
ndb-connectstring=124.95.137.12
optimizer_switch=engine_condition_pushdown=off 问题得以解决
来源:http://www.greensoftcode.net/
http://www.blogjava.net/yongboy/archive/2013/12/12/407498.html docker-registry:http://www.cnblogs.com/xguo/p/3829329.html ubuntu 14.04 http://www.tuicool.com/articles/b63uei centos 6.5 http://blog.yourtion.com/ubuntu-install-docker.html
/etc/sysctl.conf
> > net.bridge.bridge-nf-call-iptables = 1 > > net.bridge.bridge-nf-call-ip6tables = 0 > > net.bridge.bridge-nf-call-arptables = 1
xe-switch-network-backend bridge
REBOOT
http://www.chenshake.com/install-on-ubuntu-12-04-open-vswitch/ http://docs.cloudstack.apache.org/projects/cloudstack-installation/en/latest/hypervisor/kvm.html#install-and-configure-the-agent tip: 添加网桥 使用openvswitch建立网桥,kvm使用,命令如下: 建立网桥br #ovs-vsctl add-br br0 把eth0(物理机上网的网卡)添加到br0 #ovs-vsctl add-port br0 eth0 如果不出意外的话现在机器就不能上网了,可以按照以下方法解决 删除eth0的配置 #ifconfig eth0 0 为br0分配ip #dhclient br0 因为我使用的是dhcp获取ip的,所以执行了此命令,如果你的ip是自己手动配置的,请把eth0的配置写到br0上。
https://joshuarogers.net/installing-cloudstack-43-ubuntu-1404 iso: http://www.tuicool.com/articles/FnYFF32
MD5Digest dig = new MD5Digest(); byte[] bytes = "111111".getBytes(); dig.update(bytes, 0, bytes.length); byte[] md5 = new byte[dig.getDigestSize()]; dig.doFinal(md5, 0); System.out.println(new String(Base64.encode(md5)));
http://www.jolokia.org/download.html tomcat jmx http://blog.csdn.net/diy8187/article/details/4369137 统计 http://blog.csdn.net/blog4j/article/details/17122061 http://www.myexception.cn/software-architecture-design/410583.html
http://ma.ttias.be/advanced-monitoring-haproxy-with-zabbix-agent/
https://www.zabbix.org/wiki/File:Template_JMX_Tomcat-2.2.0.xml http://blog.chinaunix.net/uid-29179844-id-4093754.html
http://blog.sina.com.cn/s/blog_62079f6201019itr.html
location / { proxy_pass http://127.0.0.1:9999; proxy_connect_timeout 60; proxy_set_header Host $host; proxy_set_header X-Real-IP $remote_addr; proxy_set_header X-Forwarded-For $proxy_add_x_forwarded_for; proxy_set_header X-NginX-Proxy true; # 下面是关键 proxy_http_version 1.1; proxy_set_header Upgrade $http_upgrade; proxy_set_header Connection "upgrade"; # 这是配置webpysessoin丢失的问题 fastcgi_param SCRIPT_NAME ""; }
http://nginx.org/en/docs/http/websocket.html
------------------------------------lic------------------------------------- *u3-7QAAAAIAAAABAAAAAgAKcHVibGljY2VydAAAAUjuvYiDAAVYLjUwOQAAAzQwggMwMIIC7qAD AgECAgQnLAd6MAsGByqGSM44BAMFADBqMQswCQYDVQQGEwJDTjEQMA4GA1UECBMHYmVpamluZzEQ MA4GA1UEBxMHYmVpamluZzERMA8GA1UEChMIcHJveHpvbmUxETAPBgNVBAsTCHByb3h6b25lMREw DwYDVQQDEwhwcm94em9uZTAeFw0xNDEwMDgwNzUxMTFaFw0yNDEwMDUwNzUxMTFaMGoxCzAJBgNV BAYTAkNOMRAwDgYDVQQIEwdiZWlqaW5nMRAwDgYDVQQHEwdiZWlqaW5nMREwDwYDVQQKEwhwcm94 em9uZTERMA8GA1UECxMIcHJveHpvbmUxETAPBgNVBAMTCHByb3h6b25lMIIBtzCCASwGByqGSM44 BAEwggEfAoGBAP1*U4EddRIpUt9KnC7s5Of2EbdSPO9EAMMeP4C2USZpRV1AIlH7WT2NWPq*xfW6 MPbLm1Vs14E7gB00b*JmYLdrmVClpJ-f6AR7ECLCT7up1*63xhv4O1fnxqimFQ8E-4P208UewwI1 VBNaFpEy9nXzrith1yrv8iIDGZ3RSAHHAhUAl2BQjxUjC8yykrmCouuEC*BYHPUCgYEA9-Gghdab Pd7LvKtcNrhXuXmUr7v6OuqC-VdMCz0HgmdRWVeOutRZT-ZxBxCBgLRJFnEj6EwoFhO3zwkyjMim 4TwWeotUfI0o4KOuHiuzpnWRbqN*C*ohNWLx-2J6ASQ7zKTxvqhRkImog9*hWuWfBpKLZl6Ae1Ul ZAFMO*7PSSoDgYQAAoGAR-WVUpxcibqSXpi4VHPXIEoiBCu9Ik8AHItVuevHmPqsOLB5ZXbC2qbN oIVaJyhLntmeCS6M3ZOPWzHdNqcYdA1Rt9nNYQNpHgaMdHJo-w-ueUCDoo7-L2ho6c59P604f7IA qmjfSnSWdB5OZlQebi23d96awCLTS0bQkN1k0w2jITAfMB0GA1UdDgQWBBS4wsh7wxLuDzvl1gxL 2oA9AevomTALBgcqhkjOOAQDBQADLwAwLAIUSGuB1IXVBwg0VcHn2iBzAjdMUxQCFCUNoYiFqGE7 Qbx9r-jA9BpDOyuDq5iw6uBl83BChP5kQrBpVLJxZbs= ---------------------------------------------------------------------------- GgYqeio1TiUuLqb1kOvqbpAyOV-CXGt7KCibUH*icgfcehQjhsIHNgisDDDt7AZAeZptrTYf56ky xrzMEkPdoMMoFQGV*9kEXoab6awrAXP-GDcUAwOK7KS*q8-3O-UY7yjOaSMjR2QHszAgkLrFUuxt onkCQa6EAriSiWdYu*7FGbTlQNAmiUTXilsnnWSCXyw7Hl6xP08kNbovUY4e31D-boaCdW-hQPQw 0XbDZJdT5ndCo4Mh-R4vu6gSmt*t3QJhp7pyeQeOR6VxpIJRFMUCwz2Ddrn0D160nQJ2fx2vchE- Cz*vDkgQbCkFb7m9aBxKWztEZnATDwyYjyQmOXlcwO1ef4rdpxrBqpib9H5K1ddcQy6xkQdQXdvP b-Jvq1Dmh*IKrayoqWQY09fdgEKAjmadF7xYKnEVL5nDwI9ZhtIlOrYktQ6q8NqCLd4wKolMTx8q uOGWe-259-SGrSUNOp*-kgJXkWnqnRVs3do02XSWAsysixFJVSHNItePltdmBGimexVa1G8rV2dz rSmPyCDlzF12SZKKYePDQOmaYM4EYiUL9Et271D9tv5SsvEzMZhwFiolb33peKztzz2tZ4lOZbXf c-9sEPqhiOLYkDGqzxfnNyTjtTI4vz9WYqNjOe4SwOxsnHPkltb2evP4hyXru1CZNsm3w9dt1cHu i6QMYgYz1ivHKoyZ0iAh8N*NtN7o0OAxptyaDv9v-SsqXljN4af0BdJOzwMzSS65B8f47poUH3X- sKJIp797A5PTviXrCIwP126YWqPgUUHQ5LrsrsxKoQf6nTn7d*QAEQY5FIEoBtbmpq90KBVFVuZg OKSawSAuJh7Vv2EK3QWS0lk31eRSXymI85ERboNNGbNmMwek*k02KCtlLP4kO2CNs5WF74Dwo732 wVAcdz3VXKt1bmk- ---------------------------------------------------------------------------- Z29kMzU3MXByb3h6b25lIQ==
Anypoint Connectors Update Site - http://repository.mulesoft.org/connectors/releases/3.5.0 Anypoint Addons Update Site - http://studio.mulesoft.org/r3/addons/beta Anypoint Studio Update Site - http://studio.mulesoft.org/r3/updates APIkit Update Site - http://studio.mulesoft.org/r3/apikit mule - http://studio.mulesoft.org/3.5/plugin Mule ESB Runtimes for Anypoint Studio - http://studio.mulesoft.org/r3/studio-runtimes/ mulesoft - http://www.mulesoft.org/documentation/display/current/Studio+Update+Sites
首先把我看到的有用的资料留下: 1、官方文档-基本用户手册:http://directory.apache.org/apacheds/basic-user-guide.html 主要介绍了安装以及基本操作、登录等。 2、官方文档-高级用户手册:http://directory.apache.org/apacheds/advanced-user-guide.html 介绍了代码编译、系统结构、服务配置以及服务权限管理,这里吐槽一下,真的很难懂,并且各种TODO; 3、看起来像官方的文档:http://joacim.breiler.com/apacheds/book.html 介绍得很详尽,例子也很丰富。 4、访问控制实例 FR20_ApacheDS_Access_Control_Administration_The_X.500_Way.pdf ============================================================================================================= 常用的名词解析: DIT Directory Information Tree
AA administrative areas
AP administrative points
AAA autonomous administrative area 有自治权的管理区域,所有的实体均统一管理
SAA specific administrative area 特定管理区域
IAA inner administrative area 内部管理区域
SAP specific administrative point
ACI Access Control Information
Usually an entry is selected as the administrative point and marked with an operational attribute. The attributeType of the operational attribute is 'administrativeRole'.
通过添加一个可选属性来使一个实体成为管理点
ACSA access control specific area
================================================================================================================= 实战演练 需求: 1、LDAP超级管理员,管理LDAP上的所有数据; 2、匿名用户可以查看用户信息; 3、用户分为开发、测试和运维三组; 4、通过用户组授权 操作指南: 1、安装ApacheDS服务端; 下载地址:apacheds-2.0.0-M15-64bit.bin 下载到目录/home/apacheds/ - /etc/init.d/apacheds-2.0.0-M15-default start
2、安装Apache Directory Studio 本次使用Eclipse插件,详见 http://directory.apache.org/studio/installation-in-eclipse.html,也支持Eclipse market安装。 3、连接与配置 切换到Eclipse的LDAP视图,新建连接 hostname:199.155.122.90 port:10389 encryption method: nocryption (不同加密算法端口注意) authentication method: simple user:uid=admin,ou=system passwd:secret (默认的最高权限用户) OpenConfiguration启用Access Control,禁用匿名登录 重启apacheds服务生效 4、分区设置 系统默认example分区,我们删除之,并新建,本次创建dc=xxx.com 
5、新建ou=users,新建ou=groups。 - dn: ou=groups,dc=taotaosou.com
- objectClass: organizationalUnit
- objectClass: top
- ou: groups
- dn: ou=users,dc=taotaosou.com
- objectClass: organizationalUnit
- objectClass: top
- ou: users
- dn: dc=taotaosou.com
- objectclass: domain
- objectclass: top
- dc: taotaosou.com
- administrativeRole: accessControlSpecificArea
- dn: cn=enableAllUsersRead,dc=taotaosou.com
- objectClass: subentry
- objectClass: accessControlSubentry
- objectClass: top
- cn: enableAllUsersRead
- prescriptiveACI: { identificationTag "enableAllUsersRead", precedence 0, aut
- henticationLevel none, itemOrUserFirst userFirst: { userClasses { allUsers
- }, userPermissions { { protectedItems { entry, allUserAttributeTypesAndValu
- es }, grantsAndDenials { grantCompare, grantFilterMatch, grantRead, grantRe
- turnDN, grantBrowse } } } } }
- subtreeSpecification: { }
- dn: cn=allowSelfAccessAndModification,dc=taotaosou.com
- objectClass: subentry
- objectClass: accessControlSubentry
- objectClass: top
- cn: allowSelfAccessAndModification
- prescriptiveACI: { identificationTag "allowSelfAccessAndModification", prece
- dence 10, authenticationLevel simple, itemOrUserFirst userFirst: { userClas
- ses { thisEntry }, userPermissions { { protectedItems { entry, allUserAttri
- buteTypesAndValues }, grantsAndDenials { grantRemove, grantExport, grantCom
- pare, grantImport, grantRead, grantFilterMatch, grantModify, grantInvoke, g
- rantDiscloseOnError, grantRename, grantReturnDN, grantBrowse, grantAdd } }
- } } }
- subtreeSpecification: { }
- dn: cn=enableAdminSuper,dc=taotaosou.com
- objectClass: subentry
- objectClass: accessControlSubentry
- objectClass: top
- cn: enableAdminSuper
- prescriptiveACI: { identificationTag "enableAdminSuper", precedence 0, authe
- nticationLevel strong, itemOrUserFirst userFirst: { userClasses { userGroup
- { "cn=administrator,ou=gourp,dc=taotaosou.com" } }, userPermissions { { pr
- otectedItems { entry, allUserAttributeTypesAndValues }, grantsAndDenials {
- grantRemove, grantExport, grantCompare, grantImport, grantRead, grantFilter
- Match, grantModify, grantInvoke, grantDiscloseOnError, grantRename, grantRe
- turnDN, grantBrowse, grantAdd } } } } }
- subtreeSpecification: { }
http://blog.csdn.net/lansine2005/article/details/19978411
http://www.ahcit.com/?p=1703
http://redminecrm.com/pages/vmware_image
可重用性是Jakarta Commons项目的灵魂所在。这些包在设计阶段就已经考虑了可重用性问题。其中一些包,例如Commons里面用来记录日志的Logging包,最初是为其他项目设计的,例如Jakarta Struts项目,当人们发现这些包对于其他项目也非常有用,能够极大地帮助其他项目的开发,他们决定为这些包构造一个"公共"的存放位置,这就是Jakarta Commons项目。 为了真正提高可重用性,每一个包都必须不依赖于其他大型的框架或项目。因此,Commons项目的包基本上都是独立的,不仅是相对于其他项目的独立,而且相对于Commons内部的大部分其他包独立。虽然存在一些例外的情况,例如Betwixt包要用到XML API,但绝大部分只使用最基本的API,其主要目的就是要能够通过简单的接口方便地调用。 不过由于崇尚简洁,许多包的文档变得过于简陋,缺乏维护和支持,甚至有一部分还有错误的链接,文档也少得可怜。大部分的包需要我们自己去找出其用法,甚至有时还需要我们自己去分析其适用场合。本文将逐一介绍这些包,希望能够帮助你迅速掌握这一积累了许多人心血的免费代码库。 说明:Jakarta Commons和Apache Commons是不同的,后者是Apache Software Foundation的一个顶层项目,前者则是Jakarta项目的一个子项目,同是也是本文要讨论的主角。本文后面凡是提到Commons的地方都是指Jakarta的Commons。 为了便于说明,本文把Commons项目十八个成品级的组件(排除了EL、Latka和Jexl)分成5类,如下表所示 ![]() commons分为3部分Commons Proper、Commons Sandbox和Commons Dormant Commons Proper:提供了设计良好可重用的java组件,并都经过了广泛、严格的测试。 Commons Sandbox:处于实验、测试阶段的组件。 Commons Dormant:处于停滞状态,从Sandbox退出的,不活跃的组件,谨慎使用。 Commons Proper组件: Codec——包含一些通用的编码解码算法。包括一些语音编码器, Hex, Base64, 以及URL encoder。 BeanUtils——提供对 Java 反射和自省API的包装,处理javabean的工具。 Betwixt——将JavaBeans与XML相互转换。 Digester——基于规则的XML文档解析,主要用于XML到Java对象的映射. Email——处理e-mail FileUpload——web应用中的文件上传组件 IO——帮助进行IO功能开发 JXPath——使用XPath语法操作javabean的工具。 Lang——提供对java.lang包的扩展 Chain——对Chain of Responsibility(责任链)设计模式的实现。使多个对象都有机会处理请求, 从而避免请求的发送者和接收者之间的耦合关系。将这些对象连成一条链,并沿着这条链传递请求,直到有一个对象处理它为止。 CLI——处理命令行的命令的解析。 Attributes—— 支持源代码级的元数据。 Collections——扩展和增加标准的 Java Collection框架。 Configuration——操作各种格式的配置文件。Properties文件 /XML文件 /JNDI /JDBC 数据源 /System properties /Applet parameters / Servlet parameters Daemon——创建类似unix守护线程的java代码,可以安全地执行一些后台操作,线程不被某个应用程序控制,而是由操作系统控制 类似windows的service,可以设置一个服务依赖于另一个服务,一个服务关闭前必须先执行另一个服务。 DBCP——一个数据库连接池 DbUtils——一个JDBC的工具类,比如可以将ResultSets生成javabean。 Discovery——提供工具来定位资源 (包括类) ,通过使用各种模式来映射服务/引用名称和资源名称。 EL——JSP 2.0引入的表达式 HttpClient——使用HTTP协议的客户端开发框架 Jelly——Jelly能够把XML转换成可执行代码,所以Jelly是一个基于XML与Java的脚本和处理引擎。 Jelly借鉴了JSP定指标签,Velocity, Cocoon和Xdoclet中的脚本引擎的许多优点。Jelly可以用在命令行,Ant或者Servlet之中。 Jexl——Jexl是一个表达式语言,通过借鉴来自于Velocity的经验扩展了JSTL定义的表达式语言。 Launcher——跨平台的java程序的启动 Logging——提供的是一个日志(Log)接口(interface),同时兼顾轻量级和不依赖于具体的日志实现工具。 它提供给中间件/日志工具开发者一个简单的日志操作抽象,允许程序开发人员使用不同的具体日志实现工具。用户被假定已熟悉某种日志实现工具的更高级别的细节。JCL提供的接口,对其它一些日志工具,包括Log4J, Avalon LogKit, and JDK 1.4等,进行了简单的包装,此接口更接近于Log4J和LogKit的实现. Math——Math 是一个轻量的,自包含的数学和统计组件,解决了许多非常通用但没有及时出现在Java标准语言中的实践问题. Modeler—— 支持兼容JMX规范的MBeans开发。 Net——集合了网络工具和协议工具的实现 Pool——Commons-Pool 提供了通用对象池接口,一个用于创建模块化对象池的工具包,以及通常的对象池实现。 Primitives——对java原始类型的支持。 SCXML——处理SCXML Transaction——事务处理,实现了多层次锁、事务集合、事务文件的访问。 Validator——提供了一个简单的,可扩展的框架来在一个XML文件中定义校验器 (校验方法)和校验规则。支持校验规则的和错误消息的国际化。 VFS——访问各种文件系统,可以是本地文件、HTTP服务器上的文件、zip中的文件。 Commons Sandbox组件: Compress——处理压缩文件如tar, zip 和 bzip2 格式。 CSV——处理CSV文件 Exec——安全地处理外部进程 Finder——实现类似UNIX find命令的功能 I18n——处理软件的I18n功能 Id——生成id号功能 Javaflow——捕捉程序运行状态 JCI——java编译接口 OpenPGP——处理加密方法OpenPGP. Pipeline——处理类似工作队列的管道工具 Proxy——生成动态代理 --------------------------------org.apache.commons.beanutils.PropertyUtils; copyProperties(a,b);//把相同类型b的属性赋值给a -------------------------------- 在org.apache.commons包中提供了的一系列能简化一些编程过程中常见问题的共通函数和类,使程序员能把主要精力集中在 构架,业务实现和优化而不是具体实现及验证上,一言以蔽之,它能使我们避免重复的发明车轮。 commons分为3部分Commons Proper、Commons Sandbox和Commons Dormant Commons Proper:提供了设计良好可重用的java组件,并都经过了广泛、严格的测试。 Commons Sandbox:处于实验、测试阶段的组件。 Commons Dormant:处于停滞状态,从Sandbox退出的,不活跃的组件,谨慎使用。 Commons Proper组件: Codec——包含一些通用的编码解码算法。包括一些语音编码器, Hex, Base64, 以及URL encoder。 BeanUtils——提供对 Java 反射和自省API的包装,处理javabean的工具。 Betwixt——将JavaBeans与XML相互转换。 Digester——基于规则的XML文档解析,主要用于XML到Java对象的映射. Email——处理e-mail FileUpload——web应用中的文件上传组件 IO——帮助进行IO功能开发 JXPath——使用XPath语法操作javabean的工具。 Lang——提供对java.lang包的扩展 Chain——对Chain of Responsibility(责任链)设计模式的实现。使多个对象都有机会处理请求, 从而避免请求的发送者和接收者之间的耦合关系。将这些对象连成一条链,并沿着这条链传递请求,直到有一个对象处理它为止。 CLI——处理命令行的命令的解析。 Attributes—— 支持源代码级的元数据。 Collections——扩展和增加标准的 Java Collection框架。 Configuration——操作各种格式的配置文件。Properties文件 /XML文件 /JNDI /JDBC 数据源 /System properties /Applet parameters / Servlet parameters Daemon——创建类似unix守护线程的java代码,可以安全地执行一些后台操作,线程不被某个应用程序控制,而是由操作系统控制 类似windows的service,可以设置一个服务依赖于另一个服务,一个服务关闭前必须先执行另一个服务。 DBCP——一个数据库连接池 DbUtils——一个JDBC的工具类,比如可以将ResultSets生成javabean。 Discovery——提供工具来定位资源 (包括类) ,通过使用各种模式来映射服务/引用名称和资源名称。 EL——JSP 2.0引入的表达式 HttpClient——使用HTTP协议的客户端开发框架 Jelly——Jelly能够把XML转换成可执行代码,所以Jelly是一个基于XML与Java的脚本和处理引擎。 Jelly借鉴了JSP定指标签,Velocity, Cocoon和Xdoclet中的脚本引擎的许多优点。Jelly可以用在命令行,Ant或者Servlet之中。 Jexl——Jexl是一个表达式语言,通过借鉴来自于Velocity的经验扩展了JSTL定义的表达式语言。 Launcher——跨平台的java程序的启动 Logging——提供的是一个日志(Log)接口(interface),同时兼顾轻量级和不依赖于具体的日志实现工具。 它提供给中间件/日志工具开发者一个简单的日志操作抽象,允许程序开发人员使用不同的具体日志实现工具。用户被假定已熟悉某种日志实现工具的更高级别的细节。JCL提供的接口,对其它一些日志工具,包括Log4J, Avalon LogKit, and JDK 1.4等,进行了简单的包装,此接口更接近于Log4J和LogKit的实现. Math——Math 是一个轻量的,自包含的数学和统计组件,解决了许多非常通用但没有及时出现在Java标准语言中的实践问题. Modeler—— 支持兼容JMX规范的MBeans开发。 Net——集合了网络工具和协议工具的实现 Pool——Commons-Pool 提供了通用对象池接口,一个用于创建模块化对象池的工具包,以及通常的对象池实现。 Primitives——对java原始类型的支持。 SCXML——处理SCXML Transaction——事务处理,实现了多层次锁、事务集合、事务文件的访问。 Validator——提供了一个简单的,可扩展的框架来在一个XML文件中定义校验器 (校验方法)和校验规则。支持校验规则的和错误消息的国际化。 VFS——访问各种文件系统,可以是本地文件、HTTP服务器上的文件、zip中的文件。 Commons Sandbox组件: Compress——处理压缩文件如tar, zip 和 bzip2 格式。 CSV——处理CSV文件 Exec——安全地处理外部进程 Finder——实现类似UNIX find命令的功能 I18n——处理软件的I18n功能 Id——生成id号功能 Javaflow——捕捉程序运行状态 JCI——java编译接口 OpenPGP——处理加密方法OpenPGP. Pipeline——处理类似工作队列的管道工具 Proxy——生成动态代理 --------------------------------org.apache.commons.beanutils.PropertyUtils; copyProperties(a,b);//把相同类型b的属性赋值给a -------------------------------- 在org.apache.commons包中提供了的一系列能简化一些编程过程中常见问题的共通函数和类,使程序员能把主要精力集中在 构架,业务实现和优化而不是具体实现及验证上,一言以蔽之,它能使我们避免重复的发明车轮。
http://www.2cto.com/os/201309/243840.html
http://www.cnblogs.com/xiaoerlang/p/3345236.html
http://steven-wiki.readthedocs.org/en/latest/security/cas-tomcat/ http://wenku.baidu.com/view/13a57761783e0912a2162a94.html restful: http://jasig.github.io/cas/4.0.0/protocol/REST-Protocol.html http://jasig.275507.n4.nabble.com/Setting-up-the-RESTlet-servlet-on-CAS-3-3-5-td2068602.html
http://blog.e-works.net.cn/626381/articles/526568.html http://www.oecp.cn/hi/wlo_o/blog/2160
http://packetlife.net/blog/2011/apr/11/extracting-packets-large-captures/
http://stackoverflow.com/questions/18833931/how-to-use-the-muleclient-request-for-async-amqp-rabbitmq-implementation-from-ja?rq=1
http://www.mulesoft.org/documentation/display/current/Using+Spring+Beans+as+Flow+Components
System.out.println("debug:"+Base64.class.getProtectionDomain().getCodeSource().getLocation());
设置默认时区。当然你可以这样检查一下: //--- System.out.println(TimeZone.getDefault()); // 输出当前默认时区 final TimeZone zone = TimeZone.getTimeZone("GMT+8"); // 获取中国时区 TimeZone.setDefault(zone); // 设置时区 System.out.println(TimeZone.getDefault()); // 输出验证 //--- 除了上面的解决方法外,还可以: 在 TOMCAT 的 JAVA 运行参数添加 -Duser.timezone=Asia/Shanghai 或者,如果有启动的定时器或首次执行的代码,可以使用语句 System.setProperty("user.timezone","Asia/Shanghai"); 来设置 但是为解决时区问题, 这样编码实在太烦, 所以你要知道如何从根本上解决问题: tomcat的catalina.sh:
JAVA_OPTS="$JAVA_OPTS -Duser.timezone=Asia/Shanghai"
http://virtuallyhyper.com/2013/05/configure-haproxy-to-load-balance-sites-with-ssl/
正常的网络连接中很少会出现多个包丢失的现象,每成功接收或转发100,000个数据包最多只会有几个包丢失(如图1)。在Linux虚拟机中,通过ifconfig命令可以很轻松地监控到这种状态。 
图1. 通常以太网卡是不会丢包的 当虚拟机的网络在突发大量访问的情况下,可能会发生多个包丢失,这样就需要调整虚拟机的网络设置。首先,确认虚拟机使用了VMXNET3虚拟网 卡驱动。这样,在Linux宿主机的特定情况下,当大数据文件在高带宽的网络上传输时会发生多数据包丢失。关闭接收和转发校验总和可以解决这种情况。因为 校验总和的作用是停止错误包的发送,这样做会增加风险。考虑到以太网卡的错误率通常低于百万分之一,风险的级别并不高。 使用Linux ethtool工具来关闭VMware网络设置中的接收和转发校验总和,在命令行窗口中以root账户登录ethtool。例如关闭网卡eth0的校验总 和命令如下:readethtool --offload eth0 rx off tx off; 命令生效后,打开相应网卡的配置文件: /etc/sysconfig/network/ifcfg-eth0 ( SUSE) 或 /etc/sysconfig/network-scripts/ifcfg-eth0 (Red Hat ) 同时把ETHTOOL_OPTIONS参数变为ETHTOOL_OPTIONS='--offload eth0 rx off tx off' 如果依然存在丢包问题,尝试用ethtool工具增加接收队列的缓冲区大小。默认情况下,缓存设为256,可以设置的最大值为4096。重新设置缓存大小为512,使用命令ethtool -G eth0 512。如果结果不理想,尝试更大的值。 遇到Windows虚拟机的高丢包率就需要调整VMXNET3驱动的网络设置。在Device Manager中右键单击VMXNET3驱动并选择Properties。在Advanced页中有两个参数:Small RX Buffers和RX Ring #1 Size。适当增加这些参数的值然后测试能否有改善。逐步加大该值直到问题解决。 多数情况下,这些设置可以降低虚拟机的丢包率。如果调整网络参数失败,或许就需要解决虚拟机其它的一些性能相关问题,而不是虚拟机和ESXi平 台之间的VMware网络设置。咨询宿主机OS 的相关专家,应该有很多可以调整性能的相关参数。当心更改了错误的参数可能会对虚拟机带来明显的负面影响。
http://code4app.net/category/cocos2d http://www.cocos2d-x.org/hub/all?category=5 http://blog.makeapp.co/
http://ricston.com/blog/mule-image-hosting-raml-mulerequester/
什么东西可以监控OpenStack呢?OpenStack对监控的需求起码有以下这些: - 不仅要能监控物理机,也能监控虚机
- 监控信息也必须是tenant隔离的
- 监控项的收集应该是自动地
- 监控工具应该一般化以监控任何设备
- 监控工具必须提供API
下面是监控工具的一般架构: 
网上搜索了一下,现在主流的监控工具有:Nagios, cacti, Zabbix, Muni, Zenoss。我不是做运维的对这些工具都不熟,以前不熟,现在也不熟。下面是一些理解,不一定准。 Nagios,最老牌了,比较通用的监控工具。特大的特点是报警。图形化功能一般般。一般要安装Agent,配置起来看网上的说法是比较复杂的,没用过,没实际发言权。 cacti,图形化功能不错,所以Nagios一般结合它来使用。 Zabbix,监控和图形化功能都还可以了,尤其有一本电子书 zabbix 1.8 network monitoring Zenoss, 监控新贵,它使用无Agent的通用技术如SNMP和SSL来监控,部署起来会比较方便。尤其是Zenoss公司有人现在也加入OpenStack社区了,专门开发了一个OpenStack特有的扩展( https://github.com/zenoss/ZenPacks.zenoss.OpenStack)不幸的是,目前只支持Nova API 1.1,且它只能收集单个tenant的数据,不利于rating和billing。 OpenStack Ceilometer工程主要监控的是tenant下虚机的数据,用来做billing的,物理机的监控支持不大好。 比较来比较去,如果是我,可能会做如下选型决定,不一定正确 : Nagios 或者 Zenoss (视情况) 下面内容来自:http://docs.openstack.org/developer/ceilometer/, 我们看一下Ceilometer工程的现状, 架构如下: 
运行OpenStack各组件的节点上一般有Agent来收集信息,收集后发给MQ,Ceilometer的Collector进程监控到数据之后存储到DB之中。从http://docs.openstack.org/developer/ceilometer/measurements.html 这页显示的监控项来看,目前Ceilometer监控来的数据主要来只是用来做billing的。 文章来源:http://blog.csdn.net/quqi99/article/details/9400747
文章作者:张华 http://blog.csdn.net/quqi99
使用truelicense实现用于JAVA工程license机制(包括license生成和验,有需要的朋友可以参考下。 开发的软件产品在交付使用的时候,往往会授权一段时间的试用期,这个时候license就派上用场了。不同于在代码中直接加上时间约束,需要重新授权的时候使用license可以避免修改源码,改动部署,授权方直接生成一个新的license发送给使用方替换掉原来的license文件即可。下面将讲述使用truelicense来实现license的生成和使用。Truelicense是一个开源的证书管理引擎,详细介绍见https://truelicense.java.net/ 一、首先介绍下license授权机制的原理: 1、 生成密钥对,方法有很多。 2、 授权者保留私钥,使用私钥对包含授权信息(如使用截止日期,MAC地址等)的license进行数字签名。 3、 公钥给使用者(放在验证的代码中使用),用于验证license是否符合使用条件。 接下来是本例制作license的具体步骤: 二、第一步:使用keytool生成密钥对 以下命令在dos命令行执行,注意当前执行目录,最后生成的密钥对即在该目录下: 1、首先要用KeyTool工具来生成私匙库:(-alias别名 –validity 3650表示10年有效) keytool -genkey -alias privatekey -keystoreprivateKeys.store -validity 3650 2、然后把私匙库内的公匙导出到一个文件当中: keytool -export -alias privatekey -file certfile.cer -keystore privateKeys.store 3、然后再把这个证书文件导入到公匙库: keytool -import -alias publiccert -file certfile.cer -keystore publicCerts.store 最后生成文件privateKeys.store、publicCerts.store拷贝出来备用。 三、第二步:生成证书(该部分代码由授权者独立保管执行) 1、 首先LicenseManagerHolder.java类: package cn.melina.license; import de.schlichtherle.license.LicenseManager; import de.schlichtherle.license.LicenseParam; /** * LicenseManager?????? * @author melina */ public class LicenseManagerHolder { private static LicenseManager licenseManager; public static synchronized LicenseManager getLicenseManager(LicenseParam licenseParams) { if (licenseManager == null) { licenseManager = new LicenseManager(licenseParams); } return licenseManager; } } 2、 然后是主要生成license的代码CreateLicense.java: package cn.melina.license; import java.io.File; import java.io.IOException; import java.io.InputStream; import java.text.DateFormat; import java.text.ParseException; import java.text.SimpleDateFormat; import java.util.Properties; import java.util.prefs.Preferences; import javax.security.auth.x500.X500Principal; import de.schlichtherle.license.CipherParam; import de.schlichtherle.license.DefaultCipherParam; import de.schlichtherle.license.DefaultKeyStoreParam; import de.schlichtherle.license.DefaultLicenseParam; import de.schlichtherle.license.KeyStoreParam; import de.schlichtherle.license.LicenseContent; import de.schlichtherle.license.LicenseParam; import de.schlichtherle.license.LicenseManager; /** * CreateLicense * @author melina */ public class CreateLicense { //common param private static String PRIVATEALIAS = ""; private static String KEYPWD = ""; private static String STOREPWD = ""; private static String SUBJECT = ""; private static String licPath = ""; private static String priPath = ""; //license content private static String issuedTime = ""; private static String notBefore = ""; private static String notAfter = ""; private static String consumerType = ""; private static int consumerAmount = 0; private static String info = ""; // 为了方便直接用的API里的例子 // X500Princal是一个证书文件的固有格式,详见API private final static X500Principal DEFAULTHOLDERANDISSUER = new X500Principal( "CN=Duke、OU=JavaSoft、O=Sun Microsystems、C=US"); public void setParam(String propertiesPath) { // 获取参数 Properties prop = new Properties(); InputStream in = getClass().getResourceAsStream(propertiesPath); try { prop.load(in); } catch (IOException e) { // TODO Auto-generated catch block e.printStackTrace(); } PRIVATEALIAS = prop.getProperty("PRIVATEALIAS"); KEYPWD = prop.getProperty("KEYPWD"); STOREPWD = prop.getProperty("STOREPWD"); SUBJECT = prop.getProperty("SUBJECT"); KEYPWD = prop.getProperty("KEYPWD"); licPath = prop.getProperty("licPath"); priPath = prop.getProperty("priPath"); //license content issuedTime = prop.getProperty("issuedTime"); notBefore = prop.getProperty("notBefore"); notAfter = prop.getProperty("notAfter"); consumerType = prop.getProperty("consumerType"); consumerAmount = Integer.valueOf(prop.getProperty("consumerAmount")); info = prop.getProperty("info"); } public boolean create() { try { /************** 证书发布者端执行 ******************/ LicenseManager licenseManager = LicenseManagerHolder .getLicenseManager(initLicenseParams0()); licenseManager.store((createLicenseContent()), new File(licPath)); } catch (Exception e) { e.printStackTrace(); System.out.println("客户端证书生成失败!"); return false; } System.out.println("服务器端生成证书成功!"); return true; } // 返回生成证书时需要的参数 private static LicenseParam initLicenseParams0() { Preferences preference = Preferences .userNodeForPackage(CreateLicense.class); // 设置对证书内容加密的对称密码 CipherParam cipherParam = new DefaultCipherParam(STOREPWD); // 参数1,2从哪个Class.getResource()获得密钥库;参数3密钥库的别名;参数4密钥库存储密码;参数5密钥库密码 KeyStoreParam privateStoreParam = new DefaultKeyStoreParam( CreateLicense.class, priPath, PRIVATEALIAS, STOREPWD, KEYPWD); LicenseParam licenseParams = new DefaultLicenseParam(SUBJECT, preference, privateStoreParam, cipherParam); return licenseParams; } // 从外部表单拿到证书的内容 public final static LicenseContent createLicenseContent() { DateFormat format = new SimpleDateFormat("yyyy-MM-dd"); LicenseContent content = null; content = new LicenseContent(); content.setSubject(SUBJECT); content.setHolder(DEFAULTHOLDERANDISSUER); content.setIssuer(DEFAULTHOLDERANDISSUER); try { content.setIssued(format.parse(issuedTime)); content.setNotBefore(format.parse(notBefore)); content.setNotAfter(format.parse(notAfter)); } catch (ParseException e) { // TODO Auto-generated catch block e.printStackTrace(); } content.setConsumerType(consumerType); content.setConsumerAmount(consumerAmount); content.setInfo(info); // 扩展 content.setExtra(new Object()); return content; } } 3、 测试程序licenseCreateTest.java: package cn.melina.license; import cn.melina.license.CreateLicense; public class licenseCreateTest { public static void main(String[] args){ CreateLicense cLicense = new CreateLicense(); //获取参数 cLicense.setParam("./param.properties"); //生成证书 cLicense.create(); } } 4、 生成时使用到的param.properties文件如下: ##########common parameters########### #alias PRIVATEALIAS=privatekey #key(该密码生成密钥对的密码,需要妥善保管,不能让使用者知道) KEYPWD=bigdata123456 #STOREPWD(该密码是在使用keytool生成密钥对时设置的密钥库的访问密码) STOREPWD=abc123456 #SUBJECT SUBJECT=bigdata #licPath licPath=bigdata.lic #priPath priPath=privateKeys.store ##########license content########### #issuedTime issuedTime=2014-04-01 #notBeforeTime notBefore=2014-04-01 #notAfterTime notAfter=2014-05-01 #consumerType consumerType=user #ConsumerAmount consumerAmount=1 #info info=this is a license 根据properties文件可以看出,这里只简单设置了使用时间的限制,当然可以自定义添加更多限制。该文件中表示授权者拥有私钥,并且知道生成密钥对的密码。并且设置license的内容。 四、第三步:验证证书(使用证书)(该部分代码结合需要授权的程序使用) 1、 首先LicenseManagerHolder.java类,同上。 2、 然后是主要验证license的代码VerifyLicense.java: package cn.melina.license; import java.io.File; import java.io.IOException; import java.io.InputStream; import java.util.Properties; import java.util.prefs.Preferences; import de.schlichtherle.license.CipherParam; import de.schlichtherle.license.DefaultCipherParam; import de.schlichtherle.license.DefaultKeyStoreParam; import de.schlichtherle.license.DefaultLicenseParam; import de.schlichtherle.license.KeyStoreParam; import de.schlichtherle.license.LicenseParam; import de.schlichtherle.license.LicenseManager; /** * VerifyLicense * @author melina */ public class VerifyLicense { //common param private static String PUBLICALIAS = ""; private static String STOREPWD = ""; private static String SUBJECT = ""; private static String licPath = ""; private static String pubPath = ""; public void setParam(String propertiesPath) { // 获取参数 Properties prop = new Properties(); InputStream in = getClass().getResourceAsStream(propertiesPath); try { prop.load(in); } catch (IOException e) { // TODO Auto-generated catch block e.printStackTrace(); } PUBLICALIAS = prop.getProperty("PUBLICALIAS"); STOREPWD = prop.getProperty("STOREPWD"); SUBJECT = prop.getProperty("SUBJECT"); licPath = prop.getProperty("licPath"); pubPath = prop.getProperty("pubPath"); } public boolean verify() { /************** 证书使用者端执行 ******************/ LicenseManager licenseManager = LicenseManagerHolder .getLicenseManager(initLicenseParams()); // 安装证书 try { licenseManager.install(new File(licPath)); System.out.println("客户端安装证书成功!"); } catch (Exception e) { e.printStackTrace(); System.out.println("客户端证书安装失败!"); return false; } // 验证证书 try { licenseManager.verify(); System.out.println("客户端验证证书成功!"); } catch (Exception e) { e.printStackTrace(); System.out.println("客户端证书验证失效!"); return false; } return true; } // 返回验证证书需要的参数 private static LicenseParam initLicenseParams() { Preferences preference = Preferences .userNodeForPackage(VerifyLicense.class); CipherParam cipherParam = new DefaultCipherParam(STOREPWD); KeyStoreParam privateStoreParam = new DefaultKeyStoreParam( VerifyLicense.class, pubPath, PUBLICALIAS, STOREPWD, null); LicenseParam licenseParams = new DefaultLicenseParam(SUBJECT, preference, privateStoreParam, cipherParam); return licenseParams; } } 3、 测试程序licenseVerifyTest.java: package cn.melina.license; public class licenseVerifyTest { public static void main(String[] args){ VerifyLicense vLicense = new VerifyLicense(); //获取参数 vLicense.setParam("./param.properties"); //验证证书 vLicense.verify(); } } 4、 验证时使用到的Properties文件如下: ##########common parameters########### #alias PUBLICALIAS=publiccert #STOREPWD(该密码是在使用keytool生成密钥对时设置的密钥库的访问密码) STOREPWD=abc123456 #SUBJECT SUBJECT=bigdata #licPath licPath=bigdata.lic #pubPath pubPath=publicCerts.store 根据该验证的properties可以看出,使用者只拥有公钥,没有私钥,并且也只知道访问密钥库的密码,而不能知道生成密钥对的密码。 五、说明: 注意实际操作中,公钥、私钥、证书等文件的存放路径。 以上代码需要用到truelicense的一些包,可以自行网上搜,也可以下载我的完整工程,里面附带了所需的jar包。 以上两个完整工程提供下载:http://download.csdn.net/detail/luckymelina/7141131 GOOD LUCK!小伙伴们加油!欢迎与我交流。
摘要: 之前做了一个web项目的时候,好好的网站第二天总是会提示using the Connector/J connection property 'autoReconnect=true' to avoid this problem. 这样的错误1com.mysql.jdbc.CommunicationsException: The last packet successfully recei... 阅读全文
/etc/rabbitmq.conf:
[ {rabbit, [{loopback_users, []}]} ].
http://outofmemory.cn/code-snippet/4079/java-usage-Xuggler-get-video-shichang-fen-bianlv-high-kuan-kind-information
Canvas里的 globalCompositeOperation是个很少用到的函数,不太熟悉程序绘图的同学们估计压根都不知道这玩意是干什么的. 简单来说, Composite(组合),就是对你在绘图中,后绘制的图形与先绘制的图形之间的组合显示效果,比如在国画中,你先画一笔红色,再来一笔绿色,相交的部分是一种混色,而在油画中,绿色就会覆盖掉相交部分的红色,这在程序绘图中的处理就是Composite,Canvas API中对应的函数就是globalCompositeOperation,跟globalAlpha一样,这个属性是全局的,所以在使用的时候要注意save和restore. 我在练习这个函数的时候,用的是chrome浏览器,但是测试结果却跟实际应该出现的结果不太一致,开始我以为是写错了,检查数遍却没有问题,疑惑之下换了各种浏览器来测试,真是囧啊,每个浏览器居然都不一样,连同核心的chrome和safari都不一样...下面是测试结果.  chrome chrome firefox firefox opera opera safari safari firefox官方网站给的实际效果图 firefox官方网站给的实际效果图下面是每一个选项的说明(我表达的可能不太明白,看图吧): source-over 默认,相交部分由后绘制图形的填充(颜色,渐变,纹理)覆盖,全部浏览器通过 source-in 只绘制相交部分,由后绘制图形的填充覆盖,其余部分透明,webkit两兄弟没有通过 source-out 只绘制后绘制图形不相交的部分,由后绘制图形的填充覆盖,其余部分透明,webkit两兄弟没有通过 source-atop 后绘制图形不相交的部分透明,相交部分由后绘制图形的填充覆盖,全部浏览器通过 destination-over 相交部分由先绘制图形的填充(颜色,渐变,纹理)覆盖,全部浏览器通过 destination-in 只绘制相交部分,由先绘制图形的填充覆盖,其余部分透明,webkit两兄弟没有通过 destination-out 只绘制先绘制图形不相交的部分,由先绘制图形的填充覆盖,其余部分透明,全部浏览器通过 destination-atop 先绘制图形不相交的部分透明,相交部分由先绘制图形的填充覆盖,webkit两兄弟没有通过 lighter 相交部分由根据先后图形填充来增加亮度,全部浏览器通过 darker 相交部分由根据先后图形填充来降低亮度,chrome通过,firefox官方说Firefox 3.6 / Thunderbird 3.1 / Fennec 1.0以后版本移除这个效果-0-,why?safari看似可以,但是无论你什么颜色,它都给填充成黑色,opera无效果 copy 只绘制后绘制图形,只有opera通过 xor 相交部分透明,全部浏览器通过 结果太令人无语了,特别是firefox那个新版本移除,我靠,为嘛啊?chrome和safari难兄难弟,成绩一塌糊涂,难道是webkit核心的问题?safari那个填充黑色很有IE6-中png透明问题的风范...opera表现很抢眼,只有一个效果未实现,继续努力! 评分及浏览器版本: Chrome dev 7.0.503.0 : 7/12 Firefox 3.6.6 : 10/12 Opera 10.53 : 11/12 Safari 4.0.3(531.9.1) : 6/12
Logging In to Guacamole You can access the web login screen for Guacamole from the server at http://127.0.0.1:8080/guacamole The default user is "guacadmin", with the default password of "guacadmin". You can change your password by editing your own user in the administration screen. With everything configured correctly you should be able to access the web login screen through Amahi at http://guacamole.yourhdaname.com:8080/guacamole/
Using HAProxy to make SSH and SSL available on the same port Certain places firewall TCP ports other than the most common ports. There are many techniques for bypassing such restrictions. One simple approach is to run a SSH daemon on port 443, however a downside of this is you need to dedicate an IP address to this SSH service. There is quite a neat technique for making SSH and SSL share a port; in the SSL protocol clients should write first, whereas in SSH the server should write first; therefore by waiting to see if the client writes data it is possible to make a guess as to if the client is an SSL client or a SSH client. I'm not the first person to think this up, Net::Proxy has a script called sslh and confusingly there is also a C implementation also called sslh. I recently switched my web server to use HAProxy to allow me some more flexiblity in how I configure things (especially now the development version has keepalive support). While reading the (incredibly detailed) documentation I noticed it should be able to do the sslh technique. Doing this needs the (currently) in development HAProxy 1.4 (support was added for content switching TCP as well as HTTP in this commit -- thanks to Cyril Bonté on the mailing list for confirming that). The configuration looks something like the following (global section omitted, you'll want to run it as a user other than root and chroot it if you actually use this). defaults timeout connect 5s timeout client 50s timeout server 20s
listen ssl :443 tcp-request inspect-delay 2s acl is_ssl req_ssl_ver 2:3.1 tcp-request content accept if is_ssl use_backend ssh if !is_ssl server www-ssl :444 timeout client 2h
backend ssh mode tcp server ssh :22 timeout server 2h
This listens on port 443, forwards it to port 444 (where the actual SSL web server is listening) unless it is not SSLv2, SSLv3 or TLSv1 traffic, in which case it forwards it to the ssh backend listening on port 22.
Obviously as I said earlier this is only a guess that is subject to network conditions such as packet loss. I'm not recommending you use this technique on a production site, but for a low traffic machine where you want to run both protocols it is very useful. (By increasing the timeout for SSH you increase the chances of a correct result, but also add a potentially annoying delay). Sometimes layer 7 filtering techniques are in use and just listening on port 443 is not enough. In this case you can use SSH inside SSL.
http://blog.sina.com.cn/s/blog_6b8fc5470101fi4b.html
dpkg-deb: error: subprocess paste was killed by signal (Broken pipe)
已解决: cd/var/lib/dpkg
sudo mv info info.bak
sudo mkdir info
# this config needs haproxy-1.1.28 or haproxy-1.2.1 global log 127.0.0.1 local0 log 127.0.0.1 local1 notice #log loghost local0 info maxconn 4096 tune.bufsize 20480 tune.maxrewrite 2048 #chroot /usr/share/haproxy user haproxy group haproxy daemon #debug #quiet defaults log global mode tcp option tcplog option dontlognull option tcp-smart-accept option tcp-smart-connect #option dontlog-normal retries 3 option redispatch timeout connect 1h timeout client 1h timeout server 1h maxconn 40000 option redispatch listen rabbitmq_cluster 0.0.0.0:5672 mode tcp maxconn 2000 balance roundrobin server rabbit1 172.20.21.1:5672 check inter 2000 rise 2 fall 3 server rabbit2 172.20.21.2:5672 check inter 2000 rise 2 fall 3 server rabbit3 172.20.21.3:5672 check inter 2000 rise 2 fall 3 listen mariadb_cluster bind 0.0.0.0:3306 mode tcp #option tcpka option mysql-check user haproxy #mysql.... root.mysql..... #balance leastconn #.... balance roundrobin server mysql1 172.20.21.1:3306 weight 1 check inter 1s rise 2 fall 2 server mysql2 172.20.21.2:3306 weight 1 check inter 1s rise 2 fall 2 server mysql3 172.20.21.3:3306 weight 1 check inter 1s rise 2 fall 2 listen ssdb_cluster 0.0.0.0:8888 mode tcp maxconn 2000 balance roundrobin server ssdb1 172.20.21.1:8888 check inter 2000 rise 2 fall 3 server ssdb2 172.20.21.2:8888 check inter 2000 rise 2 fall 3 listen 49 0.0.0.0:3389 mode tcp maxconn 2000 balance source option tcpka server 49 172.20.0.49:3389 check inter 2000 rise 2 fall 3 listen stats :1936 mode http stats enable stats hide-version stats realm Haproxy\ Statistics stats uri / stats auth admin:admin
https://github.com/foursquare/heapaudit
摘要: Install MariaDB Galera Cluster in Ubuntuby SECAGUY on 2 JULY 2013 · LEAVE A COMMENTI am going to show you on how to install MariaDB Cluster (with Galera) in Ubuntu Precis... 阅读全文
http://www.wangzhongyuan.com/archives/351.html
如何杀死僵尸进程呢? 一般僵尸进程很难直接kill掉,不过您可以kill僵尸爸爸。父进程死后,僵尸进程成为”孤儿进程”,过继给1号进程init,init始终会负责清理僵尸进程.它产生的所有僵尸进程也跟着消失。 ps -e -o ppid,stat | grep Z | cut -d” ” -f2 | xargs kill -9 或 kill -HUP `ps -A -ostat,ppid | grep -e ’^[Zz]‘ | awk ’{print $2}’` 当然您可以自己编写更好的shell脚本,欢迎与大家分享。 另外子进程死后,会发送SIGCHLD信号给父进程,父进程收到此信号后,执行waitpid()函数为子进程收尸。就是基于这样的原理:就算父进 程没有调用wait,内核也会向它发送SIGCHLD消息,而此时,尽管对它的默认处理是忽略,如果想响应这个消息,可以设置一个处理函数。
| | Druid | DBCP | C3P0 | JBoss | Weblogic | BonCP | | 数据库用户名称 | Username | Username | User | user-name | | | | 数据库密码 | Password | Password | Password | password | | | | 驱动名称 | DriverClassName | DriverClassName | DriverClass | driver-class | DriverName | | | JDBC连接串 | Url | Url | JdbcUrl | connection-url | Url | | | JDBC连接属性 | Properties | Properties | Properties | connection-property | Properties | | | 初始化大小 | InitialSize | InitialSize | InitialPoolSize | | Initial Capacity | | | 连接池最小空闲 | MinIdle | MinIdle | MinPoolSize | min-pool-size | | | | 连接池最大空闲 | MaxIdle | MaxIdle | MaxPoolSize | max-pool-size | | | | 连接池最大使用连接数量 | MaxActive | MaxActive | | | MaximumCapacity | | | 最小逐出时间 | MinEvictableIdleTimeMillis | MinEvictableIdleTimeMillis | | | | | | 最多等待线程 | MaxWaitThreadCount | MaxWaitThreadCount | | | HighestNumWaiters | | | 连接池增长步长 | | | AcquireIncrement | | CapacityIncrement | | | 获取连接时测试是否有效 | TestOnBorrow | TestOnBorrow | TestConnectionOnCheckout | | | | | 归还连接时是否测试有效 | TestOnReturn | TestOnReturn | TestConnectionOnCheckin | | TestConnectionsOnReserve | | | 测试有效用的SQL Query | ValidationQuery | ValidationQuery | PreferredTestQuery | | | | | 测试有效的超时时间 | ValidationQueryTimeout | ValidationQueryTimeout | | | | | | 连接初始化SQL | ConnectionInitSqls | ConnectionInitSqls | | | InitSQL | | | 连接最大存活实现 | | | MaxConnectionAge | | | | | 连接泄漏的超时时间 | RemoveAbandonedTimeout | RemoveAbandonedTimeout | UnreturnedConnectionTimeout | | | | | 关闭泄漏的连接时打印堆栈信息 | LogAbandoned | LogAbandoned | DebugUnreturnedConnectionStackTraces | | | | | 逐出连接的检测时间间隔 | TimeBetweenEvictionRunsMillis | TimeBetweenEvictionRunsMillis | | | ShrinkFrequencySeconds | | | Statement缓存算法 | | | | | StatementCacheType | | | Statement缓存大小 | | | | | StatementCacheSize | | | | | | | | TestTableName | | | | | | | | SecondsToTrustAnIdlePoolConnection | | | | | | | | ConnectionCreationRetryFrequencySeconds | | | | | | | | LoginDelaySeconds | | | | | | | | Profile Connection Usage | | | | | | | | Profile Connection Reservation Wait | | | | | | | | Profile Connection Leak | | | | | | | | Profile Connection Reservation Failed | | | | | | | | Profile Statement Cache Entry | | | | | | | | Profile Statement Usage | | | | | | | | Profile Connection Last Usage | | | | | | | | Profile Connection Multithreaded Usage | | | | | | | | Profile Harvest Frequency Seconds | | | 连接池扩展 | Filters | | | | DriverInterceptor | | | | | | | | CredentialMappingEnabled | | | | | | | | InactiveConnectionTimeoutSeconds | | | | | | | | ConnectionReserveTimeoutSeconds | | | | QueryTimeout | | | | StatementTimeout | | | 连接池关闭时对正在使用连接的处理方式 | | | | | IgnoreInUseConnectionsEnabled | | | 把连接放到ThreadLocal中 | | | | | PinnedToThread | | | 关闭“赃”连接(调用过getVendorConnection方法) | | | | | RemoveInfectedConnections | |
现在网站发展的趋势对网络负载均衡的使用是随着网站规模的提升根据不同的阶段来使用不同的技术: 一种是通过硬件来进行进行,常见的硬件有比较昂贵的NetScaler、F5、Radware和Array等商用的负载均衡器,它的优点就是有专业的维护团队来对这些服务进行维护、缺点就是花销太大,所以对于规模较小的网络服务来说暂时还没有需要使用;另外一种就是类似于LVS/HAProxy、Nginx的基于Linux的开源免费的负载均衡软件策略,这些都是通过软件级别来实现,所以费用非常低廉,所以我个也比较推荐大家采用第二种方案来实施自己网站的负载均衡需求。 近期朋友刘鑫(紫雨荷雪)的项目成功上线了,PV达到了亿级/日的访问量,最前端用的是HAProxy+Keepalived双机作的负载均衡器 /反向代理,整个网站非常稳定;这让我更坚定了以前跟老男孩前辈聊的关于网站架构比较合理设计的架构方案:即Nginx /HAProxy+Keepalived作Web最前端的负载均衡器,后端的MySQL数据库架构采用一主多从,读写分离的方式,采用LVS+Keepalived的方式。 在这里我也有一点要跟大家申明下:很多朋友担心软件级别的负载均衡在高并发流量冲击下的稳定情况,事实是我们通过成功上线的许多网站发现,它们的稳 定性也是非常好的,宕机的可能性微乎其微,所以我现在做的项目,基本上没考虑服务级别的高可用了。相信大家对这些软件级别的负载均衡软件都已经有了很深的 的认识,下面我就它们的特点和适用场合分别说明下。 LVS:使用集群技术和Linux操作系统实现一个高性能、高可用的服务器,它具有很好的可伸缩性(Scalability)、可靠性(Reliability)和可管理性(Manageability),感谢章文嵩博士为我们提供如此强大实用的开源软件。 LVS的特点是:
- 抗负载能力强、是工作在网络4层之上仅作分发之用,没有流量的产生,这个特点也决定了它在负载均衡软件里的性能最强的;
- 配置性比较低,这是一个缺点也是一个优点,因为没有可太多配置的东西,所以并不需要太多接触,大大减少了人为出错的几率;
- 工作稳定,自身有完整的双机热备方案,如LVS+Keepalived和LVS+Heartbeat,不过我们在项目实施中用得最多的还是LVS/DR+Keepalived;
- 无流量,保证了均衡器IO的性能不会收到大流量的影响;
- 应用范围比较广,可以对所有应用做负载均衡;
- 软件本身不支持正则处理,不能做动静分离,这个就比较遗憾了;其实现在许多网站在这方面都有较强的需求,这个是Nginx/HAProxy+Keepalived的优势所在。
- 如果是网站应用比较庞大的话,实施LVS/DR+Keepalived起来就比较复杂了,特别后面有Windows Server应用的机器的话,如果实施及配置还有维护过程就比较复杂了,相对而言,Nginx/HAProxy+Keepalived就简单多了。站长教学网 eduyo.com
Nginx的特点是:
- 工作在网络的7层之上,可以针对http应用做一些分流的策略,比如针对域名、目录结构,它的正则规则比HAProxy更为强大和灵活,这也是许多朋友喜欢它的原因之一;
- Nginx对网络的依赖非常小,理论上能ping通就就能进行负载功能,这个也是它的优势所在;
- Nginx安装和配置比较简单,测试起来比较方便;
- 也可以承担高的负载压力且稳定,一般能支撑超过几万次的并发量;
- Nginx可以通过端口检测到服务器内部的故障,比如根据服务器处理网页返回的状态码、超时等等,并且会把返回错误的请求重新提交到另一个节点,不过其中缺点就是不支持url来检测;
- Nginx仅能支持http和Email,这样就在适用范围上面小很多,这个它的弱势;
- Nginx不仅仅是一款优秀的负载均衡器/反向代理软件,它同时也是功能强大的Web应用服务器。LNMP现在也是非常流行的web架构,大有和以前最流行的LAMP架构分庭抗争之势,在高流量的环境中也有很好的效果。
- Nginx现在作为Web反向加速缓存越来越成熟了,很多朋友都已在生产环境下投入生产了,而且反映效果不错,速度比传统的Squid服务器更快,有兴趣的朋友可以考虑用其作为反向代理加速器。
HAProxy的特点是:
- HAProxy是支持虚拟主机的,以前有朋友说这个不支持虚拟主机,我这里特此更正一下。
- 能够补充Nginx的一些缺点比如Session的保持,Cookie的引导等工作
- 支持url检测后端的服务器出问题的检测会有很好的帮助。
- 它跟LVS一样,本身仅仅就只是一款负载均衡软件;单纯从效率上来讲HAProxy更会比Nginx有更出色的负载均衡速度,在并发处理上也是优于Nginx的。
- HAProxy可以对Mysql读进行负载均衡,对后端的MySQL节点进行检测和负载均衡,不过在后端的MySQL slaves数量超过10台时性能不如LVS,所以我向大家推荐LVS+Keepalived。
- HAProxy的算法现在也越来越多了,具体有如下8种:
① roundrobin,表示简单的轮询,这个不多说,这个是负载均衡基本都具备的;
② static-rr,表示根据权重,建议关注;
③ leastconn,表示最少连接者先处理,建议关注;
④ source,表示根据请求源IP,这个跟Nginx的IP_hash机制类似,我们用其作为解决session问题的一种方法,建议关注;
⑤ ri,表示根据请求的URI;
⑥ rl_param,表示根据请求的URl参数'balance url_param' requires an URL parameter name;
⑦ hdr(name),表示根据HTTP请求头来锁定每一次HTTP请求;
⑧ rdp-cookie(name),表示根据据cookie(name)来锁定并哈希每一次TCP请求。
Nginx和LVS作对比的结果 1、Nginx工作在网络的7层,所以它可以针对http应用本身来做分流策略,比如针对域名、目录结构等,相比之下LVS并不具备这样的功能,所 以 Nginx单凭这点可利用的场合就远多于LVS了;但Nginx有用的这些功能使其可调整度要高于LVS,所以经常要去触碰触碰,由LVS的第2条优点 看,触碰多了,人为出问题的几率也就会大。
2、Nginx对网络的依赖较小,理论上只要ping得通,网页访问正常,Nginx就能连得通,Nginx同时还能区分内外网,如果是同时拥有内外网的 节点,就相当于单机拥有了备份线路;LVS就比较依赖于网络环境,目前来看服务器在同一网段内并且LVS使用direct方式分流,效果较能得到保证。另 外注意,LVS需要向托管商至少申请多一个ip来做Visual IP,貌似是不能用本身的IP来做VIP的。要做好LVS管理员,确实得跟进学习很多有关网络通信方面的知识,就不再是一个HTTP那么简单了。站长教学网 eduyo.com
3、Nginx安装和配置比较简单,测试起来也很方便,因为它基本能把错误用日志打印出来。LVS的安装和配置、测试就要花比较长的时间了,因为同上所述,LVS对网络依赖比较大,很多时候不能配置成功都是因为网络问题而不是配置问题,出了问题要解决也相应的会麻烦得多。
4、Nginx也同样能承受很高负载且稳定,但负载度和稳定度差LVS还有几个等级:Nginx处理所有流量所以受限于机器IO和配置;本身的bug也还是难以避免的;Nginx没有现成的双机热备方案,所以跑在单机上还是风险较大,单机上的事情全都很难说。
5、Nginx可以检测到服务器内部的故障,比如根据服务器处理网页返回的状态码、超时等等,并且会把返回错误的请求重新提交到另一个节点。目前LVS中 ldirectd也能支持针对服务器内部的情况来监控,但LVS的原理使其不能重发请求。重发请求这点,譬如用户正在上传一个文件,而处理该上传的节点刚 好在上传过程中出现故障,Nginx会把上传切到另一台服务器重新处理,而LVS就直接断掉了,如果是上传一个很大的文件或者很重要的文件的话,用户可能 会因此而恼火。
6、Nginx对请求的异步处理可以帮助节点服务器减轻负载,假如使用apache直接对外服务,那么出现很多的窄带链接时apache服务器将会占用大 量内存而不能释放,使用多一个Nginx做apache代理的话,这些窄带链接会被Nginx挡住,apache上就不会堆积过多的请求,这样就减少了相 当多的内存占用。这点使用squid也有相同的作用,即使squid本身配置为不缓存,对apache还是有很大帮助的。LVS没有这些功能,也就无法能 比较。
7、Nginx能支持http和email(email的功能估计比较少人用),LVS所支持的应用在这点上会比Nginx更多。在使用上,一般最前端所 采取的策略应是LVS,也就是DNS的指向应为LVS均衡器,LVS的优点令它非常适合做这个任务。重要的ip地址,最好交由LVS托管,比如数据库的 ip、webservice服务器的ip等等,这些ip地址随着时间推移,使用面会越来越大,如果更换ip则故障会接踵而至。所以将这些重要ip交给 LVS托管是最为稳妥的,这样做的唯一缺点是需要的VIP数量会比较多。Nginx可作为LVS节点机器使用,一是可以利用Nginx的功能,二是可以利 用Nginx的性能。当然这一层面也可以直接使用squid,squid的功能方面就比Nginx弱不少了,性能上也有所逊色于Nginx。Nginx也 可作为中层代理使用,这一层面Nginx基本上无对手,唯一可以撼动Nginx的就只有lighttpd了,不过lighttpd目前还没有能做到 Nginx完全的功能,配置也不那么清晰易读。另外,中层代理的IP也是重要的,所以中层代理也拥有一个VIP和LVS是最完美的方案了。具体的应用还得 具体分析,如果是比较小的网站(日PV<1000万),用Nginx就完全可以了,如果机器也不少,可以用DNS轮询,LVS所耗费的机器还是比较 多的;大型网站或者重要的服务,机器不发愁的时候,要多多考虑利用LVS
roundrobin Each server is used in turns, according to their weights.
This is the smoothest and fairest algorithm when the server's
processing time remains equally distributed. This algorithm
is dynamic, which means that server weights may be adjusted
on the fly for slow starts for instance. It is limited by
design to 4128 active servers per backend. Note that in some
large farms, when a server becomes up after having been down
for a very short time, it may sometimes take a few hundreds
requests for it to be re-integrated into the farm and start
receiving traffic. This is normal, though very rare. It is
indicated here in case you would have the chance to observe
it, so that you don't worry.
roundrobin:每个server根据权重依次被轮询, 这个算法是动态的,意味着 server的权重可以实时地被调整。对于每个haproxy的backend servers的数目 而言被限制在4128个活跃数目之内。 static-rr Each server is used in turns, according to their weights. This algorithm is as similar to roundrobin except that it is static, which means that changing a server's weight on the fly will have no effect. On the other hand, it has no design limitation on the number of servers, and when a server goes up, it is always immediately reintroduced into the farm, once the full map is recomputed. It also uses slightly less CPU to run (around -1%). 静态roundrobin(static-rr):跟roundrobin类似,唯一的区别是不可以动态实时 server权重和backend 的server数目没有上限。 leastconn The server with the lowest number of connections receives the connection. Round-robin is performed within groups of servers of the same load to ensure that all servers will be used. Use of this algorithm is recommended where very long sessions are expected, such as LDAP, SQL, TSE, etc... but is not very well suited for protocols using short sessions such as HTTP. This algorithm is dynamic, which means that server weights may be adjusted on the fly for slow starts for instance. 最小连接数目负载均衡策略(leastconn):round-robin适合于各个server负载相同的情况。 最小连接数目算法适合于长时间会话,如LDAP,SQL,TSE,但是并不适合于HTTP短连接的协议。 source The source IP address is hashed and divided by the total weight of the running servers to designate which server will receive the request. This ensures that the same client IP address will always reach the same server as long as no server goes down or up. If the hash result changes due to the number of running servers changing, many clients will be directed to a different server. This algorithm is generally used in TCP mode where no cookie may be inserted. It may also be used on the Internet to provide a best-effort stickiness to clients which refuse session cookies. This algorithm is static by default, which means that changing a server's weight on the fly will have no effect, but this can be changed using "hash-type". 源IP hash散列调度:将源ip地址进行hash,再根据hasn求模或者一致性hash定位到 hash表中的server上。相同的ip地址的请求被分发到同一个server上。但当server的数量变化时, 来自于同一client的请求可能会被分发到不同的server上。这个算法通常用在没有cookie的tcp模式下。 uri The left part of the URI (before the question mark) is hashed and divided by the total weight of the running servers. The result designates which server will receive the request. This ensures that a same URI will always be directed to the same server as long as no server goes up or down. This is used with proxy caches and anti-virus proxies in order to maximize the cache hit rate. Note that this algorithm may only be used in an HTTP backend. This algorithm is static by default, which means that changing a server's weight on the fly will have no effect, but this can be changed using "hash-type". This algorithm support two optional parameters "len" and "depth", both followed by a positive integer number. These options may be helpful when it is needed to balance servers based on the beginning of the URI only. The "len" parameter indicates that the algorithm should only consider that many characters at the beginning of the URI to compute the hash. Note that having "len" set to 1 rarely makes sense since most URIs start with a leading "/". The "depth" parameter indicates the maximum directory depth to be used to compute the hash. One level is counted for each slash in the request. If both parameters are specified, the evaluation stops when either is reached. url_param The URL parameter specified in argument will be looked up in the query string of each HTTP GET request. If the modifier "check_post" is used, then an HTTP POST request entity will be searched for the parameter argument, when it is not found in a query string after a question mark ('?') in the URL. Optionally, specify a number of octets to wait for before attempting to search the message body. If the entity can not be searched, then round robin is used for each request. For instance, if your clients always send the LB parameter in the first 128 bytes, then specify that. The default is 48. The entity data will not be scanned until the required number of octets have arrived at the gateway, this is the minimum of: (default/max_wait, Content-Length or first chunk length). If Content-Length is missing or zero, it does not need to wait for more data than the client promised to send. When Content-Length is present and larger than <max_wait>, then waiting is limited to <max_wait> and it is assumed that this will be enough data to search for the presence of the parameter. In the unlikely event that Transfer-Encoding: chunked is used, only the first chunk is scanned. Parameter values separated by a chunk boundary, may be randomly balanced if at all. If the parameter is found followed by an equal sign ('=') and a value, then the value is hashed and divided by the total weight of the running servers. The result designates which server will receive the request. This is used to track user identifiers in requests and ensure that a same user ID will always be sent to the same server as long as no server goes up or down. If no value is found or if the parameter is not found, then a round robin algorithm is applied. Note that this algorithm may only be used in an HTTP backend. This algorithm is static by default, which means that changing a server's weight on the fly will have no effect, but this can be changed using "hash-type". hdr(name) The HTTP header <name> will be looked up in each HTTP request. Just as with the equivalent ACL 'hdr()' function, the header name in parenthesis is not case sensitive. If the header is absent or if it does not contain any value, the roundrobin algorithm is applied instead. An optional 'use_domain_only' parameter is available, for reducing the hash algorithm to the main domain part with some specific headers such as 'Host'. For instance, in the Host value " haproxy.1wt.eu ", only "1wt" will be considered. This algorithm is static by default, which means that changing a server's weight on the fly will have no effect, but this can be changed using "hash-type". rdp-cookie rdp-cookie(name) The RDP cookie <name> (or "mstshash" if omitted) will be looked up and hashed for each incoming TCP request. Just as with the equivalent ACL 'req_rdp_cookie()' function, the name is not case-sensitive. This mechanism is useful as a degraded persistence mode, as it makes it possible to always send the same user (or the same session ID) to the same server. If the cookie is not found, the normal roundrobin algorithm is used instead. Note that for this to work, the frontend must ensure that an RDP cookie is already present in the request buffer. For this you must use 'tcp-request content accept' rule combined with a 'req_rdp_cookie_cnt' ACL. This algorithm is static by default, which means that changing a server's weight on the fly will have no effect, but this can be changed us
1.安装mariadb on ubuntu http://blog.secaserver.com/2013/07/install-mariadb-galera-cluster-ubuntu/ 3 在服务器上用mysql -h 192.168.0.1 -u root -p mysql命令登录mysql数据库 然后用grant命令下放权限。 GRANT ALL PRIVILEGES ON *.* TO root@localhost IDENTIFIED BY 'root-password' WITH GRANT OPTION; GRANT ALL PRIVILEGES ON *.* TO root@127.0.0.1 IDENTIFIED BY 'root-password' WITH GRANT OPTION; GRANT ALL PRIVILEGES ON *.* TO root@'%' IDENTIFIED BY 'root-password' WITH GRANT OPTION; 例如: GRANT ALL PRIVILEGES ON *.* TO root@'%' identified by '123456' 注意:自己根据情况修改以上命令中的 “用户”“ip地址”“密码”。 2 安装和配置haproxy option mysql-check [ user <username> ]
USE mysql; INSERT INTO user (Host,User) values ('<ip_of_haproxy>','<username>'); FLUSH PRIVILEGESheck
only consists in parsing the Mysql Handshake Initialisation packet or Error packet, we don't send anything in this mode. It was reported that it can generate lockout if check is too frequent and/or if there is not enough traffic. In fact, you need in this case to check MySQL "max_connect_errors" value as if a connection is established successfully within fewer than MySQL "max_connect_errors" attempts after a previous connection was interrupted, the error count for the host is cleared to zero. If HAProxy's server get blocked, the "FLUSH HOSTS" statement is the only way to unblock it.
配置:
# this config needs haproxy-1.1.28 or haproxy-1.2.1 global
log 127.0.0.1
local0 info
#日志相关
log 127.0.0.1
local1 notice
maxconn 4096
daemon
#debug
#quiet defaults
log global mode http #option httplog option dontlognull retries 3 option redispatch maxconn 2000 contimeout 5000 clitimeout 50000 srvtimeout 50000 listen mysql bind 0.0.0.0:3333 #代理端口 mode tcp #模式 TCP option mysql-check user haproxy #mysql健康检查 root为mysql登录用户名 balance roundrobin #调度算法 server mysql1 172.20.21.1:3306 weight 1 check inter 1s rise 2 fall 2 server mysql2 172.20.21.2:3306 weight 1 check inter 1s rise 2 fall 2 server mysql3 172.20.21.3:3306 weight 1 check inter 1s rise 2 fall 2 listen stats :1936 mode http stats enable stats hide-version stats realm Haproxy\ Statistics stats uri / stats auth admin:admin
如何安裝RabbitMQ Cluster 建立測試環境與測試系統總是最花時間的,趁著今天重新安裝一組RabbitMQ 的測試環境,把所有的步驟和順序都整理起來吧。 安裝RabbitMQ Our APT repository To use our APT repository: - Add the following line to your /etc/apt/sources.list:
deb http://www.rabbitmq.com/debian/ testing main (Please note that the word testing in this line refers to the state of our release of RabbitMQ, not any particular Debian distribution. You can use it with Debian stable, testing or unstable, as well as with Ubuntu. We describe the release as "testing" to emphasise that we release somewhat frequently.) - (optional) To avoid warnings about unsigned packages, add our public key to your trusted key list using apt-key(8):
wget http://www.rabbitmq.com/rabbitmq-signing-key-public.asc sudo apt-key add rabbitmq-signing-key-public.asc - Run apt-get update.
- Install packages as usual; for instance,
sudo apt-get install rabbitmq-server
設定Cluster 最簡易的方法就是先啟動,cluster master node產生 /var/lib/rabbitmq/.erlang.cookie 這份文件,然後再把這份文件copy 到 每一個cluster node鄉對應的目錄下面去,接下來就參考RabbitMQ - create cluster這份文件,範例事先建立3台的cluster。 1. 啟動每台rabbitMQ # rabbit1$ rabbitmq-server -detached
# rabbit2$ rabbitmq-server -detached
# rabbit3$ rabbitmq-server -detached
2. 確認每一台rabbitmq 是否是standalone狀態 # rabbit1$ rabbitmqctl cluster_status
Cluster status of node rabbit@rabbit1 ...
[{nodes,[{disc,[rabbit@rabbit1]}]},{running_nodes,[rabbit@rabbit1]}]
...done.
# rabbit2$ rabbitmqctl cluster_status
Cluster status of node rabbit@rabbit2 ...
[{nodes,[{disc,[rabbit@rabbit2]}]},{running_nodes,[rabbit@rabbit2]}]
...done.
# rabbit3$ rabbitmqctl cluster_status
Cluster status of node rabbit@rabbit3 ...
[{nodes,[{disc,[rabbit@rabbit3]}]},{running_nodes,[rabbit@rabbit3]}]
...done. 3. 依序加入cluster rabbit2$ rabbitmqctl stop_app
Stopping node rabbit@rabbit2 ...done.
rabbit2$ rabbitmqctl reset
Resetting node rabbit@rabbit2 ...done.
rabbit2$ rabbitmqctl cluster rabbit@rabbit1
Clustering node rabbit@rabbit2 with [rabbit@rabbit1] ...done.
rabbit2$ rabbitmqctl start_app
Starting node rabbit@rabbit2 ...done. 4. 確認cluster status是否正確加入 rabbit1$ rabbitmqctl cluster_status
Cluster status of node rabbit@rabbit1 ...
[{nodes,[{disc,[rabbit@rabbit1]},{ram,[rabbit@rabbit2]}]},
{running_nodes,[rabbit@rabbit2,rabbit@rabbit1]}]
...done.
rabbit2$ rabbitmqctl cluster_status
Cluster status of node rabbit@rabbit2 ...
[{nodes,[{disc,[rabbit@rabbit1]},{ram,[rabbit@rabbit2]}]},
{running_nodes,[rabbit@rabbit1,rabbit@rabbit2]}]
...done.
設定Web Management Plugin 參考 rabbitmq - Management Plugin,重點是要在Cluster node的每一台都要安裝這個plugin # rabbitmq-plugins enable rabbitmq_management 安裝好以後,要記得重啟服務 # service rabbitmq-server restart 設定好就可以連到http://server-name:55672/#/ 看看web 介面有沒有起來,預設的帳號密碼都是guest,如果是內部測試那還沒關係,如果是要連到外面,一定記得要改帳號密碼和permission。 設定帳號 最後我們可以設定一個vhost 以及這個vhost的帳號密碼和權限 #rabbitmqctl add_vhost /demo
#rabbitmqctl add_user demo mypass
#rabbitmqctl set_permissions -p /demo demo ".*" ".*" ".*"
启动HAProxy
/etc/default/haproxy # Set ENABLED to 1 if you want the init script to start haproxy.
ENABLED=1 启动日志 /etc/rsyslog.d 添加文件haproxy.conf: $ModLoad imudp
$UDPServerRun 514
local0.* -/var/log/haproxy-0.log
local1.* -/var/log/haproxy-1.log
HAProxy配置
# this config needs haproxy-1.1.28 or haproxy-1.2.1
global
log 127.0.0.1 local0
log 127.0.0.1 local1 notice
#log loghost local0 info
maxconn 4096
#chroot /usr/share/haproxy
user haproxy
group haproxy
daemon
#debug
#quiet
defaults
log global
mode tcp
option tcplog
option dontlognull
retries 3
option redispatch
maxconn 2000
contimeout 5000
clitimeout 50000
srvtimeout 50000
listen rabbitmq_cluster 0.0.0.0:5678
mode tcp
balance roundrobin
server rabbit65 192.168.1.200:5672 check inter 2000 rise 2 fall 3
server rabbit66 192.168.1.201:5672 check inter 2000 rise 2 fall 3
listen stats :1936
mode http
stats enable
stats hide-version
stats realm Haproxy\ Statistics
stats uri /
stats auth admin:admin
Linux下高并发socket最大连接数所受的限制问题 1、修改用户进程可打开文件数限制 在Linux平台上,无论编写客户端程序还是服务端程序,在进行高并发TCP连接处理时,最高的并发数量都要受到系统对用户单一进程同时可打开文件数量的限制(这是因为系统为每个TCP连接都要创建一个socket句柄,每个socket句柄同时也是一个文件句柄)。可使用ulimit命令查看系统允许当前用户进程打开的文件数限制: [speng@as4 ~]$ ulimit -n 1024 这表示当前用户的每个进程最多允许同时打开1024个文件,这1024个文件中还得除去每个进程必然打开的标准输入,标准输出,标准错误,服务器监听 socket,进程间通讯的unix域socket等文件,那么剩下的可用于客户端socket连接的文件数就只有大概1024-10=1014个左右。也就是说缺省情况下,基于Linux的通讯程序最多允许同时1014个TCP并发连接。 对于想支持更高数量的TCP并发连接的通讯处理程序,就必须修改Linux对当前用户的进程同时打开的文件数量的软限制(soft limit)和硬限制(hardlimit)。其中软限制是指Linux在当前系统能够承受的范围内进一步限制用户同时打开的文件数;硬限制则是根据系统硬件资源状况(主要是系统内存)计算出来的系统最多可同时打开的文件数量。通常软限制小于或等于硬限制。 修改上述限制的最简单的办法就是使用ulimit命令: [speng@as4 ~]$ ulimit -n 上述命令中,在中指定要设置的单一进程允许打开的最大文件数。如果系统回显类似于"Operation notpermitted"之类的话,说明上述限制修改失败,实际上是因为在中指定的数值超过了Linux系统对该用户打开文件数的软限制或硬限制。因此,就需要修改Linux系统对用户的关于打开文件数的软限制和硬限制。 第一步,修改/etc/security/limits.conf文件,在文件中添加如下行: speng soft nofile 10240 speng hard nofile 10240 其中speng指定了要修改哪个用户的打开文件数限制,可用'*'号表示修改所有用户的限制; soft或hard指定要修改软限制还是硬限制;10240则指定了想要修改的新的限制值,即最大打开文件数(请注意软限制值要小于或等于硬限制)。修改完后保存文件。 第二步,修改/etc/pam.d/login文件,在文件中添加如下行: session required /lib/security/pam_limits.so 这是告诉Linux在用户完成系统登录后,应该调用pam_limits.so模块来设置系统对该用户可使用的各种资源数量的最大限制(包括用户可打开的最大文件数限制),而pam_limits.so模块就会从/etc/security/limits.conf文件中读取配置来设置这些限制值。修改完后保存此文件。 第三步,查看Linux系统级的最大打开文件数限制,使用如下命令: [speng@as4 ~]$ cat /proc/sys/fs/file-max 12158 这表明这台Linux系统最多允许同时打开(即包含所有用户打开文件数总和)12158个文件,是Linux系统级硬限制,所有用户级的打开文件数限制都不应超过这个数值。通常这个系统级硬限制是Linux系统在启动时根据系统硬件资源状况计算出来的最佳的最大同时打开文件数限制,如果没有特殊需要,不应该修改此限制,除非想为用户级打开文件数限制设置超过此限制的值。 修改此硬限制的方法是修改/etc/rc.local脚本,在脚本中添加如下行: echo 22158 > /proc/sys/fs/file-max 这是让Linux在启动完成后强行将系统级打开文件数硬限制设置为22158.修改完后保存此文件。 完成上述步骤后重启系统,一般情况下就可以将Linux系统对指定用户的单一进程允许同时打开的最大文件数限制设为指定的数值。如果重启后用 ulimit-n命令查看用户可打开文件数限制仍然低于上述步骤中设置的最大值,这可能是因为在用户登录脚本/etc/profile中使用ulimit -n命令已经将用户可同时打开的文件数做了限制。由于通过ulimit-n修改系统对用户可同时打开文件的最大数限制时,新修改的值只能小于或等于上次 ulimit-n设置的值,因此想用此命令增大这个限制值是不可能的。 所以,如果有上述问题存在,就只能去打开/etc/profile脚本文件,在文件中查找是否使用了ulimit-n限制了用户可同时打开的最大文件数量,如果找到,则删除这行命令,或者将其设置的值改为合适的值,然后保存文件,用户退出并重新登录系统即可。 通过上述步骤,就为支持高并发TCP连接处理的通讯处理程序解除关于打开文件数量方面的系统限制。 2、修改网络内核对TCP连接的有关限制 在Linux上编写支持高并发TCP连接的客户端通讯处理程序时,有时会发现尽管已经解除了系统对用户同时打开文件数的限制,但仍会出现并发TCP连接数增加到一定数量时,再也无法成功建立新的TCP连接的现象。出现这种现在的原因有多种。 第一种原因可能是因为Linux网络内核对本地端口号范围有限制。此时,进一步分析为什么无法建立TCP连接,会发现问题出在connect()调用返回失败,查看系统错误提示消息是"Can't assign requestedaddress".同时,如果在此时用tcpdump工具监视网络,会发现根本没有TCP连接时客户端发SYN包的网络流量。这些情况说明问题在于本地Linux系统内核中有限制。 其实,问题的根本原因在于Linux内核的TCP/IP协议实现模块对系统中所有的客户端TCP连接对应的本地端口号的范围进行了限制(例如,内核限制本地端口号的范围为1024~32768之间)。当系统中某一时刻同时存在太多的TCP客户端连接时,由于每个TCP客户端连接都要占用一个唯一的本地端口号(此端口号在系统的本地端口号范围限制中),如果现有的TCP客户端连接已将所有的本地端口号占满,则此时就无法为新的TCP客户端连接分配一个本地端口号了,因此系统会在这种情况下在connect()调用中返回失败,并将错误提示消息设为"Can't assignrequested address". 有关这些控制逻辑可以查看Linux内核源代码,以linux2.6内核为例,可以查看tcp_ipv4.c文件中如下函数: static int tcp_v4_hash_connect(struct sock *sk) 请注意上述函数中对变量sysctl_local_port_range的访问控制。变量sysctl_local_port_range的初始化则是在tcp.c文件中的如下函数中设置: void __init tcp_init(void) 内核编译时默认设置的本地端口号范围可能太小,因此需要修改此本地端口范围限制。 第一步,修改/etc/sysctl.conf文件,在文件中添加如下行: net.ipv4.ip_local_port_range = 1024 65000 这表明将系统对本地端口范围限制设置为1024~65000之间。请注意,本地端口范围的最小值必须大于或等于1024;而端口范围的最大值则应小于或等于65535.修改完后保存此文件。 第二步,执行sysctl命令: [speng@as4 ~]$ sysctl -p 如果系统没有错误提示,就表明新的本地端口范围设置成功。如果按上述端口范围进行设置,则理论上单独一个进程最多可以同时建立60000多个TCP客户端连接。 第二种无法建立TCP连接的原因可能是因为Linux网络内核的IP_TABLE防火墙对最大跟踪的TCP连接数有限制。此时程序会表现为在 connect()调用中阻塞,如同死机,如果用tcpdump工具监视网络,也会发现根本没有TCP连接时客户端发SYN包的网络流量。由于 IP_TABLE防火墙在内核中会对每个TCP连接的状态进行跟踪,跟踪信息将会放在位于内核内存中的conntrackdatabase中,这个数据库的大小有限,当系统中存在过多的TCP连接时,数据库容量不足,IP_TABLE无法为新的TCP连接建立跟踪信息,于是表现为在connect()调用中阻塞。此时就必须修改内核对最大跟踪的TCP连接数的限制,方法同修改内核对本地端口号范围的限制是类似的: 第一步,修改/etc/sysctl.conf文件,在文件中添加如下行: net.ipv4.ip_conntrack_max = 10240 这表明将系统对最大跟踪的TCP连接数限制设置为10240.请注意,此限制值要尽量小,以节省对内核内存的占用。 第二步,执行sysctl命令: [speng@as4 ~]$ sysctl -p 如果系统没有错误提示,就表明系统对新的最大跟踪的TCP连接数限制修改成功。如果按上述参数进行设置,则理论上单独一个进程最多可以同时建立10000多个TCP客户端连接。 3、使用支持高并发网络I/O的编程技术在Linux上编写高并发TCP连接应用程序时,必须使用合适的网络I/O技术和I/O事件分派机制。可用的I/O技术有同步I/O,非阻塞式同步I/O(也称反应式I/O),以及异步I/O.在高TCP并发的情形下,如果使用同步I/O,这会严重阻塞程序的运转,除非为每个TCP连接的I/O创建一个线程。 但是,过多的线程又会因系统对线程的调度造成巨大开销。因此,在高TCP并发的情形下使用同步 I/O是不可取的,这时可以考虑使用非阻塞式同步I/O或异步I/O.非阻塞式同步I/O的技术包括使用select(),poll(),epoll等机制。异步I/O的技术就是使用AIO. 从I/O事件分派机制来看,使用select()是不合适的,因为它所支持的并发连接数有限(通常在1024个以内)。如果考虑性能,poll()也是不合适的,尽管它可以支持的较高的TCP并发数,但是由于其采用"轮询"机制,当并发数较高时,其运行效率相当低,并可能存在I/O事件分派不均,导致部分TCP连接上的I/O出现"饥饿"现象。而如果使用epoll或AIO,则没有上述问题(早期Linux内核的AIO技术实现是通过在内核中为每个 I/O请求创建一个线程来实现的,这种实现机制在高并发TCP连接的情形下使用其实也有严重的性能问题。但在最新的Linux内核中,AIO的实现已经得到改进)。 综上所述,在开发支持高并发TCP连接的Linux应用程序时,应尽量使用epoll或AIO技术来实现并发的TCP连接上的I/O控制,这将为提升程序对高并发TCP连接的支持提供有效的I/O保证。 内核参数sysctl.conf的优化 /etc/sysctl.conf 是用来控制linux网络的配置文件,对于依赖网络的程序(如web服务器和cache服务器)非常重要,RHEL默认提供的最好调整。 推荐配置(把原/etc/sysctl.conf内容清掉,把下面内容复制进去): net.ipv4.ip_local_port_range = 1024 65536 net.core.rmem_max=16777216 net.core.wmem_max=16777216 net.ipv4.tcp_rmem=4096 87380 16777216 net.ipv4.tcp_wmem=4096 65536 16777216 net.ipv4.tcp_fin_timeout = 10 net.ipv4.tcp_tw_recycle = 1 net.ipv4.tcp_timestamps = 0 net.ipv4.tcp_window_scaling = 0 net.ipv4.tcp_sack = 0 net.core.netdev_max_backlog = 30000 net.ipv4.tcp_no_metrics_save=1 net.core.somaxconn = 262144 net.ipv4.tcp_syncookies = 0 net.ipv4.tcp_max_orphans = 262144 net.ipv4.tcp_max_syn_backlog = 262144 net.ipv4.tcp_synack_retries = 2 net.ipv4.tcp_syn_retries = 2 这个配置参考于cache服务器varnish的推荐配置和SunOne 服务器系统优化的推荐配置。 varnish调优推荐配置的地址为:http://varnish.projects.linpro.no/wiki/Performance 不过varnish推荐的配置是有问题的,实际运行表明"net.ipv4.tcp_fin_timeout = 3"的配置会导致页面经常打不开;并且当网友使用的是IE6浏览器时,访问网站一段时间后,所有网页都会 打不开,重启浏览器后正常。可能是国外的网速快吧,我们国情决定需要调整"net.ipv4.tcp_fin_timeout = 10",在10s的情况下,一切正常(实际运行结论)。 修改完毕后,执行: /sbin/sysctl -p /etc/sysctl.conf /sbin/sysctl -w net.ipv4.route.flush=1 命令生效。为了保险起见,也可以reboot系统。 调整文件数: linux系统优化完网络必须调高系统允许打开的文件数才能支持大的并发,默认1024是远远不够的。 执行命令: Shell代码 echo ulimit -HSn 65536 》 /etc/rc.local echo ulimit -HSn 65536 》/root/.bash_profile ulimit -HSn 65536
如何设置呢,官方是这样的: 第一步:配置/etc/security/limits.conf sudo vim /etc/security/limits.conf 文件尾追加 * hard nofile 40960 * soft nofile 40960 4096可以自己设置,四列参数的设置见英文,简单讲一下:第一列,可以是用户,也可以是组,要用@group这样的语法,也可以是通配符如*% 第二列,两个值:hard,硬限制,soft,软件限制,一般来说soft要比hard小,hard是底线,决对不能超过,超过soft报警,直到hard数 第三列,见列表,打开文件数是nofile 第四列,数量,这个也不能设置太大
第二步:/etc/pam.d/su(官方)或/etc/pam.d/common-session(网络) sudo vim /etc/pam.d/su 将 pam_limits.so 这一行注释去掉 重起系统 sudo vim /etc/pam.d/common-session 加上以下一行 session required pam_limits.so 打开/etc/pam.d/su,发现是包含/etc/pam.d/common-session这个文件的,所以修改哪个文件都应该是可以的 我的修改是在/etc/pam.d/common-session文件中进行的。
官方只到第二步,就重启系统了,没有第三步,好象不行,感觉是不是全是第三步的作用?! 第三步:配置/etc/profile 最后一行加上 ulimit -SHn 40960
重启,ulimit -n 验证,显示40960就没问题了
注意以上三步均是要使用root权限进行修改。
/etc/sysctl.conf
net.core.rmem_default = 25696000 net.core.rmem_max = 25696000 net.core.wmem_default = 25696000 net.core.wmem_max = 25696000 net.ipv4.tcp_timestamps = 0 net.ipv4.tcp_sack =1 net.ipv4.tcp_window_scaling = 1 hotrod方式: nohup ./bin/startServer.sh -r hotrod -l 172.20.21.1 -c ./etc/config-samples/distributed-udp.xml -p 11222 &
From a convenience perspective, I want to authenticate as infrequently as possible. However, security requirements suggest that I should be authenticated for all sorts of services. This means that Single Sign On and forwardable authentication credentials would be useful. Within an individual organisation at least, it is useful and fairly straightforward to have centralised control for authentication services. More and more authorisation and applications services are able to use centralised authentication services such as Kerberos. This document will demonstrate how to configure a machine running OpenSSH server to use GSSAPI so that users can log in if they have authorised kerberos tickets. This is not the place for extensive explanations about tickets or how to set up the Key Distribution Center(KDC) in the first place or how to build or install the necessary software on various different unixlike systems. Likely, your distribution's package management system can provide you with what you need. Kerberos All destination machines should have /etc/krb5.conf modified to allow forwardable tickets: [libdefaults] default_realm = ALLGOODBITS.ORG forwardable = TRUE [realms] ALLGOODBITS.ORG = { kdc = kerberos.allgoodbits.org } Using kadmin, create a principal for a user: kadmin> ank <username>@<REALM> Here the process differs depending upon whether you're using MIT Kerberos (probably) or Heimdal. MIT Create a principal for the host: kadmin> ank -randkey host/<FQDN>@<REALM> Extract the key for the host principal to a keytab file and locate it correctly on the ssh server: kadmin> ktadd -k /tmp/<FQDN>.keytab host/<FQDN> Heimdal Create a principal for the host: kadmin> ank -r host/<FQDN>@<REALM> Extract the key for the host principal to a keytab file and locate it correctly on the ssh server: kadmin> ext -k /tmp/<FQDN>.keytab host/<FQDN>@<REALM> SSH Then we need to take the keytab file into which you extracted the key for the host principal and copy it to the location on the ssh server where sshd will look for it, probably /etc/krb5.keytab. We need to configure sshd_config(5). The important options start with GSSAPI, not to be confused with the Kerberos options which are merely for KDC-validated password authentication; the GSSAPI method allows authentication and login based upon existing tickets. In other words, the "Kerberos" method requires you to enter your password (again), GSSAPI will allow login based on upon the tickets you already have. sshd_config: GSSAPIAuthentication yes GSSAPICleanupCredentials yes PermitRootLogin without-password ssh_config: GSSAPIAuthentication yes GSSAPIDelegateCredentials yes PAM Linux Pluggable Authentication Modules(PAM) provide a common framework for authentication/authorisation for applications. /etc/pam.d/common-account: account sufficient pam_krb5.so use_first_pass /etc/pam.d/common-auth: auth sufficient pam_krb5.so use_first_pass /etc/pam.d/common-password: password sufficient pam_krb5.so /etc/pam.d/common-session: session optional pam_krb5.so This is sufficient to allow OpenAFS based home directories because although AFS uses Kerberosv4, MIT Kerberos does 5 to 4 ticket conversion on the fly. Troubleshooting - As with anything concerned with kerberos, make sure you have NTP and DNS working properly before you even start.
- ssh -v can give you a lot of valuable information.
- read your logs.
nohup ./bin/startServer.sh -r hotrod -l 172.20.21.3 -c ./etc/config-samples/distributed-udp.xml -p 11222 &
https://github.com/sksamuel/elasticsearch-river-hazelcast
ElasticSearch是一个基于Lucene构建的开源,分布式,RESTful搜索引擎。设计用于云计算中,能够达到实时搜索,稳定,可靠,快速,安装使用方便。支持通过HTTP使用JSON进行数据索引。 我们建立一个网站或应用程序,并要添加搜索功能,令我们受打击的是:搜索工作是很难的。我们希望我们的搜索解决方案要快,我们希望 有一个零配置和一个完全免费的搜索模式,我们希望能够简单地使用JSON通过HTTP的索引数据,我们希望我们的搜索服务器始终可用,我们希望能够一台开 始并扩展到数百,我们要实时搜索,我们要简单的多租户,我们希望建立一个云的解决方案。Elasticsearch旨在解决所有这些问题和更多的。 安装 以windows操作系统和ES0.19.7版本为例: ①下载elasticsearch-0.19.7.zip ②直接解压至某目录,设置该目录为ES_HOME环境变量 ③安装JDK,并设置JAVA_HOME环境变量 ④在windows下,运行 %ES_HOME%\bin\elasticsearch.bat即可运行
分布式搜索elasticsearch单机与服务器环境搭建 先到http://www.elasticsearch.org/download/下 载最新版的elasticsearch运行包,本文写时最新的是0.19.1,作者是个很勤快的人,es的更新很频繁,bug修复得很快。下载完解开有三 个包:bin是运行的脚本,config是设置文件,lib是放依赖的包。如果你要装插件的话就要多新建一个plugins的文件夹,把插件放到这个文件 夹中。
1.单机环境: 单机版的elasticsearch运行很简单,linux下直接 bin/elasticsearch就运行了,windows运行bin/elasticsearch.bat。如果是在局域网中运行elasticsearch集群也是很简单的,只要cluster.name设置一致,并且机器在同一网段下,启动的es会自动发现对方,组成集群。 2.服务器环境: 如果是在服务器上就可以使用elasticsearch-servicewrapper这个es插件,它支持通过参数,指定是在后台或前台运行es,并且支持启动,停止,重启es服务(默认es脚本只能通过ctrl+c关闭es)。使用方法是到https://github.com/elasticsearch/elasticsearch-servicewrapper下载service文件夹,放到es的bin目录下。下面是命令集合:
bin/service/elasticsearch +
console 在前台运行es
start 在后台运行es
stop 停止es
install 使es作为服务在服务器启动时自动启动
remove 取消启动时自动启动 在service目录下有个elasticsearch.conf配置文件,主要是设置一些java运行环境参数,其中比较重要的是下面的 参数: #es的home路径,不用用默认值就可以
set.default.ES_HOME=<Path to ElasticSearch Home> #分配给es的最小内存
set.default.ES_MIN_MEM=256 #分配给es的最大内存
set.default.ES_MAX_MEM=1024
# 启动等待超时时间(以秒为单位)
wrapper.startup.timeout=300
# 关闭等待超时时间(以秒为单位) wrapper.shutdown.timeout=300 # ping超时时间(以秒为单位) wrapper.ping.timeout=300 安装插件 以head插件为例: 联网时,直接运行%ES_HOME%\bin\plugin -install mobz/elasticsearch-head 不联网时,下载elasticsearch-head的zipball的master包,把内容解压到%ES_HOME%\plugin\head\_site目录下,[该插件为site类型插件] 安装完成,重启服务,在浏览器打开 http://localhost:9200/_plugin/head/ 即可
ES概念 cluster 代表一个集群,集群中有多个节点,其中有一个为主节点,这个主节点是可以通过选举产生的,主从节点是对于集群内部来说 的。es的一个概念就是去中心化,字面上理解就是无中心节点,这是对于集群外部来说的,因为从外部来看es集群,在逻辑上是个整体,你与任何一个节点的通 信和与整个es集群通信是等价的。 shards 代表索引分片,es可以把一个完整的索引分成多个分片,这样的好处是可以把一个大的索引拆分成多个,分布到不同的节点上。构成分布式搜索。分片的数量只能在索引创建前指定,并且索引创建后不能更改。 replicas 代表索引副本,es可以设置多个索引的副本,副本的作用一是提高系统的容错性,当个某个节点某个分片损坏或丢失时可以从副本中恢复。二是提高es的查询效率,es会自动对搜索请求进行负载均衡。 recovery 代表数据恢复或叫数据重新分布,es在有节点加入或退出时会根据机器的负载对索引分片进行重新分配,挂掉的节点重新启动时也会进行数据恢复。 river 代表es的一个数据源,也是其它存储方式(如:数据库)同步数据到es的一个方法。它是以插件方式存在的一个es服 务,通过读取river中的数据并把它索引到es中,官方的river有couchDB的,RabbitMQ的,Twitter的,Wikipedia 的。 gateway 代表es索引的持久化存储方式,es默认是先把索引存放到内存中,当内存满了时再持久化到硬盘。当这个es集群关闭再 重新启动时就会从gateway中读取索引数据。es支持多种类型的gateway,有本地文件系统(默认),分布式文件系统,Hadoop的HDFS和 amazon的s3云存储服务。 discovery.zen 代表es的自动发现节点机制,es是一个基于p2p的系统,它先通过广播寻找存在的节点,再通过多播协议来进行节点之间的通信,同时也支持点对点的交互。 Transport 代表es内部节点或集群与客户端的交互方式,默认内部是使用tcp协议进行交互,同时它支持http协议(json格式)、thrift、servlet、memcached、zeroMQ等的传输协议(通过插件方式集成)。
分布式搜索elasticsearch中文分词集成 elasticsearch官方只提供smartcn这个中文分词插件,效果不是很好,好在国内有medcl大神(国内最早研究es的人之一)写的两个中文分词插件,一个是ik的,一个是mmseg的,下面分别介绍下两者的用法,其实都差不多的,先安装插件,命令行:
安装ik插件: plugin -install medcl/elasticsearch-analysis-ik/1.1.0 下载ik相关配置词典文件到config目录 - cd config
- wget http://github.com/downloads/medcl/elasticsearch-analysis-ik/ik.zip --no-check-certificate
- unzip ik.zip
- rm ik.zip
安装mmseg插件: - bin/plugin -install medcl/elasticsearch-analysis-mmseg/1.1.0
下载相关配置词典文件到config目录 - cd config
- wget http://github.com/downloads/medcl/elasticsearch-analysis-mmseg/mmseg.zip --no-check-certificate
- unzip mmseg.zip
- rm mmseg.zip
分词配置 ik分词配置,在elasticsearch.yml文件中加上 - index:
- analysis:
- analyzer:
- ik:
- alias: [ik_analyzer]
- type: org.elasticsearch.index.analysis.IkAnalyzerProvider
或 - index.analysis.analyzer.ik.type : “ik”
这两句的意义相同
mmseg分词配置,也是在在elasticsearch.yml文件中 - index:
- analysis:
- analyzer:
- mmseg:
- alias: [news_analyzer, mmseg_analyzer]
- type: org.elasticsearch.index.analysis.MMsegAnalyzerProvider
或 - index.analysis.analyzer.default.type : "mmseg"
mmseg分词还有些更加个性化的参数设置如下 - index:
- analysis:
- tokenizer:
- mmseg_maxword:
- type: mmseg
- seg_type: "max_word"
- mmseg_complex:
- type: mmseg
- seg_type: "complex"
- mmseg_simple:
- type: mmseg
- seg_type: "simple"
这样配置完后插件安装完成,启动es就会加载插件。 定义mapping 在添加索引的mapping时就可以这样定义分词器 - {
- "page":{
- "properties":{
- "title":{
- "type":"string",
- "indexAnalyzer":"ik",
- "searchAnalyzer":"ik"
- },
- "content":{
- "type":"string",
- "indexAnalyzer":"ik",
- "searchAnalyzer":"ik"
- }
- }
- }
- }
indexAnalyzer为索引时使用的分词器,searchAnalyzer为搜索时使用的分词器。 java mapping代码如下: - XContentBuilder content = XContentFactory.jsonBuilder().startObject()
- .startObject("page")
- .startObject("properties")
- .startObject("title")
- .field("type", "string")
- .field("indexAnalyzer", "ik")
- .field("searchAnalyzer", "ik")
- .endObject()
- .startObject("code")
- .field("type", "string")
- .field("indexAnalyzer", "ik")
- .field("searchAnalyzer", "ik")
- .endObject()
- .endObject()
- .endObject()
- .endObject()
定义完后操作索引就会以指定的分词器来进行分词。 附: ik分词插件项目地址:https://github.com/medcl/elasticsearch-analysis-ik mmseg分词插件项目地址:https://github.com/medcl/elasticsearch-analysis-mmseg 如果觉得配置麻烦,也可以下载个配置好的es版本,地址如下:https://github.com/medcl/elasticsearch-rtf elasticsearch的基本用法
最大的特点:
1. 数据库的 database, 就是 index
2. 数据库的 table, 就是 tag
3. 不要使用browser, 使用curl来进行客户端操作. 否则会出现 java heap ooxx...
curl: -X 后面跟 RESTful : GET, POST ...
-d 后面跟数据。 (d = data to send)
1. create:
指定 ID 来建立新记录。 (貌似PUT, POST都可以)
$ curl -XPOST localhost:9200/films/md/2 -d '
{ "name":"hei yi ren", "tag": "good"}'
使用自动生成的 ID 建立新纪录:
$ curl -XPOST localhost:9200/films/md -d '
{ "name":"ma da jia si jia3", "tag": "good"}'
2. 查询:
2.1 查询所有的 index, type:
$ curl localhost:9200/_search?pretty=true
2.2 查询某个index下所有的type:
$ curl localhost:9200/films/_search
2.3 查询某个index 下, 某个 type下所有的记录:
$ curl localhost:9200/films/md/_search?pretty=true
2.4 带有参数的查询:
$ curl localhost:9200/films/md/_search?q=tag:good
{"took":7,"timed_out":false,"_shards":{"total":5,"successful":5,"failed":0},"hits":{"total":2,"max_score":1.0,"hits":[{"_index":"film","_type":"md","_id":"2","_score":1.0, "_source" :
{ "name":"hei yi ren", "tag": "good"}},{"_index":"film","_type":"md","_id":"1","_score":0.30685282, "_source" :
{ "name":"ma da jia si jia", "tag": "good"}}]}}
2.5 使用JSON参数的查询: (注意 query 和 term 关键字)
$ curl localhost:9200/film/_search -d '
{"query" : { "term": { "tag":"bad"}}}'
3. update
$ curl -XPUT localhost:9200/films/md/1 -d { ...(data)... }
4. 删除。 删除所有的:
$ curl -XDELETE localhost:9200/films
在debian6中,加入开机启动脚本的方法与debian5不同了,直接做符号链接到runlevel已经不起作用了,提示缺少LSB信息,并且用insserv来替代update-rc.d: root@14:/etc/rc2.d# update-rc.d -n php_fastcgi.sh defaults
update-rc.d: using dependency based boot sequencing
insserv: warning: script 'K02php_fastcgi' missing LSB tags and overrides
insserv: warning: script 'K01php_fastcgi.sh' missing LSB tags and overrides
insserv: warning: script 'php_fastcgi.sh' missing LSB tags and overrides
insserv: warning: current start runlevel(s) (empty) of script `php_fastcgi.sh' overwrites defaults (2 3 4 5).
insserv: warning: current stop runlevel(s) (0) of script `php_fastcgi.sh' overwrites defaults (0 1 6).
insserv: dryrun, not creating .depend.boot, .depend.start, and .depend.stop
# insserv /etc/init.d/php_fastcgi.sh
insserv: warning: script 'K02php_fastcgi' missing LSB tags and overrides
insserv: warning: script 'php_fastcgi.sh' missing LSB tags and overrides debian6中将脚本加入到开机启动的方法: 在脚本中加入LSB描述信息。
root@14:~# more /etc/init.d/php_fastcgi.sh
#!/bin/sh
### BEGIN INIT INFO
# Provides: php_fastcgi.sh
# Required-Start: $local_fs $remote_fs $network $syslog
# Required-Stop: $local_fs $remote_fs $network $syslog
# Default-Start: 2 3 4 5
# Default-Stop: 0 1 6
# Short-Description: starts the php_fastcgi daemon
# Description: starts php_fastcgi using start-stop-daemon
### END INIT INFO 安装启动脚本到system init script。
root@14:~# insserv -v -d /etc/init.d/php_fastcgi.sh 重启机器试试吧。
linux 广播 255.255.255.255 sendto error: Network is unreachable
全网广播
场景: 今天调试linux 网络编程的广播,当向255.255.255.255 的某个端口发送广播包的时候,sendto 返回 -1,错误原因是: sendto error: Network is unreachable。 2. 指令的解决方法: oute add -net 255.255.255.255 netmask 255.255.255.255 dev eth0 metric 1 或者 route add -host 255.255.255.255 dev eth0 http://blog.csdn.net/qiaoliang328/article/details/8881474
devcon install c:\windows\inf\netloop.inf *MSLOOP
reg add "HKEY_CURRENT_USER\Software\Microsoft\Windows\ShellNoRoam" /v @ /t REG_SZ /d "%Name%" /f
reg add "HKLM\SYSTEM\CurrentControlSet\Control\ComputerName\ComputerName" /v "ComputerName" /t REG_SZ /d "%Name%" /f
reg add "HKLM\SYSTEM\CurrentControlSet\Control\ComputerName\ActiveComputerName" /v "ComputerName" /t REG_SZ /d "%Name%" /f
reg add "HKLM\SYSTEM\CurrentControlSet\Services\Eventlog" /v "ComputerName" /t REG_SZ /d "%Name%" /f
reg add "HKLM\SYSTEM\CurrentControlSet\Control\ComputerName\ComputerName" /v "ComputerName" /t REG_SZ /d "%Name%" /f
reg add "HKLM\SYSTEM\CurrentControlSet\Services\Tcpip\Parameters" /v "NV Hostname" /t REG_SZ /d "%Name%" /f
reg add "HKLM\SYSTEM\CurrentControlSet\Services\Tcpip\Parameters" /v "Hostname" /t REG_SZ /d "%Name%" /f
Impala是由Cloudera开发的高性能实时计算工具,相比Hive性能提升了几十、甚至近百倍,基本思想是将计算分发到每个 Datanode所在的节点,依靠内存实现数据的缓存进行快速计算,类似的系统还有Berkeley的Shark。从实际测试来看,Impala效率确实 不错,由于Impala大量使用C++实现,不使用CDH的Image而自己编译安装要费不少功夫,这里记录一下安装配置过程和碰到的一些问题。我在测试 时候使用的是CentOS6.2。
一些基本的安装步骤在这里,但我在安装的时候碰到一些问题,这里再详细说明一下过程。 1.安装所需的依赖lib,这一步没有什么不同 sudo yum install boost-test boost-program-options libevent-devel automake libtool flex bison gcc-c++ openssl-devel make cmake doxygen.x86_64 glib-devel boost-devel python-devel bzip2-devel svn libevent-devel cyrus-sasl-devel wget git unzip 2.安装LLVM,按照流程做即可,注意要在多台机器上编译安装Impala的话,只用在一台机器上执行下面蓝色的部分,再把llvm分发到多台机器上执行后面红色部分的指令就可以了,没必要每个机器都通过svn下载一遍源代码,很费时。 wget http://llvm.org/releases/3.2/llvm-3.2.src.tar.gz
tar xvzf llvm-3.2.src.tar.gz
cd llvm-3.2.src/tools
svn co http://llvm.org/svn/llvm-project/cfe/tags/RELEASE_32/final/ clang
cd ../projects
svn co http://llvm.org/svn/llvm-project/compiler-rt/tags/RELEASE_32/final/ compiler-rt cd ..
./configure –with-pic
make -j4 REQUIRES_RTTI=1
sudo make install 3.安装Maven,这个没什么好说的,按照步骤,设置一下环境变量即可,Maven是为了后面build impala源代码用的。 wget http://www.fightrice.com/mirrors/apache/maven/maven-3/3.0.4/binaries/apache-maven-3.0.4-bin.tar.gz
tar xvf apache-maven-3.0.4.tar.gz && sudo mv apache-maven-3.0.4 /usr/local 修改~/.bashrc,增加maven环境变量 export M2_HOME=/usr/local/apache-maven-3.0.4
export M2=$M2_HOME/bin
export PATH=$M2:$PATH 更新环境变量,查看mvn版本是否正确 source ~/.bashrc
mvn -version 4.下载Impala源代码 git clone https://github.com/cloudera/impala.git 5.设置Impala环境变量,编译时需要 cd impala
./bin/impala-config.sh 6.下载impala依赖的第三方package cd thirdparty
./download_thirdparty.sh 注意这里其中一个包cyrus-sasl-2.1.23可能下载失败,可以自行搜索(CSDN里面就有)下载下来然后解压缩到thirdparty 文件夹,最好是在执行完download_thirdparty.sh之后做这一步,因为download_thirdparty.sh会把所有目录下下 载下来的tar.gz给删除掉。 7.理论上现在可以开始build impala了,但是实际build过程中可能会出现问题,我碰到的问题和 Boost相关的(具体错误不记得了),最后发现是由于boost版本太低导致的,CentOS 6.2系统默认yum源中的boost和boost-devel版本是1.41,但是impala编译需要1.44以上的版本,因此需要做的是自己重新编 译boost,我用的是boost 1.46版本。 #删除已安装的boost和boost-devel yum remove boost yum remove boost-devel #下载boost #可以去(http://www.boost.org/users/history/)下载boost #下载后解压缩 tar xvzf boost_1_46_0.tar.gz mv boost_1_46_0 /usr/local/ cd /usr/include ./bootstrap.sh ./bjam #执行后若打印以下内容,则表示安装成功 # The Boost C++ Libraries were successfully built! # The following directory should be added to compiler include paths: # /usr/local/boost_1_46_0 # The following directory should be added to linker library paths: # /usr/local/boost_1_46_0/stage/lib #现在还需要设置Boost环境变量和Impala环境变量 export BOOST_ROOT=’/usr/local/boost_1_46_0′
export IMPALA_HOME=’/home/extend/impala’ #注意一下,这里虽然安装了boost,但是我在实际使用的时候,编译还是会报错的,报的错误是找不到这个包:#libboost_filesystem-mt.so,这个包是由boost-devel提供的,所以我的做法是把boost-devel给重新装上
#我没有试过如果之前不删除boost-devel会不会有问题,能确定的是按这里写的流程做是没问题的 yum install boost-devel 8.现在终于可以编译impala了 cd $IMPALA_HOME
./build_public.sh -build_thirdparty
#编译首先会编译C++部分,然后再用mvn编译java部分,整个过程比较慢,我在虚拟机上大概需要1-2个小时。
#Impala编译完后的东西在be/build/debug里面 9.启动impala_shell需要用到的python包 #第一次执行impalad_shell可能会报错,这里需要安装python的两个包:thrift和prettytable,使用easy_install即可
easy_install prettytable
easy_install thrift 10.如果你以为到这里就万事大吉就太天真了,在配置、启动、使用Impala的时候还会有很多奇葩的问题; 问题1:Hive和Hadoop使用的版本
CDH对版本的依赖要求比较高,为了保证Impala正常运行,强烈建议使用Impala里面thirdparty目录中自带的Hadoop(native lib已经编译好的)和Hive版本。
Hadoop的配置文件在$HADOOP_HOME/etc/hadoop中,要注意的是需要启用native lib #修改hadoop的core-site.xml,除了这个选项之外,其他配置和问题2中的core-site.xml一致
<property>
<name>hadoop.native.lib</name>
<value>true</value>
<description>Should native hadoop libraries, if present, be used.</description>
</property> 问题2:Impala的配置文件位置
Impala默认使用的配置文件路径是在bin/set-classpath.sh中配置的,建议把CLASSPATH部分改成 CLASSPATH=\
$IMPALA_HOME/conf:\
$IMPALA_HOME/fe/target/classes:\
$IMPALA_HOME/fe/target/dependency:\
$IMPALA_HOME/fe/target/test-classes:\
${HIVE_HOME}/lib/datanucleus-core-2.0.3.jar:\
${HIVE_HOME}/lib/datanucleus-enhancer-2.0.3.jar:\
${HIVE_HOME}/lib/datanucleus-rdbms-2.0.3.jar:\
${HIVE_HOME}/lib/datanucleus-connectionpool-2.0.3.jar: 即要求Impala使用其目录下的Conf文件夹作为配置文件,然后创建一下Conf目录,把3样东西拷贝进来:core-site.xml、hdfs-site.xml、hive-site.xml。
core-site.xml的配置,下面几个选项是必须要配置的, <?xml version="1.0"?>
<?xml-stylesheet type="text/xsl" href="configuration.xsl"?>
<configuration>
<property>
<name>fs.defaultFS</name>
<value>hdfs://10.200.4.11:9000</value>
</property>
<property>
<name>dfs.client.read.shortcircuit</name>
<value>true</value>
</property>
<property>
<name>dfs.client.use.legacy.blockreader.local</name>
<value>false</value>
</property>
<property>
<name>dfs.client.read.shortcircuit.skip.checksum</name>
<value>false</value>
</property>
</configuration> hdfs-site.xml的配置 <?xml version="1.0" encoding="UTF-8"?>
<?xml-stylesheet type="text/xsl" href="configuration.xsl"?>
<configuration>
<property>
<name>dfs.block.local-path-access.user</name>
<value>${your user}</value>
</property>
<property>
<name>dfs.datanode.hdfs-blocks-metadata.enabled</name>
<value>true</value>
</property>
<property>
<name>dfs.datanode.data.dir</name>
<value>${yourdatadir}</value>
</property>
<property>
<name>dfs.client.use.legacy.blockreader.local</name>
<value>false</value>
</property>
<property>
<name>dfs.datanode.data.dir.perm</name>
<value>750</value>
</property>
<property>
<name>dfs.client.file-block-storage-locations.timeout</name>
<value>5000</value>
</property>
<property>
<name>dfs.domain.socket.path</name>
<value>/home/extend/cdhhadoop/dn.8075</value>
</property>
</configuration> 最后是hive-site.xml,这个比较简单,指定使用DBMS为元数据存储即可(impala必须和hive共享元数据,因为impala无 法create table);Hive-site.xml使用mysql作为metastore的说明在很多地方都可以查到,配置如下: <?xml version="1.0"?>
<?xml-stylesheet type="text/xsl" href="configuration.xsl"?>
<configuration>
<property>
<name>javax.jdo.option.ConnectionURL</name>
<value>jdbc:mysql://10.28.0.190:3306/impala?createDatabaseIfNotExist=true</value>
<description>JDBC connect string for a JDBC metastore</description>
</property>
<property>
<name>javax.jdo.option.ConnectionDriverName</name>
<value>com.mysql.jdbc.Driver</value>
<description>Driver class name for a JDBC metastore</description>
</property>
<property>
<name>javax.jdo.option.ConnectionUserName</name>
<value>root</value>
<description>username to use against metastore database</description>
</property>
<property>
<name>javax.jdo.option.ConnectionPassword</name>
<value>root</value>
<description>password to use against metastore database</description>
</property>
</configuration> 记得把mysql-connector的jar包给拷贝到hive的lib里面去,同样也要拷贝给impala ( 拷贝至$IMPALA_HOME/fe/target/dependency) 11.启动Impala。到此,Impala是可以正常启动的。这里说明一下,官方文档没有说很清楚Impala的Service之间是如何互相协调的,按照官方的步骤,最后通过如下方法来在一台机器上启动Impala Service: #启动单机impala service
${IMPALA_HOME}/bin/start-impalad.sh -use_statestore=false
#启动impala shell
${IMPALA_HOME}/bin/impala-shell.sh 然后impala-shell就可以连接到localhost进行查询了;注意,这里只是单机查询,可以用来验证你的Impala是否正常work 了;如何启动一个Impala集群,跳到第12步。这里继续说一下可能遇到的问题,我遇到的一个比较奇葩的问题是show tables和count(1)没有问题,但是select * from table的时候impala在读取数据的时候就崩溃了(有时报错could not find method close from class org/apache/hadoop/fs/FSDataInputStream with signature ()V ),这里修改了两个地方解决这个问题: a.修改impala的set-classpath.sh并移除$IMPALA_HOME/fe/target/dependency目录中除了hadoop-auth-2.0.0-*.jar之外所有hadoop-*开头的jar包。 #把impala dependency中和hadoop相关的包给弄出来,只保留auth
mv $IMPALA_HOME/fe/target/dependency/hadoo* $IMPALA_HOME
mv $IMPALA_HOME/hadoop-auth*.jar mv $IMPALA_HOME/fe/target/dependency
#修改bin/set-classpath.sh,将$HADOOP_HOME中的lib给加入,在set-classpath.sh最后一行export CLASSPATH之前#添加
for jar in `ls $HADOOP_HOME/share/hadoop/common/*.jar`; do
CLASSPATH=${CLASSPATH}:$jar
done
for jar in `ls $HADOOP_HOME/share/hadoop/yarn/*.jar`; do
CLASSPATH=${CLASSPATH}:$jar
done
for jar in `ls $HADOOP_HOME/share/hadoop/hdfs/*.jar`; do
CLASSPATH=${CLASSPATH}:$jar
done
for jar in `ls $HADOOP_HOME/share/hadoop/mapreduce/*.jar`; do
CLASSPATH=${CLASSPATH}:$jar
done
for jar in `ls $HADOOP_HOME/share/hadoop/tools/lib/*.jar`; do
CLASSPATH=${CLASSPATH}:$jar
done b.注意到Impala对待table的时候只能够使用hive的默认列分隔符,如果在hive里面create table的时候使用了自定义的分隔符,Impala servive就会在读数据的时候莫名其妙的崩溃。 12.启动Impala 集群
Impala实际上由两部分组成,一个是StateStore,用来协调各个机器计算,相当于Master,然后就是Impalad,相当于Slave,启动方法如下: #启动statestore #方法1,直接利用impala/bin下面的这个python脚本 #这个脚本会启动一个StateStore,同时启动-s个数量的Impala Service在本机 $IMPALA_HOME/bin/start-impala-cluster.py -s 1 –log_dir /home/extend/impala/impalaLogs #方法2,手动启动StateStore $IMPALA_HOME/be/build/debug/statestore/statestored -state_store_port=24000 #启动impala service
#在每个编译安装了impala的节点上执行命令
#参数-state_store_host指定启动了stateStore的机器名
#-nn即namenode,指定hadoop的namenode
#-nn_port是namenode的HDFS入口端口号
$IMPALA_HOME/bin/start-impalad.sh -state_store_host=m11 -nn=m11 -nn_port=9000 正常启动之后,访问http://${stateStore_Server}:25010/ 可以看到StateStore的状态,其中的subscribers页面可以看到已经连接上的impala service node; 13.使用Impala客户端
这一步最简单,随便找一个机器启动 $IMPALA_HOME/bin/impala-shell.sh #启动之后可以随便连接一个impala service connect m12 #连接上之后就可以执行show tables之类的操作了 #需要注意的是,如果hive创建表或更新了表结构,impala的节点是不知道的 #必须通过客户端连接各个impala service并执行refresh来刷新metadata #或者重启所有impala service
nohup ./bin/startServer.sh -r hotrod -l 172.20.21.1 -c ./etc/config-samples/distributed-udp.xml -p 11222 &
http://www.ibm.com/developerworks/cn/aix/library/au-kerbauthent/
These notes are for MIT Kerberos 1.3 or higher. -
/etc/krb5.conf
The /etc/krb5.conf configuration file should include rc4-hmac support under the [libdefaults] section. Windows XP uses rc4-hmac. However, do not include rc4-hmac in the default* encryption types, as older Unix clients may not support rc4-hmac. [libdefaults]
default_realm = EXAMPLE.ORG
default_etypes = des3-hmac-sha1 des-cbc-crc
default_tkt_enctypes = des3-hmac-sha1 des-cbc-crc
default_tgs_enctypes = des3-hmac-sha1 des-cbc-crc
permitted_enctypes = des3-hmac-sha1 des-cbc-crc rc4-hmac
dns_lookup_realm = false
dns_lookup_kdc = true -
kdc.conf
The kdc.conf configuration file on the Kerberos servers must support rc4-hmac as an encryption type. [realms]
EXAMPLE.ORG = {
database_name = /var/kerberos/krb5kdc/principal
key_stash_file = /var/kerberos/krb5kdc/.k5.EXAMPLE.ORG
supported_enctypes = des3-hmac-sha1:normal des-cbc-crc:normal ?
rc4-hmac:normal
}
- Kerberos Configuration
Use the ksetup.exe command to add the site Kerberos servers. $ ksetup.exe /addkdc EXAMPLE.ORG kerberos-1.example.org
$ ksetup.exe /addkdc EXAMPLE.ORG kerberos-2.example.org
$ ksetup.exe /addkdc EXAMPLE.ORG kerberos.example.org
$ ksetup.exe /addkpasswd EXAMPLE.ORG kerberos.example.org
$ ksetup.exe /setrealm EXAMPLE.ORG - Host principals
Create host
principals on each Windows client, then use the same password to create
an equivalent principal in the MIT Kerberos database. If using an
installation system such as Unattended, use a script to generate the random password and setup the host principal. #!/usr/bin/perl
my $domain = 'example.org';
my $password = '';
my @chars = grep { /[[:print:]]/ and /\S/ } map { chr } 1..128;
$password .= $chars[rand @chars] for 1..(int (rand 7)) + 8;
system qw{ksetup.exe /setcomputerpassword}, $password;
print "Principal: host/", lc( $ENV{COMPUTERNAME} ), ".$domain\n";
print "Password: $password\n"; Then, use kdamin to add an equivalent principal to the Kerberos database, using the same password as above. Use the -e rc4-hmac:normal encryption option if adding a principal for a Windows XP system. kadmin: ank -e rc4-hmac:normal host/client.example.org - User Mapping
User mapping translates local accounts to the Kerberos domain. See module:users for user account management under CFEngine. $ ksetup.exe /mapuser * *
Windows clients can authenticate to Samba using Kerberos. Use Samba version 3.0.14a or higher on the server, and enable Kerberos support in the smb.conf configuration file. [global]
use kerberos keytab = yes
realm = EXAMPLE.ORG
security = ads Multiple host and cifs
principals must be created for each Samba server, as principals are
case sensitive, and Windows systems may randomly start using Server.example.org or SERVER.EXAMPLE.ORG when connecting. Extract these principals to the /etc/krb5.keytab file on each Samba server. kadmin: ank -randkey host/server.example.org
kadmin: ank -randkey host/Server.example.org
kadmin: ank -randkey host/SERVER.EXAMPLE.ORG
kadmin: ank -randkey cifs/server.example.org
kadmin: ank -randkey cifs/Server.example.org
kadmin: ank -randkey cifs/SERVER.EXAMPLE.ORG
kadmin: ktadd -k /etc/krb5.keytab host/server.example.org
kadmin: ktadd -k /etc/krb5.keytab host/Server.example.org
kadmin: ktadd -k /etc/krb5.keytab host/SERVER.EXAMPLE.ORG
kadmin: ktadd -k /etc/krb5.keytab cifs/server.example.org
kadmin: ktadd -k /etc/krb5.keytab cifs/Server.example.org
kadmin: ktadd -k /etc/krb5.keytab cifs/SERVER.EXAMPLE.ORG
1.首先安装后,有一个180天的试用期。
2.在180天试用期即将结束时,使用下面的评估序列号激活Svr 2008 R2 可以重新恢复180天试用期
Windows Server 2008 R2 Web: KBV3Q-DJ8W7-VPB64-V88KG-82C49
Windows Server 2008 R2 Standard: 4GGC4-9947F-FWFP3-78P6F-J9HDR
Windows Server 2008 R2 Enterprise: 7PJBC-63K3J-62TTK-XF46D-W3WMD
Windows Server 2008 R2 Datacenter: QX7TD-2CMJR-D7WWY-KVCYC-6D2YT
3.在180天试用期即将结束时,用“Rearm”后,重新输入上面的序列号,重启电脑,剩余时间又恢复到180天。微软官方文档中声明该命令只能重复使用5次。
4.上面的方法5次后,此后将无法再次使用。就要进行下一步,修改注册表中的一处键值(SkipRearm),以后就可以再次使用“Rearm”的命令,这个键值总共可以修改8次。
5.因此……。
char Str[20];
int ret;
ret = sprintf(Str, "%llu",ifconfig.flags);
1.资源池要展示的。 2.在初始化和后期是可以管理的。
分别在资源中心和基础设施里面加模块就可以了。
资源中心就是展示。
不参与管理。
资源中心全是统计性的和展示性的。
https://help.ubuntu.com/10.04/serverguide/kerberos.html Kerberos
Kerberos is a network authentication system based on the principal of a trusted third party.
The other two parties being the user and the service the user wishes to authenticate to. Not all services and applications
can use Kerberos, but for those that can, it brings the network environment one step closer to being Single Sign On (SSO).
This section covers installation and configuration of a Kerberos server, and some example client configurations.
If you are new to Kerberos there are a few terms that are good to
understand before setting up a Kerberos server. Most of the terms
will relate to things you may be familiar with in other
environments:
-
Principal: any users, computers, and services provided by servers need to be defined as Kerberos Principals.
-
Instances: are used for service principals and special administrative principals.
-
Realms: the unique realm of control provided by the Kerberos installation. Usually the DNS domain converted to
uppercase (EXAMPLE.COM).
-
Key Distribution Center: (KDC) consist of three parts, a database of all principals, the authentication server,
and the ticket granting server. For each realm there must be at least one KDC.
-
Ticket Granting Ticket: issued by the Authentication Server (AS), the Ticket Granting Ticket (TGT) is encrypted in
the user's password which is known only to the user and the KDC.
-
Ticket Granting Server: (TGS) issues service tickets to clients upon request.
-
Tickets: confirm the identity of the two principals. One principal being a user and the other a service requested by
the user. Tickets establish an encryption key used for secure communication during the authenticated session.
-
Keytab Files: are files extracted from the KDC principal database and contain the encryption key for a service or
host.
To put the pieces together, a Realm has at least one KDC,
preferably two for redundancy, which contains a database of Principals.
When a
user principal logs into a workstation, configured for Kerberos
authentication, the KDC issues a Ticket Granting Ticket (TGT). If the
user
supplied credentials match, the user is authenticated and can then
request tickets for Kerberized services from the Ticket Granting Server
(TGS). The service tickets allow the user to authenticate to the
service without entering another username and password.
Before installing the Kerberos server a properly configured DNS
server is needed for your domain. Since the Kerberos Realm by
convention matches the domain name, this section uses the example.com domain configured in
the section called “Primary Master”.
Also, Kerberos is a time sensitive protocol. So if the local
system time between a client machine and the server differs by
more than five minutes (by default), the workstation will not be
able to authenticate. To correct the problem all hosts
should have their time synchronized using the Network Time Protocol (NTP). For details
on setting up NTP see the section called “Time Synchronisation with NTP”.
The first step in installing a Kerberos Realm is to install the krb5-kdc and
krb5-admin-server packages. From a terminal enter:
sudo apt-get install krb5-kdc krb5-admin-server
You will be asked at the end of the install to supply a name for
the Kerberos and Admin servers, which may or may not be the
same server, for the realm.
Next, create the new realm with the kdb5_newrealm utility:
sudo krb5_newrealm
The questions asked during installation are used to configure the /etc/krb5.conf file. If you need to adjust
the Key Distribution Center (KDC) settings simply edit the file and restart the krb5-kdc daemon.
-
Now that the KDC running an admin user is needed. It is
recommended to use a different username from your everyday username.
Using the kadmin.local utility in a terminal prompt enter:
sudo kadmin.local
Authenticating as principal root/admin@EXAMPLE.COM with password.
kadmin.local: addprinc steve/admin
WARNING: no policy specified for steve/admin@EXAMPLE.COM; defaulting to no policy
Enter password for principal "steve/admin@EXAMPLE.COM":
Re-enter password for principal "steve/admin@EXAMPLE.COM":
Principal "steve/admin@EXAMPLE.COM" created.
kadmin.local: quit
In the above example steve is the Principal,
/admin is an Instance, and
@EXAMPLE.COM signifies the realm. The "every day"
Principal would be steve@EXAMPLE.COM, and should have only normal user rights.
![[Note]](https://help.ubuntu.com/libs/admon/note.png)
|
|
|
Replace EXAMPLE.COM and steve with your Realm and admin username.
|
-
Next, the new admin user needs to have the appropriate Access Control List (ACL) permissions.
The permissions are configured in the /etc/krb5kdc/kadm5.acl file:
steve/admin@EXAMPLE.COM *
This entry grants steve/admin the ability to perform any operation on all principals in the realm.
-
Now restart the krb5-admin-server for the new ACL to take affect:
sudo /etc/init.d/krb5-admin-server restart
-
The new user principal can be tested using the kinit utility:
kinit steve/admin
steve/admin@EXAMPLE.COM's Password:
After entering the password, use the klist utility to view information about the
Ticket Granting Ticket (TGT):
klist
Credentials cache: FILE:/tmp/krb5cc_1000
        Principal: steve/admin@EXAMPLE.COM

  Issued           Expires          Principal
Jul 13 17:53:34  Jul 14 03:53:34  krbtgt/EXAMPLE.COM@EXAMPLE.COM
You may need to add an entry into the /etc/hosts for the KDC. For example:
192.168.0.1 kdc01.example.com kdc01
Replacing 192.168.0.1 with the IP address of your KDC.
-
In order for clients to determine the KDC for the Realm some DNS SRV records are needed. Add the following to
/etc/named/db.example.com:
_kerberos._udp.EXAMPLE.COM.     IN SRV 1  0 88  kdc01.example.com.
_kerberos._tcp.EXAMPLE.COM.     IN SRV 1  0 88  kdc01.example.com.
_kerberos._udp.EXAMPLE.COM.     IN SRV 10 0 88  kdc02.example.com.
_kerberos._tcp.EXAMPLE.COM.     IN SRV 10 0 88  kdc02.example.com.
_kerberos-adm._tcp.EXAMPLE.COM. IN SRV 1  0 749 kdc01.example.com.
_kpasswd._udp.EXAMPLE.COM.      IN SRV 1  0 464 kdc01.example.com.
|
|
|
|
Replace EXAMPLE.COM, kdc01, and kdc02 with your
domain name, primary KDC, and secondary KDC.
|
See Chapter 7, Domain Name Service (DNS) for detailed instructions on setting up DNS.
Your new Kerberos Realm is now ready to authenticate clients.
Once you have one Key Distribution Center (KDC) on your network, it is good practice to have a Secondary KDC in case the
primary becomes unavailable.
-
First, install the packages, and when asked for the Kerberos and
Admin server names enter the name of the Primary KDC:
sudo apt-get install krb5-kdc krb5-admin-server
-
Once you have the packages installed, create the Secondary KDC's host principal. From a terminal prompt, enter:
kadmin -q "addprinc -randkey host/kdc02.example.com"
|
|
|
|
After, issuing any kadmin commands you will be prompted for your
username/admin@EXAMPLE.COM principal password.
|
-
Extract the keytab file:
kadmin -q "ktadd -k keytab.kdc02 host/kdc02.example.com"
-
There should now be a keytab.kdc02 in the current directory, move the file to
/etc/krb5.keytab:
sudo mv keytab.kdc02 /etc/krb5.keytab
|
|
|
|
If the path to the keytab.kdc02 file is different adjust accordingly.
|
Also, you can list the principals in a Keytab file, which can be useful when troubleshooting, using the
klist utility:
sudo klist -k /etc/krb5.keytab
-
Next, there needs to be a kpropd.acl file on each KDC that lists all KDCs for the Realm. For example,
on both primary and secondary KDC, create /etc/krb5kdc/kpropd.acl:
host/kdc01.example.com@EXAMPLE.COM
host/kdc02.example.com@EXAMPLE.COM
-
Create an empty database on the Secondary KDC:
sudo kdb5_util -s create
-
Now start the kpropd daemon, which listens for connections from the
kprop utility. kprop is used to transfer
dump files:
sudo kpropd -S
-
From a terminal on the Primary KDC, create a dump file of the principal database:
sudo kdb5_util dump /var/lib/krb5kdc/dump
-
Extract the Primary KDC's keytab file and copy it to /etc/krb5.keytab:
kadmin -q "ktadd -k keytab.kdc01 host/kdc01.example.com"
sudo mv keytab.kdc01 /etc/kr5b.keytab
|
|
|
|
Make sure there is a host for kdc01.example.com before extracting the Keytab.
|
-
Using the kprop utility push the database to the Secondary KDC:
sudo kprop -r EXAMPLE.COM -f /var/lib/krb5kdc/dump kdc02.example.com
|
|
|
|
There should be a SUCCEEDED message if the propagation worked. If there is an error
message check /var/log/syslog on the secondary KDC for more information.
|
You may also want to create a cron job to periodically update the database on the Secondary KDC. For
example, the following will push the database every hour:
# m h  dom mon dow   command
0 * * * * /usr/sbin/kdb5_util dump /var/lib/krb5kdc/dump && /usr/sbin/kprop -r EXAMPLE.COM -f /var/lib/krb5kdc/dump kdc02.example.com
-
Back on the Secondary KDC, create a stash file to hold the Kerberos
master key:
sudo kdb5_util stash
-
Finally, start the krb5-kdc daemon on the Secondary KDC:
sudo /etc/init.d/krb5-kdc start
The Secondary KDC should now be able to issue tickets for the Realm. You can test this by stopping
the krb5-kdc daemon on the Primary KDC, then use kinit to request a ticket.
If all goes well you should receive a ticket from the Secondary KDC.
This section covers configuring a Linux system as a Kerberos client. This will allow access
to any kerberized services once a user has successfully logged into the system.
In order to authenticate to a Kerberos Realm, the krb5-user and libpam-krb5
packages are needed, along with a few others that are not
strictly necessary but make life easier. To install the packages
enter the following in a terminal prompt:
sudo apt-get install krb5-user libpam-krb5 libpam-ccreds auth-client-config
The auth-client-config package allows simple configuration of PAM for authentication from multiple
sources, and the libpam-ccreds
will cache authentication credentials allowing you to login in case the
Key Distribution Center (KDC) is unavailable. This package is
also useful for laptops that may authenticate using Kerberos while
on the corporate network, but will need to be accessed off the
network as well.
To configure the client in a terminal enter:
sudo dpkg-reconfigure krb5-config
You will then be prompted to enter the name of the Kerberos
Realm. Also, if you don't have DNS configured with Kerberos
SRV records, the menu will prompt you for the hostname of the Key Distribution Center (KDC) and
Realm Administration server.
The dpkg-reconfigure adds entries to the /etc/krb5.conf file for your Realm.
You should have entries similar to the following:
[libdefaults]
        default_realm = EXAMPLE.COM
...
[realms]
        EXAMPLE.COM = }
                kdc = 192.168.0.1
                admin_server = 192.168.0.1
        }
You can test the configuration by requesting a ticket using the kinit utility. For example:
kinit steve@EXAMPLE.COM
Password for steve@EXAMPLE.COM:
When a ticket has been granted, the details can be viewed using klist:
klist
Ticket cache: FILE:/tmp/krb5cc_1000
Default principal: steve@EXAMPLE.COM

Valid starting     Expires            Service principal
07/24/08 05:18:56  07/24/08 15:18:56  krbtgt/EXAMPLE.COM@EXAMPLE.COM
        renew until 07/25/08 05:18:57


Kerberos 4 ticket cache: /tmp/tkt1000
klist: You have no tickets cached
Next, use the auth-client-config to configure the libpam-krb5 module
to request a ticket during login:
sudo auth-client-config -a -p kerberos_example
You will should now receive a ticket upon successful login authentication.
一、什么是 SSL 证书,什么是 HTTPS SSL 证书是一种数字证书,它使用 Secure Socket Layer 协议在浏览器和 Web 服务器之间建立一条安全通道,从而实现:
1、数据信息在客户端和服务器之间的加密传输,保证双方传递信息的安全性,不可被第三方窃听;
2、用户可以通过服务器证书验证他所访问的网站是否真实可靠。
(via百度百科) HTTPS 是以安全为目标的 HTTP 通道,即 HTTP 下加入 SSL 加密层。HTTPS 不同于 HTTP 的端口,HTTP默认端口为80,HTTPS默认端口为443.
二、什么网站需要使用SSL证书 1、购物交易类网站
不用多说,网上银行、支付宝、Paypal等肯定会全程加密以保护你的信息安全。 2、注册与登陆
一些大的网站,比如电子邮箱,注册会员或者登陆的时候,会专门通过SSL通道,保证密码安全不被窃取。 3、某些在线代理
这个。。。嗯哼,就不说了。 4、装B
比如我…… 三、自行颁发不受浏览器信任的SSL证书 为晒晒IQ网颁发证书。ssh登陆到服务器上,终端输入以下命令,使用openssl生成RSA密钥及证书。 # 生成一个RSA密钥 $ openssl genrsa -des3 -out 33iq.key 1024 # 拷贝一个不需要输入密码的密钥文件 $ openssl rsa -in 33iq.key -out 33iq_nopass.key # 生成一个证书请求 $ openssl req -new -key 33iq.key -out 33iq.csr # 自己签发证书 $ openssl x509 -req -days 365 -in 33iq.csr -signkey 33iq.key -out 33iq.crt |
第3个命令是生成证书请求,会提示输入省份、城市、域名信息等,重要的是,email一定要是你的域名后缀的。这样就有一个 csr 文件了,提交给 ssl 提供商的时候就是这个 csr 文件。当然我这里并没有向证书提供商申请,而是在第4步自己签发了证书。 
编辑配置文件nginx.conf,给站点加上HTTPS协议 server { server_name YOUR_DOMAINNAME_HERE; listen 443; ssl on; ssl_certificate /usr/local/nginx/conf/33iq.crt; ssl_certificate_key /usr/local/nginx/conf/33iq_nopass.key; # 若ssl_certificate_key使用33iq.key,则每次启动Nginx服务器都要求输入key的密码。 } |
重启Nginx后即可通过https访问网站了。 自行颁发的SSL证书能够实现加密传输功能,但浏览器并不信任,会出现以下提示:
 四、受浏览器信任的证书 要获取受浏览器信任的证书,则需要到证书提供商处申请。证书授证中心,又叫做CA机构,为每个使用公开密钥的用户发放一个数字证书。浏览器在默认情况下内置了一些CA机构的证书,使得这些机构颁发的证书受到信任。VeriSign即 是一个著名的国外CA机构,工行、建行、招行、支付宝、财付通等网站均使用VeriSign的证书,而网易邮箱等非金融网站采用的是中国互联网信息中心 CNNIC颁发的SSL证书。一般来说,一个证书的价格不菲,以VeriSign的证书为例,价格在每年8000元人民币左右。 据说也有免费的证书可以申请。和VeriSign一样,StartSSL也 是一家CA机构,它的根证书很久之前就被一些具有开源背景的浏览器支持(Firefox浏览器、谷歌Chrome浏览器、苹果Safari浏览器等)。后 来StartSSL竟然搞定了微软:在升级补丁中,微软更新了通过Windows根证书认证(Windows Root Certificate Program)的厂商清单,并首次将StartCom公司列入了该认证清单。现在,在Windows 7或安装了升级补丁的Windows Vista或Windows XP操作系统中,系统会完全信任由StartCom这类免费数字认证机构认证的数字证书,从而使StartSSL也得到了IE浏览器的支持。(来源及申请步骤) 五、只针对注册、登陆进行https加密处理 既然HTTPS能保证安全,为什么全世界大部分网站都仍旧在使用HTTP呢?使用HTTPS协议,对服务器来说是很大的负载开销。从性能上考虑,我 们无法做到对于每个用户的每个访问请求都进行安全加密(当然,Google这种大神除外)。作为一个普通网站,我们所追求的只是在进行交易、密码登陆等操 作时的安全。通过配置Nginx服务器,可以使用rewrite来做到这一点。 在https server下加入如下配置: if ($uri !~* "/logging.php$") { rewrite ^/(.*)$ http://$host/$1 redirect; } |
在http server下加入如下配置: if ($uri ~* "/logging.php$") { rewrite ^/(.*)$ https://$host/$1 redirect; } |
这样一来,用户会且只会在访问logging.php的情况下,才会通过https访问。 更新:有一些开发框架会根据 $_SERVER['HTTPS'] 这个 PHP 变量是否为 on 来判断当前的访问请求是否是使用 https。为此我们需要在 Nginx 配置文件中添加一句来设置这个变量。遇到 https 链接重定向后会自动跳到 http 问题的同学可以参考一下。 server { ... listen 443; location \.php$ { ... include fastcgi_params; fastcgi_param HTTPS on; # 多加这一句 } } server { ... listen 80; location \.php$ { ... include fastcgi_params; } } |
参考链接:
http://zou.lu/nginx-https-ssl-module
http://blog.s135.com/startssl/
http://www.baalchina.net/2008/08/nginx-https-rewrite/
com.mysql.jdbc.CommunicationsException: The last packet
successfully received from the server was58129 seconds ago.The last
packet sent successfully to the server was 58129 seconds ago, which is
longer than the server configured value of 'wait_timeout'. You should
consider either expiring and/or testing connection validity before use
in your application, increasing the server configured values for client
timeouts, or using the Connector/J connection property
'autoReconnect=true' to avoid this problem.
查了一下,原来是mysql超时设置的问题
如果连接闲置8小时 (8小时内没有进行数据库操作), mysql就会自动断开连接, 要重启tomcat.
解决办法:
一种. 如果不用hibernate的话, 则在 connection url中加参数: autoReconnect=true
jdbc.url=jdbc:mysql://ipaddress:3306/database?autoReconnect=true&autoReconnectForPools=true
二种。用hibernate的话, 加如下属性:
<property name="connection.autoReconnect">true</property>
<property name="connection.autoReconnectForPools">true</property>
<property name="connection.is-connection-validation-required">true</property>
三。要是还用c3p0连接池:
<property name="hibernate.c3p0.acquire_increment">1</property>
<property name="hibernate.c3p0.idle_test_period">0</property>
<property name="hibernate.c3p0.timeout">0</property>
<property name="hibernate.c3p0.validate">true</property>
四。最不好的解决方案
使用Connector/J连接MySQL数据库,程序运行较长时间后就会报以下错误:
Communications link failure,The last packet successfully received
from the server was *** millisecond ago.The last packet successfully
sent to the server was *** millisecond ago。
其中错误还会提示你修改wait_timeout或是使用Connector/J的autoReconnect属性避免该错误。
后来查了一些资料,才发现遇到这个问题的人还真不少,大部分都是使用连接池方式时才会出现这个问题,短连接应该很难出现这个问题。这个问题的原因:
MySQL服务器默认的“wait_timeout”是28800秒即8小时,意味着如果一个连接的空闲时间超过8个小时,MySQL将自动断开该连接,而连接池却认为该连接还是有效的(因为并未校验连接的有效性),当应用申请使用该连接时,就会导致上面的报错。
1.按照错误的提示,可以在JDBC
URL中使用autoReconnect属性,实际测试时使用了autoReconnect=true&
failOverReadOnly=false,不过并未起作用,使用的是5.1版本,可能真像网上所说的只对4之前的版本有效。
2.没办法,只能修改MySQL的参数了,wait_timeout最大为31536000即1年,在my.cnf中加入:
[mysqld]
wait_timeout=31536000
interactive_timeout=31536000
重启生效,需要同时修改这两个参数
SET SQL_MODE="NO_AUTO_VALUE_ON_ZERO" NO_AUTO_VALUE_ON_ZERO影响AUTO_INCREMENT列的处理。一般情况,你可以向该列插入NULL或0生成下一个序列号。NO_AUTO_VALUE_ON_ZERO禁用0,因此只有NULL可以生成下一个序列号。 如
果将0保存到表的AUTO_INCREMENT列,该模式会很有用。(不推荐采用该惯例)。例如,如果你用mysqldump转储表并重载,MySQL遇
到0值一般会生成新的序列号,生成的表的内容与转储的表不同。重载转储文件前启用NO_AUTO_VALUE_ON_ZERO可以解决该问题。
8 Virtual Desktop program: Ulteo, NX Enteprise Server, FoSS CLOUD, Orcale Virtualbox, Thinstuff, JetClouding, Go Grid,2xCloud Computing
sudo qemu-img create -f qcow2 -o size=30240M,preallocation=metadata win2003_hda.img http://blog.kreyolys.com/2011/09/27/kvm-virtual-machines-disk-format-file-basedqcow2-or-block-devicelvm2/---比较 sudo virt-install \
--name win2003_test \
--ram=1024 \
--vcpus=2 \
--disk /kvm/win2003_hda.img,bus=virtio \
--network bridge:br0,model=virtio \
--vnc \
--accelerate \
-c /share/os/win2003-i386.iso \
--disk /home/kvm/virtio-win-1.1.16.vfd,device=floppy \
-c /home/kvm/virtio-win-0.1-22.iso \
--os-type=windows \
--os-variant=win2k3 \
--noapic \
--connect \
qemu:///system \
--hvm http://www.howtoforge.com/installing-kvm-guests-with-virt-install-on-ubuntu-12.04-lts-server 半虚拟化参考: #!/bin/sh WINISO=/path/to/win7.iso #Windows ISO INSTALLDISK=win7virtio.img #Disk location. Can be LVM LV VFD=http://alt.fedoraproject.org/pub/alt/virtio-win/latest/images/bin/virtio-win-1.1.16.vfd DRVRISO=http://alt.fedoraproject.org/pub/alt/virtio-win/latest/images/bin/virtio-win-0.1-22.iso [ -e $(basename $VFD) ] || wget $VFD [ -e $(basename $DRVRISO) ] || wget $DRVRISO [ -e $INSTALLDISK ] || qemu-img create $INSTALLDISK 30G sudo virt-install -c qemu:///system --virt-type kvm --name win7virtio --ram 1024 --disk path="$INSTALLDISK",bus=virtio \ --disk $(basename $VFD),device=floppy --os-variant win7 --cdrom $(basename $DRVRISO) --cdrom "$WINISO" --vcpus 2 ENDING OF BASH SCRIPT
其他参考: In my previous article KVM Guests: Using Virt-Install to Import an Existing Disk Image we discussed how to use virt-install to import an existing disk image, which already has an OS installed into it. Additionally in KVM Guests: Using Virt-Install to Install Debian and Ubuntu Guests I documented how to initiate an install directly off of the apt mirror of your choice for Debian and Ubuntu Guests using virt-install. In this article we will use virt-install to create a guest and begin the installation using a CD or ISO image for installation media. Assumptions I Have Made - My KVM host is Ubuntu 10.10 and I am assuming that yours is as well. If it is not then the syntax might be slightly different or may not include the same features.
- That you have kvm installed on the host and you can manually create VMs using virt-manager and they work perfectly.
- That you have a bridge configured and working on other guests.
- That you have virt-install and libvirt-bin installed as well as virt-manager or virt-viewer so that you can complete the install after the virt-install command has completed.
- That you are trying to import disk images that support VirtIO devices (most recent Linux distributions, Windows does not natively support the VirtIO interface, so you will had to have manually installed the VirtIO drivers into your disk image).
The Basic Command # virt-install -n vmname -r 2048 --os-type=linux --os-variant=ubuntu --disk /kvm/images/disk/vmname_boot.img,device=disk,bus=virtio,size=40,sparse=true,format=raw -w bridge=br0,model=virtio --vnc --noautoconsole -c /kvm/images/iso/ubuntu.iso Parameters Detailed - -n vmname [the name of your VM]
- -r 2048 [the amount of RAM in MB for your VM]
- –os-type=linux [the type of OS linux or windows]
- –os-variant=ubuntu [the distribution or version of Windows for a full list see man virt-install]
- –disk /kvm/images/disk/vmname_boot.img,device=disk,bus=virtio,size=40,sparse=true,format=raw [this is a long one you define the path, then comma delimited options, device is the type of storage cdrom, disk, floppy, bus is the interface ide, scsi, usb, virtio - virtio is the fastest but you need to install the drivers for Windows and older versions of Linux don't have support]
- -w bridge=br0,model=virtio [the network configuration, in this case we are connecting to a bridge named br0, and using the virtio drivers which perform much better if you are using an OS which doesn't support virtio you can use e1000 or rtl8139. You could alternatively use --nonetworks if you do not need networking]
- –vnc [configures the graphics card to use VNC allowing you to use virt-viewer or virt-manager to see the desktop as if you were at the a monitor of a physical machine]
- –noautoconsole [configures the installer to NOT automatically try to open virt-viewer to view the console to complete the installation - this is helpful if you are working on a remote system through SSH]
- -c /kvm/images/iso/ubuntu.iso [this option specifies the cdrom device or iso image with which to boot off of. You could additionally specify the cdrom device as a disk device, and not use the -c option, it will then boot off of the cdrom if you don't specify another installation method]
LVM Disk Variation # virt-install -n vmname -r 2048 --os-type=linux --os-variant=ubuntulucid --disk /dev/vg_name/lv_name,device=disk,bus=virtio -w bridge=br0,model=virtio --vnc --noautoconsole -c /kvm/images/iso/ubuntu.iso No VirtIO Variation (Uses IDE and e1000 NIC Emulation) # virt-install -n vmname -r 2048 --os-type=linux --os-variant=ubuntulucid --disk /kvm/images/disk/vmname_boot.img,device=disk,bus=ide,size=40,sparse=true,format=raw -w bridge=br0,model=e1000 --vnc --noautoconsole -c /kvm/images/iso/ubuntu.iso Define VM Without Installation Method # virt-install -n vmname -r 2048 --os-type=linux --os-variant=ubuntulucid --disk /kvm/images/disk/vmname_boot.img,device=disk,bus=virtio,size=40,sparse=true,format=raw --disk /kvm/images/iso/ubuntu.iso,device=cdrom -w bridge=br0,model=virtio --vnc --noautoconsole
################### #安装Xming 和 Putty: ################### Xming是一个在Microsoft Windows操作系统上运行X Window System(也常称为X11或X X的工作站)的自由软件,可用于在Windows运行Linux的程序(需要在本地Windows上运行一个X Server,即是本程序)。 Linux 以及各种Unix like的操作系统现在都用基于X Window图形界面。但是由于体积臃肿导致在Linux运行3D游戏十分困难。但是得益于其接口良好、扩展性和可移植性优秀的特点(重要的是具有网络透 明性),利用它可以很方便的远程启动Linux的图形程序。 下载地址: https://sourceforge.net/projects/xming/ 或者 http://www.straightrunning.com/XmingNotes/ Xming 用OpenGL展示界面 Xming-fonts 标准X字体,部分传统的X应用的显示也需要这些字体 Xming-mesa 用更慢的Mesa展示界面, 有时X转发会更好 Xming-portable-PuTTY 提供X界面转发ssh程序 Xming-tools-and-clients 提供一些X应用专用的工具 Putty: http://www.putty.org/ #################################################### # 通过SSH来使用Xming,在putty terminal 中打开Linux下的图形界面 #################################################### 1)保证Linux server中 /etc/ssh/sshd_config X11Forwarding yes 2)Putty中X11 forwarding: Putty Configuration-->Preffered SSH protocal version->SSH版本是2. Connection-->SSH-->X11-->Enable X11 forwarding, X display location填上localhost:0, 下面的协议选择MIT-Magic-Cookie-1. 3)windows下起linux下的图形界面 启动Xming,"Display number"中的数字, 使用默认的0. 使用Putty连接Linux server,在putty终端下运行 set DISPLAY=10.160.13.229:0(注意:这里IP是Xming安装程序所在的主机的IP地址,即:X Server的IP地址,这里就是你的windows的地址,X Client是linux 服务器) (DISPLAY 环境变量格式如下hostname: displaynumber.screennumber,我们需要知道,在某些机器上,可能有多个显示设备共享使用同一套输入设备,例如在一台PC上连接 两台CRT显示器,但是它们只共享使用一个键盘和一个鼠标。这一组显示设备就拥有一个共同的displaynumber,而这组显示设备中的每个单独的设 备则拥有自己单独的 screennumber。displaynumber和screennumber都是从零开始的数字。这样,对于我们普通用户来说, displaynumber、screennumber就都是0。 hostname指Xserver所在的主机主机名或者ip地址, 图形将显示在这一机器上, 可以是启动了图形界面的Linux/Unix机器, 也可以是安装了Exceed, X-Deep/32等Windows平台运行的Xserver的Windows机器.如果Host为空, 则表示Xserver运行于本机, 并且图形程序(Xclient)使用unix socket方式连接到Xserver, 而不是TCP方式. 使用TCP方式连接时, displaynumber为连接的端口减去6000的值, 如果displaynumber为0, 则表示连接到6000端口; 使用unix socket方式连接时则表示连接的unix socket的路径,如果displaynumber为0, 则表示连接到/tmp/.X11-unix/X0 . creennumber则几乎总是0. ) 然后运行gvim,发现linux下的gvim显示在你的windows桌面上了。 如果出现: Xlib: connection to "10.160.13.229:0.0" refused by server Xlib: No protocol specified 在右下角点击Xming server的view log,发现有如下消息 AUDIT: ... Xming: client 4 rejected from IP 10.160.23.18 这个10.160.23.18正是linux server的地址 解决办法:
右键桌面上的Xming图标,修改Xming的命令,取消权限控制,使用-ac选项:
C:\Program Files\XMing\Xming.exe :0 -clipboard -multiwindow -ac 然后启动Xming,发现可以在windows下显示linux的图形界面了。。
Nginx 的 location 指令,允许对不同的 URI 进行不同的配置,既可以是字符串,也可以是正则表达式。使用正则表达式,须使用以下前缀:
(1) ~*, 表示不区分大小写的匹配。
(2) ~, 表示区分大小写的匹配。
对于非正则的匹配,即字符串匹配,有如下前缀:
(1) ^~, 表示匹配到字符串后,终止正则匹配。
(2) =, 表示精确匹配。
(3) @, 当然,这个也算不上字符串匹配。如果可以,你也可以将其理解成是正则匹配。它是一个命名标记,这种 location 不会用于正常的请求,它们通常只用于处理内部的重定向。
在匹配过程中,Nginx 将首先匹配字符串,然后匹配正则表达式。匹配到第一个正则表达式后,会停止搜索。如果匹配到正则表达式,则使用正则表达式的搜索结果,如果没有匹配到正则表达式,则使用字符串的搜索结果。
上面这段话的意思是说,有一个字符串和正则表达式均能匹配上,那么会使用正则表达式的搜索结果。这里,我们可以使用前缀"^~" 来禁止匹配到字符串后,继续检查正则表达式。匹配到 URI 后,将停止搜索。
使用前缀 "=" 可以进行精确的 URI 匹配,如果找到匹配的 URI,则停止搜索。"location = /" 只能匹配到 "/",而 "/test.html" 则不能被匹配。
正则表达式的匹配,按照它们在配置文件中的顺序进行,写在前面的优先。
另外,前缀 "@" 是一个命名标记,这种 location 不会用于正常的请求,它们通常只用于处理内部的重定向(例如:error_page, try_files)。
最后总结一下匹配的过程:
(1) 前缀 "=" 先进行匹配,如果找到了,终止搜索。
(2) 对所有其它 location 进行非正则的匹配,找到最精确匹配(对于 /blog/admin/ 这个 URI, location /blog 要比 location / 长,因此 location /blog 要比 location / 要精确)的那个。如果找到的这个是带"^~" 前缀的,则终止搜索并直接返回找到的这个,否则开始正则查找。会不会出现所有的非正则匹配都无法匹配到 URI 呢,当然,你若不定义一个 location /,这种情况的确会发生,没关系啊,它会进行正则查找的。
(3) 正则查找,按照我们配置文件中配置的 location 顺序进行查找。
(4) 如果正则查找匹配成功,则使用此正则匹配的 location,否则,使用第二步查找的结果。如果『否则』发生了,同时,第二步中的粗体字部分的假设的情况也发生了,怎么办?404 会等着你的。
参考:nginx location的管理以及查找
例子: location = / {
# 只匹配 / 查询。
[ configuration A ]
} location / {
# 匹配任何查询,因为所有请求都已 / 开头。但是正则表达式规则和长的块规则将被优先和查询匹配。
[ configuration B ]
} location ^~ /images/ {
# 匹配任何已 /images/ 开头的任何查询并且停止搜索。任何正则表达式将不会被测试。
[ configuration C ]
} location ~* \.(gif|jpg|jpeg)$ {
# 匹配任何已 gif、jpg 或 jpeg 结尾的请求。然而所有 /images/ 目录的请求将使用 Configuration C。
[ configuration D ]
} 例子请求: 1, / -> 精确匹配到第1个location,匹配停止,使用configuration A
2,/some/other/url -> 首先前缀部分字符串匹配到了第2个location,然后进行正则匹配,显然没有匹配上,则使用第2个location的配置configurationB
3,/images /1.jpg -> 首先前缀部分字符串匹配到了第2个location,但是接着对第3个location也前缀匹配上了,而且这时已经是配置文件里面对这个url的最大字 符串匹配了,并且location带有 "^~" 前缀,则不再进行正则匹配,最终使用configuration C
4,/some/other/path/to/1.jpg -> 首先前缀部分同样字符串匹配到了第2个location,然后进行正则匹配,这时正则匹配成功,则使用congifuration D 注意:按任意顺序定义这4个配置结果将仍然一样。
网上搜索到的是在配置文件中添加:
optimize_server_names off;
server_name_in_redirect off;
但在nginx0.8.38中提示:
Restarting nginx: [warn]: the "optimize_server_names" directive is deprecated, use the "server_name_in_redirect" directive instead in /etc/nginx/nginx.conf:44
[emerg]: "server_name_in_redirect" directive is duplicate in /etc/nginx/nginx.conf:45
configuration file /etc/nginx/nginx.conf test failed
大意是说:
optimize_server_names已经被弃用,只用server_name_in_redirect即可。
因此,只需在nginx.conf中添加以下一行即可。
server_name_in_redirect off;
功能描述:在Flex中嵌套框架,并且进行数值传递 1、编辑Flex框架组件iFrame.mxml <?xml version="1.0" encoding="utf-8"?> <mx:Script>
<![CDATA[ import flash.external.ExternalInterface;
import flash.geom.Point;
import flash.net.navigateToURL; private var __source: String; /**
* Move iframe through ExternalInterface. The location is determined using localToGlobal()
* on a Point in the Canvas.
**/
private function moveIFrame(): void
{ var localPt:Point = new Point(0, 0);
var globalPt:Point = this.localToGlobal(localPt); ExternalInterface.call("moveIFrame", globalPt.x, globalPt.y, this.width, this.height);
} /**
* The source URL for the IFrame. When set, the URL is loaded through ExternalInterface.
**/
public function set source(source: String): void
{
if (source)
{ if (! ExternalInterface.available)
{
throw new Error("ExternalInterface is not available in this container. Internet Explorer ActiveX, Firefox, Mozilla 1.7.5 and greater, or other browsers that support NPRuntime are required.");
}
__source = source;
ExternalInterface.call("loadIFrame", source);
moveIFrame();
}
} public function get source(): String
{
return __source;
} /**
* Whether the IFrame is visible.
**/
override public function set visible(visible: Boolean): void
{
super.visible=visible; if (visible)
{
ExternalInterface.call("showIFrame");
}
else
{
ExternalInterface.call("hideIFrame");
}
} ]]>
</mx:Script> </mx:Canvas> 2、放置到要使用框架的Flex中index.mxml,并写入引用哪个frame.html <ui:IFrame id="iFrame" source="frame.html" visible="true" width="100%" height="300"/> 3、在引用框架的Flex生成页index.html里加入: <1. wmode set to opaque 在调用swf的后面加上"wmode","opaque" "wmode","opaque"
<2. the moveIFrame,hideIFrame,showIFrame,loadIFrame methods <script language="JavaScript" type="text/javascript">
<!--
// -----------------------------------------------------------------------------
// Globals
// Major version of Flash required
var requiredMajorVersion = 9;
// Minor version of Flash required
var requiredMinorVersion = 0;
// Minor version of Flash required
var requiredRevision = 28;
// -----------------------------------------------------------------------------
// -->
function moveIFrame(x,y,w,h) {
var frameRef=document.getElementById("myFrame");
frameRef.style.left=x;
frameRef.style.top=y;
var iFrameRef=document.getElementById("myIFrame");
iFrameRef.width=w;
iFrameRef.height=h;
}
function hideIFrame(){
document.getElementById("myFrame").style.visibility="hidden";
}
function showIFrame(){
document.getElementById("myFrame").style.visibility="visible";
} function loadIFrame(url){
document.getElementById("myFrame").innerHTML = "<iframe id='myIFrame' src='" + url + "'frameborder='0'></iframe>";
} //要调用的内容,加载前三个就可以了,后面这个函数是用来调用返回值 function getEditorText(){
return document.getElementById("myIFrame").contentWindow.GetEditorText1();
} </script>
<3. the 'myFrame' div 在</body>这前写入: <div id="myFrame" style="position:absolute;background-color:transparent;border:0 px;visibility:hidden;"></div> 4、在Flex页面index.mxml输入的函数值,调用index.html中的'getEditorText'函数,并且写入到text1.text中 text1.text=ExternalInterface.call('getEditorText',param1,param2,param3,...) getEditorText:函数名称 param:参数值 5、在生成页中取得框架中的函数 框架内的frame.html,放置在head之间: function GetEditorText1(){
return getHTML(params); index.html生成页的调用,设置在head之间: function getEditorText(){
return document.getElementById("myIFrame").contentWindow.GetEditorText1();
} 后记:实际中在这里只是调用一个层放在对应位置而已,当我们在Flex中做申缩动作时,层也要跟着改变,我是如此处理的: 设置move或show事件,当move或show时则调用:iFrame.source = "frame.html" 参考: 具体的一个例子——使用IFrame这个框架的一个页面的代码如下: <!-- saved from url=(0014)about:internet -->
<html lang="en">
<head>
<meta http-equiv="Content-Type" content="text/html; charset=utf-8" />
<title></title>
<script src="AC_OETags.js" language="javascript"></script>
<style>
body { margin: 0px; overflow:hidden }
</style>
<script>
<!--
function moveIFrame(x,y,w,h) {
// alert("move to " + x + "," + y + ", " + w + "/" + h);
var frameRef=document.getElementById("myFrame");
frameRef.style.left=x;
frameRef.style.top=y;
frameRef.width=w;
frameRef.height=h;
}
function hideIFrame(){
// alert("hide");
document.getElementById("myFrame").style.visibility="hidden";
} function showIFrame(){
// alert("show");
document.getElementById("myFrame").style.visibility="visible";
} function navigateTo(url) {
// alert("nav to " + url);
// alert("from " + document.getElementById("myFrame").location);
document.getElementById("myFrame").src = url;
} -->
</script>
<script language="VBScript">
<!--
// Catch FS Commands in IE, and pass them to the corresponding JavaScript function.
Sub flexapp_FSCommand(ByVal command, ByVal str)
call flexapp_DoFSCommand(command, str)
end sub // -->
</script>
</head>
<body style="margin:0px"> <object onMouseDown="document.body.focus();"
classid='clsid:D27CDB6E-AE6D-11cf-96B8-444553540000'
codebase='http://download.macromedia.com/pub/shockwave/cabs/flash/swflash.cab#version=7,0,14 ,0'
width='100%' height='100%'
id='flexapp' name='flexapp'>
<param name='flashvars' value=''>
<param name='src' value='EXPIframe.swf'>
<param name="wmode" value="opaque">
<embed pluginspage='http://www.macromedia.com/go/getflashplayer' width='100%' height='100%'
flashvars=''
src='EXPIframe.swf'
name='flexapp'
wmode="opaque"
swLiveConnect="true"
/>
</object> <iframe id="myFrame" name="myFrame"
frameborder="0"
style="position:absolute;background- color:transparent;border:0px;visibility:hidden;"></iframe> </body>
</html>
浏览-选择文件-点击 “上传 ”后,效果如下: 弹出透明UI遮罩层 并显示上传这个过程 我这里设置太透明了 效果不是很立体 
文件结构如图: 
说明:用到“高山来客”的大文件上传组件 http://www.cnblogs.com/bashan/archive/2008/05/23/1206095.html 以及Newtonsoft.Json.dll Json字符串反序列化为对象 http://james.newtonking.com/projects/json-net.aspx jquery.blockUI.js 弹出透明遮罩层 http://malsup.com/jquery/block/ jquery.form.js 表单验证Ajax提交 参照了“蚂蚁飞了”的文章 多谢多谢 http://blog.csdn.net/jetsteven HTML: <form id="uploadForm" runat="server" enctype="multipart/form-data"> <div id="uploadfield" style="width:600px; height:500px"> <input id="File1" type="file" runat="server" /> <asp:Button ID="Button1" runat="server" Text="上传" onclick="Button1_Click" /> <p>文件上传进度条</p> <p>文件上传进度条</p> <p>文件上传进度条</p> <p>文件上传进度条</p> <p>文件上传进度条</p> <p>文件上传进度条</p> <p>文件上传进度条</p> </div> <div id="ui" style="display:none" > <div id="output" > </div> <div id="progressbar"class="ui-progressbar ui-widget ui-widget-content ui-corner-all" style="width:296px; height:20px;"></div> <input id="btn_cancel" type="button" value="取消上传" /> </div> </form> js: var inte; $(function() { $('#uploadForm').submit(function() { return false; }); $('#uploadForm').ajaxForm({ //这里调用jquery.form.js表单注册方法 beforeSubmit: function(a, f, o) {//提交前的处理 o.dataType = "json"; $('#uploadfield').block({ message: $('#ui'), css: { width: '300px', border: '#b9dcfe 1px solid',padding: '0.5em 0.2em' } }); inte = self.setInterval("getprogress()", 500); } }); $('#btn_cancel').click(function() { var uploadid = $("#UploadID").val(); $.ajax({ type: "POST", dataType: "json", async: false, //ajax的请求时同步 只有一个线程 url: "upload_ajax.ashx", data: "UploadID=" + uploadid + "&cancel=true", success: function(obj) { $("#output").html(obj.msg); inte = self.clearInterval(inte); $('#uploadfield').unblock(); } }); }); }); function getprogress() { var uploadid = $("#UploadID").val() $.ajax({ type: "POST", dataType: "json", async: false, url: "upload_ajax.ashx", data: "UploadID=" + uploadid, success: function(obj) { var p = obj.msg.Readedlength / obj.msg.TotalLength * 100; var info = "<FONT color=Green> 当前上传文件:</FONT>" + obj.msg.CurrentFile; info += "<br><FONT color=Green>" + obj.msg.FormatStatus + ":</FONT>" + obj.msg.Status; info += "<br><FONT color=Green>文件大小:</FONT>" + obj.msg.TotalLength; info += "<br><FONT color=Green>速度:</FONT>" + obj.msg.FormatRatio; info += "<br><FONT color=Green>剩余时间:</FONT>" + obj.msg.LeftTime; $("#output").html(info); $("#progressbar").progressbar({ value: 0 }); //初始化 $("#progressbar").progressbar("option", "value", p); $("#progressbar div").html(p.toFixed(2) + "%"); $("#progressbar div").addClass("percentText"); if (obj.msg.Status == 4) { inte = self.clearInterval(inte); $('#uploadfield').unblock(); } } }); } 交互过程代码: <%@ WebHandler Language="C#" Class="progressbar" %> using System; using System.Web; using BigFileUpload;//大文件引用命名空间 using Newtonsoft.Json;//对象到JSON的相互转换 using System.Text.RegularExpressions;//正则 public class progressbar : IHttpHandler { private string template = "{{statue:'{0}',msg:{1}}}"; public void ProcessRequest(HttpContext context) { context.Response.ContentType = "text/plain"; try { string guid = context.Request["UploadID"]; string cancel =context.Request["cancel"]; UploadContext c = UploadContextFactory.GetUploadContext(guid); if (!string.IsNullOrEmpty(cancel)) { c.Abort=true; throw new Exception("用户取消"); } string json = Newtonsoft.Json.JsonConvert.SerializeObject(c); WriteResultJson(1, json, context,template); }catch (Exception err) { WriteResultJson(0, err.Message, context); } } public static void WriteResultJson(int resultno, string description, HttpContext context) { WriteResultJson(resultno, description, context, "{{statue:'{0}',msg:'{1}'}}"); } public static void WriteResultJson(int resultno, string description, HttpContext context, string template) { description = ClearBR(ReplaceString(description, "'", "|", false)); context.Response.Write(string.Format(template, resultno, description)); } public static string ClearBR(string str) { Regex r = null; Match m = null; r = new Regex(@"(\r|\n)", RegexOptions.IgnoreCase); for (m = r.Match(str); m.Success; m = m.NextMatch()) { str = str.Replace(m.Groups[0].ToString(), @"\n"); } return str; } public static string ReplaceString(string SourceString, string SearchString, string ReplaceString, bool IsCaseInsensetive) { return Regex.Replace(SourceString, Regex.Escape(SearchString), ReplaceString, IsCaseInsensetive ? RegexOptions.IgnoreCase : RegexOptions.None); } public bool IsReusable { get { return false; } } } 转 http://www.cnblogs.com/jcomet/archive/2010/03/24/1693467.html
原理简单的不能再简单,就是替换变量,用转义字符替换你的字符串,把整个js变成一个字符串,然后随便加密替换,最后用eval来解释他。最后把整个js文件压缩下,没有注释,没有换行,没有空格,一般人都会看到吐血。 说了半天不够爽,总不能让大家手动加密和替换吧,以下是我的御用在线加密工具,jQuery就是用其中一个加密和压缩的: http://www.javascriptobfuscator.com/Default.aspx http://dean.edwards.name/packer/ 这2网站只提供加密,不提供解密,其实你解密了看得人也很痛苦,没有注释,没有格式,全是abcd这样无意义的变量,真有心想学你js的人,那就让他学吧。你如果真的变态,那你不妨两边混合加密几次,保准没人看得懂,不过估计浏览器解释起来也挺费劲的。 特别友情提醒:meebe.net 1.加密后记着留住你原本的js文件,不要到时候改bug都改不了了。 2.加密后如果出现运行不了,请把你加密前的文件每次函数结束都加上";",因为去除换行后,浏览器解释器没碰到";"有时候会报错。如果加密后有错,请务必多加几个";"在每个语句结束或者定义结束的时候。
转自 meebe.net
Step 1 – Install Visual Studio 2008 - If you don’t have it, get the express edition here: http://www.microsoft.com/Express/VC/
- Run through the installer, not much else to do.
Step 2 – Install wxWidgets - Download wxWidgets (select the wxMSW installer file) from here:
http://www.wxwidgets.org/downloads/ - I choose to install to c:\dev\wxwidgets\wxWidgets-2.8.10 but you can choose a different path if you want.
Step 3 – Create an environment variable for the wxWidgets path. - Click the Start icon.
- Right click on Computer and choose Properties.
- Click Advanced system settings.
- Click the Environment variables button.
- Under System Variables, click New.
- Enter the Variable name: WXWIN
- Enter the Variable Value: C:\Dev\wxWidgets-2.8.10
- Click OK, click OK, click OK (yes three times).
Step 4 – Compile the wxWidgets Libraries. - Browse to the following folder: C:\Dev\wxWidgets-2.8.10\build\msw
- Located the file called wx.dsw and open it with Visual Studio. (I just double-clicked on it.)
- Choose “Yes to all” when Visual Studio prompts you to convert the project.
- Build the project.
- Wait for the build to complete. It took approximately two minutes on my Lenovo T61p (dual core, 4 GB, Windows 7 64 bit). You should a line like this when it finishes successfully.
========== Build: 20 succeeded, 0 failed, 0 up-to-date, 0 skipped ========== - Close Visual Studio.
Step 5 – Create a new project - In Visual Studio 2008, go to File | New Project.
- Select Visual C++ | Empty Project.
- Give the project a name and click OK. I named this wxTest.
Step 6 – Create/Copy your source to this project. - Right-click on the Project name and choose Open Folder in Windows Explorer. This will open to the home folder of your project. (Don’t right click the Solution name, make sure to right click the project under the solution name.)
- Open a second Windows Explore window.
- In the second window, browse to the wxWidgets sample directory and open the Minimal folder: C:\Dev\wxWidgets-2.8.10\samples\Minimal
Note: You can choose other projects but you may want to start with Minimal and move on from there. - Copy only the minimal.cpp and minimal.rc files to your project directory (the rest are not needed).
- Close the second window pointing to the C:\Dev\wxWidgets-2.8.10\samples\Minimal directory, it is not needed anymore.
- From the explorer window open to your project directory, use ctrl+click to highlight both the minimal.cpp and minimal.rc files.
- Drag both highlighted files into the Visual Studio Window and drop them over the project name.
The minimal.cpp file should automatically be placed under the Source files section of your project.
The minimal.rc file should automatically be placed under the Resource files section of your project.
Step 7 – Customize the project properties - Right-click on the wxTest project and select Properties. (Don’t right click the Solution name, make sure to right click the project under the solution name.)
- In the top left of the properties window there is a Configuration drop down menu. Select All Configurations.
- Click to expand Configuration Properties.
- Click to expand C/C++.
Note: If you don’t see a C/C++ section, then you don’t have any source files. You need at least one C++ source file for this section to show up. - Click to highlight General.
- Enter the following in Additional Include Directories.
$(WXWIN)\include;$(WXWIN)\lib\vc_lib\mswd - Click to highlight Preprocessor.
- Enter the following in Preprocessor Definitions.
WIN32;__WXMSW__;_WINDOWS;_DEBUG;__WXDEBUG__ - Click to expand Linker.
- Click to highlight General.
- Enter the following in Additional Library Directories.
$(WXWIN)\lib\vc_lib - Click to highlight Input.
- Enter the following in Additional Dependencies.
wxmsw28d_core.lib wxbase28d.lib wxtiffd.lib wxjpegd.lib wxpngd.lib wxzlibd.lib wxregexd.lib wxexpatd.lib winmm.lib comctl32.lib rpcrt4.lib wsock32.lib odbc32.lib Note: Not all of these libraries are required for this project, however, I list all of these because you may use some of them at some point. If you don’t think one is needed, remove it and recompile and if you don’t get errors, you were right, you probably didn’t need it. - Click to expand Resources. (If you don’t see a Resources option, then you don’t have any files under resources so that is normal. Did you skip Step 5 because you probably should have added a resource in Step 5.)
- Click to highlight General.
- Enter the following in Preprocessor Definitions.
_DEBUG;__WXMSW__;__WXDEBUG__;_WINDOWS;NOPCH - Enter the following in Additional Include Directories.
$(WXWIN)\include;$(WXWIN)\lib\vc_lib\mswd
You are now ready to build your wxWidgets application using Visual Studio 2008 on Windows 7. Build your project and if you get any errors, go through it again, you probably missed a step (or I did, since I have already been caught with one step left out).
最近发现bootstrap toolkit非常好用,现在收集一下sample网站:
1.http://twitter.github.com/bootstrap/(首先主站,可惜要fq)
2.http://webdesigntutsplus.s3.amazonaws.com/tuts/195_bootstrap/demo/main.html (也是一个简单的列子,可以作为参考)
3.http://www.breakingnews.com/ (新闻类网站,做的漂亮呀。。。)
4.http://www.mobile-loft.com/ (整体风格简洁)
5.http://demo.newfies-dialer.org/ (ajax登录的例子)
void ConvertGBKToUtf8(CString& strGBK) {
int len=MultiByteToWideChar(CP_ACP, 0, (LPCTSTR)strGBK, -1, NULL,0);
unsigned short * wszUtf8 = new unsigned short[len+1];
memset(wszUtf8, 0, len * 2 + 2);
MultiByteToWideChar(CP_ACP, 0, (LPCTSTR)strGBK, -1, wszUtf8, len);
len = WideCharToMultiByte(CP_UTF8, 0, wszUtf8, -1, NULL, 0, NULL, NULL);
char *szUtf8=new char[len + 1];
memset(szUtf8, 0, len + 1);
WideCharToMultiByte (CP_UTF8, 0, wszUtf8, -1, szUtf8, len, NULL,NULL);
strGBK = szUtf8;
delete[] szUtf8;
delete[] wszUtf8;
}
void ConvertUtf8ToGBK(CString& strUtf8) {
int len=MultiByteToWideChar(CP_UTF8, 0, (LPCTSTR)strUtf8, -1, NULL,0);
unsigned short * wszGBK = new unsigned short[len+1];
memset(wszGBK, 0, len * 2 + 2);
MultiByteToWideChar(CP_UTF8, 0, (LPCTSTR)strUtf8, -1, wszGBK, len);
len = WideCharToMultiByte(CP_ACP, 0, wszGBK, -1, NULL, 0, NULL, NULL);
char *szGBK=new char[len + 1];
memset(szGBK, 0, len + 1);
WideCharToMultiByte (CP_ACP, 0, wszGBK, -1, szGBK, len, NULL,NULL);
strUtf8 = szGBK;
delete[] szGBK;
delete[] wszGBK;
}
背景 luacom是一个非常强大的模块,它使我们可以应用各种com组件,比如Word,但是,有一个问题,中文文件名它不识别。为什么呢?因为com内部是 unicode的,于是luacom要求所有输入都是utf-8的,而且luacom的输出也是utf-8的。这可肿么办啊? iconv GNU有个libiconv库,要是有这个我们就不怕了! luaforge上搜索下,果然有lua-iconv,安装! luarocks install lua-iconv 不好意思,出错啦!出错的原因有两个: - 我们没有安装libiconv库
- lua-iconv没有提供用cl编译的方法
自己编译lua-iconv
- 下载编译好的Windows版的 libiconv
- 下载 lua-iconv 源代码
- 解压 libiconv-1.9.1.bin.woe32.zip 文件,并将include目录添加为vs2008的包含文件目录,将lib目录添加为vs2008的库文件目录中(参见上一篇文章)
- 解压lua-iconv的源代码
- vs2008新建一个空的Win32 DLL工程(参见上一篇文章),命名为luaiconv,将 luaiconv.c 文件添加到工程中
- 修改源代码:int luaopen_iconv(lua_State *L) -> __declspec(dllexport) int luaopen_luaiconv(lua_State *L)
- 注意:最后生成的dll文件名,必须和 luaopen_luaiconv 中的 luaiconv 一样(参见上一篇文章)
- 项目属性 -> 链接器 -> 输入 -> 附加库文件 : lua51.lib iconv.lib charset.lib
- 编译生成release版的 luaiconv.dll 文件
- 将luaiconv.dll文件,以及libiconv-1.9.1.bin.woe32.zip解压出来的 iconv.dll(知道我为什么要改luaopen_iconv函数名了吧)和charset.dll文件一起拷贝到 luaforwindows的clibs目录中
测试 - require "luacom"
- require "luaiconv"
-
- function createIconv(to, from)
- local cd = iconv.new(to, from)
- return function(txt)
- return cd:iconv(txt)
- end
- end
-
- L = createIconv("utf-8", "gbk")
-
- -- 注意:运行本文件会修改 C:\你好word.docx 文件,请注意备份
-
- wordApp = assert(luacom.CreateObject("Word.Application"))
- wordApp.Visible = true
-
- wordDocPath = L"C:\\你好word.docx"
- if not pcall(function() wordDoc = wordApp.Documents:Open(wordDocPath) end) then
- wordDoc = wordApp.Documents:Add()
- end
-
- wordApp.Selection:TypeText(L"你好word")
- wordDoc:SaveAs2(wordDocPath, wdFormatDocument)
以上测试代码,第一次运行时会创建 C:\你好word.docx 文件,以后再运行时会打开这个文件,每次运行都会输入 “你好word” 文字。如果你是Word 2003,那么,请将docx改为doc即可。 参考文献 http://hi.baidu.com/nivrrex/blog/item/17c231adad9e8a0f4b36d6ca.html 这位大哥自己用VC的函数写了转换函数,不过没有封装成库,而且我觉得写得不够简洁,用iconv库比较好,还不容易出错 http://www.cppblog.com/darkdestiny/archive/2009/04/25/81055.html 这位大哥,自己用iconv实现了转换,也没有封装成库。我的“L”函数也是从他这借来的,非常感谢!不过,我认为它这个相比我这个有两个弱点: 1、每次调用L函数,都要经过 iconv 打开、转换、关闭的过程,而我对一种形式的转换只需要打开一次(lua-iconv实现的^_^) 2、如果要实现反向转换,即utf-8到gbk,那么还得修改模块,而我这里就不用了(当然也是lua-iconv实现的^_^)
libiconv的说明
Cocos2d-x 已经提供了对 Lua 的基本支持,但除了 Lua 的基本库外,并没有捆绑一些常用库,例如 LuaSocket。 经过一番尝试,终于搞定了此问题 :) 获得 LuaSocket 源代码后,在 cocos2d-x 项目的 libs/lua 目录中建立子目录 exts/luasocket,并将 luasocket-2.0.2/src 目录中所有的 *.c/*.h 文件拷贝到 libs/lua/exts/luasocket 目录中。 在 libs/lua/exts 目录中建立文件: lualoadexts.h #ifndef __LUALOADEXTS_H_ #define __LUALOADEXTS_H_ #include "lauxlib.h" void luax_initpreload(lua_State *L); #endif // __LUALOADEXTS_H_ lualoadexts.c #include "lualoadexts.h" // luasocket #include "luasocket.h" #include "mime.h" static luaL_Reg luax_preload_list[] = { {"socket.core", luaopen_socket_core}, {"mime.core", luaopen_mime_core}, {NULL, NULL} }; void luax_initpreload(lua_State *L) { luaL_Reg* lib = luax_preload_list; luaL_findtable(L, LUA_GLOBALSINDEX, "package.preload", sizeof(luax_preload_list)/sizeof(luax_preload_list[0])-1); for (; lib->func; lib++) { lua_pushstring(L, lib->name); lua_pushcfunction(L, lib->func); lua_rawset(L, -3); } lua_pop(L, 1); } 最后,打开 libs/lua/cocos2dx_support/LuaEngineImpl.cpp 文件,在 CCLuaScriptModule::CCLuaScriptModule() 构造函数最后载入 Lua 标准库和扩展库的代码: CCLuaScriptModule::CCLuaScriptModule() { d_ownsState = true; d_state = lua_open(); luaL_openlibs(d_state); int nOpen = tolua_Cocos2d_open(d_state); CC_UNUSED_PARAM(nOpen); nOpen = tolua_SimpleAudioEngine_open(d_state); CC_UNUSED_PARAM(nOpen); // init standard libraries luaL_openlibs(d_state); // init more libraries luax_initpreload(d_state); } LuaScoket 除了 C 代码,还有一部分是 Lua 代码,所以需要将 luasocket-2.0.2/src/*.lua 复制到项目中,然后用下列 Lua 代码进行测试: local socket = require("socket") print("socket module:", socket) print("socket.connect function:", socket.connect) print("socket.bind function:", socket.bind) print("\n") print("io module:", io)
将 Lua 源代码直接放入最终产品,显然不是个理想选择。利用 LOOP 提供的 Precompiler 工具,可以将 Lua 模块编译为 C 代码。 准备工作 LOOP 是一个 Lua 的 OOP 框架,Precompiler 则是 LOOP 中包含的一个工具。要安装 LOOP,得先安装 LuaRocks。 $ wget http://luarocks.org/releases/luarocks-2.0.5.tar.gz $ tar zxf luarocks-2.0.5.tar.gz $ cd luarocks-2.0.5 $ ./configure $ make $ sudo make install 然后安装 LOOP: $ sudo luarocks install loop OK,现在准备工作完成了,接下来就是编译 Lua 模块为 C 代码。 编译 我们的框架中有一个 display.lua 模块,下面的代码可以将这个模块编译出来: $ precompiler.lua -o luaqeeplayscripts -l "?.lua" -b -p qeeplay qeeplay/display.lua 最后会得到 luaqeeplayscripts.c/.h 文件。其中定义了函数: qeeplay int luaopen_qeeplay_display(lua_State *L); 在上述命令行中,各个参数的意义如下: -o: 指定输出文件名,例如 -o luaqeeplayscripts 会输出 luaqeeplayscripts.c/.h -l: 指定推断 lua 模块名的模式,设定为 -l "?.lua" 就会以 lua 源文件名称作为模块名。 例如 display.lua 就是 display 模块。如果 display.lua 文件在 qeeplay 子目录中, 那么 qeeplay/display.lua 的模块名就是 qeeplay.display。 -b: 编译为字节码 -p: 函数定义的前缀,一般指定一个可以方便以后对生成的 .c/.h 文件进行再处理 如果要将多个 lua 文件编译为一个 C 代码,可以添加更多的文件名到命令行中,例如: $ precompiler.lua -o luasocketscripts -l "?.lua" -b -p socket \ socket.lua \ socket/url.lua \ socket/tp.lua \ socket/smtp.lua \ socket/mime.lua \ socket/ltn12.lua \ socket/http.lua \ socket/ftp.lua 会创建 luasocketscripts.c/.h 文件,其中定义下列函数: socket int luaopen_socket(lua_State *L); socket int luaopen_socket_url(lua_State *L); socket int luaopen_socket_tp(lua_State *L); socket int luaopen_socket_smtp(lua_State *L); socket int luaopen_socket_mime(lua_State *L); socket int luaopen_socket_ltn12(lua_State *L); socket int luaopen_socket_http(lua_State *L); socket int luaopen_socket_ftp(lua_State *L); 载入编译好的 C 代码 利用前一篇文章中的 lualoadexts.c/lualoadexts.h,做一些修改即可: luaqeeplayscripts.c #include "lualoadexts.h" // qeeplay #include "luaqeeplayscripts.h" static luaL_Reg luax_preload_list[] = { {"qeeplay.display", luaopen_qeeplay_display}, {NULL, NULL} }; void luax_initpreload(lua_State *L) { .... } 如果有更多模块需要载入,只需要 include 相应的头文件,并修改 luax_preload_list 定义即可。
今天在flex里通过addEventListener函数给控件动态加载click事件侦听函数时,除了事件本身传递的Event类型参数外,还需要传递更多的参数,在网上找了一段代码,用起来还不错,张贴到这里。
package
{
public class EventArgExtend
{
public function EventArgExtend()
{
}
public static function create(f:Function,... arg):Function
{
var F:Boolean=false;
var _f:Function=function(e:*,..._arg)
{
_arg=arg
if(!F)
{
F=true
_arg.unshift(e)
}
f.apply(null,_arg)
};
return _f;
}
public static function toString():String
{
return "Class JEventDelegate";
}
}
}
=========================================== 使用的方式:
txtShow.addEventListener(MouseEvent.CLICK,EventArgExtend.create(clickHandler,1,"str"));
private function clickHandler(e:Event,...arg):void
{
Alert.show(arg[0].toString());
Alert.show(arg[1].toString());
}
还有另外一个方法,没有封装效果,不过代码更加容易理解:
var sayHello:String = "欢迎光临www.FlashJ.cn -Flash,Ria技术博客";
btn1.addEventListener(MouseEvent.CLICK,function (e:MouseEvent){clickHandlerWithArg(e,sayHello)});
function clickHandlerWithArg(e:MouseEvent,arg:String):void
{
var out:String= e.target + "发出事件(有参数) :" + arg;
trace(out);
}
编辑
作用域 功能 快捷键
全局 查找并替换 Ctrl+F
文本编辑器 查找上一个 Ctrl+Shift+K
文本编辑器 查找下一个 Ctrl+K
全局 撤销 Ctrl+Z
全局 复制 Ctrl+C
全局 恢复上一个选择 Alt+Shift+↓
全局 剪切 Ctrl+X
全局 快速修正 Ctrl1+1
全局 内容辅助 Alt+/
全局 全部选中 Ctrl+A
全局 删除 Delete
全局 上下文信息 Alt+?
Alt+Shift+?
Ctrl+Shift+Space
Java编辑器 显示工具提示描述 F2
Java编辑器 选择封装元素 Alt+Shift+↑
Java编辑器 选择上一个元素 Alt+Shift+←
Java编辑器 选择下一个元素 Alt+Shift+→
文本编辑器 增量查找 Ctrl+J
文本编辑器 增量逆向查找 Ctrl+Shift+J
全局 粘贴 Ctrl+V
全局 重做 Ctrl+Y
查看
作用域 功能 快捷键
全局 放大 Ctrl+=
全局 缩小 Ctrl+-
窗口
作用域 功能 快捷键
全局 激活编辑器 F12
全局 切换编辑器 Ctrl+Shift+W
全局 上一个编辑器 Ctrl+Shift+F6
全局 上一个视图 Ctrl+Shift+F7
全局 上一个透视图 Ctrl+Shift+F8
全局 下一个编辑器 Ctrl+F6
全局 下一个视图 Ctrl+F7
全局 下一个透视图 Ctrl+F8
文本编辑器 显示标尺上下文菜单 Ctrl+W
全局 显示视图菜单 Ctrl+F10
全局 显示系统菜单 Alt+-
导航
作用域 功能 快捷键
Java编辑器 打开结构 Ctrl+F3
全局 打开类型 Ctrl+Shift+T
全局 打开类型层次结构 F4
全局 打开声明 F3
全局 打开外部javadoc Shift+F2
全局 打开资源 Ctrl+Shift+R
全局 后退历史记录 Alt+←
全局 前进历史记录 Alt+→
全局 上一个 Ctrl+,
全局 下一个 Ctrl+.
Java编辑器 显示大纲 Ctrl+O
全局 在层次结构中打开类型 Ctrl+Shift+H
全局 转至匹配的括号 Ctrl+Shift+P
全局 转至上一个编辑位置 Ctrl+Q
Java编辑器 转至上一个成员 Ctrl+Shift+↑
Java编辑器 转至下一个成员 Ctrl+Shift+↓
文本编辑器 转至行 Ctrl+L
搜索
作用域 功能 快捷键
全局 出现在文件中 Ctrl+Shift+U
全局 打开搜索对话框 Ctrl+H
全局 工作区中的声明 Ctrl+G
全局 工作区中的引用 Ctrl+Shift+G
文本编辑
作用域 功能 快捷键
文本编辑器 改写切换 Insert
文本编辑器 上滚行 Ctrl+↑
文本编辑器 下滚行 Ctrl+↓
文件
作用域 功能 快捷键
全局 保存 Ctrl+X
Ctrl+S
全局 打印 Ctrl+P
全局 关闭 Ctrl+F4
全局 全部保存 Ctrl+Shift+S
全局 全部关闭 Ctrl+Shift+F4
全局 属性 Alt+Enter
全局 新建 Ctrl+N
项目
作用域 功能 快捷键
全局 全部构建 Ctrl+B
源代码
作用域 功能 快捷键
Java编辑器 格式化 Ctrl+Shift+F
Java编辑器 取消注释 Ctrl+\
Java编辑器 注释 Ctrl+/
Java编辑器 添加导入 Ctrl+Shift+M
Java编辑器 组织导入 Ctrl+Shift+O
Java编辑器 使用try/catch块来包围 未设置,太常用了,所以在这里列出,建议自己设置。
也可以使用Ctrl+1自动修正。
运行
作用域 功能 快捷键
全局 单步返回 F7
全局 单步跳过 F6
全局 单步跳入 F5
全局 单步跳入选择 Ctrl+F5
全局 调试上次启动 F11
全局 继续 F8
全局 使用过滤器单步执行 Shift+F5
全局 添加/去除断点 Ctrl+Shift+B
全局 显示 Ctrl+D
全局 运行上次启动 Ctrl+F11
全局 运行至行 Ctrl+R
全局 执行 Ctrl+U
重构
作用域 功能 快捷键
全局 撤销重构 Alt+Shift+Z
全局 抽取方法 Alt+Shift+M
全局 抽取局部变量 Alt+Shift+L
全局 内联 Alt+Shift+I
全局 移动 Alt+Shift+V
全局 重命名 Alt+Shift+R
全局 重做 Alt+Shift+Y
configure 脚本确定系统所具有一些特性,特别是 nginx 用来处理连接的方法。然后,它创建 Makefile 文件。 configure 支持下面的选项: --prefix=<path> - Nginx安装路径。如果没有指定,默认为 /usr/local/nginx。 --sbin-path=<path> - Nginx可执行文件安装路径。只能安装时指定,如果没有指定,默认为<prefix>/sbin/nginx。 --conf-path=<path> - 在没有给定-c选项下默认的nginx.conf的路径。如果没有指定,默认为<prefix>/conf/nginx.conf。 --pid-path=<path> - 在nginx.conf中没有指定pid指令的情况下,默认的nginx.pid的路径。如果没有指定,默认为 <prefix>/logs/nginx.pid。 --lock-path=<path> - nginx.lock文件的路径。 --error-log-path=<path> - 在nginx.conf中没有指定error_log指令的情况下,默认的错误日志的路径。如果没有指定,默认为 <prefix>/logs/error.log。 --http-log-path=<path> - 在nginx.conf中没有指定access_log指令的情况下,默认的访问日志的路径。如果没有指定,默认为 <prefix>/logs/access.log。 --user=<user> - 在nginx.conf中没有指定user指令的情况下,默认的nginx使用的用户。如果没有指定,默认为 nobody。 --group=<group> - 在nginx.conf中没有指定user指令的情况下,默认的nginx使用的组。如果没有指定,默认为 nobody。 --builddir=DIR - 指定编译的目录 --with-rtsig_module - 启用 rtsig 模块 --with-select_module --without-select_module - Whether or not to enable the select module. This module is enabled by default if a more suitable method such as kqueue, epoll, rtsig or /dev/poll is not discovered by configure. //允许或不允许开启SELECT模式,如果 configure 没有找到更合适的模式,比如:kqueue(sun os),epoll (linux kenel 2.6+), rtsig(实时信号)或者/dev/poll(一种类似select的模式,底层实现与SELECT基本相 同,都是采用轮训方法) SELECT模式将是默认安装模式 --with-poll_module --without-poll_module - Whether or not to enable the poll module. This module is enabled by default if a more suitable method such as kqueue, epoll, rtsig or /dev/poll is not discovered by configure. --with-http_ssl_module - Enable ngx_http_ssl_module. Enables SSL support and the ability to handle HTTPS requests. Requires OpenSSL. On Debian, this is libssl-dev. //开启HTTP SSL模块,使NGINX可以支持HTTPS请求。这个模块需要已经安装了OPENSSL,在DEBIAN上是libssl-dev --with-http_realip_module - 启用 ngx_http_realip_module --with-http_addition_module - 启用 ngx_http_addition_module --with-http_sub_module - 启用 ngx_http_sub_module --with-http_dav_module - 启用 ngx_http_dav_module --with-http_flv_module - 启用 ngx_http_flv_module --with-http_stub_status_module - 启用 "server status" 页 --without-http_charset_module - 禁用 ngx_http_charset_module --without-http_gzip_module - 禁用 ngx_http_gzip_module. 如果启用,需要 zlib 。 --without-http_ssi_module - 禁用 ngx_http_ssi_module --without-http_userid_module - 禁用 ngx_http_userid_module --without-http_access_module - 禁用 ngx_http_access_module --without-http_auth_basic_module - 禁用 ngx_http_auth_basic_module --without-http_autoindex_module - 禁用 ngx_http_autoindex_module --without-http_geo_module - 禁用 ngx_http_geo_module --without-http_map_module - 禁用 ngx_http_map_module --without-http_referer_module - 禁用 ngx_http_referer_module --without-http_rewrite_module - 禁用 ngx_http_rewrite_module. 如果启用需要 PCRE 。 --without-http_proxy_module - 禁用 ngx_http_proxy_module --without-http_fastcgi_module - 禁用 ngx_http_fastcgi_module --without-http_memcached_module - 禁用 ngx_http_memcached_module --without-http_limit_zone_module - 禁用 ngx_http_limit_zone_module --without-http_empty_gif_module - 禁用 ngx_http_empty_gif_module --without-http_browser_module - 禁用 ngx_http_browser_module --without-http_upstream_ip_hash_module - 禁用 ngx_http_upstream_ip_hash_module --with-http_perl_module - 启用 ngx_http_perl_module --with-perl_modules_path=PATH - 指定 perl 模块的路径 --with-perl=PATH - 指定 perl 执行文件的路径 --http-log-path=PATH - Set path to the http access log --http-client-body-temp-path=PATH - Set path to the http client request body temporary files --http-proxy-temp-path=PATH - Set path to the http proxy temporary files --http-fastcgi-temp-path=PATH - Set path to the http fastcgi temporary files --without-http - 禁用 HTTP server --with-mail - 启用 IMAP4/POP3/SMTP 代理模块 --with-mail_ssl_module - 启用 ngx_mail_ssl_module --with-cc=PATH - 指定 C 编译器的路径 --with-cpp=PATH - 指定 C 预处理器的路径 --with-cc-opt=OPTIONS - Additional parameters which will be added to the variable CFLAGS. With the use of the system library PCRE in FreeBSD, it is necessary to indicate --with-cc-opt="-I /usr/local/include". If we are using select() and it is necessary to increase the number of file descriptors, then this also can be assigned here: --with-cc-opt="-D FD_SETSIZE=2048". --with-ld-opt=OPTIONS - Additional parameters passed to the linker. With the use of the system library PCRE in FreeBSD, it is necessary to indicate --with-ld-opt="-L /usr/local/lib". --with-cpu-opt=CPU - 为特定的 CPU 编译,有效的值包括:pentium, pentiumpro, pentium3, pentium4, athlon, opteron, amd64, sparc32, sparc64, ppc64 --without-pcre - 禁止 PCRE 库的使用。同时也会禁止 HTTP rewrite 模块。在 "location" 配置指令中的正则表达式也需要 PCRE 。 --with-pcre=DIR - 指定 PCRE 库的源代码的路径。 --with-pcre-opt=OPTIONS - Set additional options for PCRE building. --with-md5=DIR - Set path to md5 library sources. --with-md5-opt=OPTIONS - Set additional options for md5 building. --with-md5-asm - Use md5 assembler sources. --with-sha1=DIR - Set path to sha1 library sources. --with-sha1-opt=OPTIONS - Set additional options for sha1 building. --with-sha1-asm - Use sha1 assembler sources. --with-zlib=DIR - Set path to zlib library sources. --with-zlib-opt=OPTIONS - Set additional options for zlib building. --with-zlib-asm=CPU - Use zlib assembler sources optimized for specified CPU, valid values are: pentium, pentiumpro --with-openssl=DIR - Set path to OpenSSL library sources --with-openssl-opt=OPTIONS - Set additional options for OpenSSL building --with-debug - 启用调试日志 --add-module=PATH - Add in a third-party module found in directory PATH 在不同版本间,选项可能会有些许变化,请总是使用 ./configure --help 命令来检查一下当前的选项列表。
见配置,摘自nginx.conf 里的server 段: server { listen 80; server_name abc.163.com ; location / { proxy_pass http://ent.163.com/ ; } location /star/ { proxy_pass http://ent.163.com ; } }里面有两个location,我先说第一个,/ 。其实这里有两种写法,分别是: location / { proxy_pass http://ent.163.com/ ; }location / { proxy_pass http://ent.163.com ; }出来的效果都一样的。 第二个location,/star/。同样两种写法都有,都出来的结果,就不一样了。 location /star/ { proxy_pass http://ent.163.com ; }当访问 http://abc.163.com/star/ 的时候,nginx 会代理访问到 http://ent.163.com/star/ ,并返回给我们。 location /star/ { proxy_pass http://ent.163.com/ ; }当访问 http://abc.163.com/star/ 的时候,nginx 会代理访问到 http://ent.163.com/ ,并返回给我们。 这两段配置,分别在于, proxy_pass http://ent.163.com/ ; 这个”/”,令到出来的结果完全不同。 前者,相当于告诉nginx,我这个location,是代理访问到http://ent.163.com 这个server的,我的location是什么,nginx 就把location 加在proxy_pass 的 server 后面,这里是/star/,所以就相当于 http://ent.163.com/star/。如果是location /blog/ ,就是代理访问到 http://ent.163.com/blog/。 后者,相当于告诉nginx,我这个location,是代理访问到http://ent.163.com/的,http: //abc.163.com/star/ == http://ent.163.com/ ,可以这样理解。改变location,并不能改变返回的内容,返回的内容始终是http://ent.163.com/ 。 如果是location /blog/ ,那就是 http://abc.163.com/blog/ == http://ent.163.com/ 。 这样,也可以解释了上面那个location / 的例子,/ 嘛,加在server 的后面,仍然是 / ,所以,两种写法出来的结果是一样的。 PS: 如果是 location ~* ^/start/(.*)\.html 这种正则的location,是不能写”/”上去的,nginx -t 也会报错的了。因为,路径都需要正则匹配了嘛,并不是一个相对固定的locatin了,必然要代理到一个server。
location syntax: location [=|~|~*|^~] /uri/ { … }
语法:location [=|~|~*|^~] /uri/ { … } default: no
默认:否 context: server
上下文:server This directive allows different configurations depending on the URI. It can be configured using both conventional strings and regular expressions. To use regular expressions, you must use the prefix ~* for case insensitive match and ~ for case sensitive match.
这个指令随URL不同而接受不同的结构。你可以配置使用常规字符串和正则表达式。如果使用正则表达式,你必须使用 ~* 前缀选择不区分大小写的匹配或者 ~ 选择区分大小写的匹配。 To determine which location directive matches a particular query, the conventional strings are checked first. Conventional strings match the beginning portion of the query and are case-sensitive – the most specific match will be used (see below on how nginx determines this). Afterwards, regular expressions are checked in the order defined in the configuration file. The first regular expression to match the query will stop the search. If no regular expression matches are found, the result from the convention string search is used.
确定 哪个location 指令匹配一个特定指令,常规字符串第一个测试。常规字符串匹配请求的开始部分并且区分大小写,最明确的匹配将会被使用(查看下文明白 nginx 怎么确定它)。然后正则表达式按照配置文件里的顺序测试。找到第一个比配的正则表达式将停止搜索。如果没有找到匹配的正则表达式,使用常规字符串的结果。 There are two ways to modify this behavior. The first is to use the prefix “=”, which matches an exact query only. If the query matches, then searching stops and the request is handled immediately. For example, if the request “/” occurs frequently, then using “location = /” will expedite the processing of this request.
有两个方法修改这个行为。第一个方法是使用 “=”前缀,将只执行严格匹配。如果这个查询匹配,那么将停止搜索并立即处理这个请求。例子:如果经常发生”/”请求,那么使用 “location = /” 将加速处理这个请求。 The second is to use the prefix ^~. This prefix is used with a conventional string and tells nginx to not check regular expressions if the path provided is a match. For instance, “location ^~ /images/” would halt searching if the query begins with /images/ – all regular expression directives would not be checked.
第二个是使用 ^~ 前缀。如果把这个前缀用于一个常规字符串那么告诉nginx 如果路径匹配那么不测试正则表达式。 Furthermore it is important to know that NGINX does the comparison not URL encoded, so if you have a URL like “/images/%20/test” then use “/images/ /test” to determine the location.
而且它重要在于 NGINX 做比较没有 URL 编码,所以如果你有一个 URL 链接’/images/%20/test’ , 那么使用 “images/ /test” 限定location。 To summarize, the order in which directives are checked is as follows:
总结,指令按下列顺序被接受: 1. Directives with the = prefix that match the query exactly. If found, searching stops.
1. = 前缀的指令严格匹配这个查询。如果找到,停止搜索。
2. All remaining directives with conventional strings, longest match first. If this match used the ^~ prefix, searching stops.
2. 剩下的常规字符串,长的在前。如果这个匹配使用 ^~ 前缀,搜索停止。
3. Regular expressions, in order of definition in the configuration file.
3. 正则表达式,按配置文件里的顺序。
4. If #3 yielded a match, that result is used. Else the match from #2 is used.
4. 如果第三步产生匹配,则使用这个结果。否则使用第二步的匹配结果。 Example:
例子: location = / {
# matches the query / only.
# 只匹配 / 查询。
[ configuration A ]
}
location / {
# matches any query, since all queries begin with /, but regular
# expressions and any longer conventional blocks will be
# matched first.
# 匹配任何查询,因为所有请求都已 / 开头。但是正则表达式规则和长的块规则将被优先和查询匹配。
[ configuration B ]
}
location ^~ /images/ {
# matches any query beginning with /images/ and halts searching,
# so regular expressions will not be checked.
# 匹配任何已 /images/ 开头的任何查询并且停止搜索。任何正则表达式将不会被测试。
[ configuration C ]
}
location ~* “.(gif|jpg|jpeg)$ {
# matches any request ending in gif, jpg, or jpeg. However, all
# requests to the /images/ directory will be handled by
# Configuration C.
# 匹配任何已 gif、jpg 或 jpeg 结尾的请求。然而所有 /images/ 目录的请求将使用 Configuration C。
[ configuration D ]
} Example requests:
例子请求: * / -> configuration A
* /documents/document.html -> configuration B
* /images/1.gif -> configuration C
* /documents/1.jpg -> configuration D Note that you could define these 4 configurations in any order and the results would remain the same.
注意:按任意顺序定义这4个配置结果将仍然一样。 一、介绍Nginx是俄罗斯人编写的十分轻量级的HTTP服务器,Nginx,它的发音为“engine X”, 是一个高性能的HTTP和反向代理服务器,同时也是一个IMAP/POP3/SMTP 代理服务器.
二、Location语法语法:location [=|~|~*|^~] /uri/ { … }
注:
1、~ 为区分大小写匹配
2、~* 为不区分大小写匹配
3、!~和!~*分别为区分大小写不匹配及不区分大小写不匹配
示例一:
location / { }
匹配任何查询,因为所有请求都以 / 开头。但是正则表达式规则将被优先和查询匹配。
示例二:
location =/ {}
仅仅匹配/
示例三:
location ~* \.(gif|jpg|jpeg)$ {
rewrite \.(gif|jpg)$ /logo.png;
}
注:不区分大小写匹配任何以gif,jpg,jpeg结尾的文件
三、ReWrite语法
last – 基本上都用这个Flag。
break – 中止Rewirte,不在继续匹配
redirect – 返回临时重定向的HTTP状态302
permanent – 返回永久重定向的HTTP状态301
1、下面是可以用来判断的表达式:
-f和!-f用来判断是否存在文件
-d和!-d用来判断是否存在目录
-e和!-e用来判断是否存在文件或目录
-x和!-x用来判断文件是否可执行
2、下面是可以用作判断的全局变量
例:http://localhost:88/test1/test2/test.php
$host:localhost
$server_port:88
$request_uri:http://localhost:88/test1/test2/test.php
$document_uri:/test1/test2/test.php
$document_root:D:\nginx/html
$request_filename:D:\nginx/html/test1/test2/test.php
四、Redirect语法
server {
listen 80;
server_name start.igrow.cn;
index index.html index.php;
root html;
if ($http_host !~ “^star\.igrow\.cn 正则表达式匹配,其中: - * ~ 为区分大小写匹配
- * ~* 为不区分大小写匹配
- * !~和!~*分别为区分大小写不匹配及不区分大小写不匹配
文件及目录匹配,其中: - * -f和!-f用来判断是否存在文件
- * -d和!-d用来判断是否存在目录
- * -e和!-e用来判断是否存在文件或目录
- * -x和!-x用来判断文件是否可执行
flag标记有: - * last 相当于Apache里的[L]标记,表示完成rewrite
- * break 终止匹配, 不再匹配后面的规则
- * redirect 返回302临时重定向 地址栏会显示跳转后的地址
- * permanent 返回301永久重定向 地址栏会显示跳转后的地址
一些可用的全局变量有,可以用做条件判断(待补全) - $args
- $content_length
- $content_type
- $document_root
- $document_uri
- $host
- $http_user_agent
- $http_cookie
- $limit_rate
- $request_body_file
- $request_method
- $remote_addr
- $remote_port
- $remote_user
- $request_filename
- $request_uri
- $query_string
- $scheme
- $server_protocol
- $server_addr
- $server_name
- $server_port
- $uri
结合QeePHP的例子 - if (!-d $request_filename) {
- rewrite ^/([a-z-A-Z]+)/([a-z-A-Z]+)/?(.*)$ /index.php?namespace=user&controller=$1&action=$2&$3 last;
- rewrite ^/([a-z-A-Z]+)/?$ /index.php?namespace=user&controller=$1 last;
- break;
多目录转成参数
abc.domian.com/sort/2 => abc.domian.com/index.php?act=sort&name=abc&id=2 - if ($host ~* (.*)\.domain\.com) {
- set $sub_name $1;
- rewrite ^/sort\/(\d+)\/?$ /index.php?act=sort&cid=$sub_name&id=$1 last;
- }
目录对换
/123456/xxxx -> /xxxx?id=123456 - rewrite ^/(\d+)/(.+)/ /$2?id=$1 last;
例如下面设定nginx在用户使用ie的使用重定向到/nginx-ie目录下: - if ($http_user_agent ~ MSIE) {
- rewrite ^(.*)$ /nginx-ie/$1 break;
- }
目录自动加“/” - if (-d $request_filename){
- rewrite ^/(.*)([^/])$ http://$host/$1$2/ permanent;
- }
禁止htaccess - location ~/\.ht {
- deny all;
- }
禁止多个目录 - location ~ ^/(cron|templates)/ {
- deny all;
- break;
- }
禁止以/data开头的文件
可以禁止/data/下多级目录下.log.txt等请求; - location ~ ^/data {
- deny all;
- }
禁止单个目录
不能禁止.log.txt能请求 - location /searchword/cron/ {
- deny all;
- }
禁止单个文件 - location ~ /data/sql/data.sql {
- deny all;
- }
给favicon.ico和robots.txt设置过期时间;
这里为favicon.ico为99天,robots.txt为7天并不记录404错误日志 - location ~(favicon.ico) {
- log_not_found off;
- expires 99d;
- break;
- }
- location ~(robots.txt) {
- log_not_found off;
- expires 7d;
- break;
- }
设定某个文件的过期时间;这里为600秒,并不记录访问日志 - location ^~ /html/scripts/loadhead_1.js {
- access_log off;
- root /opt/lampp/htdocs/web;
- expires 600;
- break;
- }
文件反盗链并设置过期时间
这里的return 412 为自定义的http状态码,默认为403,方便找出正确的盗链的请求
“rewrite ^/ http://leech.c1gstudio.com/leech.gif;”显示一张防盗链图片
“access_log off;”不记录访问日志,减轻压力
“expires 3d”所有文件3天的浏览器缓存 - location ~* ^.+\.(jpg|jpeg|gif|png|swf|rar|zip|css|js)$ {
- valid_referers none blocked *.c1gstudio.com *.c1gstudio.net localhost 208.97.167.194;
- if ($invalid_referer) {
- rewrite ^/ http://leech.c1gstudio.com/leech.gif;
- return 412;
- break;
- }
- access_log off;
- root /opt/lampp/htdocs/web;
- expires 3d;
- break;
- }
只充许固定ip访问网站,并加上密码 - root /opt/htdocs/www;
- allow 208.97.167.194;
- allow 222.33.1.2;
- allow 231.152.49.4;
- deny all;
- auth_basic “C1G_ADMIN”;
- auth_basic_user_file htpasswd;
将多级目录下的文件转成一个文件,增强seo效果
/job-123-456-789.html 指向/job/123/456/789.html - rewrite ^/job-([0-9]+)-([0-9]+)-([0-9]+)\.html$ /job/$1/$2/jobshow_$3.html last;
将根目录下某个文件夹指向2级目录
如/shanghaijob/ 指向 /area/shanghai/
如果你将last改成permanent,那么浏览器地址栏显是/location/shanghai/ - rewrite ^/([0-9a-z]+)job/(.*)$ /area/$1/$2 last;
上面例子有个问题是访问/shanghai 时将不会匹配 - rewrite ^/([0-9a-z]+)job$ /area/$1/ last;
- rewrite ^/([0-9a-z]+)job/(.*)$ /area/$1/$2 last;
这样/shanghai 也可以访问了,但页面中的相对链接无法使用,
如./list_1.html真实地址是/area/shanghia/list_1.html会变成/list_1.html,导至无法访问。 那我加上自动跳转也是不行咯
(-d $request_filename)它有个条件是必需为真实目录,而我的rewrite不是的,所以没有效果 - if (-d $request_filename){
- rewrite ^/(.*)([^/])$ http://$host/$1$2/ permanent;
- }
知道原因后就好办了,让我手动跳转吧 - rewrite ^/([0-9a-z]+)job$ /$1job/ permanent;
- rewrite ^/([0-9a-z]+)job/(.*)$ /area/$1/$2 last;
文件和目录不存在的时候重定向: - if (!-e $request_filename) {
- proxy_pass http://127.0.0.1;
- }
域名跳转 - server
- {
- listen 80;
- server_name jump.c1gstudio.com;
- index index.html index.htm index.php;
- root /opt/lampp/htdocs/www;
- rewrite ^/ http://www.c1gstudio.com/;
- access_log off;
- }
多域名转向 - server_name www.c1gstudio.com www.c1gstudio.net;
- index index.html index.htm index.php;
- root /opt/lampp/htdocs;
- if ($host ~ “c1gstudio\.net”) {
- rewrite ^(.*) http://www.c1gstudio.com$1 permanent;
- }
三级域名跳转 - if ($http_host ~* “^(.*)\.i\.c1gstudio\.com$”) {
- rewrite ^(.*) http://top.yingjiesheng.com$1;
- break;
- }
域名镜向 - server
- {
- listen 80;
- server_name mirror.c1gstudio.com;
- index index.html index.htm index.php;
- root /opt/lampp/htdocs/www;
- rewrite ^/(.*) http://www.c1gstudio.com/$1 last;
- access_log off;
- }
某个子目录作镜向 - location ^~ /zhaopinhui {
- rewrite ^.+ http://zph.c1gstudio.com/ last;
- break;
- }
discuz ucenter home (uchome) rewrite - rewrite ^/(space|network)-(.+)\.html$ /$1.php?rewrite=$2 last;
- rewrite ^/(space|network)\.html$ /$1.php last;
- rewrite ^/([0-9]+)$ /space.php?uid=$1 last;
discuz 7 rewrite - rewrite ^(.*)/archiver/((fid|tid)-[\w\-]+\.html)$ $1/archiver/index.php?$2 last;
- rewrite ^(.*)/forum-([0-9]+)-([0-9]+)\.html$ $1/forumdisplay.php?fid=$2&page=$3 last;
- rewrite ^(.*)/thread-([0-9]+)-([0-9]+)-([0-9]+)\.html$ $1/viewthread.php?tid=$2&extra=page\%3D$4&page=$3 last;
- rewrite ^(.*)/profile-(username|uid)-(.+)\.html$ $1/viewpro.php?$2=$3 last;
- rewrite ^(.*)/space-(username|uid)-(.+)\.html$ $1/space.php?$2=$3 last;
- rewrite ^(.*)/tag-(.+)\.html$ $1/tag.php?name=$2 last;
给discuz某版块单独配置域名 - server_name bbs.c1gstudio.com news.c1gstudio.com;
- location = / {
- if ($http_host ~ news\.c1gstudio.com$) {
- rewrite ^.+ http://news.c1gstudio.com/forum-831-1.html last;
- break;
- }
- }
discuz ucenter 头像 rewrite 优化 - location ^~ /ucenter {
- location ~ .*\.php?$
- {
- #fastcgi_pass unix:/tmp/php-cgi.sock;
- fastcgi_pass 127.0.0.1:9000;
- fastcgi_index index.php;
- include fcgi.conf;
- }
- location /ucenter/data/avatar {
- log_not_found off;
- access_log off;
- location ~ /(.*)_big\.jpg$ {
- error_page 404 /ucenter/images/noavatar_big.gif;
- }
- location ~ /(.*)_middle\.jpg$ {
- error_page 404 /ucenter/images/noavatar_middle.gif;
- }
- location ~ /(.*)_small\.jpg$ {
- error_page 404 /ucenter/images/noavatar_small.gif;
- }
- expires 300;
- break;
- }
- }
jspace rewrite - location ~ .*\.php?$
- {
- #fastcgi_pass unix:/tmp/php-cgi.sock;
- fastcgi_pass 127.0.0.1:9000;
- fastcgi_index index.php;
- include fcgi.conf;
- }
- location ~* ^/index.php/
- {
- rewrite ^/index.php/(.*) /index.php?$1 break;
- fastcgi_pass 127.0.0.1:9000;
- fastcgi_index index.php;
- include fcgi.conf;
- }
amp;quot  { {
rewrite ^(.*) http://star.igrow.cn$1 redirect;
}
}
五、防盗链location ~* \.(gif|jpg|swf)$ {
valid_referers none blocked start.igrow.cn sta.igrow.cn;
if ($invalid_referer) {
rewrite ^/ http://$host/logo.png;
}
}
六、根据文件类型设置过期时间
location ~* \.(js|css|jpg|jpeg|gif|png|swf)$ {
if (-f $request_filename) {
expires 1h;
break;
}
}
七、禁止访问某个目录
location ~* \.(txt|doc)${
root /data/www/wwwroot/linuxtone/test;
deny all;
}
XX 
先用现成的组件玩一下,一会再去看看组件源码研究一下。 http://code.google.com/p/flex-iframe/ 下载了flexiframe.swc,引入工程。 flex代码 <?xml version="1.0" encoding="utf-8"?>
<mx:Application xmlns:mx="http://www.adobe.com/2006/mxml"
layout="absolute"
xmlns:code="http://code.google.com/p/flex-iframe/">
<mx:Panel width="500"
height="400"> <code:IFrame id="googleIFrame"
label="Google"
source="http://www.google.com"
width="100%"
height="100%"/>
</mx:Panel> </mx:Application> 运行,发现,可以了。 
不过,有个问题,鼠标点击别处的时候,网页消失了。 找了很多地方,找到了解决方法。设置wmode。 首先了解一下wmode是什么。 window mode(wmode)
wmode即窗口模式总共有三种: window 模式
默认情况下的显示模式,在这种模式下flash player有自己的窗口句柄,这就意味着flash影片是存在于Windows中的一个显示实例,并且是在浏览器核心显示窗口之上的,所以flash只 是貌似显示在浏览器中,但这也是flash最快最有效率的渲染模式。由于他是独立于浏览器的HTML渲染表面,这就导致默认显示方式下flash总是会遮 住位置与他重合的所有DHTML层。
但是大多数苹果电脑浏览器会允许DHTML层显示在flash之上,但当flash影片播放时会出现比较诡异的现象,比如DHTML层像被flash刮掉一块一样显示异常。
Opaque 模式
这 是一种无窗口模式,在这种情况下flash player没有自己的窗口句柄,这就需要浏览器需要告诉flash player在浏览器的渲染表面绘制的时间和位置。这时flash影片就不会在高于浏览器HTML渲染表面而是与其他元素一样在同一个页面上,因此你就可 以使用z-index值来控制DHTML元素是遮盖flash或者被遮盖。
Transparent 模式
透明模式, 在这种模式下flash player会将stage的背景色alpha值将为0并且只会绘制stage上真实可见的对象,同样你也可以使用z-index来控制flash影片的 深度值,但是与Opaque模式不同的是这样做会降低flash影片的回放效果,而且在9.0.115之前的flash player版本设置wmode=”opaque”或”transparent”会导致全屏模式失效。 这边,我们将wmode设置为transparent。 我直接修改了工程的html模板,红色字体部分为新增加的代码。 if ( hasProductInstall && !hasRequestedVersion ) {
// DO NOT MODIFY THE FOLLOWING FOUR LINES
// Location visited after installation is complete if installation is required
var MMPlayerType = (isIE == true) ? "ActiveX" : "PlugIn";
var MMredirectURL = window.location;
document.title = document.title.slice(0, 47) + " - Flash Player Installation";
var MMdoctitle = document.title; AC_FL_RunContent(
"src", "playerProductInstall",
"FlashVars", "MMredirectURL="+MMredirectURL+'&MMplayerType='+MMPlayerType+'&MMdoctitle='+MMdoctitle+"",
"width", "${width}",
"height", "${height}",
"align", "middle",
"id", "${application}",
"quality", "high",
"bgcolor", "${bgcolor}",
"name", "${application}",
"allowScriptAccess","sameDomain",
"type", "application/x-shockwave-flash",
"pluginspage", "http://www.adobe.com/go/getflashplayer",
"wmode","transparent"
);
} else if (hasRequestedVersion) {
// if we've detected an acceptable version
// embed the Flash Content SWF when all tests are passed
AC_FL_RunContent(
"src", "${swf}",
"width", "${width}",
"height", "${height}",
"align", "middle",
"id", "${application}",
"quality", "high",
"bgcolor", "${bgcolor}",
"name", "${application}",
"allowScriptAccess","sameDomain",
"type", "application/x-shockwave-flash",
"pluginspage", "http://www.adobe.com/go/getflashplayer",
"wmode","transparent"
);
} else { // flash is too old or we can't detect the plugin
var alternateContent = 'Alternate HTML content should be placed here. '
+ 'This content requires the Adobe Flash Player. '
+ '<a href=http://www.adobe.com/go/getflash/>Get Flash</a>';
document.write(alternateContent); // insert non-flash content
} <embed src="${swf}.swf" quality="high" bgcolor="${bgcolor}"
width="${width}" height="${height}" name="${application}" align="center"
play="true"
loop="false"
quality="high"
allowScriptAccess="sameDomain"
type="application/x-shockwave-flash"
pluginspage="http://www.adobe.com/go/getflashplayer"
wmode="transparent">
</embed> 保存,运行。问题解决了。
restrict限制的意思 1. 限制某个字符的输入,用符号 ^ 跟上要限制的字符,可跟多个字符
<!-- 限制字符"~"的输入 -->
<mx:TextInput id="xxx" restrict="^~" />
<!-- 限制字符"ab"的输入 -->
<mx:TextInput id="xxx" restrict="^ab" />
2. 设置只能输入某些字符,将允许输入的字符罗列出来即可,也可以用 - 组合表示字符范围
<!-- 只能输入abc -->
<mx:TextInput id="xxx" restrict="abc" />
<!-- 只能输入小写字母 -->
<mx:TextInput id="xxx" restrict="a-z" />
<!-- 只能输入小写字母、大写字母和数字 -->
<mx:TextInput id="xxx" restrict="a-zA-Z0-9" />
3. 组合使用
<!-- 只能输入数字和符号"." -->
<mx:TextInput id="xxx" restrict="0-9." />
<!-- 只能输入除ab之外的小写字母 -->
<mx:TextInput id="xxx" restrict="a-z^ab" />
下面罗列出了一些常用的正则表达式: ^/d+$ //匹配非负整数(正整数 + 0)
^[0-9]*[1-9][0-9]*$ //匹配正整数
^((-/d+)|(0+))$ //匹配非正整数(负整数 + 0)
^-[0-9]*[1-9][0-9]*$ //匹配负整数
^-?/d+$ //匹配整数
^/d+(/./d+)?$ //匹配非负浮点数(正浮点数 + 0)
^(([0-9]+/.[0-9]*[1-9][0-9]*)|([0-9]*[1-9][0-9]*/.[0-9]+)|([0-9]*[1-9][0-9]*))$ //匹配正浮点数
^((-/d+(/./d+)?)|(0+(/.0+)?))$ //匹配非正浮点数(负浮点数 + 0)
^(-(([0-9]+/.[0-9]*[1-9][0-9]*)|([0-9]*[1-9][0-9]*/.[0-9]+)|([0-9]*[1-9][0-9]*)))$ //匹配负浮点数
^(-?/d+)(/./d+)?$ //匹配浮点数
^[A-Za-z]+$ //匹配由26个英文字母组成的字符串
^[A-Z]+$ //匹配由26个英文字母的大写组成的字符串
^[a-z]+$ //匹配由26个英文字母的小写组成的字符串
^[A-Za-z0-9]+$ //匹配由数字和26个英文字母组成的字符串
^/w+$ //匹配由数字、26个英文字母或者下划线组成的字符串
^[/w-]+(/.[/w-]+)*@[/w-]+(/.[/w-]+)+$ //匹配email地址
^[a-zA-z]+://匹配(/w+(-/w+)*)(/.(/w+(-/w+)*))*(/?/S*)?$ //匹配url 匹配中文字符的正则表达式: [/u4e00-/u9fa5]
匹配双字节字符(包括汉字在内):[^/x00-/xff]
匹配空行的正则表达式:/n[/s| ]*/r
匹配HTML标记的正则表达式:/<(.*)>.*<//>|<(.*) //>/
匹配首尾空格的正则表达式:(^/s*)|(/s*$)
匹配Email地址的正则表达式:/w+([-+.]/w+)*@/w+([-.]/w+)*/./w+([-.]/w+)*
匹配网址URL的正则表达式:^[a-zA-z]+://(/w+(-/w+)*)(/.(/w+(-/w+)*))*(/?/S*)?$
匹配帐号是否合法(字母开头,允许5-16字节,允许字母数字下划线):^[a-zA-Z][a-zA-Z0-9_]{4,15}$
匹配国内电话号码:(/d{3}-|/d{4}-)?(/d{8}|/d{7})?
匹配腾讯QQ号:^[1-9]*[1-9][0-9]*$
下表是元字符及其在正则表达式上下文中的行为的一个完整列表:
/ 将下一个字符标记为一个特殊字符、或一个原义字符、或一个后向引用、或一个八进制转义符。
^ 匹配输入字符串的开始位置。如果设置了 RegExp 对象的Multiline 属性,^ 也匹配 ’/n’ 或 ’/r’ 之后的位置。
$ 匹配输入字符串的结束位置。如果设置了 RegExp 对象的Multiline 属性,$ 也匹配 ’/n’ 或 ’/r’ 之前的位置。
* 匹配前面的子表达式零次或多次。
+ 匹配前面的子表达式一次或多次。+ 等价于 {1,}。
? 匹配前面的子表达式零次或一次。? 等价于 {0,1}。
{n} n 是一个非负整数,匹配确定的n 次。
{n,} n 是一个非负整数,至少匹配n 次。
{n,m} m 和 n 均为非负整数,其中n <= m。最少匹配 n 次且最多匹配 m 次。在逗号和两个数之间不能有空格。
? 当该字符紧跟在任何一个其他限制符 (*, +, ?, {n}, {n,}, {n,m}) 后面时,匹配模式是非贪婪的。非贪婪模式尽可能少的匹配所搜索的字符串,而默认的贪婪模式则尽可能多的匹配所搜索的字符串。
. 匹配除 “/n” 之外的任何单个字符。要匹配包括 ’/n’ 在内的任何字符,请使用象 ’[./n]’ 的模式。
(pattern) 匹配pattern 并获取这一匹配。
(?:pattern) 匹配pattern 但不获取匹配结果,也就是说这是一个非获取匹配,不进行存储供以后使用。
x|y 匹配 x 或 y。
[xyz] 字符集合。
[^xyz] 负值字符集合。
[a-z] 字符范围,匹配指定范围内的任意字符。
[^a-z] 负值字符范围,匹配任何不在指定范围内的任意字符。
/b 匹配一个单词边界,也就是指单词和空格间的位置。
/B 匹配非单词边界。
/cx 匹配由x指明的控制字符。
/d 匹配一个数字字符。等价于 [0-9]。 /D 匹配一个非数字字符。等价于 [^0-9]。
/f 匹配一个换页符。等价于 /x0c 和 /cL。
/n 匹配一个换行符。等价于 /x0a 和 /cJ。
/r 匹配一个回车符。等价于 /x0d 和 /cM。
/s 匹配任何空白字符,包括空格、制表符、换页符等等。等价于[ /f/n/r/t/v]。
/S 匹配任何非空白字符。等价于 [^ /f/n/r/t/v]。
/t 匹配一个制表符。等价于 /x09 和 /cI。
/v 匹配一个垂直制表符。等价于 /x0b 和 /cK。
/w 匹配包括下划线的任何单词字符。等价于’[A-Za-z0-9_]’。
/W 匹配任何非单词字符。等价于 ’[^A-Za-z0-9_]’。
/xn 匹配 n,其中 n 为十六进制转义值。十六进制转义值必须为确定的两个数字长。
/num 匹配 num,其中num是一个正整数。对所获取的匹配的引用。
/n 标识一个八进制转义值或一个后向引用。如果 /n 之前至少 n 个获取的子表达式,则 n 为后向引用。否则,如果 n 为八进制数字 (0-7),则 n 为一个八进制转义值。
/nm 标识一个八进制转义值或一个后向引用。如果 /nm 之前至少有is preceded by at least nm 个获取得子表达式,则 nm 为后向引用。如果 /nm 之前至少有 n 个获取,则 n 为一个后跟文字 m 的后向引用。如果前面的条件都不满足,若 n 和 m 均为八进制数字 (0-7),则 /nm 将匹配八进制转义值 nm。
众所周知Flex主要用于B/S结构程序的开发,凡是这类型的开发都存在页面间的传值的问题,通常一般的B/S开发主要不外乎使用地址修改法,隐藏表单域等方法,但是这些方法在Flex中确没有用,原因是应为Flex支持的模型和普通的B/S开发语言不一样,一般的B/S开发语言使用的主要是请求/响应模型,而Flex采用的是事件驱动模型(这种模型主要见于C/S结构程序),所以我们的Form表单等传值方法就无效了,哪么我们如何在两个这样模型的页面中传递数据呢?下面我们讲述下两种常用的传值方法:
一、 利用ExternalInterface调用Javascript
a) 该方法主要利用ExternalInterface的call方法调用Javascript函数,进而修改地址(有点类似于地址修改法),在接受页面上主要是靠BrowserManager获取地址栏信息,并利用URLUtil截取参数。
b) 该方法虽然简单但是确调用了2种语言,给编写带来一定的困难
发送页面代码(second.html):
<?xml version="1.0" encoding="utf-8"?>
<mx:Application xmlns:mx="http://www.adobe.com/2006/mxml" layout="absolute">
<mx:Script>
<![CDATA[
function kk():void{
var val�:String = myparam.text;
ExternalInterface.call("function(){window.location.href='http://localhost:8080/send/page.html#param1="+val�+"'}"); }
]]>
</mx:Script>
<mx:TextInput id="myparam"></mx:TextInput>
<mx:Button name="ok" click="kk()" x="185" label="提交"></mx:Button>
</mx:Application>
接收页面代码(page.html):
<?xml version="1.0" encoding="utf-8"?>
<mx:Application xmlns:mx="http://www.adobe.com/2006/mxml" layout="absolute" creationComplete="init()" >
<mx:Script>
<![CDATA[
import mx.managers.IBrowserManager;
import mx.managers.BrowserManager;
import mx.utils.URLUtil;
[Bindable]
var param:String;
function init():void
{
var bm:IBrowserManager = BrowserManager.getInstance();
bm.init();
var o:Object = URLUtil.stringToObject(bm.fragment,"&");
param = o.param1;
}
]]>
</mx:Script>
<mx:TextInput id="val" text="{param}">
</mx:TextInput>
</mx:Application>
二、 利用SharedObject(本地共享对象传送)
a) 该对象类似于Cookie,将需要传送的数据放在SharedObject对象中,而实际上在本机大致在(win2k和 win xp中,默认路径为C:/Documents and Settings/username/Application Data/Macromedia/Flash Player/#SharedObjects (username为机器的用户名))位置生成一个sol文件,该对象具有一个data属性,只要将你要传的数据按键值对放进去就好了,下次读取的时候就在本地直接读取即可
b) 遗憾的是,该对象要求你自己创建还要自己清除,并且在写入数据时一定要强制刷新,否则数据无法希尔
发送页面代码(index.html):
<?xml version="1.0" encoding="utf-8"?>
<mx:Application xmlns:mx="http://www.adobe.com/2006/mxml" layout="absolute">
<mx:Script>
<![CDATA[
function s mit():void
{
var param:String = myparam.text;
//创建全局SharedObject,如果不用全局就去掉后面的"/",一旦去掉那么cookie只能被自己的Application使用,其他Applicaiton无法看见
//myparam是要求在本机创建一个叫cookie.sol的文件
var obj:SharedObject = SharedObject.getLocal("cookie","/");
obj.data.username=myparam.text;
obj.flush();
//调用URLReq�st将跳转到second.html页面
var req�st:URLReq�st =new URLReq�st();
req�st.url="second.html";
navigateToURL(req�st);
}
]]>
</mx:Script>
<mx:TextInput id="myparam"></mx:TextInput>
<mx:Button label="提交" click="s mit()" x="177"></mx:Button>
</mx:Application>
接收页面代码(second.html):
<?xml version="1.0" encoding="utf-8"?>
<mx:Application xmlns:mx="http://www.adobe.com/2006/mxml" layout="absolute" creationComplete="init()">
<mx:Script>
<![CDATA[
[Bindable]
var param:String;
function init():void
{
//在本地找到myparam.sol文件
var obj:SharedObject =SharedObject.getLocal("cookie","/");
//读取前页存入的数据
param = obj.data.username;
//用完了别忘了将myparam.sol文件删除
obj.clear();
}
]]>
</mx:Script>
<mx:TextInput id="mypar" text="{param}"></mx:TextInput>
</mx:Application>
参数输入进程号...
#!/bin/bash if [ -z $1 ]
then
echo "Need a pid argument"
exit 1
fi if [ -d /proc/$1 ];then
exit 0
else
exit 1
fi
nc -vv -w 2 -z vm-node10 22 ID=$? echo $ID
1为失败、0为成功
首先把自己的脚本放到/etc/init.d中,,然后执行如下指令: update-rc.d a start 90 2 3 4 5 . stop 90 0 1 6 . 其中a就是你的脚本,注意有两个点。 a脚本范例。 #!/bin/sh
# Source function library.
if [ -f /etc/init.d/functions ]; then
. /etc/init.d/functions
else
. /lib/lsb/init-functions
fi
MOD=/a.ko
start()
{
echo -n $"insert a kernel module: "
/sbin/insmod $MOD
echo
}
stop()
{
echo -n $"remove a kernel module: "
/sbin/rmmod a -f
echo
}
[ -f $MOD ] || exit 0
# See how we were called.
case "$1" in
start)
start
;;
stop)
stop
;;
restart|reload)
stop
start
;;
*)
echo $"Usage: $0 {start|stop|restart|reload}" update-rc.d命令,是用来自动的升级System V类型初始化脚本,简单的讲就是,哪些东西是你想要系统在引导初始化的时候运行的,哪些是希望在关机或重启时停止的,可以用它来帮你设置。这些脚本的连接 位于/etc/rcn.d/LnName,对应脚本位于/etc/init.d/Script-name.
1、设置指定启动顺序、指定运行级别的启动项:
update-rc.d <service> start <order> <runlevels>
2、设置在指定运行级中,按指定顺序停止:
update-rc.d <service> stop <order> <runlevels>
3、从所有的运行级别中删除指定的启动项:
update-rc.d -f <script-name> remove
例如:
update-rc.d script-name start 90 1 2 3 4 5 . stop 52 0 6 .
start 90 1 2 3 4 5 . : 表示在1、2、3、4、5这五个运行级别中,按先后顺序,由小到大,第90个开始运行这个脚本。
stop 52 0 6 . :表示在0、6这两个运行级别中,按照先后顺序,由小到大,第52个停止这个脚本的运行。 如果在 /etc/init.d 中加入一个 script,还须要制作相关的 link
在 /etc/rc*.d 中。K 开头是 kill , S 开头是 start , 数字顺序代表启动的顺序。(SysV)
update-rc.d 可以帮你的忙。
例:
在 /etc/init.d 中建立一个叫作 zope 的 script , 然后
update-rc.d zope defaults
就会产生以下链結::
Adding system startup for /etc/init.d/zope ...
/etc/rc0.d/K20zope -> ../init.d/zope
/etc/rc1.d/K20zope -> ../init.d/zope
/etc/rc6.d/K20zope -> ../init.d/zope
/etc/rc2.d/S20zope -> ../init.d/zope
/etc/rc3.d/S20zope -> ../init.d/zope
/etc/rc4.d/S20zope -> ../init.d/zope
/etc/rc5.d/S20zope -> ../init.d/zope
其他进阶使用方式请 man update-rc.d
Linux
一旦内核加载完成,内核会启动 init 进程,然后运行 rc6 脚本,之后运行所有属于其运行级别的命令脚本。这
些脚本都储存在 /etc/rc.d/rcN.d 中(N代表运行级别),并且都建立着到 /etc/init.d 子目录中命令脚本程序
的符号链接。
默认运行级别配置在 /etc/inittab 中。它通常为 3 或 5: # grep default: /etc/inittab
id:3:initdefault: |
可以使用 init 来改变当前运行级别。举个例子: 运行级别列表如下:
0 系统停止
1 进入单用户模式(也可以是 S)
2 没有 NFS 特性的多用户模式
3 完全多用户模式(正常操作模式)
4 未使用
5 类似于级别3,但提供 XWindow 系统登录环境
6 重新启动系统
使用 chkconfig 工具控制程序在一个运行级别启动和停止。 # chkconfig --list # 列出所有 init 脚本
# chkconfig --list sshd # 查看 sshd 在各个运行级别中的启动配置
# chkconfig sshd --level 35 on # 对 sshd 在级别 3 和 5 下创建启动项
# chkconfig sshd off # 在所有的运行级别下禁用 sshd |
Debian 和基于Debian 发行版像 Ubuntu 或 Knoppix 使用命令 update-rc.d 来管理运行级别脚本。默认启动为
2,3,4 和 5,停止为 0,1 和 6。 # update-rc.d sshd defaults # 设置 sshd 为默认启动级别
# update-rc.d sshd start 20 2 3 4 5 . stop 20 0 1 6 . # 用显示参数
# update-rc.d -f sshd remove # 在所有的运行级别下禁用 sshd
# shutdown -h now (或者 # poweroff) # 关闭停止系统 |
FreeBSD
BSD 启动步骤不同于 SysV, 她没有运行级别。她的启动状态(单用户,有或没有 XWindow)被配置在 /etc/
ttys中。所有的系统脚本都位于 /etc/rc.d/中,第三方应用程序位于 /usr/local/etc/rc.d/中。service 的启
动顺序被配置在 /etc/rc.conf 和/etc/rc.conf.local中。默认行为可在 /etc/defaults/rc.conf 中进行配
置。 这些脚本至少响应 start|stop|status. # /etc/rc.d/sshd status
sshd is running as pid 552.
# shutdown now # 进入单用户模式
# exit # 返回到多用户模式
# shutdown -p now # 关闭停止系统
# shutdown -r now # 重新启动系统 |
同样可以使用进程 init 进入下列状态级别。举个例子: # init 6 为重启。
0 停止系统并关闭电源 (信号 USR2)
1 进入单用户模式 (信号 TERM)
6 重新启动 (信号 INT)
c 阻止进一步登录 (信号 TSTP)
q 重新检查 ttys(5) 文件 (信号 HUP) 在FreeBSD下,查看系统的内核安全级别可以用命令: sysctl -a |grep securelevel
用ssh登录一个机器(换过ip地址),提示输入yes后,屏幕不断出现y,只有按ctrl + c结束 错误是:The authenticity of host 192.168.0.xxx can't be established. 以前和同事碰到过这个问题,解决了,没有记录,这次又碰到了不知道怎么处理,还好有QQ聊天记录,查找到一下,找到解决方案: 执行ssh -o StrictHostKeyChecking=no 192.168.0.xxx 就OK
先说flash as3吧,可以用root.loaderInfo.parameters
AS3类 GSPManager.as 代码:
package
{
import flash.display.Sprite;
import flash.events.Event;
import flash.text.TextField;
public class GSPManager extends Sprite
{
public function GSPManager()
{
this.addEventListener(Event.ADDED_TO_STAGE,addedToStageHandler);
}
private function addedToStageHandler(e:Event):void
{
this.removeEventListener(Event.ADDED_TO_STAGE,addedToStageHandler);
init();
}
private function init():void
{
var out_txt:TextField = new TextField();
//边框
out_txt.border = true;
//边框颜色
out_txt.borderColor = 0x80FF3300;
//大小
out_txt.width = 100;
out_txt.height = 20;
//位置
out_txt.x = (stage.stageWidth - out_txt.width)/2;
out_txt.y = (stage.stageHeight - out_txt.height)/2;
//添加到舞台
addChild(out_txt);
//获得参数对象
var param:Object = root.loaderInfo.parameters;
if (param["name"]!=null)
{
out_txt.text = param["name"] + param["num"];
trace("value:"+param["name"]);
//判断
}
else
{
out_txt.text = "null";
trace("value:null");
}
}
}
}
GetSwfParam.fla 绑定的文档类为GSPManager.as ,在文档类绑定框里写GSPManager这个就可以了
之后编译出来的GetSwfParam.swf 就可以添加到页面了
Java web页面代码:
<%@ page language="java" import="java.util.*" contentType="text/html;charset=GBK"%>
<!DOCTYPE HTML PUBLIC "-//W3C//DTD HTML 4.01 Transitional//EN">
<html>
<head>
</head>
<body>
<object id="g" classid="clsid:d27cdb6e-ae6d-11cf-96b8-444553540000" codebase="http://download.macromedia.com/pub/shockwave/_cabs/flash/swflash.cab#version=6,0,29,0" width="300" height="200">
<param name="movie" value="GetSwfParam.swf?name=sange&num=66" />
<param name="quality" value="high" />
<param name="allowScriptAccess" value="sameDomain" />
<param name="scale" value="exactfit" />
<embed name="g" src="GetSwfParam.swf" quality="high" scale="exactfit" align="middle" play="true" loop="false" pluginspage="http://www.macromedia.com/go/getflashplayer" type="application/x-shockwave-flash" width="300" height="200" ></embed>
</object>
</body>
</html>
这里要说的是swf后有很多参数就用&符号 , 比如GetSwfParam.swf?name=sange&num=66&id=1
现在说Flex了,因为让同事也做了这样的东西,但他只会Flex,他没弄出来,所以我试下,发现用root没反映,但我很肯定Flex应该也可以弄出来,发现跟flash as3确实不同,不能用root,因为Flex中没有root这个概念。问了群里的人,收获大了,原来就Application,哈哈,不就是根节点么,也就相当于root,就是名称不一样。
Flex就用Application.application.parameters
GetSwfParam.mxml 代码:
<?xml version="1.0" encoding="utf-8"?>
<mx:Application xmlns:mx="http://www.adobe.com/2006/mxml" backgroundColor="#ffffff" layout="absolute" creationComplete="init()">
<mx:Script>
<![CDATA[
private function init():void
{
//获得参数对象
var param:Object = Application.application.parameters;
if(param["name"] != null)
{
mytxt.text = param["name"];
}
else
{
mytxt.text = "null";
}
}
]]>
</mx:Script>
<mx:TextInput id="mytxt" x="60" y="47"/>
</mx:Application>
把编译好的swf添加到页面就可以了。同上,Java web页面代码不变。
Flex页面跳转的五种实现方式
2010-08-13 13:25 Dboyqiao javaeye.com 我要评论() 字号: T | T
Flex页面跳转有很多值得学习的地方,本文向大家介绍一下Flex页面跳转的几种方式,主要包括五种方式,这里为大家一一介绍。
AD:
在学习Flex的过程中,你可能会遇到Flex页面跳转的概念,这里和大家分享一下Flex中实现Flex页面跳转以下几种方式,相信本文介绍一定会让你有所收获。
Flex页面跳转
Flex中实现Flex页面跳转以下几种方式:
Flex页面跳转方式一:使用ViewStack组件,把要跳转的页新建成MXMLComponent,然后通过ViewStack组件把这些页包含进来,然后再通过改变ViewStack的selectedItem或者selectedChild来切换这些页。 - <mx:ViewStackidmx:ViewStackid="storeViews"width="100%"height="550"
- creationPolicy="all">
- <shouyeidshouyeid="homeView"label="首页"showEffect="WipeDown"hideEffect="WipeUp"/>
- <leixingidleixingid="pView"label="模板类型"showEffect="WipeDown"hideEffect="WipeUp"/>
- <makeidmakeid="supportView"label="立即制作"showEffect="WipeDown"hideEffect="WipeUp"/>
- </mx:ViewStack>
- <mx:Buttonclickmx:Buttonclick="storeViews.selectedChild=homeView;"/>
-
Flex页面跳转方式二:使用navigateToURL,主要方式如下: - varurl:String="http://localhost:8080/Flex_Java_Demo/
- welcome.html";
- varrequest:URLRequest=newURLRequest(url);
- navigateToURL(request,"_blank");
-
这个方法实现Flex页面切换时会弹出新的页面,而不是只变换url
Flex页面跳转方式三:引用flash中的importflash.external.ExternalInterface这个接口,它能提供像jsp中window.location.href方法一样方便,主要代码为:
- ExternalInterface.call("function(){window.location.
- href='http://localhost:8080/Flex_J2eeDemo
- /bin/Welcome.html';}");
Flex页面跳转方式四:使用组件技术,把不同的页面做成component,然后通过TabNavigator等进行切换,通过使用state实现跳转。
Flex页面跳转方式五:把不同的页面做成Module,然后使用ModuleLoder来进行加载切换。
【编辑推荐】
- 实现Flex页面跳转行之有效的办法
- 四种方式实现Flex页面跳转
- 全面认识Flex应用程序的六大元素
- 揭开Flex正则表达式的神秘面纱
- Flex数据绑定及其使用频繁的几种情况
【责任编辑: 程华权 TEL:(010)68476606】
 (3票)
(3票)  (1票)
(1票)  (0票)
(0票)  (0票)
(0票)  (0票)
(0票)  (0票)
(0票)

PHP语言和MySQL数据库这两种开源技术已经成为开发Web应用的最佳[详细]
flash builder 4.5注册方法 2011-06-30 12:53 先在C:\Windows\System32\drivers\etc的hosts文件中添加以下内容,(用记事本打开就行):
127.0.0.1 activate.adobe.com
127.0.0.1 practivate.adobe.com
127.0.0.1 ereg.adobe.com
127.0.0.1 activate.wip3.adobe.com
127.0.0.1 wip3.adobe.com
127.0.0.1 3dns-3.adobe.com
127.0.0.1 3dns-2.adobe.com
127.0.0.1 adobe-dns.adobe.com
127.0.0.1 adobe-dns-2.adobe.com
127.0.0.1 adobe-dns-3.adobe.com
127.0.0.1 ereg.wip3.adobe.com
127.0.0.1 activate-sea.adobe.com
127.0.0.1 wwis-dubc1-vip60.adobe.com
127.0.0.1 activate-sjc0.ado
这是注册:
1424-4938-3077-5736-3940-5640
1424-4827-8874-7387-0243-7331 |
Flash Builder 4.5高级版试用版免费高速下载Company: Adobe 
官方下载地址:http://trials3.adobe.com/AdobeProducts/FLBR/4_5/win32/FlashBuilder_4_5_LS10.exe 1424-4827-8874-7387-0243-7331 1424-4938-3077-5736-3940-5640 FB4.5 序列号 Flex4.5 5月17日发布,本人的用第一个已经激活成功,大家看看还能用不。 Adobe Flash Builder 4.5 软件(曾为 Adobe Flex Builder)是基于 Eclipse的开发工具,使用 ActionScript 和开源 Flex 框架快速构建具有表现力的移动、Web 和桌面应用程序。 最具表现力的体验 创建更直观和更具吸引力的 Web 应用程序,帮助人们理解并使用数据以支持重要的业务活动,从而提高生产力和工作效率。 用于 Android、iOS 和 RIM 的移动应程序 受益于对移动应用程序开发和测试的新支持,可以使用通用代码库构建用于 Android、Apple iOS和 Blackberry Tablet OS的应用程序,同时共享 Web 应用程序的代码。 更具生产力,功能更强大 使用广泛新工具功能和改进的工具功能加速 Flex 和 ActionScript 项目的代码编写和测试过程。 新集成的 PHP 工具支持 使用 Flash Builder 4.5 for PHP 中的 Zend Studio 8 软件完整副本,获得最佳的 Flex/PHP 开发体验。 Adobe官方下载(本地服务器)- Flash Builder 4.5高级版试用版(Windows,581.2M,点击免费高速下载)
- Flash Builder 4.5高级版试用版(Mac,679.8M,点击免费高速下载)
- Flash Builder 4.5 for PHP高级版试用版(Windows,956.5M,点击免费高速下载)
- Flash Builder 4.5 for PHP高级版试用版免费(Mac,911.3M,点击免费高速下载)
Adobe官方下载(国外服务器)- Flash Builder 4.5高级版试用版(Windows和Mac版本,免费高速下载)
- Flash Builder 4.5 for PHP高级版试用版(Windows和Mac版本,免费高速下载)
本文件大小为581.2M,Adobe独家提供本地高速下载,您可以通过浏览器直接点击下载或者通过下载加速器(如迅雷、QQ旋风)下载,实际的下载速度和您的实际网络环境相关。考虑到文件较大,我们推荐您使用具有断点续传功能的下载加速器辅助下载。 官方下载地址:http://trials3.adobe.com/AdobeProducts/FLBR/4_5/win32/FlashBuilder_4_5_LS10.exe 1424-4827-8874-7387-0243-7331 1424-4938-3077-5736-3940-5640 FB4.5 序列号 Flex4.5 5月17日发布,本人的用第一个已经激活成功,大家看看还能用不。
引言 Apache Axis2(主要的开源 Web 服务平台之一)提供了一系列新功能,最为可贵的是,其中的很多功能都对向开发人员提供更为用户友好的方法起到了促进作用。在之前的 Axis 版本中,并不十分重视用户友好性。例如,在 Axis1 中,用户必须手动调用管理客户机并更新服务器类路径,然后重新启动服务器以应用更改。这个有点麻烦的部署模型对新手肯定是一道障碍。因此,Axis2 经过了精心的设计,能够克服此缺点,并提供更为灵活、可方便进行配置的部署模型。 Axis2 部署新功能 Axis2 部署模型将一系列新功能引入了 Apache Web 服务堆栈中(其中一些功能对于 Web 服务范式并非新事物)。以下列出了最为重要的主要更改和新功能: - 类似于 Java™ 2 Platform Enterprise Edition (J2EE) 的部署机制(基于存档)
- 热部署和热更新
- 存储库(可以在其中放置服务和模块)
- 处理程序(模块)部署的更改
- 新部署描述符
- 多个部署选项
在下面的内容中,我们将逐个对每个方面进行详细讨论。 回页首 类似于 J2EE 的部署机制 在任何 J2EE 应用服务器中,都可以将应用程序作为自包含包部署,可以将所有的资源、配置文件和二进制文件打包为一个文件并进行部署。这显然非常实用,而也正是因为如此,Axis2 也引入了相同的机制来更方便地部署服务(和模块)。 考虑这样的情况,假如您有一个存在多个第三方依赖关系和一组属性文件的服务,同时假定没有类似于 J2EE 的部署机制。必须手动将所有这些依赖 JAR 文件和属性文件放入类路径中。如果有一个或两个服务器,这项工作的量将翻倍!在存在数百副本的集群环境中,将依赖 JAR 文件和其他资源添加到类路径中的做法并不实际。有了类似于 J2EE 的部署机制后,就没有这些问题了,只需要将服务放入副本中,而不需要进行任何其他工作了。 Axis2 自包含包(或存档文件)的内部结构如图 1 中所示。两种 Axis2 服务(存档和模块存档)非常相似。二者之间的细微差别包括: - 对于 Axis 服务,描述符文件是 services.xml;而对于 Axis 模块,描述符文件是 module.xml。
- Axis2 服务的文件扩展名是 .aar(服务的文件名将为 foo.aar),模块的文件扩展名为 .mar(模块的文件名将为 foo.mar)。
图 1. 存档文件的结构

回页首 热部署和热更新 对于企业级应用程序,可用性是一个大问题。即使短时间的停机都可能带来很大损失,因此重新启动服务器并不是一个较好的做法。需要在不用关闭系统的情况下对其进行更新。而这就是热部署和热更新的用武之地。热部署和热更新是 Apache Web 服务堆栈(如 Axis 和 Axis2)中的新功能。这两个新功能如下所述: - 热部署是指在系统启动并运行的情况下部署新服务的能力。例如,假定您有两个服务——service1 和 service2——已启动并运行,现在要在不用关闭系统的情况下部署名为 service3 的新服务。部署 service3 就是一个热部署场景。作为系统管理员,如果不喜欢服务的热部署,则可以通过更改名为 axis2.xml 的 Axis2 全局配置文件,将全局配置参数更改为以下所示,从而关闭此功能:
<parameter name="hotdeployment">false</parameter>。 - 热更新是指在不关闭系统的情况下更改现有 Web 服务的能力。这是一个重要的特性,是测试环境中需要的一个功能。不过,在实时系统中使用热更新并不明智,因为这可能导致系统进入未知状态。此外,还可能会丢失该服务的现有服务数据。为了防止出现这种情况,Axis2 缺省将热更新参数设置为 FALSE。如果希望使用此功能,请按照以下所示更改配置参数,从而启用此功能:
<parameter name="hotupdate">true</parameter>。
回页首 存储库 Axis2 存储库实际上就是文件系统中具有特定结构的目录。它可以位于本地,也可以位于远程计算机上。之所以引入存储库概念,目的是为了方便地支持基于存档的热部署功能。 存储库目录包含两个主要子目录,分别名为 services 和 modules。还可能有一个可选的子目录,名为 lib。如果希望部署服务,需要将服务存档文件放入 services 目录中。类似地,如果希望部署模块,请将模块存档文件放入 modules 目录。对于 lib 目录,要将其作为放置对服务和模块公用的第三方库的位置。图 2 显示了存储库的图形表示形式。
图 2. Axis2 存储库

注意:如果 modules 目录中的部分或全部模块希望共享某些资源,可以将这些资源添加到 modules 目录中的 lib 目录内。类似地,如果 services 目录中的全部或部分服务希望共享公共资源,恰当的位置是在 services 目录内的 lib 目录。 回页首 处理程序(模块)部署的更改 服务扩展(或模块)的概念是 Apache Axis 范式的一个新功能。其基本思想是对系统的核心功能进行扩展或提供服务质量保证。对于 Axis1,如果希望扩展其核心功能,则需要编写处理程序(执行链中的最小单位),更改全局配置文件添加该处理程序,最后要重新启动系统。 模块进行相同的工作,但会减少所需进行的工作量。同时,模块可以通过使用模块描述文件 modul.xml 来包含一个或多个处理程序。大多数情况下,模块是特定 WS 规范的实现,例如 Axis2 addressing 模块就是 WS-Addressing 的实现。 如前面提到的,可以将模块作为存档文件部署。模块存档文件的结构如图 3 中所示。
图 3. 模块存档文件的结构

回页首 新部署描述符 Axis2 的灵活性和可扩展性的重点是其部署描述符。将不再仅处理一个配置文件,而是针对不同的配置级别有不同的配置文件。例如,如果希望向系统添加处理程序,则没有必要更改全局配置;可以通过仅更改模块配置文件来完成此工作。Axis2 中有三种类型的描述符或配置文件: - 全局描述符 (axis2.xml)
- 服务描述符 (services.xml)
- 模块描述符 (module.xml)
在全局描述符中,所有系统级的配置都在 axis2.xml 中给出,包括以下内容: Axis2 提供了缺省 axis2.xml。其中包含启动 Axis2 所需的最小配置,但可以自由对其进行更改,从而使用您自己的 axis2.xml 启动 Axis2。务必注意,如果对 axis2.xml 进行了任何更改,则必须重新启动系统,以使这些更改生效。 在服务描述符中,由 services.xml 给出关于服务的配置。为了使服务有效,需要在服务存档文件中包含 services.xml 文件。服务配置文件包含以下内容: - 服务级别的参数
- 服务的描述
- 消息接收方
- 需要作为 Web 操作(服务中的操作)公开的操作
- 服务级别的模块
模块描述符文件 (module.xml) 包含将模块插入到系统中所需的配置数据。主要配置包括以下方面: 务必注意,module.xml 还可能包含以下元素: - 关于模块的描述(及其实现的规范)
- 端点(对于可靠消息传递的情况,就是类似于 create sequence 的端点)
回页首 Axis2 中可用的部署方法 在 Axis2 中,可采用三种主要方式部署服务: - 将服务存档文件放入存储库中。
- 使用存档文件以编程方式创建服务。
- 将服务作为传统 Java 对象(Plain Old Java Object,POJO)部署。
在 Axis2 中,部署服务的最常用方法是直接将服务存档文件复制或放置到存储库中(services 目录)。如果使用基于 Axis2 WAR 文件的分发版本,则有两个选择: - 手动将存档文件放置到存储库中。
- 使用 Web 控制台上载服务。
以编程方式部署并非用户需求,而是模块创建者的需求,因为某些模块要求 Web 服务的部署提供模块的全部功能。若要以编程方式创建服务,需要使用 services.xml、类加载器(可用于加载您的类文件)和 AxisConfiguration。此方法的优势在于,您并不需要将服务存档文件复制到存储库中,而且仅在运行时服务才可见。清单 1 可帮助您形成对编程服务部署方法的基本认识。
清单 1. 编程服务部署
AxisConfiguration axisConfig; // you need to have reference to AxisConfiguration File file = new File("Location of the file""); ClassLoader clsLoader = new URLClassLoader(new URL[]{file.toURL()}); InputStream in = new FileInputStream("location of service.xml"); AxisService service = DeploymentEngine.buildService(in, clsLoader, axisConfig); |
使用 Java 类部署服务是 Axis2 中提供的一项使用非常方便的功能,在这种情况下没有必要生成服务存档文件或 services.xml。唯一的要求是,必须在创建服务前将 Java 类放入类路径中。在运行时,可以由模块或服务创建新服务并进行部署。在 Axis2 中部署 POJO 仅需要三行代码,如清单 2 中所示。
清单 2. 在 Axis2 中部署 POJO
AxisService service = AxisService.createService( MyService.class.getName(), axisConfig, RPCMessageReceiver.class); axisConfig.addService(service); |
回页首 总结 Axis2 在这里并不是证明 Web 服务概念,而是提供更好的 SOAP 处理模型,且相对于 Axis1 及其他现有 Web 服务引擎而言,此模型在速度和内存方面性能有了很大的改善。此外,它还提供了方便的部署机制。现在已经进入 Axis2 的时代了!
一、环境安装(tomcat,本人5.5):
首先下载到官方网站下载axis2 war包。
将war包复制到webapps目录下边,启动tomcat,服务器加载了war包后会生成axis2目录,跟我们平时的应用目录没神马区别,唯一要注意的是axis的配置文件在WEB-INFconf,
在开发过程中要修改一下这个的配置文件。
二、(改造配置文件):
配置axis2的文件,axis2支持热部署,意味着你可以再编译好的class文件,直接复制到pojo目录下(默认是pojo,等会有说明修改)。
在配置文件中找到<parameter name="hotdeployment">true</parameter>默认已经为热部署;
另外一个在开发过程中你常需要把热更新打开,默认是false 不打开,找到hotupdate
<parameter name="hotupdate">true</parameter>
发布pojo的目录只是默认的,如果需要使用其他的目录,需要添加配置元素,在axisconfig下面添加
<deployer extension=".class" directory="mymulu" class="org.apache.axis2.deployment.POJODeployer"/>
上面的配置文件只需要修改 directory的属性,改为目录名
二、(使用POJO方式发布webservice):
在pojo目录(此目录没有,在axis2WEB-INF下面创建,其实细心的同学会发现,在配置文件axis就已经给我们定义了pojo目录,看前面添加发布pojo目录)下面的webservice可以通过重写url去访问(后面带一些参数,类似action),如果遇到数据类型则需要做转换,原因传输过程是以字符串形式传输,而且重写URL的参数名必须要与方法的参数名相同。感觉比较土的方法
好吧说了那么多,现在让我们来个helloworld吧~!!
首先我们先发布一个webservice,
编写一个MyTest类 public class MyTest { public String getString(String str){ System.out.println("调用了getString()传入参数"+str); return str; } public void doNoThing(String str){ System.out.println("调用了doNothing()传入参数:"+str); } }
1.启动你的tomcat,访问这个url:http://127.0.0.1:8080/axis2/ (确保axis2是正常运行了),
2.神马,没改配置文件,好吧,就在%tomcat_home%webappsaxis2WEB-INF下面建立一个pojo文件夹。编写好的类编译成class文件后,直接复制到你所指定的目录下。
3.最后访问你的服务吧http://127.0.0.1:8080/axis2/services/MyTest?wsdl
现在开始客户端开发,这里省略了使用axis的API开发客户端,个人觉得这样的开发效率好低吖,新手上手(本人懒的去看那个API),应该快速掌握怎么使用,所以这里介绍stub方式,使用了axis自带的命令,可以根据wsdl生成客户端,在%AXIS2_HOME%�in目录下有一个wsdl2java脚本(注意是wsdl to java)。
前提准备
下载了axis2 bin 文件,配置环境变量 例如:
变量名:AXIS2_HOME
值:E:studywebserviceaxis2-1.5.4-binaxis2-1.5.4
这里要用到前面的发布的webservice,保持你的服务器是启动的,你的服务正常。
打开CMD
输入下面的命令
%AXIS2_HOME%/bin/wsdl2java -uri http://localhost:8080/axis2/services/MyTest?wsdl -p com.lj.mywebservice -s -o c:/mywebservice
这里说一下参数, -uri 当然是服务的wsdl文件地址,-p 报名 , -o 表示目录,这里写的是绝对路径,也可以写相对路径
回车,你会发现在C盘下多了一个文件目录,打开里边一层层进去后,有一个MyTestStub类,这个类实现非常复杂,不用管他,拿过来直接用。
新建一个工程,写个测试类,把刚才生成的类复制进去,当然别忘记了引入axis的jar包。
package com.lj.myswebservice; import java.rmi.RemoteException; import org.apache.axis2.AxisFault; public class TestClass { public static void main(String[] args) { try { MyTestStub my=new MyTestStub(); //在MYTestStub里边定义了三个静态嵌套类,分别作为参数对象,返回值对象。 //这里定义了donothing方法的参数对象 MyTestStub.DoNoThing donothing=new MyTestStub.DoNoThing(); //这里定义了getstring方法的参数对象 MyTestStub.GetString getstring=new MyTestStub.GetString(); ////这里定义了getString方法的返回值对象 MyTestStub.GetStringResponse getstringresponse=new MyTestStub.GetStringResponse(); //设置参数值 donothing.setArgs0("神马也不做啊"); //设置参数值 getstring.setArgs0("我是帅锅"); //调用donothing方法 my.doNoThing(donothing); //调用getString发放,设置参数,并返回值 getstringresponse=my.getString(getstring); //打印返回值 System.out.println(getstringresponse.get_return()); } catch (AxisFault e) { // TODO Auto-generated catch block e.printStackTrace(); } catch (RemoteException e) { // TODO Auto-generated catch block e.printStackTrace(); } } }
运行结果如下。
<!--StartFragment -->
 服务器结果如下。 <!--StartFragment --> 
总结,使用axis2构建服务是非常快的,这个例子使用的是deploy pojo的方式发布服务,所谓pojo就是个普通的JAVA类,与javabean区别就是不一定有get set方法(是不是这样理解?)。在客户端调用服务的时候,采取stub方式(貌似现在很流行,这样编写客户端是灰常直观的),只要拿到wsdl文件,就可以使用 wsdl2java命令生成客户端,大大减少了开发量。
还差得远( ⊙ o ⊙ )啊!··明晚再看看别的方式发布鸟·· 晚了睡觉了··明天早起上班( ⊙ o ⊙ )啊!···
www.s135.com 和 blog.s135.com 域名均指向 Nginx 所在的服务器IP。 用户访问 http://www.s135.com,将其负载均衡到192.168.1.2:80、192.168.1.3:80、192.168.1.4:80、192.168.1.5:80四台服务器。 用户访问 http://blog.s135.com,将其负载均衡到192.168.1.7服务器的8080、8081、8082端口。 以下为配置文件nginx.conf: 引用 user www www; worker_processes 10; #error_log logs/error.log; #error_log logs/error.log notice; #error_log logs/error.log info; #pid logs/nginx.pid; #最大文件描述符 worker_rlimit_nofile 51200; events { use epoll; worker_connections 51200; } http { include conf/mime.types; default_type application/octet-stream; keepalive_timeout 120; tcp_nodelay on; upstream www.s135.com { server 192.168.1.2:80; server 192.168.1.3:80; server 192.168.1.4:80; server 192.168.1.5:80; } upstream blog.s135.com { server 192.168.1.7:8080; server 192.168.1.7:8081; server 192.168.1.7:8082; } server { listen 80; server_name www.s135.com; location / { proxy_pass http://www.s135.com; proxy_set_header Host $host; proxy_set_header X-Real-IP $remote_addr; proxy_set_header X-Forwarded-For $proxy_add_x_forwarded_for; } log_format www_s135_com '$remote_addr - $remote_user [$time_local] $request ' '"$status" $body_bytes_sent "$http_referer" ' '"$http_user_agent" "$http_x_forwarded_for"'; access_log /data1/logs/www.log www_s135_com; } server { listen 80; server_name blog.s135.com; location / { proxy_pass http://blog.s135.com; proxy_set_header Host $host; proxy_set_header X-Real-IP $remote_addr; proxy_set_header X-Forwarded-For $proxy_add_x_forwarded_for; } log_format blog_s135_com '$remote_addr - $remote_user [$time_local] $request ' '"$status" $body_bytes_sent "$http_referer" ' '"$http_user_agent" "$http_x_forwarded_for"'; access_log /data1/logs/blog.log blog_s135_com; } } 附:Nginx 的安装方法可参照《 Nginx 0.5.31 + PHP 5.2.4(FastCGI)搭建可承受3万以上并发连接数,胜过Apache 10倍的Web服务器》文章的以下段落(仅做负载均衡,无需支持PHP的安装方法): 二、安装PHP 5.2.4(FastCGI模式)
4、创建www用户和组,以及其使用的目录:
三、安装Nginx 0.5.31
1、安装Nginx所需的pcre库:
2、安装Nginx
3、创建Nginx日志目录
5、启动Nginx
vc2008确实好使,不过缺陷也非常明显,只要是它编译的东西,在其他电脑经常会出现无法顺利运行的情况,最常见的错误就是:“由于应用程序配置不正确,应用程序未能启动。重新安装应用程序可能会纠正这个问题。” 经过各种努力,最后发现,一般情况下只需要安装一下vcredist_x86.exe这个vc的可重发行组件包就可以了。其主要原理是因为vc2008的版本比较高,其编译时链接的相关dll版本比xp下的高太多,而我们在xp下运行的时候调用的是老版本的dll,所以出现了问题。安装新版的可重发行组件包后,旧版本的dll被替换成新版本的,问题就解决了。 可是又出现了新的问题,总不能让用户使用我们软件的时候,非要去安装其他组件吧~~而且,其他很多软件都是用vc开发的,这些软件为什么不需要呢?本着钻牛角尖的态度,进行了更深一步的探索; 最近研究ccv,突然发现ccv的bin目录下有一个Microsoft.VC90.CRT目录,下面有几个dll文件,还有一个manifast文件。看到这个不禁眼前一亮,在我的程序中把这几个文件打包进去就ok了吧?于是进行尝试,查找本机安装vs2008目录下的Microsoft.VC90.CRT目录一顿cp,结果,很沮丧,测试失败~~告一段落~~ 某天又在网上发现有人在帖子里的回答,其中两个字吸引了我:“版本”。我灵机一动,赶紧去查看版本,发现我当前的版本是9.0.30729.4148,而帖子里的manifast文件中的版本是9.0.21022.8。于是,我赶紧找了一个这个版本的下载下来,替换我的程序中的这几个dll和manifast,再运行,果然成功了。 因此得到以下结论: 1、可重发行组件包是没问题的,肯定可以用,因为它替换了系统的这几个dll,所以可行; 2、如果不想在自己的“绿色”软件的基础上再要安装这么个组件,或者自己的非绿色软件在安装的过程中再安装这么个组件,只需要处理这几个关键的dll就行啦。 3、即使有了这几个dll也不一定行,一定要注意版本!实在不行这几个版本多试一试。我到现在还不太明白,我的vs2008的版本是9.0.30729.4148,编译出来的东西应该也是这个版本的啊,可是为什么用了老版本才好用,新版本的反而不好用呢? 4、具体文件如下: Microsoft.VC90.CRT.manifest msvcm90.dll msvcp90.dll msvcr90.dll
本文有标题党之嫌。在NoSQL如日中天的今天,各种NoSQL产品可谓百花齐放,但每一个产品都有自己的特点,有长处也有不适合的场景。本文对Cassandra, Mongodb, CouchDB, Redis, Riak 以及 HBase 进行了多方面的特点分析,希望看完此文的您能够对这些NoSQL产品的特性有所了解。 | | - Written in: Erlang
- Main point: DB consistency, ease of use
- License: Apache
- Protocol: HTTP/REST
- Bi-directional (!) replication,
- continuous or ad-hoc,
- with conflict detection,
- thus, master-master replication. (!)
- MVCC – write operations do not block reads
- Previous versions of documents are available
- Crash-only (reliable) design
- Needs compacting from time to time
- Views: embedded map/reduce
- Formatting views: lists & shows
- Server-side document validation possible
- Authentication possible
- Real-time updates via _changes (!)
- Attachment handling
- thus, CouchApps (standalone js apps)
- jQuery library included
Best used: For accumulating, occasionally changing data, on which pre-defined queries are to be run. Places where versioning is important. For example: CRM, CMS systems. Master-master replication is an especially interesting feature, allowing easy multi-site deployments. | | | - Written in: C/C++
- Main point: Blazing fast
- License: BSD
- Protocol: Telnet-like
- Disk-backed in-memory database,
- but since 2.0, it can swap to disk.
- Master-slave replication
- Simple keys and values,
- but complex operations like ZREVRANGEBYSCORE
- INCR & co (good for rate limiting or statistics)
- Has sets (also union/diff/inter)
- Has lists (also a queue; blocking pop)
- Has hashes (objects of multiple fields)
- Of all these databases, only Redis does transactions (!)
- Values can be set to expire (as in a cache)
- Sorted sets (high score table, good for range queries)
- Pub/Sub and WATCH on data changes (!)
Best used: For rapidly changing data with a foreseeable database size (should fit mostly in memory). For example: Stock prices. Analytics. Real-time data collection. Real-time communication. | | | - Written in: C++
- Main point: Retains some friendly properties of SQL. (Query, index)
- License: AGPL (Drivers: Apache)
- Protocol: Custom, binary (BSON)
- Master/slave replication
- Queries are javascript expressions
- Run arbitrary javascript functions server-side
- Better update-in-place than CouchDB
- Sharding built-in
- Uses memory mapped files for data storage
- Performance over features
- After crash, it needs to repair tables
- Better durablity coming in V1.8
Best used: If you need dynamic queries. If you prefer to define indexes, not map/reduce functions. If you need good performance on a big DB. If you wanted CouchDB, but your data changes too much, filling up disks. For example: For all things that you would do with MySQL or PostgreSQL, but having predefined columns really holds you back. | | | - Written in: Java
- Main point: Best of BigTable and Dynamo
- License: Apache
- Protocol: Custom, binary (Thrift)
- Tunable trade-offs for distribution and replication (N, R, W)
- Querying by column, range of keys
- BigTable-like features: columns, column families
- Writes are much faster than reads (!)
- Map/reduce possible with Apache Hadoop
- I admit being a bit biased against it, because of the bloat and complexity it has partly because of Java (configuration, seeing exceptions, etc)
Best used: When you write more than you read (logging). If every component of the system must be in Java. (“No one gets fired for choosing Apache’s stuff.”) For example: Banking, financial industry (though not necessarily for financial transactions, but these industries are much bigger than that.) Writes are faster than reads, so one natural niche is real time data analysis. | | | - Written in: Erlang & C, some Javascript
- Main point: Fault tolerance
- License: Apache
- Protocol: HTTP/REST
- Tunable trade-offs for distribution and replication (N, R, W)
- Pre- and post-commit hooks,
- for validation and security.
- Built-in full-text search
- Map/reduce in javascript or Erlang
- Comes in “open source” and “enterprise” editions
Best used: If you want something Cassandra-like (Dynamo-like), but no way you’re gonna deal with the bloat and complexity. If you need very good single-site scalability, availability and fault-tolerance, but you’re ready to pay for multi-site replication. For example: Point-of-sales data collection. Factory control systems. Places where even seconds of downtime hurt. | HBase | - Written in: Java
- Main point: Billions of rows X millions of columns
- License: Apache
- Protocol: HTTP/REST (also Thrift)
- Modeled after BigTable
- Map/reduce with Hadoop
- Query predicate push down via server side scan and get filters
- Optimizations for real time queries
- A high performance Thrift gateway
- HTTP supports XML, Protobuf, and binary
- Cascading, hive, and pig source and sink modules
- Jruby-based (JIRB) shell
- No single point of failure
- Rolling restart for configuration changes and minor upgrades
- Random access performance is like MySQL
Best used: If you’re in love with BigTable.  And when you need random, realtime read/write access to your Big Data. And when you need random, realtime read/write access to your Big Data. For example: Facebook Messaging Database (more general example coming soon) | 原文链接:Cassandra vs MongoDB vs CouchDB vs Redis vs Riak vs HBase comparison
如果有不明白的地方或者陌生的端口可以在这里查到。以便于检查系统是否感染病毒或木马。但是在有防火墙的情况下,一般的防火墙都是严格审核程序的网络连接 的,所以会预先封闭所有的端口,有需要访问网络的程序会预先向防火墙提出申请,防火墙做出响应,并弹出提示,要求用户做出选择,这时候我们就要认真看了, 是哪一个程序,在文件夹的哪一个位置,要做一个估计,陌生程序就更要检查。这样才能不给恶意程序任何余地。同时系统自动升级最好打开,或者定期到 windows的微软网站下载系统更新程序,这样也非常有利于系统安全。系统漏洞可能会使恶意程序通过系统漏洞绕过防火墙连接到网络。
端口:1
服务:tcpmux
说 明:这显示有人在寻找sgi irix机器。irix是实现tcpmux的主要提供者,默认情况下tcpmux在这种系统中被打开。irix机器在发布是含有几个默认的无密码的帐户, 如:ip、guest uucp、nuucp、demos 、tutor、diag、outofbox等。许多管理员在安装后忘记删除这些帐户。因此hacker在internet上搜索tcpmux并利用这些帐 户。
端口:7
服务:echo
说明:能看到许多人搜索fraggle放大器时,发送到x.x.x.0和x.x.x.255的信息。
端口:19
服务:character generator
说 明:这是一种仅仅发送字符的服务。udp版本将会在收到udp包后回应含有**字符的包。tcp连接时会发送含有**字符的数据流直到连接关闭。 hacker利用ip欺骗可以发动dos攻击。伪造两个chargen服务器之间的udp包。同样fraggle dos攻击向目标地址的这个端口广播一个带有伪造受害者ip的数据包,受害者为了回应这些数据而过载。
端口:21
服务:ftp
说 明:ftp服务器所开放的端口,用于上传、下载。最常见的攻击者用于寻找打开anonymous的ftp服务器的方法。这些服务器带有可读写的目录。木马 doly trojan、fore、invisible ftp、webex、wincrash和blade runner所开放的端口。
端口:22
服务:ssh
说明:pcanywhere建立的tcp和这一端口的连接可能是为了寻找ssh。这一服务有许多弱点,如果配置成特定的模式,许多使用rsaref库的版本就会有不少的漏洞存在。
端口:23
服务:telnet
说明:远程登录,入侵者在搜索远程登录unix的服务。大多数情况下扫描这一端口是为了找到机器运行的操作系统。还有使用其他技术,入侵者也会找到密码。木马tiny telnet server就开放这个端口。
端口:25
服务:smtp
说 明:smtp服务器所开放的端口,用于发送邮件。入侵者寻找smtp服务器是为了传递他们的spam。入侵者的帐户被关闭,他们需要连接到高带宽的 e-mail服务器上,将简单的信息传递到不同的地址。木马antigen、email password sender、haebu coceda、shtrilitz stealth、winpc、winspy都开放这个端口。
端口:31
服务:msg authentication
说明:木马master paradise、hackers paradise开放此端口。
端口:42
服务:wins replication
说明:wins复制
端口:53
服务:domain name server(dns)
说明:dns服务器所开放的端口,入侵者可能是试图进行区域传递(tcp),欺骗dns(udp)或隐藏其他的通信。因此防火墙常常过滤或记录此端口。
端口:67
服务:bootstrap protocol server
说 明:通过dsl和cable modem的防火墙常会看见大量发送到广播地址255.255.255.255的数据。这些机器在向dhcp服务器请求一个地址。hacker常进入它 们,分配一个地址把自己作为局部路由器而发起大量中间人(man-in-middle)攻击。客户端向68端口广播请求配置,服务器向67端口广播回应请 求。这种回应使用广播是因为客户端还不知道可以发送的ip地址。
端口:69
服务:trival file transfer
说明:许多服务器与bootp一起提供这项服务,便于从系统下载启动代码。但是它们常常由于错误配置而使入侵者能从系统中窃取任何 文件。它们也可用于系统写入文件。
端口:79
服务:finger server
说明:入侵者用于获得用户信息,查询操作系统,探测已知的缓冲区溢出错误,回应从自己机器到其他机器finger扫描。
端口:80
服务:http
说明:用于网页浏览。木马executor开放此端口。
端口:99
服务:metagram relay
说明:后门程序ncx99开放此端口。
端口:102
服务:message transfer agent(mta)-x.400 over tcp/ip
说明:消息传输代理。
端口:109
服务:post office protocol -version3
说明:pop3服务器开放此端口,用于接收邮件,客户端访问服务器端的邮件服务。pop3服务有许多公认的弱点。关于用户名和密码交 换缓冲区溢出的弱点至少有20个,这意味着入侵者可以在真正登陆前进入系统。成功登陆后还有其他缓冲区溢出错误。
端口:110
服务:sun公司的rpc服务所有端口
说明:常见rpc服务有rpc.mountd、nfs、rpc.statd、rpc.csmd、rpc.ttybd、amd等
端口:113
服务:authentication service
说 明:这是一个许多计算机上运行的协议,用于鉴别tcp连接的用户。使用标准的这种服务可以获得许多计算机的信息。但是它可作为许多服务的记录器,尤其是 ftp、pop、imap、smtp和irc等服务。通常如果有许多客户通过防火墙访问这些服务,将会看到许多这个端口的连接请求。记住,如果阻断这个端 口客户端会感觉到在防火墙另一边与e-mail服务器的缓慢连接。许多防火墙支持tcp连接的阻断过程中发回rst。这将会停止缓慢的连接。
端口:119
服务:network news transfer protocol
说明:news新闻组传输协议,承载usenet通信。这个端口的连接通常是人们在寻找usenet服务器。多数isp限制,只有他们的客户才能访问他们的新闻组服务器。打开新闻组服务器将允许发/读任何人的帖子,访问被限制的新闻组服务器,匿名发帖或发送spam。
端口:135
服务:本地 service
说 明:microsoft在这个端口运行dce rpc end-point mapper为它的dcom服务。这与unix 111端口的功能很相似。使用dcom和rpc的服务利用计算机上的end-point mapper注册它们的位置。远端客户连接到计算机时,它们查找end-point mapper找到服务的位置。hacker扫描计算机的这个端口是为了找到这个计算机上运行exchange server吗?什么版本?还有些dos攻击直接针对这个端口。
端口:137、138、139
服务:netbios name service
说明:其中137、138是udp端口,当通过网上邻居传输文件时用这个端口。而139端口:通过这个端口进入的连接试图获得netbios/smb服务。这个协议被用于windows文件和打印机共享和samba。还有wins regisrtation也用它。
端口:143
服务:interim mail access protocol v2
说 明:和pop3的安全问题一样,许多imap服务器存在有缓冲区溢出漏洞。记住:一种linux蠕虫(admv0rm)会通过这个端口繁殖,因此许多这个 端口的扫描来自不知情的已经被感染的用户。当redhat在他们的linux发布版本中默认允许imap后,这些漏洞变的很流行。这一端口还被用于 imap2,但并不流行。
端口:161
服务:snmp
说明:snmp允许远程管理设备。所有配置和运行信息的储存 在数据库中,通过snmp可获得这些信息。许多管理员的错误配置将被暴露在internet。cackers将试图使用默认的密码public、 private访问系统。他们可能会试验所有可能的组合。snmp包可能会被错误的指向用户的网络。
端口:177
服务:x display manager control protocol
说明:许多入侵者通过它访问x-windows操作台,它同时需要打开6000端口。
端口:389
服务:ldap、ils
说明:轻型目录访问协议和netmeeting internet locator server共用这一端口。
端口:443
服务:https
说明:网页浏览端口,能提供加密和通过安全端口传输的另一种http。
端口:456
服务:【null】
说明:木马hackers paradise开放此端口。
端口:513
服务:login,remote login
说明:是从使用cable modem或dsl登陆到子网中的unix计算机发出的广播。这些人为入侵者进入他们的系统提供了信息。
端口:544
服务:【null】
说明:kerberos kshell
端口:548
服务:macintosh,file services(afp/ip)
说明:macintosh,文件服务。
端口:553
服务:corba iiop (udp)
说明:使用cable modem、dsl或vlan将会看到这个端口的广播。corba是一种面向对象的rpc系统。入侵者可以利用这些信息进入系统。
端口:555
服务:dsf
说明:木马phase1.0、stealth spy、inikiller开放此端口。
端口:568
服务:membership dpa
说明:成员资格 dpa。
端口:569
服务:membership msn
说明:成员资格 msn。
端口:635
服务:mountd
说 明:linux的mountd bug。这是扫描的一个流行bug。大多数对这个端口的扫描是基于udp的,但是基于tcp的mountd有所增加(mountd同时运行于两个端口)。 记住mountd可运行于任何端口(到底是哪个端口,需要在端口111做portmap查询),只是linux默认端口是635,就像nfs通常运行于 2049端口。
端口:636
服务:ldap
说明:ssl(secure sockets layer)
端口:666
服务:doom id software
说明:木马attack ftp、satanz backdoor开放此端口
端口:993
服务:imap
说明:ssl(secure sockets layer)
端口:1001、1011
服务:【null】
说明:木马silencer、webex开放1001端口。木马doly trojan开放1011端口。
端口:1024
服务:reserved
说 明:它是动态端口的开始,许多程序并不在乎用哪个端口连接网络,它们请求系统为它们分配下一个闲置端口。基于这一点分配从端口1024开始。这就是说第一 个向系统发出请求的会分配到1024端口。你可以重启机器,打开telnet,再打开一个窗口运行natstat -a 将会看到telnet被分配1024端口。还有sql session也用此端口和5000端口。
端口:1025、1033
服务:1025:network blackjack 1033:【null】
说明:木马netspy开放这2个端口。
端口:1080
服务:socks
说 明:这一协议以通道方式穿过防火墙,允许防火墙后面的人通过一个ip地址访问internet。理论上它应该只允许内部的通信向外到达internet。 但是由于错误的配置,它会允许位于防火墙外部的攻击穿过防火墙。wingate常会发生这种错误,在加入irc聊天室时常会看到这种情况。
端口:1170
服务:【null】
说明:木马streaming audio trojan、psyber stream server、voice开放此端口。
端口:1234、1243、6711、6776
服务:【null】
说明:木马subseven2.0、ultors trojan开放1234、6776端口。木马subseven1.0/1.9开放1243、6711、6776端口。
端口:1245
服务:【null】
说明:木马vodoo开放此端口。
端口:1433
服务:sql
说明:microsoft的sql服务开放的端口。
端口:1492
服务:stone-design-1
说明:木马ftp99cmp开放此端口。
端口:1500
服务:rpc client fixed port session queries
说明:rpc客户固定端口会话查询
端口:1503
服务:netmeeting t.120
说明:netmeeting t.120
端口:1524
服务:ingress
说 明:许多攻击脚本将安装一个后门shell于这个端口,尤其是针对sun系统中sendmail和rpc服务漏洞的脚本。如果刚安装了防火墙就看到在这个 端口上的连接企图,很可能是上述原因。可以试试telnet到用户的计算机上的这个端口,看看它是否会给你一个shell。连接到 600/pcserver也存在这个问题。
端口:1600
服务:issd
说明:木马shivka-burka开放此端口。
端口:1720
服务:netmeeting
说明:netmeeting h.233 call setup。
端口:1731
服务:netmeeting audio call control
说明:netmeeting音频调用控制。
端口:1807
服务:【null】
说明:木马spysender开放此端口。
端口:1981
服务:【null】
说明:木马shockrave开放此端口。
端口:1999
服务:cisco identification port
说明:木马backdoor开放此端口。
端口:2000
服务:【null】
说明:木马girlfriend 1.3、millenium 1.0开放此端口。
端口:2001
服务:【null】
说明:木马millenium 1.0、trojan cow开放此端口。
端口:2023
服务:xinuexpansion 4
说明:木马pass ripper开放此端口。
端口:2049
服务:nfs
说明:nfs程序常运行于这个端口。通常需要访问portmapper查询这个服务运行于哪个端口。
端口:2115
服务:【null】
说明:木马bugs开放此端口。
端口:2140、3150
服务:【null】
说明:木马deep throat 1.0/3.0开放此端口。
端口:2500
服务:rpc client using a fixed port session replication
说明:应用固定端口会话复制的rpc客户
端口:2583
服务:【null】
说明:木马wincrash 2.0开放此端口。
端口:2801
服务:【null】
说明:木马phineas phucker开放此端口。
端口:3024、4092
服务:【null】
说明:木马wincrash开放此端口。
端口:3128
服务:squid
说 明:这是squid http代理服务器的默认端口。攻击者扫描这个端口是为了搜寻一个代理服务器而匿名访问internet。也会看到搜索其他代理服务器的端口8000、 8001、8080、8888。扫描这个端口的另一个原因是用户正在进入聊天室。其他用户也会检验这个端口以确定用户的机器是否支持代理。
端口:3129
服务:【null】
说明:木马master paradise开放此端口。
端口:3150
服务:【null】
说明:木马the invasor开放此端口。
端口:3210、4321
服务:【null】
说明:木马schoolbus开放此端口
端口:3333
服务:dec-notes
说明:木马prosiak开放此端口
端口:3389
服务:超级终端
说明:windows 2000终端开放此端口。
端口:3700
服务:【null】
说明:木马portal of doom开放此端口
端口:3996、4060
服务:【null】
说明:木马remoteanything开放此端口
端口:4000
服务:qq客户端
说明:腾讯qq客户端开放此端口。
端口:4092
服务:【null】
说明:木马wincrash开放此端口。
端口:4590
服务:【null】
说明:木马icqtrojan开放此端口。
端口:5000、5001、5321、50505
服务:【null】
说明:木马blazer5开放5000端口。木马sockets de troie开放5000、5001、5321、50505端口。
端口:5400、5401、5402
服务:【null】
说明:木马blade runner开放此端口。
端口:5550
服务:【null】
说明:木马xtcp开放此端口。
端口:5569
服务:【null】
说明:木马robo-hack开放此端口。
端口:5632
服务:pcanywere
说 明:有时会看到很多这个端口的扫描,这依赖于用户所在的位置。当用户打开pcanywere时,它会自动扫描局域网c类网以寻找可能的代理(这里的代理是 指agent而不是proxy)。入侵者也会寻找开放这种服务的计算机。,所以应该查看这种扫描的源地址。一些搜寻pcanywere的扫描包常含端口 22的udp数据包。
端口:5742
服务:【null】
说明:木马wincrash1.03开放此端口。
端口:6267
服务:【null】
说明:木马广外女生开放此端口。
端口:6400
服务:【null】
说明:木马the thing开放此端口。
端口:6670、6671
服务:【null】
说明:木马deep throat开放6670端口。而deep throat 3.0开放6671端口。
端口:6883
服务:【null】
说明:木马deltasource开放此端口。
端口:6969
服务:【null】
说明:木马gatecrasher、priority开放此端口。
端口:6970
服务:realaudio
说明:realaudio客户将从服务器的6970-7170的udp端口接收音频数据流。这是由tcp-7070端口外向控制连接设置的。
端口:7000
服务:【null】
说明:木马remote grab开放此端口。
端口:7300、7301、7306、7307、7308
服务:【null】
说明:木马netmonitor开放此端口。另外netspy1.0也开放7306端口。
端口:7323
服务:【null】
说明:sygate服务器端。
端口:7626
服务:【null】
说明:木马giscier开放此端口。
端口:7789
服务:【null】
说明:木马ickiller开放此端口。
端口:8000
服务:oicq
说明:腾讯qq服务器端开放此端口。
端口:8010
服务:wingate
说明:wingate代理开放此端口。
端口:8080
服务:代理端口
说明:www代理开放此端口。
端口:9400、9401、9402
服务:【null】
说明:木马incommand 1.0开放此端口。
端口:9872、9873、9874、9875、10067、10167
服务:【null】
说明:木马portal of doom开放此端口。
端口:9989
端口:9989
服务:【null】
说明:木马ini-killer开放此端口。
端口:11000
服务:【null】
说明:木马sennaspy开放此端口。
端口:11223
服务:【null】
说明:木马progenic trojan开放此端口。
端口:12076、61466
服务:【null】
说明:木马telecommando开放此端口。
端口:12223
服务:【null】
说明:木马hack? keylogger开放此端口。
端口:12345、12346
服务:【null】
说明:木马netbus1.60/1.70、gabanbus开放此端口。
端口:12361
服务:【null】
说明:木马whack-a-mole开放此端口。
端口:13223
服务:powwow
说 明:powwow是tribal voice的聊天程序。它允许用户在此端口打开私人聊天的连接。这一程序对于建立连接非常具有攻击性。它会驻扎在这个tcp端口等回应。造成类似心跳间隔 的连接请求。如果一个拨号用户从另一个聊天者手中继承了ip地址就会发生好象有很多不同的人在测试这个端口的情况。这一协议使用opng作为其连接请求的 前4个字节。
端口:16969
服务:【null】
说明:木马priority开放此端口。
端口:17027
服务:conducent
说明:这是一个外向连接。这是由于公司内部有人安装了带有conducent"adbot"的共享软件。conducent"adbot"是为共享软件显示广告服务的。使用这种服务的一种流行的软件是pkware。
端口:19191
服务:【null】
说明:木马蓝色火焰开放此端口。
端口:20000、20001
服务:【null】
说明:木马millennium开放此端口。
端口:20034
服务:【null】
说明:木马netbus pro开放此端口。
端口:21554
服务:【null】
说明:木马girlfriend开放此端口。
端口:22222
服务:【null】
说明:木马prosiak开放此端口。
端口:23456
服务:【null】
说明:木马evil ftp、ugly ftp开放此端口。
端口:26274、47262
服务:【null】
说明:木马delta开放此端口。
端口:27374
服务:【null】
说明:木马subseven 2.1开放此端口。
端口:30100
服务:【null】
说明:木马netsphere开放此端口。
端口:30303
服务:【null】
说明:木马socket23开放此端口。
端口:30999
服务:【null】
说明:木马kuang开放此端口。
端口:31337、31338
服务:【null】
说明:木马bo(back orifice)开放此端口。另外木马deepbo也开放31338端口。
端口:31339
服务:【null】
说明:木马netspy dk开放此端口。
端口:31666
服务:【null】
说明:木马bowhack开放此端口。
端口:33333
服务:【null】
说明:木马prosiak开放此端口。
端口:34324
服务:【null】
说明:木马tiny telnet server、biggluck、tn开放此端口。
端口:40412
服务:【null】
说明:木马the spy开放此端口。
端口:40421、40422、40423、40426、
服务:【null】
说明:木马masters paradise开放此端口。
端口:43210、54321
服务:【null】
说明:木马schoolbus 1.0/2.0开放此端口。
端口:44445
服务:【null】
说明:木马happypig开放此端口。
端口:50766
服务:【null】
说明:木马fore开放此端口。
端口:53001
服务:【null】
说明:木马remote windows shutdown开放此端口。
端口:65000
服务:【null】
说明:木马devil 1.03开放此端口。
端口:88
说明:kerberos krb5。另外tcp的88端口也是这个用途。
端口:137
说 明:sql named pipes encryption over other protocols name lookup(其他协议名称查找上的sql命名管道加密技术)和sql rpc encryption over other protocols name lookup(其他协议名称查找上的sql rpc加密技术)和wins netbt name service(wins netbt名称服务)和wins proxy都用这个端口。
端口:161
说明:simple network management protocol(smtp)(简单网络管理协议)。
端口:162
说明:snmp trap(snmp陷阱)
端口:445
说明:common internet file system(cifs)(公共internet文件系统)
端口:464
说明:kerberos kpasswd(v5)。另外tcp的464端口也是这个用途。
端口:500
说明:internet key exchange(ike)(internet密钥交换)
端口:1645、1812
说明:remot authentication dial-in user service(radius)authentication(routing and remote access)(远程认证拨号用户服务)
端口:1646、1813
说明:radius accounting(routing and remote access)(radius记帐(路由和远程访问))
端口:1701
说明:layer two tunneling protocol(l2tp)(第2层隧道协议)
端口:1801、3527
说明:microsoft message queue server(microsoft消息队列服务器)。还有tcp的135、1801、2101、2103、2105也是同样的用途。
端口:2504
说明:network load balancing(网络平衡负荷)
前面系统讨论过java类型加载(loading)的问题,在这篇文章中简要分析一下java类型卸载(unloading)的问题,并简要分析一下如何解决如何运行时加载newly compiled version的问题。
【相关规范摘要】
首先看一下,关于java虚拟机规范中时如何阐述类型卸载(unloading)的:
A class or interface may be unloaded if and only if its class loader is unreachable. The bootstrap class loader is always reachable; as a result, system classes may never be unloaded.
Java虚拟机规范中关于类型卸载的内容就这么简单两句话,大致意思就是:只有当加载该类型的类加载器实例(非类加载器类型)为unreachable状态时,当前被加载的类型才被卸载.启动类加载器实例永远为reachable状态,由启动类加载器加载的类型可能永远不会被卸载.
我们再看一下Java语言规范提供的关于类型卸载的更详细的信息(部分摘录):
//摘自JLS 12.7 Unloading of Classes and Interfaces
1、An implementation of the Java programming language may unload classes.
2、Class unloading is an optimization that helps reduce memory use. Obviously,the semantics of a program should not depend on whether and how a system chooses to implement an optimization such as class unloading.
3、Consequently,whether a class or interface has been unloaded or not should be transparent to a program
通过以上我们可以得出结论: 类型卸载(unloading)仅仅是作为一种减少内存使用的性能优化措施存在的,具体和虚拟机实现有关,对开发者来说是透明的.
纵观java语言规范及其相关的API规范,找不到显示类型卸载(unloading)的接口, 换句话说:
1、一个已经加载的类型被卸载的几率很小至少被卸载的时间是不确定的
2、一个被特定类加载器实例加载的类型运行时可以认为是无法被更新的
【类型卸载进一步分析】
前面提到过,如果想卸载某类型,必须保证加载该类型的类加载器处于unreachable状态,现在我们再看看有 关unreachable状态的解释:
1、A reachable object is any object that can be accessed in any potential continuing computation from any live thread.
2、finalizer-reachable: A finalizer-reachable object can be reached from some finalizable object through some chain of references, but not from any live thread. An unreachable object cannot be reached by either means.
某种程度上讲,在一个稍微复杂的java应用中,我们很难准确判断出一个实例是否处于unreachable状态,所 以为了更加准确的逼近这个所谓的unreachable状态,我们下面的测试代码尽量简单一点.
【测试场景一】使用自定义类加载器加载, 然后测试将其设置为unreachable的状态
说明:
1、自定义类加载器(为了简单起见, 这里就假设加载当前工程以外D盘某文件夹的class)
2、假设目前有一个简单自定义类型MyClass对应的字节码存在于D:/classes目录下
public class MyURLClassLoader extends URLClassLoader {
public MyURLClassLoader() {
super(getMyURLs());
}
private static URL[] getMyURLs() {
try {
return new URL[]{new File ("D:/classes/").toURL()};
} catch (Exception e) {
e.printStackTrace();
return null;
}
}
}
1 public class Main {
2 public static void main(String[] args) {
3 try {
4 MyURLClassLoader classLoader = new MyURLClassLoader();
5 Class classLoaded = classLoader.loadClass("MyClass");
6 System.out.println(classLoaded.getName());
7
8 classLoaded = null;
9 classLoader = null;
10
11 System.out.println("开始GC");
12 System.gc();
13 System.out.println("GC完成");
14 } catch (Exception e) {
15 e.printStackTrace();
16 }
17 }
18 }
我们增加虚拟机参数-verbose:gc来观察垃圾收集的情况,对应输出如下:
MyClass
开始GC
[Full GC[Unloading class MyClass]
207K->131K(1984K), 0.0126452 secs]
GC完成
【测试场景二】使用系统类加载器加载,但是无法将其设置为unreachable的状态
说明:将场景一中的MyClass类型字节码文件放置到工程的输出目录下,以便系统类加载器可以加载
1 public class Main {
2 public static void main(String[] args) {
3 try {
4 Class classLoaded = ClassLoader.getSystemClassLoader().loadClass(
5 "MyClass");
6
7
8 System.out.printl(sun.misc.Launcher.getLauncher().getClassLoader());
9 System.out.println(classLoaded.getClassLoader());
10 System.out.println(Main.class.getClassLoader());
11
12 classLoaded = null;
13
14 System.out.println("开始GC");
15 System.gc();
16 System.out.println("GC完成");
17
18 //判断当前系统类加载器是否有被引用(是否是unreachable状态)
19 System.out.println(Main.class.getClassLoader());
20 } catch (Exception e) {
21 e.printStackTrace();
22 }
23 }
24 }
我们增加虚拟机参数-verbose:gc来观察垃圾收集的情况, 对应输出如下:
sun.misc.Launcher$AppClassLoader@197d257
sun.misc.Launcher$AppClassLoader@197d257
sun.misc.Launcher$AppClassLoader@197d257
开始GC
[Full GC 196K->131K(1984K), 0.0130748 secs]
GC完成
sun.misc.Launcher$AppClassLoader@197d257
由于系统ClassLoader实例(AppClassLoader@197d257">sun.misc.Launcher$AppClassLoader@197d257)加载了很多类型,而且又没有明确的接口将其设置为null,所以我们无法将加载MyClass类型的系统类加载器实例设置为unreachable状态,所以通过测试结果我们可以看出,MyClass类型并没有被卸载.(说明: 像类加载器实例这种较为特殊的对象一般在很多地方被引用, 会在虚拟机中呆比较长的时间)
【测试场景三】使用扩展类加载器加载, 但是无法将其设置为unreachable的状态
说明:将测试场景二中的MyClass类型字节码文件打包成jar放置到JRE扩展目录下,以便扩展类加载器可以加载的到。由于标志扩展ClassLoader实例(ExtClassLoader@7259da">sun.misc.Launcher$ExtClassLoader@7259da)加载了很多类型,而且又没有明确的接口将其设置为null,所以我们无法将加载MyClass类型的系统类加载器实例设置为unreachable状态,所以通过测试结果我们可以看出,MyClass类型并没有被卸载.
1 public class Main {
2 public static void main(String[] args) {
3 try {
4 Class classLoaded = ClassLoader.getSystemClassLoader().getParent()
5 .loadClass("MyClass");
6
7 System.out.println(classLoaded.getClassLoader());
8
9 classLoaded = null;
10
11 System.out.println("开始GC");
12 System.gc();
13 System.out.println("GC完成");
14 //判断当前标准扩展类加载器是否有被引用(是否是unreachable状态)
15 System.out.println(Main.class.getClassLoader().getParent());
16 } catch (Exception e) {
17 e.printStackTrace();
18 }
19 }
20 }
我们增加虚拟机参数-verbose:gc来观察垃圾收集的情况,对应输出如下:
sun.misc.Launcher$ExtClassLoader@7259da
开始GC
[Full GC 199K->133K(1984K), 0.0139811 secs]
GC完成
sun.misc.Launcher$ExtClassLoader@7259da
关于启动类加载器我们就不需再做相关的测试了,jvm规范和JLS中已经有明确的说明了.
【类型卸载总结】
通过以上的相关测试(虽然测试的场景较为简单)我们可以大致这样概括:
1、有启动类加载器加载的类型在整个运行期间是不可能被卸载的(jvm和jls规范).
2、被系统类加载器和标准扩展类加载器加载的类型在运行期间不太可能被卸载,因为系统类加载器实例或者标准扩展类的实例基本上在整个运行期间总能直接或者间接的访问的到,其达到unreachable的可能性极小.(当然,在虚拟机快退出的时候可以,因为不管ClassLoader实例或者Class(java.lang.Class)实例也都是在堆中存在,同样遵循垃圾收集的规则).
3、被开发者自定义的类加载器实例加载的类型只有在很简单的上下文环境中才能被卸载,而且一般还要借助于强制调用虚拟机的垃圾收集功能才可以做到.可以预想,稍微复杂点的应用场景中(尤其很多时候,用户在开发自定义类加载器实例的时候采用缓存的策略以提高系统性能),被加载的类型在运行期间也是几乎不太可能被卸载的(至少卸载的时间是不确定的).
综合以上三点,我们可以默认前面的结论1, 一个已经加载的类型被卸载的几率很小至少被卸载的时间是不确定的.同时,我们可以看的出来,开发者在开发代码时候,不应该对虚拟机的类型卸载做任何假设的前提下来实现系统中的特定功能.
【类型更新进一步分析】
前面已经明确说过,被一个特定类加载器实例加载的特定类型在运行时是无法被更新的.注意这里说的
是一个特定的类加载器实例,而非一个特定的类加载器类型.
【测试场景四】
说明:现在要删除前面已经放在工程输出目录下和扩展目录下的对应的MyClass类型对应的字节码
1 public class Main {
2 public static void main(String[] args) {
3 try {
4 MyURLClassLoader classLoader = new MyURLClassLoader();
5 Class classLoaded1 = classLoader.loadClass("MyClass");
6 Class classLoaded2 = classLoader.loadClass("MyClass");
7 //判断两次加载classloader实例是否相同
8 System.out.println(classLoaded1.getClassLoader() == classLoaded2.getClassLoader());
9
10 //判断两个Class实例是否相同
11 System.out.println(classLoaded1 == classLoaded2);
12 } catch (Exception e) {
13 e.printStackTrace();
14 }
15 }
16 }
输出如下:
true
true
通过结果我们可以看出来,两次加载获取到的两个Class类型实例是相同的.那是不是确实是我们的自定义
类加载器真正意义上加载了两次呢(即从获取class字节码到定义class类型…整个过程呢)?
通过对java.lang.ClassLoader的loadClass(String name,boolean resolve)方法进行调试,我们可以看出来,第二
次 加载并不是真正意义上的加载,而是直接返回了上次加载的结果.
说明:为了调试方便, 在Class classLoaded2 = classLoader.loadClass("MyClass");行设置断点,然后单步跳入, 可以看到第二次加载请求返回的结果直接是上次加载的Class实例. 调试过程中的截图 最好能自己调试一下).
【测试场景五】同一个类加载器实例重复加载同一类型
说明:首先要对已有的用户自定义类加载器做一定的修改,要覆盖已有的类加载逻辑, MyURLClassLoader.java类简要修改如下:重新运行测试场景四中的测试代码
1 public class MyURLClassLoader extends URLClassLoader {
2 //省略部分的代码和前面相同,只是新增如下覆盖方法
3 /*
4 * 覆盖默认的加载逻辑,如果是D:/classes/下的类型每次强制重新完整加载
5 *
6 * @see java.lang.ClassLoader#loadClass(java.lang.String)
7 */
8 @Override
9 public Class<?> loadClass(String name) throws ClassNotFoundException {
10 try {
11 //首先调用系统类加载器加载
12 Class c = ClassLoader.getSystemClassLoader().loadClass(name);
13 return c;
14 } catch (ClassNotFoundException e) {
15 // 如果系统类加载器及其父类加载器加载不上,则调用自身逻辑来加载D:/classes/下的类型
16 return this.findClass(name);
17 }
18 }
19 }
说明: this.findClass(name)会进一步调用父类URLClassLoader中的对应方法,其中涉及到了defineClass(String name)的调用,所以说现在类加载器MyURLClassLoader会针对D:/classes/目录下的类型进行真正意义上的强制加载并定义对应的类型信息.
测试输出如下:
Exception in thread "main" java.lang.LinkageError: duplicate class definition: MyClass
at java.lang.ClassLoader.defineClass1(Native Method)
at java.lang.ClassLoader.defineClass(ClassLoader.java:620)
at java.security.SecureClassLoader.defineClass(SecureClassLoader.java:124)
at java.net.URLClassLoader.defineClass(URLClassLoader.java:260)
at java.net.URLClassLoader.access$100(URLClassLoader.java:56)
at java.net.URLClassLoader$1.run(URLClassLoader.java:195)
at java.security.AccessController.doPrivileged(Native Method)
at java.net.URLClassLoader.findClass(URLClassLoader.java:188)
at MyURLClassLoader.loadClass(MyURLClassLoader.java:51)
at Main.main(Main.java:27)
结论:如果同一个类加载器实例重复强制加载(含有定义类型defineClass动作)相同类型,会引起java.lang.LinkageError: duplicate class definition.
【测试场景六】同一个加载器类型的不同实例重复加载同一类型
1 public class Main {
2 public static void main(String[] args) {
3 try {
4 MyURLClassLoader classLoader1 = new MyURLClassLoader();
5 Class classLoaded1 = classLoader1.loadClass("MyClass");
6 MyURLClassLoader classLoader2 = new MyURLClassLoader();
7 Class classLoaded2 = classLoader2.loadClass("MyClass");
8
9 //判断两个Class实例是否相同
10 System.out.println(classLoaded1 == classLoaded2);
11 } catch (Exception e) {
12 e.printStackTrace();
13 }
14 }
15 }
测试对应的输出如下:
false
【类型更新总结】
由不同类加载器实例重复强制加载(含有定义类型defineClass动作)同一类型不会引起java.lang.LinkageError错误, 但是加载结果对应的Class类型实例是不同的,即实际上是不同的类型(虽然包名+类名相同). 如果强制转化使用,会引起ClassCastException.(说明: 头一段时间那篇文章中解释过,为什么不同类加载器加载同名类型实际得到的结果其实是不同类型, 在JVM中一个类用其全名和一个加载类ClassLoader的实例作为唯一标识,不同类加载器加载的类将被置于不同的命名空间).
应用场景:我们在开发的时候可能会遇到这样的需求,就是要动态加载某指定类型class文件的不同版本,以便能动态更新对应功能.
建议:
1. 不要寄希望于等待指定类型的以前版本被卸载,卸载行为对java开发人员透明的.
2. 比较可靠的做法是,每次创建特定类加载器的新实例来加载指定类型的不同版本,这种使用场景下,一般就要牺牲缓存特定类型的类加载器实例以带来性能优化的策略了.对于指定类型已经被加载的版本, 会在适当时机达到unreachable状态,被unload并垃圾回收.每次使用完类加载器特定实例后(确定不需要再使用时), 将其显示赋为null, 这样可能会比较快的达到jvm 规范中所说的类加载器实例unreachable状态, 增大已经不再使用的类型版本被尽快卸载的机会.
3. 不得不提的是,每次用新的类加载器实例去加载指定类型的指定版本,确实会带来一定的内存消耗,一般类加载器实例会在内存中保留比较长的时间. 在bea开发者网站上找到一篇相关的文章(有专门分析ClassLoader的部分):http://dev2dev.bea.com/pub/a/2005/06/memory_leaks.html
写的过程中参考了jvm规范和jls, 并参考了sun公司官方网站上的一些bug的分析文档。
欢迎大家批评指正!
本博客中的所有文章、随笔除了标题中含有引用或者转载字样的,其他均为原创。转载请注明出处,谢谢!
启动集群中所有的regionserver ./hbase-daemons.sh start regionserver
启动某个regionserver
./hbase-daemon.sh start regionserver
做了几天工程,对HBase中的表操作熟悉了一下。下面总结一下常用的表操作和容易出错的几个方面。当然主要来源于大牛们的文章。我在前人的基础上稍作解释。 1.连接HBase中的表testtable,用户名:root,密码:root public void ConnectHBaseTable()
{
Configuration conf = new Configuration();
conf.set("hadoop.job.ugi", "root,root");
HBaseConfiguration config = new HBaseConfiguration();
try
{
table = new HTable(config, "testtable");
}catch(Exception e){e.printStackTrace();}
} 2.根据行名name获得一行数据,存入Result.注意HBase中的表数据是字节存储的。 下面的例子表示获得行名为name的行的famA列族col1列的数据。 String rowId = "name";
Get get = new Get(rowId);
Result result = hTable.get(get);
byte[] value = result.getValue(famA, col1);
System.out.println(Bytes.toString(value));
3.向表中存数据 下面的例子表示写入一行。行名为abcd,famA列族col1列的数据为"hello world!"。 byte[] rowId = Bytes.toBytes("abcd");
byte[] famA = Bytes.toBytes("famA");
byte[] col1 = Bytes.toBytes("col1");
Put put = new Put(rowId).
add(famA, col1, Bytes.toBytes("hello world!"));
hTable.put(put);
4.扫描的用法(scan):便于获得自己需要的数据,相当于SQL查询。 byte[] famA = Bytes.toBytes("famA");
byte[] col1 = Bytes.toBytes("col1");
HTable hTable = new HTable("test");
//表示要查询的行名是从a开始,到z结束。
Scan scan = new Scan(Bytes.toBytes("a"), Bytes.toBytes("z"));
//用scan.setStartRow(Bytes.toBytes(""));设置起始行 //用scan.setStopRow(Bytes.toBytes(""));设置终止行 //表示查询famA族col1列 scan.addColumn(famA, col1);
//注意,下面是filter的写法。相当于SQL的where子句 //表示famA族col1列的数据等于"hello world!"
SingleColumnValueFilter singleColumnValueFilterA = new SingleColumnValueFilter(
famA, col1, CompareOp.EQUAL, Bytes.toBytes("hello world!"));
singleColumnValueFilterA.setFilterIfMissing(true);
//表示famA族col1列的数据等于"hello hbase!"
SingleColumnValueFilter singleColumnValueFilterB = new SingleColumnValueFilter(
famA, col1, CompareOp.EQUAL, Bytes.toBytes("hello hbase!"));
singleColumnValueFilterB.setFilterIfMissing(true);
//表示famA族col1列的数据是两者中的一个
FilterList filter = new FilterList(Operator.MUST_PASS_ONE, Arrays
.asList((Filter) singleColumnValueFilterA,
singleColumnValueFilterB));
scan.setFilter(filter);
ResultScanner scanner = hTable.getScanner(scan);
//遍历每个数据
for (Result result : scanner) {
System.out.println(Bytes.toString(result.getValue(famA, col1)));
}
5.上面的代码容易出错的地方在于,需要导入HBase的类所在的包。导入时需要选择包,由于类可能出现在HBase的各个子包中,所以要选择好,下面列出常用的包。尽量用HBase的包 import org.apache.hadoop.conf.Configuration;
import org.apache.hadoop.hbase.HBaseConfiguration;
import org.apache.hadoop.hbase.client.Get;
import org.apache.hadoop.hbase.client.HTable;
import org.apache.hadoop.hbase.client.Put;
import org.apache.hadoop.hbase.client.Result;
import org.apache.hadoop.hbase.client.ResultScanner;
import org.apache.hadoop.hbase.client.Scan;
import org.apache.hadoop.hbase.filter.Filter;
import org.apache.hadoop.hbase.filter.FilterList;
import org.apache.hadoop.hbase.filter.SingleColumnValueFilter;
import org.apache.hadoop.hbase.filter.CompareFilter.CompareOp;
import org.apache.hadoop.hbase.filter.FilterList.Operator;
import org.apache.hadoop.hbase.util.Bytes; import java.io.IOException;
import java.text.SimpleDateFormat;
import java.util.Arrays;
import java.util.Date; 6.下面列出HBase常用的操作 (1)时间戳到时间的转换.单一的时间戳无法给出直观的解释。 public String GetTimeByStamp(String timestamp)
{ long datatime= Long.parseLong(timestamp);
Date date=new Date(datatime);
SimpleDateFormat format=new SimpleDateFormat("yyyy-MM-dd HH:MM:ss");
String timeresult=format.format(date);
System.out.println("Time : "+timeresult);
return timeresult;
} (2)时间到时间戳的转换。注意时间是字符串格式。字符串与时间的相互转换,此不赘述。 public String GetStampByTime(String time)
{
String Stamp="";
SimpleDateFormat sdf=new SimpleDateFormat("yyyy-MM-dd HH:mm:ss");
Date date;
try
{
date=sdf.parse(time);
Stamp=date.getTime()+"000";
System.out.println(Stamp);
}catch(Exception e){e.printStackTrace();}
return Stamp;
} 上面就是我的一点心得。以后碰到什么问题,再来解决。 参考文献:http://www.nearinfinity.com/blogs/aaron_mccurry/using_hbase-dsl.html
因官方Book Performance Tuning部分章节没有按配置项进行索引,不能达到快速查阅的效果。所以我以配置项驱动,重新整理了原文,并补充一些自己的理解,如有错误,欢迎指正。 配置优化 zookeeper.session.timeout
默认值:3分钟(180000ms)
说明:RegionServer与Zookeeper间的连接超时时间。当超时时间到后,ReigonServer会 被Zookeeper从RS集群清单中移除,HMaster收到移除通知后,会对这台server负责的regions重新balance,让其他存活的 RegionServer接管.
调优:
这个timeout决定了RegionServer是否能够及时的failover。设置成1分钟或更低,可以减少因等待超时而被延长的failover时间。
不过需要注意的是,对于一些Online应用,RegionServer的宕机到恢复时间本身就很短的(网络闪断,crash等故障,运维可快速介入), 如果调低timeout时间,会得不偿失。因为当ReigonServer被正式从RS集群中移除时,HMaster就开始做balance了,当故障的 RS快速恢复后,这个balance动作是毫无意义的,反而会使负载不均匀,给RS带来更多负担。 hbase.regionserver.handler.count
默认值:10
说明:RegionServer的请求处理IO线程数。
调优:
这个参数的调优与内存息息相关。
较少的IO线程,适用于处理单次请求内存消耗较高的Big PUT场景(大容量单次PUT或设置了较大cache的scan,均属于Big PUT)或ReigonServer的内存比较紧张的场景。
较多的IO线程,适用于单次请求内存消耗低,TPS要求非常高的场景。
这里需要注意的是如果server的region数量很少,大量的请求都落在一个region上,因快速充满memstore触发flush导致的读写锁会影响全局TPS,不是IO线程数越高越好。
压测时,开启Enabling RPC-level logging,可以同时监控每次请求的内存消耗和GC的状况,最后通过多次压测结果来合理调节IO线程数。
这里是一个案例 Hadoop and HBase Optimization for Read Intensive Search Applications,作者在SSD的机器上设置IO线程数为100,仅供参考。 hbase.hregion.max.filesize
默认值:256M
说明:在当前ReigonServer上单个Reigon的大小,单个Region超过指定值时,这个Region会被自动split成更小的region。
调优:
小region对split和compaction友好,因为拆分region或compact小region里的storefile速度很快,内存占用低。缺点是split和compaction会很频繁。
特别是数量较多的小region不停地split, compaction,会使响应时间波动很大,region数量太多不仅给管理上带来麻烦,甚至引发一些Hbase的bug。
一般512以下的都算小region。 大region,则不太适合经常split和compaction,因为做一次compact和split会产生较长时间的停顿,对应用的读写性能冲击非常大。此外,大region意味着较大的storefile,compaction时对内存也是一个挑战。
当然,大region还是有其用武之地,你只要在某个访问量低峰的时间点统一做compact和split,大region就可以发挥优势了,毕竟它能保证绝大多数时间平稳的读写性能。 既然split和compaction如此影响性能,有没有办法去掉?
compaction是无法避免的,split倒是可以从自动调整为手动。
只要通过将这个参数值调大到某个很难达到的值,比如100G,就可以间接禁用自动split(RegionServer不会对未到达100G的region做split)。
再配合RegionSplitter这个工具,在需要split时,手动split。
手动split在灵活性和稳定性上比起自动split要高很多,相反,管理成本增加不多,比较推荐online实时系统使用。 内存方面,小region在设置memstore的大小值上比较灵活,大region则过大过小都不行,过大会导致flush时app的IO wait增高,过小则因store file过多读性能降低。 hbase.regionserver.global.memstore.upperLimit/lowerLimit 默认值:0.4/0.35
upperlimit说明:hbase.hregion.memstore.flush.size 这个参数的作用是 当单个memstore达到指定值时,flush该memstore。但是,一台ReigonServer可能有成百上千个memstore,每个 memstore也许未达到flush.size,jvm的heap就不够用了。该参数就是为了限制memstores占用的总内存。
当ReigonServer内所有的memstore所占用的内存综合达到heap的40%时,HBase会强制block所有的更新并flush这些memstore以释放所有memstore占用的内存。
lowerLimit说明: 同upperLimit,只不过当全局memstore的内存达到35%时,它不会flush所有的memstore,它会找一些内存占用较大的 memstore,个别flush,当然更新还是会被block。lowerLimit算是一个在全局flush前的补救措施。可以想象一下,如果 memstore需要在一段时间内全部flush,且这段时间内无法接受写请求,对HBase集群的性能影响是很大的。
调优:这是一个Heap内存保护参数,默认值已经能适用大多数场景。它的调整一般是为了配合某些专属优化,比如读密集型应用,将读缓存开大,降低该值,腾出更多内存给其他模块使用。
这个参数会给使用者带来什么影响?
比如,10G内存,100个region,每个memstore 64M,假设每个region只有一个memstore,那么当100个memstore平均占用到50%左右时,就会达到lowerLimit的限制。 假设此时,其他memstore同样有很多的写请求进来。在那些大的region未flush完,就可能又超过了upperlimit,则所有 region都会被block,开始触发全局flush。 hfile.block.cache.size 默认值:0.2
说明:storefile的读缓存占用Heap的大小百分比,0.2表示20%。该值直接影响数据读的性能。
调优:当然是越大越好,如果读比写少,开到0.4-0.5也没问题。如果读写较均衡,0.3左右。如果写比读多,果断 默认吧。设置这个值的时候,你同时要参考 hbase.regionserver.global.memstore.upperLimit ,该值是 memstore占heap的最大百分比,两个参数一个影响读,一个影响写。如果两值加起来超过80-90%,会有OOM的风险,谨慎设置。 hbase.hstore.blockingStoreFiles 默认值:7
说明:在compaction时,如果一个Store(Coulmn Family)内有超过7个storefile需要合并,则block所有的写请求,进行flush,限制storefile数量增长过快。
调优:block请求会影响当前region的读写性能,将值设为单个region可以支撑的最大store file数量会是个不错的选择。最大storefile数量可通过region size/memstore size来计算。如果你将region size设为无限大,那么你需要预估一个region可能产生的最大storefile数。 hbase.hregion.memstore.block.multiplier 默认值:2
说明:当一个region里的memstore超过单个memstore.size两倍的大小时,block该 region的所有请求,进行flush,释放内存。虽然我们设置了memstore的总大小,比如64M,但想象一下,在最后63.9M的时候,我 Put了一个100M的数据或写请求量暴增,最后一秒钟put了1万次,此时memstore的大小会瞬间暴涨到超过预期的memstore.size。 这个参数的作用是当memstore的大小增至超过memstore.size时,block所有请求,遏制风险进一步扩大。
调优: 这个参数的默认值还是比较靠谱的。如果你预估你的正常应用场景(不包括异常)不会出现突发写或写的量可控,那么保持默认值即可。如果正常情况下,你的写量 就会经常暴增,那么你应该调大这个倍数并调整其他参数值,比如hfile.block.cache.size和 hbase.regionserver.global.memstore.upperLimit/lowerLimit,以预留更多内存,防止HBase server OOM。 其他 启用LZO压缩
LZO对比Hbase默认的GZip,前者性能较高,后者压缩比较高,具体参见 Using LZO Compression 。对于想提高HBase读写性能的开发者,采用LZO是比较好的选择。对于非常在乎存储空间的开发者,则建议保持默认。 不要在一张表里定义太多的Column Family Hbase目前不能良好的处理超过2-3个CF的表。因为某个CF在flush发生时,它邻近的CF也会因关联效应被触发flush,最终导致系统产生很多IO。 批量导入 在批量导入数据到Hbase前,你可以通过预先创建region,来平衡数据的负载。详见 Table Creation: Pre-Creating Regions Hbase客户端优化 AutoFlush 将HTable的setAutoFlush设为false,可以支持客户端批量更新。即当Put填满客户端flush缓存时,才发送到服务端。
默认是true。 Scan Caching scanner一次缓存多少数据来scan(从服务端一次抓多少数据回来scan)。
默认值是 1,一次只取一条。 Scan Attribute Selection scan时建议指定需要的Column Family,减少通信量,否则scan默认会返回整个row的所有数据(所有Coulmn Family)。 Close ResultScanners 通过scan取完数据后,记得要关闭ResultScanner,否则RegionServer可能会出现问题。 Optimal Loading of Row Keys 当你scan一张表的时候,返回结果只需要row key(不需要CF, qualifier,values,timestaps)时,你可以在scan实例中添加一个filterList,并设置 MUST_PASS_ALL操作,filterList中add FirstKeyOnlyFilter或KeyOnlyFilter。这样可以减少网络通信量。 Turn off WAL on Puts 当Put某些非重要数据时,你可以设置writeToWAL(false),来进一步提高写性能。writeToWAL(false)会在Put时放弃写WAL log。风险是,当RegionServer宕机时,可能你刚才Put的那些数据会丢失,且无法恢复。 启用Bloom Filter Bloom Filter通过空间换时间,提高读操作性能。 转载请注明原文链接:http://kenwublog.com/hbase-performance-tuning
We recently set up HBase and HBase-trx (from https://github.com/hbase-trx) to use multiple-column indexes with this code. After you compile it, just copy the jar and the hbase-trx jar into your hbase’s lib folder and you should be good to to! When you create a composite index, you can see the metadata for the index by looking at the table description. One of the properties will read “INDEXES =>” followed by index names and ‘family:qualifier’ style column names in the index. KeyGeneratorFactory:
package com.ir.store.hbase.indexes;
import java.util.List;
import org.apache.hadoop.hbase.client.tableindexed.IndexKeyGenerator;
public class KeyGeneratorFactory {
 public static IndexKeyGenerator getInstance(List columns) {
 return new HBaseIndexKeyGenerator(columns);
 }
 }
HBaseIndexKeyGenerator:
package com.ir.store.hbase.indexes;
import java.io.DataInput;
 import java.io.DataOutput;
 import java.io.IOException;
 import java.util.ArrayList;
 import java.util.List;
 import java.util.Map;
 import org.apache.hadoop.hbase.client.tableindexed.IndexKeyGenerator;
 import org.apache.hadoop.hbase.util.Bytes;
public class HBaseIndexKeyGenerator extends Object implements IndexKeyGenerator {
 public static byte[] KEYSEPERATOR = "~;?".getBytes();
private int columnCount;
 private List columnNames = new ArrayList();
public HBaseIndexKeyGenerator(List memberColumns) {
// For new key generators
columnNames = memberColumns;
columnCount = memberColumns.size();
} public HBaseIndexKeyGenerator() {
// Hollow constructor for deserializing -- should call readFields shortly
columnCount = 0;
} public void readFields(DataInput binaryInput) throws IOException {
columnCount = binaryInput.readInt();
for (int currentColumn = 0; currentColumn < columnCount; currentColumn++)
columnNames.add(Bytes.readByteArray(binaryInput));
} public void write(DataOutput binaryOutput) throws IOException {
binaryOutput.writeInt(columnCount);
for (byte[] columnName : columnNames)
Bytes.writeByteArray(binaryOutput, columnName);
}
 public byte[] createIndexKey(byte[] baseRowIdentifier, Map baseRowData) {
 byte[] indexRowIdentifier = null;
 for (byte[] columnName: columnNames) {
 if (indexRowIdentifier == null)
 indexRowIdentifier = baseRowData.get(columnName);
 else indexRowIdentifier = Bytes.add(indexRowIdentifier, HBaseIndexKeyGenerator.KEYSEPERATOR, baseRowData.get(columnName));
 }
 if (baseRowIdentifier != null)
 return Bytes.add(indexRowIdentifier, HBaseIndexKeyGenerator.KEYSEPERATOR, baseRowIdentifier);
 return indexRowIdentifier;
 }
 }
对于Bigtable类型的分布式数据库应用来说,用户往往会对其性能状况有极大的兴趣,这其中又对实时数据插入性能更为关注。HBase作为Bigtable的一个实现,在这方面的性能会如何呢?这就需要通过测试数据来说话了。 数据插入性能测试的设计场景是这样的,取随机值的Rowkey长度为2000字节,固定值的Value长度为4000字节,由于单行Row插入速度太快,系统统计精度不够,所以将插入500行Row做一次耗时统计。 这里要对HBase的特点做个说明,首先是Rowkey值为何取随机数,这是因为HBase是对Rowkey进行排序的,随机Rowkey将被分配到不同的region上,这样才能发挥出分布式数据库的性能优点。而Value对于HBase来说不会进行任何解析,其数据是否变化,对性能是不应该有任何影响的。同时为了简单起见,所有的数据都将只插入到一个表格的同一个Column中。 在测试之初,需要对集群进行调优,关闭可能大量耗费内存、带宽以及CPU的服务,例如Apache的Http服务。保持集群的宁静度。此外,为了保证测试不受干扰,Hbase的集群系统需要被独立,以保证不与HDFS所在的Hadoop集群有所交叉。 那么做好一切准备,就开始进行数据灌入,客户端从Zookeeper上查询到Regionserver的地址后,开始源源不断的向Hbase的Regionserver上喂入Row。 这里,我写了一个通过JFreeChart来实时生成图片的程序,每3分钟,喂数据的客户端会将获取到的耗时统计打印在一张十字坐标图中,这些图又被保存在制定的web站点中,并通过http服务展示出来。在通过长时间不间断的测试后,我得到了如下图形: 
这个图形非常有特点,好似一条直线上,每隔一段时间就会泛起一个波浪,且两个高峰之间必有一个较矮的波浪。高峰的间隔则呈现出越来越大的趋势。而较矮的波浪恰好处于两高峰的中间位置。 为了解释这个现象,我对HDFS上Hbase所在的主目录下文件,以及被插入表格的region情况进行了实时监控,以期发现这些波浪上发生了什么事情。 回溯到客户端喂入数据的开始阶段,创建表格,在HDFS上便被创建了一个与表格同名的目录,该目录下将出现第一个region,region中会以family名创建一个目录,这个目录下才存在记录具体数据的文件。同时在该表表名目录下,还会生成一个“compaction.dir”目录,该目录将在family名目录下region文件超过指定数目时用于合并region。 当第一个region目录出现的时候,内存中最初被写入的数据将被保存到这个文件中,这个间隔是由选项“hbase.hregion.memstore.flush.size”决定的,默认是64MB,该region所在的Regionserver的内存中一旦有超过64MB的数据的时候,就将被写入到region文件中。这个文件将不断增殖,直到超过由“hbase.hregion.max.filesize”决定的文件大小时(默认是256MB,此时加上内存刷入的数据,实际最大可能到256+64M),该region将被执行split,立即被一切为二,其过程是在该目录下创建一个名为“.splits”的目录作为标记,然后由Regionserver将文件信息读取进来,分别写入到两个新的region目录中,最后再将老的region删除。这里的标记目录“.splits”将避免在split过程中发生其他操作,起到类似于多线程安全的锁功能。在新的region中,从老的region中切分出的数据独立为一个文件并不再接受新的数据(该文件大小超过了64M,最大可达到(256+64)/2=160MB),内存中新的数据将被保存到一个重新创建的文件中,该文件大小将为64MB。内存每刷新一次,region所在的目录下就将增加一个64M的文件,直到总文件数超过由“hbase.hstore.compactionThreshold”指定的数量时(默认为3),compaction过程就将被触发了。在上述值为3时,此时该region目录下,实际文件数只有两个,还有额外的一个正处于内存中将要被刷入到磁盘的过程中。Compaction过程是Hbase的一个大动作,Hbase不仅要将这些文件转移到“compaction.dir”目录进行压缩,而且在压缩后的文件超过256MB时,还必须立即进行split动作。这一系列行为在HDFS上可谓是翻山倒海,影响颇大。待Compaction结束之后,后续的split依然会持续进行一小段时间,直到所有的region都被切割分配完毕,Hbase才会恢复平静并等待下一次数据从内存写入到HDFS的到来。 理解了上述过程,则必然对HBase的数据插入性能为何是上图所示的曲线的原因一目了然。与X轴几乎平行的直线,表明数据正在被写入HBase的Regionserver所在机器的内存中。而较低的波峰意味着Regionserver正在将内存写入到HDFS上,较高的波峰意味着Regionserver不仅正在将内存刷入到HDFS,而且还在执行Compaction和Split两种操作。如果调整“hbase.hstore.compactionThreshold”的值为一个较大的数量,例如改成5,可以预见,在每两个高峰之间必然会等间隔的出现三次较低的波峰,并可预见到,高峰的高度将远超过上述值为3时的高峰高度(因为Compaction的工作更为艰巨)。由于region数量由少到多,而我们插入的Row的Rowkey是随机的,因此每一个region中的数据都会均匀的增加,同一段时间插入的数据将被分布到越来越多的region上,因此波峰之间的间隔时间也将会越来越长。 再次理解上述论述,我们可以推断出Hbase的数据插入性能实际上应该被分为三种情况,即直线状态、低峰状态和高峰状态。在这三种情况下得到的性能数据才是最终Hbase数据插入性能的真实描述。那么提供给用户的数据该是采取哪一个呢?我认为直线状态由于其所占时间会较长,尤其在用户写入数据的速度也许并不是那么快的情况下,所以这个状态下得到的性能数据结果更应该提供给用户。
HBase的写效率还是很高的,但其随机读取效率并不高 可以采取一些优化措施来提高其性能,如: 1. 启用lzo压缩,见这里 2. 增大hbase.regionserver.handler.count数为100 3. 增大hfile.block.cache.size为0.4,提高cache大小 4. 增大hbase.hstore.blockingStoreFiles为15 5. 启用BloomFilter,在HBase0,89中可以设置 6.Put时可以设置setAutoFlush为false,到一定数目后再flushCommits 在14个Region Server的集群上,新建立一个lzo压缩表 测试的Put和Get的性能如下: 1. Put数据: 单线程灌入1.4亿数据,共花费50分钟,每秒能达到4万个,这个性能确实很好了,不过插入的value比较小,只有不到几十个字节 多线程put,没有测试,因为单线程的效率已经相当高了 2. Get数据: 在没有任何Block Cache,而且是Random Read的情况: 单线程平均每秒只能到250个左右 6个线程平均每秒能达到1100个左右 16个线程平均每秒能达到2500个左右 有BlockCache(曾经get过对应的row,而且还在cache中)的情况: 单线程平均每秒能到3600个左右 6个线程平均每秒能达到1.2万个左右 16个线程平均每秒能达到2.5万个左右
在Android的客户端编程中(特别是SNS 类型的客户端),经常需要实现注册功能Activity,要用户输入用户名,密码,邮箱,照片后注册。但这时就有一个问题,在HTML中用form表单就 能实现如上的注册表单,需要的信息会自动封装为完整的HTTP协议,但在Android中如何把这些参数和需要上传的文件封装为HTTP协议呢? 我们可以先做个试验,看一下form表单到底封装了什么样的信息。 第一步:编写一个Servlet,把接收到的HTTP信息保存在一个文件中,代码如下: - public void doPost(HttpServletRequest request, HttpServletResponse response)
-
- throws ServletException, IOException {
-
-
-
- //获取输入流,是HTTP协议中的实体内容
-
- ServletInputStream sis=request.getInputStream();
-
-
-
- //缓冲区
-
- byte buffer[]=new byte[1024];
-
-
-
- FileOutputStream fos=new FileOutputStream("d:\\file.log");
-
-
-
- int len=sis.read(buffer, 0, 1024);
-
-
-
- //把流里的信息循环读入到file.log文件中
-
- while( len!=-1 )
-
- {
-
- fos.write(buffer, 0, len);
-
- len=sis.readLine(buffer, 0, 1024);
-
- }
-
-
-
- fos.close();
-
- sis.close();
-
-
-
- }
-
-
第二步:实现如下一个表单页面, 详细的代码如下: - <form action="servlet/ReceiveFile" method="post" enctype="multipart/form-data">
-
- 第一个参数<input type="text" name="name1"/> <br/>
-
- 第二个参数<input type="text" name="name2"/> <br/>
-
- 第一个上传的文件<input type="file" name="file1"/> <br/>
-
- 第二个上传的文件<input type="file" name="file2"/> <br/>
-
- <input type="submit" value="提交">
-
- </form>
注意了,由于要上传附件,所以一定要设置enctype为multipart/form-data,才可以实现附件的上传。 第三步:填写完信息后按“提交”按钮后,在D盘下查找file.log文件用记事本打开,数据如下: —————————–7d92221b604bc Content-Disposition: form-data; name=”name1″ hello —————————–7d92221b604bc Content-Disposition: form-data; name=”name2″ world —————————–7d92221b604bc Content-Disposition: form-data; name=”file1″; filename=”C:\2.GIF” Content-Type: image/gif GIF89a € € €€ €€ € €€€€€览? 3 f 3 33 3f 3 3 3 f f3 ff f f f ? 檉 櫃 櫶 ? ? 蘤 虣 烫 ? 3 f 3 3 33 f3 ? ? 33 33333f33?3?33f 3f33ff3f?f?f3 3?3檉3櫃3櫶3?3 3?3蘤3虣3烫3?3 333f3??f f 3f ff 檉 蘤 f3 f33f3ff3檉3蘤3ff ff3fffff檉f蘤ff f?f檉f櫃f櫶f?f f?f蘤f虣f烫f?f f3fff檉蘤 3 f 櫃 虣 ? ?3?f?櫃3虣3檉 檉3檉f檉櫃f虣f櫃 櫃3櫃f櫃櫃櫶櫃櫶 櫶3櫶f櫶櫃烫櫶? ?3?f?櫃虣 3 f 櫶 烫 ? ?3?f?櫶3烫3蘤 蘤3蘤f蘤櫶f烫f虣 虣3虣f虣櫶櫶虣烫 烫3烫f烫櫶烫烫? ?3?f?櫶烫 3 f ? ? 3 333f3?3?3f f3fff?f?f ?檉櫃櫶??蘤虣烫? 3f??!? , �e ??羵�Q鸚M!C囑��lH馉脝远5荑p釩?3R?R愣?MV39�V5?谈re琷?试 3??qn?薵Q燚c?獖i郸EW艗赥戟j ; —————————–7d92221b604bc Content-Disposition: form-data; name=”file2″; filename=”C:\2.txt” Content-Type: text/plain hello everyone!!! —————————–7d92221b604bc– 从表单源码可知,表单上传的数据有4个:参数name1和name2,文件file1和file2 首先从file.log观察两个参数name1和name2的情况。这时候使用UltraEdit打开file.log(因为有些字符在记事本里显示不出来,所以要用16进制编辑器) 结合16进制数据和记事本显示的数据可知上传参数部分的格式规律: 1. 第一行是“—————————–7d92221b604bc”作为分隔符,然后是“\r\n”(即16进制编辑器显示的0D 0A)回车换行符。 2. 第二行 (1) 首先是HTTP中的扩展头部分“Content-Disposition: form-data;”,表示上传的是表单数据。 (2) “name=”name1″”参数的名称。 (3) “\r\n”(即16进制编辑器显示的0D 0A)回车换行符。 3. 第三行:“\r\n”(即16进制编辑器显示的0D 0A)回车换行符。 4. 第四行:参数的值,最后是“\r\n”(即16进制编辑器显示的0D 0A)回车换行符。 由观察可得,表单上传的每个参数都是按照以上1—4的格式构造HTTP协议中的参数部分。 结合16进制数据和记事本显示的数据可知上传文件部分的格式规律: 1. 第一行是“—————————–7d92221b604bc”作为分隔符,然后是“\r\n”(即16进制编辑器显示的0D 0A)回车换行符。 2. 第二行: a) 首先是HTTP中的扩展头部分“Content-Disposition: form-data;”,表示上传的是表单数据。 b) “name=”file2″;”参数的名称。 c) “filename=”C:\2.txt””参数的值。 d) “\r\n”(即16进制编辑器显示的0D 0A)回车换行符。 3. 第三行:HTTP中的实体头部分“Content-Type: text/plain”:表示所接收到得实体内容的文件格式。计算机的应用中有多种多种通用的文件格式,人们为每种通用格式都定义了一个名称,称为 MIME,MIME的英文全称是”Multipurpose Internet Mail Extensions” (多功能Internet 邮件扩充服务) 4. 第四行:“\r\n”(即16进制编辑器显示的0D 0A)回车换行符。 5. 第五行开始:上传的内容的二进制数。 6. 最后是结束标志“—————————–7d92221b604bc–”,注意:这个结束标志和分隔符的区别是最后多了“–”部分。 但现在还有一个问题,就是分隔符“—————————–7d92221b604bc”是怎么确定的呢?是不是一定要“7d92221b604bc”这串数字? 我们以前的分析只是观察了HTTP请求的实体部分,可以借用工具观察完整的HTTP请求看一看有没有什么线索? 在IE下用HttpWatch,在Firefox下用Httpfox这个插件,可以实现网页数据的抓包,从图4可看出,原来在Content-Type部分指定了分隔符所用的字符串。
根据以上总结的注册表单中的参数传递和文件上传的规律,我们可以能写出Android中实现一个用户注册功能(包括个人信息填写和上传图片部分)的工具类, 首先,要有一个javaBean类FormFile封装文件的信息: - public class FormFile {
- /* 上传文件的数据 */
- private byte[] data;
- /* 文件名称 */
- private String filname;
- /* 表单字段名称*/
- private String formname;
- /* 内容类型 */
- private String contentType = "application/octet-stream"; //需要查阅相关的资料
-
- public FormFile(String filname, byte[] data, String formname, String contentType) {
- this.data = data;
- this.filname = filname;
- this.formname = formname;
- if(contentType!=null) this.contentType = contentType;
- }
-
- public byte[] getData() {
- return data;
- }
-
- public void setData(byte[] data) {
- this.data = data;
- }
-
- public String getFilname() {
- return filname;
- }
-
- public void setFilname(String filname) {
- this.filname = filname;
- }
-
- public String getFormname() {
- return formname;
- }
-
- public void setFormname(String formname) {
- this.formname = formname;
- }
-
- public String getContentType() {
- return contentType;
- }
-
- public void setContentType(String contentType) {
- this.contentType = contentType;
- }
-
- }
-
实现文件上传的代码如下: /**
* 直接通过HTTP协议提交数据到服务器,实现表单提交功能
* @param actionUrl 上传路径
* @param params 请求参数 key为参数名,value为参数值
* @param file 上传文件
*/
public static String post(String actionUrl, Map<String, String> params, FormFile[] files) {
try {
String BOUNDARY = “———7d4a6d158c9″; //数据分隔线
String MULTIPART_FORM_DATA = “multipart/form-data”;
URL url = new URL(actionUrl);
HttpURLConnection conn = (HttpURLConnection) url.openConnection();
conn.setDoInput(true);//允许输入
conn.setDoOutput(true);//允许输出
conn.setUseCaches(false);//不使用Cache
conn.setRequestMethod(”POST”);
conn.setRequestProperty(”Connection”, “Keep-Alive”);
conn.setRequestProperty(”Charset”, “UTF-8″);
conn.setRequestProperty(”Content-Type”, MULTIPART_FORM_DATA + “; boundary=” + BOUNDARY);
StringBuilder sb = new StringBuilder();
//上传的表单参数部分,格式请参考文章
for (Map.Entry<String, String> entry : params.entrySet()) {//构建表单字段内容
sb.append(”–”);
sb.append(BOUNDARY);
sb.append(”\r\n”);
sb.append(”Content-Disposition: form-data; name=\”"+ entry.getKey() + “\”\r\n\r\n”);
sb.append(entry.getValue());
sb.append(”\r\n”);
}
DataOutputStream outStream = new DataOutputStream(conn.getOutputStream());
outStream.write(sb.toString().getBytes());//发送表单字段数据
//上传的文件部分,格式请参考文章
for(FormFile file : files){
StringBuilder split = new StringBuilder();
split.append(”–”);
split.append(BOUNDARY);
split.append(”\r\n”);
split.append(”Content-Disposition: form-data;name=\”"+ file.getFormname()+”\”;filename=\”"+ file.getFilname() + “\”\r\n”);
split.append(”Content-Type: “+ file.getContentType()+”\r\n\r\n”);
outStream.write(split.toString().getBytes());
outStream.write(file.getData(), 0, file.getData().length);
outStream.write(”\r\n”.getBytes());
}
byte[] end_data = (”–” + BOUNDARY + “–\r\n”).getBytes();//数据结束标志
outStream.write(end_data);
outStream.flush();
int cah = conn.getResponseCode();
if (cah != 200) throw new RuntimeException(”请求url失败”);
InputStream is = conn.getInputStream();
int ch;
StringBuilder b = new StringBuilder();
while( (ch = is.read()) != -1 ){
b.append((char)ch);
}
outStream.close();
conn.disconnect();
return b.toString();
} catch (Exception e) {
throw new RuntimeException(e);
}
}
一. 相同配置(set....)的 Configuration 可以考虑只在整个 Application 中共享同一个实例: Create a configuration instance First you have to create a freemarker.template.Configuration instance and adjust its settings. A Configuration instance is a central place to store the application level settings of FreeMarker. Also, it deals with the creation and caching of pre-parsed templates. Probably you will do it only once at the beginning of the application (possibly servlet) life-cycle: 二. 具有不同配置(set....)的 Configuration 应该建立相互独立的实例:
From now you should use this single configuration instance. Note however that if a system has multiple independent components that use FreeMarker, then of course they will use their own private Configuration instance.
三. 共享的 Configuration 实例有利于开启 MRU Cache 功能: In a multithreaded environment Configuration instances, Template instances and data models should be handled as immutable (read-only) objects. That is, you create and initialize them (for example with set... methods), and then you don't modify them later (e.g. you don't call set...). This allows us to avoid expensive synchronized blocks in a multithreaded environment. Beware with Template instances; when you get a Template instance with Configuration.getTemplate, you may get an instance from the template cache that is already used by other threads, so do not call its set... methods (calling process is of course fine). The above restrictions do not apply if you access all objects from the same single thread only.
四. 开启 MRU Cache 策略
FreeMarker caches templates (assuming you use the Configuration methods to create Template objects). This means that when you call getTemplate, FreeMarker not only returns the resulting Template object, but stores it in a cache, so when next time you call getTemplate with the same (or equivalent) path, it just returns the cached Template instance, and will not load and parse the template file again.
cfg.setCacheStorage(new freemarker.cache.MruCacheStorage(20, 250)) | |  | | | | Or, since MruCacheStorage is the default cache storage implementation: | | | | cfg.setSetting(Configuration.CACHE_STORAGE_KEY, "strong:20, soft:250"); | | | | | | When you create a new Configuration object, initially it uses an MruCacheStorage where maxStrongSize is 0, and maxSoftSize is Integer.MAX_VALUE (that is, in practice, infinite). But using non-0 maxStrongSize is maybe a better strategy for high load servers, since it seems that, with only softly referenced items, JVM tends to cause just higher resource consumption if the resource consumption was already high, because it constantly throws frequently used templates from the cache, which then have to be re-loaded and and re-parsed. 五. MRU (Most Recently Used) Cache 自动更新模板内容的特性 If you change the template file, then FreeMarker will re-load and re-parse the template automatically when you get the template next time. However, since checking if the file has been changed can be time consuming, there is a Configuration level setting called ``update delay''. This is the time that must elapse since the last checking for a newer version of a certain template before FreeMarker will check that again. This is set to 5 seconds by default. If you want to see the changes of templates immediately, set it to 0. Note that some template loaders may have problems with template updating. For example, class-loader based template loaders typically do not notice that you have changed the template file.
六. MRU Cache 的两级缓存策略 A template will be removed from the cache if you call getTemplate and FreeMarker realizes that the template file has been removed meanwhile. Also, if the JVM thinks that it begins to run out of memory, by default it can arbitrarily drop templates from the cache. Furthermore, you can empty the cache manually with the clearTemplateCache method of Configuration. The actual strategy of when a cached template should be thrown away is pluggable with the cache_storage setting, by which you can plug any CacheStorage implementation. For most users freemarker.cache.MruCacheStorage will be sufficient. This cache storage implements a two-level Most Recently Used cache. In the first level, items are strongly referenced up to the specified maximum (strongly referenced items can't be dropped by the JVM, as opposed to softly referenced items). When the maximum is exceeded, the least recently used item is moved into the second level cache, where they are softly referenced, up to another specified maximum. The size of the strong and soft parts can be specified with the constructor. For example, set the size of the strong part to 20, and the size of soft part to 250:
今早一来,突然发现使用-put命令往HDFS里传数据传不上去了,抱一大堆错误,然后我使用bin/hadoop dfsadmin -report查看系统状态 admin@adw1:/home/admin/joe.wangh/hadoop-0.19.2>bin/hadoop dfsadmin -report
Configured Capacity: 0 (0 KB)
Present Capacity: 0 (0 KB)
DFS Remaining: 0 (0 KB)
DFS Used: 0 (0 KB)
DFS Used%: ?%
-------------------------------------------------
Datanodes available: 0 (0 total, 0 dead) 使用bin/stop-all.sh关闭HADOOP admin@adw1:/home/admin/joe.wangh/hadoop-0.19.2>bin/stop-all.sh
stopping jobtracker
172.16.197.192: stopping tasktracker
172.16.197.193: stopping tasktracker
stopping namenode
172.16.197.193: no datanode to stop
172.16.197.192: no datanode to stop
172.16.197.191: stopping secondarynamenode 哦,看到了吧,发现datanode前面并没有启动起来。去DATANODE上查看一下日志 admin@adw2:/home/admin/joe.wangh/hadoop-0.19.2/logs>vi hadoop-admin-datanode-adw2.hst.ali.dw.alidc.net.log
************************************************************/
2010-07-21 10:12:11,987 ERROR org.apache.hadoop.hdfs.server.datanode.DataNode: java.io.IOException: Incompatible namespaceIDs in /home/admin/joe.wangh/hadoop/data/dfs.data.dir: namenode namespaceID = 898136669; datanode namespaceID = 2127444065
at org.apache.hadoop.hdfs.server.datanode.DataStorage.doTransition(DataStorage.java:233)
at org.apache.hadoop.hdfs.server.datanode.DataStorage.recoverTransitionRead(DataStorage.java:148)
at org.apache.hadoop.hdfs.server.datanode.DataNode.startDataNode(DataNode.java:288)
at org.apache.hadoop.hdfs.server.datanode.DataNode.<init>(DataNode.java:206)
at org.apache.hadoop.hdfs.server.datanode.DataNode.makeInstance(DataNode.java:1239)
at org.apache.hadoop.hdfs.server.datanode.DataNode.instantiateDataNode(DataNode.java:1194)
at org.apache.hadoop.hdfs.server.datanode.DataNode.createDataNode(DataNode.java:1202)
at org.apache.hadoop.hdfs.server.datanode.DataNode.main(DataNode.java:1324)
...... 错误提示namespaceIDs不一致。 下面给出两种解决办法,我使用的是第二种。 Workaround 1: Start from scratch I can testify that the following steps solve this error, but the side effects won't make you happy (me neither). The crude workaround I have found is to: 1. stop the cluster 2. delete the data directory on the problematic datanode: the directory is specified by dfs.data.dir in conf/hdfs-site.xml; if you followed this tutorial, the relevant directory is /usr/local/hadoop-datastore/hadoop-hadoop/dfs/data 3. reformat the namenode (NOTE: all HDFS data is lost during this process!) 4. restart the cluster When deleting all the HDFS data and starting from scratch does not sound like a good idea (it might be ok during the initial setup/testing), you might give the second approach a try. Workaround 2: Updating namespaceID of problematic datanodes Big thanks to Jared Stehler for the following suggestion. I have not tested it myself yet, but feel free to try it out and send me your feedback. This workaround is "minimally invasive" as you only have to edit one file on the problematic datanodes: 1. stop the datanode 2. edit the value of namespaceID in <dfs.data.dir>/current/VERSION to match the value of the current namenode 3. restart the datanode If you followed the instructions in my tutorials, the full path of the relevant file is /usr/local/hadoop-datastore/hadoop-hadoop/dfs/data/current/VERSION (background: dfs.data.dir is by default set to ${hadoop.tmp.dir}/dfs/data, and we set hadoop.tmp.dir to /usr/local/hadoop-datastore/hadoop-hadoop). If you wonder how the contents of VERSION look like, here's one of mine: #contents of <dfs.data.dir>/current/VERSION namespaceID=393514426 storageID=DS-1706792599-10.10.10.1-50010-1204306713481 cTime=1215607609074 storageType=DATA_NODE layoutVersion=-13 原因:每次namenode format会重新创建一个namenodeId,而tmp/dfs/data下包含了上次format下的id,namenode format清空了namenode下的数据,但是没有晴空datanode下的数据,导致启动时失败,所要做的就是每次fotmat前,清空tmp一下 的所有目录.
- private void buildZK() {
- System.out.println("Build zk client");
- try {
- zk = new ZooKeeper(zookeeperConnectionString, 10000, this);
- Stat s = zk.exists(rootPath, false);
- if (s == null) {
- zk.create(rootPath, new byte[0], ZooDefs.Ids.OPEN_ACL_UNSAFE, CreateMode.PERSISTENT);
- zk.create(rootPath + "/ELECTION", new byte[0], ZooDefs.Ids.OPEN_ACL_UNSAFE, CreateMode.PERSISTENT);
- }
- String value = zk.create(rootPath + "/ELECTION/n_", hostAddress, ZooDefs.Ids.OPEN_ACL_UNSAFE, CreateMode.EPHEMERAL_SEQUENTIAL);
- } catch (Exception e) {
- e.printStackTrace();
- System.err.println("Error connect to zoo keeper");
- }
- }
-
-
- public void process(WatchedEvent event) {
- System.out.println(event);
- if (event.getState() == Event.KeeperState.Disconnected || event.getState() == Event.KeeperState.Expired) {
- System.out.println("Zookeeper connection timeout.");
- buildZK();
- }
-
- }
-
修改配置
复制conf/zoo_sample.cfg文件为conf/zoo.cfg,修改其中的数据目录。 # cat /opt/apps/zookeeper/conf/zoo.cfg tickTime=2000 initLimit=5 syncLimit=2 dataDir=/opt/zkdata clientPort=2181 相关配置如下: - tickTime:这个时间作为Zookeeper服务器之间或者服务器与客户端之间维护心跳的时间,时间单位毫秒。
- initLimit:选举leader的初始延时。由于服务器启动加载数据需要一定的时间(尤其是配置数据非常多),因此在选举 Leader后立即同步数据前需要一定的时间来完成初始化。可以适当放大一点。延时时间为initLimit*tickTime,也即此数值为 tickTime的次数。
- syncLimit:此时间表示为Leader与Follower之间的最大响应时间单元,如果超时此时间(syncLimit*tickTime),那么Leader认为Follwer也即死掉,将从服务器列表中删除。
如果是单机模式的话,那么只需要tickTime/dataDir/clientPort三个参数即可,这在单机调试环境很有效。 集群环境配置
增加其他机器的配置 # cat /opt/apps/zookeeper/conf/zoo.cfg tickTime=2000 initLimit=5 syncLimit=2 dataDir=/opt/zkdata clientPort=2181 server.1=10.11.5.202:2888:3888 server.2=192.168.105.218:2888:3888 server.3=192.168.105.65:2888:3888 其中server.X的配置是每一个机器的相关参数。X代表唯一序号,例如1/2/3等,值是IP:PORT:PORT。其中IP是 zookeeper服务器的IP地址或者域名,第一个PORT(例如2888)是服务器之间交换数据的端口,也即Follower连接Leader的端 口,而第二个端口(例如3888)是各服务器选举Leader的端口。单机配置集群的话可以通过不同的端口来实现。 同步文件目录 # rsync --inplace -vzrtLp --delete-after --progress /opt/apps/zookeeper root@192.168.105.218:/opt/apps # rsync --inplace -vzrtLp --delete-after --progress /opt/apps/zookeeper root@192.168.106.65:/opt/apps 建立每一个服务器的id 注意,此id需要和zoo.cfg中的配置对应起来 ssh root@10.11.5.202 'echo 1 > /opt/zkdata/myid' ssh root@192.168.105.218 'echo 2 > /opt/zkdata/myid' ssh root@192.168.106.65 'echo 3 > /opt/zkdata/myid' 启动服务器
ssh root@10.11.5.202 '/opt/apps/zookeeper/bin/zkServer.sh start' ssh root@192.168.105.218 '/opt/apps/zookeeper/bin/zkServer.sh start' ssh root@192.168.106.65 '/opt/apps/zookeeper/bin/zkServer.sh start' 防火墙配置
如果开启了iptables防火墙,则需要在文件/etc/sysconfig/iptables文件下增加如下配置 -A RH-Firewall-1-INPUT -m state --state NEW -m tcp -p tcp --dport 2181 -j ACCEPT -A RH-Firewall-1-INPUT -m state --state NEW -m tcp -p tcp --dport 2888 -j ACCEPT -A RH-Firewall-1-INPUT -m state --state NEW -m tcp -p tcp --dport 3888 -j ACCEPT 重启防火墙: service iptables restart
最近经常对自己提一些问题,然后自己通过google、读代码、测试寻求答案来解决疑惑,可能这些问题也能给其他人带来一些帮助。 quora是个不错的问答型网站,兴趣去看一下自己感兴趣的话题吧~ 1)HBase中的TTL参数什么意思?
TTL == "Time To Live". You can specify how long a cell lives in hbase.
Onces its "TTL" has expired, its removed. 2)影响read性能的配置参数有哪些? hbase-env.xml:
export HBASE_HEAPSIZE=4000 hbase-default.xml:
hfile.block.cache.size 3)HBase在写操作的时候会更新LruBlockCache吗? 从代码上看写的时候不会更新lruBlockCache! 4)如何将一个HBase CF指定为IN_MEMORY?
创建table的时候可以指定CF的属性,create 'taobao', {NAME => 'edp', IN_MEMORY => true} 5)HBase cache每次load的最小单位是block 6)如果每次load一个block到cache中,而以后不会再读取这个block,则这个block对block cache
hit ratio没有贡献啊,但是为什么block cache hit ratio有60%+呢?(这个我当初的错误理解,漏
洞还是很多的) 注意block cache hit ratio的最小计量单位应该是record,cache的最小单位才是block, 因为block
下面有很多record,后面的record借助了读第一个record带来的cache福利,所以block cache hit ratio
才会有60%+
7)如果只有一行一个cf,写入很大量的数据会不会发生region split?
- <property>
- <name>hbase.hregion.max.filesize</name>
- <value>67108864</value>
- <description>
- Maximum HStoreFile size. If any one of a column families' HStoreFiles has
- grown to exceed this value, the hosting HRegion is split in two.
- Default: 256M.
- </description>
- </property>
测试: 将参数hbase.hregion.max.filesize设置成64M以后,然后create table的时候只创建一个CF,测试的时候只往一个row + CF 下面塞入数据,数据量大概在80M左右,在web上显示的数目是107M,但是没有发生region split。这说明region split最小单位应该是row key级别,因为这里只有一个row,即使数据量已经上去了,但是还是没有发生region split.
Hi all. I've a thinkpad T60 and 9.10 installed. I did some search on the forums and found the workaround with tpb package to fix thinkpad volume buttons issue. My problems with that fix are: -tbp package depens on xosd (or whatever like that, NOT Notify-OSD) so the result is not the best...  -tpb package is not neccessary at all, because thinkpad_acpi module can take care about volume buttons as well, you just have to enable the hotkey mask! http://www.thinkwiki.org/wiki/Thinkpad-acpi So my workaround on T60 (in terminal): 9.04 jaunty: Code: sudo echo enable,0x00ffffff > /proc/acpi/ibm/hotkey 9.10 karmic: (using sysfs): (also works on 10.04 and 10.10 as well...) Code: sudo cp /sys/devices/platform/thinkpad_acpi/hotkey_all_mask /sys/devices/platform/thinkpad_acpi/hotkey_mask Update:
The solutions only works till next reboot or suspend/resume cycle.
you should put the commands in:
/etc/rc.local
without sudo of course, to make it permanent. Please confirm if the solution works on other thikpad models. As soon as I find solution for all the things I need on my T60 I will put it up on Thinkwiki and paste the link here. (Active protection - hdaps) (Trackpoint additional functions - you just have to install the: gpointing-device-settings package) (fingerprint reader - thinkfinger) Hope it helped for someone.
Distributed File Systems (DFS) are a new type of file systems which provides some extra features over normal file systems and are used for storing and sharing files across wide area network and provide easy programmatic access. File Systems like HDFS from Hadoop and many others falls in the category of distributed file systems and has been widely used and are quite popular.
This tutorial provides a step by step guide for accessing and using distributed file system for storing and retrieving data using j\Java. Hadoop Distributed File System has been used for this tutorial because it is freely available, easy to setup and is one of the most popular and well known Distributed file system. The tutorial demonstrates how to access Hadoop distributed file system using java showing all the basic operations.
Introduction
Distributed File Systems (DFS) are a new type of file systems which provides some extra features over normal file systems and are used for storing and sharing files across wide area network and provide easy programmatic access.
Distributed file system is used to make files distributed across multiple servers appear to users as if they reside in one place on the network. Distributed file system allows administrators to consolidate file shares that may exist on multiple servers to appear as if they all are in the same location so that users can access them from a single point on the network.
HDFS stands for Hadoop Distributed File System and is a distributed file system designed to run on commodity hardware. Some of the features provided by Hadoop are:
• Fault tolerance: Data can be replicated, so if any of the servers goes down, resources still will be available for user.
• Resource management and accessibility: Users does not require knowing the physical location of the data; they can access all the resources through a single point. HDFS also provides web browser interface to view the contents of the file.
• It provides high throughput access to application data.
This tutorial will demonstrate how to use HDFS for basic distributed file system operations using Java. Java 1.6 version and Hadoop driver has been used (link is given in Pre-requisites section). The development environment consists of Eclipse 3.4.2 and Hadoop 0.19.1 on Microsoft Windows XP – SP3.
Pre-requisites
1. Hadoop-0.19.1 installation - here and here -
2. Hadoop-0.19.1-core.jar file 3. Commons-logging-1.1.jar file 4. Java 1.6 5. Eclipse 3.4.2
Creating New Project and FileSystem Object
First step is to create a new project in Eclipse and then create a new class in that project.
Now add all the jar files to the project, as mentioned in the pre-requisites.
First step in using or accessing Hadoop Distributed File System (HDFS) is to create file system object.
Without creating an object you cannot perform any operations on the HDFS, so file system object is always required to be created.
Two input parameters are required to create object. They are “Host name” and “Port”.
Code below shows how to create file system object to access HDFS.
Configuration config = new Configuration();
config.set("fs.default.name","hdfs://127.0.0.1:9000/");
FileSystem dfs = FileSystem.get(config);
Here Host name = “127.0.0.1” & Port = “9000”.
Various HDFS operations Now we will see various operations that can be performed on HDFS. Creating Directory
Now we will start with creating a directory.
First step for using HDFS is to create a directory where we will store our data.
Now let us create a directory named “TestDirectory”. String dirName = "TestDirectory";
Path src = new Path(dfs.getWorkingDirectory()+"/"+dirName);
dfs.mkdirs(src); Here dfs.getWorkingDirectory() function will return the path of the working directory which is the basic working directory and all the data will be stored inside this directory. mkdirs() function accepts object of the type Path, so as shown above Path object is created first. Directory is required to be created inside basic working directory, so Path object is created accordingly. dfs.mkdirs(src)function will create a directory in the working folder with name “TestDirectory”. Sub directories can also be created inside the “TestDirectory”; in that case path specified during creation of Path object will change. For example a directory named “subDirectory” can be created inside directory “TestDirectory” as shown in below code. String subDirName = "subDirectory";
Path src = new Path(dfs.getWorkingDirectory()+"/TestDirectory/"+ subDirName);
dfs.mkdirs(src); Deleting Directory or file
Existing directory in the HDFS can be deleted. Below code shows how to delete the existing directory.
String dirName = "TestDirectory";
Path src = new Path(dfs.getWorkingDirectory()+"/"+dirName);
Dfs.delete(src);
Please note that delete() method can also be used to delete files. What needs to be deleted should be specified in the Path object. Copying file to/from HDFS from/to Local file system
Basic aim of using HDFS is to store data, so now we will see how to put data in HDFS.
Once directory is created, required data can be stored in HDFS from the local file system.
So consider that a file named “file1.txt” is located at “E:\HDFS” in the local file system, and it is required to be copied under the folder “subDirectory” (that was created earlier) in HDFS.
Code below shows how to copy file from local file system to HDFS.
Path src = new Path("E://HDFS/file1.txt");
Path dst = new Path(dfs.getWorkingDirectory()+"/TestDirectory/subDirectory/");
dfs.copyFromLocalFile(src, dst);
Here src and dst are the Path objects created for specifying the local file system path where file is located and HDFS path where file is required to be copied respectively. copyFromLocalFile() method is used for copying file from local file system to HDFS.
Similarly, file can also be copied from HDFS to local file system. Code below shows how to copy file from HDFS to local file system. Path src = new Path(dfs.getWorkingDirectory()+"/TestDirectory/subDirectory/file1.txt");
Path dst = new Path("E://HDFS/");
dfs.copyToLocalFile(src, dst); Here copyToLocalFile() method is used for copying file from HDFS to local file system. CIO, CTO & Developer Resources Creating a file and writing data in it It is also possible to create a file in HDFS and write data in it. So if required instead of directly copying the file from the local file system, a file can be first created and then data can be written in it.
Code below shows how to create a file name “file2.txt” in HDFS directory.
Path src = new Path(dfs.getWorkingDirectory()+"/TestDirectory/subDirectory/file2.txt");
dfs.createNewFile(src);
Here createNewFile() method will create the file in HDFS based on the input provided in src object.
Now as the file is created, data can be written in it. Code below shows how to write data present in the “file1.txt” of local file system to “file2.txt” of HDFS. Path src = new Path(dfs.getWorkingDirectory()+"/TestDirectory/subDirectory/file2.txt");
FileInputStream fis = new FileInputStream("E://HDFS/file1.txt");
int len = fis.available();
byte[] btr = new byte[len];
fis.read(btr);
FSDataOutputStream fs = dfs.create(src);
fs.write(btr);
fs.close();
Here write() method of FSDataOutputStream is used to write data in file located in HDFS. Reading data from a file It is always necessary to read the data from file for performing various operations on data. It is possible to read data from the file which is stored in HDFS.
Code below shows how to retrieve data from the file present in the HDFS. Here data is read from the file (file1.txt) which is present in the directory (subDirectory) that was created earlier.
Path src = new Path(dfs.getWorkingDirectory()+"/TestDirectory/subDirectory/file1.txt");
FSDataInputStream fs = dfs.open(src);
String str = null;
while ((str = fs.readline())!= null)
{
System.out.println(str);
}
Here readline() method of FSDataInputStream is used to read data from the file located in HDFS. Also src is the Path object used to specify the path of the file in HDFS which has to be read. Miscellaneous operations that can be performed on HDFS Below are some of the basic operations that can be performed on HDFS. Below is the code that can be used to check whether particular file or directory exists in HDFS. If it exists, it returns true and if it doesn’t exists it returns false.dfs.exists() method is used for this. Path src = new Path(dfs.getWorkingDirectory()+"/TestDirectory/HDFS/file1.txt");
System.out.println(dfs.exists(src)); Below is the code that can be used to check the default block size in which file would be split. It returns block size in terms of Number of Bytes.dfs.getDefaultBlockSize() method is used for this. System.out.println(dfs.getDefaultBlockSize());
To check for the default replication factor, as shown belowdfs.getDefaultReplication() method can be used. System.out.println(dfs.getDefaultReplication());
To check whether given path is HDFS directory or file, as shown belowdfs.isDirectory() or dfs.isFile() methods can be used. Path src = new Path(dfs.getWorkingDirectory()+"/TestDirectory/subDirectory/file1.txt");
System.out.println(dfs.isDirectory(src));
System.out.println(dfs.isFile(src)); Conclusion
So we just learned some of the basics about Hadoop Distributed File System, how to create and delete directory, how to copy file to/from HDFS from/to local file system, how to create and delete file into directory, how to write data in file, and how to read data from file. We also learned various other operations that can be performed on HDFS. Thus from what we have done we can say that, HDFS is easy to use for data storage and retrieval. References:
http://hadoop.apache.org/common/docs/current/hdfs_design.html
http://en.wikipedia.org/wiki/Hadoop
本文主要介绍zookeeper中zookeeper Server leader的选举,zookeeper在选举leader的时候采用了paxos算法(主要是fast paxos),这里主要介绍其中两种:LeaderElection 和FastLeaderElection.
我们先要清楚以下几点
在zookeeper中,一个zookeeper集群有多少个Server是固定,每个Server用于选举的IP和PORT都在配置文件中
- 除了IP和PORT能标识一个Server外,还有没有别的方法
每一个Server都有一个数字编号,而且是唯一的,我们根据配置文件中的配置来对每一个Server进行编号,这一步在部署时需要人工去做,需要在存储数据文件的目录中创建一个文件叫myid的文件,并写入自己的编号,这个编号在处理我提交的value相同很有用
获得n/2 + 1个Server同意(这里意思是n/2 + 1个Server要同意拥有zxid是所有Server最大的哪个Server)
zookeeper中选举主要是采用UDP,也一种实现是采用TCP,在这里介绍的两种实现采用的是UDP
LOOKING 初始化状态
LEADING 领导者状态
FOLLOWING 跟随者状态
- 如果所有zxid都相同(例如: 刚初始化时),此时有可能不能形成n/2+1个Server,怎么办
zookeeper中每一个Server都有一个ID,这个ID是不重复的,而且按大小排序,如果遇到这样的情况时,zookeeper就推荐ID最大的哪个Server作为Leader
- zookeeper中Leader怎么知道Fllower还存活,Fllower怎么知道Leader还存活
Leader定时向Fllower发ping消息,Fllower定时向Leader发ping消息,当发现Leader无法ping通时,就改变自己的状态(LOOKING),发起新的一轮选举
名词解释
zookeeer Server: zookeeper中一个Server,以下简称Server
zxid(zookeeper transtion id): zookeeper 事务id,他是选举过程中能否成为leader的关键因素,它决定当前Server要将自己这一票投给谁(也就是我在选举过程中的value,这只是其中一个,还有id)
myid/id(zookeeper server id): zookeeper server id ,他也是能否成为leader的一个因素
epoch/logicalclock:他主要用于描述leader是否已经改变,每一个Server中启动都会有一个epoch,初始值为0,当 开始新的一次选举时epoch加1,选举完成时 epoch加1。
tag/sequencer:消息编号
xid:随机生成的一个数字,跟epoch功能相同
Fast Paxos消息流向图与Basic Paxos的对比
消息流向图
Client   Proposer      Acceptor     Learner
|         |          |  |  |       |  |
X-------->|          |  |  |       |  |  Request
|         X--------->|->|->|       |  |  Prepare(N)//向所有Server提议
|         |<---------X--X--X       |  |  Promise(N,{Va,Vb,Vc})//向提议人回复是否接受提议(如果不接受回到上一步)
|         X--------->|->|->|       |  |  Accept!(N,Vn)//向所有人发送接受提议消息
|         |<---------X--X--X------>|->|  Accepted(N,Vn)//向提议人回复自己已经接受提议)
|<---------------------------------X--X  Response
|         |          |  |  |       |  |
没有冲突的选举过程
Client    Leader         Acceptor      Learner
|         |          |  |  |  |       |  |
|         X--------->|->|->|->|       |  |  Any(N,I,Recovery)
|         |          |  |  |  |       |  |
X------------------->|->|->|->|       |  |  Accept!(N,I,W)//向所有Server提议,所有Server收到消息后,接受提议
|         |<---------X--X--X--X------>|->|  Accepted(N,I,W)//向提议人发送接受提议的消息
|<------------------------------------X--X  Response(W)
|         |          |  |  |  |       |  |
第一种实现: LeaderElection
LeaderElection是Fast paxos最简单的一种实现,每个Server启动以后都询问其它的Server它要投票给谁,收到所有Server回复以后,就计算出zxid最大的哪个Server,并将这个Server相关信息设置成下一次要投票的Server
每个Server都有一个response线程和选举线程,我们先看一下每个线程是做一些什么事情
response线程
它主要功能是被动的接受对方法的请求,并根据当前自己的状态作出相应的回复,每次回复都有自己的Id,以及xid,我们根据他的状态来看一看他都回复了哪些内容
LOOKING状态:
自己要推荐的Server相关信息(id,zxid)
LEADING状态
myid,上一次推荐的Server的id
FLLOWING状态:
当前Leader的id,以及上一次处理的事务ID(zxid)
选举线程
选举线程由当前Server发起选举的线程担任,他主要的功能对投票结果进行统计,并选出推荐的Server。选举线程首先向所有Server发起一次询问(包括自己),被询问方,根据自己当前的状态作相应的回复,选举线程收到回复后,验证是否是自己发起的询问(验证 xid是否一致),然后获取对方的id(myid),并存储到当前询问对象列表中,最后获取对方提议的leader相关信息(id,zxid),并将这些 信息存储到当次选举的投票记录表中,当向所有Server都询问完以后,对统计结果进行筛选并进行统计,计算出当次询问后获胜的是哪一个 Server,并将当前zxid最大的Server设置为当前Server要推荐的Server(有可能是自己,也有可以是其它的Server,根据投票 结果而定,但是每一个Server在第一次投票时都会投自己),如果此时获胜的Server获得n/2 + 1的Server票数, 设置当前推荐的leader为获胜的Server,将根据获胜的Server相关信息设置自己的状态。每一个Server都重复以上流程,直到选出 leader
了解每个线程的功能以后,我们来看一看选举过程
当一个Server启动时它都会发起一次选举,此时由选举线程发起相关流程,那么每个Server都会获得当前zxid最大的哪个Server是谁,如果当次最大的Server没有获得n/2+1个票数,那么下一次投票时,他将向zxid最大的Server投票,重复以上流程,最后一定能选举出一个Leader
只要保证n/2+1个Server存活就没有任何问题,如果少于n/2+1个Server存活就没办法选出Leader
当选举出Leader以后,此时每个Server应该是什么状态(FLLOWING)都已经确定,此时由于Leader已经死亡我们就不管它,其它的Fllower按正常的流程继续下去,当完成这个流程以后,所有的Fllower都会向Leader发送Ping消息,如果无法ping通,就改变自己的状态为(FLLOWING ==> LOOKING),发起新的一轮选举
这个过程的处理跟选举过程中Leader死亡处理方式一样,这里就不再描述
第二种实现: FastLeaderElection
fastLeaderElection是标准的fast paxos的实现,它首先向所有Server提议自己要成为leader,当其它Server收到提议以后,解决epoch和zxid的冲突,并接受对方的提议,然后向对方发送接受提议完成的消息
数据结构
本地消息结构:
static public class Notification {
long leader; //所推荐的Server id
long zxid; //所推荐的Server的zxid(zookeeper transtion id)
long epoch; //描述leader是否变化(每一个Server启动时都有一个logicalclock,初始值为0)
QuorumPeer.ServerState state; //发送者当前的状态
InetSocketAddress addr; //发送者的ip地址
}
网络消息结构:
static public class ToSend {
int type; //消息类型
long leader; //Server id
long zxid; //Server的zxid
long epoch; //Server的epoch
QuorumPeer.ServerState state; //Server的state
long tag; //消息编号
InetSocketAddress addr;
}
Server具体的实现
每个Server都一个接收线程池(3个线程)和一个发送线程池 (3个线程),在没有发起选举时,这两个线程池处于阻塞状态,直到有消息到来时才解除阻塞并处理消息,同时每个Server都有一个选举线程(可以发起 选举的线程担任);我们先看一下每个线程所做的事情,如下:
被动接收消息端(接收线程池)的处理:
notification: 首先检测当前Server上所被推荐的zxid,epoch是否合法(currentServer.epoch <= currentMsg.epoch && (currentMsg.zxid > currentServer.zxid || (currentMsg.zxid == currentServer.zxid && currentMsg.id > currentServer.id))) 如果不合法就用消息中的zxid,epoch,id更新当前Server所被推荐的值,此时将收到的消息转换成Notification消息放入接收队列中,将向对方发送ack消息
ack: 将消息编号放入ack队列中,检测对方的状态是否是LOOKING状态,如果不是说明此时已经有Leader已经被选出来,将接收到的消息转发成Notification消息放入接收对队列
主动发送消息端(发送线程池)的处理:
notification: 将要发送的消息由Notification消息转换成ToSend消息,然后发送对方,并等待对方的回复,如果在等待结束没有收到对方法回复,重做三次,如果重做次还是没有收到对方的回复时检测当前的选举(epoch)是否已经改变,如果没有改变,将消息再次放入发送队列中,一直重复直到有Leader选出或者收到对方回复为止
ack: 主要将自己相关信息发送给对方
主动发起选举端(选举线程)的处理:
首先自己的epoch 加1,然后生成notification消息,并将消息放入发送队列中,系统中配置有几个Server就生成几条消息,保证每个Server都能收到此消息,如果当前Server的状态是LOOKING就一直循环检查接收队列是否有消息,如果有消息,根据消息中对方的状态进行相应的处理。
LOOKING状态:
首先检测消息中epoch是否合法,是否比当前Server的大,如果比较当前Server的epoch大时,更新epoch,检测是消息中的zxid,id是否比当前推荐的Server大,如果是更新相关值,并新生成notification消息放入发关队列,清空投票统计表; 如果消息小的epoch则什么也不做; 如果相同检测消息中zxid,id是否合法,如果消息中的zxid,id大,那么更新当前Server相关信息,并新生成notification消息放入发送队列,将收到的消息的IP和投票结果放入统计表中,并计算统计结果,根据结果设置自己相应的状态
LEADING状态:
将收到的消息的IP和投票结果放入统计表中(这里的统计表是独立的),并计算统计结果,根据结果设置自己相应的状态
FOLLOWING状态:
将收到的消息的IP和投票结果放入统计表中(这里的统计表是独立的),并计算统计结果,根据结果设置自己相应的状态
了解每个线程的功能以后,我们来看一看选举过程,选举过程跟第一程一样
当一个Server启动时它都会发起一次选举,此时由选举线程发起相关流程,通过将自己的zxid和epoch告诉其它Server,最后每个Server都会得zxid值最大的哪个Server的相关信息,并且在下一次投票时就投zxid值最大的哪个Server,重复以上流程,最后一定能选举出一个Leader
只要保证n/2+1个Server存活就没有任何问题,如果少于n/2+1个Server存活就没办法选出Leader
当选举出Leader以后,此时每个Server应该是什么状态 (FLLOWING)都已经确定,此时由于Leader已经死亡我们就不管它,其它的Fllower按正常的流程继续下去,当完成这个流程以后,所有的 Fllower都会向Leader发送Ping消息,如果无法ping通,就改变自己的状态为(FLLOWING ==> LOOKING),发起新的一轮选举
这个过程的处理跟选举过 程中Leader死亡处理方式一样,这里就不再描述
摘要: zookeeper简介
zookeeper是一个开源分布式的服务,它提供了分布式协作,分布式同步,配置管理等功能. 其实现的功能与google的chubby基本一致.zookeeper的官方网站已经写了一篇非常经典的概述性文章,请大家参阅:ZooKeeper: A Distributed Coordination Service for Distributed Applications
在此我... 阅读全文
在分布式算法领域,有个非常重要的算法叫Paxos, 它的重要性有多高呢,Google的Chubby [1]中提到
all working protocols for asynchronous consensus we have so far encountered have Paxos at their core.
关于Paxos算法的详述在维基百科中有更多介绍,中文版介绍的是choose value的规则[2],英文版介绍的是Paxos 3 phase commit的流程[3],中文版不是从英文版翻译而是独立写的,所以非常具有互补性。Paxos算法是由Leslie Lamport提出的,他在Paxos Made Simple[4]中写道
The Paxos algorithm, when presented in plain English, is very simple.
当你研究了很长一段时间Paxos算法还是有点迷糊的时候,看到上面这句话可能会有点沮丧。但是公认的它的算法还是比较繁琐的,尤其是要用程序员严谨的思维将所有细节理清的时候,你的脑袋里更是会充满了问号。Leslie Lamport也是用了长达9年的时间来完善这个算法的理论。
实际上对于一般的开发人员,我们并不需要了解Paxos所有细节及如何实现,只需要知道Paxos是一个分布式选举算法就够了。本文主要介绍一下Paxos常用的应用场合,或许有一天当你的系统增大到一定规模,你知道有这样一个技术,可以帮助你正确及优雅的解决技术架构上一些难题。
1. database replication, log replication等, 如bdb的数据复制就是使用paxos兼容的算法。Paxos最大的用途就是保持多个节点数据的一致性。
2. naming service, 如大型系统内部通常存在多个接口服务相互调用。
1) 通常的实现是将服务的ip/hostname写死在配置中,当service发生故障时候,通过手工更改配置文件或者修改DNS指向的方法来解决。缺点是可维护性差,内部的单元越多,故障率越大。
2) LVS双机冗余的方式,缺点是所有单元需要双倍的资源投入。
通过Paxos算法来管理所有的naming服务,则可保证high available分配可用的service给client。象ZooKeeper还提供watch功能,即watch的对象发生了改变会自动发notification, 这样所有的client就可以使用一致的,高可用的接口。
3.config配置管理
1) 通常手工修改配置文件的方法,这样容易出错,也需要人工干预才能生效,所以节点的状态无法同时达到一致。
2) 大规模的应用都会实现自己的配置服务,比如用http web服务来实现配置中心化。它的缺点是更新后所有client无法立即得知,各节点加载的顺序无法保证,造成系统中的配置不是同一状态。
4.membership用户角色/access control list, 比如在权限设置中,用户一旦设置某项权限比如由管理员变成普通身份,这时应在所有的服务器上所有远程CDN立即生效,否则就会导致不能接受的后果。
5. 号码分配。通常简单的解决方法是用数据库自增ID, 这导致数据库切分困难,或程序生成GUID, 这通常导致ID过长。更优雅的做法是利用paxos算法在多台replicas之间选择一个作为master, 通过master来分配号码。当master发生故障时,再用paxos选择另外一个master。
这里列举了一些常见的Paxos应用场合,对于类似上述的场合,如果用其它解决方案,一方面不能提供自动的高可用性方案,同时也远远没有Paxos实现简单及优雅。
Yahoo!开源的ZooKeeper [5]是一个开源的类Paxos实现。它的编程接口看起来很像一个可提供强一致性保证的分布式小文件系统。对上面所有的场合都可以适用。但可惜的是,ZooKeeper并不是遵循Paxos协议,而是基于自身设计并优化的一个2 phase commit的协议,因此它的理论[6]并未经过完全证明。但由于ZooKeeper在Yahoo!内部已经成功应用在HBase, Yahoo! Message Broker, Fetch Service of Yahoo! crawler等系统上,因此完全可以放心采用。
另外选择Paxos made live [7]中一段实现体会作为结尾。
* There are significant gaps between the description of the Paxos algorithm and the needs of a real-world system. In order to build a real-world system, an expert needs to use numerous ideas scattered in the literature and make several relatively small protocol extensions. The cumulative effort will be substantial and the final system will be based on an unproven protocol.
* 由于chubby填补了Paxos论文中未提及的一些细节,所以最终的实现系统不是一个理论上完全经过验证的系统
* The fault-tolerance computing community has not developed the tools to make it easy to implement their algorithms.
* 分布式容错算法领域缺乏帮助算法实现的的配套工具, 比如编译领域尽管复杂,但是yacc, ANTLR等工具已经将这个领域的难度降到最低。
* The fault-tolerance computing community has not paid enough attention to testing, a key ingredient for building fault-tolerant systems.
* 分布式容错算法领域缺乏测试手段
这里要补充一个背景,就是要证明分布式容错算法的正确性通常比实现算法还困难,Google没法证明Chubby是可靠的,Yahoo!也不敢保证它的ZooKeeper理论正确性。大部分系统都是靠在实践中运行很长一段时间才能谨慎的表示,目前系统已经基本没有发现大的问题了。
摘要: 简介: Zookeeper 分布式服务框架是 Apache Hadoop 的一个子项目,它主要是用来解决分布式应用中经常遇到的一些数据管理问题,如:统一命名服务、状态同步服务、集群管理、分布式应用配置项的管理等。本文将从使用者角度详细介绍 Zookeeper 的安装和配置文件中各个配置项的意义,以及分析 Zookeeper 的典型的应用场景(配置文件的管理、集群管理、同步锁、Leader... 阅读全文
ibatis dbcp连接数据库问题(上)
(2007-12-20 22:43:33)
我是懒人,就不自己写了,就直接引用我找到的两篇博文:
最近网站会出现一个现象是,在并发量大的时候,Tomcat或JBoss的服务线程会线程挂起,同时服务器容易出现数据连接的 java.net.SocketException: Broken pipe 的错误。刚才开始咋一看感觉像是DB端处理不来或是DB端的连接时间到了wait_timeout 的时间强行断开。出于这两个目的,网收集了一些资料后,有的说法是在DB的 wait_timeout 时间后断开的一些连接在连接池中处于空闲状态,当应用层获取该连接后进行的DB操作就会发生上面这个错误。
但在我查看了DBCP连接池代码和做了些测试后,发生这种说法并非正确。
1. 首先,出现 Broken pipe 的错误不是因连接超时所致,这个错误只有在Linux下多发,就是在高并发的情况下,网络资源不足的情况出现的, 会发送SIGPIPE信号,LINUX下默认程序退出的,具体解决办法目前还未找到合适的,有的说法是在Linux的环境变量中设置: _JAVA_SR_SIGNUM = 12 基本就可以解决,但经测试结果看并未解决。对于该问题持续关注中。
2. 之后,Broken pipe 问题未彻底解决,那么对于DBCP连接池只好对一些作废的连接要进行强制回收,若这里不做强制回收的话,最终也就会导致 pool exhausted 了,所以这一步一定要加上保护。配置如下:
- #### 是否在自动回收超时连接的时候打印连接的超时错误
- dbcp.logAbandoned=true
- #### 是否自动回收超时连接
- dbcp.removeAbandoned=true
- #### 超时时间(以秒数为单位)
- dbcp.removeAbandonedTimeout=150
3. 对于DB的 wait_timeout 空闲连接时间设置,在超过该时间值的连接,DB端会强行关闭,经测试结果,即使DB强行关闭了空闲连接,对于DBCP而言在获取该连接时无法激活该连接,会自动废弃该连接,重新从池中获取空闲连接或是重新创建连接,从源代码上看,这个自动完成的激活逻辑并不需要配置任何参数,是DBCP的默认操作。故对于网上的不少说连接池时间配置与DB不协调会导致 Broken pipe 的说法是错误,至少对于DBCP是不会出现该问题,也许C3P0是这样。
不过对于连接池的优化而言,本来就在池里空闲的连接被DB给强行关闭也不件好事,这里可以组合以下几个配置解决该问题:
java 代码
- # false : 空闲时是否验证, 若不通过断掉连接, 前提是空闲对象回收器开启状态
- dbcp.testWhileIdle = true
- # -1 : 以毫秒表示空闲对象回收器由运行间隔。值为负数时表示不运行空闲对象回收器
- # 若需要回收, 该值最好小于 minEvictableIdleTimeMillis 值
- dbcp.timeBetweenEvictionRunsMillis = 300000
- # 1000*60*30 : 被空闲对象回收器回收前在池中保持空闲状态的最小时间, 毫秒表示
- # 若需要回收, 该值最好小于DB中的 wait_timeout 值
- dbcp.minEvictableIdleTimeMillis = 320000
4. 最后,还有一个就是DBCP的maxWait参数,该参数值不宜配置太大,因为在池消耗满时,该会挂起线程等待一段时间看看是否能获得连接,一般到池耗尽的可能很少,若真要耗尽了一般也是并发太大,若此时再挂线程的话,也就是同时挂起了Server的线程,若到Server线程也挂满了,不光是访问DB的线程无法访问,就连访问普通页面也无法访问了。结果是更糕。
这样,通过以上几个配置,DBCP连接池的连接泄漏应该不会发生了(当然除了程序上的连接泄漏),不过对于并发大时Linux上的BrokenPipe 问题最好能彻底解决。但是对于并发量大时,Tomcat或JBoss的服务线程会挂起的原因还是未最终定位到原因,目前解决了DBCP的影响后,估计问题可能会是出现在 mod_jk 与 Tomcat 的连接上了,最终原因也有可能是 broken pipe 所致。关注与解决中……
2.ibatis使用dbcp连接数据库
一、建立数据表(我用的是oracle 9.2.0.1)
prompt PL/SQL Developer import file
prompt Created on 2007年5月24日 by Administrator
set feedback off
set define off
prompt Dropping T_ACCOUNT...
dro p table T_ACCOUNT cascade constraints; (注意:这里由于ISP限制上传drop,所以加了一个空格)
prompt Creating T_ACCOUNT...
create table T_ACCOUNT
(
ID NUMBER not null,
FIRSTNAME VARCHAR2(2),
LASTNAME VARCHAR2(4),
EMAILADDRESS VARCHAR2(60)
)
;
alter table T_ACCOUNT
add constraint PK_T_ACCOUNT primary key (ID);
prompt Disabling triggers for T_ACCOUNT...
alter table T_ACCOUNT disable all triggers;
prompt Loading T_ACCOUNT...
insert into T_ACCOUNT (ID, FIRSTNAME, LASTNAME, EMAILADDRESS)
values (1, '王', '三旗', 'E_wsq@msn.com');
insert into T_ACCOUNT (ID, FIRSTNAME, LASTNAME, EMAILADDRESS)
values (2, '冷', '宫主', 'E_wsq@msn.com');
commit;
prompt 2 records loaded
prompt Enabling triggers for T_ACCOUNT...
alter table T_ACCOUNT enable all triggers;
set feedback on
set define on
prompt Done.
二、在工程中加入
commons-dbcp-1.2.2.jar
commons-pool-1.3.jar
ibatis-common-2.jar
ibatis-dao-2.jar
ibatis-sqlmap-2.jar
三、编写如下属性文件
jdbc.properties
#连接设置
driverClassName=oracle.jdbc.driver.OracleDriver
url=jdbc:oracle:thin:@90.0.12.112:1521:ORCL
username=gzfee
password=1
#<!-- 初始化连接 -->
initialSize=10
#<!-- 最大空闲连接 -->
maxIdle=20
#<!-- 最小空闲连接 -->
minIdle=5
#最大连接数量
maxActive=50
#是否在自动回收超时连接的时候打印连接的超时错误
logAbandoned=true
#是否自动回收超时连接
removeAbandoned=true
#超时时间(以秒数为单位)
removeAbandonedTimeout=180
#<!-- 超时等待时间以毫秒为单位 6000毫秒/1000等于60秒 -->
maxWait=1000
四、将上面建立的属性文件放入classes下
注:如果是用main类测试则应在工程目录的classes下,如果是站点测试则在web-inf的classes目录下
五、写ibatis与DBCP的关系文件
DBCPSqlMapConfig.xml
<?xml version="1.0" encoding="UTF-8" ?>
<!DOCTYPE sqlMapConfig
PUBLIC "-//ibatis.apache.org//DTD SQL Map Config 2.0//EN"
"http://ibatis.apache.org/dtd/sql-map-config-2.dtd">
<sqlMapConfig>
<properties resource ="jdbc.properties"/>
<transactionManager type ="JDBC">
<dataSource type ="DBCP">
<property name ="JDBC.Driver" value ="${driverClassName}"/>
<property name ="JDBC.ConnectionURL" value ="${url}" />
<property name ="JDBC.Username" value ="${username}" />
<property name ="JDBC.Password" value ="${password}" />
<property name ="Pool.MaximumWait" value ="30000" />
<property name ="Pool.ValidationQuery" value ="select sysdate from dual" />
<property name ="Pool.LogAbandoned" value ="true" />
<property name ="Pool.RemoveAbandonedTimeout" value ="1800000" />
<property name ="Pool.RemoveAbandoned" value ="true" />
</dataSource>
</transactionManager>
<sqlMap resource="com/mydomain/data/Account.xml"/> (注:这里对应表映射)
</sqlMapConfig>
六、写数据表映射文件
Account.xml
<?xml version="1.0" encoding="UTF-8" ?>
<!DOCTYPE sqlMap
PUBLIC "-//ibatis.apache.org//DTD SQL Map 2.0//EN"
"http://ibatis.apache.org/dtd/sql-map-2.dtd">
<sqlMap namespace="Account">
<!-- Use type aliases to avoid typing the full classname every time. -->
<typeAlias alias="Account" type="com.mydomain.domain.Account"/>
<!-- Result maps describe the mapping between the columns returned
from a query, and the class properties. A result map isn't
necessary if the columns (or aliases) match to the properties
exactly. -->
<resultMap id="AccountResult" class="Account">
<result property="id" column="id"/>
<result property="firstName" column="firstName"/>
<result property="lastName" column="lastName"/>
<result property="emailAddress" column="emailAddress"/>
</resultMap>
<!-- Select with no parameters using the result map for Account class. -->
<select id="selectAllAccounts" resultMap="AccountResult">
select * from T_ACCOUNT
</select>
<!-- A simpler select example without the result map. Note the
aliases to match the properties of the target result class. -->
<select id="selectAccountById" parameterClass="int" resultClass="Account">
select
id as id,
firstName as firstName,
lastName as lastName,
emailAddress as emailAddress
from T_ACCOUNT
where id = #id#
</select>
<!-- Insert example, using the Account parameter class -->
<insert id="insertAccount" parameterClass="Account">
insert into T_ACCOUNT (
id,
firstName,
lastName,
emailAddress
values (
#id#, #firstName#, #lastName#, #emailAddress#
)
</insert>
<!-- Update example, using the Account parameter class -->
<update id="updateAccount" parameterClass="Account">
update T_ACCOUNT set
firstName = #firstName#,
lastName = #lastName#,
emailAddress = #emailAddress#
where
id = #id#
</update>
<!-- Delete example, using an integer as the parameter class -->
<delete id="deleteAccountById" parameterClass="int">
delet e from T_ACCOUNT where id = #id# (注意:这里由于ISP限制上传delete,所以加了一个空格)
</delete>
</sqlMap>
Java Scripting and JRuby Examples
Author: Martin Kuba
The new JDK 6.0 has a new API for scripting languages, which seems to be a good idea. I decided this is a good opportunity to learn the Ruby language :-) But I haven't found a simple example of it using Google, so here it is.
Download and install JDK 6.0. You need version 6, as the scripting support was added in version 6. Then you need to put five files in your classpath:
All you need to do is to add these files into the CLASSPATH.
(If you don't know how to do that, please read the Java tutorial first. Don't forget to include the current directory into the CLASSPATH. On Linux, you can do:
 export CLASSPATH=.
for i in *.jar ; do CLASSPATH=$CLASSPATH:$i; done
).
Here is a simple Java code that executes a Ruby script defining some functions and the executing them:
package cz.cesnet.meta.jruby;
import javax.script.ScriptEngine;
import javax.script.ScriptEngineFactory;
import javax.script.ScriptEngineManager;
import javax.script.ScriptException;
import javax.script.ScriptContext;
import java.io.BufferedReader;
import java.io.FileNotFoundException;
import java.io.FileReader;
public class JRubyExample1 {
public static void main(String[] args) throws ScriptException, FileNotFoundException {
//list all available scripting engines
listScriptingEngines();
//get jruby engine
ScriptEngine jruby = new ScriptEngineManager().getEngineByName("jruby");
//process a ruby file
jruby.eval(new BufferedReader(new FileReader("myruby.rb")));
//call a method defined in the ruby source
jruby.put("number", 6);
jruby.put("title", "My Swing App");
long fact = (Long) jruby.eval("showFactInWindow($title,$number)");
System.out.println("fact: " + fact);
jruby.eval("$myglobalvar = fact($number)");
long myglob = (Long) jruby.getBindings(ScriptContext.ENGINE_SCOPE).get("myglobalvar");
System.out.println("myglob: " + myglob);
}
public static void listScriptingEngines() {
ScriptEngineManager mgr = new ScriptEngineManager();
for (ScriptEngineFactory factory : mgr.getEngineFactories()) {
System.out.println("ScriptEngineFactory Info");
System.out.printf("\tScript Engine: %s (%s)\n", factory.getEngineName(), factory.getEngineVersion());
System.out.printf("\tLanguage: %s (%s)\n", factory.getLanguageName(), factory.getLanguageVersion());
for (String name : factory.getNames()) {
System.out.printf("\tEngine Alias: %s\n", name);
}
}
}
}
And here is the Ruby code in file myruby.rb:
def fact(n)
if n==0
return 1
else
return n*fact(n-1)
end
end
class CloseListener
include java.awt.event.ActionListener
def actionPerformed(event)
puts "CloseListere.actionPerformed() called"
java.lang.System.exit(0)
end
end
def showFactInWindow(title,number)
f = fact(number)
frame = javax.swing.JFrame.new(title)
frame.setLayout(java.awt.FlowLayout.new())
button = javax.swing.JButton.new("Close")
button.addActionListener(CloseListener.new)
frame.contentPane.add(javax.swing.JLabel.new(number.to_s+"! = "+f.to_s))
frame.contentPane.add(button)
frame.defaultCloseOperation=javax.swing.WindowConstants::EXIT_ON_CLOSE
frame.pack()
frame.visible=true
return f
end
The Ruby script defines a function fact(n) which computes the factorial of a given number. Then it defines a (Ruby) class CloseListener, which extend a (Java) class java.awt.event.ActionListener. And finaly it defines a function showFactInWindow, which builds a GUI window displaying a label and a close button, assigns the CloseListener class as a listener for the button action, and returns the value of n! :

Please note that a Ruby and Java classes can be mixed together.
(To run the example save the codes above into files cz/cesnet/meta/jruby/JRubyExample1.java and myruby.rb, and compile them and run using
javac cz/cesnet/meta/jruby/JRubyExample1.java
java cz.cesnet.meta.jruby.JRubyExample1
)
You can pass any Java object using the put("key",object) method on the ScriptingEngine class, the key becomes a global variable in Ruby, so you can access it using $key. The numerical value returned by showFactInWindow is Ruby's Fixnum clas, which is converted into java.lang.Long and returned by the eval() method.
Any additional global variable in the Ruby script can be obtained in Java by getBindings(), as is shown by getting the $myglobalvar RUby global variable.
In JRuby 0.9.8, it was not possible to override or add methods of Java classes in Ruby and call them in Java. However, in JRuby 1.0 it is possible. If you have read the previous version of this page, please note, that the syntax for extending Java interfaces has changed in JRuby 1.0 to use include instead of <.
This is a Java interface MyJavaInterface.java:
package cz.cesnet.meta.jruby;


public interface MyJavaInterface {

String myMethod(Long num);

}
This is a Java class MyJavaClass.java:
package cz.cesnet.meta.jruby;


public class MyJavaClass implements MyJavaInterface {

public String myMethod(Long num) {

return "I am Java method, num="+num;

}

}
This is a Ruby code example2.rb:
#example2.rb
class MyDerivedClass < Java::cz.cesnet.meta.jruby.MyJavaClass
def myMethod(num)
return "I am Ruby method, num="+num.to_s()
end
end
class MyImplClass
include Java::cz.cesnet.meta.jruby.MyJavaInterface
def myMethod(num)
return "I am Ruby method in interface impl, num="+num.to_s()
end
def mySecondMethod()
return "I am an additonal Ruby method"
end
end
This is the main code.
package cz.cesnet.meta.jruby;
import javax.script.ScriptEngine;
import javax.script.ScriptEngineManager;
import javax.script.ScriptException;
import java.io.BufferedReader;
import java.io.FileNotFoundException;
import java.io.FileReader;
import java.lang.reflect.Method;
public class JRubyExample2 {
public static void main(String[] args) throws ScriptException, FileNotFoundException {
//get jruby engine
ScriptEngine jruby = new ScriptEngineManager().getEngineByName("jruby");
//process a ruby file
jruby.eval(new BufferedReader(new FileReader("example2.rb")));
//get a Ruby class extended from Java class
MyJavaClass mjc = (MyJavaClass) jruby.eval("MyDerivedClass.new");
String s = mjc.myMethod(2l);
//WOW! the Ruby method is visible
System.out.println("s: " + s);
//get a Ruby class implementing a Java interface
MyJavaInterface mji = (MyJavaInterface) jruby.eval("MyImplClass.new");
String s2 = mji.myMethod(3l);
//WOW ! the Ruby method is visible
System.out.println("s2: " + s2);
//however the other methods are not visible :-(
for (Method m : mji.getClass().getMethods()) {
System.out.println("m.getName() = " + m.getName());
}
}
}
The output is
s: I am Ruby method, num=2
s2: I am Ruby method in interface impl, num=3
m.getName() = myMethod
m.getName() = hashCode
m.getName() = equals
m.getName() = toString
m.getName() = isProxyClass
m.getName() = getProxyClass
m.getName() = getInvocationHandler
m.getName() = newProxyInstance
m.getName() = getClass
m.getName() = wait
m.getName() = wait
m.getName() = wait
m.getName() = notify
m.getName() = notifyAll
So you see, a Ruby method overriding a method in a Java class and a Ruby method implementing a method in a Java interface are visible in Java ! However additional methods are not visible in Java.
A useful usage of JRuby in Java is in web applications, when you need to give your user the option to write some complex user-defined conditions. For example, I needed to allow users to specify conditions for other users to access a chat room, based on attributes of the other users provided by autentization system Shibboleth. So I implemented JRuby scripting in TomCat-deployed web application. I used TomCat 6.0, but 5.5 should work the same way. Here are my findings.
First the easy part. Just add the jar files needed for JRuby to WEB-INF/lib/ directory and it just works. Great ! Now your users can enter any Ruby script, and you can provide it with input data using global variables, execute it and read its output value, in a class called from a servlet. In the following example, I needed a boolean value as the output, so the usual Ruby rules for truth values are simulated:
public boolean evalRubyScript() {
ScriptEngine jruby = engineManager.getEngineByName("jruby");
jruby.put("attrs", getWhatEverInputDataYouNeedToProvide());
try {
Object retval = jruby.eval(script);
if (retval instanceof Boolean) return ((Boolean) retval);
return retval != null;
} catch (ScriptException e) {
throw new RuntimeException(e);
}
}
However, your users can type anything. Sooner or later, somebody will type something harmful, like java.lang.System.exit(1) or File.readlines('/etc/passwd') etc. You have to limit what the users can do. Fortunately, there is a security framework in Java, which is not enabled by default, by you can enable it by starting TomCat with the -security option:
$CATALINA_BASE/bin/catalina.sh start -security
That runs the JVM for TomCat with SecurityManager enabled. But alas, your web application most likely will not work with security enabled, as your code or the libraries you use now cannot read system properties, read files etc. So you have to allow them to do it. Edit the file $CATALINA_BASE/conf/catalina.prolicy and add the following code, where you replacemywebapp with the name of your web application:
//first allow everything for trusted libraries, add you own
grant codeBase "jar:file:${catalina.base}/webapps/mywebapp/WEB-INF/lib/stripes.jar!/-" {
permission java.security.AllPermission;
};
grant codeBase "jar:file:${catalina.base}/webapps/mywebapp/WEB-INF/lib/log4j-1.2.13.jar!/-" {
permission java.security.AllPermission;
};
//JSP pages don't compile without this
grant codeBase "file:${catalina.base}/work/Catalina/localhost/mywebapp/" {
permission java.lang.RuntimePermission "defineClassInPackage.org.apache.jasper.runtime";
};
//if you need to read or write temporary file, use this
grant codeBase "file:${catalina.base}/webapps/mywebapp/WEB-INF/classes/-" {
permission java.io.FilePermission "${java.io.tmpdir}/file.ser", "read,write" ;
};
// and now, allow only the basic things, as this applies to all code in your webapp including JRuby
grant codeBase "file:${catalina.base}/webapps/mywebapp/-" {
permission java.util.PropertyPermission "*", "read";
permission java.lang.RuntimePermission "accessDeclaredMembers";
permission java.lang.RuntimePermission "createClassLoader";
permission java.lang.RuntimePermission "defineClassInPackage.java.lang";
permission java.lang.RuntimePermission "getenv.*";
permission java.util.PropertyPermission "*", "read,write";
permission java.io.FilePermission "${user.home}/.jruby", "read" ;
permission java.io.FilePermission "file:${catalina.base}/webapps/mywebapp/WEB-INF/lib/jruby.jar!/-", "read" ;
};
Your webapp will probably not work even after you added this code to the policy file, as your code may need permissions to do other things to work. I have found that the easiest way how to find what's missing is to run TomCat with security debuging enabled:
$ rm logs/*
$ CATALINA_OPTS=-Djava.security.debug=access,failure bin/catalina.sh run -security
...
reproduce the problem by accessing the webapp
...
$ bin/catalina.sh run stop
$ fgrep -v 'access allowed' logs/catalina.out
This will filter out allowed accesses, so what remains are denied accesses:
access: access denied (java.lang.RuntimePermission accessClassInPackage.sun.misc)
java.lang.Exception: Stack trace
at java.lang.Thread.dumpStack(Thread.java:1206)
at java.security.AccessControlContext.checkPermission(AccessControlContext.java:313)
...
access: domain that failed ProtectionDomain  (file:/home/joe/tomcat-6.0.13/webapps/mywebapp/WEB-INF/lib/somelib.jar ^lt;no signer certificates>)
That means, that the code in somelib.jar need the RuntimePermission to run, so you have to add it to the catalina.policy file. Then repeat the steps untill you web application runs without problems.
Now the users cannot do dangerous things. If they try to type java.lang.System.exit(1) in the JRuby code, the VM will not exit, instead they will get a security exception:
java.security.AccessControlException: access denied (java.lang.RuntimePermission exitVM.1)
at java.security.AccessControlContext.checkPermission(AccessControlContext.java:323)
at java.security.AccessController.checkPermission(AccessController.java:546)
at java.lang.SecurityManager.checkPermission(SecurityManager.java:532)
The web application is secured now.
摘要: 跳转到主要内容
登录 (或注册)
中文
技术主题
软件下载
社区
技术讲座
developerWorks 中国
Java technology
文档库
Java 类的热替换... 阅读全文
This tutorial explains how to configure your cluster computers to easily start a set of Erlang nodes on every machine through SSH. It shows how to use the slave module to start Erlang nodes that are linked to a main controler.
Configuring SSH servers
SSH server is generally properly installed and configured by Linux distributions, if you ask for SSH server installation. The SSH server is sometime called sshd, standing for SSH deamon.
You need to have SSH servers running on all your cluster nodes.
Configuring your SSH client: connection without password
SSH client RSA key authentification
To be able to manage your cluster as a whole, you need to set up your SSH access to the cluster nodes so that you can log into them without being prompt for a password or passphrase. Here are the needed steps to configure your SSH client and server to use RSA key for authentification. You only need to do this procedure once, for each client/server.
- Generate an SSH RSA key, if you do not already have one:
- Copy the id_rsa.pub file to the target machine:
scp .ssh/id_rsa.pub userid@ssh2-server:id_rsa.pub
- Connect through SSH on the server:
- Create a .ssh directory in the user home directory (if necessary):
- Copy the contents of the id_rsa.pub file to the authorization file for protocol 2 connections:
cat id_rsa.pub >>$HOME/.ssh/authorized_keys
- Remove the id_rsa.pub file:
Alternatively, you can use the command ssh-copy-id ssh2-server, if it is available on your computer, to replace step 2 to 6. ssh-copy-id is for example available on Linux Mandrake and Debian distributions.
Adding your identity to the SSH-agent software
After the previous step, you will be prompted for the passphrase of your RSA key each time you are initialising a connection. To avoid typing the passphrase many time, you can add your identity to a program called ssh-agent that will keep your passphrase for the work session duration. Use of the SSH protocol will thus be simplified:
- Ensure a program called ssh-agent is running. Type:
to check if ssh-agent is running under your userid. Type:
to check that ssh-agent is linked to your current window manager session or shell process.
- If ssh-agent is not started, you can create an ssh-agent session in the shell with, for example, the screen program:
After this command, SSH actions typed into the screen console will be handle through the ssh-agent.
- Add your identity to the agent:
Type your passphrase when prompted.
- You can list the identity that have been added into the running ssh-agent:
- You can remove an identity from the ssh-agent with:
Please consult ssh-add manual for more options (identity lifetime, agent locking, ...)
Routing to and from the cluster
When setting up clusters, you can often only access the gateway/load balancer front computer. To access the other node, you need to tell the gateway machine to route your requests to the cluster nodes.
To take an example, suppose your gateway to the cluster is 80.65.232.137. The controler machine is a computer outside the cluster. This is computer where the operator is controling the cluster behaviour. Your cluster internal adresses form the following network: 192.0.0.0. On your client computer, launch the command:
route add -net 192.0.0.0 gw 80.65.232.137 netmask 255.255.255.0
 |
This will only works if IP forwarding is activated on the gateway computer. |
To ensure proper routing, you can maintain an common /etc/hosts file with entries for all computers in your cluster. In our example, with a seven-computers cluster, the file /etc/hosts could look like:
10.9.195.12   controler
80.65.232.137 gateway
192.0.0.11    eddieware
192.0.0.21    yaws1
192.0.0.22    yaws2
192.0.0.31    mnesia1
192.0.0.32    mnesia2
You could also add a DNS server, but for relatively small cluster, it is probably easier to manage an /etc/hosts file.
Starting Erlang nodes and setting up the Erlang cluster
Starting a whole Erlang cluster can be done very easily once you can connect with SSH to all cluster node without being prompt for a password.
Starting the Erlang master node
Erlang needs to be started with the -rsh ssh parameters to use ssh connection to the target nodes within the slave command, instead of rsh connection. It also need to be started with network enable with the -sname node parameter.
Here is an example Erlang command to start the Erlang master node:
erl -rsh ssh -sname clustmaster
Be carefull, your master node short name has to be sufficent to route from the slave nodes in the cluster to your master node. The slave:start timeout if it cannot connect back from the slave to your master node.
Starting the slave nodes (cluster)
The custom function cluster:slaves/1 is a wrapper to the Erlang slave function. It allows to easily start a set of Erlang node on target hosts with the same cookie.
-module(cluster).
-export([slaves/1]).
%% Argument:
%% Hosts: List of hostname (string)
slaves([]) ->
ok;
slaves([Host|Hosts]) ->
Args = erl_system_args(),
NodeName = "cluster",
{ok, Node} = slave:start_link(Host, NodeName, Args),
io:format("Erlang node started = [~p]~n", [Node]),
slaves(Hosts).
erl_system_args()->
Shared = case init:get_argument(shared) of
error -> " ";
{ok,[[]]} -> " -shared "
end,
lists:append(["-rsh ssh -setcookie",
atom_to_list(erlang:get_cookie()),
Shared, " +Mea r10b "]).
%% Do not forget to start erlang with a command like:
%% erl -rsh ssh -sname clustmaster
Here is a sample session:
mremond@controler:~/cvs/cluster$ erl -rsh ssh -sname demo
Erlang (BEAM) emulator version 5.3 [source] [hipe]
Eshell V5.3 (abort with ^G)
(demo@controler)1> cluster:slaves(["gateway", "yaws1", "yaws2", "mnesia1", "mnesia2", "eddieware"]).
Erlang node started = [cluster@gateway]
Erlang node started = [cluster@yaws1]
Erlang node started = [cluster@yaws2]
Erlang node started = [cluster@mnesia1]
Erlang node started = [cluster@mnesia2]
Erlang node started = [cluster@eddieware]
ok
The order of the nodes in the cluster:slaves/1 list parameter does not matter.
You can check the list of known nodes:
(demo@controler)2> nodes().
[cluster@gateway,
cluster@yaws1,
cluster@yaws2,
cluster@mnesia1,
cluster@mnesia2,
cluster@eddieware]
And you can start executing code on cluster nodes:
(demo@controler)3> rpc:multicall(nodes(), io, format, ["Hello world!~n", []]).
Hello world!
Hello world!
Hello world!
Hello world!
Hello world!
Hello world!
{[ok,ok,ok,ok,ok,ok],[]}
|
If you have trouble with slave start, you can uncomment the line:
%%io:format("Command: ~s~n", [Cmd])
before the open_port instruction:
open_port({spawn, Cmd}, [stream]),
in the slave:wait_for_slave/7 function. |
<?php
header('Content-disposition:attachment;filename=movie.mpg');
header('Content-type:video/mpeg');
readfile('movie.mpg');
?>
socket API原本是为网络通讯设计的,但后来在socket的框架上发展出一种IPC机制,就是UNIX Domain Socket。虽然网络socket也可用于同一台主机的进程间通讯(通过loopback地址127.0.0.1),但是UNIX Domain Socket用于IPC更有效率:不需要经过网络协议栈,不需要打包拆包、计算校验和、维护序号和应答等,只是将应用层数据从一个进程拷贝到另一个进程。这是因为,IPC机制本质上是可靠的通讯,而网络协议是为不可靠的通讯设计的。UNIX Domain Socket也提供面向流和面向数据包两种API接口,类似于TCP和UDP,但是面向消息的UNIX Domain Socket也是可靠的,消息既不会丢失也不会顺序错乱。
UNIX Domain Socket是全双工的,API接口语义丰富,相比其它IPC机制有明显的优越性,目前已成为使用最广泛的IPC机制,比如X Window服务器和GUI程序之间就是通过UNIX Domain Socket通讯的。
使用UNIX Domain Socket的过程和网络socket十分相似,也要先调用socket()创建一个socket文件描述符,address family指定为AF_UNIX,type可以选择SOCK_DGRAM或SOCK_STREAM,protocol参数仍然指定为0即可。
UNIX Domain Socket与网络socket编程最明显的不同在于地址格式不同,用结构体sockaddr_un表示,网络编程的socket地址是IP地址加端口号,而UNIX Domain Socket的地址是一个socket类型的文件在文件系统中的路径,这个socket文件由bind()调用创建,如果调用bind()时该文件已存在,则bind()错误返回。
以下程序将UNIX Domain socket绑定到一个地址。
#include <stdlib.h>
#include <stdio.h>
#include <stddef.h>
#include <sys/socket.h>
#include <sys/un.h>
int main(void)
{
int fd, size;
struct sockaddr_un un;
memset(&un, 0, sizeof(un));
un.sun_family = AF_UNIX;
strcpy(un.sun_path, "foo.socket");
if ((fd = socket(AF_UNIX, SOCK_STREAM, 0)) < 0) {
perror("socket error");
exit(1);
}
size = offsetof(struct sockaddr_un, sun_path) + strlen(un.sun_path);
if (bind(fd, (struct sockaddr *)&un, size) < 0) {
perror("bind error");
exit(1);
}
printf("UNIX domain socket bound\n");
exit(0);
}
注意程序中的offsetof宏,它在stddef.h头文件中定义:
#define offsetof(TYPE, MEMBER) ((int)&((TYPE *)0)->MEMBER)
offsetof(struct sockaddr_un, sun_path)就是取sockaddr_un结构体的sun_path成员在结构体中的偏移,也就是从结构体的第几个字节开始是sun_path成员。想一想,这个宏是如何实现这一功能的?
该程序的运行结果如下。
$ ./a.out
UNIX domain socket bound
$ ls -l foo.socket
srwxrwxr-x 1 user        0 Aug 22 12:43 foo.socket
$ ./a.out
bind error: Address already in use
$ rm foo.socket
$ ./a.out
UNIX domain socket bound
以下是服务器的listen模块,与网络socket编程类似,在bind之后要listen,表示通过bind的地址(也就是socket文件)提供服务。
#include <stddef.h>
#include <sys/socket.h>
#include <sys/un.h>
#include <errno.h>
#define QLEN 10
/*
* Create a server endpoint of a connection.
* Returns fd if all OK, <0 on error.
*/
int serv_listen(const char *name)
{
int                 fd, len, err, rval;
struct sockaddr_un  un;
/* create a UNIX domain stream socket */
if ((fd = socket(AF_UNIX, SOCK_STREAM, 0)) < 0)
return(-1);
unlink(name);   /* in case it already exists */
/* fill in socket address structure */
memset(&un, 0, sizeof(un));
un.sun_family = AF_UNIX;
strcpy(un.sun_path, name);
len = offsetof(struct sockaddr_un, sun_path) + strlen(name);
/* bind the name to the descriptor */
if (bind(fd, (struct sockaddr *)&un, len) < 0) {
rval = -2;
goto errout;
}
if (listen(fd, QLEN) < 0) { /* tell kernel we're a server */
rval = -3;
goto errout;
}
return(fd);
errout:
err = errno;
close(fd);
errno = err;
return(rval);
}
以下是服务器的accept模块,通过accept得到客户端地址也应该是一个socket文件,如果不是socket文件就返回错误码,如果是socket文件,在建立连接后这个文件就没有用了,调用unlink把它删掉,通过传出参数uidptr返回客户端程序的user id。
#include <stddef.h>
#include <sys/stat.h>
#include <sys/socket.h>
#include <sys/un.h>
#include <errno.h>
int serv_accept(int listenfd, uid_t *uidptr)
{
int                 clifd, len, err, rval;
time_t              staletime;
struct sockaddr_un  un;
struct stat         statbuf;
len = sizeof(un);
if ((clifd = accept(listenfd, (struct sockaddr *)&un, &len)) < 0)
return(-1);     /* often errno=EINTR, if signal caught */
/* obtain the client's uid from its calling address */
len -= offsetof(struct sockaddr_un, sun_path); /* len of pathname */
un.sun_path[len] = 0;           /* null terminate */
if (stat(un.sun_path, &statbuf) < 0) {
rval = -2;
goto errout;
}
if (S_ISSOCK(statbuf.st_mode) == 0) {
rval = -3;      /* not a socket */
goto errout;
}
if (uidptr != NULL)
*uidptr = statbuf.st_uid;   /* return uid of caller */
unlink(un.sun_path);        /* we're done with pathname now */
return(clifd);
errout:
err = errno;
close(clifd);
errno = err;
return(rval);
}
以下是客户端的connect模块,与网络socket编程不同的是,UNIX Domain Socket客户端一般要显式调用bind函数,而不依赖系统自动分配的地址。客户端bind一个自己指定的socket文件名的好处是,该文件名可以包含客户端的pid以便服务器区分不同的客户端。
#include <stdio.h>
#include <stddef.h>
#include <sys/stat.h>
#include <sys/socket.h>
#include <sys/un.h>
#include <errno.h>
#define CLI_PATH    "/var/tmp/"      /* +5 for pid = 14 chars */
/*
* Create a client endpoint and connect to a server.
* Returns fd if all OK, <0 on error.
*/
int cli_conn(const char *name)
{
int                fd, len, err, rval;
struct sockaddr_un un;
/* create a UNIX domain stream socket */
if ((fd = socket(AF_UNIX, SOCK_STREAM, 0)) < 0)
return(-1);
/* fill socket address structure with our address */
memset(&un, 0, sizeof(un));
un.sun_family = AF_UNIX;
sprintf(un.sun_path, "%s%05d", CLI_PATH, getpid());
len = offsetof(struct sockaddr_un, sun_path) + strlen(un.sun_path);
unlink(un.sun_path);        /* in case it already exists */
if (bind(fd, (struct sockaddr *)&un, len) < 0) {
rval = -2;
goto errout;
}
/* fill socket address structure with server's address */
memset(&un, 0, sizeof(un));
un.sun_family = AF_UNIX;
strcpy(un.sun_path, name);
len = offsetof(struct sockaddr_un, sun_path) + strlen(name);
if (connect(fd, (struct sockaddr *)&un, len) < 0) {
rval = -4;
goto errout;
}
return(fd);
errout:
err = errno;
close(fd);
errno = err;
return(rval);
}
我们介绍了nginx这个轻量级的高性能server主要可以干的两件事情:
>直接作为http server(代替apache,对PHP需要FastCGI处理器支持,这个我们之后介绍);
>另外一个功能就是作为反向代理服务器实现负载均衡 (如下我们就来举例说明实际中如何使用nginx实现负载均衡)。因为nginx在处理并发方面的优势,现在这个应用非常常见。当然了Apache的mod_proxy和mod_cache结合使用也可以实现对多台app server的反向代理和负载均衡,但是在并发处理方面apache还是没有nginx擅长。
nginx作为反向代理实现负载均衡的例子:
1)环境:
a. 我们本地是Windows系统,然后使用VirutalBox安装一个虚拟的Linux系统。
在本地的Windows系统上分别安装nginx(侦听8080端口)和apache(侦听80端口)。在虚拟的Linux系统上安装apache(侦听80端口)。
这样我们相当于拥有了1台nginx在前端作为反向代理服务器;后面有2台apache作为应用程序服务器(可以看作是小型的server cluster。;-) );
b. nginx用来作为反向代理服务器,放置到两台apache之前,作为用户访问的入口;
nginx仅仅处理静态页面,动态的页面(php请求)统统都交付给后台的两台apache来处理。
也就是说,可以把我们网站的静态页面或者文件放置到nginx的目录下;动态的页面和数据库访问都保留到后台的apache服务器上。
c. 如下介绍两种方法实现server cluster的负载均衡。
我们假设前端nginx(为127.0.0.1:80)仅仅包含一个静态页面index.html;
后台的两个apache服务器(分别为localhost:80和158.37.70.143:80),一台根目录放置phpMyAdmin文件夹和test.php(里面测试代码为print "server1";),另一台根目录仅仅放置一个test.php(里面测试代码为print "server2";)。
2)针对不同请求 的负载均衡:
a. 在最简单地构建反向代理的时候 (nginx仅仅处理静态不处理动态内容,动态内容交给后台的apache server来处理),我们具体的设置为:在nginx.conf中修改:
location ~ \.php$ {
proxy_pass 158.37.70.143:80 ;
}
>这样当客户端访问localhost:8080/index.html的时候,前端的nginx会自动进行响应;
>当用户访问localhost:8080/test.php的时候(这个时候nginx目录下根本就没有该文件),但是通过上面的设置location ~ \.php$(表示正则表达式匹配以.php结尾的文件,详情参看location是如何定义和匹配的 http://wiki.nginx.org/NginxHttpCoreModule) ,nginx服务器会自动pass给158.37.70.143的apache服务器了。该服务器下的test.php就会被自动解析,然后将html的结果页面返回给nginx,然后nginx进行显示(如果nginx使用memcached模块或者squid还可以支持缓存),输出结果为打印server2。
如上是最为简单的使用nginx做为反向代理服务器的例子;
b. 我们现在对如上例子进行扩展,使其支持如上的两台服务器。
我们设置nginx.conf的server模块部分,将对应部分修改为:
location ^~ /phpMyAdmin/ {
proxy_pass 127.0.0.1:80 ;
}
location ~ \.php$ {
proxy_pass 158.37.70.143:80 ;
}
上面第一个部分location ^~ /phpMyAdmin/,表示不使用正则表达式匹配(^~),而是直接匹配,也就是如果客户端访问的URL是以 http://localhost:8080/phpMyAdmin/ 开头的话(本地的nginx目录下根本没有phpMyAdmin目录),nginx会自动pass到 127.0.0.1:80 的Apache服务器,该服务器对phpMyAdmin目录下的页面进行解析,然后将结果发送给nginx,后者显示;
如果客户端访问URL是 http://localhost/test.php 的话,则会被pass到 158.37.70.143:80 的apache进行处理。
因此综上,我们实现了针对不同请求的负载均衡。
>如果用户访问静态页面index.html,最前端的nginx直接进行响应;
>如果用户访问test.php页面的话, 158.37.70.143:80 的Apache进行响应;
>如果用户访问目录phpMyAdmin下的页面的话, 127.0.0.1:80 的Apache进行响应;
3)访问同一页面 的负载均衡:
即 用户访问http://localhost:8080/test.php 这个同一页面的时候,我们实现两台服务器的负载均衡 (实际情况中,这两个服务器上的数据要求同步一致,这里我们分别定义了打印server1和server2是为了进行辨认区别)。
a. 现在我们的情况是在windows下nginx是localhost侦听8080端口;
两台apache,一台是127.0.0.1:80(包含test.php页面但是打印server1),另一台是虚拟机的158.37.70.143:80(包含test.php页面但是打印server2)。
b. 因此重新配置nginx.conf为:
>首先 在nginx的配置文件nginx.conf的http模块中添加,服务器集群server cluster(我们这里是两台)的定义:
upstream myCluster {
server 127.0.0.1:80 ;
server 158.37.70.143:80 ;
}
表示这个server cluster包含2台服务器
>然后在server模块中定义,负载均衡:
location ~ \.php$ {
proxy_pass http://myCluster ; #这里的名字和上面的cluster的名字相同
proxy_redirect off;
proxy_set_header Host $host;
proxy_set_header X-Real-IP $remote_addr;
proxy_set_header X-Forwarded-For $proxy_add_x_forwarded_for;
}
这样的话,如果访问 http://localhost:8080/test.php 页面的话,nginx目录下根本没有该文件,但是它会自动将其pass到myCluster定义的服务区机群中,分别由127.0.0.1:80;或者158.37.70.143:80;来做处理。
上面在定义upstream的时候每个server之后没有定义权重,表示两者均衡;如果希望某个更多响应的话例如:
upstream myCluster {
server 127.0.0.1:80 weight=5;
server 158.37.70.143:80 ;
}
这样表示5/6的几率访问第一个server,1/6访问第二个。另外还可以定义max_fails和fail_timeout等参数。
http://wiki.nginx.org/NginxHttpUpstreamModule
====================
综上,我们 使用nginx的反向代理服务器reverse proxy server的功能,将其布置到多台apache server的前端。
nginx仅仅用来处理静态页面响应和动态请求的代理pass,后台的apache server作为app server来对前台pass过来的动态页面进行处理并返回给nginx。
通过以上的架构,我们可以实现nginx和多台apache构成的机群cluster的负载均衡。
两种均衡:
1)可以在nginx中定义访问不同的内容,代理到不同的后台server; 如上例子中的访问phpMyAdmin目录代理到第一台server上;访问test.php代理到第二台server上;
2)可以在nginx中定义访问同一页面,均衡 (当然如果服务器性能不同可以定义权重来均衡) 地代理到不同的后台server上。 如上的例子访问test.php页面,会均衡地代理到server1或者server2上。
实际应用中,server1和server2上分别保留相同的app程序和数据,需要考虑两者的数据同步。
很早之前在Infoq上看到Heroku的介绍,不过当时这个网站并没有推出,今天在整理收藏夹的时候发现,Heroku已经推出一段时间,而且现在作为云计算平台已经有很快的发展了。
Heroku是Rails应用最简单的部署平台。只是简单的把代码放进去,然后启动、运行,没人会做不到这些。Heroku会处理一切,从版本控制到 自动伸缩的协作(基于Amazon的EC2之上)。我们提供一整套工具来开发和管理应用,不管是通过Web接口还是新的扩展API。
HeroKu的架构大部分是采用开源的架构来实现的,:)其实构建云计算平台,开源的世界已经解决一切了,不是吗?下面看看HeroKu的架构图,非常漂亮:

一、反向代理服务器采用Nigix
Nigix是一个开源的,高性能的web server和支持IMAP/POP3代理的反向代理服务器,Nigix不采用多线程的方式来支持大并发处理,而是采用了一个可扩展的Event-Driven(信号asynchronous)的网络模型来实现,解决了著名的C10K问题。
Nigix在这里用来解决Http Level的问题,包括SSL的处理,Http请求中转,Gzip的传输压缩等等处理,同时应用了多个前端的Nigix 服务器来解决DNS及负载均衡的问题。
二、Http Cache采用Varnish
Varnish is a state-of-the-art, high-performance HTTP accelerator. It uses the advanced features in Linux 2.6, FreeBSD 6/7 and Solaris 10 to achieve its high performance.
Varnish在这里主要给采用来处理静态资源,包括对页面的静态化处理,图片,CSS等等,这里请求获取不到的再通过下一层的Routing Mess去获取。通常还有另外一个选择Squid,不过近几年来,Varnish 给大型网站应用的更加的多了。
三、动态路由处理层,这里采用了Erlang 实现的,是由该团队自己实现的,Erlang 提供了高可靠性和稳定性的服务端实现能力(其实,我们也可以这样去使用),这个层主要是解决路由寻址的问题,通过合理分配动态过来的请求,跟踪请求的负载能力,并合理的分配可获取的下一层app 服务。这个层实现了对业务app的可扩展性和容错性,可以根据下一层服务的负载容量来合理进行路由的选择。原理上它是一个分布式的动态HTTP请求的路由池子。
四、动态网格层,用户部署的app是部署在这一层,可以看成是一个服务器集群,只是粒度会更加的细小。
五、数据库层,这里不用多说了
六、Memory Cache
也不需要多说,现在大部分互联网公司都在应用,而且基于它开发了很多好的连接器,我们公司其实也有在采用,不过我们还有自己开发的分布式内存系统,如原来的TTC Server,现在好像叫WorkBench。
DBUS_SESSION_BUS_ADDRESS="tcp:host=localhost,port=732"
这个话题来自: Nutz的issue 361
在考虑这个issue时, 我一直倾向于使用系统变量file.encoding来改变JVM的默认编码.
今天,我想到, 这个系统变量,对JVM的影响到底有多大呢?
我使用最简单的方法看看这个变量的影响–在JDK 1.6.0_20的src.zip文件中,查找包含file.encoding字眼的文件.
共找到4个, 分别是:
先上重头戏 java.nio.Charset类:
    public static Charset defaultCharset() {
            if (defaultCharset == null) {
            synchronized (Charset.class) {
            java.security.PrivilegedAction pa =
            new GetPropertyAction("file.encoding");
            String csn = (String)AccessController.doPrivileged(pa);
            Charset cs = lookup(csn);
            if (cs != null)
            defaultCharset = cs;
            else
            defaultCharset = forName("UTF-8");
            }
            }
            return defaultCharset;
            }
|
java.net.URLEncoder的静态构造方法,影响到的方法 java.net.URLEncoder.encode(String)
com.sun.org.apache.xml.internal.serializer.Encoding的getMimeEncoding方法(209行起)
最后一个javax.print.DocFlavor类的静态构造方法:
可以看到,系统变量file.encoding影响到
1. Charset.defaultCharset() Java环境中最关键的编码设置
2. URLEncoder.encode(String) Web环境中最常遇到的编码使用
3. com.sun.org.apache.xml.internal.serializer.Encoding 影响对无编码设置的xml文件的读取
4. javax.print.DocFlavor 影响打印的编码
故,影响还是很大的哦, 可以说是Java中编码的一个关键钥匙!
我们大家在做J2EE项目开发的时候,都会用到Application Server,然后配置Connection Pool,Data Source,但不知道大家有没有留意到,其实我们绝大部分的应用用的都是Apache的DBCP机制。
JES,Weblogic,JBoss等等的大型App Server,其中一个好处就是提供了Admin Console,让配置做起来就像傻瓜式的,Step By Step就可以了,下面举个用Tomcat的应用例子,深入一点探讨DBCP的配置都做了些什么。(当然得配置Server.xml了,但是其实JES和Weblogic等等的大型App Server,也是可以同样修改Server.xml或这Domain.xml来达到同一目的的,只不过有了Admin Console,大家容易避免犯错,但其实我觉得,要深入了解一个App Server,避免不了深入了解配置文件里面的内容)。
当使用DBCP(通常我们都是用Oracle的了)时候,不知道大家有没有遇到一个情况,当数据库连接因为某种原因断掉(有可能时网络问题,导致App Server跑了一天后,第二天再跑马上爆错误),再从Connection Pool中获取连接而又不做Validate,这时候取得的Connection实际上已经是无效的了,从而导致程序一跑,马上爆Connect Reset错误。
其实只要你了解一下DBCP的运作机制和相关属性的话,这个问题就很容易避免了。
DBCP使用Apache的ObjectPool作为Connection Pool的实现,在构造GenericObjectPool的时候,会生成一个Inner Class Evictor,实现Runnable的接口。如果属性_timeBetweenEvictionRunsMillis > 0,每过_timeBetweenEvictionRunsMillis毫秒后Evictor会调用evict method,检查Object的idle time是否大于属性_minEvictableIdleTimeMillis毫秒(如果_minEvictableIdleTimeMillis设置为<=0则忽略,使用default value 30分钟),如果是则销毁该Object,否则就激活并进行Validate,然后调用ensureMinIdle method检查确保Connection Pool中的Object个数不小于属性_minIdle。在调用returnObject method把Object放回ObjectPool时候,需要检查该Object是否有效,然后调用PoolableObjectFactory的passivateObject method使Object处于inactive状态,再检查ObjectPool中的对象个数是否小于属性_maxIdle,是则可以把该Object放回到ObjectPool,否则销毁此Object。
除此之外,还有几个比较重要的属性,_testOnBorrow,_testOnReturn,_testWhileIdle,这些属性的意思是取得,返回对象,空闲时候是否进行Valiadte,检查对象是否有效。默认都为False,只有把这些属性设为True,再提供_validationQuery语句就可以保证DBCP始终有效了,例如,Oracle中就完全可以使用select 1 from dual来进行验证,这里要注意的是,DBCP要求_validationQuery语句查询的Result Set必须为非空。
在Tomcat的Server.xml,我们可以看看下面的这个例子:
<Resource name="lda/raw"
type="javax.sql.DataSource"
password="lda_master"
driverClassName="oracle.jdbc.driver.OracleDriver"
maxIdle="30" minIdle="2" maxWait="60000" maxActive="1000"
testOnBorrow="true" testWhileIdle="true" validationQuery="select 1 from dual"
username="lda_master" url="jdbc:oracle:thin:@192.160.100.107:15537:lcststd"/>
这样一来,就能够解决Connect Reset的问题了。刚才说了,其实很多App Server都会有相应的配置地方,只是大型的服务器正好提供了Admin Console,上面可以显式的配置Connection Pool,也有明显的属性选择,这里就不一一详述了,都是眼见的功夫。
本文出自 “jayenho” 博客,转载请与作者联系!
摘要: 公共安全管理的一般过程分为监测、预警、决策和处置,前两者属于安全事故发生前的防范,后两者属于事故发生后的紧急处理.公共安全事件发生的隐患越早被识别,处理就可以越及时,损失就越小.
关键词: 物联网
公共安全是指多数人的生命、健康和公私财产安全,其涵盖范围包括自然灾害,如地震、洪涝等;技术灾害,如交通事故、火灾、爆炸等;社会灾害,如骚乱、恐怖主义袭击等;公共卫生事件,如食品、药品安全和突发疫情等。我国的公共安全形势严峻,每年死亡人数超过20万,伤残人数超过200万;每年经济损失近9000亿元,相当于GDP的3.5%,远高于中等发达国家1%??2%左右的水平。
公共安全重在预先感知
公共安全管理的一般过程分为监测、预警、决策和处置,前两者属于安全事故发生前的防范,后两者属于事故发生后的紧急处理。公共安全事件发生的隐患越早被识别,处理就可以越及时,损失就越小。管理公共安全事故的重点应该在发生前,而不只是在发生之后。但目前的情况是,安全的防范技术难度大,同时也往往容易被人们所忽视。
物联网是安防的重要技术手段,目前公众所说的物联网就是带有传感/标识器的智能感知信息网络系统,涵盖了当初的物联网、传感网等概念,是在传感、识别、接入网、无线通信网、互联网、计算技术、信息处理和应用软件、智能控制等信息集成基础上的新发展。
公共安全管理的关键是预先感知。感知的对象很多,例如地表、堤坝、道路交通、公共区域、危化品、周界、水资源、食品药品生产环节以及疫情等容易引起公共安全事故发生的源头、场所和环节;感知的内容包括震动、压力、流量、图像、声音、光线、气体、温湿度、浓度、化学成分、标签信息、生物信息等;感知的目的就是要准确获取管理对象的异常变化。
公共安全中需要感知的对象、内容和数量非常巨大,感知之间的关联关系也错综复杂,要做到准确、及时和无遗漏,光靠人工识别基本无法做到、也不现实。物联网的智能化应用将转变传统管理模式,大幅度提高公共管理水平。
求解技术局限
物联网基本层次结构按照普遍的理解划分为感知层、网络层和应用层。感知层由传感器、RFID和传感网络组成,负责数据采集;网络层一般指三大电信公司的宽带网、Wi-Fi、GPRS/CDMA、3G/4G等,负责数据传输;应用层是基于信息数据汇集之上的各类应用。
感知层上的局限是:目前的传感器在较为复杂的环境下,难以做到准确、快速感知;高性能传感器的成本过高,对使用环境要求苛刻,限制了推广;传感器标准不统一,大家各自为政。
网络层比传感层和应用层要成熟,几大电信公司不遗余力地扩展网络能力;三网合一的推进将进一步扩大覆盖面、提高传输能力。
应用层上,专业系统条块分割,形成“信息孤岛”,限制了应用进一步提升和发展;各专业系统之间技术体系标准不统一,存在互联互通的技术障碍。
另外,在管理层面,也存在条块分割、难以形成统一指挥的局面;而且创新和产业体系不成熟,创新能力不够,存在较多简单模仿和贴牌,不利于形成产业持续、健康发展的局面。
不过,目前安防行业也出现了一些新的趋势,将会影响到整个公共安全领域。
IP化
安防系统的数字化及网络的普及为IP化提供了条件;安防系统从分散的单点系统朝分布式监控、集中管理方向发展,联网监控报警是大势所趋,“平安城市”等项目的大规模建设也加快了联网监控的步伐。
IT化
传统IT厂商及电信运营商全面进入安防行业,安防行业面临重大洗牌;IT行业成熟的结构化、标准化体系架构设计和理念将应用于安防领域,推动安防行业升级。
网管化
安防系统规模越来越大、监控范围越来越广、监控对象越来越多,海量存储对系统的管理和维护提出了更高要求,需要做到电信级可管可控。
面对这些新的趋势,公共安全的信息系统建设需要迈上一个智能化综合管理的阶梯。
系统的融合性
物联网将横向整合各个孤立的安防系统,实现信息互通和联动,形成立体化决策支撑体系,使决策更智能、更科学。
平台的开放性
物联网采用标准化的开放平台,带动整个安防产业链发展,形成安防行业规模化的态势。
应用的灵活性
采用安防通用平台+应用子集的顶层设计架构,在保证系统标准化、可重用的同时,满足应用的多样性和不同应用的个性化要求。
系统的智能性
智能感知通过多感知协同,在感知阶段就完成信息的智能处理,滤除无效、冗余信息,保证信息获取的真实、全面和有效;智能分析对感知信息进行分析,对数据特征进行准确地识别和判断;智能决策通过专家系统等形成最优的决策建议;智能处置对异常情况和突发事件进行有效的处置,如结合特定业务和应用的报警联动;智能管理系统具有智能的自动配置管理、自动诊断和告警、故障自动愈合和多种接入方式的远程维护功能,尽量减轻人工负担。
政策科研双管齐下
正如物联网是信息化发展的更高阶段,基于物联网的智能安防、安监系统也是公共安全行业发展的大势所趋。
在政策与管理层面,需要将公共安全信息科技列入国家战略性发展规划范围;整合现有相关资源,引导资源投入和技术、产品创新;推进产学研结合,在有条件的地方开展示范项目建设。
在技术层面,公共安全中的物联网关键技术研究包括5大方面:
1. 物联网智能安防、安监通用平台的建设,设备的接入和管理,中间件、体系结构和标准的确立。
2. 高性能传感器和传感设备的研发,例如新型材料、纳米材料、生物技术、仿生技术、极低功耗、MEMS。
3. 云计算的利用,包括异构数据海量存储和管理、智能信息处理、主动决策等。
4. 基础资源管理,包括万亿量级节点的标识、异构网络融合、自治认知。
5. 物联网的安全,涉及物的真实性、联的可靠性、网的健壮性。
物联网的发展将极大地拓宽安防、安监的范围和内涵,未来的安防、安监将会渗透进人们生活的方方面面,成为物联网的一个基本功能;物联网对安防、安监行业的推动不仅体现在提升传统安防、安监的技术上,还将对整个行业的产业格局、业务模式产生重大影响,今后新的安防、安监应用、运营模式也将会层出不穷。

图注:物联网智能安防共性平台总体架构
(责编:邱文峰)
chmod 700 ~/.ssh
chmod 600 ~/.ssh/authorized_keys


一个图片太大了,只好分割成为两部分。根据流程图来说一下具体一个任务执行的情况。
- 在分布式环境中客户端创建任务并提交。
- InputFormat做Map前的预处理,主要负责以下工作:
- 验证输入的格式是否符合JobConfig的输入定义,这个在实现Map和构建Conf的时候就会知道,不定义可以是Writable的任意子类。
- 将input的文件切分为逻辑上的输入InputSplit,其实这就是在上面提到的在分布式文件系统中blocksize是有大小限制的,因此大文件会被划分为多个block。
- 通过RecordReader来再次处理inputsplit为一组records,输出给Map。(inputsplit只是逻辑切分的第一步,但是如何根据文件中的信息来切分还需要RecordReader来实现,例如最简单的默认方式就是回车换行的切分)
- RecordReader处理后的结果作为Map的输入,Map执行定义的Map逻辑,输出处理后的key和value对应到临时中间文件。
- Combiner可选择配置,主要作用是在每一个Map执行完分析以后,在本地优先作Reduce的工作,减少在Reduce过程中的数据传输量。
- Partitioner可选择配置,主要作用是在多个Reduce的情况下,指定Map的结果由某一个Reduce处理,每一个Reduce都会有单独的输出文件。(后面的代码实例中有介绍使用场景)
- Reduce执行具体的业务逻辑,并且将处理结果输出给OutputFormat。
- OutputFormat的职责是,验证输出目录是否已经存在,同时验证输出结果类型是否如Config中配置,最后输出Reduce汇总后的结果。
业务场景和代码范例
业务场景描述:可设定输入和输出路径(操作系统的路径非HDFS路径),根据访问日志分析某一个应用访问某一个API的总次数和总流量,统计后分别输出到两个文件中。这里仅仅为了测试,没有去细分很多类,将所有的类都归并于一个类便于说明问题。

测试代码类图
LogAnalysiser就是主类,主要负责创建、提交任务,并且输出部分信息。内部的几个子类用途可以参看流程中提到的角色职责。具体地看看几个类和方法的代码片断:
LogAnalysiser::MapClass
    public static class MapClass extends MapReduceBase

        implements Mapper<LongWritable, Text, Text, LongWritable>

    {

        public void map(LongWritable key, Text value, OutputCollector<Text, LongWritable> output, Reporter reporter)

                throws IOException

        {

            String line = value.toString();//没有配置RecordReader,所以默认采用line的实现,key就是行号,value就是行内容

            if (line == null || line.equals(""))

                return;

            String[] words = line.split(",");

            if (words == null || words.length < 8)

                return;

            String appid = words[1];

            String apiName = words[2];

            LongWritable recbytes = new LongWritable(Long.parseLong(words[7]));

            Text record = new Text();

            record.set(new StringBuffer("flow::").append(appid)

                            .append("::").append(apiName).toString());

            reporter.progress();

            output.collect(record, recbytes);//输出流量的统计结果,通过flow::作为前缀来标示。

            record.clear();

            record.set(new StringBuffer("count::").append(appid).append("::").append(apiName).toString());

            output.collect(record, new LongWritable(1));//输出次数的统计结果,通过count::作为前缀来标示

        }

    }
LogAnalysiser:: PartitionerClass
    public static class PartitionerClass implements Partitioner<Text, LongWritable>

    {

        public int getPartition(Text key, LongWritable value, int numPartitions)

        {

            if (numPartitions >= 2)//Reduce 个数,判断流量还是次数的统计分配到不同的Reduce

                if (key.toString().startsWith("flow::"))

                    return 0;

                else

                    return 1;

            else

                return 0;

        }

        public void configure(JobConf job){}

}
LogAnalysiser:: CombinerClass
参看ReduceClass,通常两者可以使用一个,不过这里有些不同的处理就分成了两个。在ReduceClass中蓝色的行表示在CombinerClass中不存在。
LogAnalysiser:: ReduceClass
    public static class ReduceClass extends MapReduceBase

        implements Reducer<Text, LongWritable,Text, LongWritable>

    {

        public void reduce(Text key, Iterator<LongWritable> values,

                OutputCollector<Text, LongWritable> output, Reporter reporter)throws IOException

        {

            Text newkey = new Text();

            newkey.set(key.toString().substring(key.toString().indexOf("::")+2));

            LongWritable result = new LongWritable();

            long tmp = 0;

            int counter = 0;

            while(values.hasNext())//累加同一个key的统计结果

            {

                tmp = tmp + values.next().get();


                counter = counter +1;//担心处理太久,JobTracker长时间没有收到报告会认为TaskTracker已经失效,因此定时报告一下

                if (counter == 1000)

                {

                    counter = 0;

                    reporter.progress();

                }

            }

            result.set(tmp);

            output.collect(newkey, result);//输出最后的汇总结果

        }

    }
LogAnalysiser
	public static void main(String[] args)

{

try

{

run(args);

} catch (Exception e)

{

e.printStackTrace();

}

}

public static void run(String[] args) throws Exception

{

if (args == null || args.length <2)

{

System.out.println("need inputpath and outputpath");

return;

}

String inputpath = args[0];

String outputpath = args[1];

String shortin = args[0];

String shortout = args[1];

if (shortin.indexOf(File.separator) >= 0)

shortin = shortin.substring(shortin.lastIndexOf(File.separator));

if (shortout.indexOf(File.separator) >= 0)

shortout = shortout.substring(shortout.lastIndexOf(File.separator));

SimpleDateFormat formater = new SimpleDateFormat("yyyy.MM.dd");

shortout = new StringBuffer(shortout).append("-")

.append(formater.format(new Date())).toString();


if (!shortin.startsWith("/"))

shortin = "/" + shortin;

if (!shortout.startsWith("/"))

shortout = "/" + shortout;

shortin = "/user/root" + shortin;

shortout = "/user/root" + shortout;

File inputdir = new File(inputpath);

File outputdir = new File(outputpath);

if (!inputdir.exists() || !inputdir.isDirectory())

{

System.out.println("inputpath not exist or isn't dir!");

return;

}

if (!outputdir.exists())

{

new File(outputpath).mkdirs();

}


JobConf conf = new JobConf(new Configuration(),LogAnalysiser.class);//构建Config

FileSystem fileSys = FileSystem.get(conf);

fileSys.copyFromLocalFile(new Path(inputpath), new Path(shortin));//将本地文件系统的文件拷贝到HDFS中


conf.setJobName("analysisjob");

conf.setOutputKeyClass(Text.class);//输出的key类型,在OutputFormat会检查

conf.setOutputValueClass(LongWritable.class); //输出的value类型,在OutputFormat会检查

conf.setMapperClass(MapClass.class);

conf.setCombinerClass(CombinerClass.class);

conf.setReducerClass(ReduceClass.class);

conf.setPartitionerClass(PartitionerClass.class);

conf.set("mapred.reduce.tasks", "2");//强制需要有两个Reduce来分别处理流量和次数的统计

FileInputFormat.setInputPaths(conf, shortin);//hdfs中的输入路径

FileOutputFormat.setOutputPath(conf, new Path(shortout));//hdfs中输出路径


Date startTime = new Date();

System.out.println("Job started: " + startTime);

JobClient.runJob(conf);

Date end_time = new Date();

System.out.println("Job ended: " + end_time);

System.out.println("The job took " + (end_time.getTime() - startTime.getTime()) /1000 + " seconds.");

//删除输入和输出的临时文件

fileSys.copyToLocalFile(new Path(shortout),new Path(outputpath));

fileSys.delete(new Path(shortin),true);

fileSys.delete(new Path(shortout),true);

}
以上的代码就完成了所有的逻辑性代码,然后还需要一个注册驱动类来注册业务Class为一个可标示的命令,让hadoop jar可以执行。
public class ExampleDriver {

  public static void main(String argv[]){

    ProgramDriver pgd = new ProgramDriver();

    try {

      pgd.addClass("analysislog", LogAnalysiser.class, "A map/reduce program that analysis log .");

      pgd.driver(argv);

    }

    catch(Throwable e){

      e.printStackTrace();

    }

  }

}
将代码打成jar,并且设置jar的mainClass为ExampleDriver这个类。在分布式环境启动以后执行如下语句:
hadoop jar analysiser.jar analysislog /home/wenchu/test-in /home/wenchu/test-out
在/home/wenchu/test-in中是需要分析的日志文件,执行后就会看见整个执行过程,包括了Map和Reduce的进度。执行完毕会在/home/wenchu/test-out下看到输出的内容。有两个文件:part-00000和part-00001分别记录了统计后的结果。 如果需要看执行的具体情况,可以看在输出目录下的_logs/history/xxxx_analysisjob,里面罗列了所有的Map,Reduce的创建情况以及执行情况。在运行期也可以通过浏览器来查看Map,Reduce的情况:http://MasterIP:50030/jobtracker.jsp
Hadoop集群测试
首先这里使用上面的范例作为测试,也没有做太多的优化配置,这个测试结果只是为了看看集群的效果,以及一些参数配置的影响。
文件复制数为1,blocksize 5M
| Slave数 |
处理记录数(万条) |
执行时间(秒) |
| 2 |
95 |
38 |
| 2 |
950 |
337 |
| 4 |
95 |
24 |
| 4 |
950 |
178 |
| 6 |
95 |
21 |
| 6 |
950 |
114 |
Blocksize 5M
| Slave数 |
处理记录数(万条) |
执行时间(秒) |
| 2(文件复制数为1) |
950 |
337 |
| 2(文件复制数为3) |
950 |
339 |
| 6(文件复制数为1) |
950 |
114 |
| 6(文件复制数为3) |
950 |
117 |
文件复制数为1
| Slave数 |
处理记录数(万条) |
执行时间(秒) |
| 6(blocksize 5M) |
95 |
21 |
| 6(blocksize 77M) |
95 |
26 |
| 4(blocksize 5M) |
950 |
178 |
| 4(blocksize 50M) |
950 |
54 |
| 6(blocksize 5M) |
950 |
114 |
| 6(blocksize 50M) |
950 |
44 |
| 6(blocksize 77M) |
950 |
74 |
测试的数据结果很稳定,基本测几次同样条件下都是一样。通过测试结果可以看出以下几点:
- 机器数对于性能还是有帮助的(等于没说^_^)。
- 文件复制数的增加只对安全性有帮助,但是对于性能没有太多帮助。而且现在采取的是将操作系统文件拷贝到HDFS中,所以备份多了,准备的时间很长。
- blocksize对于性能影响很大,首先如果将block划分的太小,那么将会增加job的数量,同时也增加了协作的代价,降低了性能,但是配置的太大也会让job不能最大化并行处理。所以这个值的配置需要根据数据处理的量来考虑。
- 最后就是除了这个表里面列出来的结果,应该去仔细看输出目录中的_logs/history中的xxx_analysisjob这个文件,里面记录了全部的执行过程以及读写情况。这个可以更加清楚地了解哪里可能会更加耗时。
随想
“云计算”热的烫手,就和SAAS、Web2及SNS等一样,往往都是在搞概念,只有真正踏踏实实的大型互联网公司,才会投入人力物力去研究符合自己的分布式计算。其实当你的数据量没有那么大的时候,这种分布式计算也就仅仅只是一个玩具而已,只有在真正解决问题的过程中,它深层次的问题才会被挖掘出来。
这三篇文章(分布式计算开源框架Hadoop介绍,Hadoop中的集群配置和使用技巧)仅仅是为了给对分布式计算有兴趣的朋友抛个砖,要想真的掘到金子,那么就踏踏实实的去用、去想、去分析。或者自己也会更进一步地去研究框架中的实现机制,在解决自己问题的同时,也能够贡献一些什么。
前几日看到有人跪求成为架构师的方式,看了有些可悲,有些可笑,其实有多少架构师知道什么叫做架构?架构师的职责是什么?与其追求这么一个名号,还不如踏踏实实地做块石头沉到水底。要知道,积累和沉淀的过程就是一种成长。
相关阅读:
- 分布式计算开源框架Hadoop介绍――分布式计算开源框架Hadoop入门实践(一)。
- Hadoop中的集群配置和使用技巧――分布式计算开源框架Hadoop入门实践(二)。
作者介绍:岑文初,就职于阿里软件公司研发中心平台一部,任架构师。当前主要工作涉及阿里软件开发平台服务框架(ASF)设计与实现,服务集成平台(SIP)设计与实现。没有什么擅长或者精通,工作到现在唯一提升的就是学习能力和速度。个人Blog为:http://blog.csdn.net/cenwenchu79。
志愿参与InfoQ中文站内容建设,请邮件至editors@cn.infoq.com。也欢迎大家到InfoQ中文站用户讨论组参与我们的线上讨论。
摘要: HBASE松散数据存储设计初识 - 西湖边的穷秀才-文初 - BlogJava
window.onerror = ignoreError;
function ignoreError()
{
return true;
}
Date.prototype.Format = function(f... 阅读全文
一、介绍
Google的工程师为了方便自己对MapReduce的实现搞了一个叫做Sawzall的工具,Google就放了几篇论文放在网上,但这玩意在代码上不开源在设计思想是开源的,在前面一篇文章中我也提到过Hadoop也推出了类似Sawzall的Pig语言,就是根据Google放出来的论文山寨的。
Pig是对处理超大型数据集的抽象层,在MapReduce中的框架中有map和reduce两个函数,如果你亲手弄一个MapReduce实现从编写代码,编译,部署,放在Hadoop上执行这个MapReduce程序还是耗费你一定的时间的,有了Pig这个东东以后不仅仅可以简化你对MapReduce的开发,而且还可以对不同的数据之间进行转换,例如:包含在连接内的一些转化在MapReduce中不太容易去实现。
Apache Pig的运行可以纯本地的,解压,敲个“bin/pig -x local”命令直接运行,非常简单,这就是传说中的local模式,但是人们往往不是这样使用,都是将Pig与hdfs/hadoop集群环境进行对接,我看说白了Apache的Pig最大的作用就是对mapreduce算法(框架)实现了一套shell脚本 ,类似我们通常熟悉的SQL语句,在Pig中称之为Pig Latin,在这套脚本中我们可以对加载出来的数据进行排序、过滤、求和、分组(group by)、关联(Joining),Pig也可以由用户自定义一些函数对数据集进行操作,也就是传说中的UDF(user-defined functions)。
经过Pig Latin的转换后变成了一道MapReduce的作业,通过MapReduce多个线程,进程或者独立系统并行执行处理的结果集进行分类和归纳。Map() 和 Reduce() 两个函数会并行运行,即使不是在同一的系统的同一时刻也在同时运行一套任务,当所有的处理都完成之后,结果将被排序,格式化,并且保存到一个文件。Pig利用MapReduce将计算分成两个阶段,第一个阶段分解成为小块并且分布到每一个存储数据的节点上进行执行,对计算的压力进行分散,第二个阶段聚合第一个阶段执行的这些结果,这样可以达到非常高的吞吐量,通过不多的代码和工作量就能够驱动上千台机器并行计算,充分的利用计算机的资源,打消运行中的瓶颈。
所以用Pig可以对TB级别海量的数据进行查询非常轻松,并且这些海量的数据都是非结构化的数据,例如:一堆文件可能是log4j输出日志存又放于跨越多个计算机的多个磁盘上,用来记录上千台在线服务器的健康状态日志,交易日至,IP访问记录,应用服务日志等等。我们通常需要统计或者抽取这些记录,或者查询异常记录,对这些记录形成一些报表,将数据转化为有价值的信息,这样的话查询会较为复杂,此时类似MySQL这样的产品就并非能满足我们的对速度、执行效率上的需求,而用Apache的Pig就可以帮助我们去实现这样的目标。
反之,你如果在做实验的时候,把MySQL中的100行数据转换成文本文件放在在pig中进行查询,会让你非常失望,为何这短短的100行数据查询的效率极低,呵呵,因为中间有一个生成MapReduce作业的过程,这是无法避免的开销,所以小量的数据查询是不适合pig做的,就好比用关二哥的大刀切青菜一样。另外,还可以利用Pig的API在Java环境中调用,对Apache的Pig以上内容请允许我这样片面的理解,谢谢。
二、基本架构
从整体上来看大量的数据聚集在HDFS系统上,通过输入类似SQL的脚本简化对MapReduce的操作,让这几行代码/脚本去驱动上千台机器进行并行计算。
如图所示:

Pig的实现有5个主要的部分构成:
如图所示:

1.Pig自己实现的一套框架对输入、输出的人机交互部分的实现,就是Pig Latin 。
2.Zebra是Pig与HDFS/Hadoop的中间层、Zebra是MapReduce作业编写的客户端,Zerbra用结构化的语言实现了对hadoop物理存储元数据的管理也是对Hadoop的数据抽象层,在Zebra中有2个核心的类 TableStore(写)/TableLoad(读)对Hadoop上的数据进行操作。
3.Pig中的Streaming主要分为4个组件: 1. Pig Latin 2. 逻辑层(Logical Layer) 3. 物理层(Physical Layer) 4. Streaming具体实现(Implementation),Streaming会创建一个Map/Reduce作业,并把它发送给合适的集群,同时监视这个作业的在集群环境中的整个执行过程。
4.MapReduce在每台机器上进行分布式计算的框架(算法)。
5.HDFS最终存储数据的部分。
三、与Hive对比
请允许我很无聊的把飞机和火车拿来做比较,因为2者根本没有深入的可比性,虽然两者都是一种高速的交通工具,但是具体的作用范围是截然不同的,就像Hive和Pig都是Hadoop中的项目,并且Hive和pig有很多共同点,但Hive还似乎有点数据库的影子,而Pig基本就是一个对MapReduce实现的工具(脚本)。两者都拥有自己的表达语言,其目的是将MapReduce的实现进行简化,并且读写操作数据最终都是存储在HDFS分布式文件系统上。看起来Pig和Hive有些类似的地方,但也有些不同,来做一个简单的比较,先来看一张图:

查看大图请点击这里
再让我说几句废话:
Language
在Hive中可以执行 插入/删除 等操作,但是Pig中我没有发现有可以 插入 数据的方法,请允许我暂且认为这是最大的不同点吧。
Schemas
Hive中至少还有一个“表”的概念,但是Pig中我认为是基本没有表的概念,所谓的表建立在Pig Latin脚本中,对与Pig更不要提metadata了。
Partitions
Pig中没有表的概念,所以说到分区对于Pig来说基本免谈,如果跟Hive说“分区”(Partition)他还是能明白的。
Server
Hive可以依托于Thrift启动一个服务器,提供远程调用。 找了半天压根没有发现Pig有这样的功能,如果你有新发现可以告诉我,就好像有人开发了一个Hive的REST
Shell
在Pig 你可以执行一些个 ls 、cat 这样很经典、很cool的命令,但是在使用Hive的时候我压根就没有想过有这样的需求。
Web Interface
Hive有,Pig无
JDBC/ODBC
Pig无,Hive有
四、使用
1启动/运行
分为2台服务器,一台作为pig的服务器,一台作为hdfs的服务器。
首先需要在pig的服务器上进行配置,将pig的配置文件指向hdfs服务器,修改pig/conf目录下的
vim /work/pig/conf/pig.properties
添加以下内容:
fs.default.name=hdfs://192.168.1.201:9000/ #指向HDFS服务器
mapred.job.tracker=192.168.1.201:9001 #指向MR job服务器地址
如果是第一次运行请在Hadoop的HDFS的服务器上创建root目录,并且将etc目录下的passwd文件放在HDFS的root目录下,请执行以下两条命令。
hadoop fs -mkdir /user/root
hadoop fs -put /etc/passwd /user/root/passwd
创建运行脚本,用vim命令在pig的服务器上创建javabloger_testscript.pig 文件,内容如下:
LoadFile = load 'passwd' using PigStorage(':');
Result = foreach LoadFile generate $0 as id;
dump Result;
运行pig脚本,例如:pig javabloger_testscript.pig,执行状态如图所示:

执行结果:

2.java 代码 运行并且打印运行结果
import java.io.IOException;
import java.util.Iterator;
import org.apache.pig.PigServer;
import org.apache.pig.data.Tuple;
public class LocalPig {
public static void main(String[] args) {
try {
PigServer pigServer = new PigServer("local");
runIdQuery(pigServer, "passwd");
} catch (Exception e) {
}
}
public static void runIdQuery(PigServer pigServer, String inputFile) throws IOException {
pigServer.registerQuery("LoadFile = load '" + inputFile+ "' using PigStorage(':');");
pigServer.registerQuery("Result = foreach A generate $0 as id;");
Iterator<Tuple> result = pigServer.openIterator("Result ");
while (result.hasNext()) {
Tuple t = result.next();
System.out.println(t);
}
// pigServer.store("B", "output");
}
}
–end–
本文已经同步到新浪微博, 点击这里访问“J2EE企业应用 顾问/咨询- H.E.'s Blog”的官方微博。
http://code.google.com/p/nutla/
1、概述
不管程序性能有多高,机器处理能力有多强,都会有其极限。能够快速方便的横向与纵向扩展是Nut设计最重要的原则。
Nut是一个Lucene+Hadoop分布式搜索框架,能对千G以上索引提供7*24小时搜索服务。在服务器资源足够的情况下能达到每秒处理100万次的搜索请求。
Nut开发环境:jdk1.6.0.21+lucene3.0.2+eclipse3.6.1+hadoop0.20.2+zookeeper3.3.1+hbase0.20.6+memcached+linux
2、特新
a、热插拔
b、可扩展
c、高负载
d、易使用,与现有项目无缝集成
e、支持排序
f、7*24服务
g、失败转移
3、搜索流程
Nut由Index、Search、Client、Cache和DB五部分构成。(Cache默认使用memcached,DB默认使用hbase)
Client处理用户请求和对搜索结果排序。Search对请求进行搜索,Search上只放索引,数据存储在DB中,Nut将索引和存储分离。Cache缓存的是搜索条件和结果文档id。DB存储着数据,Client根据搜索排序结果,取出当前页中的文档id从DB上读取数据。
用户发起搜索请求给由Nut Client构成的集群,由某个Nut Client根据搜索条件查询Cache服务器是否有该缓存,如果有缓存根据缓存的文档id直接从DB读取数据,如果没有缓存将随机选择一组搜索服务器组(Search Group i),将查询条件同时发给该组搜索服务器组里的n台搜索服务器,搜索服务器将搜索结果返回给Nut Client由其排序,取出当前页文档id,将搜索条件和当前文档id缓存,同时从DB读取数据。

4、索引流程
Hadoop Mapper/Reducer 建立索引。再将索引从HDFS分发到各个索引服务器。
对索引的更新分为两种:删除和添加(更新分解为删除和添加)。
a、删除
在HDFS上删除索引,将生成的*.del文件分发到所有的索引服务器上去或者对HDFS索引目录删除索引再分发到对应的索引服务器上去。
b、添加
新添加的数据用另一台服务器来生成。
删除和添加步骤可按不同定时策略来实现。
5、Zookeeper服务器状态管理策略
在架构设计上通过使用多组搜索服务器可以支持每秒处理100万个搜索请求。
每组搜索服务器能处理的搜索请求数在1万—1万5千之间。如果使用100组搜索服务器,理论上每秒可处理100万个搜索请求。
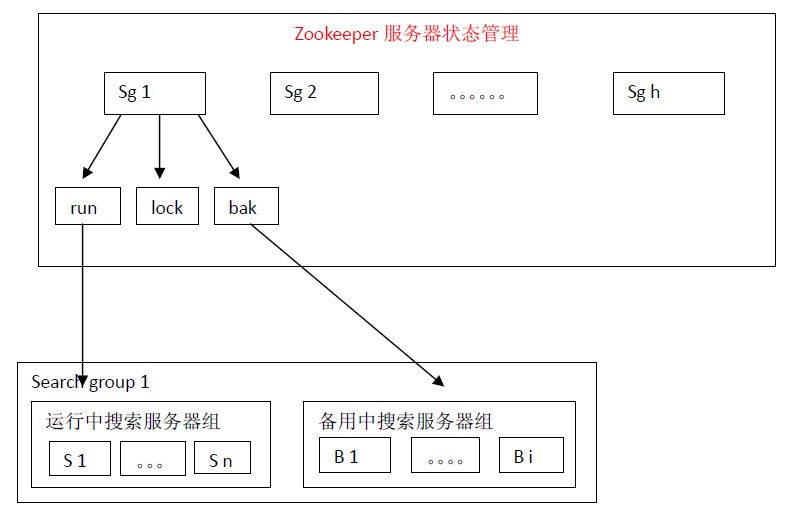
假如每组搜索服务器有100份索引放在100台正在运行中搜索服务器(run)上,那么将索引按照如下的方式放在备用中搜索服务器(bak)上:index 1,index 2,index 3,index 4,index 5,index 6,index 7,index 8,index 9,index 10放在B 1 上,index 6,index 7,index 8,index 9,index 10,index 11,index 12,index 13,index 14,index 15放在B 2上。。。。。。index 96,index 97,index 98,index 99,index 100,index 5,index 4,index 3,index 2,index 1放在最后一台备用搜索服务器上。那么每份索引会存在3台机器中(1份正在运行中,2份备份中)。
尽管这样设计每份索引会存在3台机器中,仍然不是绝对安全的。假如运行中的index 1,index 2,index 3同时宕机的话,那么就会有一份索引搜索服务无法正确启用。这样设计,作者认为是在安全性和机器资源两者之间一个比较适合的方案。
备用中的搜索服务器会定时检查运行中搜索服务器的状态。一旦发现与自己索引对应的服务器宕机就会向lock申请分布式锁,得到分布式锁的服务器就将自己加入到运行中搜索服务器组,同时从备用搜索服务器组中删除自己,并停止运行中搜索服务器检查服务。
为能够更快速的得到搜索结果,设计上将搜索服务器分优先等级。通常是将最新的数据放在一台或几台内存搜索服务器上。通常情况下前几页数据能在这几台搜索服务器里搜索到。如果在这几台搜索服务器上没有数据时再向其他旧数据搜索服务器上搜索。
优先搜索等级的逻辑是这样的:9最大为搜索全部服务器并且9不能作为level标识。当搜索等级level为1,搜索优先级为1的服务器,当level为2时搜索优先级为1和2的服务器,依此类推。
HBase – Hadoop Database,是一个高可靠性、高性能、面向列、可伸缩的分布式存储系统,利用HBase技术可在廉价PC Server上搭建起大规模结构化存储集群。
HBase是Google Bigtable的开源实现,类似Google Bigtable利用GFS作为其文件存储系统,HBase利用Hadoop HDFS作为其文件存储系统;Google运行MapReduce来处理Bigtable中的海量数据,HBase同样利用Hadoop MapReduce来处理HBase中的海量数据;Google Bigtable利用 Chubby作为协同服务,HBase利用Zookeeper作为对应。

上图描述了Hadoop EcoSystem中的各层系统,其中HBase位于结构化存储层,Hadoop HDFS为HBase提供了高可靠性的底层存储支持,Hadoop MapReduce为HBase提供了高性能的计算能力,Zookeeper为HBase提供了稳定服务和failover机制。
此外,Pig和Hive还为HBase提供了高层语言支持,使得在HBase上进行数据统计处理变的非常简单。 Sqoop则为HBase提供了方便的RDBMS数据导入功能,使得传统数据库数据向HBase中迁移变的非常方便。
HBase访问接口
1. Native Java API,最常规和高效的访问方式,适合Hadoop MapReduce Job并行批处理HBase表数据
2. HBase Shell,HBase的命令行工具,最简单的接口,适合HBase管理使用
3. Thrift Gateway,利用Thrift序列化技术,支持C++,PHP,Python等多种语言,适合其他异构系统在线访问HBase表数据
4. REST Gateway,支持REST 风格的Http API访问HBase, 解除了语言限制
5. Pig,可以使用Pig Latin流式编程语言来操作HBase中的数据,和Hive类似,本质最终也是编译成MapReduce Job来处理HBase表数据,适合做数据统计
6. Hive,当前Hive的Release版本尚没有加入对HBase的支持,但在下一个版本Hive 0.7.0中将会支持HBase,可以使用类似SQL语言来访问HBase
HBase数据模型
Table & Column Family
| Row Key |
Timestamp |
Column Family |
| URI |
Parser |
| r1 |
t3 |
url=http://www.taobao.com |
title=天天特价 |
| t2 |
host=taobao.com |
|
| t1 |
|
|
| r2 |
t5 |
url=http://www.alibaba.com |
content=每天… |
| t4 |
host=alibaba.com |
|
Ø Row Key: 行键,Table的主键,Table中的记录按照Row Key排序
Ø Timestamp: 时间戳,每次数据操作对应的时间戳,可以看作是数据的version number
Ø Column Family:列簇,Table在水平方向有一个或者多个Column Family组成,一个Column Family中可以由任意多个Column组成,即Column Family支持动态扩展,无需预先定义Column的数量以及类型,所有Column均以二进制格式存储,用户需要自行进行类型转换。
Table & Region
当Table随着记录数不断增加而变大后,会逐渐分裂成多份splits,成为regions,一个region由[startkey,endkey)表示,不同的region会被Master分配给相应的RegionServer进行管理:

-ROOT- && .META. Table
HBase中有两张特殊的Table,-ROOT-和.META.
Ø .META.:记录了用户表的Region信息,.META.可以有多个regoin
Ø -ROOT-:记录了.META.表的Region信息,-ROOT-只有一个region
Ø Zookeeper中记录了-ROOT-表的location

Client访问用户数据之前需要首先访问zookeeper,然后访问-ROOT-表,接着访问.META.表,最后才能找到用户数据的位置去访问,中间需要多次网络操作,不过client端会做cache缓存。
MapReduce on HBase
在HBase系统上运行批处理运算,最方便和实用的模型依然是MapReduce,如下图:

HBase Table和Region的关系,比较类似HDFS File和Block的关系,HBase提供了配套的TableInputFormat和TableOutputFormat API,可以方便的将HBase Table作为Hadoop MapReduce的Source和Sink,对于MapReduce Job应用开发人员来说,基本不需要关注HBase系统自身的细节。
HBase系统架构

Client
HBase Client使用HBase的RPC机制与HMaster和HRegionServer进行通信,对于管理类操作,Client与HMaster进行RPC;对于数据读写类操作,Client与HRegionServer进行RPC
Zookeeper
Zookeeper Quorum中除了存储了-ROOT-表的地址和HMaster的地址,HRegionServer也会把自己以Ephemeral方式注册到Zookeeper中,使得HMaster可以随时感知到各个HRegionServer的健康状态。此外,Zookeeper也避免了HMaster的单点问题,见下文描述
HMaster
HMaster没有单点问题,HBase中可以启动多个HMaster,通过Zookeeper的Master Election机制保证总有一个Master运行,HMaster在功能上主要负责Table和Region的管理工作:
1. 管理用户对Table的增、删、改、查操作
2. 管理HRegionServer的负载均衡,调整Region分布
3. 在Region Split后,负责新Region的分配
4. 在HRegionServer停机后,负责失效HRegionServer 上的Regions迁移
HRegionServer
HRegionServer主要负责响应用户I/O请求,向HDFS文件系统中读写数据,是HBase中最核心的模块。

HRegionServer内部管理了一系列HRegion对象,每个HRegion对应了Table中的一个Region,HRegion中由多个HStore组成。每个HStore对应了Table中的一个Column Family的存储,可以看出每个Column Family其实就是一个集中的存储单元,因此最好将具备共同IO特性的column放在一个Column Family中,这样最高效。
HStore存储是HBase存储的核心了,其中由两部分组成,一部分是MemStore,一部分是StoreFiles。MemStore是Sorted Memory Buffer,用户写入的数据首先会放入MemStore,当MemStore满了以后会Flush成一个StoreFile(底层实现是HFile),当StoreFile文件数量增长到一定阈值,会触发Compact合并操作,将多个StoreFiles合并成一个StoreFile,合并过程中会进行版本合并和数据删除,因此可以看出HBase其实只有增加数据,所有的更新和删除操作都是在后续的compact过程中进行的,这使得用户的写操作只要进入内存中就可以立即返回,保证了HBase I/O的高性能。当StoreFiles Compact后,会逐步形成越来越大的StoreFile,当单个StoreFile大小超过一定阈值后,会触发Split操作,同时把当前Region Split成2个Region,父Region会下线,新Split出的2个孩子Region会被HMaster分配到相应的HRegionServer上,使得原先1个Region的压力得以分流到2个Region上。下图描述了Compaction和Split的过程:

在理解了上述HStore的基本原理后,还必须了解一下HLog的功能,因为上述的HStore在系统正常工作的前提下是没有问题的,但是在分布式系统环境中,无法避免系统出错或者宕机,因此一旦HRegionServer意外退出,MemStore中的内存数据将会丢失,这就需要引入HLog了。每个HRegionServer中都有一个HLog对象,HLog是一个实现Write Ahead Log的类,在每次用户操作写入MemStore的同时,也会写一份数据到HLog文件中(HLog文件格式见后续),HLog文件定期会滚动出新的,并删除旧的文件(已持久化到StoreFile中的数据)。当HRegionServer意外终止后,HMaster会通过Zookeeper感知到,HMaster首先会处理遗留的 HLog文件,将其中不同Region的Log数据进行拆分,分别放到相应region的目录下,然后再将失效的region重新分配,领取 到这些region的HRegionServer在Load Region的过程中,会发现有历史HLog需要处理,因此会Replay HLog中的数据到MemStore中,然后flush到StoreFiles,完成数据恢复。
HBase存储格式
HBase中的所有数据文件都存储在Hadoop HDFS文件系统上,主要包括上述提出的两种文件类型:
1. HFile, HBase中KeyValue数据的存储格式,HFile是Hadoop的二进制格式文件,实际上StoreFile就是对HFile做了轻量级包装,即StoreFile底层就是HFile
2. HLog File,HBase中WAL(Write Ahead Log) 的存储格式,物理上是Hadoop的Sequence File
HFile
下图是HFile的存储格式:

首先HFile文件是不定长的,长度固定的只有其中的两块:Trailer和FileInfo。正如图中所示的,Trailer中有指针指向其他数据块的起始点。File Info中记录了文件的一些Meta信息,例如:AVG_KEY_LEN, AVG_VALUE_LEN, LAST_KEY, COMPARATOR, MAX_SEQ_ID_KEY等。Data Index和Meta Index块记录了每个Data块和Meta块的起始点。
Data Block是HBase I/O的基本单元,为了提高效率,HRegionServer中有基于LRU的Block Cache机制。每个Data块的大小可以在创建一个Table的时候通过参数指定,大号的Block有利于顺序Scan,小号Block利于随机查询。每个Data块除了开头的Magic以外就是一个个KeyValue对拼接而成, Magic内容就是一些随机数字,目的是防止数据损坏。后面会详细介绍每个KeyValue对的内部构造。
HFile里面的每个KeyValue对就是一个简单的byte数组。但是这个byte数组里面包含了很多项,并且有固定的结构。我们来看看里面的具体结构:

开始是两个固定长度的数值,分别表示Key的长度和Value的长度。紧接着是Key,开始是固定长度的数值,表示RowKey的长度,紧接着是RowKey,然后是固定长度的数值,表示Family的长度,然后是Family,接着是Qualifier,然后是两个固定长度的数值,表示Time Stamp和Key Type(Put/Delete)。Value部分没有这么复杂的结构,就是纯粹的二进制数据了。
HLogFile

上图中示意了HLog文件的结构,其实HLog文件就是一个普通的Hadoop Sequence File,Sequence File 的Key是HLogKey对象,HLogKey中记录了写入数据的归属信息,除了table和region名字外,同时还包括 sequence number和timestamp,timestamp是“写入时间”,sequence number的起始值为0,或者是最近一次存入文件系统中sequence number。
HLog Sequece File的Value是HBase的KeyValue对象,即对应HFile中的KeyValue,可参见上文描述。
结束
本文对HBase技术在功能和设计上进行了大致的介绍,由于篇幅有限,本文没有过多深入地描述HBase的一些细节技术。目前一淘的存储系统就是基于HBase技术搭建的,后续将介绍“一淘分布式存储系统”,通过实际案例来更多的介绍HBase应用。
摘要: 环境准备
需要环境:
PC-1 Suse Linux 9 10.192.1.1
PC-2 Suse Linux 9 &n... 阅读全文
摘要: Hive HBase Integration
Contents
Hive HBase Integration
Introduction
Storage Handlers
Usage
Column Mapping
Multiple Colu... 阅读全文
一、安装准备
1、下载HBASE 0.20.5版本:http://www.apache.org/dist/hbase/hbase-0.20.5/
2、JDK版本:jdk-6u20-linux-i586.bin
3、操作系统:Linux s132 2.6.9-78.8AXS2smp #1 SMP Tue Dec 16 02:42:55 EST 2008 x86_64 x86_64 x86_64 GNU/Linux
4、默认前提是安装完hadoop 0.20.2版本:
192.168.3.131 namenode
192.168.3.132 datanode
192.168.3.133 datanode
二、操作步骤(默认在namenode上进行)
1、拷贝以上文件到Linux的“/root”目录下。同时新建目录“/jz”。
2、安装JDK,此步省略...
3、解压hbase到/jz目录下。tar -zxvf hbase-0.20.5.tar.gz -C /jz
4、修改/jz/hbase-0.20.5/conf/hbase-env.sh文件。指定本地的JDK安装路径:
export JAVA_HOME=/usr/java/jdk1.6.0_20
5、修改/jz/hbase-0.20.5/conf/hbase-site.xml。内容如下:
<configuration>
<property>
<name>hbase.rootdir</name>
<value>hdfs://m131:9000/hbase</value>
</property>
<property>
<name>hbase.cluster.distributed</name>
<value>true</value>
</property>
<property>
<name>hbase.master.port</name>
<value>60000</value>
</property>
<property>
<name>hbase.zookeeper.quorum</name>
<value>m131,s132,s133</value>
</property>
</configuration>
6、修改/jz/hbase-0.20.5/conf/regionservers文件(同hadoop的slaves文件内容相同),内容如下:
7、 将 “/jz/hbase-0.20.5” 目录分别拷贝到192.168.3.132和192.168.3.133下。
8、修改/etc/profile文件,在文件末尾加上环境变量:
export HBASE_HOME=/jz/hbase-0.20.5
export PATH=$PATH:$HBASE_HOME/bin
将文件拷贝到192.168.3.132和192.168.3.133对应的目录下,分别在各个控制台输入:source /etc/profile,使之生效。
9、修改/etc/hosts文件,如下:
# Do not remove the following line, or various programs
# that require network functionality will fail.
127.0.0.1 localhost
192.168.3.131 m131
192.168.3.132 s132
192.168.3.133 s133
然后将文件拷贝到192.168.3.132和192.168.3.133对应的目录下
三、启动HBase
1、通过shell脚本启动hbase。
sh /jz/hbase-0.20.5/bin/start-hbase.sh
2、进入/jz/hbase-0.20.5/bin目录,执行hbsae shell命令,进入hbase控制台,显示如下。
[root@m131 conf]# hbase shell
HBase Shell; enter 'help<RETURN>' for list of supported commands.
Version: 0.20.5, r956266, Sat Jun 19 12:25:12 PDT 2010
hbase(main):001:0>
3、在hbase控制台输入list命令,如果正常执行,表示hbase启动成功。如下:2
hbase(main):001:0> list
0 row(s) in 0.0610 seconds
hbase(main):002:0>
4、WEB查看hbase
四、一些异常的和注意事项
1、安装hbase 0.20.5版本自带了zookeeper-3.2.2,所以不需要单独安装zookeeper。
2、hbase默认通过zookeeper管理,配置项在/jz/hbase-0.20.5/conf/hbase-env.sh文件中:
# Tell HBase whether it should manage it's own instance of Zookeeper or not.
# export HBASE_MANAGES_ZK=true
如果需要采用自带安装的zookeeper,可以将注释取消,把true修改为false。否则启动hbase的时候将会提示地址被占用。不过不影响hbase正常使用。
3、通过shell控制台想hbase插入中文数据将会报错,这是由于hbase中只是存放字节,采用程序将汉字改为字节录入即可。
4、在hbase脚本中执行shell命令,如果出现以下错误,表示hbase中有节点不能正常运行。
NativeException: org.apache.hadoop.hbase.client.RetriesExhaustedException: Trying to contact region server 192.168.3.139:60020 for region .META.,,1, row '', but failed after 7 attempts.
5、有疑问或是写的不对的地方欢迎大家发邮件交流:dajuezhao@gmail.com
转:http://www.tech126.com/hadoop-hbase/
基于现有的Hadoop集群,来搭建Hbase的环境
整个过程还是比较简单的
1. 下载Hbase源码,并解压
cp hbase-0.20.6.tar.gz /opt/hadoop/
cd /opt/hadoop/
tar zxvf hbase-0.20.6.tar.gz
ln -s hbase-0.20.6 hbase
2.修改hbase-env.sh,加入java环境,并修改log位置
export JAVA_HOME=/opt/java/jdk
export HBASE_LOG_DIR=/opt/log/hbase
export HBASE_MANAGES_ZK=true
3. 修改hbase-site.xml,配置hbase
<property>
<name>hbase.rootdir</name>
<value>hdfs://zw-hadoop-master:9000/hbase</value>
<description>The directory shared by region servers.</description>
</property>
<property>
<name>hbase.cluster.distributed</name>
<value>true</value>
<description>The mode the cluster will be in. Possible values are
false: standalone and pseudo-distributed setups with managed Zookeeper
true: fully-distributed with unmanaged Zookeeper Quorum (see hbase-env.sh)
</description>
</property>
<property>
<name>hbase.master</name>
<value>hdfs://zw-hadoop-master:60000</value>
</property>
<property>
<name>hbase.zookeeper.quorum</name>
<value>zw-hadoop-slave225,zw-hadoop-slave226,zw-hadoop-slave227</value>
<description>Comma separated list of servers in the ZooKeeper Quorum. For example, "host1.mydomain.com,host2.mydomain.com,host3.mydomain.com". By default this is set to localhost for local and pseudo-distributed modes of operation. For a fully-distributed setup, this should be set to a full list of ZooKeeper quorum servers. If HBASE_MANAGES_ZK is set in hbase-env.sh this is the list of servers which we will start/stop ZooKeeper on.
</description>
</property>
<property>
<name>hbase.zookeeper.property.dataDir</name>
<value>/opt/log/zookeeper</value>
<description>Property from ZooKeeper's config zoo.cfg.
The directory where the snapshot is stored.
</description>
</property>
几个配置的说明:
- hbase.rootdir设置hbase在hdfs上的目录,主机名为hdfs的namenode节点所在的主机
- hbase.cluster.distributed设置为true,表明是完全分布式的hbase集群
- hbase.master设置hbase的master主机名和端口
- hbase.zookeeper.quorum设置zookeeper的主机,官方推荐设置为3,5,7比较好
4. 编辑regionservers文件,设置regionservers的服务器,和hadoop的slaves一样即可
5. 启动Hbase
/opt/sohuhadoop/hbase/bin/start-hbase.sh
/opt/sohuhadoop/hbase/bin/stop-hbase.sh
Hbase默认只有一个Master,我们可以也启动多个Master:
/opt/sohuhadoop/hbase/bin/hbase-daemon.sh start master
不过,其它的Master并不会工作,只有当主Master down掉后
其它的Master才会选择接管Master的工作
Hbase也有一个简单的web界面,来查看其状态
http://10.10.71.1:60010/master.jsp
http://10.10.71.1:60030/regionserver.jsp
http://10.10.71.1:60010/zk.jsp
参考:http://developer.yahoo.com/hadoop/tutorial/module2.html
Rebalancing Blocks
如何添加新节点到集群:
New nodes can be added to a cluster in a straightforward manner. On the new node, the same Hadoop version and configuration ( conf/hadoop-site.xml ) as on the rest of the cluster should be installed. Starting the DataNode daemon on the machine will cause it to contact the NameNode and join the cluster. (The new node should be added to the slaves file on the master server as well, to inform the master how to invoke script-based commands on the new node.)
如何在新的节点上平衡数据:
But the new DataNode will have no data on board initially; it is therefore not alleviating space concerns on the existing nodes. New files will be stored on the new DataNode in addition to the existing ones, but for optimum usage, storage should be evenly balanced across all nodes.
This can be achieved with the automatic balancer tool included with Hadoop. The Balancer class will intelligently balance blocks across the nodes to achieve an even distribution of blocks within a given threshold, expressed as a percentage. (The default is 10%.) Smaller percentages make nodes more evenly balanced, but may require more time to achieve this state. Perfect balancing (0%) is unlikely to actually be achieved.
The balancer script can be run by starting bin/start-balancer.sh in the Hadoop directory. The script can be provided a balancing threshold percentage with the -threshold parameter;
e.g., bin/start-balancer.sh -threshold 5 .
The balancer will automatically terminate when it achieves its goal, or when an error occurs, or it cannot find more candidate blocks to move to achieve better balance. The balancer can always be terminated safely by the administrator by running bin/stop-balancer.sh .
The balancing script can be run either when nobody else is using the cluster (e.g., overnight), but can also be run in an "online" fashion while many other jobs are on-going. To prevent the rebalancing process from consuming large amounts of bandwidth and significantly degrading the performance of other processes on the cluster, the dfs.balance.bandwidthPerSec configuration parameter can be used to limit the number of bytes/sec each node may devote to rebalancing its data store.
Copying Large Sets of Files
When migrating a large number of files from one location to another (either from one HDFS cluster to another, from S3 into HDFS or vice versa, etc), the task should be divided between multiple nodes to allow them all to share in the bandwidth required for the process. Hadoop includes a tool called distcp for this purpose.
By invoking bin/hadoop distcp src dest , Hadoop will start a MapReduce task to distribute the burden of copying a large number of files from src to dest . These two parameters may specify a full URL for the the path to copy. e.g., "hdfs://SomeNameNode:9000/foo/bar/" and "hdfs://OtherNameNode:2000/baz/quux/"will copy the children of /foo/bar on one cluster to the directory tree rooted at /baz/quux on the other. The paths are assumed to be directories, and are copied recursively. S3 URLs can be specified withs3://bucket-name /key .
Decommissioning Nodes
如何从集群中删除节点:
In addition to allowing nodes to be added to the cluster on the fly, nodes can also be removed from a cluster while it is running , without data loss. But if nodes are simply shut down "hard," data loss may occuras they may hold the sole copy of one or more file blocks.
Nodes must be retired on a schedule that allows HDFS to ensure that no blocks are entirely replicated within the to-be-retired set of DataNodes.
HDFS provides a decommissioning feature which ensures that this process is performed safely. To use it, follow the steps below:
Step 1: Cluster configuration . If it is assumed that nodes may be retired in your cluster, then before it is started, an excludes file must be configured. Add a key named dfs.hosts.exclude to your conf/hadoop-site.xml file. The value associated with this key provides the full path to a file on the NameNode's local file system which contains a list of machines which are not permitted to connect to HDFS.
Step 2: Determine hosts to decommission . Each machine to be decommissioned should be added to the file identified by dfs.hosts.exclude , one per line. This will prevent them from connecting to the NameNode.
Step 3: Force configuration reload . Run the command bin/hadoop dfsadmin -refreshNodes . This will force the NameNode to reread its configuration, including the newly-updated excludes file. It will decommission the nodes over a period of time, allowing time for each node's blocks to be replicated onto machines which are scheduled to remain active.
Step 4: Shutdown nodes . After the decommission process has completed, the decommissioned hardware can be safely shutdown for maintenance, etc. The bin/hadoop dfsadmin -report command will describe which nodes are connected to the cluster.
Step 5: Edit excludes file again . Once the machines have been decommissioned, they can be removed from the excludes file. Running bin/hadoop dfsadmin -refreshNodes again will read the excludes file back into the NameNode, allowing the DataNodes to rejoin the cluster after maintenance has been completed, or additional capacity is needed in the cluster again, etc.
Verifying File System Health
After decommissioning nodes, restarting a cluster, or periodically during its lifetime, you may want to ensure that the file system is healthy--that files are not corrupted or under-replicated, and that blocks are not missing.
Hadoop provides an fsck command to do exactly this. It can be launched at the command line like so:
  bin/hadoop fsck [path

] [options

]
If run with no arguments, it will print usage information and exit. If run with the argument / , it will check the health of the entire file system and print a report. If provided with a path to a particular directory or file, it will only check files under that path. If an option argument is given but no path, it will start from the file system root (/ ). The options may include two different types of options:
Action options specify what action should be taken when corrupted files are found. This can be -move , which moves corrupt files to /lost+found , or -delete , which deletes corrupted files.
Information options specify how verbose the tool should be in its report. The -files option will list all files it checks as it encounters them. This information can be further expanded by adding the -blocks option, which prints the list of blocks for each file. Adding -locations to these two options will then print the addresses of the DataNodes holding these blocks. Still more information can be retrieved by adding -racksto the end of this list, which then prints the rack topology information for each location. (See the next subsection for more information on configuring network rack awareness.) Note that the later options do not imply the former; you must use them in conjunction with one another. Also, note that the Hadoop program uses -files in a "common argument parser" shared by the different commands such as dfsadmin , fsck ,dfs , etc. This means that if you omit a path argument to fsck, it will not receive the -files option that you intend. You can separate common options from fsck-specific options by using -- as an argument, like so:
bin/hadoop fsck -- -files -blocks
The -- is not required if you provide a path to start the check from, or if you specify another argument first such as -move .
By default, fsck will not operate on files still open for write by another client. A list of such files can be produced with the -openforwrite option.
摘要: 一、分布式计算开源框架Hadoop实践
在SIP项目设计的过程中,对于它庞大的日志在开始时就考虑使用任务分解的多线程处理模式来分析统计,在我从前写的文章《Tiger Concurrent Practice --日志分析并行分解设计与实现》中有所提到。但是由于统计的内容暂时还是十分简单,所以就采用Memcache作为计数器,结合MySQL就完成了访问控制以及统计的工作。然而未来,对于海量日志分析的... 阅读全文
引子
作为企业架构师,我的职业习惯之一,就是不断的探求各种新的有前景的概念和思想,看其是否有潜力为我所服务的来自各行各业的企业客户带来价值。同样出于对这种理念的追求,我对NoSQL领域的关注了也有一段时间了,甚至从这个术语产生(或者错误的产生?)之前就开始了。Google首先在这方面点了一把火,发布了论文Big Table架构,对关系数据库是银弹这种普遍的信念提出了质疑,而Amazon关于Dynamo的论文则紧随其后。 过去的一年中我们见证了NoSQL强劲的势头,在这一领域有多达25种产品/解决方案发布,并且NoSQL的触角已经伸向了业界的各个角落。在此前提下,我最近考虑深入这一领域,评估一下我的客户究竟如何才能从这种NoSQL运动中获益。不仅如此,我还想探究对于企业来说,是否是到了该认真考虑采纳NoSQL的合适时机了。
什么是NoSQL——快速回顾
像许多关注这一领域的人一样,我不喜欢从本质上将SQL与NoSQL这一术语对立起来。同时我对该术语现有的解释"Not Only SQL"也不甚满意。对我来说,我们这里所讨论的并非是是否使用SQL。(相反的是,我们仍然可以选择类似SQL这样的查询接口(缺少对join等的支持)来与这些数据库交互,使用现有的资源和技术来管理开发伸缩性和可维护性。) 这一运动是要找到存储和检索数据的其他高效的途径,而不是盲目地在任何情况下都把关系数据库当作万金油。因此,我认为'Non Relational Database'(非关系型数据库)能够更好的表达这一思想。
无论采用哪个名字,“非关系型数据库”这一范围所传达出来的“囊括所有”类型的意味,使得这一概念比较模糊(并且它还是否定型的)。这又使得人们(特别是企业中的决策者)对于哪些是属于这个范围,哪些不是,更重要的是,对他们来说这到底意味着什么,感到非常迷惑。
为了解答这些疑问,我尝试通过以下几点特征的描述,来刻画“非关系型数据库”的内在本质。
所谓“非关系型数据库”指的是
- 使用松耦合类型、可扩展的数据模式来对数据进行逻辑建模(Map,列,文档,图表等),而不是使用固定的关系模式元组来构建数据模型。
- 以遵循于CAP定理(能保证在一致性,可用性和分区容忍性三者中中达到任意两个)的跨多节点数据分布模型而设计,支持水平伸缩。这意味着对于多数据中心和动态供应(在生产集群中透明地加入/删除节点)的必要支持,也即弹性(Elasticity)。
- 拥有在磁盘或内存中,或者在这两者中都有的,对数据持久化的能力,有时候还可以使用可热插拔的定制存储。
- 支持多种的'Non-SQL'接口(通常多于一种)来进行数据访问。

围绕着图中四个特征的(数据持久性、逻辑数据模型、数据分布模型和接口)“非关系型数据库”的各种变形,在最近的一些文章中有详尽的描述,并且在因特网上有着广泛的传播。所以我就不做过多繁复的描述,而是通过一些例子对关键的方向进行总结,供快速参考:
接口——REST (HBase,CouchDB,Riak等),MapReduce (HBase,CouchDB,MongoDB,Hypertable等),Get/Put (Voldemort,Scalaris等),Thrift (HBase,Hypertable,Cassandra等),语言特定的API(MongoDB)。
逻辑数据模型——面向键值对的(Voldemort,Dynomite 等),面向Column Family的(BigTable,HBase,Hypertable 等),面向文档的(Couch DB,MongoDB等),面向图的(Neo4j, Infogrid等)
数据分布模型——一致性和可用性(HBase,Hypertable, MongoDB等), 可用性和可分区性(Cassandra等)。一致性和可分区性的组合会导致一些非额定的节点产生可用性的损失。有趣的是目前还没有一个“非关系型数据库”支持这一组合。
数据持久性——基于内存的(如Redis,Scalaris, Terrastore),基于磁盘的(如MongoDB,Riak等),或内存及磁盘二者的结合(如HBase,Hypertable,Cassandra)。存储的类型有助于我们辨别该解决方案适用于哪种类型。然而,在大多数情况下人们发现基于组合方案的解决方案是最佳的选择。既能通过内存数据存储支持高性能,又能在写入足够多的数据后存储到磁盘来保证持续性。
如何将其与企业IT融合
如今的企业中,并非所有用例都直观地倾向于使用关系型数据库,或者都需要严格的ACID属性(特别是一致性和隔离性)。在80年代及90年代,绝大部分存储在企业数据库里的数据都是结构化的业务事务的“记录”,必须用受控的方式来生成或访问,而如今它已一去不复返了。无可争辩的是,仍有这一类型的数据在那里,并将继续也应该通过关系型数据库来建模,存储和访问。但对于过去15年以来,随着Web的发展,电子商务和社交计算的兴起所引起的企业里不受控的非结构化并且面向信息的数据大爆炸,该如何应对呢?企业确实不需要关系型数据库来管理这些数据,因为关系型数据库的特点决定了它不适用于这些数据的性质和使用方式。

上图总结了现今以web为中心的企业中信息管理的新兴模式。而“非关系型数据库” 是处理这些趋势的最佳选择(较之关系型数据库来说),提供了对非结构化数据的支持,拥有支持分区的水平伸缩性,支持高可用性等等。
以下是支持这一观点的一些实际应用场景:
日志挖掘——集群里的多个节点都会产生服务器日志、应用程序日志和用户活动日志等。对于解决生产环境中的问题,日志挖掘工具非常有用,它能访问跨服务器的日志记录,将它们关联起来并进行分析。使用“非关系型数据库”来定制这样的解决方案将会非常容易。
分析社交计算——许多企业如今都为用户(内部用户、客户和合作伙伴)提供通过消息论坛,博客等方式来进行社交计算的能力。挖掘这些非结构化的数据对于获得用户的喜好偏向以及进一步提升服务有着至关重要的作用。使用“非关系型数据库” 可以很好的解决这一需求。
外部数据feed聚合——许多情况下企业需要消费来自合作伙伴的数据。显然,就算经过了多轮的讨论和协商,企业对于来自合作伙伴的数据的格式仍然没有发言权。同时,许多情况下,基于合作伙伴业务的变更,这些数据格式也频繁的发生变化。通过“非关系型数据库”来开发或定制一个ETL解决方案能够非常成功的解决这一问题。
高容量的EAI系统——许多企业的EAI系统都有高容量传输流(不管是基于产品的还是定制开发的)。出于可靠性和审计的目的,这些通过EAI系统的消息流通常都需要持久化。对于这一场景,“非关系型数据库” 再次体现出它十分适用于底层的数据存储,只要能给定环境中源系统和目标系统的数据结构更改和所需的容量。
前端订单处理系统——随着电子商务的膨胀,通过不同渠道流经零售商、银行和保险供应商、娱乐服务供应商、物流供应商等等的订单、应用、服务请求的容量十分巨大。同时,由于不同渠道的所关联的行为模式的限制,每种情况下系统所使用的信息结构都有所差异,需要加上不同的规则类型。在此之上,绝大部分数据不需要即时的处理和后端对帐。所需要的是,当终端用户想要从任何地方推送这些数据时,这些请求都能够被捕获并且不会被打断。随后,通常会有一个对帐系统将其更新到真正的后端源系统并更新终端用户的订单状态。这又是一个可以应用“非关系型数据库”的场景,可用于初期存储终端用户的输入。这一场景是体现“非关系型数据库”的应用的极佳例子,它具有高容量,异构的输入数据类型和对帐的"最终一致性"等等特点。
企业内容管理服务——出于各种各样的目的,内容管理在企业内部得到了广泛的应用,横跨多个不同的功能部门比如销售、市场、零售和人力资源等。企业大多数时间所面临的挑战是用一个公共的内容管理服务平台,将不同部门的需求整合到一起,而它们的元数据是各不相同的。这又是“非关系型数据库”发挥作用的地方。
合并和收购——企业在合并与收购中面临巨大的挑战,因为他们需要将适应于相同功能的系统整合起来。“非关系型数据库” 可解决这一问题,不管是快速地组成一个临时的公共数据存储,或者是架构一个未来的数据存储来调和合并的公司之间现有公共应用程序的结构。
但我们如何才能准确的描述,相对于传统的关系型数据库,企业使用“非关系型数据库”带来的好处呢?下面是可通过非关系型数据库的核心特点(正如上一节所讨论的)而获得的一些主要的好处,即企业的任何IT决策都会参考的核心参数——成本削减,更好的周转时间和更优良的质量。

业务灵活性——更短的周转时间
“非关系型数据库”能够以两种基本的方式带来业务灵活性。
- 模式自由的逻辑数据模型有助于在为任何业务进行调整时带来更快的周转时间,把对现有应用和功能造成影响减到最少。在大多数情况下因任意的变更而给你带来的迁移工作几乎为零。
- 水平伸缩性能够在当越来越多的用户负载造成负载周期性变化,或者应用突然变更的使用模式时,提供坚固的保障。面向水平伸缩性的架构也是迈向基于SLA构建(例如云)的第一步,这样才能保证在不断变化的使用情形下业务的延续性。
更佳的终端用户体验——更优越的质量
在现今企业IT中,应用的质量主要由终端用户的满意度来决定。“非关系型数据库”通过解决如下终端用户的考虑因素,能够达到同样的效果,而这些因素也是最容易发生和最难以处理的。
- “非关系型数据库” 为提升应用的性能带来了极大的机会。分布式数据的核心概念是保证磁盘I/O(寻道速率)绝不能成为应用性能的瓶颈。尽管性能更多的是由传输速率来决定。在此之上,绝大部分解决方案支持各种不同的新一代的高速计算的范式,比如MapReduce,排序列,Bloom Filter,仅可追加的B树,Memtable等。
- 现今用户满意度的另一个重要的方面就是可靠性。终端用户希望在想要访问应用时就能访问到,并且至少是在当他们分配到时间的时候能随时执行他们的任务。所以不可用的应用需要不惜代价的避免。许多现代的“非关系型数据库”都能适应并支持这一类有着严格和最终一致性的可用性的需求。
更低的所有者总成本
在如今的竞争市场中,企业IT支出随时都要仔细审查,以合理的成本获取合理的质量才值得赞许。在这一领域中“非关系型数据库”在一定程度上胜于传统的数据库,特别是当存储和处理的数据容量很大时。
- 水平伸缩性的基本前提保证了它们可以运行于廉价机器之上。这不仅削减了硬件资本的成本,同时还削减了诸如电力,维护等运维成本。同时这还进一步的为利用诸如云、虚拟数据中心等下一代低成本的基础设施打下了基础。
- 从长期来看,更少的维护能带来更多的运维成本优势。对于关系型数据库,这绝对是一个需要存储大容量数据的场景。为大容量的数据调优数据库需要高超的技艺,也就意味着更高的成本。相较之下,“非关系型数据库”始终提供快速和响应的特点,就算是在数据大幅上升的情况下。索引和缓存也以同样的方式工作。开发者不必过多担心硬件、磁盘、重新索引及文件布局等,而是把更多的精力投入了应用程序的开发上。
企业采用中所面临的挑战
抛开所有这些长远的好处,在企业拥抱“非关系型数据库”之前,当然还需要经历各种各样的挑战。

不考虑因现有思想的转换和缺乏信心而产生的来自高层的阻力,目前我认为的最主要的战术性挑战是:
为“非关系型数据库”认定正确的应用/使用场景
尽管从理论上容易论证并非所有的企业数据都需要基于关系和ACID的系统,然而由于关系型数据库与企业数据间多年的绑定关系,要作出所有的数据可以通过非关系的解决方案而解耦的决定仍然有很多困难。许多时候IT经理(以及其它对于应用程序负有核心的底线责任的各级人员)不明白他们将会失去什么,这样的担忧对于从关系型数据库转变出来比较不利。企业IT最有价值的资产就是数据。因此,要作出决定使用一种不太明确或者未被广泛采用的解决方案来管理同样的数据,这种能力不仅需要转换思维方式,同时还需要来自高层的强大的支持(和推动)。
我们如何选择最适合我们的产品/解决方案
另一个重大的挑战是找出合适的产品/工具来提供“非关系型数据库”。正如前面所提到的那样,现今业界里面有多于25种不同的产品和解决方案,它们在四个方面有着不同的特点。正因为每个产品在这四个方面特点各异,所以要选择一个产品来应对所有的需求显得尤为困难。有的时候,可能在企业的不同部门使用到多种类型的非关系型数据库,最后人们可能会完全出于对标准的需要而转向关系型数据库。
如何获得规模经济
这一想法本质上是从前一个问题分支出来的。如果一个组织需要使用多个非关系型数据库解决方案(由于单个方案的适用问题),那么保证在技术(开发者,管理者,支持人员),基础设施(硬件成本,软件许可成本,支持成本,咨询成本),以及工件(公共组件和服务)方面的规模经济就是一个大问题。这一方面与传统的关系型数据库解决方案比较起来确实更为严峻,因为大部分时间组织的数据存储都是以共享服务的模式在运行的。
我们如何保证解决方案的可移植性
从“非关系型数据库”的发展来看,我们可以很直观地推测在未来的几年中这一领域会有许多变化,比如供应商的合并,功能的进步以及标准化。所以对于企业来说一个更好的策略是不要把宝押在某个特定的产品/解决方案上,以后才可以更灵活的转换到一个更好的经过考验的产品。 由于现在的非关系型产品/解决方案大部分是私有的,因此IT决策者在考虑尝试“非关系型数据库”之前,不得不认真考虑可移植性这一重要的问题。这纯粹是出于保护现有投资的需要。
我们如何获得合适的产品支持类型
现在的“非关系型数据库”能通过外部组织而提供支持方案的少之又少。就算有,也无法与Oracle,IBM或者微软等相比。特别是在数据恢复,备份和特定的数据恢复方面,由于许多“非关系型数据库”在这些方面未能提供一个健壮而易于使用的机制,对于企业决策者来说,仍存在很大的问题。
我们如何预算整体成本
与重量级的关系型数据库相比,“非关系型数据库”通常在性能和伸缩性特征方面能提供的数据更少。我也没有发现有TPC基准程序方面和类似的其它方面的数据。这将企业决策者置于了一个“没有方向”的情况下,因为他们不知道需要在硬件、软件许可、基础设施管理和支持等方面支出多大的费用。要得出一个预算估计,缺乏判断的数据就成了一个主要的障碍。因此在项目启动阶段,大部分情况下决策者还是会选择基于熟悉的关系型数据库的解决方案。
有时候,就算可以得到这些数字,但也不足以用来形成TCO模型并与传统的基于关系型数据库的数据存储和非关系型数据存储进行整体的成本分析(Capex+Opex)比较。通常情况下水平伸缩性所要求的大量的硬件机器(以及软件许可成本,支持成本),如果与垂直伸缩性乍一比较,会让人觉得战战兢兢,除非由此带来的好处经过基于TCO模型的全方位比较仍然被证明是可以持续的。
关于如何采用NoSQL的两点思考
这是否意味着目前来看企业应该对NoSQL运动持观望的态度呢?并非如此。诚然,“非关系型数据库”对于广泛的采用来说还未到完全成熟的阶段。但“非关系型数据库”作为未来企业骨架的潜力仍不能忽视。特别是不远的将来企业将更多地处理大容量的半结构化/非结构化以及最终一致性的数据,而不是相对而言小容量的,严格结构化的遵循ACID的数据。 所以现在而言至关重要的是做企业的关键决策人的思想工作,让他们明白企业的数据处理需要使用“非关系型数据库”。在这一过程中,要采取一些渐进的步骤把“非关系型数据库”应用到企业IT的一些关键的方面(技术,人员和流程),并产生一定的价值。这样,就可以用一种缓慢而稳健的方式从整体上来解决我们之前所总结出来的一系列问题。

采用一个产品/解决方案
如今市场上的选择非常多样化,可根据“非关系型数据库”侧重的面不同而进行差异化的处理。与此同时,企业应用场景可能需要不同类型的特点。然而以不同的解决方案来处理不同的应用/使用场景从规模经济的角度出发对于企业是不适宜的。因此最好是根据目标应用的需要最终落实到某一个具体的产品/解决方案上。需要注意的是大多数的解决方案在特性上都会有一些折中,有些特性可能在其它的产品中可以获得,有些可能只是在发展路线图当中暂时设定了一个位置。因为大部分的产品会在不久的将来不断趋于成熟,因此可以通过不同配置来提供不同的解决方案。所以只要现有的解决方案能适合目前大部分的需要,不妨作为一个起点将其采纳。
选择产品/解决方案的经验法则
- 支持所需要的逻辑数据模型应当被给予更高的权重。这将从实质上决定该解决方案在当前或未来能否灵活地适应不同的业务需求。
- 调查该产品所支持的物理数据模型的合适与否,据此对这一解决方案所需要的水平伸缩性、可靠性、一致性和分区性作出合理的评估。这同样能表明备份和恢复机制的可能性。
- 接口支持需要与企业标准的运行环境对齐。由于这些产品支持多样的接口,所以这一点可以得到很好的处理。
- 只要产品支持水平伸缩性,对于持久化模型的选择就不再重要了。
这里有一份一系列“非关系型数据库”的对照表。对于现在正认真考虑采用的企业来说,这是一个不错的起点。为了更贴近企业本身的情况,从25+的集合中挑选出的子集所用到的的关键选择标准是:
- 最重要的一点首先是企业应用程序必须支持有一定复杂程度的数据结构。否则的话,应用程序管理复杂性的责任将变得非常大。我认为比较合理的应当是介于纯粹的键值对与关系型模式中间的一种方案。出于这方面的考虑像Vlodemort,Tokyo Cabinet等产品就排除在了我的列表之外。
- 第二点是以低成本的分片/分区为大容量数据提供水平支持。缺乏这样的支持就使得解决方案与任何关系型数据库无异了。因此像Neo4J(尽管他有丰富的基于图的模型),Redis,CouchDB等此时此刻就被过滤出我的列表之外了。
- 最后一条评判标准,在企业级推广之前我会考虑一定程度的商业支持。否则的话,一旦出现生产环境的问题,我该去找谁呢?出于这一点,我不得不将现在的一些明星产品排除在外,比如Cassandra(尽管有很大的可能不久的将来Rackspace或者Cloudera就会对其提供支持,因为它已经被用于一些生产环境里边了,比如Twitter,Digg,Facebook)。
有了这些过滤标准,我可以精简这一列表,符合目前企业可用的产品有 MongoDB (下一版本就会提供shards支持),Riak,Hypertable和HBase。下面这个表格中总结了这四个产品的主要特性。一个企业可以基于自己具体的实际情况从中作出选择,找到最适合自己需要的特性。
|
特性
|
MongoDB
|
Riak
|
HyperTable
|
HBase
|
|
逻辑数据模型
|
富文档,并提供对内嵌文档的支持
|
富文档
|
列家族(Column Family)
|
列家族(Column Family)
|
|
CAP支持
|
CA
|
AP
|
CA
|
CA
|
|
动态添加删除节点
|
支持(很快在下一发布中就会加入)
|
支持
|
支持
|
支持
|
|
多DC支持
|
支持
|
不支持
|
支持
|
支持
|
|
接口
|
多种特定语言API(Java,Python,Perl,C#等)
|
HTTP之上的JSON
|
REST,Thrift,Java
|
C++,Thrift
|
|
持久化模型
|
磁盘
|
磁盘
|
内存加磁盘(可调的)
|
内存加磁盘(可调的)
|
|
相对性能
|
更优(C++编写)
|
最优(Erlang编写)
|
更优(C++编写)
|
优(Java编写)
|
|
商业支持
|
10gen.com
|
Basho Technologies
|
Hypertable Inc
|
Cloudera
|
数据访问抽象
为数据访问创建一个单独的抽象层对于“非关系型数据库”来说是必须的。它可以带来多方面的好处。首先,应用开发者可以与底层解决方案的细节完全隔离开来。这对于技术方面的伸缩性带来了好处。同时未来如果需要更改底层的解决方案也很方便。这也以一个标准的方式满足了多个应用的要求(即去掉了Join,Group by等复杂特性的SQL)。
为性能和伸缩性创建模型
不管选择怎样的解决方案,使用标准技术(比如排队网络模型,分层排队网络等)来对性能和伸缩性进行建模都是高度推荐的。它能够为基本的服务器规划、拓扑以及整体的软件许可证成本,管理运行等提供必要的数据。这将实质上成为所有预算计划的主要参考数据,并对作出决策提供帮助。
构建显式的冗余
要防止数据丢失,除了将数据复制到备份服务器上,没有其它的办法了。尽管许多非关系型数据库提供自动复制功能,但仍然存在主节点单点失效的风险。因此最好是使用次节点备份,并准备好用于数据恢复和自动数据修复的脚本。出于这样的目的,应当充分的了解目标解决方案的物理数据模型,找出可能的恢复机制备选方案,基于企业的整体需求和实践来对这些选项作出评估。
构建公共数据服务平台
就像公共共享服务的关系型数据库一样,也可以构建非关系型数据库的公共数据服务来促进规模经济效应,满足基础设施和支持的需要。这对于未来进一步演化和更改也有帮助。这可以作为愿望列表上的最终目标,通过中期或长期的努力来达到这一成熟水平。然而,初始阶段就设立这样的远景有助于在整个过程中作出正确的决策。
壮大企业的技术力量
每个组织都有一部分人对于学习新生的和非传统的事物充满热忱。成立这样的小组,并挑选人员(全职的或兼职的),密切关注这方面的动向,了解问题和挑战,进行前瞻性的思考,能够为使用这些技术的项目提供方向和帮助。同时,这个小组还可以为决策者澄清炒作的疑云,提供来自真实数据的观点。
建立与产品社区的关系
选择了产品之后,与产品社区建立起良好的关系对于双方的成功都有极大的好处。许多非关系型数据库目前都有十分活跃的社区,非常愿意相互帮助。企业与社区之间的良好合作能给大家带来一个双赢的局面。 如能提前对问题和解决方案有了解,那么企业在对某些特性或版本作出决策时就能成竹在胸。反过来,企业又能对产品特性的路线图产生影响作用,这对他们自身和社区都是有利的。另一方面,社区也能从实际层次的问题中得到反馈,从而丰富和完善产品。来自大型企业的成功案例同样能让他们处于领先。
迭代前进
考虑到非关系型数据库相对的成熟度,风险最小的采用策略就是遵循迭代开发的方法论。构建公共数据服务平台和标准化数据访问抽象不可能是一蹴而就的。相反,通过迭代和面向重构的方式能更好的达到目标。运用不太成熟的技术进行转型的过程,中途改变解决方案也不会太意外的。与此同时,采用敏捷的方式来看待事物,能够帮助建立起一个能从管理和实现两方面不断吸引改进的开放态度。
然而,在这一问题上实现迭代,非常重要的一点是定义一个决策条件矩阵。比如操作指南(和例子),来判断一个应用的对象模型是否适合关系型或非关系的范围,对基础设施规划作出指导,列出必需的测试用例等等。
结束语
企业的非关系型数据库采用过程中最大的挑战就是转变决策者的思想观念——让他们相信并非所有的数据/对象都适合关系型数据库。 最能证明这一点就是选择合适的用例去尝试非关系型数据库,进而证实在合适的背景下,非关系型数据库是比关系型数据库更有效的解决方案。 找到一些“非关键业务”(但能立竿见影的)适合于非关系型数据库的项目。这些项目的成功(甚至失败)都能有助于观念的改变。这也能有助于不断学习如何才能以一种不同的方式来更好的采用非关系型数据库。这些少儿学步般的尝试所作出的努力与投入都是值得的,如果企业想要在将来使用“非关系型数据库”来重塑其信息管理体系的话。
关于作者
Sourav Mazumder目前是InfoSys Technologies的首席技术架构师。他在信息技术领域有14年以上的经验。作为Infosys技术顾问团的主要成员,Sourav为Infosys在美国、欧洲、澳洲和日本的主要客户,提供保险、电信、银行、零售、安全、交通以及建筑、工程、施工等多个行业的服务。 他曾参与Web项目的技术架构和路线图定义,SOA战略实施,国际战略定义,UI组件化,性能建模,伸缩性分析,非结构化数据管理等等。Sourav参考的Infosys自身的核心银行产品Finacle,也为他提供了丰富的产品开发经验。Sourav还曾参与开发Infosys的J2EE可重用框架,和定义Infosys在架构方面和开发定制应用方面的软件工程方法。Sourav的经历还包括在保证架构合规和开发项目的治理方面的工作。
Sourav是iCMG认证的软件架构师,同时也是TOGAF 8认证的执行者。Sourav最近在LISA伯克利全球化会议上发表了演讲。Sourav关于SOA的最新白皮书在社区里十分流行。
Sourav目前关注NoSQL,Web 2.0,治理,性能建构和全球化。
感谢马国耀对本文的审校。
给InfoQ中文站投稿或者参与内容翻译工作,请邮件至editors@cn.infoq.com。也欢迎大家加入到InfoQ中文站用户讨论组中与我们的编辑和其他读者朋友交流。
Install Oracle 64Bit On Ubuntu
Creating A Listener For the New DB
It's not a requirement to create a Listener before you create a database, but it's a good idea to do so. A Listener is a process which listens on a well-known port for requests from remote users seeking to connect to the Oracle database. Without one, therefore, you'd only ever be able to connect to the database whilst directly logged onto the server itself, which is obviously a bit of a show-stopper!
To create a Listener, we use the Network Configuration Assistant. To invoke the Assistant, just issue the command netca (should be in path) as the oracle user in a new terminal session. Press "Next" to accept the defaults. After a bit you will get to "Finish" which is where you want to finish.
netca
Creating a Database
First, find out the id of the oinstall group. You can find this from looking in System -> Admin -> Users and Groups -> Manage Groups. Alternatively, use:
cat /etc/group | grep oinstall
NB: The oinstall Group Id should be 1002 or similar. If the User/Group Applet is giving "0" then try double checking the Properties of the group. I've noticed that the Users/Groups Applet can be unreliable...
Then, as root, perform the following command. (NB: This can't be performed by sudo, you must be root)
echo "<dba_group_gid>" > /proc/sys/vm/hugetlb_shm_group
This allows the oinstall group access to hugetlbpages. Without this you will get error "ORA-27125: unable to create shared memory segment" when setting up the database.
Run the Database Configuration Assistant, or DBCA for short. You will need to be the Oracle user you set up earlier.
dbca
This is not a difficult thing to do: mostly, in our case, it involves clicking "Next" to walk through the wizard, accepting all defaults. You will be prompted when you actually need to enter something.
Just be sure to specify the correct database name (it should match what is set as your ORACLE_SID, but with a proper domain extension. By default the ORACLE_SID is orcl10, and can be found out by running the oraenv command in the oracle bin directory...
Use the password "oracle" for the password and write down the values it spits out at the end...!
NB: If you get a "ORA-12547- Lost Contact" error, make sure you have libaio1installed (sudo apt-get install libaio1)...
Well Done...!
If it all went well you now have an Oracle Db on your machine. Pat yourself on the back for getting this far and sticking with it. You still have a way to go before its all installed but go and have some tea to celebrate...! And then go on to Part 2...
Last Updated on Saturday, 16 January 2010 12:09
关于kindle你必须知道的几点:
中文显示
Kindle 3的中文显示基本上没有问题了,只有中文标题会偶尔出现口字乱码。豆瓣上有个小tip: kindle 3 不装多看系统也可以看中文 ( http://www.douban.com/group/topic/14228764/ ),在主页输入命令:
;debugOn
~changeLocale zh-CN
;debugOff
(三行后都要回车)就可以改成中文显示,我已经试验成功。txt要重存成UTF8
免费3G
(详见:绑定Kindle 支持国内上网)
文档转换:
建议通过发送文档(UTF-8编码txt/html/doc/pdf/jpg等)到你的私人kindle邮箱 ***@free.kindle.com来直接转换文档,方便快捷还免费,只要打开kindle的wifi功能并联网就能在一分钟内同步。一旦发送成功,amazon会给你回复一封邮件(如下图),告诉你文档已经传输成功,可以打开kindle的wifi(发送到***@free.kindle.com的文档),然后文档会在两分钟内同步到你的kindle。另外,回复的邮件里也给出了转换后的azw格式文档的下载地址,这样你也可以先把文档下载到电脑里,待会用数据线传输。更多介绍参考(英文) Sending Personal Documents to Kindle.
UTF-8编码:
txt文档最好用绿色小巧且免费的notepad2转换为UTF-8编码(见下图),doc没有太大限制,docx格式目前还处于实验阶段,有时转换会出错。
NOTEPAD2:
下载地址:http://sourceforge.net/projects/notepad2/files/
电池续航:
kindle如果不进行翻页和联网,停留在任何页面都是根本不耗电的,所以Kindle没有电源的开关键;如果一直开着wifi或3G,kindle的电池只能坚持7天,如果关闭wifi,充完电后可以坚持一个月,建议不用wifi的时候按menu键关闭wifi功能。
收费服务:
文档发送到***@kindle.com 收费(via Whispernet,但也不是很贵,50MB大小以下的单个文档,美国境内是$0.15美元每次,美国境外$ .99美元每次),并且需要kindle的3G功能。
同步管理:
kindle.amazon.com , 在这里查看你已经购买的书籍或者邮件上传的文档,还可以查看你在kindle上添加的读书笔记,可以与twitter/facebook帐号绑定。
浏览器:
菜单路径Menu–>Experimental–>Browser,这里还可以看到音乐播放的菜单
音乐播放:
菜单路径同上:Menu–>Experimental
重装系统:
不喜欢Kindle3的原装系统?安装国产Kindle系统”多看”吧。喜欢折腾的童鞋,可以参考这位童鞋的日志:Kindle 3折腾记. “多看的缺点就是还不如原版系统稳定,但是亮点太多了,多支持了chm,epub等格式不说,光是对于pdf的优化,就是个值得尝试的理由。更不待说它对于中文支持的大大改进。” 链接: 多看 for Kindle2\Kindle3 软件下载区
支持格式:
邮件发送文档支持的格式有:
Microsoft Word (.DOC)
HTML (.HTML, .HTM)
RTF (.RTF)
JPEG (.JPEG, .JPG)
GIF (.GIF)
PNG (.PNG)
BMP (.BMP)
PDF (.PDF): See below for details.
Microsoft Word (.DOCX) is supported in our experimental category.
推荐书籍:
Kindle新书发现《Dirty Chinese》中文脏话集,很给力!点此购买 http://sinaurl.cn/h4XBGV
<孙子兵法>英文版(免费)
应用推荐:
一款免费推送RSS订阅到kindle的在线应用: http://www.kindlefeeder.com/
本文中提到的某位童鞋的在线看漫画网站: http://mo.pnuts.cc/
现在亚马逊的kindle网店里有免费的扫雷和sudoku和填词游戏:
开场白:
Hive与HBase的整合功能的实现是利用两者本身对外的API接口互相进行通信,相互通信主要是依靠hive_hbase-handler.jar工具类 (Hive Storage Handlers), 大致意思如图所示:

口水:
对 hive_hbase-handler.jar 这个东东还有点兴趣,有空来磋磨一下。
一、2个注意事项:
1、需要的软件有 Hadoop、Hive、Hbase、Zookeeper,Hive与HBase的整合对Hive的版本有要求,所以不要下载.0.6.0以前的老版本,Hive.0.6.0的版本才支持与HBase对接,因此在Hive的lib目录下可以看见多了hive_hbase-handler.jar这个jar包,他是Hive扩展存储的Handler ,HBase 建议使用 0.20.6的版本,这次我没有启动HDFS的集群环境,本次所有测试环境都在一台机器上。
2、运行Hive时,也许会出现如下错误,表示你的JVM分配的空间不够,错误信息如下:
Invalid maximum heap size: -Xmx4096m
The specified size exceeds the maximum representable size.
Could not create the Java virtual machine.
解决方法:
/work/hive/bin/ext# vim util/execHiveCmd.sh 文件中第33行
修改,
HADOOP_HEAPSIZE=4096
为
HADOOP_HEAPSIZE=256
另外,在 /etc/profile/ 加入 export $HIVE_HOME=/work/hive
二、启动运行环境
1启动Hive
hive –auxpath /work/hive/lib/hive_hbase-handler.jar,/work/hive/lib/hbase-0.20.3.jar,/work/hive/lib/zookeeper-3.2.2.jar -hiveconf hbase.master=127.0.0.1:60000
加载 Hive需要的工具类,并且指向HBase的master服务器地址,我的HBase master服务器和Hive运行在同一台机器,所以我指向本地。
2启动HBase
/work/hbase/bin/hbase master start
3启动Zookeeper
/work/zookeeper/bin/zkServer.sh start
三、执行
在Hive中创建一张表,相互关联的表
CREATE TABLE hbase_table_1(key int, value string) STORED BY 'org.apache.hadoop.hive.hbase.HBaseStorageHandler' WITH SERDEPROPERTIES ("hbase.columns.mapping" = ":key,cf1:val") TBLPROPERTIES ("hbase.table.name" = "xyz");
在运行一个在Hive中建表语句,并且将数据导入
建表
CREATE TABLE pokes (foo INT, bar STRING);
数据导入
LOAD DATA LOCAL INPATH '/work/hive/examples/files/kv1.txt' OVERWRITE INTO TABLE pokes;
在Hive与HBase关联的表中 插入一条数据
INSERT OVERWRITE TABLE hbase_table_1 SELECT * FROM pokes WHERE foo=98;
运行成功后,如图所示:

插入数据时采用了MapReduce的策略算法,并且同时向HBase写入,如图所示:

在HBase shell中运行 scan 'xyz' 和describe "xyz" 命令,查看表结构,运行结果如图所示:

xyz是通过Hive在Hbase中创建的表,刚刚在Hive的建表语句中指定了映射的属性 "hbase.columns.mapping" = ":key,cf1:val" 和 在HBase中建表的名称 "hbase.table.name" = "xyz"
在hbase在运行put命令,插入一条记录
put 'xyz','10001','cf1:val','www.javabloger.com'
在hive上运行查询语句,看看刚刚在hbase中插入的数据有没有同步过来,
select * from hbase_table_1 WHERE key=10001;
如图所示:

最终的效果
以上整合过程和操作步骤已经执行完毕,现在Hive中添加记录HBase中有记录添加,同样你在HBase中添加记录Hive中也会添加, 表示Hive与HBase整合成功,对海量级别的数据我们是不是可以在HBase写入,在Hive中查询 喃?因为HBase 不支持复杂的查询,但是HBase可以作为基于 key 获取一行或多行数据,或者扫描数据区间,以及过滤操作。而复杂的查询可以让Hive来完成,一个作为存储的入口(HBase),一个作为查询的入口(Hive)。如下图示。

呵呵,见笑了,以上只是我面片的观点。
先这样,稍后我将继续更新,感谢你的阅读。
相关文章:
Apache Hive入门2
Apache Hive入门1
HBase入门篇4
HBase入门篇3
HBase入门篇2
HBase入门篇
–end–
Facebook的新实时消息系统:Hbase——每月存储1350亿条消息
你或许已经知道,facebook已经介绍过全新的social inbox产品,集成了email,IM,短信,文本信息,facebook的在线消息。最为重要的是,他们每个月要存储超过1350亿条消息。他们如何存放这些信息呢?facebook的Kannan Muthukkaruppan在《邮件的底层技术:HBase》一文中给了一个十分意外的答案——HBase,打败了MySQL,Cassandra和其他一些技术,成为facebook的选择。
为什么说是一个意外的答案?facebook创造了Cassandra,并且其就是为邮件类型的应用而打造的,但是他们发现Cassandra的最终一致性模型并不适合他们的全新的实时邮件产品。Facebook同样拥有大量的MySQL架构,但是他们发现性能会随着数据和索引的增加变差。他们同样可以选择自己来开发一个新的存储模型,但是他们最终选择了HBase。
HBase是一个可扩展的、并且支持海量数据下的高并发记录级别更新操作的表存储产品——为邮件系统量身定做。HBase同样支持基于BigTable模型的key-value存储。这样能够很好的支持按key来查找记录以及按范围来搜寻或者过滤,这也是邮件系统的特性之一。然而,复杂一点的查询却并不被支持。查询是通过一个叫Hive的工具来进行分析的,这是facebook创造的用以处理他们几个P的数据仓库的,Hive是基于Hadoop文件系统HDFS,这也是HBase所采用的文件系统。
Facebook检视了他们的应用场景,指出他们为什么要选择HBase。他们所需要的系统应该能处理以下两种数据:
- 一个较小的临时数据集,是经常变化的。
- 一个不断增加的数据集,是很少被访问的。
有点意思哈。你阅读了收件箱里的邮件,以后就很少再去看它一眼了。这两种截然不同的数据使用方式,你可能会用两个系统来实现。但是显然HBase就能搞定这一切。目前尚不清楚它是如何(在两种数据集上)来实现通用的搜索功能的,尽管它集成了多种搜索引擎。
他们系统的一些关键特性:
·HBase:
·拥有一个比Cassandra更简答的一致性模型。
·非常好的可伸缩性和性能。
·大多数特性对他们的需求来说是足足有余的:自动负载平衡和故障转移,支持压缩,单机多个切片(multiple shards)。
·HDFS是HBase使用的文件系统,支持冗余复制,端到端的校验以及自动恢复平衡。
·facebook的运维团队在使用HDFS方面有丰富的经验,他们是Hadoop的大客户,Hadoop就是使用HDFS作为分布式文件系统的。
·Haystack用来做为存储附件用的。
·重头开始写了一个自定义的应用server,以便处理大量来自不同源的消息。
·在ZooKeeper的顶层实现了一个“用户发现服务”。
·使用了一系列的基础服务:email帐户验证,好友关系链,隐私控制,消息传送控制(消息是通过chat系统发送还是通过短信系统发送)。
·保持了他们一贯的作风,小团队做出令人惊讶的事情:15个工程师花了1年的时间发布了20个新的基础服务。
·facebook不打算只使用一个数据库平台并在这之上实现标准化应用,他们会针对不同的应用使用不同的平台。
Facebook在HDFS/Hadoop/Hive上有了丰富的经验,并且成为HBase的大客户,这让我夜不能寐。与一个十分流行的产品合作并成为其产业链的一部分是所有产品的梦想。这正是HBase所得到的。由于HBase涵盖了诸如持久性,实时性,分布式,线性扩展,健壮性,海量数据,开源,key-value,列导向(column-oriented)等热点。我们有理由相信它能变得更加流行,特别是基于它被facebook使用的事实。
(原文作者Todd Hoff,C++代码规范的作者)
Posted by kaoshijuan on 2010 年 11 月 23 日 at 上午 9:22 under 未分类.
1 Comment.
摘要: Scala近期正式发布了2.8版本,这门优秀的编程语言将简洁、清晰的语法与面向对象和函数式编程范式无缝融合起来,同时又完全兼容于Java,这样Scala就能使用Java开发者所熟知的Java API和众多的框架了。在这种情况下,我们可以通过Scala改进并简化现有的Java框架。此外,Scala的学习门槛也非常低,因为我们可以轻松将其集成到“众所周知的Java世界中”。
... 阅读全文
摘要: Sometimes, the simplest things are the most difficult to explain. Scala’s interoperability with Java is completely unparalleled, even including languages like Groovy which tout their tight... 阅读全文
Unit的结果类型指的是函数没有返回有用的值。Scala的Unit类型比较接近Java的void类型,而且实际上Java里每一个返回void的方法都被映射为Scala里返回Unit的方法。因此结果类型为Unit的方法,仅仅是为了它们的副作用而运行。
- package org.apache.pivot.scala.log
-
- import scala.reflect.BeanProperty
- import io.Source
- import org.apache.pivot.wtk.content.ListViewItemRenderer
- import java.lang.String
- import org.apache.pivot.wtkx.{WTKX, WTKXSerializer}
-
- /*为了避免和scala.Application的名称冲突,这里修改了别名*/
- import org.apache.pivot.wtk.{ Application => PivotApplication, _}
- import org.apache.pivot.collections.{ArrayList, Map}
-
- /**
- * Created by IntelliJ IDEA.
- * User: Administrator
- * Date: 2010-8-26
- * Time: 10:36:45
- * To change this template use File | Settings | File Templates.
- */
-
- /*日志记录Bean对象,由于Scala标准生成的字段不使用getter/setter的格式,
- 但是提供了注解 @scala.reflect.BeanProperty ,使得编译器可以生成标准的JavaBean对象的getter/setter接口
- val 只生成了getter
- var 同时生成了getter和setter */
- class LogRecord ( @BeanProperty val threadName : String,
- @BeanProperty val date : String,
- @BeanProperty val time : String,
- @BeanProperty val module : String,
- @BeanProperty val level : String,
- @BeanProperty val content : String){
-
- /*
- 重载了 Any的 toString接口
- override关键字是必须的,在java中使用的是注解 @override,但是java中@override并不是必须的。
- 省略了 函数还回值,由编译器进行类型推演得到
- */
- override def toString() = {
- threadName +" "+date +" "+ time +" "+module +" "+level+" "+content
- }
-
- }
-
- /*
- LogRecord 类的半生对象
- 定义了 scala中的魔术接口 apply ,使得可以使用 LogRecord("sting 文本") 可以创建一个class LogRecord对象。
- apply方法的调用由编译器自动调用,我们只负责定义即可
- 我们要解析的日志格式
-
- threadName date time module Level content
- DVOSMAIN 08/26/10 10:17:17 LOGINFO : INFO - Debug level: 2
- DVOSMAIN 08/26/10 10:17:17 LOGINFO : INFO - *=ERROR WARNING EXCEPT
- DVOSMAIN 08/26/10 10:17:17 LOGINFO : INFO - LM=*
-
- */
- object LogRecord {
- def apply( line : String ) : LogRecord = {
-
- /*生成一个 Regex对象,用于模式匹配*/
- val logRegex = """([A-Za-z0-9]+) +([0-9/]*) +([0-9:]*) +([A-Z]*) +: *([A-Z_]+).*""".r
-
- line match {
- /*如果模式匹配成功,threadName,date,time,module,level 分配按次序绑定到模式匹配表达式中()的内容 */
- case logRegex(threadName,date,time,module,level) =>
- val logRecord: LogRecord = new LogRecord( threadName, date, time, module, level,line)
- logRecord
- /*模式匹配通配符,在没有匹配到的情况下,做通用处理。如果不添加,在匹配不到时会抛出 MatchError异常*/
- case _ =>
- val logRecord: LogRecord = new LogRecord("N/A","N/A","N/A","N/A","N/A","N/A")
- logRecord
- }
-
- }
- }
-
- /*
- Apache Pivot ListView ItemRenderer
- 重新定义了如何显示 LogRecord对象的 列表项目的渲染。
- 如果使用默认的,那么ListView显示对象时,直接调用对象的toString获得其字符串表示
- */
- class LogListViewItemRenderer extends ListViewItemRenderer {
-
- imageView.setVisible(false)
-
- override def render(item: AnyRef, index: Int, listView: ListView, selected: Boolean, checked: Boolean, highlighted: Boolean, disabled: Boolean) = {
- if ( item != null && item.isInstanceOf[LogRecord])
- {
- val log = item.asInstanceOf[LogRecord]
- label.setText(log.content)
-
-
- }
- }
-
-
-
- }
-
- /**
- 定义主窗口界面代码,必须继承自 org.apache.pivot.Application
- 使用了 @WTKX注解,该注解属于 wtkx的命名对象的绑定语法,在从wtkx文件加载GUI时,
- 调用bind接口可以自动和wtkx文件中声明的wtkx:id对象进行绑定,无需在掉吗中调用 get("name")
- */
- class MainWindow extends PivotApplication {
- var window : Window = null
- @WTKX var textInputFilePath : TextInput = null
- @WTKX var browsePushButton : PushButton = null
- @WTKX var loadPushButton : PushButton = null
- @WTKX var textInputThreadName :TextInput = null
- @WTKX var textInputModule : TextInput = null
- @WTKX var textInputLevel : TextInput = null
- @WTKX var textInputContent : TextInput = null
- @WTKX var logListView : ListView = null
-
-
- def resume = {}
-
- def suspend = {}
-
- def shutdown(optional: Boolean) = {
- if ( window != null)
- {
- window.close
- true
- }
- false
- }
-
- def startup(display: Display, properties: Map[String, String]) = {
- val wtkxSerializer = new WTKXSerializer()
- var matchString : String = null
-
- /*从xml(wtkx)文件加载GUI*/
- window = wtkxSerializer.readObject(this,"MainWindow.xml").asInstanceOf[Window]
-
- wtkxSerializer.bind(this)
- if ( properties containsKey "logfile")
- {
- textInputFilePath setText ( properties get "logfile")
- }
-
- /*给 Button添加事件处理函数*/
- browsePushButton.getButtonPressListeners.add( function2Listener (browseButtonPressed ) )
- loadPushButton.getButtonPressListeners.add( function2Listener(loadButtonPressed ))
-
-
- window.open(display)
-
- }
-
- /*浏览按钮事件处理,打开一个文件浏览窗口,让用户选择文件,并在用户关闭对话框时,捕获用户选择的文件名*/
- def browseButtonPressed( button : Button ) : Unit = {
- val dialog : FileBrowserSheet = new FileBrowserSheet(FileBrowserSheet.Mode.OPEN)
-
- dialog.open( window, new SheetCloseListener() {
- def sheetClosed(sheet: Sheet) = {
- if ( sheet.getResult)
- {
- val fileBrowseSheet = sheet.asInstanceOf[FileBrowserSheet]
- textInputFilePath.setText( fileBrowseSheet.getSelectedFile.getPath.toString)
- }
- }
- })
- }
-
- /*从log文件加载内容,每一行是一个日志记录
- for中使用了 if过滤器,只有条件符合了,才会进入for循环体。
-
- scala没有提供continu,而是在 for中提供了条件过滤来替代
- */
- def loadButtonPressed( button : Button ) : Unit = {
- val logFile = Source.fromFile(textInputFilePath.getText)
- val list = new ArrayList[LogRecord]
- for ( line <- logFile.getLines ; logRecord = LogRecord(line.trim);
- if ( textInputThreadName.getText == "" || textInputThreadName.getText.contains(logRecord.threadName) );
- if ( textInputModule.getText == "" || textInputModule.getText.contains(logRecord.module));
- if ( textInputLevel.getText == "" || textInputLevel.getText.contains(logRecord.level))){
-
- list add logRecord
- }
-
- logListView.setListData( list)
-
- }
- /*按钮事件辅助接口,用于把一个 事件处理函数转换为ButtonPressListener对象,也可以采取更高级的内容,使用implicit,这里没有使用*/
- def function2Listener( fun : Button => Unit ) :ButtonPressListener = {
- val listener = new ButtonPressListener()
- {
- def buttonPressed(button: Button) = {
- fun(button)
- }
- }
-
- listener
- }
- }
-
- /*
- 主函数
- 符合Pivot主函数入口规则
- */
- object LogAnalyse {
- def main ( args : Array[String]) : Unit = {
-
-
- DesktopApplicationContext.main( classOf[MainWindow], args)
-
-
- }
- }
package org.apache.pivot.scala.log
import scala.reflect.BeanProperty
import io.Source
import org.apache.pivot.wtk.content.ListViewItemRenderer
import java.lang.String
import org.apache.pivot.wtkx.{WTKX, WTKXSerializer}
/*为了避免和scala.Application的名称冲突,这里修改了别名*/
import org.apache.pivot.wtk.{ Application => PivotApplication, _}
import org.apache.pivot.collections.{ArrayList, Map}
/**
* Created by IntelliJ IDEA.
* User: Administrator
* Date: 2010-8-26
* Time: 10:36:45
* To change this template use File | Settings | File Templates.
*/
/*日志记录Bean对象,由于Scala标准生成的字段不使用getter/setter的格式,
但是提供了注解 @scala.reflect.BeanProperty ,使得编译器可以生成标准的JavaBean对象的getter/setter接口
val 只生成了getter
var 同时生成了getter和setter */
class LogRecord ( @BeanProperty val threadName : String,
@BeanProperty val date : String,
@BeanProperty val time : String,
@BeanProperty val module : String,
@BeanProperty val level : String,
@BeanProperty val content : String){
/*
重载了 Any的 toString接口
override关键字是必须的,在java中使用的是注解 @override,但是java中@override并不是必须的。
省略了 函数还回值,由编译器进行类型推演得到
*/
override def toString()  = {
threadName +" "+date +" "+ time +" "+module +" "+level+" "+content
}
}
/*
LogRecord 类的半生对象
定义了 scala中的魔术接口 apply ,使得可以使用  LogRecord("sting 文本") 可以创建一个class LogRecord对象。
apply方法的调用由编译器自动调用,我们只负责定义即可
我们要解析的日志格式
threadName date    time     module       Level   content
DVOSMAIN 08/26/10 10:17:17 LOGINFO     : INFO  - Debug level: 2
DVOSMAIN 08/26/10 10:17:17 LOGINFO     : INFO  - *=ERROR WARNING EXCEPT
DVOSMAIN 08/26/10 10:17:17 LOGINFO     : INFO  - LM=*
*/
object LogRecord {
def apply( line : String  ) : LogRecord = {
/*生成一个 Regex对象,用于模式匹配*/
val logRegex = """([A-Za-z0-9]+) +([0-9/]*) +([0-9:]*) +([A-Z]*) +: *([A-Z_]+).*""".r
line match {
/*如果模式匹配成功,threadName,date,time,module,level 分配按次序绑定到模式匹配表达式中()的内容 */
case logRegex(threadName,date,time,module,level) =>
val logRecord: LogRecord = new LogRecord( threadName, date, time, module, level,line)
logRecord
/*模式匹配通配符,在没有匹配到的情况下,做通用处理。如果不添加,在匹配不到时会抛出 MatchError异常*/
case _ =>
val logRecord: LogRecord = new LogRecord("N/A","N/A","N/A","N/A","N/A","N/A")
logRecord
}
}
}
/*
Apache Pivot ListView ItemRenderer
重新定义了如何显示 LogRecord对象的 列表项目的渲染。
如果使用默认的,那么ListView显示对象时,直接调用对象的toString获得其字符串表示
*/
class LogListViewItemRenderer extends ListViewItemRenderer {
imageView.setVisible(false)
override def render(item: AnyRef, index: Int, listView: ListView, selected: Boolean, checked: Boolean, highlighted: Boolean, disabled: Boolean) = {
if ( item != null && item.isInstanceOf[LogRecord])
{
val log = item.asInstanceOf[LogRecord]
label.setText(log.content)
}
}
}
/**
定义主窗口界面代码,必须继承自 org.apache.pivot.Application
使用了 @WTKX注解,该注解属于 wtkx的命名对象的绑定语法,在从wtkx文件加载GUI时,
调用bind接口可以自动和wtkx文件中声明的wtkx:id对象进行绑定,无需在掉吗中调用 get("name")
*/
class MainWindow extends PivotApplication {
var window : Window   = null
@WTKX var textInputFilePath : TextInput  = null
@WTKX var browsePushButton : PushButton  = null
@WTKX var loadPushButton : PushButton   = null
@WTKX var textInputThreadName :TextInput   = null
@WTKX var textInputModule : TextInput    = null
@WTKX var textInputLevel : TextInput    = null
@WTKX var textInputContent : TextInput   = null
@WTKX var logListView : ListView = null
def resume = {}
def suspend = {}
def shutdown(optional: Boolean) = {
if ( window != null)
{
window.close
true
}
false
}
def startup(display: Display, properties: Map[String, String]) = {
val wtkxSerializer = new WTKXSerializer()
var matchString : String = null
/*从xml(wtkx)文件加载GUI*/
window = wtkxSerializer.readObject(this,"MainWindow.xml").asInstanceOf[Window]
wtkxSerializer.bind(this)
if ( properties containsKey "logfile")
{
textInputFilePath setText ( properties get "logfile")
}
/*给 Button添加事件处理函数*/
browsePushButton.getButtonPressListeners.add( function2Listener (browseButtonPressed ) )
loadPushButton.getButtonPressListeners.add( function2Listener(loadButtonPressed ))
window.open(display)
}
/*浏览按钮事件处理,打开一个文件浏览窗口,让用户选择文件,并在用户关闭对话框时,捕获用户选择的文件名*/
def browseButtonPressed( button : Button ) : Unit = {
val dialog : FileBrowserSheet = new   FileBrowserSheet(FileBrowserSheet.Mode.OPEN)
dialog.open( window, new SheetCloseListener() {
def sheetClosed(sheet: Sheet) = {
if ( sheet.getResult)
{
val fileBrowseSheet = sheet.asInstanceOf[FileBrowserSheet]
textInputFilePath.setText( fileBrowseSheet.getSelectedFile.getPath.toString)
}
}
})
}
/*从log文件加载内容,每一行是一个日志记录
for中使用了 if过滤器,只有条件符合了,才会进入for循环体。
scala没有提供continu,而是在 for中提供了条件过滤来替代
*/
def loadButtonPressed( button : Button ) : Unit = {
val logFile = Source.fromFile(textInputFilePath.getText)
val list = new ArrayList[LogRecord]
for ( line <- logFile.getLines ; logRecord = LogRecord(line.trim);
if ( textInputThreadName.getText == "" || textInputThreadName.getText.contains(logRecord.threadName) );
if ( textInputModule.getText == "" || textInputModule.getText.contains(logRecord.module));
if ( textInputLevel.getText == "" || textInputLevel.getText.contains(logRecord.level))){
list add logRecord
}
logListView.setListData( list)
}
/*按钮事件辅助接口,用于把一个 事件处理函数转换为ButtonPressListener对象,也可以采取更高级的内容,使用implicit,这里没有使用*/
def function2Listener( fun : Button => Unit ) :ButtonPressListener =  {
val listener = new ButtonPressListener()
{
def buttonPressed(button: Button) = {
fun(button)
}
}
listener
}
}
/*
主函数
符合Pivot主函数入口规则
*/
object LogAnalyse {
def main ( args : Array[String]) : Unit = {
DesktopApplicationContext.main( classOf[MainWindow], args)
}
}
run:
使用 java时:
java -classpath
scala-library.jar;pivot-core-1.5.jar;pivot-tools-1.5.jar;pivot-wtk-1.5.jar;pivot-wtk-terra-1.5.jar;.
org.apache.pivot.scala.log.LogAnalyse
使用 scala时
java -classpath
pivot-core-1.5.jar;pivot-tools-1.5.jar;pivot-wtk-1.5.jar;pivot-wtk-terra-1.5.jar;.
org.apache.pivot.scala.log.LogAnalyse
这个功能只能用powerdesigner 的脚本功能来实现,使用起来也简单
打开powerdesigner,shift + ctrl + X 打开脚本窗口
输入执行的脚本,点 run 即可。
简单的导入Excel脚本
'开始
Option Explicit
Dim mdl ' the current model
Set mdl = ActiveModel
If (mdl Is Nothing) Then
MsgBox "There is no Active Model"
End If
Dim HaveExcel
Dim RQ
RQ = vbYes 'MsgBox("Is Excel Installed on your machine ?", vbYesNo + vbInformation, "Confirmation")
If RQ = vbYes Then
HaveExcel = True
' Open & Create Excel Document
Dim x1 '
Set x1 = CreateObject("Excel.Application")
x1.Workbooks.Open "D:\11.xls" '指定excel文档路径
x1.Workbooks(1).Worksheets("Sheet1").Activate '指定要打开的sheet名称
Else
HaveExcel = False
End If
a x1, mdl
sub a(x1, mdl)
dim rwIndex
dim tableName
dim colname
dim table
dim col
dim count
on error Resume Next
set table = mdl.Tables.CreateNew '创建一个表实体
table.Name = "卡片信息表" '指定表名,如果在Excel文档里有,也可以 .Cells(rwIndex, 3).Value 这样指定
table.Code = "AM_CARDINFO" '指定表名
count = count + 1
For rwIndex = 2 To 1000 '指定要遍历的Excel行标 由于第1行是表头,从第2行开始
With x1.Workbooks(1).Worksheets("Sheet1")
If .Cells(rwIndex, 1).Value = "" Then
Exit For
End If
set col = table.Columns.CreateNew '创建一列/字段
'MsgBox .Cells(rwIndex, 1).Value, vbOK + vbInformation, "列"
If .Cells(rwIndex, 3).Value = "" Then
col.Name = .Cells(rwIndex, 1).Value '指定列名
Else
col.Name = .Cells(rwIndex, 3).Value
End If
'MsgBox col.Name, vbOK + vbInformation, "列"
col.Code = .Cells(rwIndex, 1).Value '指定列名
col.DataType = .Cells(rwIndex, 2).Value '指定列数据类型
col.Comment = .Cells(rwIndex, 5).Value '指定列说明
If .Cells(rwIndex, 4).Value = "否" Then
col.Mandatory = true '指定列是否可空 true 为不可空
End If
If rwIndex = 2 Then
col.Primary = true '指定主键
End If
End With
Next
MsgBox "生成数据表结构共计 " + CStr(count), vbOK + vbInformation, "表"
Exit Sub
End sub
提示里不区分大小写, 多个提示用空格分开, 如:select /*+ hint1(tab1) hint2(TAB1 idx1) */ col1, col2 from tab1 where col1='xxx';
如果表使用了别名, 那么提示里也必须使用别名, 如:select /*+ hint1(t1) */ col1, col2 from tab1 t1 where col1='xxx';
在SQL优化过程中常见HINT的用法(前10个比较常用, 前3个最常用):
1. /*+ INDEX */ 和 /*+ INDEX(TABLE INDEX1, index2) */ 和 /*+ INDEX(tab1.col1 tab2.col2) */ 和 /*+ NO_INDEX */ 和 /*+ NO_INDEX(TABLE INDEX1, index2) */
表明对表选择索引的扫描方法. 第一种不指定索引名是让Oracle对表中可用索引比较并选择某个最佳索引; 第二种是指定索引名且可指定多个索引; 第三种是10g开始有的, 指定列名, 且表名可不用别名; 第四种即全表扫描; 第五种表示禁用某个索引, 特别适合于准备删除某个索引前的评估操作. 如果同时使用了INDEX和NO_INDEX则两个提示都会被忽略掉.
例如:SELECT /*+ INDEX(BSEMPMS SEX_INDEX) USE SEX_INDEX BECAUSE THERE ARE FEWMALE BSEMPMS */ FROM BSEMPMS WHERE SEX='M';
2. /*+ ORDERED */
FROM子句中默认最后一个表是驱动表,ORDERED将from子句中第一个表作为驱动表. 特别适合于多表连接非常慢时尝试.
例如:SELECT /*+ ORDERED */ A.COL1,B.COL2,C.COL3 FROM TABLE1 A,TABLE2 B,TABLE3 C WHERE A.COL1=B.COL1 AND B.COL1=C.COL1;
3. /*+ PARALLEL(table1,DEGREE) */ 和 /*+ NO_PARALLEL(table1) */
该提示会将需要执行全表扫描的查询分成多个部分(并行度)执行, 然后在不同的操作系统进程中处理每个部分. 该提示还可用于DML语句. 如果SQL里还有排序操作, 进程数会翻倍,此外还有一个一个负责组合这些部分的进程,如下面的例子会产生9个进程. 如果在提示中没有指定DEGREE, 那么就会使用创建表时的默认值. 该提示在默认情况下会使用APPEND提示. NO_PARALLEL是禁止并行操作,否则语句会使用由于定义了并行对象而产生的并行处理.
例如:select /*+ PARALLEL(tab_test,4) */ col1, col2 from tab_test order by col2;
4. /*+ FIRST_ROWS */ 和 /*+ FIRST_ROWS(n) */
表示用最快速度获得第1/n行, 获得最佳响应时间, 使资源消耗最小化.
在update和delete语句里会被忽略, 使用分组语句如group by/distinct/intersect/minus/union时也会被忽略.
例如:SELECT /*+ FIRST_ROWS */ EMP_NO,EMP_NAM,DAT_IN FROM BSEMPMS WHERE EMP_NO='SCOTT';
5. /*+ RULE */
表明对语句块选择基于规则的优化方法.
例如:SELECT /*+ RULE */ EMP_NO,EMP_NAM,DAT_IN FROM BSEMPMS WHERE EMP_NO='SCOTT';
6. /*+ FULL(TABLE) */
表明对表选择全局扫描的方法.
例如:SELECT /*+ FULL(A) */ EMP_NO,EMP_NAM FROM BSEMPMS A WHERE EMP_NO='SCOTT';
7. /*+ LEADING(TABLE) */
类似于ORDERED提示, 将指定的表作为连接次序中的驱动表.
8. /*+ USE_NL(TABLE1,TABLE2) */
将指定表与嵌套的连接的行源进行连接,以最快速度返回第一行再连接,与USE_MERGE刚好相反.
例如:SELECT /*+ ORDERED USE_NL(BSEMPMS) */ BSDPTMS.DPT_NO,BSEMPMS.EMP_NO,BSEMPMS.EMP_NAM FROM BSEMPMS,BSDPTMS WHERE BSEMPMS.DPT_NO=BSDPTMS.DPT_NO;
9. /*+ APPEND */ 和 /*+ NOAPPEND */
直接插入到表的最后,该提示不会检查当前是否有插入操作所需的块空间而是直接添加到新块中, 所以可以提高速度. 当然也会浪费些空间, 因为它不会使用那些做了delete操作的块空间. NOAPPEND提示则相反,所以会取消PARALLEL提示的默认APPEND提示.
例如:insert /*+ append */ into test1 select * from test4;
insert /*+ parallel(test1) noappend */ into test1 select * from test4;
10. /*+ USE_HASH(TABLE1,table2) */
将指定的表与其它行源通过哈希连接方式连接起来.为较大的结果集提供最佳响应时间. 类似于在连接表的结果中遍历每个表上每个结果的嵌套循环, 指定的hash表将被放入内存, 所以需要有足够的内存(hash_area_size或pga_aggregate_target)才能保证语句正确执行, 否则将在磁盘里进行.
例如:SELECT /*+ USE_HASH(BSEMPMS,BSDPTMS) */ * FROM BSEMPMS,BSDPTMS WHERE BSEMPMS.DPT_NO=BSDPTMS.DPT_NO;
----------------------------------------------------------------------------------------------------
11. /*+ USE_MERGE(TABLE) */
将指定的表与其它行源通过合并排序连接方式连接起来.特别适合于那种在多个表大量行上进行集合操作的查询, 它会将指定表检索到的的所有行排序后再被合并, 与USE_NL刚好相反.
例如:SELECT /*+ USE_MERGE(BSEMPMS,BSDPTMS) */ * FROM BSEMPMS,BSDPTMS WHERE BSEMPMS.DPT_NO=BSDPTMS.DPT_NO;
12. /*+ ALL_ROWS */
表明对语句块选择基于开销的优化方法,并获得最佳吞吐量,使资源消耗最小化. 可能会限制某些索引的使用.
例如:SELECT /*+ ALL+_ROWS */ EMP_NO,EMP_NAM,DAT_IN FROM BSEMPMS WHERE EMP_NO='SCOTT';
13. /*+ CLUSTER(TABLE) */
提示明确表明对指定表选择簇扫描的访问方法. 如果经常访问连接表但很少修改它, 那就使用集群提示.
例如:SELECT /*+ CLUSTER */ BSEMPMS.EMP_NO,DPT_NO FROM BSEMPMS,BSDPTMS WHERE DPT_NO='TEC304' AND BSEMPMS.DPT_NO=BSDPTMS.DPT_NO;
14. /*+ INDEX_ASC(TABLE INDEX1, INDEX2) */
表明对表选择索引升序的扫描方法. 从8i开始, 这个提示和INDEX提示功能一样, 因为默认oracle就是按照升序扫描索引的, 除非未来oracle还退出降序扫描索引.
例如:SELECT /*+ INDEX_ASC(BSEMPMS PK_BSEMPMS) */ FROM BSEMPMS WHERE DPT_NO='SCOTT';
15. /*+ INDEX_COMBINE(TABLE INDEX1, INDEX2) */
指定多个位图索引, 对于B树索引则使用INDEX这个提示,如果INDEX_COMBINE中没有提供作为参数的索引,将选择出位图索引的布尔组合方式.
例如:SELECT /*+ INDEX_COMBINE(BSEMPMS SAL_BMI HIREDATE_BMI) */ * FROM BSEMPMS WHERE SAL<5000000 AND HIREDATE<SYSDATE;
16. /*+ INDEX_JOIN(TABLE INDEX1, INDEX2) */
合并索引, 所有数据都已经包含在这两个索引里, 不会再去访问表, 比使用索引并通过rowid去扫描表要快5倍.
例如:SELECT /*+ INDEX_JOIN(BSEMPMS SAL_HMI HIREDATE_BMI) */ SAL,HIREDATE FROM BSEMPMS WHERE SAL<60000;
17. /*+ INDEX_DESC(TABLE INDEX1, INDEX2) */
表明对表选择索引降序的扫描方法.
例如:SELECT /*+ INDEX_DESC(BSEMPMS PK_BSEMPMS) */ FROM BSEMPMS WHERE DPT_NO='SCOTT';
18. /*+ INDEX_FFS(TABLE INDEX_NAME) */
对指定的表执行快速全索引扫描,而不是全表扫描的办法.要求要检索的列都在索引里, 如果表有很多列时特别适用该提示.
例如:SELECT /*+ INDEX_FFS(BSEMPMS IN_EMPNAM) */ * FROM BSEMPMS WHERE DPT_NO='TEC305';
19. /*+ NO_EXPAND */
对于WHERE后面的OR 或者IN-LIST的查询语句,NO_EXPAND将阻止其基于优化器对其进行扩展, 缩短解析时间.
例如:SELECT /*+ NO_EXPAND */ * FROM BSEMPMS WHERE DPT_NO='TDC506' AND SEX='M';
20. /*+ DRIVING_SITE(TABLE) */
强制与ORACLE所选择的位置不同的表进行查询执行.特别适用于通过dblink连接的远程表.
例如:SELECT /*+ DRIVING_SITE(DEPT) */ * FROM BSEMPMS,DEPT@BSDPTMS DEPT WHERE BSEMPMS.DPT_NO=DEPT.DPT_NO;
21. /*+ CACHE(TABLE) */ 和 /*+ NOCACHE(TABLE) */
当进行全表扫描时,CACHE提示能够将表全部缓存到内存中,这样访问同一个表的用户可直接在内存中查找数据. 比较适合数据量小但常被访问的表, 也可以建表时指定cache选项这样在第一次访问时就可以对其缓存. NOCACHE则表示对已经指定了CACHE选项的表不进行缓存.
例如:SELECT /*+ FULL(BSEMPMS) CAHE(BSEMPMS) */ EMP_NAM FROM BSEMPMS;
22. /*+ PUSH_SUBQ */
当SQL里用到了子查询且返回相对少的行时, 该提示可以尽可能早对子查询进行评估从而改善性能, 不适用于合并连接或带远程表的连接.
例如:select /*+ PUSH_SUBQ */ emp.empno, emp.ename, itemno from emp, orders where emp.empno = orders.empno and emp.deptno = (select deptno from dept where loc='XXX');
23. /*+ INDEX_SS(TABLE INDEX1,INDEX2) */
指示对特定表的索引使用跳跃扫描, 即当组合索引的第一列不在where子句中时, 让其使用该索引.
一、建立表空间
CREATE TABLESPACE test
DATAFILE 'c:/oracle/oradata/db/test01.dbf' SIZE 50M
UNIFORM SIZE 1M; #指定区尺寸为128k,如不指定,区尺寸默认为64k
或
CREATE TABLESPACE test
DATAFILE 'c:/oracle/oradata/db/test01.dbf' SIZE 50M
MINIMUM EXTENT 50K EXTENT MANAGEMENT LOCAL
DEFAULT STORAGE (INITIAL 50K NEXT 50K MAXEXTENTS 100 PCTINCREASE 0);
可从dba_tablespaces中查看刚创建的表空间的信息
二、建立UNDO表空间
CREATE UNDO TABLESPACE test_undo
DATAFILE 'c:/oracle/oradata/db/test_undo.dbf' SIZE 50M
UNDO表空间的EXTENT是由本地管理的,而且在创建时的SQL语句中只能使用DATAFILE和EXTENT MANAGEMENT子句。
ORACLE规定在任何时刻只能将一个还原表空间赋予数据库,即在一个实例中可以有多个还原表空间存在,但只能有一个为活动的。可以使用ALTER SYSTEM命令进行还原表空间的切换。
SQL> ALTER SYSTEM SET UNDO_TABLESPACE = test_undo;
三、建立临时表空间
CREATE TEMPORARY TABLESPACE test_temp
TEMPFILE '/oracle/oradata/db/test_temp.dbf' SIZE 50M
查看系统当前默认的临时表空间
select * from dba_properties where property_name like 'DEFAULT%'
改变系统默认临时表空间
alter database default temporary tablespace test_temp;
四、改变表空间状态
1.使表空间脱机
ALTER TABLESPACE test OFFLINE;
如果是意外删除了数据文件,则必须带有RECOVER选项
ALTER TABLESPACE game test FOR RECOVER;
2.使表空间联机
ALTER TABLESPACE test ONLINE;
3.使数据文件脱机
ALTER DATABASE DATAFILE 3 OFFLINE;
4.使数据文件联机
ALTER DATABASE DATAFILE 3 ONLINE;
5.使表空间只读
ALTER TABLESPACE test READ ONLY;
6.使表空间可读写
ALTER TABLESPACE test READ WRITE;
五、删除表空间
DROP TABLESPACE test INCLUDING CONTENTS AND DATAFILES CASCADE CONSTRAINTS;
DROP TABLESPACE 表空间名 [INCLUDING CONTENTS [AND DATAFILES] [CASCADE CONSTRAINTS]]
1. INCLUDING CONTENTS 子句用来删除段
2. AND DATAFILES 子句用来删除数据文件
3. CASCADE CONSTRAINTS 子句用来删除所有的引用完整性约束
六、扩展表空间
首先查看表空间的名字和所属文件
select tablespace_name, file_id, file_name,
round(bytes/(1024*1024),0) total_space
from dba_data_files
order by tablespace_name;
1.增加数据文件
ALTER TABLESPACE test
ADD DATAFILE '/oracle/oradata/db/test02.dbf' SIZE 1000M;
2.手动增加数据文件尺寸
ALTER DATABASE DATAFILE 'c:/oracle/oradata/db/test01.dbf'
RESIZE 100M;
3.设定数据文件自动扩展
ALTER DATABASE DATAFILE 'c:/oracle/oradata/db/test01.dbf'
AUTOEXTEND ON NEXT 100M
MAXSIZE 200M;
设定后可从dba_tablespace中查看表空间信息,从v$datafile中查看对应的数据文件信息
经过长时间学习创建Oracle表空间,于是和大家分享一下,看完本文你肯定有不少收获,希望本文能教会你更多东西。
1、先查询空闲空间
- select tablespace_name,file_id,block_id,bytes,blocks from dba_free_space;
2、增加Oracle表空间
先查询数据文件名称、大小和路径的信息,语句如下:
- select tablespace_name,file_id,bytes,file_name from dba_data_files;
3、修改文件大小语句如下
- alter database datafile
- '需要增加的数据文件路径,即上面查询出来的路径
- 'resize 800M;
4、创建Oracle表空间
- create tablespace test
- datafile '/home/app/oracle/oradata/oracle8i/test01.dbf' size 8M
- autoextend on
- next 5M
- maxsize 10M;
-
- create tablespace sales
- datafile '/home/app/oracle/oradata/oracle8i/sales01.dbf' size 800M
- autoextend on
- next 50M
- maxsize unlimited
- maxsize unlimited 是大小不受限制
-
- create tablespace sales
- datafile '/home/app/oracle/oradata/oracle8i/sales01.dbf' size 800M
- autoextend on
- next 50M
- maxsize 1000M
- extent management local uniform;
- unform表示区的大小相同,默认为1M
-
- create tablespace sales
- datafile '/home/app/oracle/oradata/oracle8i/sales01.dbf' size 800M
- autoextend on
- next 50M
- maxsize 1000M
- extent management local uniform size 500K;
- unform size 500K表示区的大小相同,为500K
-
- create tablespace sales
- datafile '/home/app/oracle/oradata/oracle8i/sales01.dbf' size 800M
- autoextend on
- next 50M
- maxsize 1000M
- extent management local autoallocate;
- autoallocate表示区的大小由随表的大小自动动态改变,大表使用大区小表使用小区
-
- create tablespace sales
- datafile '/home/app/oracle/oradata/oracle8i/sales01.dbf' size 800M
- autoextend on
- next 50M
- maxsize 1000M
- temporary;
- temporary创建字典管理临时表空间
-
- create temporary tablespace sales
- tempfile '/home/app/oracle/oradata/oracle8i/sales01.dbf' size 800M
- autoextend on
- next 50M
- maxsize 1000M
- 创建本地管理临时表空间,如果是临时表空间,所有语句中的datafile都换为tempfile
-
- 8i系统默认创建字典管理临时表空间,要创建本地管理临时表空间要加temporary tablespace关键字
- 创建本地管理临时表空间时,不得使用atuoallocate参数,系统默认创建uniform管理方式
-
- 为表空间增加数据文件:
- alter tablespace sales add
- datafile '/home/app/oracle/oradata/oracle8i/sales02.dbf' size 800M
- autoextend on next 50M
- maxsize 1000M;
创建本地管理临时Oracle表空间,如果是临时表空间,所有语句中的datafile都换为tempfile8i系统默认创建字典管理临时表空
间,要创建本地管理临时表空间要加temporary
tablespace关键字创建本地管理临时表空间时,不得使用atuoallocate参数,系统默认创建uniform管理方式
为表空间增加数据文件:
- alter tablespace sales add
- datafile '/home/app/oracle/oradata/oracle8i/sales02.dbf' size 800M
- autoextend on next 50M
- maxsize 1000M;
5、更改自动扩展属性:
- alter database datafile
- '/home/app/oracle/oradata/oracle8i/sales01.dbf',
- '/home/app/oracle/oradata/oracle8i/sales02.dbf'
- '/home/app/oracle/oradata/oracle8i/sales01.dbf
- autoextend off;
以上介绍创建Oracle表空间,在这里拿出来和大家分享一下,希望对大家有用。
Unix/Linux下一般想让某个程序在后台运行,很多都是使用 & 在程序结尾来让程序自动运行。比如我们要运行 mysql在后台:
/usr/local/mysql/bin/mysqld_safe –user=mysql &
但是我们很多程序并不象mysqld一样可以做成守护进程,可能我们的程序只是普通程序而已,一般这种程序即使使用 & 结尾,如果终端关闭,那么程序也会被关闭。为了能够后台运行,我们需要使用nohup这个命令,比如我们有个start.sh需要在后台运行,并且希望在后台能够一直运行,那么就使用nohup:
nohup /root/start.sh &
在shell中回车后提示:
[~]$ appending output to nohup.out
原程序的的标准输出被自动改向到当前目录下的nohup.out文件,起到了log的作用。
但是有时候在这一步会有问题,当把终端关闭后,进程会自动被关闭,察看nohup.out可以看到在关闭终端瞬间服务自动关闭。
咨询红旗Linux工程师后,他也不得其解,在我的终端上执行后,他启动的进程竟然在关闭终端后依然运行。
在第二遍给我演示时,我才发现我和他操作终端时的一个细节不同:他是在当shell中提示了nohup成功后还需要按终端上键盘任意键退回到
shell输入命令窗口,然后通过在shell中输入exit来退出终端;而我是每次在nohup执行成功后直接点关闭程序按钮关闭终端.。所以这时候会
断掉该命令所对应的session,导致nohup对应的进程被通知需要一起shutdown。
这个细节有人和我一样没注意到,所以在这儿记录一下了。
附:nohup命令参考
nohup 命令
用途:不挂断地运行命令。
语法:nohup Command [ Arg … ] [ & ]
描述:nohup 命令运行由 Command 参数和任何相关的 Arg 参数指定的命令,忽略所有挂断(SIGHUP)信号。在注销后使用
nohup 命令运行后台中的程序。要运行后台中的 nohup 命令,添加 & ( 表示”and”的符号)到命令的尾部。
无论是否将 nohup 命令的输出重定向到终端,输出都将附加到当前目录的 nohup.out 文件中。如果当前目录的
nohup.out 文件不可写,输出重定向到 $HOME/nohup.out 文件中。如果没有文件能创建或打开以用于追加,那么 Command
参数指定的命令不可调用。如果标准错误是一个终端,那么把指定的命令写给标准错误的所有输出作为标准输出重定向到相同的文件描述符。
退出状态:该命令返回下列出口值:
126 可以查找但不能调用 Command 参数指定的命令。
127 nohup 命令发生错误或不能查找由 Command 参数指定的命令。
否则,nohup 命令的退出状态是 Command 参数指定命令的退出状态。
nohup命令及其输出文件
nohup命令:如果你正在运行一个进程,而且你觉得在退出帐户时该进程还不会结束,那么可以使用nohup命令。该命令可以在你退出帐户/关闭终端之后继续运行相应的进程。nohup就是不挂起的意思( n ohang up)。
该命令的一般形式为:nohup command &
使用nohup命令提交作业
如果使用nohup命令提交作业,那么在缺省情况下该作业的所有输出都被重定向到一个名为nohup.out的文件中,除非另外指定了输出文件:
nohup command > myout.file 2>&1 &
在上面的例子中,输出被重定向到myout.file文件中。
使用 jobs 查看任务。
使用 fg %n 关闭。
另外有两个常用的ftp工具ncftpget和ncftpput,可以实现后台的ftp上传和下载,这样就可以利用这些命令在后台上传和下载文件了。
熟悉Oracle9i的人应该都知道,Oracle9i中有2种日志,一种称为Redo Log(重做日志),另一种叫做Archive Log(归档日志),但是这两种日志在Oracle9i数据库中所起到的作用相信很难有人说清楚,下面我就结合自己对Oracle9i的认识来进行一下说明
重做日志redo log file是LGWR进程从Oracle实例中的redo log buffer写入的,是循环利用的。就是说一个redo log file(group) 写满后,才写下一个。
归档日志archive log是当数据库运行在归档模式下时,一个redo log file(group)写满后,由ARCn进程将重做日志的内容备份到归档日志文件下,然后这个redo log file(group)才能被下一次使用。
不管数据库是否是归档模式,重做日志是肯定要写的。而只有数据库在归档模式下,重做日志才会备份,形成归档日志。
归档日志结合全备份,用于数据库出现问题后的恢复使用。
分布式计算开源框架Hadoop介绍
作者 岑文初 发布于 2008年8月4日 上午2时15分
社区
Java
主题
网格计算,
集群与缓存
标签
Hadoop
──
分布式计算开源框架Hadoop入门实践(一)
相关厂商内容
迷你书免费下载:开源选型、Struts
2、Scrum和XP、GRails
SOY
Framework:Java富客户端快速开发框架
在SIP项目设计的过程中,对于它庞大的日志在开始时就考虑使用任务分解的多线程处理模式来分析统计,在我从前写的文章《Tiger
Concurrent Practice
--日志分析并行分解设计与实现》中有所提到。但是由于统计的内容暂时还是十分简单,所以就采用Memcache作为计数器,结合MySQL就完成了访问
控制以及统计的工作。然而未来,对于海量日志分析的工作,还是需要有所准备。现在最火的技术词汇莫过于“云计算”,在Open
API日益盛行的今天,互联网应用的数据将会越来越有价值,如何去分析这些数据,挖掘其内在价值,就需要分布式计算来支撑海量数据的分析工作。
回过头来看,早先那种多线程,多任务分解的日志分析设计,其实是分布式计算的一个单机版缩略,如何将这种单机的工作进行分拆,变成协同工作的集群,
其实就是分布式计算框架设计所涉及的。在去年参加BEA大会的时候,BEA和VMWare合作采用虚拟机来构建集群,无非就是希望使得计算机硬件能够类似
于应用程序中资源池的资源,使用者无需关心资源的分配情况,从而最大化了硬件资源的使用价值。分布式计算也是如此,具体的计算任务交由哪一台机器执行,执
行后由谁来汇总,这都由分布式框架的Master来抉择,而使用者只需简单地将待分析内容提供给分布式计算系统作为输入,就可以得到分布式计算后的结果。
Hadoop是Apache开源组织的一个分布式计算开源框架,在很多大型网站上都已经得到了应用,如亚马逊、Facebook和Yahoo等等。
对于我来说,最近的一个使用点就是服务集成平台的日志分析。服务集成平台的日志量将会很大,而这也正好符合了分布式计算的适用场景(日志分析和索引建立就
是两大应用场景)。
当前没有正式确定使用,所以也是自己业余摸索,后续所写的相关内容,都是一个新手的学习过程,难免会有一些错误,只是希望记录下来可以分享给更多志同道合的朋友。
什么是Hadoop?
搞什么东西之前,第一步是要知道What(是什么),然后是Why(为什么),最后才是How(怎么做)。但很多开发的朋友在做了多年项目以后,都习惯是先How,然后What,最后才是Why,这样只会让自己变得浮躁,同时往往会将技术误用于不适合的场景。
Hadoop框架中最核心的设计就是:MapReduce和HDFS。MapReduce的思想是由Google的一篇论文所提及而被广为流传的,
简单的一句话解释MapReduce就是“任务的分解与结果的汇总”。HDFS是Hadoop分布式文件系统(Hadoop Distributed File
System)的缩写,为分布式计算存储提供了底层支持。
MapReduce从它名字上来看就大致可以看出个缘由,两个动词Map和Reduce,“Map(展开)”就是将一个任务分解成为多个任务,
“Reduce”就是将分解后多任务处理的结果汇总起来,得出最后的分析结果。这不是什么新思想,其实在前面提到的多线程,多任务的设计就可以找到这种思
想的影子。不论是现实社会,还是在程序设计中,一项工作往往可以被拆分成为多个任务,任务之间的关系可以分为两种:一种是不相关的任务,可以并行执行;另
一种是任务之间有相互的依赖,先后顺序不能够颠倒,这类任务是无法并行处理的。回到大学时期,教授上课时让大家去分析关键路径,无非就是找最省时的任务分
解执行方式。在分布式系统中,机器集群就可以看作硬件资源池,将并行的任务拆分,然后交由每一个空闲机器资源去处理,能够极大地提高计算效率,同时这种资
源无关性,对于计算集群的扩展无疑提供了最好的设计保证。(其实我一直认为Hadoop的卡通图标不应该是一个小象,应该是蚂蚁,分布式计算就好比蚂蚁吃
大象,廉价的机器群可以匹敌任何高性能的计算机,纵向扩展的曲线始终敌不过横向扩展的斜线)。任务分解处理以后,那就需要将处理以后的结果再汇总起来,这 就是Reduce要做的工作。

图1:MapReduce结构示意图
上图就是MapReduce大致的结构图,在Map前还可能会对输入的数据有Split(分割)的过程,保证任务并行效率,在Map之后还会有Shuffle(混合)的过程,对于提高Reduce的效率以及减小数据传输的压力有很大的帮助。后面会具体提及这些部分的细节。
HDFS是分布式计算的存储基石,Hadoop的分布式文件系统和其他分布式文件系统有很多类似的特质。分布式文件系统基本的几个特点:
- 对于整个集群有单一的命名空间。
- 数据一致性。适合一次写入多次读取的模型,客户端在文件没有被成功创建之前无法看到文件存在。
- 文件会被分割成多个文件块,每个文件块被分配存储到数据节点上,而且根据配置会由复制文件块来保证数据的安全性。

图2:HDFS结构示意图
上图中展现了整个HDFS三个重要角色:NameNode、DataNode和Client。NameNode可以看作是分布式文件系统中的管理
者,主要负责管理文件系统的命名空间、集群配置信息和存储块的复制等。NameNode会将文件系统的Meta-data存储在内存中,这些信息主要包括
了文件信息、每一个文件对应的文件块的信息和每一个文件块在DataNode的信息等。DataNode是文件存储的基本单元,它将Block存储在本地
文件系统中,保存了Block的Meta-data,同时周期性地将所有存在的Block信息发送给NameNode。Client就是需要获取分布式文
件系统文件的应用程序。这里通过三个操作来说明他们之间的交互关系。
文件写入:
- Client向NameNode发起文件写入的请求。
- NameNode根据文件大小和文件块配置情况,返回给Client它所管理部分DataNode的信息。
- Client将文件划分为多个Block,根据DataNode的地址信息,按顺序写入到每一个DataNode块中。
文件读取:
- Client向NameNode发起文件读取的请求。
- NameNode返回文件存储的DataNode的信息。
- Client读取文件信息。
文件Block复制:
- NameNode发现部分文件的Block不符合最小复制数或者部分DataNode失效。
- 通知DataNode相互复制Block。
- DataNode开始直接相互复制。
最后再说一下HDFS的几个设计特点(对于框架设计值得借鉴):
- Block的放置:默认不配置。一个Block会有三份备份,一份放在NameNode指定的DataNode,另一份放在
与指定DataNode非同一Rack上的DataNode,最后一份放在与指定DataNode同一Rack上的DataNode上。备份无非就是为了
数据安全,考虑同一Rack的失败情况以及不同Rack之间数据拷贝性能问题就采用这种配置方式。
- 心跳检测DataNode的健康状况,如果发现问题就采取数据备份的方式来保证数据的安全性。
- 数
据复制(场景为DataNode失败、需要平衡DataNode的存储利用率和需要平衡DataNode数据交互压力等情况):这里先说一下,使用
HDFS的balancer命令,可以配置一个Threshold来平衡每一个DataNode磁盘利用率。例如设置了Threshold为10%,那么
执行balancer命令的时候,首先统计所有DataNode的磁盘利用率的均值,然后判断如果某一个DataNode的磁盘利用率超过这个均值
Threshold以上,那么将会把这个DataNode的block转移到磁盘利用率低的DataNode,这对于新节点的加入来说十分有用。
- 数据交验:采用CRC32作数据交验。在文件Block写入的时候除了写入数据还会写入交验信息,在读取的时候需要交验后再读入。
- NameNode是单点:如果失败的话,任务处理信息将会纪录在本地文件系统和远端的文件系统中。
- 数
据管道性的写入:当客户端要写入文件到DataNode上,首先客户端读取一个Block然后写到第一个DataNode上,然后由第一个
DataNode传递到备份的DataNode上,一直到所有需要写入这个Block的NataNode都成功写入,客户端才会继续开始写下一个
Block。
- 安全模式:在分布式文件系统启动的时候,开始的时候会有安全模式,当分布式文件系统处于安全模式的情况下,文
件系统中的内容不允许修改也不允许删除,直到安全模式结束。安全模式主要是为了系统启动的时候检查各个DataNode上数据块的有效性,同时根据策略必
要的复制或者删除部分数据块。运行期通过命令也可以进入安全模式。在实践过程中,系统启动的时候去修改和删除文件也会有安全模式不允许修改的出错提示,只
需要等待一会儿即可。
下面综合MapReduce和HDFS来看Hadoop的结构:

图3:Hadoop结构示意图
在Hadoop的系统中,会有一台Master,主要负责NameNode的工作以及JobTracker的工作。JobTracker的主要职责
就是启动、跟踪和调度各个Slave的任务执行。还会有多台Slave,每一台Slave通常具有DataNode的功能并负责TaskTracker的
工作。TaskTracker根据应用要求来结合本地数据执行Map任务以及Reduce任务。
说到这里,就要提到分布式计算最重要的一个设计点:Moving
Computation is Cheaper than Moving
Data。就是在分布式处理中,移动数据的代价总是高于转移计算的代价。简单来说就是分而治之的工作,需要将数据也分而存储,本地任务处理本地数据然后归
总,这样才会保证分布式计算的高效性。
为什么要选择Hadoop?
说完了What,简单地说一下Why。官方网站已经给了很多的说明,这里就大致说一下其优点及使用的场景(没有不好的工具,只用不适用的工具,因此选择好场景才能够真正发挥分布式计算的作用):
- 可扩展:不论是存储的可扩展还是计算的可扩展都是Hadoop的设计根本。
- 经济:框架可以运行在任何普通的PC上。
- 可靠:分布式文件系统的备份恢复机制以及MapReduce的任务监控保证了分布式处理的可靠性。
- 高效:分布式文件系统的高效数据交互实现以及MapReduce结合Local
Data处理的模式,为高效处理海量的信息作了基础准备。
使用场景:个人觉得最适合的就是海量数据的分析,其实Google最早提出MapReduce也就是为了海量数
据分析。同时HDFS最早是为了搜索引擎实现而开发的,后来才被用于分布式计算框架中。海量数据被分割于多个节点,然后由每一个节点并行计算,将得出的结
果归并到输出。同时第一阶段的输出又可以作为下一阶段计算的输入,因此可以想象到一个树状结构的分布式计算图,在不同阶段都有不同产出,同时并行和串行结
合的计算也可以很好地在分布式集群的资源下得以高效的处理。
1.Android团队提供的示例项目
如果不是从学习Android
SDK中提供的那些样例代码开始,可能没有更好的方法来掌握在Android这个框架上开发。由Android的核心开发团队提供了15个优秀的示例项 目,包含了游戏、图像处理、时间显示、开始菜单快捷方式等。
地址:http://code.google.com/p/apps-for-android/
附件: Amazed2_1-300x200.jpg
Amazed 2
Android App
2.Remote Droid
RemoteDroid是一个Android应用,能够让用户使用自己的无线网络使用无线键盘、触摸屏操作手机。这个项目为开发者提供了如网络连接、触 摸屏手指运动等很好的样例。
地址:http://code.google.com/p/remotedroid/
附件: remotedroid.jpg
Remote
Droid
3.TorProxy和Shadow
TorProxy应用实现了Android手机无线电电传通讯(TOR),和Shadow应用一起使用,可以使用手机匿名上网。从该项目源代码中,可以 掌握socket连接、管理cookie等方法。
地址:http://www.cl.cam.ac.uk/research/dtg/code/svn/android-tor/
附件: img02.png
Android
TorProxy
4、 Android SMSPopup
SMSPopup可以截获短信内容显示在一个泡泡形状的窗口中。从这个项目中可以掌握到如何使用内置的短信SMS接口。
地址:http://code.google.com/p/android-smspopup/
附件: screenshot1.png
Android
SMSPopup
5、 Standup Timer
Standup Timer应用用于控制站立会议时间,类似秒表倒计时,可以提醒每个人的讲话时间已到,从而保证每个与会者使用时间一样。从该项目的代码中,可以学会如何 使用时间函数。另外,这个项目的代码是采用视图view、模型model严格分离的设计思路。
地址:http://github.com/jwood/standup-timer
附件: stats.png
Android
App – Standup Timer
6、 Foursquare
是
Foursquare.com的一个客户端应用,该应用主要分为两个模块:API(com.joelapenna.foursquare)和界面前端
(com.joelapenna.foursquared)两部分。从该项目代码中,可以学会如何同步、多线程、HTTP连接等技术。
地址:http://code.google.com/p/foursquared/
附件: screen_1.png
Foursquare
for Android
7、 Pedometer
Pedometer应用用于记录你每天走路步[]数的。尽管记录不一定精准,但是从这个项目中,可以学习几个不同的技术:加速器交互、语音更新、后台运行服 务等。
地址:http://code.google.com/p/pedometer/
附件: Pedometer-Android_1.png
Android
pedometer
8、 OpenSudoku-android
OpenSudoku是一个简单的九宫格数独游戏。从代码中可以学习到如何在视图中显示表格数据,以及如何和一个网站交互等技术。
地址:http://code.google.com/p/opensudoku-android
附件: gameplay_sn.png
Android
OpenSudoku
9、 ConnectBot
ConnectBot是Android平台的一个客户端安全壳应用。从该项目代码中,可以学习到很多Android安全方面的内容,这些是你在开发应用 时经常需要考虑的安全问题。
地址:http://code.google.com/p/connectbot/
附件: connectbot-top.png
附件: connectbot-list.png
Android
Connectbot
10、 WordPress的Android应用
当然在最后不能不提Wordpress的Android应用了,这是Wordpress官方开发团队提供的一个项目。从代码中可以学习到XMLRPC调 用(当然还有更多的优秀内容)。
地址:http://android.svn.wordpress.org/trunk/
附件: wordpress-android-apps-develpors.jpg
Android Wordpress
源文档 <http://www.pin5i.com/showtopic-top-10-android-open-source-project.html>
摘要: 我从java1.3开始学习java,后来主要用1.4,再后来1.5和1.6中的很多新特性,都停留在“知道”的状态,比如nio,虽然据说可以提升性能,但并没有真正深入使用和测试过,工作操作文件的情况不多,所以关注也不多,即便用到,也还是习惯性的用java.io。今天看到的这篇文章,虽然测试手段非常简单,所得结论也难免有些片面 ,但依然说明,在顺序访问的时候,NIO的性能相对j... 阅读全文
摘要: 勤奋的 litaocheng 同学,在每日超负荷的加班工作之余,仍然刻苦学习笔耕不辍,为我们不断带来劲爆文章,这一篇《Erlang的Unicode支持》为我们介绍了 R13 的最新特性,也是最被大家期望的特性——内置的 Unicode 支持。废话少说,直接上正文。
在R13A中, Erlang加入了对Unicode的支持。本文涉及到的数据类型包括:list, binary, ... 阅读全文
摘要: 前些天给echo_server写了个非常简单的连接压力测试程序,
下载: stress_test.erl
-module(stress_test).
-export([start/0, tests/1]).
start() ->
... 阅读全文
摘要: Erlang被称作是“工业级的语言”,在测试领域,理应是有相当成熟度的。而,Joe老先生本人,也是崇尚“拿测试结果说话”的人(在《Programming Erlang》书中,上来就搞测试,然后再开讲的例子比比皆是)。就连 Erlang/OTP 本身的代码质量也是有严密的测试作为保障的。所以,如果在Erlang领域,你见到远比其他语言为多的测试相关工具... 阅读全文
摘要: 试了一下传说中的 JInterface ,使用 OtpErlang.jar 的整个过程其实非常简单,似乎比 JMS 的程序都简单。
首先,我们要用 java 实现的原始 erlang 程序如下,没错,就是巨简单的 echo ,我们的目标是要把它用 java 来改写,不仅写服务端,也要写客户端。
下载: echo_client.erl
-module(echo_c... 阅读全文
require 'java'
import 'oracle.jdbc.driver.OracleDriver'
module JavaLang
include_package "java.lang"
end
module JavaSql
include_package "java.sql"
end
#JavaLang::Class.forName("oracle.jdbc.driver.OracleDriver").newInstance
##发现如果直接用Class.forName话根本找不到类。看来jruby是预先导入的直接用import CLASS即可
con =
JavaSql::DriverManager.getConnection( \
"jdbc:oracle:thin:@132.228.129.104:1521:ods","ods","ods")
sql = con.createStatement()
result = sql.executeQuery("select * from dual")
while result.next
puts result.getString(1)
end
oracle guid类型其实是raw(16)类型
生成: SELECT SYS_GUID ()
INTO v_guid
FROM DUAL;
declare
c number(4);
begin
for k in 1..13 loop
c := 590+k;
dbms_job.submit(c,
'ODS_UTL_DIFF.DIFF('||k||',2,''0,21'');',
sysdate,
'trunc(sysdate)+21/24+7');
commit;
end loop;
end;
qt4内置有sqlite插件,可以直接使用sqlite.但是发现插入中文时会有乱码问题。
以windows为例,qt4内置编码为system(GBK).而sqlite内部编码为unicode.
如果插入中文首先要转换为unicode.而从数据库读取时则不需要,因为qt会自动侦测编码,
实例代码:
//插入记录
QSqlQuery query;
QByteArray sql = "insert into person values(1, 'hello', '你好!')";
QTextCodec *codec = QTextCodec::codecForName("GBK");
QString string = codec->toUnicode(sql);
query.exec(string);
//读入记录
QSqlQuery query("select * from person");
while (query.next()) {
QString string = query.value(2).toString();;
QMessageBox::information(0, "infa", string, QMessageBox::Ok);
}
1.
Transformation代表Informatica Server对数据的操作。
Transformation分类:Active和Passive
输入跟输出的记录数会发生改变
不能re-linked到另一个data stream
例子:Aggregator, Filter, Joiner, Normalizer, Rank, Update Strategy, Advanced External Procedure,
ERP Source Qualifier and Source Qualifier, Application Source Qualifier, Router, Sorter
Passive transformations
输入跟输出的记录数一样
可以re-linked到另一个data stream
例子:Expression, External Procedure, Lookup, Sequence Generator Stored Procedure, Input,
Output, XML Source Qualifier
Transformations分类 : connected 和 unconnected,unconnected transformation在其他的组件中被调用并且有返回值。
ETL的简介:
ETL即数据抽取(Extract)、转换(Transform)、装载(Load)的过程,它是构建数据仓库的重要环节
1、 数据清洗
数据清洗的任务是过滤那些不符合要求的数据,将过滤的结果交给业务主管部门,确认是否过滤掉还是由业务单位修正之后再进行抽取。不符合要求的数据主要是有不完整的数据、错误的数据、重复的数据三大类。
(1)不完整的数据:这一类数据主要是一些应该有的信息缺失,如供应商的名称、分公司的名称、客户的区域信息缺失、业务系统中主表与明细表不能
匹配等。对于这一类数据过滤出来,按缺失的内容分别写入不同Excel文件向客户提交,要求在规定的时间内补全。补全后才写入数据仓库。
(2)错误的数据:这一类错误产生的原因是业务系统不够健全,在接收输入后没有进行判断直接写入后台数据库造成的,比如数值数据输成全角数字字
符、字符串数据后面有一个回车操作、日期格式不正确、日期越界等。这一类数据也要分类,对于类似于全角字符、数据前后有不可见字符的问题,只能通过写
SQL语句的方式找出来,然后要求客户在业务系统修正之后抽取。日期格式不正确的或者是日期越界的这一类错误会导致ETL运行失败,这一类错误需要去业务
系统数据库用SQL的方式挑出来,交给业务主管部门要求限期修正,修正之后再抽取。
(3)重复的数据:对于这一类数据——特别是维表中会出现这种情况——将重复数据记录的所有字段导出来,让客户确认并整理。
数据清洗是一个反复的过程,不可能在几天内完成,只有不断的发现问题,解决问题。对于是否过滤,是否修正一般要求客户确认,对于过滤掉的数据,
写入Excel文件或者将过滤数据写入数据表,在ETL开发的初期可以每天向业务单位发送过滤数据的邮件,促使他们尽快地修正错误,同时也可以做为将来验
证数据的依据。数据清洗需要注意的是不要将有用的数据过滤掉,对于每个过滤规则认真进行验证,并要用户确认。
2、 数据转换
数据转换的任务主要进行不一致的数据转换、数据粒度的转换,以及一些商务规则的计算。
(1)不一致数据转换:这个过程是一个整合的过程,将不同业务系统的相同类型的数据统一,比如同一个供应商在结算系统的编码是XX0001,而在CRM中编码是YY0001,这样在抽取过来之后统一转换成一个编码。
(2)数据粒度的转换:业务系统一般存储非常明细的数据,而数据仓库中数据是用来分析的,不需要非常明细的数据。一般情况下,会将业务系统数据按照数据仓库粒度进行聚合。
(3)商务规则的计算:不同的企业有不同的业务规则、不同的数据指标,这些指标有的时候不是简单的加加减减就能完成,这个时候需要在ETL中将这些数据指标计算好了之后存储在数据仓库中,以供分析使用。
三、ETL日志、警告发送
1、 ETL日志
ETL日志分为三类。一类是执行过程日志,这一部分日志是在ETL执行过程中每执行一步的记录,记录每次运行每一步骤的起始时间,影响了多少行
数据,流水账形式。一类是错误日志,当某个模块出错的时候写错误日志,记录每次出错的时间、出错的模块以及出错的信息等。第三类日志是总体日志,只记录
ETL开始时间、结束时间是否成功信息。如果使用ETL工具,ETL工具会自动产生一些日志,这一类日志也可以作为ETL日志的一部分。记录日志的目的是
随时可以知道ETL运行情况,如果出错了,可以知道哪里出错。
2、 警告发送
如果ETL出错了,不仅要形成ETL出错日志,而且要向系统管理员发送警告。发送警告的方式多种,一般常用的就是给系统管理员发送邮件,并附上出错的信息,方便管理员排查错误。
ETL是BI项目的关键部分,也是一个长期的过程,只有不断的发现问题并解决问题,才能使ETL运行效率更高,为BI项目后期开发提供准确的数据。
配置模板:config.vc
# =========================================================================
# This configuration file was generated by
# Bakefile 0.2.1 (http://bakefile.sourceforge.net)
# Beware that all changes made to this file will be overwritten next
# time you run Bakefile!
# =========================================================================
# -------------------------------------------------------------------------
# These are configurable options:
# -------------------------------------------------------------------------
# C compiler
CC = cl
# C++ compiler
CXX = cl
# Standard flags for CC
CFLAGS =
# Standard flags for C++
CXXFLAGS =
# Standard preprocessor flags (common for CC and CXX)
CPPFLAGS =
# Standard linker flags
LDFLAGS =
# The C preprocessor
CPP = $(CC) /EP /nologo
# What type of library to build? [0,1]
SHARED = 0
# Build wxUniversal instead of native port? [0,1]
WXUNIV = 0
# Compile Unicode build of wxWidgets? [0,1]
UNICODE = 0
# Use MSLU library when building Unicode version. [0,1]
MSLU = 0
# Type of compiled binaries [debug,release]
BUILD = release
# The target processor architecture must be specified when it is not X86.
# This does not affect the compiler output, so you still need to make sure
# your environment is set up appropriately with the correct compiler in the
# PATH. Rather it affects some options passed to some of the common build
# utilities such as the resource compiler and the linker.
#
# Accepted values: AMD64, IA64.
TARGET_CPU = $(CPU)
# Should debugging info be included in the executables? The default value
# "default" means that debug info will be included if BUILD=debug
# and not included if BUILD=release. [0,1,default]
DEBUG_INFO = default
# Should __WXDEBUG__ be defined? The default value "default" means that it will
# be defined if BUILD=debug and not defined if BUILD=release. [0,1,default]
DEBUG_FLAG = default
# Should link against debug RTL (msvcrtd.dll) or release (msvcrt.dll)?
# Acts according to BUILD by default. [0,1,default]
DEBUG_RUNTIME_LIBS = default
# Multiple libraries or single huge monolithic one? [0,1]
MONOLITHIC = 0
# Build GUI libraries? [0,1]
USE_GUI = 1
# Build wxHTML library (USE_GUI must be 1)? [0,1]
USE_HTML = 1
# Build multimedia library (USE_GUI must be 1)? [0,1]
USE_MEDIA = 1
# Build wxXRC library (USE_GUI must be 1)? [0,1]
USE_XRC = 1
# Build wxAUI library (USE_GUI must be 1)? [0,1]
USE_AUI = 1
# Build wxRichTextCtrl library (USE_GUI must be 1)? [0,1]
USE_RICHTEXT = 1
# Build OpenGL canvas library (USE_GUI must be 1)? [0,1]
USE_OPENGL = 0
# Build ODBC database classes (USE_GUI must be 1)? [0,1]
USE_ODBC = 0
# Build quality assurance classes library (USE_GUI must be 1)? [0,1]
USE_QA = 1
# Enable exceptions in compiled code. [0,1]
USE_EXCEPTIONS = 1
# Enable run-time type information (RTTI) in compiled code. [0,1]
USE_RTTI = 1
# Enable threading in compiled code. [0,1]
USE_THREADS = 1
# Link with gdiplus.lib? (Needed for wxGraphicsContext, will also set wxUSE_GRAPHICS_CONTEXT) [0,1]
USE_GDIPLUS = 0
# Is this official build by wxWidgets developers? [0,1]
OFFICIAL_BUILD = 0
# Use this to name your customized DLLs differently
VENDOR = custom
#
WX_FLAVOUR =
#
WX_LIB_FLAVOUR =
# Name of your custom configuration. This affects directory
# where object files are stored as well as the location of
# compiled .lib files and setup.h under the lib/ toplevel directory.
CFG =
# Compiler flags needed to compile test suite in tests directory. If you want
# to run the tests, set it so that the compiler can find CppUnit headers.
CPPUNIT_CFLAGS =
# Linker flags needed to link test suite in tests directory. If you want
# to run the tests, include CppUnit library here.
CPPUNIT_LIBS =
# Version of C runtime library to use. You can change this to
# static if SHARED=0, but it is highly recommended to not do
# it if SHARED=1 unless you know what you are doing. [dynamic,static]
RUNTIME_LIBS = dynamic
makefile: makefile.vc
# =========================================================================
# This makefile was generated by
# Bakefile 0.2.1 (http://bakefile.sourceforge.net)
# Do not modify, all changes will be overwritten!
# =========================================================================
!include <../../build/msw/config.vc>
# -------------------------------------------------------------------------
# Do not modify the rest of this file!
# -------------------------------------------------------------------------
### Variables: ###
WX_RELEASE_NODOT = 28
OBJS = \
vc_$(PORTNAME)$(WXUNIVNAME)$(WXUNICODEFLAG)$(WXDEBUGFLAG)$(WXDLLFLAG)$(CFG)$(DIR_SUFFIX_CPU)
LIBDIRNAME = .\..\..\lib\vc$(DIR_SUFFIX_CPU)_$(LIBTYPE_SUFFIX)$(CFG)
SETUPHDIR = \
$(LIBDIRNAME)\$(PORTNAME)$(WXUNIVNAME)$(WXUNICODEFLAG)$(WXDEBUGFLAG)
TASKBAR_CXXFLAGS = /M$(__RUNTIME_LIBS_8)$(__DEBUGRUNTIME_3) /DWIN32 \
$(__DEBUGINFO_0) /Fd$(OBJS)\taskbar.pdb $(____DEBUGRUNTIME_2_p) \
$(__OPTIMIZEFLAG_4) $(__NO_VC_CRTDBG_p) /D__WXMSW__ $(__WXUNIV_DEFINE_p) \
$(__DEBUG_DEFINE_p) $(__EXCEPTIONS_DEFINE_p) $(__RTTI_DEFINE_p) \
$(__THREAD_DEFINE_p) $(__UNICODE_DEFINE_p) $(__MSLU_DEFINE_p) \
$(__GFXCTX_DEFINE_p) /I$(SETUPHDIR) /I.\..\..\include /W4 /I. $(__DLLFLAG_p) \
/D_WINDOWS /I.\..\..\samples /DNOPCH $(__RTTIFLAG_9) $(__EXCEPTIONSFLAG_10) \
$(CPPFLAGS) $(CXXFLAGS)
TASKBAR_OBJECTS = \
$(OBJS)\taskbar_sample.res \
$(OBJS)\taskbar_tbtest.obj
### Conditionally set variables: ###
!if "$(USE_GUI)" == "0"
PORTNAME = base
!endif
!if "$(USE_GUI)" == "1"
PORTNAME = msw
!endif
!if "$(BUILD)" == "debug" && "$(DEBUG_FLAG)" == "default"
WXDEBUGFLAG = d
!endif
!if "$(DEBUG_FLAG)" == "1"
WXDEBUGFLAG = d
!endif
!if "$(UNICODE)" == "1"
WXUNICODEFLAG = u
!endif
!if "$(WXUNIV)" == "1"
WXUNIVNAME = univ
!endif
!if "$(TARGET_CPU)" == "amd64"
DIR_SUFFIX_CPU = _amd64
!endif
!if "$(TARGET_CPU)" == "amd64"
DIR_SUFFIX_CPU = _amd64
!endif
!if "$(TARGET_CPU)" == "ia64"
DIR_SUFFIX_CPU = _ia64
!endif
!if "$(TARGET_CPU)" == "ia64"
DIR_SUFFIX_CPU = _ia64
!endif
!if "$(SHARED)" == "1"
WXDLLFLAG = dll
!endif
!if "$(SHARED)" == "0"
LIBTYPE_SUFFIX = lib
!endif
!if "$(SHARED)" == "1"
LIBTYPE_SUFFIX = dll
!endif
!if "$(TARGET_CPU)" == "amd64"
LINK_TARGET_CPU = /MACHINE:AMD64
!endif
!if "$(TARGET_CPU)" == "amd64"
LINK_TARGET_CPU = /MACHINE:AMD64
!endif
!if "$(TARGET_CPU)" == "ia64"
LINK_TARGET_CPU = /MACHINE:IA64
!endif
!if "$(TARGET_CPU)" == "ia64"
LINK_TARGET_CPU = /MACHINE:IA64
!endif
!if "$(MONOLITHIC)" == "0"
EXTRALIBS_FOR_BASE =
!endif
!if "$(MONOLITHIC)" == "1"
EXTRALIBS_FOR_BASE =
!endif
!if "$(BUILD)" == "debug" && "$(DEBUG_INFO)" == "default"
__DEBUGINFO_0 = /Zi
!endif
!if "$(BUILD)" == "release" && "$(DEBUG_INFO)" == "default"
__DEBUGINFO_0 =
!endif
!if "$(DEBUG_INFO)" == "0"
__DEBUGINFO_0 =
!endif
!if "$(DEBUG_INFO)" == "1"
__DEBUGINFO_0 = /Zi
!endif
!if "$(BUILD)" == "debug" && "$(DEBUG_INFO)" == "default"
__DEBUGINFO_1 = /DEBUG
!endif
!if "$(BUILD)" == "release" && "$(DEBUG_INFO)" == "default"
__DEBUGINFO_1 =
!endif
!if "$(DEBUG_INFO)" == "0"
__DEBUGINFO_1 =
!endif
!if "$(DEBUG_INFO)" == "1"
__DEBUGINFO_1 = /DEBUG
!endif
!if "$(BUILD)" == "debug" && "$(DEBUG_RUNTIME_LIBS)" == "default"
____DEBUGRUNTIME_2_p = /D_DEBUG
!endif
!if "$(BUILD)" == "release" && "$(DEBUG_RUNTIME_LIBS)" == "default"
____DEBUGRUNTIME_2_p =
!endif
!if "$(DEBUG_RUNTIME_LIBS)" == "0"
____DEBUGRUNTIME_2_p =
!endif
!if "$(DEBUG_RUNTIME_LIBS)" == "1"
____DEBUGRUNTIME_2_p = /D_DEBUG
!endif
!if "$(BUILD)" == "debug" && "$(DEBUG_RUNTIME_LIBS)" == "default"
____DEBUGRUNTIME_2_p_1 = /d _DEBUG
!endif
!if "$(BUILD)" == "release" && "$(DEBUG_RUNTIME_LIBS)" == "default"
____DEBUGRUNTIME_2_p_1 =
!endif
!if "$(DEBUG_RUNTIME_LIBS)" == "0"
____DEBUGRUNTIME_2_p_1 =
!endif
!if "$(DEBUG_RUNTIME_LIBS)" == "1"
____DEBUGRUNTIME_2_p_1 = /d _DEBUG
!endif
!if "$(BUILD)" == "debug" && "$(DEBUG_RUNTIME_LIBS)" == "default"
__DEBUGRUNTIME_3 = d
!endif
!if "$(BUILD)" == "release" && "$(DEBUG_RUNTIME_LIBS)" == "default"
__DEBUGRUNTIME_3 =
!endif
!if "$(DEBUG_RUNTIME_LIBS)" == "0"
__DEBUGRUNTIME_3 =
!endif
!if "$(DEBUG_RUNTIME_LIBS)" == "1"
__DEBUGRUNTIME_3 = d
!endif
!if "$(BUILD)" == "debug"
__OPTIMIZEFLAG_4 = /Od
!endif
!if "$(BUILD)" == "release"
__OPTIMIZEFLAG_4 = /O2
!endif
!if "$(USE_THREADS)" == "0"
__THREADSFLAG_7 = L
!endif
!if "$(USE_THREADS)" == "1"
__THREADSFLAG_7 = T
!endif
!if "$(RUNTIME_LIBS)" == "dynamic"
__RUNTIME_LIBS_8 = D
!endif
!if "$(RUNTIME_LIBS)" == "static"
__RUNTIME_LIBS_8 = $(__THREADSFLAG_7)
!endif
!if "$(USE_RTTI)" == "0"
__RTTIFLAG_9 =
!endif
!if "$(USE_RTTI)" == "1"
__RTTIFLAG_9 = /GR
!endif
!if "$(USE_EXCEPTIONS)" == "0"
__EXCEPTIONSFLAG_10 =
!endif
!if "$(USE_EXCEPTIONS)" == "1"
__EXCEPTIONSFLAG_10 = /EHsc
!endif
!if "$(BUILD)" == "debug" && "$(DEBUG_RUNTIME_LIBS)" == "0"
__NO_VC_CRTDBG_p = /D__NO_VC_CRTDBG__
!endif
!if "$(BUILD)" == "release" && "$(DEBUG_FLAG)" == "1"
__NO_VC_CRTDBG_p = /D__NO_VC_CRTDBG__
!endif
!if "$(BUILD)" == "debug" && "$(DEBUG_RUNTIME_LIBS)" == "0"
__NO_VC_CRTDBG_p_1 = /d __NO_VC_CRTDBG__
!endif
!if "$(BUILD)" == "release" && "$(DEBUG_FLAG)" == "1"
__NO_VC_CRTDBG_p_1 = /d __NO_VC_CRTDBG__
!endif
!if "$(WXUNIV)" == "1"
__WXUNIV_DEFINE_p = /D__WXUNIVERSAL__
!endif
!if "$(WXUNIV)" == "1"
__WXUNIV_DEFINE_p_1 = /d __WXUNIVERSAL__
!endif
!if "$(BUILD)" == "debug" && "$(DEBUG_FLAG)" == "default"
__DEBUG_DEFINE_p = /D__WXDEBUG__
!endif
!if "$(DEBUG_FLAG)" == "1"
__DEBUG_DEFINE_p = /D__WXDEBUG__
!endif
!if "$(BUILD)" == "debug" && "$(DEBUG_FLAG)" == "default"
__DEBUG_DEFINE_p_1 = /d __WXDEBUG__
!endif
!if "$(DEBUG_FLAG)" == "1"
__DEBUG_DEFINE_p_1 = /d __WXDEBUG__
!endif
!if "$(USE_EXCEPTIONS)" == "0"
__EXCEPTIONS_DEFINE_p = /DwxNO_EXCEPTIONS
!endif
!if "$(USE_EXCEPTIONS)" == "0"
__EXCEPTIONS_DEFINE_p_1 = /d wxNO_EXCEPTIONS
!endif
!if "$(USE_RTTI)" == "0"
__RTTI_DEFINE_p = /DwxNO_RTTI
!endif
!if "$(USE_RTTI)" == "0"
__RTTI_DEFINE_p_1 = /d wxNO_RTTI
!endif
!if "$(USE_THREADS)" == "0"
__THREAD_DEFINE_p = /DwxNO_THREADS
!endif
!if "$(USE_THREADS)" == "0"
__THREAD_DEFINE_p_1 = /d wxNO_THREADS
!endif
!if "$(UNICODE)" == "1"
__UNICODE_DEFINE_p = /D_UNICODE
!endif
!if "$(UNICODE)" == "1"
__UNICODE_DEFINE_p_1 = /d _UNICODE
!endif
!if "$(MSLU)" == "1"
__MSLU_DEFINE_p = /DwxUSE_UNICODE_MSLU=1
!endif
!if "$(MSLU)" == "1"
__MSLU_DEFINE_p_1 = /d wxUSE_UNICODE_MSLU=1
!endif
!if "$(USE_GDIPLUS)" == "1"
__GFXCTX_DEFINE_p = /DwxUSE_GRAPHICS_CONTEXT=1
!endif
!if "$(USE_GDIPLUS)" == "1"
__GFXCTX_DEFINE_p_1 = /d wxUSE_GRAPHICS_CONTEXT=1
!endif
!if "$(SHARED)" == "1"
__DLLFLAG_p = /DWXUSINGDLL
!endif
!if "$(SHARED)" == "1"
__DLLFLAG_p_1 = /d WXUSINGDLL
!endif
!if "$(MONOLITHIC)" == "0"
__WXLIB_ADV_p = \
wx$(PORTNAME)$(WXUNIVNAME)$(WX_RELEASE_NODOT)$(WXUNICODEFLAG)$(WXDEBUGFLAG)$(WX_LIB_FLAVOUR)_adv.lib
!endif
!if "$(MONOLITHIC)" == "0"
__WXLIB_HTML_p = \
wx$(PORTNAME)$(WXUNIVNAME)$(WX_RELEASE_NODOT)$(WXUNICODEFLAG)$(WXDEBUGFLAG)$(WX_LIB_FLAVOUR)_html.lib
!endif
!if "$(MONOLITHIC)" == "0"
__WXLIB_XML_p = \
wxbase$(WX_RELEASE_NODOT)$(WXUNICODEFLAG)$(WXDEBUGFLAG)$(WX_LIB_FLAVOUR)_xml.lib
!endif
!if "$(MONOLITHIC)" == "0"
__WXLIB_CORE_p = \
wx$(PORTNAME)$(WXUNIVNAME)$(WX_RELEASE_NODOT)$(WXUNICODEFLAG)$(WXDEBUGFLAG)$(WX_LIB_FLAVOUR)_core.lib
!endif
!if "$(MONOLITHIC)" == "0"
__WXLIB_BASE_p = \
wxbase$(WX_RELEASE_NODOT)$(WXUNICODEFLAG)$(WXDEBUGFLAG)$(WX_LIB_FLAVOUR).lib
!endif
!if "$(MONOLITHIC)" == "1"
__WXLIB_MONO_p = \
wx$(PORTNAME)$(WXUNIVNAME)$(WX_RELEASE_NODOT)$(WXUNICODEFLAG)$(WXDEBUGFLAG)$(WX_LIB_FLAVOUR).lib
!endif
!if "$(USE_GUI)" == "1"
__LIB_TIFF_p = wxtiff$(WXDEBUGFLAG).lib
!endif
!if "$(USE_GUI)" == "1"
__LIB_JPEG_p = wxjpeg$(WXDEBUGFLAG).lib
!endif
!if "$(USE_GUI)" == "1"
__LIB_PNG_p = wxpng$(WXDEBUGFLAG).lib
!endif
!if "$(MSLU)" == "1"
__UNICOWS_LIB_p = unicows.lib
!endif
!if "$(USE_GDIPLUS)" == "1"
__GDIPLUS_LIB_p = gdiplus.lib
!endif
all: $(OBJS)
$(OBJS):
-if not exist $(OBJS) mkdir $(OBJS)
### Targets: ###
all: $(OBJS)\taskbar.exe
clean:
-if exist $(OBJS)\*.obj del $(OBJS)\*.obj
-if exist $(OBJS)\*.res del $(OBJS)\*.res
-if exist $(OBJS)\*.pch del $(OBJS)\*.pch
-if exist $(OBJS)\taskbar.exe del $(OBJS)\taskbar.exe
-if exist $(OBJS)\taskbar.ilk del $(OBJS)\taskbar.ilk
-if exist $(OBJS)\taskbar.pdb del $(OBJS)\taskbar.pdb
$(OBJS)\taskbar.exe: $(TASKBAR_OBJECTS) $(OBJS)\taskbar_sample.res
link /NOLOGO /OUT:$@ $(LDFLAGS) $(__DEBUGINFO_1) $(LINK_TARGET_CPU) /LIBPATH:$(LIBDIRNAME) /SUBSYSTEM:WINDOWS @<<
$(TASKBAR_OBJECTS) $(__WXLIB_ADV_p) $(__WXLIB_HTML_p) $(__WXLIB_XML_p) $(__WXLIB_CORE_p) $(__WXLIB_BASE_p) $(__WXLIB_MONO_p) $(__LIB_TIFF_p) $(__LIB_JPEG_p) $(__LIB_PNG_p) wxzlib$(WXDEBUGFLAG).lib wxregex$(WXUNICODEFLAG)$(WXDEBUGFLAG).lib wxexpat$(WXDEBUGFLAG).lib $(EXTRALIBS_FOR_BASE) $(__UNICOWS_LIB_p) $(__GDIPLUS_LIB_p) kernel32.lib user32.lib gdi32.lib comdlg32.lib winspool.lib winmm.lib shell32.lib comctl32.lib ole32.lib oleaut32.lib uuid.lib rpcrt4.lib advapi32.lib wsock32.lib odbc32.lib
<<
$(OBJS)\taskbar_sample.res: .\..\..\samples\sample.rc
rc /fo$@ /d WIN32 $(____DEBUGRUNTIME_2_p_1) $(__NO_VC_CRTDBG_p_1) /d __WXMSW__ $(__WXUNIV_DEFINE_p_1) $(__DEBUG_DEFINE_p_1) $(__EXCEPTIONS_DEFINE_p_1) $(__RTTI_DEFINE_p_1) $(__THREAD_DEFINE_p_1) $(__UNICODE_DEFINE_p_1) $(__MSLU_DEFINE_p_1) $(__GFXCTX_DEFINE_p_1) /i $(SETUPHDIR) /i .\..\..\include /i . $(__DLLFLAG_p_1) /d _WINDOWS /i .\..\..\samples $**
$(OBJS)\taskbar_tbtest.obj: .\tbtest.cpp
$(CXX) /c /nologo /TP /Fo$@ $(TASKBAR_CXXFLAGS) $**
1.GetVersionEx
wince:GetVersionExW_OSVERSIONINFOW
winnt:GetVersionExA_OSVERSIONINFOA, GetVersionExW_OSVERSIONINFOW, GetVersionExA_OSVERSIONINFOEXA, GetVersionExW_OSVERSIONINFOEXW
win98:需unicode支持
实现的manifest文件如下:
<?xml version="1.0" encoding="UTF-8" standalone="yes"?><assembly xmlns="urn:schemas-microsoft-com:asm.v1" manifestVersion="1.0"><assemblyIdentity version="1.0.0.0" processorArchitecture="X86" name="SWT.javaw" type="win32"/><description>Standard Widget Toolkit</description><dependency><dependentAssembly><assemblyIdentity type="win32" name="Microsoft.Windows.Common-Controls" version="6.0.0.0" processorArchitecture="X86" publicKeyToken="6595b64144ccf1df" language="*"/></dependentAssembly></dependency></assembly>
如果编译后的exe文件名为:test.exe
那么新建:test.exe.manifest:
<?xml version="2.0" encoding="UTF-8" standalone="yes"?>
<assembly xmlns="urn:schemas-microsoft-com:asm.v1" manifestVersion="1.0">
<assemblyIdentity
version="0.64.1.0"
processorArchitecture="x86"
name="Controls"
type="win32"
/>
<description>wxWindows application</description>
<dependency>
<dependentAssembly>
<assemblyIdentity
type="win32"
name="Microsoft.Windows.Common-Controls"
version="6.0.0.0"
processorArchitecture="X86"
publicKeyToken="6595b64144ccf1df"
language="*"
/>
</dependentAssembly>
</dependency>
</assembly>
我们只要在文件开头添加:
# -*- coding: UTF-8 -*-
来指明文件的编码格式。在windows下最好用GBK.
在swt代码中有一个段:
#define OS_NATIVE(func) Java_org_eclipse_swt_internal_gtk_OS_##func
如果宏代替OS_NATIVE(foo),这样就会产生这样一个代替Java_org_eclipse_swt_internal_gtk_OS_foo.
非常实用!
1.ruby
http://www.ruby-doc.org/core/
代理访问:http://anonymouse.org/cgi-bin/anon-www.cgi/http://www.ruby-doc.org/core/
http://www.ruby-doc.org/stdlib/
2.rmagick
http://studio.imagemagick.org/RMagick/doc/index.html
3.gemjack.com集合的大多数rdoc(推荐!)
http://gemjack.com/
mysql和oracle存储图片文件都是用blob类型,但是ruby怎么处理的呢?
ruby还是把它当作字符串,但是要经过加工.
我们完全可以使用rmagick这个图形库来进行.
代码:
require 'rubygems'
require_gem 'rmagick'
include Magick
DBI.connect('DBI:Mysql:test_dbo:192.168.0.164', 'mysql', '') { |dbh|
dbh.execute 'SET NAMES utf8'
1.upto(13) { |i|
str = "insert into users(name, pwd, img) values(?,?,?)"
dbh.prepare(str) { |st|
jpg = Image.read('1.jpg').first
st.execute('a', 'b', jpg.to_blob)
}
}
}
如果从数据库反响出来,也类似(from_blob方法)
首先创建表,我们这里默认编码utf8:
create table samples ( id int not null auto_increment,
foo varchar(100) not null,
bar text not null,
primary key (id)
) Type=MyISAM CHARACTER SET utf8;
这里创建表类型时要使用MyISAM类型,因为只有MyISAM类型才支持完整的utf8.最后设置编码utf8.
1.dbi操作数据库
如果你本地编码时gbk的话,首先要默认类Iconv进行转换.
require 'iconv'
def gb2u str
conv = Iconv.new("UTF-8", "GBK")
str = conv.iconv(str)
str << conv.iconv(nil)
conv.close
str
end
插入代码:
DBI.connect('DBI:Mysql:test:localhost', 'mysql', '') { |dbh|
dbh.execute 'SET NAMES utf8' #这里要指明代码
1.upto(13) { |i|
st.execute("insert into samples(foo, bar) values('#{gb2u('一')}#{i}', '#{gb2u('二')}')")
}
}
2.activerecord
activerecord是对dbi的包装.(也更神,呵呵!)
代码:
require 'rubygems'
require_gem 'activerecord' #因为我是gem的安装
ActiveRecord::Base.establish_connection(
:adapter => "mysql",
:host => "localhost",
:database => "test",
:username => "mysql",
:password => "",
:encoding => "utf8") #编码只需这里指明
#指明表
class Mytab < ActiveRecord::Base
set_table_name 'samples'
end
#插入数据
tab = Mytab.new
tab.foo= gb2u('一')
tab.bar = gb2u('二')
tab.save
#查询数据
data = Mytab.find(:all)
data.each { |line|
puts "['#{line[:id]}', '#{line[:foo]}, '#{line[:bar]}]"
}
看rrobots的一个简单的例子:
----------------------- code -----------------------
require 'robot'
class NervousDuck
include Robot
def tick events
turn_radar 1 if time == 0
turn_gun 30 if time < 3
accelerate 1
turn 2
fire 3 unless events['robot_scanned'].empty?
end
end
----------------------- code -----------------------
这里至少要实现tick方法.
下面是控制robot的一些方法和属性:
battlefield_height #the height of the battlefield
battlefield_width #the width of the battlefield
energy #your remaining energy (if this drops below 0 you are dead)
gun_heading #the heading of your gun, 0 pointing east, 90 pointing
#north, 180 pointing west, 270 pointing south
gun_heat #your gun heat, if this is above 0 you can't shoot
heading #your robots heading, 0 pointing east, 90 pointing north,
#180 pointing west, 270 pointing south
size #your robots radius, if x <= size you hit the left wall
radar_heading #the heading of your radar, 0 pointing east,
#90 pointing north, 180 pointing west, 270 pointing south
time #ticks since match start
speed #your speed (-8/8)
x #your x coordinate, 0...battlefield_width
y #your y coordinate, 0...battlefield_height
accelerate(param) #accelerate (max speed is 8, max accelerate is 1/-1,
#negativ speed means moving backwards)
stop #accelerates negativ if moving forward (and vice versa),
#may take 8 ticks to stop (and you have to call it every tick)
fire(power) #fires a bullet in the direction of your gun,
#power is 0.1 - 3, this power will heat your gun
turn(degrees) #turns the robot (and the gun and the radar),
#max 10 degrees per tick
turn_gun(degrees) #turns the gun (and the radar), max 30 degrees per tick
turn_radar(degrees) #turns the radar, max 60 degrees per tick
dead #true if you are dead
say(msg) #shows msg above the robot on screen
broadcast(msg) #broadcasts msg to all bots (they recieve 'broadcasts'
#events with the msg and rough direction)
首先要设置返回头jsp页面:response.setContentType("text/xml");
var node=xmlHttpReq.responseXML.documentElement.childNodes;
document.write("当前在线人数" +node.item(0).textContent+"人");
for(obj_key in node.item(0)){
alert(obj_key);
}这个方法知道的textContent这个方法的
兼容微软Office的办公软件OpenOffice,可用于文档处理,电子表格和幻灯片制作;类似于Outlook,集成邮件、联系人、日程和任务管理等强大功能的 Evolution;GGV和XCHM分别用于查看PDF和CHM文档;Smart-Storage让U盘、移动硬 盘、读卡器、 MP3、MP4、数码相机及刻录机的使用变得异常简单;英汉词典 Stardict;压缩与归档工具File-Roller;Planner和Dia分别用于项目管理和流程 图制作。
以安全轻便著称的Firefox浏览器,支持多页面浏览、屏蔽弹出式窗口和网页字体放大;类似于Foxmail,可用于收发邮件、新闻组及RSS的 Thunderbird;支持 ICQ、Yahoo、MSN、IRC、Jabber等协议的即时通讯软件Gaim;用于视频对话的 Gnomemeeting;支持断点续传的D4X;用于BT下载的Gnome-BT;可实现网络IP电话的Linphone;用于远程桌面控制和诊断的 Tsclient。
类似于Photoshop的强大图像处理工具Gimp;类似于Coreldraw或Illustrator的矢量处理软件Inkscape;类似于 Pagemaker的排版软件Scribus;类似于3D Max的三维设计软件Blender;类似于Acdsee的图片管理软件Gthumb、F-Spot;Xsane扫描软 件简单易用。
超能媒体播放器Totem,支持目前流行的大多数影音格式和在线播放;用于抓取CD 音轨的Sound-Juicer;用于组织和管理大量数码音乐的 Rhythmbox;类似于Winamp 的MP3播放软件bmp;简洁的电视播放器Tvtime;高品质的录音软件;各种趣味盎然 的游戏软件。
				1。gem query --remote        # shortcut: gem q -R
#列出所有包
2。gem query --remote --name-matches doom
  # shortcut: gem q -R -n doom
#列出所有名字匹配的包
3。gem install --remote progressbar
# shortcut: gem i -r progressbar
#安装指定名字的包。
gem ins -r progressbar --version '> 0.0.1' #这里可以匹配版本
4。gem specification  progressbar
# shortcut: gem spec progressbar
#查看安装过的指定包详细信息
5。gem uninstall progressbar
#卸载包
6。gem query --local
# shortcut: 'gem q -L'
#列出所有本地安装过的包
7。gem ins rake
#在本地安装,如果没有远程安装
8。gem list -b ^C
#列出所有以C开头的包
9。gem_server
开启rdoc服务。可以查看安装包的rdoc
这里现在xunleibho_v14.dll 命令行输入:regsvr32 xunleibho_v14.dll
#mdconfig -a -t vnode -f abc.iso -u 1
#mount_cd9660 /dev/md0 /mnt
宣誓:你愿意向神发誓,一切居实禀告,毫不欺瞒?
Do you swear to tell the truth, the whole truth, and nothing but the truth, so help you God? You bastard! 你这杂种!
直接的方法是
rand() % N /* 不好 */
试图返回从 0 到 N - 1 的数字。但这个方法不好, 因为许多随机数
发生器的低位比特并 不随机, 参见问题 13.16。
一个较好的方法是:
(int)((double)rand() / ((double)RAND_MAX + 1) * N)
如果你不希望使用浮点, 另一个方法是:
rand() / (RAND_MAX / N + 1)
两种方法都需要知道 RAND_MAX, 而且假设 N 要远远小于 RAND_MAX。
RAND_MAX 在 ANSI 里 #define 在 <stdlib.h>。
顺便提一下, RAND_MAX 是个常数, 它告诉你 C 库函数 rand()
的固定范围。你不可以设 RAND_MAX 为其它的值, 也没有办法要求 rand()
返回其它范围的值。
如果你用的随机数发生器返回的是 0 到 1 的浮点值, 要取得范围在 0 到
N - 1 内的整数, 只要将随机数乘以 N 就可以了。
标准库
标准库中提供了C++程序的基本设施。虽然C++标准库随着C++标准折腾了许多年,直到标准的出台才正式定型,但是在标准库的实现上却很令人欣慰得看到多种实现,并且已被实践证明为有工业级别强度的佳作。
1、 Dinkumware C++ Library
参考站点:http://www.dinkumware.com/'>http://www.dinkumware.com/
P.J. Plauger编写的高品质的标准库。P.J. Plauger博士是Dr. Dobb's程序设计杰出奖的获得者。其编写的库长期被Microsoft采用,并且最近Borland也取得了其OEM的license,在其C/C+ +的产品中采用Dinkumware的库。
2、 RogueWave Standard C++ Library
参考站点:http://www.roguewave.com/'>http://www.roguewave.com/'>http://www.roguewave.com/'>http://www.roguewave.com/
这个库在Borland C++ Builder的早期版本中曾经被采用,后来被其他的库给替换了。笔者不推荐使用。
3、SGI STL
参考站点:http://www.roguewave.com/'>http://www.roguewave.com/'>http://www.roguewave.com/'>http://www.roguewave.com/
SGI公司的C++标准模版库。
4、STLport
参考站点:http://www.stlport.org/'>http://www.stlport.org/
SGI STL库的跨平台可移植版本。
准标准库——Boost
Boost 库是一个经过千锤百炼、可移植、提供源代码的C++库,作为标准库的后备,是C++标准化进程的发动机之一。 Boost库由C++标准委员会库工作组成员发起,在C++社区中影响甚大,其成员已近2000人。 Boost库为我们带来了最新、最酷、最实用的技术,是不折不扣的"准"标准库。
Boost中比较有名气的有这么几个库:
Regex
正则表达式库
Spirit
LL parser framework,用C++代码直接表达EBNF
Graph
图组件和算法
Lambda
在调用的地方定义短小匿名的函数对象,很实用的functional功能
concept check
检查泛型编程中的concept
Mpl
用模板实现的元编程框架
Thread
可移植的C++多线程库
Python
把C++类和函数映射到Python之中
Pool
内存池管理
smart_ptr
5个智能指针,学习智能指针必读,一份不错的参考是来自CUJ的文章:
Smart Pointers in Boost,哦,这篇文章可以查到,CUJ是提供在线浏览的。中文版见笔者在《Dr. Dobb's Journal软件研发杂志》第7辑上的译文。
Boost 总体来说是实用价值很高,质量很高的库。并且由于其对跨平台的强调,对标准C++的强调,是编写平台无关,现代C++的开发者必备的工具。但是Boost 中也有很多是实验性质的东西,在实际的开发中实用需要谨慎。并且很多Boost中的库功能堪称对语言功能的扩展,其构造用尽精巧的手法,不要贸然的花费时间研读。Boost另外一面,比如Graph这样的库则是具有工业强度,结构良好,非常值得研读的精品代码,并且也可以放心的在产品代码中多多利用。
参考站点:http://www.boost.org'>http://www.boost.org(国内镜像:http://www.c'> http://www.c'>http://www.c'>http://www.c-view.org/tech/lib/boost/index.htm)
GUI
在众多C++的库中,GUI部分的库算是比较繁荣,也比较引人注目的。在实际开发中,GUI库的选择也是非常重要的一件事情,下面我们综述一下可选择的GUI库,各自的特点以及相关工具的支持。
1、 MFC
大名鼎鼎的微软基础类库(Microsoft Foundation Class)。大凡学过VC++的人都应该知道这个库。虽然从技术角度讲,MFC是不大漂亮的,但是它构建于Windows API 之上,能够使程序员的工作更容易,编程效率高,减少了大量在建立 Windows 程序时必须编写的代码,同时它还提供了所有一般 C++ 编程的优点,例如继承和封装。MFC 编写的程序在各个版本的Windows操作系统上是可移植的,例如,在 Windows 3.1下编写的代码可以很容易地移植到 Windows NT 或 Windows 95 上。但是在最近发展以及官方支持上日渐势微。
2、 QT
参考网站:http://www.trolltech.com/'>http://www.trolltech.com/
Qt 是Trolltech公司的一个多平台的C++图形用户界面应用程序框架。它提供给应用程序开发者建立艺术级的图形用户界面所需的所用功能。Qt是完全面向对象的很容易扩展,并且允许真正地组件编程。自从1996年早些时候,Qt进入商业领域,它已经成为全世界范围内数千种成功的应用程序的基础。Qt也是流行的Linux桌面环境KDE 的基础,同时它还支持Windows、Macintosh、Unix/X11等多种平台。
3、WxWindows
参考网站:http://www.wxwindows.org/'>http://www.wxwindows.org/
跨平台的GUI库。因为其类层次极像MFC,所以有文章介绍从MFC到WxWindows的代码移植以实现跨平台的功能。通过多年的开发也是一个日趋完善的 GUI库,支持同样不弱于前面两个库。并且是完全开放源代码的。新近的C++ Builder X的GUI设计器就是基于这个库的。
4、Fox
开放源代码的GUI库。作者从自己亲身的开发经验中得出了一个理想的GUI库应该是什么样子的感受出发,从而开始了对这个库的开发。有兴趣的可以尝试一下。
参考网站:http://www.fox'>http://www.fox-toolkit.org/
5、 WTL
基于ATL的一个库。因为使用了大量ATL的轻量级手法,模板等技术,在代码尺寸,以及速度优化方面做得非常到位。主要面向的使用群体是开发COM轻量级供网络下载的可视化控件的开发者。
6、 GTK
参考网站:http://gtkmm.sourceforge.net/
GTK是一个大名鼎鼎的C的开源GUI库。在Linux世界中有Gnome这样的杀手应用。而GTK就是这个库的C++封装版本。
?
库
网络通信
ACE
参考网站:http://www.c'>http://www.c'>http://www.c'>http://www.cs.wustl.edu/~schmidt/ACE.html
C+ +库的代表,超重量级的网络通信开发框架。ACE自适配通信环境(Adaptive Communication Environment)是可以自由使用、开放源代码的面向对象框架,在其中实现了许多用于并发通信软件的核心模式。ACE提供了一组丰富的可复用C++ 包装外观(Wrapper Facade)和框架组件,可跨越多种平台完成通用的通信软件任务,其中包括:事件多路分离和事件处理器分派、信号处理、服务初始化、进程间通信、共享内存管理、消息路由、分布式服务动态(重)配置、并发执行和同步,等等。
StreamModule
参考网站:http://www.omnifarious.org/StrMod/'>http://www.omnifarious.org/StrMod/
设计用于简化编写分布式程序的库。尝试着使得编写处理异步行为的程序更容易,而不是用同步的外壳包起异步的本质。
SimpleSocket
参考网站:http://home.hetnet.nl/~lcbokkers/simsock.htm
这个类库让编写基于socket的客户/服务器程序更加容易。
A Stream Socket API for C++
参考网站:http://www.pcs.cnu.edu/'>http://www.pcs.cnu.edu/~dgame/sockets/socketsC++/sockets.html
又一个对Socket的封装库。
XML
Xerces
参考网站:http://xml.apache.org/xerces-c/
Xerces-C++ 是一个非常健壮的XML解析器,它提供了验证,以及SAX和DOM API。XML验证在文档类型定义(Document Type Definition,DTD)方面有很好的支持,并且在2001年12月增加了支持W3C XML Schema 的基本完整的开放标准。
XMLBooster
参考网站:http://www.xmlbooster.com/'>http://www.xmlbooster.com/
这个库通过产生特制的parser的办法极大的提高了XML解析的速度,并且能够产生相应的GUI程序来修改这个parser。在DOM和SAX两大主流XML解析办法之外提供了另外一个可行的解决方案。
Pull Parser
参考网站:http://www.extreme.indiana.edu/xgws/xsoap/xpp/'>http://www.extreme.indiana.edu/xgws/xsoap/xpp/
这个库采用pull方法的parser。在每个SAX的parser底层都有一个pull的parser,这个xpp把这层暴露出来直接给大家使用。在要充分考虑速度的时候值得尝试。
Xalan
参考网站:http://xml.apache.org/xalan-c/
Xalan是一个用于把XML文档转换为HTML,纯文本或者其他XML类型文档的XSLT处理器。
CMarkup
参考网站:http://www.firstobject.com/xml.htm'>http://www.firstobject.com/xml.htm
这是一种使用EDOM的XML解析器。在很多思路上面非常灵活实用。值得大家在DOM和SAX之外寻求一点灵感。
libxml++
http://libxmlplusplus.sourceforge.net/
libxml++是对著名的libxml XML解析器的C++封装版本
科学计算
Blitz++
参考网站:http://www.oonumerics.org/blitz/'>http://www.oonumerics.org/blitz/
Blitz++ 是一个高效率的数值计算函数库,它的设计目的是希望建立一套既具像C++ 一样方便,同时又比Fortran速度更快的数值计算环境。通常,用C++所写出的数值程序,比 Fortran慢20%左右,因此Blitz++正是要改掉这个缺点。方法是利用C++的template技术,程序执行甚至可以比Fortran更快。 Blitz++目前仍在发展中,对于常见的SVD,FFTs,QMRES等常见的线性代数方法并不提供,不过使用者可以很容易地利用Blitz++所提供的函数来构建。
POOMA
参考网站:http://www.c'>http://www.c'>http://www.c'>http://www.codesourcery.com/pooma/pooma
POOMA是一个免费的高性能的C++库,用于处理并行式科学计算。POOMA的面向对象设计方便了快速的程序开发,对并行机器进行了优化以达到最高的效率,方便在工业和研究环境中使用。
MTL
参考网站:http://www.osl.iu.edu/research/mtl/'>http://www.osl.iu.edu/research/mtl/
Matrix Template Library(MTL)是一个高性能的泛型组件库,提供了各种格式矩阵的大量线性代数方面的功能。在某些应用使用高性能编译器的情况下,比如Intel的编译器,从产生的汇编代码可以看出其与手写几乎没有两样的效能。
CGAL
参考网站:www.cgal.org
Computational Geometry Algorithms Library的目的是把在计算几何方面的大部分重要的解决方案和方法以C++库的形式提供给工业和学术界的用户。
游戏开发
Audio/Video 3D C++ Programming Library
参考网站:http://www.galacticasoftware.com/products/av/'>http://www.galacticasoftware.com/products/av/
AV3D是一个跨平台,高性能的C++库。主要的特性是提供3D图形,声效支持(SB,以及S3M),控制接口(键盘,鼠标和遥感),XMS。
KlayGE
参考网站:http://home.g365.net/enginedev/
国内游戏开发高手自己用C++开发的游戏引擎。KlayGE是一个开放源代码、跨平台的游戏引擎,并使用Python作脚本语言。KlayGE在LGPL协议下发行。感谢龚敏敏先生为中国游戏开发事业所做出的贡献。
OGRE
参考网站:http://www.ogre3d.org'>http://www.ogre3d.org
OGRE (面向对象的图形渲染引擎)是用C++开发的,使用灵活的面向对象3D引擎。它的目的是让开发者能更方便和直接地开发基于3D硬件设备的应用程序或游戏。引擎中的类库对更底层的系统库(如:Direct3D和OpenGL)的全部使用细节进行了抽象,并提供了基于现实世界对象的接口和其它类。
线程
C++ Threads
参考网站:http://threads.sourceforge.net/
这个库的目标是给程序员提供易于使用的类,这些类被继承以提供在Linux环境中很难看到的大量的线程方面的功能。
ZThreads
参考网站:http://zthread.sourceforge.net/
一个先进的面向对象,跨平台的C++线程和同步库。
序列化
s11n
参考网站:http://s11n.net/
一个基于STL的C++库,用于序列化POD,STL容器以及用户定义的类型。
Simple XML Persistence Library
参考网站:http://sxp.sourceforge.net/
这是一个把对象序列化为XML的轻量级的C++库。
字符串
C++ Str Library
参考网站:http://www.utilitycode.com/str/'>http://www.utilitycode.com/str/
操作字符串和字符的库,支持Windows和支持gcc的多种平台。提供高度优化的代码,并且支持多线程环境和Unicode,同时还有正则表达式的支持。
Common Text Transformation Library
参考网站:http://cttl.sourceforge.net/
这是一个解析和修改STL字符串的库。CTTL substring类可以用来比较,插入,替换以及用EBNF的语法进行解析。
GRETA
参考网站:http://research.microsoft.com/projects/greta/
这是由微软研究院的研究人员开发的处理正则表达式的库。在小型匹配的情况下有非常优秀的表现。
综合
P::Classes
参考网站:http://pclasses.com/
一个高度可移植的C++应用程序框架。当前关注类型和线程安全的signal/slot机制,i/o系统包括基于插件的网络协议透明的i/o架构,基于插件的应用程序消息日志框架,访问sql数据库的类等等。
ACDK - Artefaktur Component Development Kit
参考网站:http://acdk.sourceforge.net/
这是一个平台无关的C++组件框架,类似于Java或者.NET中的框架(反射机制,线程,Unicode,废料收集,I/O,网络,实用工具,XML,等等),以及对Java, Perl, Python, TCL, Lisp, COM 和 CORBA的集成。
dlib C++ library
参考网站:http://www.c'>http://www.c'>http://www.c'>http://www.cis.ohio-state.edu/~kingd/dlib/
各种各样的类的一个综合。大整数,Socket,线程,GUI,容器类,以及浏览目录的API等等。
Chilkat C++ Libraries
参考网站:http://www.c'>http://www.c'>http://www.c'>http://www.chilkatsoft.com/cpp_libraries.asp
这是提供zip,e-mail,编码,S/MIME,XML等方面的库。
C++ Portable Types Library (PTypes)
参考网站:http://www.melikyan.com/ptypes/'>http://www.melikyan.com/ptypes/
这是STL的比较简单的替代品,以及可移植的多线程和网络库。
LFC
参考网站:http://lfc.sourceforge.net/
哦,这又是一个尝试提供一切的C++库
其他库
Loki
参考网站:http://www.moderncppdesign.com/'>http: //www.moderncppdesign.com/'>http://www.moderncppdesign.com/'>http://www.moderncppdesign.com/
哦,你可能抱怨我早该和Boost一起介绍它,一个实验性质的库。作者在loki中把C++模板的功能发挥到了极致。并且尝试把类似设计模式这样思想层面的东西通过库来提供。同时还提供了智能指针这样比较实用的功能。
ATL
ATL(Active Template Library)是一组小巧、高效、灵活的类,这些类为创建可互操作的COM组件提供了基本的设施。
FC++: The Functional C++ Library
这个库提供了一些函数式语言中才有的要素。属于用库来扩充语言的一个代表作。如果想要在OOP之外寻找另一分的乐趣,可以去看看函数式程序设计的世界。大师 Peter Norvig在 "Teach Yourself Programming in Ten Years"一文中就将函数式语言列为至少应当学习的6类编程语言之一。
FACT!
参考网站:http://www.kfa'>http://www.kfa-juelich.de/zam/FACT/start/index.html
另外一个实现函数式语言特性的库
Crypto++
提供处理密码,消息验证,单向hash,公匙加密系统等功能的免费库。
还有很多非常激动人心或者是极其实用的C++库,限于我们的水平以及文章的篇幅不能包括进来。在对于这些已经包含近来的库的介绍中,由于并不是每一个我们都使用过,所以难免有偏颇之处,请读者见谅。
资源网站
正如我们可以通过计算机历史上的重要人物了解计算机史的发展,C++相关人物的网站也可以使我们得到最有价值的参考与借鉴,下面的人物我们认为没有介绍的必要,只因下面的人物在C++领域的地位众所周知,我们只将相关的资源进行罗列以供读者学习,他们有的工作于贝尔实验室,有的工作于知名编译器厂商,有的在不断推进语言的标准化,有的为读者撰写了多部千古奇作......
Bjarne Stroustrup http://www.research.att.com/'>http://www.research.att.com/~bs/
Stanley B. Lippman
http: //blogs.msdn.com/slippman/(中文版http://www.zengyihome.net'>http: //www.zengyihome.net/slippman/index.htm'>http://www.zengyihome.net'>http://www.zengyihome.net/slippman/index.htm)
Scott Meyers http://www.aristeia.com/'>http://www.aristeia.com/
David Musser http://www.c'>http://www.c'>http://www.c'>http://www.cs.rpi.edu/~musser/
Bruce Eckel http://www.bruceeckel.com'>http://www.bruceeckel.com
Nicolai M. Josuttis http://www.josuttis.com/'>http://www.josuttis.com/
Herb Sutter http://www.gotw.ca/'>http://www.gotw.ca/
Andrei Alexandrescu http://www.moderncppdesign.com/'>http://www.moderncppdesign.com/'>http://www.moderncppdesign.com/'>http://www.moderncppdesign.com/
#include <fxdefs.h>
/********************************* Typedefs **********************************/
338
339 // Forward declarations
340 class FXObject;
341 class FXStream;
342 class FXString;
343
344
345 // Streamable types; these are fixed size!
346 typedef char FXchar;
347 typedef unsigned char FXuchar;
348 typedef FXuchar FXbool;
349 typedef unsigned short FXushort;
350 typedef short FXshort;
351 typedef unsigned int FXuint;
352 typedef int FXint;
353 typedef float FXfloat;
354 typedef double FXdouble;
355 typedef FXObject *FXObjectPtr;
31 #ifndef TRUE-
32 #define TRUE 1-
33 #endif-
34 #ifndef FALSE-
35 #define FALSE 0-
36 #endif-
40 #ifndef NULL-
41 #define NULL 0-
42 #endif
#define FXMAX(a,b) (((a)>(b))?(a):(b))
#define FXMIN(a,b) (((a)>(b))?(b):(a))
#define FXABS(val) (((val)>=0)?(val):-(val))
/// Clamp value x to range [lo..hi]-
#define FXCLAMP(lo,x,hi) ((x)<(lo)?(lo):((x)>(hi)?(hi):(x)))
l for a 32-bit long word value
w for a 16-bit word value
b for an 8-bit byte value
movl %eax, %ebx
movw %ax, %bx
movb %al, %bl
The data section
.ascii Text string
.asciz Null-terminated test string
.byte Byte value
.double Double-precision floating-point number
.float Single-precision floating-point number
.int 32-bit integer number
.long 32-bit integer number(same as .int)
.octa 16-byte integer number
.quad 8-byte integer number
.short 16-bit integer number
.single Single-precision floating-point number(same as .float)
define static symbols
.equ factor, 3
.equ LINUX_SYS_CALL, 0x80
The bss section
.comm Declares a common memory area for data that is not initialized
.lcomm Declares a local common memory area for data that is not initialized
类型 说明
mode_t 文件类型,文件创建方式
off_t 文件长度和位移量(带符号的)
size_t 对象(例如字符串)长度(不带符号的)
ssize_t 返回字节技术的函数(带符号的)
mode_t 文件类型,文件创建方式
ino_t i节点编号
dev_t 设备号(主和次)
nlink_t 目录项的连接计数
uid_t 数值用户id
gid_t 数值组id
time_t 日历时间的秒计数器
ANSI C POSIX.1 XPG3
SVR4 4.3+BSD 说明
unistd.h o o
o o 符号常量
limits.h o
o o 实施常数
sys/types.h o o
o o 原系统数据类型
sys/stat.h o o
o o 文件状态
fcntl.h o o
o o 文件控制
class Song include Comparable ## include和extend有什么不同? ##include负责将 module插入到类(模块)中,这样就能以函数的形式来调用方法;而 extend负责将 module插入到对象(实例)中,这样就添加了特殊方法。 @@plays = 0 ##类变量,必须初始化 attr_reader :name, :artist, :duration ##分别为@name,@artist,@duration设置可读的属性 attr_writer :duration ##对@duration设置可写的属性 def initialize(name, artist, duration)
@name = name
@artist = artist
@duration = duration
@plays = 0 ##对象变量
end
def to_s
"Song: #@name--#@artist (#@duration)"
end
def name ##函数式的公开所有变量
@name
end
def artist
@artist
end
def duration
@duration
end
while gets
  if /Ruby/
    print
  end
end

##等同代码

 ARGF.each {|line|  print line  if line =~ /Ruby/ }
##ARGF
##An object providing access to virtual concatenation of files passed as command-line
##arguments or standard input if there are no command-line arguments. A synonym for
##$<.

##等同代码
print ARGF.grep(/Ruby/)
##闭包的常见用法
[ 'cat', 'dog', 'horse' ].each {|name| print name, " " }
  5.times {  print "*" }
  3.upto(6) {|i|  print i }	##3..6又一写法
  ('a'..'e').each {|char| print char }

##输出函数的格式字符串
printf("Number: %5.2f,\nString: %s\n", 1.23, "hello")
#############################################
##闭包的一个用法
  animals = %w( ant bee cat dog elk )    # create an array
  animals.each {|animal| puts animal }   # iterate over the contents


#############################################
  def call_block
    puts "Start of method"
    yield					##执行传入的参数.这里为"In the block"
    yield
    puts "End of method"
  end

  call_block { puts "In the block" }

##############################################
##块的用法
 { puts "Hello" }       # this is a block

  do                     ###
    club.enroll(person)    # and so is this
    person.socialize       #
  end                    ###
line = "abc"
if line =~ /Perl|Python/	##匹配正则表达式
    puts "Scripting language mentioned: #{line}"
end


  line.sub(/Perl/, 'Ruby')    # replace first 'Perl' with 'Ruby'
  line.gsub(/Python/, 'Ruby') # replace every 'Python' with 'Ruby'
  histogram = Hash.new(0)	##给hash表设置默然值为0
  histogram['key1']
  histogram['key1'] = histogram['key1'] + 1
  histogram['key1']

######################################
##gets 从命令行出入的文件名得到的文件的每一行文本。
while line = gets
  puts line.downcase	##downcase全部转换成小写
end
##数组
a = [ 'ant', 'bee', 'cat', 'dog', 'elk' ]
  a[0]
  a[3]
# this is the same:
  a = %w{ ant bee cat dog elk }
  a[0]
  a[3]

##hash表
 inst_section = {
    'cello'     => 'string',
    'clarinet'  => 'woodwind',
    'drum'      => 'percussion',
    'oboe'      => 'woodwind',
    'trumpet'   => 'brass',
    'violin'    => 'string'
  }

  inst_section['oboe']
  inst_section['cello']
  inst_section['bassoon']
 a = [ 1, 'cat', 3.14 ]   # array with three elements
  # access the first element
  a[0]
  # set the third element
  a[2] = nil
  # dump out the array
  a
  def say_goodnight(name)
    result = "Good night, #{name}"	##把变量name的值替换进字符串,ruby使用#{var}.
    return result
  end
  puts say_goodnight('Pa')
##########################################################

  def say_goodnight(name)
    result = "Good night, #{name.capitalize}" ##s.capitalize 第一个子母变为大写
								      ##s.capitalize!
							              ##Returns a copy of s with the first character converted to uppercase and the remainder to lowercase.
								      ##"fooBar".capitalize # => "Foobar"
  return result
  end
  puts say_goodnight('uncle')

##########################################################

$greeting = "Hello"        # $greeting is a global variable
@name     = "Prudence"     # @name is an instance variable
puts "#$greeting, #@name"

##########################################################
  def say_goodnight(name)	##不用使用return语句也可以返回
    "Good night, #{name}"
  end
  puts say_goodnight('Ma')
 number = -123	#数字都有Math类的方法
 number = number.abs
  song = 1
  sam = ""
  def sam.play(a)	#定义方法
    "duh dum, da dum de dum ..."
  end
  "gin joint".length	#所有都是以Object为root
  "Rick".index("c")
  -1942.abs
  sam.play(song)
class Song
def initialize(a) #构造函数
end
end
song1 = Song.new("Ruby Tuesday")
song2 = Song.new("Enveloped in Python")
# and so on
3.times { puts "Hello!" }

i.times {| i| ...}
Iterates the block i times. ##迭代一个闭包i次
把设置:
'(global-font-lock-mode t nil (font-lock))
'(jde-check-version-flag nil)
就可以解决jde对cedet版本检查。
实现要安装mozilla. 现在下来配置环境变量: export MOZILLA_FIVE_HOME=/usr/X11R6/lib/mozilla
export LD_LIBRARY_PATH=$LD_LIBRARY_PATH:${MOZILLA_FIVE_HOME}:${LD_LIBRARY_PATH}
或
setenv MOZILLA_FIVE_HOME /usr/X11R6/lib/mozilla
setenv LD_LIBRARY_PATH ${MOZILLA_FIVE_HOME}:
${LD_LIBRARY_PATH}
转帖:无法删除dll文件?
高手莫笑。。(适用于XP,2003)
在论坛有时候老听网友说某某文件删不掉啊。。之类
的。而且有很多都是dll文件。虽然解决这个问题的方法有很多种。而且也可以把他删除,但是网友们有没有想过是为什么删不掉呢??这是因为你运行的某个程
序正在调用这个dll文件。正在使用的文件是当然不可能给你删除的。那么,到底是哪个程序在调用这个dll文件呢。我教大家一个方法可以把那个程序很容易
的找出来。。
在运行里输入cmd进入命令提示符。
然后输入命令tasklist /m>c:123.txt
回车。。是不是没有任何反应??
不要急。到C盘下面去找一找,是不是有了一个123.txt?(当然。你可以自己设定文件的输出路径,名字,甚至后缀。但要是文本文件哦。。)
打开他。里面就是目前运行的各个程序正在调用的dll文件。
把不能删除的dll文件的名字记下来。然后到记事本里去编辑-查找。输入对应的dll文件。是不是找出来了??
找出来了后问题就好办多了。打开任务管理器。把对应的那个程序给关了。。就可以顺利删除了。。那就不必进安全模式,进DOS那么麻烦了。。。
当
然。有些应用程序是以服务形式运行的。那么你就有可能查到的是svhost.exe但是。里面有很多个哦。。这个也好办。仍然打开命令提示符。输入
tasklist /svc,当然,你也可以把他输出为文本文件,如tasklist
/svc>C:234.txt。看到了吗?每个svchost.exe后面是不是对应有一个ID呢?有了ID一对照也可以知道是哪个服务了。。如果
是可关的。就关了他。。不过记住。。系统进程可别乱关哦。
The sine of an angle (specified in
radians) can be computed by making use of the approximation
sinx x x
if x is
sufficiently small, and the trigonometric identity 
to reduce the size of the argument of sin. (For
purposes of this exercise an angle is considered ``sufficiently
small'' if its magnitude is not greater than 0.1 radians.) These
ideas are incorporated in the following procedures: (define (cube x) (* x x x))
(define (p x) (- (* 3 x) (* 4 (cube x))))
(define (sine angle)
(if (not (> (abs angle) 0.1))
angle
(p (sine (/ angle 3.0)))))
有100美元需找零.
美元中有50美分(half-dollars),25美分(quarters),10美分(dimes),5美分(nickels),1美分(pennies).
总共有多少种方式?
分成两步:
1.计算使用50美分找零的方法数.
2.上面数目加上除了使用50美分找零的方法数以外的数目.
(define (count-change amount)
(cc amount 6))
(define (first-denomination kinds-of-coins)
(cond ((= kinds-of-coins 1) 1)
((= kinds-of-coins 2) 2)
((= kinds-of-coins 3) 5)
((= kinds-of-coins 4) 10)
((= kinds-of-coins 5) 20)
((= kinds-of-coins 6) 50)))
(define (cc amount kinds-of-coins)
(cond ((= amount 0) 1)
((or (< amount 0)
(= kinds-of-coins 0))
0)
(else (+ (cc (- amount ;第一步
(first-denomination kinds-of-coins))
kinds-of-coins)
(cc amount ;第二步
(- kinds-of-coins 1))))))
Fibonacci函数定义如下:  (define (fib n) (define (fib n)
(cond ((= n 0) 0)
((= n 1) 1)
(else (+ (fib (- n 1))
(fib (- n 2))))))
递归数如下:

Fib( n)非常接近  n n/  5 同样下面的式子也成立:  同样使用线性迭代效率要高的多: (define (fib n)
(fib-iter 1 0 n))
(define (fib-iter a b count)
(if (= count 0)
b
(fib-iter (+ a b) a (- count 1))))
Ackermann函数可用递推关系如下定义
A(m,0)=A(m-1,0) m=1,2,…
A(m,n)=A(m-1,A(m,n-1)) m=1,2,… n=1,2,…
初始条件为
A(0,n)=n+1,n=0,1,…
(define (A x y)
(cond ((= y 0) 0)
((= x 0) (* 2 y))
((= y 1) 2)
(else (A (- x 1)
(A x (- y 1))))))
关于n!求解: 1.线性递归 (define (factorial n)
(if (= n 1)
1
(* n (factorial (- n 1)))))
如图所示的线性的膨胀再线性的缩减,就为线性递归.
2.迭代
(define (factorial n)
(fact-iter 1 1 n))
(define (fact-iter product counter max-count)
(if (> counter max-count)
product
(fact-iter (* counter product)
(+ counter 1)
max-count)))
注:试验(factorial 10000),递归堆栈溢出,而迭代则可以运行.
Exercise 1.8. Newton's method for cube roots is based on the fact that if y is an
approximation to the cube root of x, then a better approximation is
given by the value 
例子:求2的平方根
| Guess |
Quotient |
Average |
| |
| 1 |
(2/1) = 2 |
((2 + 1)/2) = 1.5 |
| |
| 1.5 |
(2/1.5) = 1.3333 |
((1.3333 + 1.5)/2) = 1.4167 |
| |
| 1.4167 |
(2/1.4167) = 1.4118 |
((1.4167 + 1.4118)/2) = 1.4142 |
| |
| 1.4142 |
...
|
...
|
一.给出一个scheme的过程 (define (sqrt-iter guess x)
(if (good-enough? guess x)
guess
(sqrt-iter (improve guess x)
x)))
二.改进猜的数(x除以猜的数和猜的数的平均值
(define (average x y)
(/ (+ x y) 2)) (define (improve guess x)
(average guess (/ x guess)))
三.如何得到比较适合的值.这里做了一个假设,猜的值的平方减去x不小于0.001
(define (good-enough? guess x)
(< (abs (- (square guess) x)) 0.001))
注:如何用内部过程来使用上面的部分:
(define (sqrt x)
(define (good-enough? guess)
(define (square)
(* guess guess))
(< (abs (- (square) x)) 0.001))
(define (improve guess)
(define (average y)
(/ (+ guess y)
2))
(average (/ x guess)))
(define (sqrt-iter guess)
(if (good-enough? guess)
guess
(sqrt-iter (improve guess))))
(sqrt-iter 1.0))
省份/城市 DNS 名称 DNS IP ADDRESS
==========================================================
香港 ns1.netvigator.com 205.252.144.228
澳门 vassun2.macau.ctm.net 202.175.3.8
深圳 ns.shenzhen.gd.cn 202.96.134.133
202.96.154.8
202.96.154.15
北京 ns.bta.net.cn 202.96.0.133
ns.spt.net.cn 202.96.199.133
ns.cn.net 202.97.16.195
202.106.0.20
202.106.148.1
202.106.196.115
广东 ns.guangzhou.gd.cn 202.96.128.143
dns.guangzhou.gd.cn 202.96.128.68
上海 ns.sta.net.cn 202.96.199.132
202.96.199.133
202.96.209.5
202.96.209.133
浙江 dns.zj.cninfo.net 202.96.102.3
202.96.96.68
202.96.104.18
陕西 ns.snnic.com 202.100.13.11
西安: 202.100.4.15
202.100.0.68
天津 ns.tpt.net.cn 202.99.96.68
辽宁 ns.dcb.ln.cn 202.96.75.68
202.96.75.64
202.96.64.68
202.96.69.38
202.96.86.18
202.96.86.24
江苏 pub.jsinfo.net 202.102.29.3
202.102.13.141
202.102.24.35
安徽:
202.102.192.68
202.102.199.68
四川 ns.sc.cninfo.net 61.139.2.69
重庆 61.128.128.68
61.128.192.4
成都: 202.98.96.68
202.98.96.69
河北 ns.hesjptt.net.cn 202.99.160.68
保定: 202.99.160.68
202.99.166.4
山西 ns.sxyzptt.net.cn 202.99.198.6
吉林 ns.jlccptt.net.cn 202.98.5.68
山东 202.102.152.3
202.102.128.68
福建 dns.fz.fj.cn 202.101.98.55
湖南 202.103.100.206
广西 10.138.128.40
202.103.224.68
202.103.225.68
江西 202.109.129.2
202.101.224.68---j江西电信DNS
202.101.226.68---江西电信DNS
202.101.240.36 ---江西电信DNS ?
云南 ns.ynkmptt.net.cn 202.98.160.68
河南: 202.102.227.68
202.102.224.68
202.102.245.12
新疆: 61.128.97.73
乌鲁木齐 61.128.97.73
61.128.97.74
武汉: 202.103.24.68
202.103.0.117
厦门两个
202.101.103.55
202.101.103.54
山东的: 202.102.134.68
长沙
202.103.96.68
202.103.96.112
一些教育网内的----不一定好用
202.203.128.33 cernet云南中心主dns
202.203.128.34
210.14.232.241 and 203.93.19.133 罗湖
202.112.10.37 长安
202.115.64.33 and 202.115.64.34 西南交大
202.201.48.1 and 202.201.48.2 nwnu
210.33.116.112 浙江电大
202.116.160.33 华南农业
202.114.240.6 wust
202.194.48.130 ytnc
202.114.0.242 and 202.112.20.131 华中科大
202.202.128.33 and 202.202.128.34 重庆医科大?西安交大?
202.112.0.33 and 202.112.0.34 cernet 华北网
210.38.192.33 韶关
全国各地VPI/VCI列表
地名 VPI VCI DNS 其它
北京 0 35 202.106.196.115
天津 0 35 202.99.96.68
广西 0 35 202.103.224.68, 202.103.225.68
云南 0 35 61.166.150.101
普洱 0 35 61.166.150.101, 61.166.15.170
兰州 0 32
西安 8 35
长春 8 35
吉林市 0 39 202.98.0.68
0 38 202.98.5.68
哈尔滨 8 35
武汉 0 32 202.103.24.68
乌鲁木齐0 32 61.128.99.133, 61.128.99.134
顺德 8 81 202.96.128.68
广州 8 32 202.96.128.68, 202.96.128.110
8 35
中山 8 35
河源 8 81 202.96.128.143, 202.96.128.43
惠东 0 100
东莞 8 35
从化 8 35 202.96.128.68
湛江 0 80
8 81
0 100 202.96.128.68, 202.96.128.143
阳江 8 35 202.96.128.68, 202.96.135.133
南海 0 100 202.96.128.68, 202.96.134.133
江門 0 100 202.96.128.68
汕尾 0 35
珠海 8 35
斗门 0 100
汕头地区8 81 202.96.128.143, 202.96.128.68
汕头 0 35
东莞 0 100
肈庆 8 81 61.140.7.67, 202.96.134.133
202.96.128.68,202.96.128.143
佛山 8 35 202.96.128.68
惠州 0 100
福清 0 200
揭阳 8 81
秦皇岛 0 35 202.99.160.68, 202.99.166.4
浙江衢州8 81 202.101.172.37, 202.96.104.18
杭州 8 35
0 32 202.101.172.35, 202.96.104.18
辽宁 0 35
抚顺铁通8 32 210.52.149.2, 211.98.2.4
202.96.64.68
10.0.1.254(固定IP)
河南安阳8 81 202.102.224.68, 202.102.227.68
濮阳 0 35 202.102.224.68, 202.102.227.68
驻马店 0 35 202.102.224.68
河南铁通0 35 211.98.192.3,202.102.224.68
山东枣庄8 81
重庆 0 35
湖南 0 35 211.98.2.4
娄底 8 81 202.103.88.3, 202.103.100.100
贵州六盘水0 35 202.98.198.168
福建 0 200 202.101.98.55, 202.101.98.54
南平 0 35 202.101.115.55
厦门 8 35
福州 0 200 202.101.98.55
龙岩 0 35 202.101.113.55
三明 0 100 202.101.114.55
安徽合肥0 35
0 32
0 33 202.102.192.68
中原油田8 81
河南焦作0 35 10.255.0.68, 202.102.227.68
上海 8 81 202.96.209.5, 202.96.209.133
福建福州0 200 202.101.98.55
广东珠海8 35 市区(含吉大、拱北、香洲、新香洲)、唐家、金鼎
0 100 南屏、西区、斗门
上海 8 81 202.96.209.5 202.96.209.133
湖南娄底8 81 202.103.88.3 202.103.100.100
乌鲁木齐0 32 61.128.99.133 61.128.99.134
山东滨州0 40
浙江台州8 81 202.101.172.37 202.96.104.18
浙江衢州8 81 202.101.172.37 202.96.104.18
秦皇岛 0 35 202.99.160.68 202.99.166.4
重庆 8 35
枣庄市 8 81
福建龙岩0 35 202.101.113.55
江西萍乡0 35 202.101.224.68 202.101.226.68
武汉 0 32 202.103.24.68
福建三明0 100 202.101.114.55
广东湛江不同地域有:大多是8 81,另外为0 100, DNS 202.96.128.68
安徽 0 35 202.102.192.68 (主机在合肥)
深圳 8 35 202.96.134.133 202.96.128.68
赣州 0 35 218.87.132.1 218.87.142.1
陕西榆林0 35 61.134.1.9 61.134.1.4
龙岩武平0 35 202.101.98.55 202.101.113.55
樟树市 0 35 202.101.224.68 202.101.226.68
广州花都8 35
江苏南京8 35 202.102.24.34
江苏苏州8 35 202.102.14.141
江苏无锡0 100 202.102.2.141
江苏常州8 35 202.102.3.141,202.102.3.144
202.102.15.162
襄樊 0 35 202.103.44.5
湖南岳阳 8 81 220.103.99.3
北京 0 35 202.106.196.115
天津 0 35 202.99.96.68
广西 0 35 202.103.224.68
202.103.225.68
南宁 0 35 202.103.224.68
梧州 0 35 主 202.103.224.68
备 202.103.229.40
玉林 0 35 202.103.224.68
柳州 0 35 202.103.225.68(主用)
202.103.224.68(备用)
江苏苏州 8 35 202.102.14.141 hrh
江苏 无锡 0 100 DNS:202.102.2.141(dns.wx.js.cn)
江苏常州 8 35 202.102.3.141,202.102.3.144,202.102.15.162
襄樊 0 35 主 202.103.44.5
辅 202.103.0.117 xfhaoym
云南 0 35 61.166.150.101
普洱 0 35 61.166.150.101
61.166.15.170
兰州 0 32
西安 8 35
长春 8 35
吉林市 0 38
0 39
202.98.0.68
202.98.5.68 WWWXin
哈尔滨 8 35
武汉 0 32 202.103.24.68
新疆乌鲁木齐 0 32 61.128.99.133
61.128.99.134
顺德 8 81
8 35
202.96.128.68
202.96.128.68
广州 8 35
8 32 主202.96.128.68
辅202.96.128.110
花都、从化 8 35 主 202.96.128.68 202.96.128.110
白云区、海珠区 0 35 61.144.56.101
202.96.128.68
中山 8 35 202.96.128.68
深圳 8 35 202.96.134.133
202.96.128.68
增城
8 35 61.144.56.100
佛山高明区 0 100 202.96.128.68
南海市盐步镇压 0 100 主202.96.128.68. 202.96.134.133
河源 8 81 202.96.128.143
202.96.128.43
惠东 0 100
东莞 8 35
0 100
202.96.128.68
从化 8 35 202.96.128.68
湛江 0 80
8 81
0 100 202.96.128.68
202.96.128.143
202.96.128.68
阳江
8 35 202.96.128.68
202.96.135.133
南海 0 100 202.96.128.68
202.96.134.133
江門 0 100 202.96.128.68
汕尾 0 35
珠海 8 35
斗门 0 100
汕头地区 8 81 DNS1:202.96.128.143
DMS2:202.96.128.68
汕头 0 35
东莞 0 100
茂名
8 35 202.103.176.22
惠州 0 100 202.96.128.143
肈庆
8 81 主控DNS:61.140.7.67
辅助DNS:202.96.134.133
主DNS:202.96.128.68
辅DNS:202.96.128.143
佛山 8 35 202.96.128.68
惠州 0 100 wy.chen
福清 0 200 wy.chen
揭阳 8 81 wy.chen
清远 8 81 202.96.128.68 202.96.134.133
深圳 8 35
秦皇岛 0 35 主:202.99.160.68
备:202.99.166.4
浙江衢州 8 81 主:202.101.172.37
备:202.96.104.18
杭州 8 35
0 32 202.101.172.35
202.96.104.18
辽宁 0 35
辽宁抚顺铁通 8 32 210.52.149.2
211.98.2.4
202.96.64.68 网关:10.0.1.254(固定IP)
大连 8 35 DNS:202.96.69.38
202.96.64.68
河南安阳 8 81 202.102.224.68
202.102.227.68
濮阳 0 35 202.102.224.68
202.102.227.68
驻马店 0 35 202.102.224.68
河南铁通 0 35 211.98.192.3
202.102.224.68
山东 202.102.134.68
山东省枣庄 8 81
济南徐州铁通 0 35
荆门京山县 8 81
上海 0 32
重庆 0 35
8 35
湖南 0 35 211.98.2.4
长沙 0 32 202.103.96.68
常德 8 38 dns 202.103.0.117
娄底 8 81 202.103.88.3
202.103.100.100
贵州六盘水 0 35 202.98.198.168
福建 0 200 202.101.98.55
202.101.98.54
南平 0 35 202.101.115.55
厦门 8 35 Chunsheng JING
福州 0 200 202.101.98.55
龙岩 0 35 202.101.98.55
202.101.113.55
三明 0 100 202.101.114.55
陕西榆林 0 35 主 61.134.1.9
备 61.134.1.4
安徽合肥 0 35
0 32
0 33
202.102.192.68 详情
云南昆明 8 35
0 35
主 DNS:202.98.160.68
备DNS:202.98.161.68
中原油田 8 81
河南焦作 0 35 10.255.0.68
202.102.227.68
上海 8 81 202.96.209.5
202.96.209.133
江西南昌 0 35
樟树市 0 35 主202.101.224.68
备202.101.226.68
江西赣州 0 35 218.87.132.1
218.87.142.1
西藏拉萨 8 81 主用dns:219.151.32.66
备用dns:202.98.224.68
Comments
安徽
202.102.192.68
202.102.199.68
苏州的:202.102.14.146
202.102.14.141
202.102.15.162
无锡
主用:221.228.255.1
备用一:218.2.135.1
备用二:61.147.37.1
上海 202.96.209.6/133
青岛
202.102.134.68
202.102.154.3
海南
202.100.192.68
202.100.199.8
黑龙江
202.97.224.68
202.97.230.4
扬州
202.102.7.141
江西:
202.101.224.68
202.101.226.68
温州 :
61.153.177.196
61.153.177.197
成都网通:221.10.251.196
上海电信:主:202.101.10.10
辅:202.96.133.199
扬州电信 主:202.102.7.141
辅202.102.7.90
香港: 203.98.129.9
203.98.129.1
深圳
202.96.134.133
202.96.134.188
贵阳
202.98.198.168
202.98.192.68
广州:
203.96.128.68
203.96.128.69
湖南省的中国铁通61.243.254. 211.98.2.4
湖南怀化最新的
218.77.31.200
安徽蚌埠
202.102.200.101
202.102.200.98
甘肃的:202.100.64.68 202.100.64.66
广州的:61.144.56.100
新疆:61.128.99.133
61.128.99.134
河南电信
219.150.150.150
219.150.32.132
邵阳:218.76.192.100,
218.76.192.101
杭州202.96.96.68早不用了,现在是202.96.103.36了
河南的早就更新了
目前河南安阳网通的是
219.157.70.130
218.29.255.68
厦门
电信 202.101.103.54
202.101.103.55
铁通 211.98.2.4
无锡DNS已经改了
现在是
主用:221.228.255.1
备用一:218.2.135.1
备用二:61.147.37.1
广东惠州
电信:202.96.128.68
铁通:211.98.4.1
211.98.2.4
马来西亚 TM NET:
主:202.188.0.133
辅:202.188.1.5
福建泉州 202.101.107.55
广州电信: 61.144.56.100 , 61.144.56.101
202.96.128.68 , 202.96.128.86 , 202.96.128.166
广州长城宽带: 211.162.62.1 深圳: 211.162.78.1
云南玉溪电信:61.166.150.101
61.166.15.170
江苏镇江电信的:202.102.4.141 202.102.2.141
江苏镇江网通的:221.6.4.66
深圳 202.96.134.134
河南铁通211.98.192.3 61.233.75.3
湖南的是202.103.96.112/202.103.96.68
湖南省怀化
202.103.83.3
218.77.31.200
重庆备用的那个61.128.192.68
内蒙网通: 202.99.224.8 202.99.224.68
吉林网通: 202.98.5.68
黑龙江202.97.224.68(69)
福建厦门:
202.101.103.55
202.101.107.55
山东电信: 219.146.0.130
219.150.32.132
|