#
https://www.softwarecollections.org/en/不用再GOOGLE寻找安装方法。
安装MYSQL示例:
# 2. Install the collection:
$ sudo yum install rh-mariadb103
# 3. Start using software collections:
$ scl enable rh-mariadb103 bash
$ service rh-mariadb103-mariadb start
$ mysql
$ mysqld

#开机加载命令
cp /opt/rh/rh-mariadb103/enable /etc/profile.d/rh-mariadb103.sh
当CLIENT或用户在KEYCLOAK中成功登录后,会返回JWT字符串,其中默认含有权限的信息,但此信息以内嵌的方式呈现,非常不方便。
"resource_access": {
"app-springboot-confidential": {
"roles": [
"user"
]
},
"test-employee-service": {
"roles": [
"READ_EMPLOYEE"
]
},
"service-springboot": {
"roles": [
"READ_PRODUCTS"
]
},
"account": {
"roles": [
"manage-account",
"manage-account-links"
]
},
"test-department-service": {
"roles": [
"READ_DEPARTMENT"
]
}
}
- 需要将权限的信息输出到一个KEY中,这时可以新增自定义CLIENT SCOPE。Mapper中新增KEYCLOAK已内置的【realm roles/client roles】,定义输出到JTW的字段名:my-roles。
- 授权哪些CLIENT可以读取此CLIENT SCOPE.
- 在登录参数scope中,加入此值:my-roles,这样在输出的JWT就会以平面的方式输出所有roles
"my-roles": [
"user",
"READ_EMPLOYEE",
"READ_PRODUCTS",
"manage-account",
"manage-account-links",
"READ_DEPARTMENT",
"offline_access",
"user"
]
@Bean
public ReactiveJwtAuthenticationConverter jwtAuthenticationConverter(ObjectMapper objectMapper) {
JwtGrantedAuthoritiesConverter jwtGrantedAuthoritiesConverter = new JwtGrantedAuthoritiesConverter();
jwtGrantedAuthoritiesConverter.setAuthorityPrefix("ROLE_");
jwtGrantedAuthoritiesConverter.setAuthoritiesClaimName("my-roles");
// KeycloakRealmRoleConverter keycloakRealmRoleConverter = new KeycloakRealmRoleConverter(objectMapper);
ReactiveJwtGrantedAuthoritiesConverterAdapter reactiveJwtGrantedAuthoritiesConverterAdapter =
new ReactiveJwtGrantedAuthoritiesConverterAdapter(
// new KeycloakRealmRoleConverter(objectMapper);
jwtGrantedAuthoritiesConverter
);
ReactiveJwtAuthenticationConverter jwtConverter = new ReactiveJwtAuthenticationConverter();
jwtConverter.setJwtGrantedAuthoritiesConverter(reactiveJwtGrantedAuthoritiesConverterAdapter);
return jwtConverter;
}
ServerHttpSecurity
.authorizeExchange(
a -> a.pathMatchers("/", "/error").permitAll()
.matchers(PathRequest.toStaticResources().atCommonLocations()).permitAll()
.pathMatchers(HttpMethod.GET, "/protected/**").hasRole("READ_DEPARTMENT")
.anyExchange()
.authenticated()
)
添加依赖,pom.xml
<dependency>
<groupId>org.springframework.boot</groupId>
<artifactId>spring-boot-starter-webflux</artifactId>
</dependency>
<!-- spring session with mongodb -->
<dependency>
<groupId>org.springframework.session</groupId>
<artifactId>spring-session-data-mongodb</artifactId>
</dependency>
<dependency>
<groupId>org.springframework.boot</groupId>
<artifactId>spring-boot-starter-data-mongodb-reactive</artifactId>
</dependency>
配置文件,application.yaml
spring:
session:
store-type: mongodb
timeout: 30s
mongodb:
collection-name: WEB_SESSIONS
java配置,HttpSessionConfiguration.java:
package com.paul.testmicroservicecommon.config;
import org.springframework.boot.autoconfigure.session.MongoSessionProperties;
import org.springframework.boot.autoconfigure.session.SessionProperties;
import org.springframework.boot.context.properties.EnableConfigurationProperties;
import org.springframework.context.annotation.Bean;
import org.springframework.session.config.ReactiveSessionRepositoryCustomizer;
import org.springframework.session.data.mongo.ReactiveMongoSessionRepository;
import org.springframework.session.data.mongo.config.annotation.web.reactive.EnableMongoWebSession;
@EnableMongoWebSession
@EnableConfigurationProperties(MongoSessionProperties.class)
public class HttpSessionConfiguration {
@Bean
public ReactiveSessionRepositoryCustomizer<ReactiveMongoSessionRepository> customize(
SessionProperties sessionProperties,
MongoSessionProperties mongoSessionProperties
){
return c -> {
c.setMaxInactiveIntervalInSeconds((int)sessionProperties.getTimeout().getSeconds());
c.setCollectionName(mongoSessionProperties.getCollectionName());
};
}
}
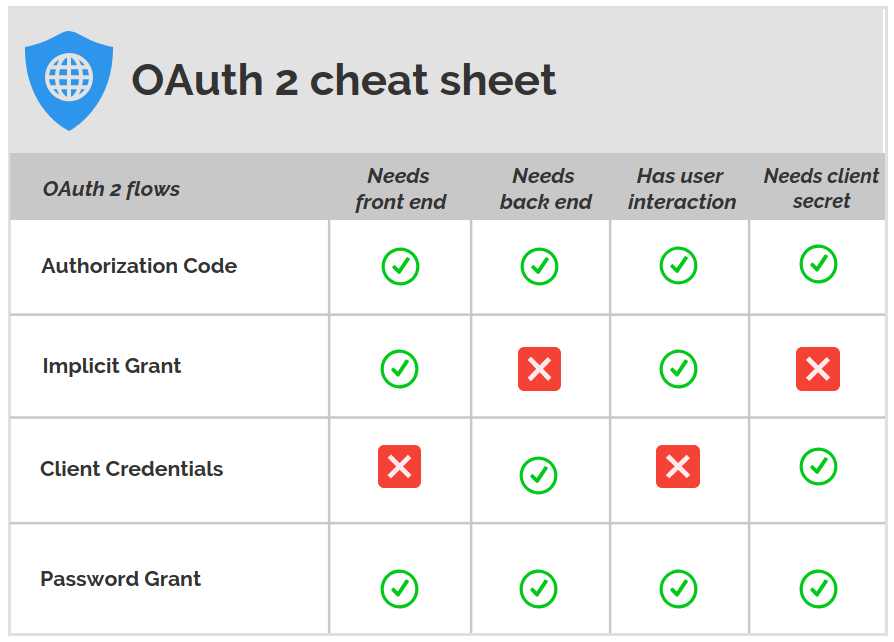
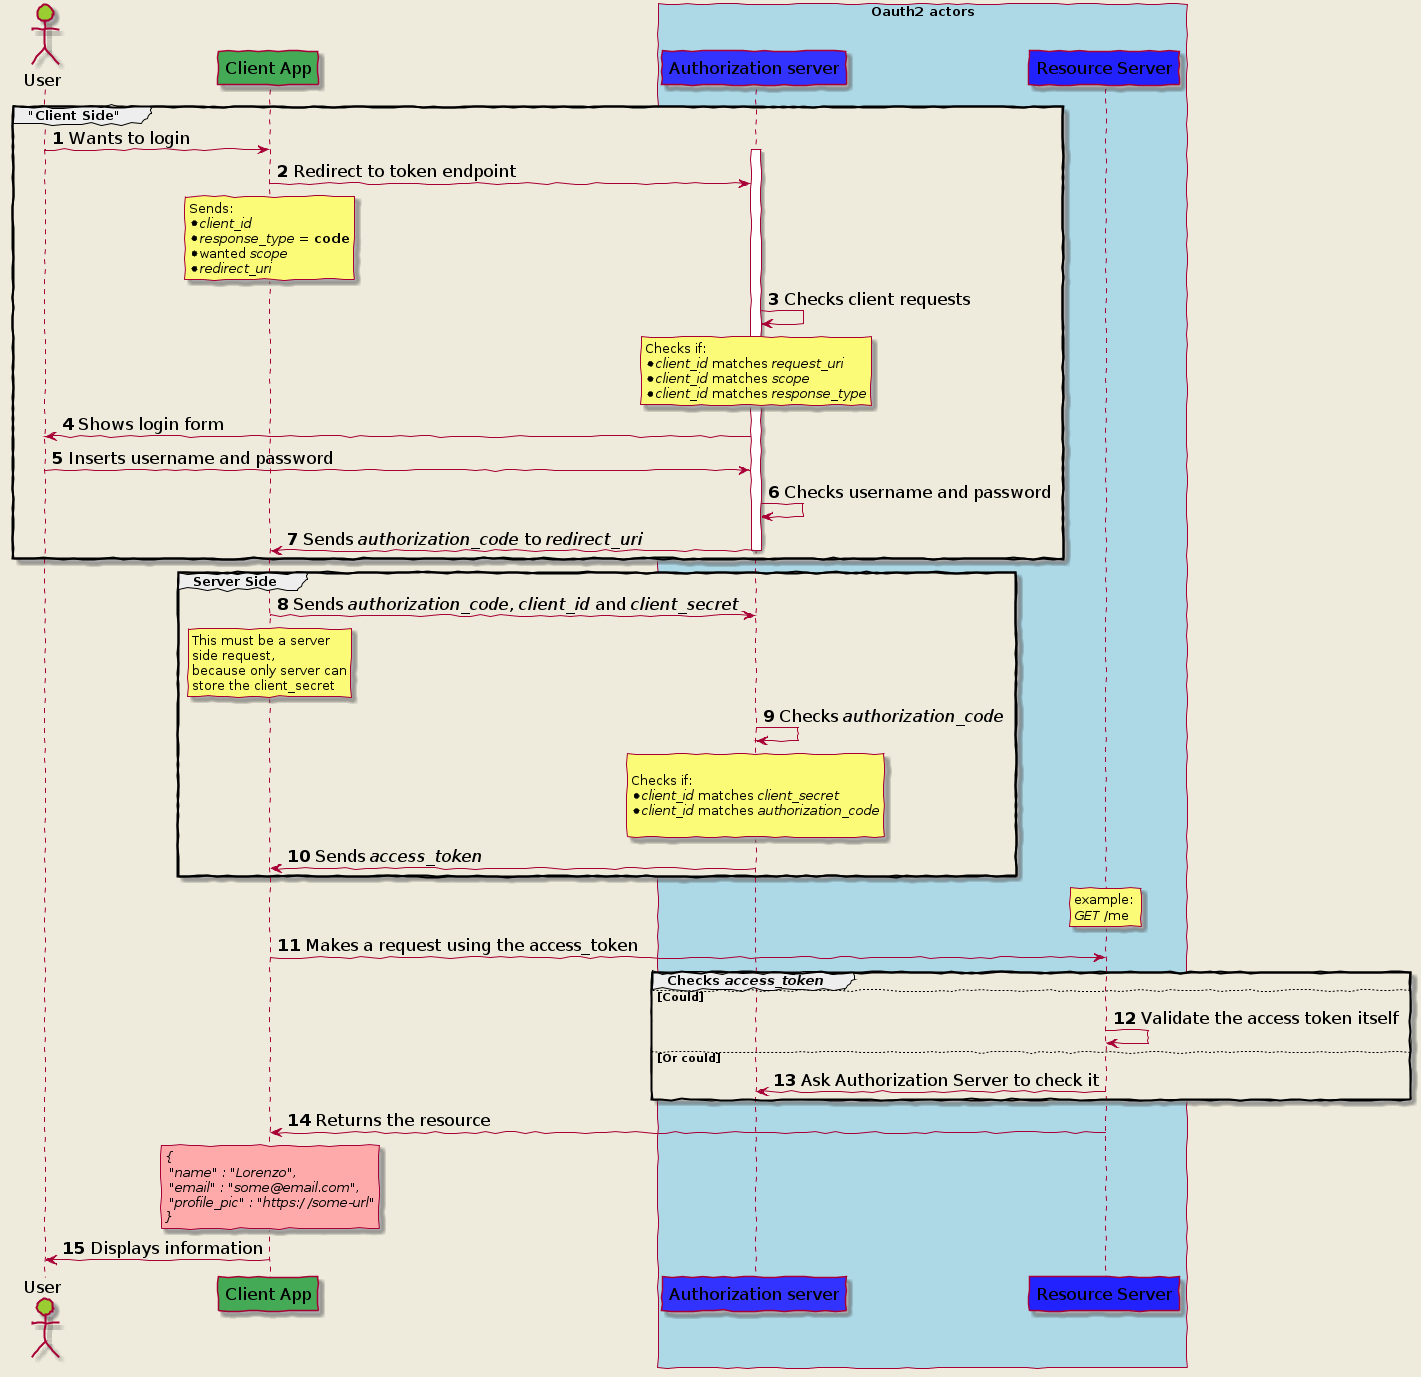
Authorization Code Grant
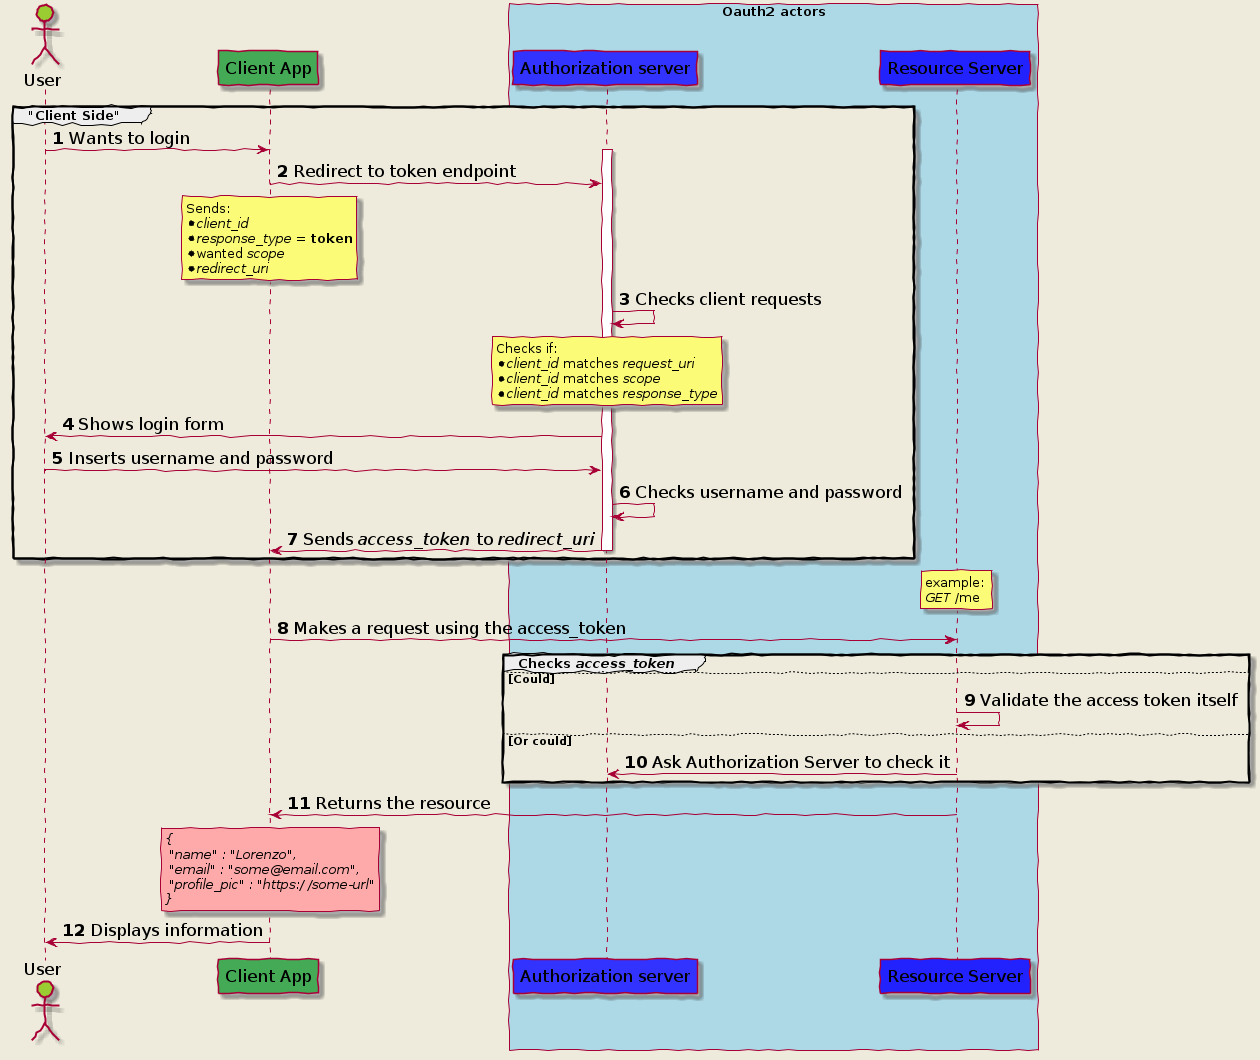
Implicit Grant Flow
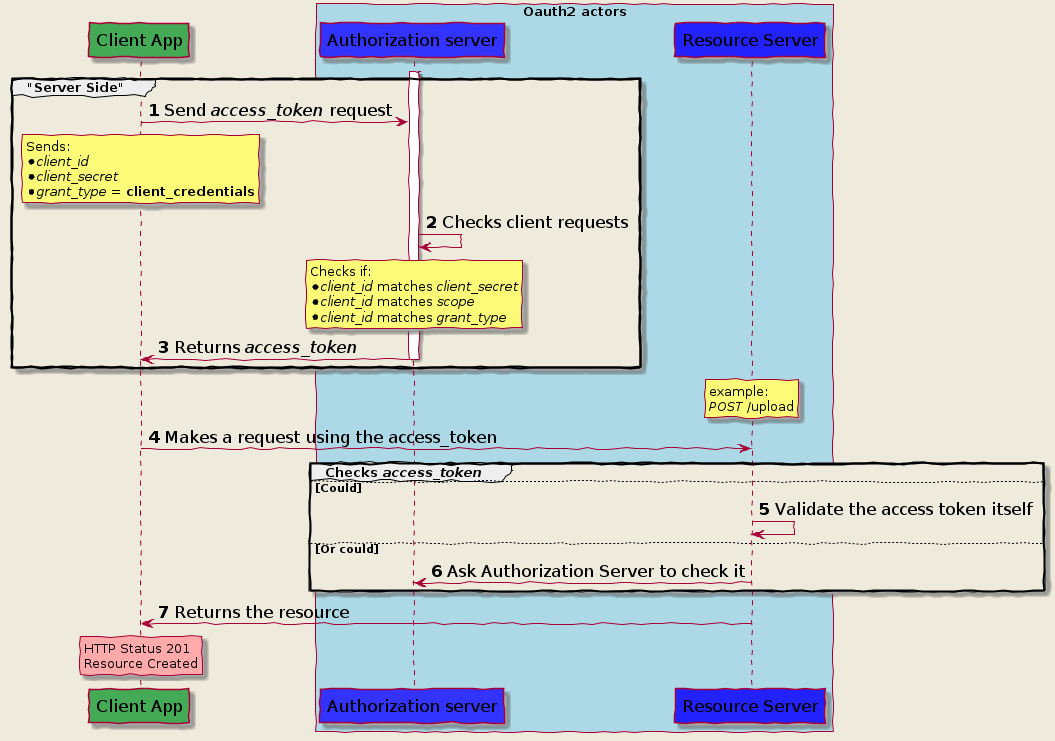
Client Credential
Password Grant flow
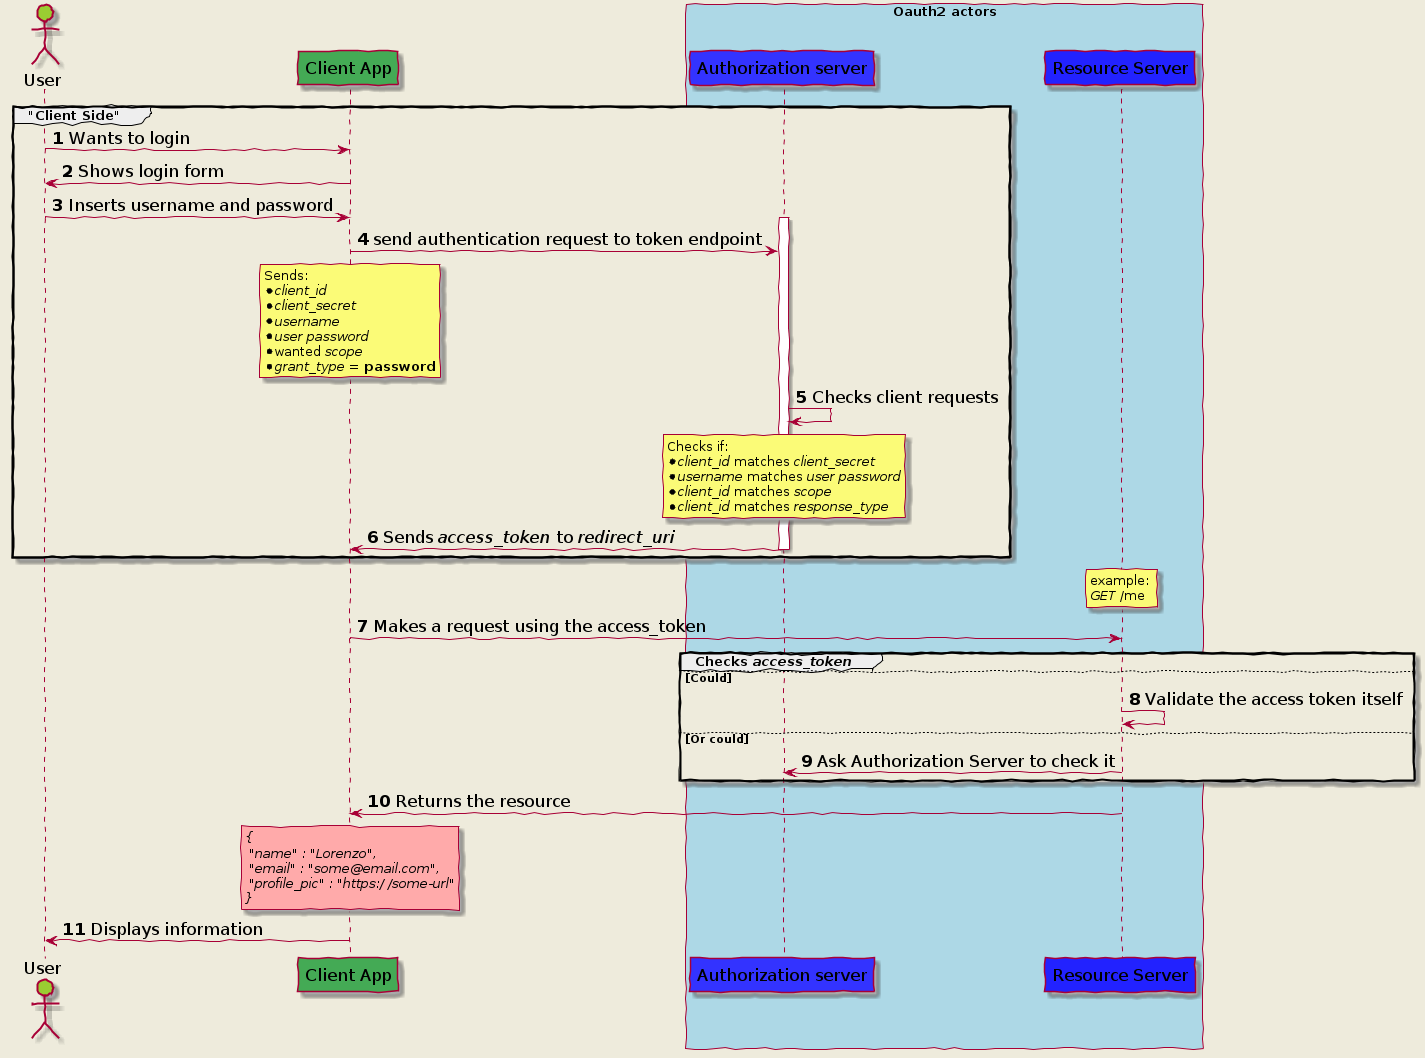 https://itnext.io/an-oauth-2-0-introduction-for-beginners-6e386b19f7a9
目前SPRING CLOUD(2020)尚未支持REACTIVE FEIGN,但官方推荐使用feign-reactive。
pom.xml
<dependency>
<groupId>com.playtika.reactivefeign</groupId>
<artifactId>feign-reactor-spring-cloud-starter</artifactId>
<version>3.1.2</version>
<type>pom</type>
</dependency>
LoanDecisionClientReactive.java
package com.paul.testspringcloudstream.loancheck.service;
import org.springframework.web.bind.annotation.PostMapping;
import org.springframework.web.bind.annotation.RequestBody;
import com.paul.testspringcloudstream.common.model.Loan;
import reactivefeign.spring.config.ReactiveFeignClient;
import reactor.core.publisher.Mono;
@ReactiveFeignClient(name = "loan-decision")
public interface LoanDecisionClientReactive {
@PostMapping("/loan-decision")
public Mono<Loan> getDecision(@RequestBody Loan loan);
}
LoanCheckConfiguration.java
@Configuration
@Import({
MongoDbConsumerConfiguration.class,
})
@EnableDiscoveryClient
@EnableReactiveFeignClients("com.paul.testspringcloudstream.loancheck.service")
public class LoanCheckConfiguration {
}
使用同feign
@Autowired
private LoanDecisionClientReactive loanDecisionClientReactive;
Reference
https://blog.csdn.net/LCBUSHIHAHA/article/details/113817966官方SAMPLE
https://github.com/kptfh/feign-reactive-sample
升级spring cloud版本之后发现bootstrap.yml 失效了,阅读官方文档得知,需要新增一个引用来开启bootstrap.xml文件的读取,新版spring cloud默认是关闭读取了。
增加依赖如下即可:
<dependency>
<groupId>org.springframework.cloud</groupId>
<artifactId>spring-cloud-starter-bootstrap</artifactId>
</dependency>
官方文档:
https://docs.spring.io/spring-cloud-config/docs/current/reference/html/#config-first-bootstrap
SPRING REACTOR 之Flux和Mono,有点象SPRING INTEGRATION的IntegrationFlow,有如下特点
- 定义了针对某种类型数据的处理流程
- 可以进行类型转换
- 长期运行,除非被要求中止
- 流程中的每种操作可以在新的线程中执行
- 可以正常中止,如果中途有异常,则该流程也会中止
- 要subscribe,流程才开始被启动
- 可以分割成各个子流程
- 可以聚合子流程
- Mono发送一个数据,就发送中止信号
- Flux发送任意数据,由程序决定何时发送中止信号
编程则比较简单,先根据不同的数据类型定义不同的Flux或Mono,业务操作用Function包装后,放在map/flatmap中,再调用subscribe启动流程。
SpringReactorTest.java
package com.paul.testreactivestream.reactor;
import java.util.List;
import org.junit.jupiter.api.Test;
import reactor.core.publisher.Flux;
import reactor.core.publisher.Mono;
import reactor.core.scheduler.Schedulers;
public class SpringReactorTest {
private void subscribeAndEnd(Flux<?> flux) {
flux.map(c -> String.format("[%s] %s", Thread.currentThread().getName(), c))
.subscribe(System.out::println);
flux.blockLast();
}
@Test
public void createAFlux_just() throws InterruptedException {
Flux<String> fruitFlux =
Flux.just("Apple", "Orange", "Grape", "Banana", "Strawberry")
.log()
;
fruitFlux.subscribe(
f -> System.out.println(
String.format("[%s] Here's some fruit: %s", Thread.currentThread().getName(), f)
)
)
;
fruitFlux.blockLast();
// Thread.currentThread().join();
}
@Test
public void zipFluxesToObject() {
Flux<String> characterFlux =
Flux.just("Garfield", "Kojak", "Barbossa");
Flux<String> foodFlux =
Flux.just("Lasagna", "Lollipops", "Apples");
Flux<String> zippedFlux =
Flux.zip(characterFlux, foodFlux, (c, f) -> c + " eats " + f);
this.subscribeAndEnd(zippedFlux);
}
@Test
public void map() {
Flux<Player> playerFlux =
Flux.just("Michael Jordan", "Scottie Pippen", "Steve Kerr")
.map(n -> {
String[] split = n.split("\\s");
return new Player(split[0], split[1]);
})
;
this.subscribeAndEnd(playerFlux);
}
@Test
public void flatMap() {
Flux<Player> playerFlux =
Flux.just("Michael Jordan", "Scottie Pippen", "Steve Kerr")
.flatMap(
n -> Mono.just(n)
.map(p -> {
String[] split = p.split("\\s");
return new Player(split[0], split[1]);
})
.subscribeOn(Schedulers.parallel())
);
this.subscribeAndEnd(playerFlux);
}
@Test
public void buffer() {
Flux<List<String>> fruitFlux =
Flux.just(
"apple", "orange", "banana", "kiwi", "strawberry"
)
.buffer(3);
this.subscribeAndEnd(fruitFlux);
}
@Test
public void bufferAsyn() {
Flux<String> flux =
Flux.just(
"apple", "orange", "banana", "kiwi", "strawberry"
)
.buffer(3)
.flatMap(x ->
Flux.fromIterable(x)
.map(y -> y.toUpperCase())
.subscribeOn(Schedulers.parallel())
// .log()
);
this.subscribeAndEnd(flux);
}
@Test
public void all() {
Mono<Boolean> animalFlux =
Flux.just(
"aardvark", "elephant", "koala", "eagle", "kangaroo"
)
.all(c -> c.contains("a"))
;
animalFlux.map(c -> String.format("[%s] %s", Thread.currentThread().getName(), c))
.subscribe(System.out::println);
}
}