
2005年5月12日
最近在弄swing,需要由JComponent生成BufferedImage,在CSDN上发现一个好例子。下面是范例:
 Rectangle rect = comp.getBounds();
BufferedImage bufImage = new BufferedImage(rect.width,
rect.height,
BufferedImage.TYPE_INT_RGB);
Graphics g = bufImage.getGraphics();
g.translate(-rect.x, -rect.y);
comp.paint(g);这样,JComponent中的图像就保存到BufferedImage中了。
原文的链接:
http://dev.csdn.net/article/13/13531.shtm
posted @
2006-04-14 23:41 小米 阅读(1444) |
评论 (1) |
编辑 收藏
好久没有写blog了,距离上次写几乎已经是半年前的事情了。

这半年发生了不少事情。首先换了家公司,进了家金融企业,每天要西装革履的,一开始还真是不习惯。

这里开发是用的spring框架,以后要多研究研究spring的东西了。
第二件事就是和恋爱了三年的女友结婚了,从此两人长相厮守,不知道时间久了会不会审美疲劳。呵呵。

第三件事就是在深圳买了自己的小房子,虽然是小小的两房,不过我们已经很知足了。
而且刚好是赶在房价大涨前买的,还算走了点运气。换到现在,都不知道去哪里买好了。
在这里要向一些留言和发邮件给我的网友道歉,前段时间实在是太忙,没有空回复你们的信息和邮件。请原谅!
posted @
2006-03-29 19:43 小米 阅读(868) |
评论 (0) |
编辑 收藏
最近真是多事情忙,而且可能要忙到9月底。好久没有上来更新我的博客了,暂且发发牢骚。

posted @
2005-08-10 17:32 小米 阅读(1338) |
评论 (1) |
编辑 收藏
这一节是非常实用的一节,我在阅读此书的时候,一直在迷惑,究竟应该怎样管理Session呢?因为Session的管理是如此重要,类似于以前写程序对JDBC Connection的管理。看完此节后,终于找到了方法。
在各种Session管理方案中,ThreadLocal模式得到了大量使用。ThreadLocal是Java中一种较为特殊的线程绑定机制。通过ThreadLocal存取的数据,总是与当前线程相关,也就是说,JVM为每个运行的线程,绑定了私有的本定实例存取空间,从而为多线程环境经常出现的并发访问问题提供了一种隔离机制。
下面是Hibernate官方提供的一个ThreadLocal工具:
import net.sf.hibernate.*;
import net.sf.hibernate.cfg.*;
import org.apache.log4j.Logger;

 /**//**
 * <p>Title: </p>
*
* <p>Description: Session的管理类</p>
*
* <p>Copyright: Copyright (c) 2005</p>
*
* <p>Company: </p>
*
* @author George Hill
* @version 1.0
 */
*/
public class HibernateUtil  {
{
private static final Logger log = Logger.getLogger(HibernateUtil.class);
private static final SessionFactory sessionFactory;

 /**//**
* 初始化Hibernate配置
 */
*/
static {
try {
// Create the SessionFactory
sessionFactory = new Configuration().configure().buildSessionFactory();
} catch (Throwable ex) {
log.error("Initial SessionFactory creation failed.", ex);
throw new ExceptionInInitializerError(ex);
}
}
public static final ThreadLocal session = new ThreadLocal();
/**//**
* 根据当前线程获取相应的Session
* @return Session
* @throws HibernateException
*/
public static Session currentSession() throws HibernateException {
Session s = (Session) session.get();
// Open a new Session, if this Thread has none yet
if (s == null) {
s = sessionFactory.openSession();
session.set(s);
}
return s;
}
/**//**
* 返回Session给相应的线程
* @throws HibernateException
*/
public static void closeSession() throws HibernateException {
Session s = (Session) session.get();
session.set(null);
if (s != null)
s.close();
}
}
针对WEB程序,还可以利用Servlet2.3的Filter机制,轻松实现线程生命周期内的Session管理。下面是一个通过Filter进行Session管理的典型案例:
public class PersistenceFilter implements Filter {
protected static ThreadLocal hibernateHolder = new ThreadLocal();
public void doFilter(ServletRequest request, ServletResponse response, FilterChain chain) throws IOException, ServletException {
hibernateHolder.set(getSession());
try {
chain.doFilter(request, response);
} finally {
Session session = (Session) hibernateHolder.get();
if (session != null) {
hibernateHolder.set(null);
try {
session.close();
} catch (HibernateException ex) {
throw new ServletException(ex);
}
}
}
}
}
posted @
2005-07-29 19:43 小米 阅读(3989) |
评论 (1) |
编辑 收藏
数据分页显示,是很多B/S系统会遇到的问题。现在大多数主流数据库都提供了数据部分读取机制,而对于某些没有提供相应机制的数据而言,Hibernate也通过其它途径实现了分页,如通过Scrollable ResultSet,如果JDBC不支持Scrollable ResultSet,Hibernate也会自动通过ResultSet的next方法进行记录定位。Hibernate的Criteria、Query等接口提供了一致的方法设定分页范围。下面是书中的例子:
Criteria criteria = session.createCriteria(TUser.class);
Criteria.add(Expression.eq("age", "20"));
//从检索结果中获取第100条记录开始的20条记录
criteria.setFirstResult(100);
criteria.setFetchSize(20); 不过,我在测试的时候总是不能够正常工作,把setFetchSize方法换成setMaxResults方法才行。换成最新的mysql-connector-java-3.1.10-bin-g.jar驱动也是一样。
posted @
2005-07-26 18:12 小米 阅读(5609) |
评论 (4) |
编辑 收藏 Hibernate通过Lifecycle、Validatable接口制定了实体对象CRUD过程中的回调方式。
Lifecycle接口中的onSave、onUpdate、onDelete方法,如果返回true则意味着需要中止执行相应的操作过程。如果代码运行期间抛出了CallbackException,对应的操作也会被中止。注意,不要试图在这些方法中调用Session进行持久化操作,这些方法中Session无法正常使用。
Validatable.validate方法将在实体被持久化之前得到调用以对数据进行验证。此方法在实体对象的生命周期内可能被数次调用,因此,此方法仅用于数据本身的逻辑校验,而不要试图在此实现业务逻辑的验证。
Hibernate还引入了Interceptor,为持久化事件的捕获和处理提供了一个非侵略性的实现。Interceptor接口定义了Hibernate中的通用拦截机制。Session创建时即可指定加载相应的Interceptor,之后,此Session的持久化操作动作都将首先经由此拦截器捕获处理。简单的加载范例如下:
SessionFactory factory = config.buildSessionFactory();
Interceptor it = new MyInterceptor();
session = sessionFactory.openSession(it); 需要注意的是,与Lifecycle相同,Interceptor的方法中不可通过Session实例进行持久化操作。
posted @
2005-07-21 18:35 小米 阅读(3436) |
评论 (1) |
编辑 收藏
有兴趣的可以去参加看看,网址:
http://www.javachina.cn/Index.jsp
posted @
2005-07-20 14:55 小米 阅读(1059) |
评论 (2) |
编辑 收藏 最近真是忙,事情都挤到一块去了。 终于有时间又看了几页书。
言归正传,Hibernate中的Collection类型分为有序集和无序集两类。这里所谓的有序和无序,是针对Hibernate数据持久过程中,是否保持数据集合中的记录排列顺序加以区分的。无序集有Set,Bag,Map几种,有序集有List一种。有序集的数据在持久化过程中,会将集合中元素排列的先后顺序同时固化到数据库中,读取时也会返回一个具备同样排列顺序的数据集合。
Hibernate中的Collection类型是用的自己的实现,所以在程序中,不能够把接口强制转化成相应的JDK Collection的实现。
结果集的排序有两种方式:
1. Sort
Collection中的数据排序。
2. order-by
对数据库执行Select SQL时,由order by子句实现的数据排序方式。
需要注意的是,order-by特性在实现中借助了JDK 1.4中的新增集合类LinkedHashSet以及LinkedHashMap。因此,order-by特性只支持在1.4版本以上的JDK中运行。
posted @
2005-07-20 10:56 小米 阅读(4010) |
评论 (0) |
编辑 收藏
Session.get/load的区别:
1.如果未能发现符合条件的记录,get方法返回null,而load方法会抛出一个ObejctNotFoundException。
2.Load方法可返回实体的代理类类型,而get方法永远直接返回实体类。
3.Load方法可以充分利用内部缓存和二级缓存中现有数据,而get方法则仅仅在内部缓存中进行数据查找,如没有发现对应数据,将越过二级缓存,直接调用SQL完成数据读取。
Session.find/iterate的区别:
find方法将执行Select SQL从数据库中获得所有符合条件的记录并构造相应的实体对象,实体对象构建完毕之后,就将其纳入缓存。它对缓存只写不读,因此无法利用缓存。
iterate方法首先执行一条Select SQL以获得所有符合查询条件的数据id,随即,iterate方法首先在本地缓存中根据id查找对应的实体对象是否存在,如果缓存中已经存在对应的数据,则直接以此数据对象作为查询结果,如果没有找到,再执行相应的Select语句获得对应的库表记录(iterate方法如果执行了数据库读取操作并构建了完整的数据对象,也会将其查询结果纳入缓存)。
Query Cache产生作用的情况:
1.完全相同的Select SQL重复执行。
2.在两次查询之间,此Select SQL对应的库表没有发生过改变。
Session.save方法的执行步骤:
1.在Session内部缓存中寻找待保存对象。内部缓存命中,则认为此数据已经保存(执行过insert操作),实体对象已经处于Persistent状态,直接返回。
2.如果实体类实现了lifecycle接口,则调用待保存对象的onSave方法。
3.如果实体类实现了validatable接口,则调用其validate()方法。
4.调用对应拦截器的Interceptor.onSave方法(如果有的话)。
5.构造Insert SQL,并加以执行。
6.记录插入成功,user.id属性被设定为insert操作返回的新记录id值。
7.将user对象放入内部缓存。
8.最后,如果存在级联关系,对级联关系进行递归处理。
Session.update方法的执行步骤:
1.根据待更新实体对象的Key,在当前session的内部缓存中进行查找,如果发现,则认为当前实体对象已经处于Persistent状态,返回。
2.初始化实体对象的状态信息(作为之后脏数据检查的依据),并将其纳入内部缓存。注意这里Session.update方法本身并没有发送Update SQL完成数据更新操作,Update SQL将在之后的Session.flush方法中执行(Transaction.commit在真正提交数据库事务之前会调用Session.flush)。
Session.saveOrUpdate方法的执行步骤:
1.首先在Session内部缓存中进行查找,如果发现则直接返回。
2.执行实体类对应的Interceptor.isUnsaved方法(如果有的话),判断对象是否为未保存状态。
3.根据unsaved-value判断对象是否处于未保存状态。
4.如果对象未保存(Transient状态),则调用save方法保存对象。
5.如果对象为已保存(Detached状态),调用update方法将对象与Session重新关联。
posted @
2005-07-12 18:49 小米 阅读(4992) |
评论 (5) |
编辑 收藏
事务的4个基本特性(ACID):
1. Atomic(原子性):事务中包含的操作被看作一个逻辑单元,这个逻辑单元中的操作要么全部成功,要么全部失败。
2. Consistency(一致性):只有合法的数据可以被写入数据库,否则事务应该将其回滚到最初状态。
3. Isolation(隔离性):事务允许多个用户对同一个数据的并发访问,而不破坏数据的正确性和完整性。同时,并行事务的修改必须与其他并行事务的修改相互独立。
4. Durability(持久性):事务结束后,事务处理的结果必须能够得到固化。
数据库操作过程中可能出现的3种不确定情况:
1. 脏读取(Dirty Reads):一个事务读取了另一个并行事务未提交的数据。
2. 不可重复读取(Non-repeatable Reads):一个事务再次读取之前的数据时,得到的数据不一致,被另一个已提交的事务修改。
3. 虚读(Phantom Reads):一个事务重新执行一个查询,返回的记录中包含了因为其他最近提交的事务而产生的新记录。
标准SQL规范中,为了避免上面3种情况的出现,定义了4个事务隔离等级:
1. Read Uncommitted:最低等级的事务隔离,仅仅保证了读取过程中不会读取到非法数据。上诉3种不确定情况均有可能发生。
2. Read Committed:大多数主流数据库的默认事务等级,保证了一个事务不会读到另一个并行事务已修改但未提交的数据,避免了“脏读取”。该级别适用于大多数系统。
3. Repeatable Read:保证了一个事务不会修改已经由另一个事务读取但未提交(回滚)的数据。避免了“脏读取”和“不可重复读取”的情况,但是带来了更多的性能损失。
4. Serializable:最高等级的事务隔离,上面3种不确定情况都将被规避。这个级别将模拟事务的串行执行。
Hibernate将事务管理委托给底层的JDBC或者JTA,默认是基于JDBC Transaction的。
Hibernate支持“悲观锁(Pessimistic Locking)”和“乐观锁(Optimistic Locking)”。
悲观锁对数据被外界修改持保守态度,因此,在整个数据处理过程中,将数据处于锁定状态。悲观锁的实现,往往依靠数据库提供的锁机制。Hibernate通过使用数据库的for update子句实现了悲观锁机制。Hibernate的加锁模式有:
1. LockMode.NONE:无锁机制
2. LockMode.WRITE:Hibernate在Insert和Update记录的时候会自动获取
3. LockMode.READ:Hibernate在读取记录的时候会自动获取
4. LockMode.UPGRADE:利用数据库的for update子句加锁
5. LockMode.UPGRADE_NOWAIT:Oracle的特定实现,利用Oracle的for update nowait子句实现加锁
乐观锁大多是基于数据版本(Version)记录机制实现。Hibernate在其数据访问引擎中内置了乐观锁实现,可以通过class描述符的optimistic-lock属性结合version描述符指定。optimistic-lock属性有如下可选取值:
1. none:无乐观锁
2. version:通过版本机制实现乐观锁
3. dirty:通过检查发生变动过的属性实现乐观锁
4. all:通过检查所有属性实现乐观锁
posted @
2005-07-08 16:19 小米 阅读(4907) |
评论 (4) |
编辑 收藏 现在搜狐新闻上报道已经有700多人伤亡,这是自从911事件以后最大的一次恐怖袭击了。现在这个世界,是越来越不太平了,贫富差距的加大使得恐怖活动有生存的土壤。
不知道世界的经济会不会随着这次恐怖袭击而开始走向萧条。现在的地球越来越像一个村,发生在任何一个角落的事情,都有可能会影响到每一个人。
posted @
2005-07-08 10:50 小米 阅读(690) |
评论 (0) |
编辑 收藏
昨晚偶然看见国际台播放星战的作者乔治卢卡斯荣获AFI终身成就奖的颁奖典礼,耐心的看完了整个颁奖典礼。乔治在发表致词的时候,说自己很高兴能够从事自己喜欢的电影工作,如果不拍摄电影,都不知道自己还能够做什么。拍电影已经成了乔治生命的一部分。
看到荧屏上全世界的老人,中年人,年轻人,孩子说着:“Thank you! George.”可以看到乔治的眼睛朦胧。我心中真是感慨,每个人都有自己的梦想,能够从事自己喜欢的事情,确实是很开心的一件事。而自己所做的工作,能够给自己带来快乐,能够给人们带来快乐,这样的工作才值得用一生的时间去从事。
每一个登山者都有着自己心目中最想登上的山顶,能够登上这个山顶,前面付出的艰辛都是值得的。人生不也如此么?找到自己喜欢从事的事情,用自己毕生的精力去做这件事。
posted @
2005-07-07 12:00 小米 阅读(717) |
评论 (0) |
编辑 收藏
| 献出一份爱心 共同援助重病程序员王俊 |
| (2005.06.27) 来自:BJUG |
|
|
|
posted @
2005-07-04 18:48 小米 阅读(1812) |
评论 (22) |
编辑 收藏
摘要: 要将BufferedImage实例保存为BMP文件,就需要知道BMP文件的格式,可以参考我转载的文章:《BMP文件格式》。 下面是我的将BufferedImage实例保存为24位色BMP文件的实现。 ...
阅读全文
posted @
2005-07-04 17:33 小米 阅读(3505) |
评论 (6) |
编辑 收藏
在公元2005年6月27日,我做出了一个重大的决定,买房!花了自己至今为止都没有见过的那么多的钱买了一个小小的2房2厅,
从此变成了“负翁”。
不过,从此以后再也不用去租房,再也不用帮别人供房,再也不用一年搬一次家。深圳租房实在太贵,莲花北的一个小小的二房都要1800,有点装修就叫豪华装修,就是一个空荡荡的房子也开口要1500,太夸张了。住农民房又极度不安全,不想拿自己的生命开玩笑。
从此就变成月供一族了,

,不过,有了压力才有动力。为了自己的将来,自己的理想,努力奋斗!
9月26日是入伙的日子,好期待那天的到来啊。

posted @
2005-06-29 09:47 小米 阅读(995) |
评论 (9) |
编辑 收藏
一般而言,ORM的数据缓存应包含如下几个层次:
1. 事务级缓存(Transcation Layer Cache)
2. 应用级/进程级缓存(Application/Process Layer Cache)
3. 分布式缓存(Cluster Layer Cache)
Hibernate数据缓存(Cache)分为两个层次,以Hibernate语义加以区分,可分为:
1. 内部缓存(Session Level,也称为一级缓存)
2. 二级缓存(SessionFactory Level,也称为二级缓存)
Hibernate中,缓存将在以下情况中发挥作用:
1. 通过id[主键]加载数据时
2. 延迟加载
内部缓存正常情况下由Hibernate自动维护,如果需要手动干预,可以通过以下方法完成:
1. Session.evict
将某个特定对象从内部缓存清除。
2. Session.clear
清空内部缓存。
在Hibernate中,二级缓存涵盖了应用级缓存和分布式缓存领域。如果数据满足以下条件,则可将其纳入缓存管理。
1. 数据不会被第三方应用修改;
2. 数据大小(Data Size)在可接收的范围之内;
3. 数据更新频率较低;
4. 同一数据可能会被系统频繁引用;
5. 非关键数据(关键数据,如金融帐户数据)。
Hibernate本身并未提供二级缓存的产品化实现,而是为众多的第三方缓存组件提供了接入接口,较常用的第三方组件有:
1. JCS
2. EHCache
3. OSCache
4. JBossCache
5. SwarmCache
Hibernate中启用二级缓存,需要在hibernate.cfg.xml配置hibernate.cache.provider_class参数,之后,需要在映射文件中指定各个映射实体(以及collection)的缓存同步策略。Hibernate提供了一下4种内置的缓存同步策略:
1. read-only
只读。对于不会发生改变的数据,可使用只读型缓存。
2. nonstrict-read-write
如果程序对并发访问下的数据同步要求不是非常严格,且数据更新操作频率较低,可以采用本选项,获得较好的性能。
3. read-write
严格可读写缓存。基于时间戳判定机制,实现了“read committed”事务隔离等级。可用于对数据同步要求严格的情况,但不支持分布式缓存。这也是实际应用中使用最多的同步策略。
4. transactional
事务型缓存,必须运行在JTA事务环境中。
posted @
2005-06-22 18:15 小米 阅读(6202) |
评论 (5) |
编辑 收藏 在Java语言中,对象之间的比较可以通过引用比较(==)和内容比较(equals)两种方式进行,而在Hibernate的实体对象的比较是通过主键值来比较,如果要实现自己的识别逻辑,则需要重写equals方法和hashCode方法。
检查数据对象改变检查的一般策略有下面两种:
1. 数据对象监控
数据对象监控的实现方式,通过拦截器对数据对象的设值方法进行拦截。一旦数据对象的设置方法被调用,则将其标志为“待更新”状态,之后在数据库操作时将其更新到对应的库表。
2. 数据版本对比
在持久层框架中维持数据对象的最近读取版本,当数据提交时将提交数据与此版本进行比对,如果发生变化则将其同步到数据库对应的库表。
Hibernate采取的是第二种检查策略。它采用一个内部数据结构"EntityEntry"保存对应实体类的状态信息。
对于级联对象的更新,Hibernate将根据unsaved-value进行判定。首先Hibernate会取出目标对象的id。之后,将此值与unsaved-value进行比对,如果相等,则认为目标对象尚未保存,否则,认为对象已经保存,无需再进行保存操作。
posted @
2005-06-22 16:32 小米 阅读(5203) |
评论 (4) |
编辑 收藏
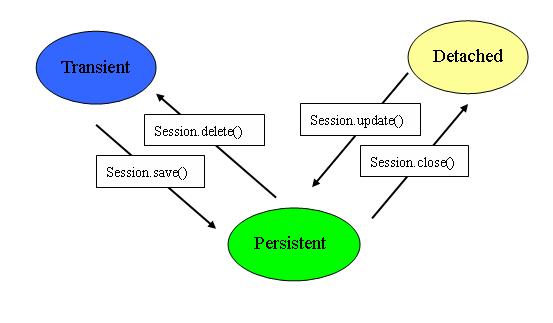
最近正在研读《深入浅出Hibernate》一书,前面写的随笔有些也是读该书的笔记,只是未做归类,从这篇开始,我将把相关的内容都整理成一个系列的读书笔记。
今天这篇是有关实体对象的生命周期。我刚开始接触Hibernate的时候,只是简单的把它当做一个API工具,直到后来看到有关VO和PO的内容时,才意识到Hibernate不仅仅是一个O/R Mapping的API工具,它还是一个容器。它可以帮你管理实体对象的生命周期。
实体对象的生命周期有三种状态:
1.Transient(自由状态)
此时的实体对象和数据库中的记录无关联,只是一个普通的JavaBean。
2.Persistent(持久状态)
此时的实体对象和数据库中的记录有关联,其变更将由Hibernate固化到数据库中。该实体对象处于由Hibernate框架所管理的状态。
3.Detached(游离状态)
处于Persistent状态的对象,其对应的Session实例关闭之后,那么,此对象就处于"Detached"状态。Detached状态和Transient状态的区别在于Detached状态的对象可以再次与某个Session实例相关联而成为Persistent对象。
从实体对象是否被纳入Hibernate实体管理容器的角度,Transient和Detached状态的实体对象可以统称为VO(Value Object),而被管理的实体对象称为PO(Persistent Object)。两者的区别:
1.VO是相对独立的实体对象,处于非管理状态。
2.PO是Hibernate纳入其实体管理容器(Entity Map)的对象,它代表了与数据库中某条记录对应的Hibernate实体,PO的变化在事务提交时将反映到实际数据库中。
3.如果一个PO与其对应的Session实例分离,那么此时,它又会变成一个VO。
下图是我画的实体对象生命周期的状态转换图:
posted @
2005-06-16 18:31 小米 阅读(3143) |
评论 (9) |
编辑 收藏
在使用HQL查询中,有时并不需要获取完整的一个实体对象,例如一个实体对象User有三个属性:account, password和email,如果我们只需要获取account和email属性,那么有两种方法可以选择。
1. 用普通的"select user.account, user.email from User as user",程序片断如下:
List list = session.createQuery("select user.account, user.email from User as user").list();
Iterator it = list.iterator();
while (it.hasNext()) {
Object[] values = (Object[]) it.next();
System.out.println(values[0] + " " + values[1]);
} 这时调用Query类的list方法返回的将是一个每个元素都是一个Object数组的List。如果只获取一个属性,那么返回的List中的每个元素都是String实例。
2.在HQL中用new操作符生成实体对象,例如:"select new User(user.account, user.email) from User as user",程序片断如下:
List list = session.createQuery("select new User(user.account, user.email) from User as user").list();
Iterator it = list.iterator();
while (it.hasNext()) {
User user = (User) it.next();
System.out.println(user.getAccount() + " " + user.getEmail());
} 这时list方法返回的List中的每一个元素都是User实体对象。这里有三点需要注意的:
a.在HQL语句中需要使用as操作符指定User的别名,并且需要在构造函数的属性前面加上别名;
b.HQL语句中的构造函数在User类中必须要有相应的构造函数;
c.生成的实体对象是VO对象,如果对这些对象调用Session的saveOrUpdate方法将导致插入新的记录,而不是更新记录。
posted @
2005-06-15 16:33 小米 阅读(3043) |
评论 (0) |
编辑 收藏
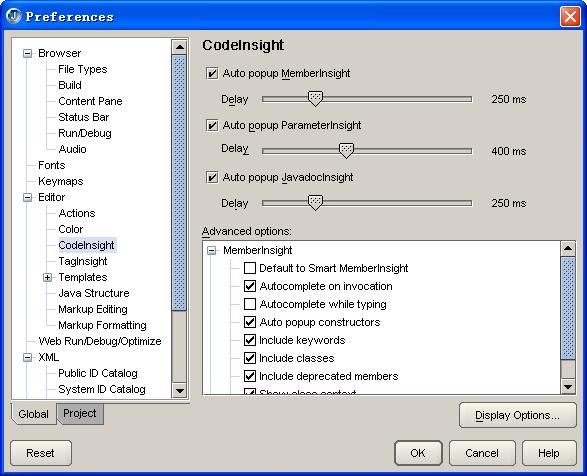
JBuilder 2005中多了一个Smart MemberInsight功能,这个功能会智能的匹配需要调用的方法或者获取的属性。例如有一个赋值操作,左边是一个List,右边是用一个方法获取值,那么当输入"."时,JBuilder 2005会自动的找到所有返回的值为List的方法。
不过,这实在是一个不怎么讨好的方法。因为很多时候并不是只有一层方法调用的,例如,当需要用一个方法获取一个实例,然后再用这个实例的方法获取需要的值时,这个功能就显得很碍手了。
终于,我还是决定关闭这个“智能”的功能。打开"Tools"——>"Preferences",在"Editor"的子项"CodeInsight"里,展开"MemberInsight",把"Default to Smart MemberInsight"这一项去掉。如下图所示:
posted @
2005-06-15 16:02 小米 阅读(551) |
评论 (0) |
编辑 收藏
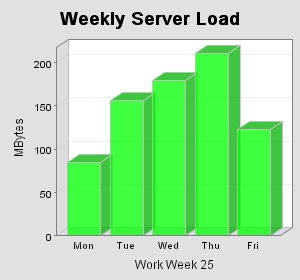
这个范例说明如何用JFreeChart画简单的柱状图,下面是一个JSP的简单范例:
<%@ page contentType="text/html; charset=GB2312" %>
<%@ page import="java.awt.*, java.text.*, java.util.*" %>
<%@ page import="org.jfree.chart.*" %>
<%@ page import="org.jfree.chart.axis.*" %>
<%@ page import="org.jfree.chart.labels.StandardCategoryItemLabelGenerator" %>
<%@ page import="org.jfree.chart.plot.*" %>
<%@ page import="org.jfree.chart.renderer.*" %>
<%@ page import="org.jfree.chart.servlet.ServletUtilities" %>
<%@ page import="org.jfree.data.DefaultCategoryDataset" %>
<%@ page import="org.jfree.ui.TextAnchor" %>
<%
//The data for the bar chart
double[] data = {85, 156, 179.5, 211, 123};
//The labels for the bar chart
String[] labels = {"Mon", "Tue", "Wed", "Thu", "Fri"};
DefaultCategoryDataset dataset = new DefaultCategoryDataset();
for (int i = 0; i < data.length; i++) {
dataset.addValue(data[i], null, labels[i]);
}
JFreeChart chart = ChartFactory.createBarChart3D("Weekly Server Load", "Work Week 25", "MBytes", dataset, PlotOrientation.VERTICAL, false, false, false);
chart.setBackgroundPaint(new Color(0xE1E1E1));
CategoryPlot plot = chart.getCategoryPlot();
// 设置Y轴显示整数
NumberAxis rangeAxis = (NumberAxis) plot.getRangeAxis();
rangeAxis.setStandardTickUnits(NumberAxis.createIntegerTickUnits());
CategoryAxis domainAxis = plot.getDomainAxis();
//设置距离图片左端距离
domainAxis.setLowerMargin(0.05);
BarRenderer3D renderer = new BarRenderer3D();
//设置柱的颜色
renderer.setSeriesPaint(0, new Color(0xff00));
plot.setRenderer(renderer);
String filename = ServletUtilities.saveChartAsPNG(chart, 300, 280, null, session);
String graphURL = request.getContextPath() + "/displayChart?filename=" + filename;
%>
<html>
<body topmargin="5" leftmargin="5" rightmargin="0">
<div style="font-size:18pt; font-family:verdana; font-weight:bold">
3D Bar Chart
</div>
<br>
<img src="<%= graphURL %>" border=0>
</body>
</html>
画出来的图:
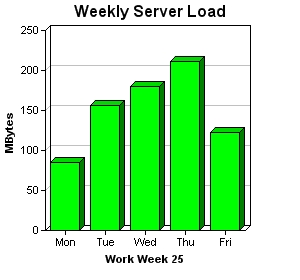
和ChartDirector画出来的图做一个比较:
posted @
2005-06-14 18:40 小米 阅读(10738) |
评论 (7) |
编辑 收藏
以前一直是用JFreeChart画统计图的,不过JFreeChart画出来的图形不够精细,看起来有些模糊,今天在网上看到另外一个工具ChartDirector,这是一个商业版本的工具,不过也可以免费使用,只是在画出来的图形下面都有一条它的广告条。
下面是它的一个柱状图的例子:
范例程序:
<%@page import="ChartDirector.*" %>
<%
//The data for the bar chart
double[] data = {85, 156, 179.5, 211, 123};
//The labels for the bar chart
String[] labels = {"Mon", "Tue", "Wed", "Thu", "Fri"};
//Create a XYChart object of size 300 x 280 pixels
XYChart c = new XYChart(300, 280);
//Set the plotarea at (45, 30) and of size 200 x 200 pixels
c.setPlotArea(45, 30, 200, 200);
//Add a title to the chart
c.addTitle("Weekly Server Load");
//Add a title to the y axis
c.yAxis().setTitle("MBytes");
//Add a title to the x axis
c.xAxis().setTitle("Work Week 25");
//Add a bar chart layer with green (0x00ff00) bars using the given data
c.addBarLayer(data, 0xff00).set3D();
//Set the labels on the x axis.
c.xAxis().setLabels(labels);
//output the chart
String chart1URL = c.makeSession(request, "chart1");
//include tool tip for the chart
String imageMap1 = c.getHTMLImageMap("", "", "title='{xLabel}: {value} MBytes'")
;
%>
<html>
<body topmargin="5" leftmargin="5" rightmargin="0">
<div style="font-size:18pt; font-family:verdana; font-weight:bold">
3D Bar Chart
</div>
<hr color="#000080">
<a href="viewsource.jsp?file=<%=request.getServletPath()%>">
<font size="2" face="Verdana">View Chart Source Code</font>
</a>
</div>
<br>
<img src='<%=response.encodeURL("getchart.jsp?"+chart1URL)%>'
usemap="#map1" border="0">
<map name="map1"><%=imageMap1%></map>
</body>
</html>
如果要在柱的顶部显示数值,可以调用Layer的setDataLabelFormat方法设置,范例:layer.setDataLabelFormat("{value}");
其它的例子可以参考它的文档的说明。ChartDirector的网址:http://www.advsofteng.com
posted @
2005-06-14 17:46 小米 阅读(5291) |
评论 (5) |
编辑 收藏
如果要在程序中定时执行任务,可以使用java.util.Timer这个类实现。使用Timer类需要一个继承了java.util.TimerTask的类。TimerTask是一个虚类,需要实现它的run方法,实际上是他implements了Runnable接口,而把run方法留给子类实现。
下面是我的一个例子:
class Worker extends TimerTask {
public void run() {
System.out.println("我在工作啦!");
}
} Timer类用schedule方法或者scheduleAtFixedRate方法启动定时执行,schedule重载了四个版本,scheduleAtFixedRate重载了两个。每个方法的实现都不同,下面是每个方法的说明:
schedule
public void schedule(TimerTask task,
                     long delay)
- Schedules the specified task for execution after the specified delay.
-
- Parameters:
task - task to be scheduled.
delay - delay in milliseconds before task is to be executed.
- Throws:
IllegalArgumentException - if delay is negative, or delay + System.currentTimeMillis() is negative.
IllegalStateException - if task was already scheduled or cancelled, or timer was cancelled.
说明:该方法会在设定的延时后执行一次任务。
schedule
public void schedule(TimerTask task,
                     Date time)
- Schedules the specified task for execution at the specified time. If the time is in the past, the task is scheduled for immediate execution.
-
- Parameters:
task - task to be scheduled.
time - time at which task is to be executed.
- Throws:
IllegalArgumentException - if time.getTime() is negative.
IllegalStateException - if task was already scheduled or cancelled, timer was cancelled, or timer thread terminated.
说明:该方法会在指定的时间点执行一次任务。
schedule
public void schedule(TimerTask task,
                     long delay,
                     long period)
- Schedules the specified task for repeated fixed-delay execution, beginning after the specified delay. Subsequent executions take place at approximately regular intervals separated by the specified period.
In fixed-delay execution, each execution is scheduled relative to the actual execution time of the previous execution. If an execution is delayed for any reason (such as garbage collection or other background activity), subsequent executions will be delayed as well. In the long run, the frequency of execution will generally be slightly lower than the reciprocal of the specified period (assuming the system clock underlying Object.wait(long) is accurate).
Fixed-delay execution is appropriate for recurring activities that require "smoothness." In other words, it is appropriate for activities where it is more important to keep the frequency accurate in the short run than in the long run. This includes most animation tasks, such as blinking a cursor at regular intervals. It also includes tasks wherein regular activity is performed in response to human input, such as automatically repeating a character as long as a key is held down.
-
- Parameters:
task - task to be scheduled.
delay - delay in milliseconds before task is to be executed.
period - time in milliseconds between successive task executions.
- Throws:
IllegalArgumentException - if delay is negative, or delay + System.currentTimeMillis() is negative.
IllegalStateException - if task was already scheduled or cancelled, timer was cancelled, or timer thread terminated.
说明:该方法会在指定的延时后执行任务,并且在设定的周期定时执行任务。
schedule
public void schedule(TimerTask task,
                     Date firstTime,
                     long period)
- Schedules the specified task for repeated fixed-delay execution, beginning at the specified time. Subsequent executions take place at approximately regular intervals, separated by the specified period.
In fixed-delay execution, each execution is scheduled relative to the actual execution time of the previous execution. If an execution is delayed for any reason (such as garbage collection or other background activity), subsequent executions will be delayed as well. In the long run, the frequency of execution will generally be slightly lower than the reciprocal of the specified period (assuming the system clock underlying Object.wait(long) is accurate).
Fixed-delay execution is appropriate for recurring activities that require "smoothness." In other words, it is appropriate for activities where it is more important to keep the frequency accurate in the short run than in the long run. This includes most animation tasks, such as blinking a cursor at regular intervals. It also includes tasks wherein regular activity is performed in response to human input, such as automatically repeating a character as long as a key is held down.
-
- Parameters:
task - task to be scheduled.
firstTime - First time at which task is to be executed.
period - time in milliseconds between successive task executions.
- Throws:
IllegalArgumentException - if time.getTime() is negative.
IllegalStateException - if task was already scheduled or cancelled, timer was cancelled, or timer thread terminated.
说明:该方法会在指定的时间点执行任务,然后从该时间点开始,在设定的周期定时执行任务。特别的,如果设定的时间点在当前时间之前,任务会被马上执行,然后开始按照设定的周期定时执行任务。
scheduleAtFixedRate
public void scheduleAtFixedRate(TimerTask task,
                                long delay,
                                long period)
- Schedules the specified task for repeated fixed-rate execution, beginning after the specified delay. Subsequent executions take place at approximately regular intervals, separated by the specified period.
In fixed-rate execution, each execution is scheduled relative to the scheduled execution time of the initial execution. If an execution is delayed for any reason (such as garbage collection or other background activity), two or more executions will occur in rapid succession to "catch up." In the long run, the frequency of execution will be exactly the reciprocal of the specified period (assuming the system clock underlying Object.wait(long) is accurate).
Fixed-rate execution is appropriate for recurring activities that are sensitive to absolute time, such as ringing a chime every hour on the hour, or running scheduled maintenance every day at a particular time. It is also appropriate for recurring activities where the total time to perform a fixed number of executions is important, such as a countdown timer that ticks once every second for ten seconds. Finally, fixed-rate execution is appropriate for scheduling multiple repeating timer tasks that must remain synchronized with respect to one another.
-
- Parameters:
task - task to be scheduled.
delay - delay in milliseconds before task is to be executed.
period - time in milliseconds between successive task executions.
- Throws:
IllegalArgumentException - if delay is negative, or delay + System.currentTimeMillis() is negative.
IllegalStateException - if task was already scheduled or cancelled, timer was cancelled, or timer thread terminated.
说明:该方法和schedule的相同参数的版本类似,不同的是,如果该任务因为某些原因(例如垃圾收集)而延迟执行,那么接下来的任务会尽可能的快速执行,以赶上特定的时间点。
scheduleAtFixedRate
public void scheduleAtFixedRate(TimerTask task,
                                Date firstTime,
                                long period)
- Schedules the specified task for repeated fixed-rate execution, beginning at the specified time. Subsequent executions take place at approximately regular intervals, separated by the specified period.
In fixed-rate execution, each execution is scheduled relative to the scheduled execution time of the initial execution. If an execution is delayed for any reason (such as garbage collection or other background activity), two or more executions will occur in rapid succession to "catch up." In the long run, the frequency of execution will be exactly the reciprocal of the specified period (assuming the system clock underlying Object.wait(long) is accurate).
Fixed-rate execution is appropriate for recurring activities that are sensitive to absolute time, such as ringing a chime every hour on the hour, or running scheduled maintenance every day at a particular time. It is also appropriate for recurring activities where the total time to perform a fixed number of executions is important, such as a countdown timer that ticks once every second for ten seconds. Finally, fixed-rate execution is appropriate for scheduling multiple repeating timer tasks that must remain synchronized with respect to one another.
-
- Parameters:
task - task to be scheduled.
firstTime - First time at which task is to be executed.
period - time in milliseconds between successive task executions.
- Throws:
IllegalArgumentException - if time.getTime() is negative.
IllegalStateException - if task was already scheduled or cancelled, timer was cancelled, or timer thread terminated.
说明:和上一个方法类似。
下面是我的一个测试片断:
public static void main(String[] args) throws Exception {
Timer timer = new Timer(false);
timer.schedule(new Worker(), new Date(System.currentTimeMillis() + 1000));
}
posted @
2005-06-09 10:29 小米 阅读(33821) |
评论 (7) |
编辑 收藏 今天得知,现在住的房子,公司要准备拍卖了,那就是说,我又要搬家了。 这将是我大学毕业后的第四次搬家了,每年搬一次家,有时候真的厌倦了这样的生活,刚适应一个环境,又要重新去适应新的环境。好想拥有自己的房子,但是现在深圳的房价却让人望楼兴叹!
 什么时候才能够让老百姓过上安居乐业的生活。
《我想有个家》,潘美辰的这首老歌,现在最能够代表我的心情了。
posted @
2005-06-06 21:49 小米 阅读(625) |
评论 (4) |
编辑 收藏
Criteria Query是很好的一种面向对象的查询实现,它提供了一种示例查询的方式。该方式根据已有的对象,查找数据库中属性匹配的其他对象。
下面是一个场景片断,模糊查找数据库中用户帐号为'test',邮件地址为
'georgehill@21cn.com'的实例,忽略大小写。
public void testCriteriaExampleQuery() throws Exception {
User user = new User();
user.setAccount("test");
user.setEmail("georgehill@21cn.com");
Criteria criteria = session.createCriteria(User.class).add(Example.create(user).enableLike(MatchMode.ANYWHERE).ignoreCase());
List list = criteria.list();
if (list != null) {
for (int i = 0; i < list.size(); i++) {
System.out.println(((User) list.get(i)).getAccount());
}
}
} 示例查询需要生成Example实例,可以通过Example的静态方法create生成。Example类有下面的几个方法指定查询的方式:
excludeZeroes
public Example excludeZeroes()
- Exclude zero-valued properties
-
excludeNone
public Example excludeNone()
- Don't exclude null or zero-valued properties
-
enableLike
public Example enableLike(MatchMode matchMode)
- Use the "like" operator for all string-valued properties
-
enableLike
public Example enableLike()
- Use the "like" operator for all string-valued properties
-
ignoreCase
public Example ignoreCase()
- Ignore case for all string-valued properties
-
excludeProperty
public Example excludeProperty(String name)
- Exclude a particular named property
-
当用enableLike()方法时,可以通过MatchMode指定匹配的方式。MatchMode提供了四种匹配的方式:
posted @
2005-06-03 17:27 小米 阅读(2223) |
评论 (3) |
编辑 收藏
摘要: 利用JavaMail的API可以快速的实现发送邮件的功能。下面是我使用的一个简单的实例,实现了简单的文本邮件的发送。
import java.io.*;import java.util.*;import javax.activation.*;import javax.mail.*;...
阅读全文
posted @
2005-06-02 16:30 小米 阅读(2288) |
评论 (7) |
编辑 收藏
好怀念以前可以过六一儿童节的时候,可以放假,学校还会组织活动,每到这天,都可以名正言顺的出去玩。呵呵。现在可没有六一儿童节过了。
posted @
2005-06-01 16:29 小米 阅读(461) |
评论 (0) |
编辑 收藏
上个月过了理论考试,昨天终于第一次开起了汽车。呵呵,一开始好紧张啊,给师傅狂骂。

有两次还差点撞到墙。

后来熟悉了后,就好了很多了。呵呵,第一天学会了怎么启动,停车,打档和转方向盘。上手还是很快滴!

不过,想起要上路,我就感觉恐怖。

posted @
2005-05-26 10:21 小米 阅读(515) |
评论 (0) |
编辑 收藏
以前在写程序的时候,碰到需要比较两个有可能为null的实例时,为了避免出现NullPointerException,经常用这样的一段代码来比较:
Object obj1 = "abc";
Object obj2 = "cde";
if ((obj1 == null && obj2 == null) || (obj1 != null && obj1.equals(obj2))
|| (obj2 != null && obj2.equals(obj1))) {
System.out.println("equals");
} 这样的程序,读起来真是挺拗口。我一直没有想到什么好的方法解决这个问题,直到今天在看到JDK的AbstractList源码的equals方法的实现时,看到这一段:
if (!(o1==null ? o2==null : o1.equals(o2)))
return false; 原来用三元运算符可以很好的解决这个问题,呵呵,我前面的程序可以改写成:
Object obj1 = "abc";
Object obj2 = "cde";
if (obj1 == null ? obj2 == null : obj1.equals(obj2))
System.out.println("equals"); 真是简洁多了!

posted @
2005-05-25 17:00 小米 阅读(1401) |
评论 (0) |
编辑 收藏
从对象池中获取的实例,因为并不清楚该channel是否已经设置成正确的状态,所以在使用时最好重新设置一遍。有以下几点需要注意:
1.在使用阻塞IO时,需要把该channel设置成阻塞的,即需要调用SocketChannel.configureBlocking(true);
2.在使用非阻塞IO时,需要把该channel设置成非阻塞的,即需要调用SocketChannel.configureBlocking(false);
3.如果该channel注册了selector,那么在返回该实例到对象池中,需要把注册的selector清除,即需要调用Selector的close方法。
下面是一段应用场景的例子:
// 把命令输出
channel.configureBlocking(true);
PrintWriter writer = new PrintWriter(channel.socket().getOutputStream(), false);
writer.write(command.endsWith("\n") ? command : command + "\n");
writer.flush();
channel.configureBlocking(false);
// 创建Selector
Selector selector = Selector.open();
// 向Selector注册我们需要的READ事件
SelectionKey skey = channel.register(selector, SelectionKey.OP_READ);
boolean stop = false;
int n = 0;
int read = 0;
ByteBuffer buffer = ByteBuffer.allocate(1024);
// 轮询
while (!stop) {
// 获取Selector返回的时间值
n = selector.select();
// 当传回的值大于0事,读事件发生了
if (n > 0) {
// 处理发生的事件
}
}
selector.close();
posted @
2005-05-25 15:02 小米 阅读(3262) |
评论 (0) |
编辑 收藏
在JDK1.3版本中引入了Dynamic Proxy的代理机制,通过实现java.lang.reflect.InvocationHandler接口,可以实现拦截需要改写的方法。下面是一个简单范例。
有下面一个接口TestInterface和它的一个实现TestImpl:
package sample.proxy;
/**//**
* <p>Title: </p>
*
* <p>Description: </p>
*
* <p>Copyright: Copyright (c) 2005</p>
*
* <p>Company: </p>
*
* @author George Hill
* @version 1.0
*/
public interface TestInterface {
public String print();
}
package sample.proxy;
/**//**
* <p>Title: </p>
*
* <p>Description: </p>
*
* <p>Copyright: Copyright (c) 2005</p>
*
* <p>Company: </p>
*
* @author George Hill
* @version 1.0
*/
public class TestImpl implements TestInterface {
public String print() {
return "Hello, it's from TestImpl class";
}
}
下面拦截print方法,调用自己的实现,这需要实现java.lang.reflect.InvocationHandler接口。
package sample.proxy;
import java.lang.reflect.*;
/**//**
* <p>Title: </p>
*
* <p>Description: </p>
*
* <p>Copyright: Copyright (c) 2005</p>
*
* <p>Company: </p>
*
* @author George Hill
* @version 1.0
*/
public class TestHandler implements InvocationHandler {
TestInterface test;
/**//**
* 将动态代理绑定到指定的TestInterface
* @param test TestInterface
* @return TestInterface 绑定代理后的TestInterface
*/
public TestInterface bind(TestInterface test) {
this.test = test;
TestInterface proxyTest = (TestInterface) Proxy.newProxyInstance(
test.getClass().getClassLoader(), test.getClass().getInterfaces(), this);
return proxyTest;
}
/**//**
* 方法调用拦截器,拦截print方法
* @param proxy Object
* @param method Method
* @param args Object[]
* @return Object
* @throws Throwable
*/
public Object invoke(Object proxy, Method method, Object[] args) throws Throwable {
// 如果调用的是print方法,则替换掉
if ("print".equals(method.getName())) {
return "HaHa, It's come from TestHandler";
} else {
return method.invoke(this.test, args);
}
}
}
下面是测试用例:
package sample.test;
import junit.framework.*;
import sample.proxy.*;
/**//**
* <p>Title: </p>
*
* <p>Description: </p>
*
* <p>Copyright: Copyright (c) 2005</p>
*
* <p>Company: </p>
*
* @author George Hill
* @version 1.0
*/
public class TestDynamicProxy extends TestCase {
private TestInterface test = null;
protected void setUp() throws Exception {
super.setUp();
TestHandler handler = new TestHandler();
// 用handler去生成实例
test = handler.bind(new TestImpl());
}
protected void tearDown() throws Exception {
test = null;
super.tearDown();
}
public void testPrint() {
System.out.println(test.print());
}
}
运行测试用例,可以看到输出的是“HaHa, It's come from TestHandler”。
posted @
2005-05-24 17:47 小米 阅读(3538) |
评论 (3) |
编辑 收藏
昨天,终于收到了等待已久的《深入浅出Hibernate》一书,到现在已经看了40多页,感觉很不错,以前的一些问题在看了作者的剖析后,豁然开朗!

作者看来下了很大功夫去写这本书,真正做到了深入浅出。我评价此书为

,向大家推荐这本书。
另外还买了一本《精通Spring》和《Java线程编程》,呵呵,看来有一段时间忙看书了。
posted @
2005-05-24 17:30 小米 阅读(666) |
评论 (1) |
编辑 收藏
在工作中,经常需要写充值这样的功能,这个功能无非是要做下面四件事:
1. 判断是否可以充值;
2. 将充值卡的余额减去充值金额;
3. 将用户的余额加上充值金额;
4. 写日志。
在实际的应用中,还是有不少地方需要考虑的,主要有以下几个方面:
1. 这四步中,后面三步都涉及到数据库的操作,所以必须在一个事务中完成;
2. 后面三步的执行顺序是需要考虑的,我觉得比较好的顺序是这样的:
a. 写日志;
b. 将充值卡的余额减去充值金额;
c. 将用户的余额加上充值金额。
由于写日志操作是不涉及到金额的,即使失败了,对系统也没有什么很大的影响,所以我放在第一步执行。至于是先给用户增加金额还是先减去充值卡的金额,似乎谁先谁后都没有什么关系。不过,其实有一个微妙的地方,如果先给用户加上余额而不幸在减去充值卡的余额时出错,甚至很不幸数据库也出了问题,没有回滚事务。那么就等于用户平白无故的多了钱,用户当然很高兴,也许会投诉,也许不会投诉(是我肯定不投诉,高兴都来不及呢
)。如果是相反的情况,那么用户必然投诉,也就可以发现系统的问题。所以我觉得应该先减去充值卡的余额。
3. 在执行更改充值卡的余额时,必须要在数据库中进行加减操作,而且要在数据库中再检查一遍充值卡的余额是否足够。执行的SQL语句类似下面:
UPDATE card SET card_balance=card_balance-? WHERE card_number=? AND card_balance>=?
由于现在大部分的系统都是多进程或者多线程的,有可能在你提交之前,有其它的进程或者线程更新了数据库中的记录,所以如果不在数据库中进行加减操作,不再检查一遍余额是否充足,会给系统带来隐患。
posted @
2005-05-20 18:19 小米 阅读(541) |
评论 (0) |
编辑 收藏
摘要: 使用Jakarta Commons Pool可以根据需要快速的实现自己的对象池,只需要实现PoolableObjectFactory或者KeyedPoolableObjectFactory接口。KeyedPoolableObjectFactory和PoolableObjectFactory的不同之处在于KeyedPoolabl...
阅读全文
posted @
2005-05-20 14:08 小米 阅读(4135) |
评论 (0) |
编辑 收藏
续上一篇随笔,struts1.2的源代码和struts1.1的源代码有些不同,struts1.1的eoncode方法是用的RequestUtils.encodeURL(String s)处理的,指定用UTF-8进行encoding。所以我的修改有些不同。
从struts的网站上下载1.1的源代码:
http://apache.justdn.org/jakarta/struts/source/jakarta-struts-1.1-src.zip,解压到本地目录。打开文件jakarta-struts-1.1-src\src\share\org\apache\struts\taglib\bean\WriteTag.java,新增一个布尔属性encode,表示是否需要用UTF-8编码输出字符串。代码片断如下:
/**//**
* The encode flag for the value.
* Added by George Hill, 05/19/2005
*/
protected boolean encode = false;
public boolean isEncode() {
return (this.encode);
}
public void setEncode(boolean encode) {
this.encode = encode;
} 修改方法formatValue,把这段:
// Return String object as is.
if ( value instanceof java.lang.String ) {
return (String)value;
} else {
}
替换成:
// Return String object as is.
if ( value instanceof java.lang.String ) {
if (encode)
return RequestUtils.encodeURL((String)value);
else
return (String)value;
} else {
}
保存修改后的文件。然后需要修改文件jakarta-struts-1.1-src\doc\userGuide\struts-bean.xml。这个文件在ant编译时会变成strtus-bean.tld文件。在tag write后面增加一个attribute,如下所示:
<attribute>
<name>encode</name>
<required>false</required>
<rtexprvalue>true</rtexprvalue>
<info>
<p>Added by George Hill, specifies the value need UTF-8 encode or not.</p>
</info>
<default>false</default>
</attribute>
然后修改一下ant的编译配置文件build.xml,这一部分和上一篇的随笔类似,请参考上篇随笔:
<<用URLEncoder输出<bean:write />的值>>。
运行ant,编译后的jar文件保存在jakarta-struts-1.1-src\target\library目录中,把原来的struts.jar和struts-bean.tld文件替换掉,就可以用自定义的<bean:write /> tag了。
posted @
2005-05-20 11:52 小米 阅读(1112) |
评论 (0) |
编辑 收藏
我在JSP页面中,当处理<a href></a>时,经常不用<html:link/>的方式处理,而是用下面这样的方式处理:
<a href="foo.do?param1=<bean:write name="n1" property="p1"/>¶m2=<bean:write name="n2" property="p2"/>">Test</a>
这样在处理多个参数时,就不需要先放到一个Collection中。按照<html:link/>的多个参数的处理方法去做,有时确实是很繁琐。不过这样带来一个新的问题,在处理中文参数值时,这样就行不通了。用request.getParameter("param1")获取的中文,在中文的个数为奇数个时,就会显示不正确。例如“三个字”在getParameter中获取的值是“三个?”。
这个问题是由于<bean:write />没有用URLEncoder的encode方法处理值,因为<bean:write />主要是用来在页面上显示bean的信息,并不是用在链接中当作参数的值。这个问题可以通过给<bean:write />增加新的属性来解决。
从Struts的网站上下载Struts 1.2.4的源代码:
http://apache.freelamp.com/struts/source/jakarta-struts-1.2.4-src.zip 解压到本地目录,然后修改文件jakarta-struts-1.2.4-src\src\share\org\apache\struts\taglib\bean\WriteTag.java。新增一个属性charset,表示需要用什么编码进行编码。代码片断如下:
/**//**
* Added by George Hill, the string value charset to encoding.
* 05/19/2005
*/
protected String charset = null;
public String getCharset() {
return (this.charset);
}
public void setCharset(String charset) {
this.charset = charset;
} 修改方法formatValue,把这段
if (value instanceof java.lang.String) {
return (String) value;
} else {
}
替换为:
if (value instanceof java.lang.String) {
if (charset != null && charset.length() != 0)
return TagUtils.getInstance().encodeURL((String) value, charset);
else
return (String) value;
} else {
}
保存修改后的文件。然后需要修改文件jakarta-struts-1.2.4-src\doc\userGuide\struts-bean.xml。这个文件在ant编译时会变成strtus-bean.tld文件。在tag write后面增加一个attribute,如下所示:
<tag>
<name>write</name>
<attribute>
<name>charset</name>
<required>false</required>
<rtexprvalue>true</rtexprvalue>
<info>
<p>Added by George Hill, use this charset to encoding the value.</p>
</info>
</attribute>
</tag>
然后修改一下ant的编译配置文件build.xml,有几个部分需要修改:
1.属性catalina.home需要修改成你安装的tomcat的目录;
2.compile.classpath需要修改,把jar文件的路径指向正确;
3.prepare.library taget部分的copy,把相关的jar文件的路径指向正确。
运行ant,编译后的jar文件保存在jakarta-struts-1.2.4-src\target\library目录中,把原来的struts.jar和struts-bean.tld文件替换掉,就可以用自定义的<bean:write /> tag了。如果不写charset属性,那么和原来的<bean:write />处理是一样的。
这样,类似于下面的链接地址:
<a href="foo.do?param1=<bean:write name="n1" property="p1"/>¶m2=<bean:write name="n2" property="p2"/>">Test</a>
就可以修改成:
<a href="foo.do?param1=<bean:write name="n1" property="p1" charset="UTF-8"/>¶m2=<bean:write name="n2" property="p2" charset="UTF-8"/>">Test</a>
在request.getParameter("param1")中将会获得正确的中文值。
对于struts 1.1,程序又稍微有些不同。我将在下一篇随笔中介绍。
posted @
2005-05-20 00:50 小米 阅读(2159) |
评论 (5) |
编辑 收藏
等了好多天,总于等到了。在China-pub和第二书店都有售。地址:
http://www.china-pub.com/computers/common/info.asp?id=24500 http://www.dearbook.com.cn/book/viewbook.aspx?pno=TS0028982 期待快递公司快点送过来!

posted @
2005-05-18 18:21 小米 阅读(422) |
评论 (0) |
编辑 收藏
下面是我的一个简单的网络服务器端的程序,程序的流程是监听ACCEPT事件,然后往客户端输出一串字符串。是不是很简单。
package sample.nio;
import java.io.*;
import java.net.*;
import java.nio.channels.*;
import java.util.*;
/**//**
* <p>Title: </p>
*
* <p>Description: </p>
*
* <p>Copyright: Copyright (c) 2005</p>
*
* <p>Company: </p>
*
* @author George Hill
* @version 1.0
*/
public class Server {
private int port;
public Server(int port) {
this.port = port;
}
public void startServer() throws IOException {
// 创建ServerSocketChannel并且绑定到指定的端口
ServerSocketChannel ssc = ServerSocketChannel.open();
InetSocketAddress address = new InetSocketAddress(InetAddress.getLocalHost(), port);
ssc.socket().bind(address);
ssc.configureBlocking(false);
// 创建Selector,并且注册ACCEPT事件
Selector selector = Selector.open();
SelectionKey skey = ssc.register(selector, SelectionKey.OP_ACCEPT);
boolean stop = false;
int n = 0;
System.out.println("Server Start");
// 轮询
while (!stop) {
// 获取Selector返回的时间值
n = selector.select();
// 当传回的值大于0事,读时间发生了
if (n > 0) {
Set set = selector.selectedKeys();
Iterator it = set.iterator();
while (it.hasNext()) {
skey = (SelectionKey) it.next();
it.remove();
if (skey.isAcceptable()) {
// 从channel()中取得刚刚注册的Channel
Socket socket = ((ServerSocketChannel) skey.channel()).accept().socket();
PrintWriter writer = new PrintWriter(socket.getOutputStream(), true);
// 将"Hello, World"写入
writer.write("Hello, World!\n");
// 睡眠3秒
try {
Thread.sleep(3000);
} catch (InterruptedException ie) {
}
// 将"EXIT"写入Buffer
writer.write("EXIT");
// 退出程序
writer.close();
// stop = true;
}
}
}
}
ssc.close();
System.out.println("Server Stop");
}
public static void main(String[] args) throws Exception {
Server server = new Server(5000);
server.startServer();
}
}
posted @
2005-05-18 12:21 小米 阅读(759) |
评论 (0) |
编辑 收藏
摘要: 最近在做有关Socket的程序,写了两个客户端程序,第一个客户端程序如下:
1package sample.nio; 2 3import java.io.IOException; 4import java.net.*; 5import&nb...
阅读全文
posted @
2005-05-18 12:18 小米 阅读(3945) |
评论 (1) |
编辑 收藏 从JDK1.4开始,SUN提供了JCE包,可以实现多种加密算法。下面是我的一个用JCE进行DES加密解密的程序:
package sample;
import java.security.*;
import javax.crypto.*;
/**//**
* <p>Title: </p>
*
* <p>Description: </p>
*
* <p>Copyright: Copyright (c) 2005</p>
*
* <p>Company: </p>
*
* @author George Hill
* @version 1.0
*/
public class Test {
// 加密使用的Key
private SecretKey key;
// 加密算法,JCE可用DES,DESede和Blowfish
private static final String algorithm = "DES";
public Test() throws NoSuchAlgorithmException {
KeyGenerator generator = KeyGenerator.getInstance(algorithm);
key = generator.generateKey();
}
/**//**
* 利用DES算法加密
* @param s String 需要加密的字符串
* @return String 加密后的字符串
* @throws Exception
*/
public String encryptData(String s) throws Exception {
Cipher c = Cipher.getInstance(algorithm);
c.init(Cipher.ENCRYPT_MODE, key);
return new String(c.doFinal(s.getBytes()));
}
/**//**
* 利用DES算法解密
* @param s String 需要解密的字符串
* @return String 解密后的字符串
* @throws Exception
*/
public String decryptData(String s) throws Exception {
Cipher c = Cipher.getInstance(algorithm);
c.init(Cipher.DECRYPT_MODE, key);
return new String(c.doFinal(s.getBytes()));
}
/**//**
* 测试程序
* @param args String[]
* @throws Exception
*/
public static void main(String[] args) throws Exception {
String s = "Hello";
Test test = new Test();
String encrypt = test.encryptData(s);
System.out.println(encrypt);
String decrypt = test.decryptData(encrypt);
System.out.println(decrypt);
}
}
在实际的使用中,往往需要对加密后的byte数组进行转换,可以自己实现转换,或者用一些第三方的API。
posted @
2005-05-18 11:55 小米 阅读(2761) |
评论 (4) |
编辑 收藏
在QQ群里,同学发来浙江工大的血案图片:
http://pop.pcpop.com/community/show.aspx?topic_id=1577569&page=1,看了很让人感慨。一个如花年纪般的生命就这样消逝了,另一个就要接受法律严厉的审判。在这件事中,双方都是受害者。从这件事中,我感受到,交朋友一定要谨慎;对于自己的朋友不要随意玩弄或者欺骗,这样最终会害人害己。用一种负责任的态度去对人对事。
posted @
2005-05-17 10:45 小米 阅读(729) |
评论 (0) |
编辑 收藏
摘要: 在数据库建立后,可以用Middlegen生成每个表对应的hbm.xml文件,并用hibernate-extensions生成对应的Java类。在后期开发时,如果要修改表,修改完后再走一遍这样的流程,那就显得有些繁琐。用XDoclet可以直接根据修改后的Java类生成对应的hbm.xml文件,这样可以减少维护的工作量。下面是我的...
阅读全文
posted @
2005-05-17 10:20 小米 阅读(2737) |
评论 (1) |
编辑 收藏
在JBuilder X中编辑XML文件时,每做修改都要停顿很长的时间,可能是在检查XML的格式是否正确。例如我在编辑Struts的有效性校验文件validation.xml文件时,常常写一小段内容都要五六分钟的时候。使我无法忍受,不得不用其它的软件编辑,例如UltraEdit。现在2005中已经没有这个问题。我感觉2005在编辑Struts的内容时,速度都比以前的版本要快。
posted @
2005-05-16 14:04 小米 阅读(359) |
评论 (0) |
编辑 收藏
摘要: Hibernate2.1.8中有关一对多的文档,可以查看官方网站上的文档:http://www.hibernate.org/hib_docs/reference/zh-cn/html/,由于篇幅太长,这里就不再引用。 我的例子是一个全国省和市的数据表,省为一...
阅读全文
posted @
2005-05-15 01:55 小米 阅读(2959) |
评论 (2) |
编辑 收藏
摘要: Hibernate中的表的关联有一对一,一对多和多对多三种关联方式,在这篇笔记和接下来的笔记中,我将用我自己的实际例子来说明如何具体实施。 我使用的Hibernate版本是2.1.8,在Hibernate的网站2.1.6版本的中文文档中有关一对一的关联有下面...
阅读全文
posted @
2005-05-14 15:02 小米 阅读(4124) |
评论 (2) |
编辑 收藏 在网上有很多有关Struts的中文解决方案,但是很多都说得很零碎,不够完整。下面是我的一个完整解决方案。
要使网页能够真正实现多语言,有三个地方都需要修改:
1.在页面部分,一定要把页面的编码设成UTF-8,就是在开头加上这一句:<%@ page contentType="text/html; charset=UTF-8" %>。并且把所有的文字信息都放到resource文件中。
以前我在写网页的时候,没有指定页面的编码,总是在获取表单的内容后,要人工的用new String(s.getBytes("ISO8859-1"))转换一下,这样是很繁琐的,而且很容易出错。网页中如果没有指定编码,那么默认的就是用ISO8859-1编码的。
2.相应的资源文件需要用native2ascii转换一下。
对于简体中文的资源文件:native2ascii -encoding gbk ApplicationResources_zh.properties convert\ApplicationResources_zh.properties
对于繁体中文的资源文件:native2ascii -encoding big5 ApplicationResources_zh_tw.properties convert\ApplicationResources_zh_tw.properties
3.需要用一个filter设置一下request的编码,我的代码如下:
1import java.io.*;
2import java.util.*;
3import javax.servlet.*;
4import javax.servlet.http.*;
5
6/**//**
7 * <p>Title: </p>
8 * <p>Description: </p>
9 * <p>Copyright: Copyright (c) 2003</p>
10 * <p>Company: </p>
11 * @author George Hill
12 * @version 1.0
13 */
14
15public class CharsetFilter implements Filter {
16
17 private FilterConfig filterConfig;
18
19 /**//**
20 * Request设置的Charset encoding
21 */
22 private String encoding;
23
24 /**//**
25 * 是否忽略设置Request的Charset encoding
26 */
27 private boolean ignore;
28
29 //Handle the passed-in FilterConfig
30 public void init(FilterConfig filterConfig) {
31 this.filterConfig = filterConfig;
32
33 encoding = filterConfig.getInitParameter("encoding");
34 String value = filterConfig.getInitParameter("ignore");
35 if ("true".equalsIgnoreCase(value) || "yes".equalsIgnoreCase(value)
36 || "on".equalsIgnoreCase(value) || "1".equalsIgnoreCase(value)) {
37 ignore = true;
38 }
39 }
40
41 //Process the request/response pair
42 public void doFilter(ServletRequest request, ServletResponse response,
43 FilterChain chain) throws IOException, ServletException {
44 if (!ignore) {
45 request.setCharacterEncoding(encoding);
46 }
47
48 chain.doFilter(request, response);
49 }
50
51 //Clean up resources
52 public void destroy() {
53 this.filterConfig = null;
54 }
55}
56 web.xml的相关片断如下:
1 <filter>
2 <filter-name>charsetfilter</filter-name>
3 <filter-class>xxx.CharsetFilter</filter-class>
4 <init-param>
5 <param-name>encoding</param-name>
6 <param-value>UTF-8</param-value>
7 </init-param>
8 <init-param>
9 <param-name>ignore</param-name>
10 <param-value>false</param-value>
11 </init-param>
12 </filter>
13 <filter-mapping>
14 <filter-name>charsetfilter</filter-name>
15 <url-pattern>/*</url-pattern>
16 </filter-mapping> 这样,在Action中处理表达的内容时,就不需要再做转换;而且在Action中处理数据给页面显示时,也不需要做转换。在页面中可以同时显示简体和繁体的内容,不需要去设置IE的编码。
另外需要说明的就是如果数据库也支持编码的话,最好也是设成UTF-8编码,这样才能够完整的解决多语言的问题。例如MySQL 4.1以上的版本可以设置编码成utf8,在JDBC的URL中可以指定编码为UTF-8。
posted @
2005-05-13 14:26 小米 阅读(2334) |
评论 (11) |
编辑 收藏
摘要: 由于篇幅较长,所以分开两篇来写。下面是我的一个实际例子,从数据库中分页获取管理员的数据,然后在JSP页面上表示出来。 我的Action的代码:
1import java.util.List; 2import j...
阅读全文
posted @
2005-05-13 11:33 小米 阅读(4905) |
评论 (25) |
编辑 收藏
摘要: 在网页编程中,经常需要利用分页显示数据,下面是我的分页显示的例子。 先说我的设计思路: 1.首先用一个PageData类保存页面相关的数据,有三个域: &...
阅读全文
posted @
2005-05-13 11:18 小米 阅读(2310) |
评论 (4) |
编辑 收藏
我是由夏昕的文档开始学习Spring的,很不错的一篇文档,在这里共享给大家。下载地址:
http://www.xiaxin.net/Spring_Dev_Guide.rar
posted @
2005-05-12 17:48 小米 阅读(672) |
评论 (0) |
编辑 收藏
我是由夏昕的文档开始学习Hibernate的,很不错的一篇文档,在这里共享给大家。下载地址:
http://www.xiaxin.net/Hibernate_DEV_GUIDE.rar
posted @
2005-05-12 17:45 小米 阅读(1519) |
评论 (0) |
编辑 收藏
摘要: 在网页编程中,经常需要使用到附加码这样的一个东西,防止黑客用程序用穷举法去破解密码。下面是我的一个附加码的Servlet实现。
1import java.awt.*; 2import java.awt.image.*; 3import...
阅读全文
posted @
2005-05-12 15:33 小米 阅读(1473) |
评论 (4) |
编辑 收藏技巧问题 如何实现为一个网卡绑定多个IP地址?
技巧主题 根目录-=>网络管理-=>网络设置
技巧作者 泛舟
发表时间 2002-09-18 15:54:47
--------------------------------------------------------------------------------
Linux的网络设备配置文件存放在/etc/sysconfig/network-scripts里面,对于以太网的第一个网络设备,配置文件名一般为 ifcfg-eth0 如果需要为第一个网络设备绑定多一个IP地址,只需要在/etc/sysconfig/network-scripts目录里面创建一个名为ifcfg-eth0:0的文件,内容样例为:
DEVICE="eth0:0"
IPADDR="211.100.10.119"
NETMASK="255.255.255.0"
ONBOOT="yes"
其中的DEVICE为设备的名称,IPADDR为此设备的IP地址,NETMASK为子网掩码,ONBOOT表示在系统启动时自动启动。
如果需要再绑定多一个IP地址,只需要把文件名和文件内的DEVICE中的eth0:x加一即可。LINUX最多可以支持255个IP别名。
posted @
2005-05-12 15:19 小米 阅读(465) |
评论 (0) |
编辑 收藏
在Oracle中不支持LIMT ? OFFSET ?这样的SQL语法,所以原先的MySQL的语句移植到Oracle中需要做一些改动,我的做法如下:
MySQL:SELECT * FROM foo ORDER BY xxx LIMIT ? OFFSET ?
Oracle:SELECT * FROM (SELECT ROWNUM AS NUMROW, A.* FROM (SELECT * FROM foo ORDER BY xxx) A) WHERE NUMROW>? AND NUMROW<=?
这是利用Oracle的一个虚拟的ROWNUM列实现的,只要在原来的SQL语句前面加上“SELECT * FROM (SELECT ROWNUM AS NUMROW, A.* FROM (”,并且把后面的“LIMIT ? OFFSET ?”改成“) A) WHERE NUMROW>? AND NUMROW<=?”,并且在代码处做相关的修改即可。
posted @
2005-05-12 14:52 小米 阅读(1232) |
评论 (1) |
编辑 收藏
最近在做系统的Oracle移植,需要从MySQL移植到Oracle中,在MySQL中有自增类型的字段,在Oracle中却没有,需要用其它的办法实现。在Oracle中要用一个SEQUENCE和触发器实现。下面是我的一个实现:
1CREATE TABLE FOO
2(
3 INDEX INT NOT NULL,
4 ABC VARCHAR2(128),
5 DEF VARCHAR2(128),
6 PRIMARY KEY (INDEXID)
7) TABLESPACE TEMP;
8
9CREATE SEQUENCE FOO_INDEXID INCREMENT BY 1 START WITH 1 MAXVALUE 999999999999 CYCLE NOCACHE;
10
11CREATE OR REPLACE TRIGGER INSERT_FOO_INDEXID
12BEFORE INSERT ON FOO
13REFERENCING
14 NEW AS new
15 OLD AS old
16FOR EACH ROW
17BEGIN
18 SELECT FOO_INDEXID.NEXTVAL INTO :new.INDEXID FROM DUAL;
19END;
posted @
2005-05-12 14:41 小米 阅读(1240) |
评论 (2) |
编辑 收藏
摘要: 以前在表单里面需要用户输入日期的时候,总是用一个text的输入框让用户自己按照格式输入,这样还需要对用户的输入进行有效性检查。经过几次后,觉得烦了,还是用一个像客户端的控件一样的东西让用户选择的比较好一些。下面是我所使用的JavaScript:
1//日历 2var ...
阅读全文
posted @
2005-05-12 14:19 小米 阅读(1043) |
评论 (0) |
编辑 收藏 最近把自己的IDE从JBuilderX升级到了2005,虽然在编辑Struts的配置文件的时候感觉快了些,但是总体还是很吃机器。以前的一些项目都是跑在Tomcat 4.0.6的环境下的,在2005中却没有了Tomcat 4.0的Server。为了让开发环境和运行环境一致,我决定给2005加上Tomcat 4.0的Server。经过一天的摸索,终于成功。
一开始我以为用Configure Servers里面的Copy功能,把Tomcat 4.1的拷贝成4.0的就可以了,但是Tomcat跑不起来,因为4.1和4.0的server.xml文件的格式是不一样的,在4.1中的server.xml文件格式如下:
1<?xml version="1.0" encoding="UTF-8"?>
2<!--This comment marks this file as generated, so it may be deleted and regenerated at any time. To preserve manual changes to this file, delete this comment.-->
3<Server debug="0" port="8081" shutdown="SHUTDOWN">
4 <Service name="Tomcat-Standalone">
5 <Connector acceptCount="10" className="org.apache.coyote.tomcat4.CoyoteConnector" connectionTimeout="60000" debug="0" maxProcessors="75" minProcessors="5" port="8080" useURIValidationHack="false"/>
6 <Engine debug="0" defaultHost="localhost" name="Standalone">
7 <Host appBase="D:\jbproject\xxxxx\Tomcat\webapps" debug="0" name="localhost" unpackWARs="true"/>
8 </Engine>
9 </Service>
10</Server>
在4.0中的server.xml文件格式如下:
1<?xml version="1.0" encoding="UTF-8"?>
2<!--This comment marks this file as generated, so it may be deleted and regenerated at any time. To preserve manual changes to this file, delete this comment.-->
3<Server debug="0" port="8081" shutdown="SHUTDOWN">
4 <Service name="Tomcat-Standalone">
5 <Connector acceptCount="10" className="org.apache.catalina.connector.http.HttpConnector" connectionTimeout="60000" debug="0" maxProcessors="75" minProcessors="5" port="8080"/>
6 <Engine debug="0" defaultHost="localhost" name="Standalone">
7 <Host appBase="D:\jbproject\xxxxx\Tomcat\webapps" debug="0" name="localhost" unpackWARs="true">
8 <Context debug="0" docBase="D:\jbproject\xxxxx\admin" path="/admin" reloadable="true" workDir="D:\jbproject\xxxxx\Tomcat\work\admin"/>
9 </Host>
10 </Engine>
11 </Service>
12</Server>
13 在4.1中把具体的Context放到了webapps目录下面,所以并不能简单的copy过来就可以用。
在JBuilder 2005中,每个Server都是以plugin的形式加入的,具体的jar文件放在lib目录下面的servers目录里面。用WinRAR打开tomcat-jbsp.jar文件,可以看到里面有Tomcat33*.class和Tomcat40*.class,也就是说其实JBuilder 2005其实是有这些server的配置信息的,只是它隐藏了。那么怎么把它打开呢?答案就在MANIFEST.MF文件里面,修改前的文件内容如下:
1Implementation-Vendor: Borland Software Corp.
2Implementation-Version: 011.000.236.000
3Implementation-Title: JBuilder 2005, English Edition
4OpenTools-Servers: com.borland.jbuilder.server.tomcat.Tomcat50Server
5 com.borland.jbuilder.server.tomcat.Tomcat41Server
6 在后面再增加一行:com.borland.jbuilder.server.tomcat.Tomcat40Server。保存,并且重启JBuilder 2005,点击Enterprise->Configure Servers,你将可以看到里面多了一个Tomcat4.0的Server。呵呵,大功告成!
类似的还可以添加其它的Server,不过只限于JBuilder 2005本身有的Server。如果熟悉JBuilder 的plugin的大虾完全可以自己编程解决。
posted @
2005-05-12 11:56 小米 阅读(539) |
评论 (0) |
编辑 收藏