在本文中,你将会学习到如何在Eclipse中创建Android JUnit的单元测试工程以及在不同的条件下创建及运行自动测试用例。
准备工作
本文假设读者已经有一定的Android基础知识,并且已经安装了Eclipse和Android SDK等开发工具。本文将指导读者如何将Android Junit框架应用到Android应用中去。本文还特别重点展示了如何测试Android中的Activity和如何识别程序中的错误。
本文的示例代码可以在http://code.google.com/p/simple-calc-unit-testing/中下载
步骤1 被测试的应用SimpleCalc概况
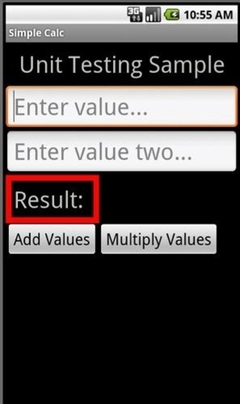
在本文中,将以一个写好了的应用SimpleCalc简单计算器为例子进行讲解。这个简单计算器有两个功能,允许用户输入两个数并将它们相加或相乘,最后显示结果,如下图所示:
步骤2 SimpleCalc的的界面设计
由于应用比较简单,只占一屏,所以我们在/res/layout/main.xml中设计如下代码所示:
<linearlayout p="" <="" xmlns:android="http://schemas.android.com/apk/res/android" style="line-height: normal !important;">
android:orientation="vertical" android:layout_width="fill_parent"
android:layout_height="fill_parent">
<textview p="" <="" android:layout_width="fill_parent" style="line-height: normal !important;">
android:layout_height="wrap_content" android:text="@string/hello"
android:gravity="center_horizontal" android:textSize="48px"
android:padding="12px" />
<edittext p="" <="android:id="@+id/value1" android:layout_height="wrap_content" style="line-height: normal !important;">
android:hint="@string/hint1" android:inputType="numberDecimal"
android:layout_width="fill_parent" android:textSize="48px">
<edittext p="" <="android:id="@+id/value2" android:layout_height="wrap_content" style="line-height: normal !important;">
android:hint="@string/hint2" android:inputType="numberDecimal"
android:layout_width="fill_parent" android:textSize="48px">
<framelayout p="" <="android:id="@+id/FrameLayout01" style="line-height: normal !important;">
android:layout_width="wrap_content" android:layout_height="wrap_content"
android:padding="12px" android:background="#ff0000">
<linearlayout p="" <="" android:id="@+id/LinearLayout02" style="line-height: normal !important;">
android:layout_width="wrap_content" android:layout_height="wrap_content"
android:orientation="horizontal" android:background="#000000"
android:padding="4px">
<textview p="" <="" android:layout_width="wrap_content" style="line-height: normal !important;">
android:layout_height="wrap_content" android:text="@string/resultLabel"
android:textSize="48px" android:id="@+id/resultLabel">
<textview p="" <="" android:layout_width="wrap_content" style="line-height: normal !important;">
android:layout_height="wrap_content" android:id="@+id/result"
android:textSize="48px" android:textStyle="bold"
android:layout_marginLeft="16px">
<linearlayout p="" <="" android:id="@+id/LinearLayout03" style="line-height: normal !important;">
android:layout_height="wrap_content" android:layout_width="fill_parent">
<button p=" android:id="@+id/addValues" android:layout_height="wrap_content">
android:text="@string/add" android:textSize="32px"
android:layout_width="wrap_content">
<button p="" <=" android:id="@+id/multiplyValues" android:layout_height="wrap_content">
android:text="@string/multiply" android:textSize="32px"
android:layout_width="wrap_content"> |
简单解析一下这个界面设计,我们使用了LinearLayout,以使得控件能在垂直方向竖向排列。界面中包括了显示标题“Unit Testing Sample”的textview,两个输入数字的edittext控件,一个FrameLayout控件中包含了一个水平的LinearLayout,在这个LinearLayout包含了一个显示结果的textview以及其提示文字“Result”,注意的是FrameLayout的背景颜色设置为红色,而LinearLayou设置成了黑色背景。