
2008年3月9日
摘要: 做为程序员,从感性角度讲评一下7年里我使用过的9款机械键盘,确实更有特色,这种特殊的触听体验非常美妙!
阅读全文
posted @
2021-03-30 15:45 我爱佳娃 阅读(466) |
评论 (0) |
编辑 收藏
搬了个家,想通过A410点播imac上下载的电影,通过系统自带共享samba怎么都不成功。
想到是13年买的A410,应该升级一下,可官网都没了,最后搜索到这个16年的最新固件:
https://drivers.softpedia.com/get/DVD-BluRay-Media-Players/Cloud-Media/Cloud-Media-Popcorn-Hour-A-410-Media-Player-Firmware-050816061625POP425802.shtml通过USB顺利更新了一把。
再查看mac可以开nfs,方法如下:
sudo vi /etc/exports
加入:
/ -sec=sys
/Users /Users/popeye /Users/popeye/movies -ro -mapall=popeye:staff -alldirs
检查配置:
sudo nfsd checkexports
重启:
sudo nfsd restart
这里要注意movies目录是我重新建立的755权限,不要用系统原来的目录,不然总是访问不了。
再到A410里网络浏览里就能找到了。
posted @
2020-01-19 21:43 我爱佳娃 阅读(781) |
评论 (0) |
编辑 收藏
http://mathias-kettner.de/checkmk_livestatus.html下载并解压最新的包:
check_mk-1.2.1i3.tar.gz
再解压其中的到livestatus目录:
livestatus.tar.gz
进入:livestatus/src
再:make clean livestatus.o
会发现一堆错误,根据编译NDO的选项:
ndoutils-1.4b7/src:
make clean ndomod-3x.o
gcc -fno-common -g -O2 -DHAVE_CONFIG_H -D BUILD_NAGIOS_3X -o ndomod-3x.o ndomod.c io.o utils.o -bundle -flat_namespace -undefined suppress -lz
在最后的编译选项里添上:
-flat_namespace -undefined suppress -lz
就可以编译出:
livestatus.o
--------------------------
livecheck编不过,报找不到n_short:
ip_icmp.h:92: error: expected specifier-qualifier-list before ‘n_short’
vi ./check_icmp.c
把这个调整到INCLUDE序列的最后即可:
#include "/usr/include/netinet/ip_icmp.h"
posted @
2012-12-21 07:00 我爱佳娃 阅读(1597) |
评论 (0) |
编辑 收藏
摘要:
场景
想要用到的场景:用户访问WEB服务,WEB访问非WEB服务1,服务1又再访问2、3,合并计算后,把数据返回给WEB及前端用户。想让访问链上的所有服务都能得到认证和鉴权,认为本次请求确实是来自用户的。所以想到用CAS,让用户在一点登录,所有服务都到此处认证和鉴权。
阅读全文
posted @
2012-12-01 10:43 我爱佳娃 阅读(9886) |
评论 (3) |
编辑 收藏This tutorial will walk you through how to configure SSL (https://localhost:8443 access) on Tomcat in 5 minutes.

For this tutorial you will need:
- Java SDK (used version 6 for this tutorial)
- Tomcat (used version 7 for this tutorial)
The set up consists in 3 basic steps:
- Create a keystore file using Java
- Configure Tomcat to use the keystore
- Test it
- (Bonus ) Configure your app to work with SSL (access through https://localhost:8443/yourApp)
1 – Creating a Keystore file using Java
Fisrt, open the terminal on your computer and type:
Windows:
cd %JAVA_HOME%/bin
Linux or Mac OS:
cd $JAVA_HOME/bin
The $JAVA_HOME on Mac is located on “/System/Library/Frameworks/JavaVM.framework/Versions/{your java version}/Home/”
You will change the current directory to the directory Java is installed on your computer. Inside the Java Home directory, cd to the bin folder. Inside the bin folder there is a file named keytool. This guy is responsible for generating the keystore file for us.
Next, type on the terminal:
keytool -genkey -alias tomcat -keyalg RSA
When you type the command above, it will ask you some questions. First, it will ask you to create a password (My password is “password“):
loiane:bin loiane$ keytool -genkey -alias tomcat -keyalg RSA Enter keystore password: password Re-enter new password: password What is your first and last name? [Unknown]: Loiane Groner What is the name of your organizational unit? [Unknown]: home What is the name of your organization? [Unknown]: home What is the name of your City or Locality? [Unknown]: Sao Paulo What is the name of your State or Province? [Unknown]: SP What is the two-letter country code for this unit? [Unknown]: BR Is CN=Loiane Groner, OU=home, O=home, L=Sao Paulo, ST=SP, C=BR correct? [no]: yes Enter key password for (RETURN if same as keystore password): password Re-enter new password: password
It will create a .keystore file on your user home directory. On Windows, it will be on: C:\Documents and Settings\[username]; on Mac it will be on /Users/[username] and on Linux will be on /home/[username].
2 – Configuring Tomcat for using the keystore file – SSL config
Open your Tomcat installation directory and open the conf folder. Inside this folder, you will find the server.xml file. Open it.
Find the following declaration:
<!-- <Connector port="8443" protocol="HTTP/1.1" SSLEnabled="true" maxThreads="150" scheme="https" secure="true" clientAuth="false" sslProtocol="TLS" /> -->
Uncomment it and modify it to look like the following:
Connector SSLEnabled="true" acceptCount="100" clientAuth="false" disableUploadTimeout="true" enableLookups="false" maxThreads="25" port="8443" keystoreFile="/Users/loiane/.keystore" keystorePass="password" protocol="org.apache.coyote.http11.Http11NioProtocol" scheme="https" secure="true" sslProtocol="TLS" />
Note we add the keystoreFile, keystorePass and changed the protocol declarations.
3 – Let’s test it!
Start tomcat service and try to access https://localhost:8443. You will see Tomcat’s local home page.
Note if you try to access the default 8080 port it will be working too: http://localhost:8080
4 – BONUS - Configuring your app to work with SSL (access through https://localhost:8443/yourApp)
To force your web application to work with SSL, you simply need to add the following code to your web.xml file (before web-app tag ends):
<security-constraint> <web-resource-collection> <web-resource-name>securedapp</web-resource-name> <url-pattern>/*</url-pattern> </web-resource-collection> <user-data-constraint> <transport-guarantee>CONFIDENTIAL</transport-guarantee> </user-data-constraint> </security-constraint>
The url pattern is set to /* so any page/resource from your application is secure (it can be only accessed with https). The transport-guarantee tag is set to CONFIDENTIAL to make sure your app will work on SSL.
If you want to turn off the SSL, you don’t need to delete the code above from web.xml, simply changeCONFIDENTIAL to NONE.
Reference: http://tomcat.apache.org/tomcat-7.0-doc/ssl-howto.html (this tutorial is a little confusing, that is why I decided to write another one my own).
Happy Coding!
posted @
2012-11-12 23:17 我爱佳娃 阅读(3236) |
评论 (0) |
编辑 收藏
EXTJS和D3都很强大,不解释了,把D3绘的图直接放到一个EXT的TAB里,直接上图上代码:
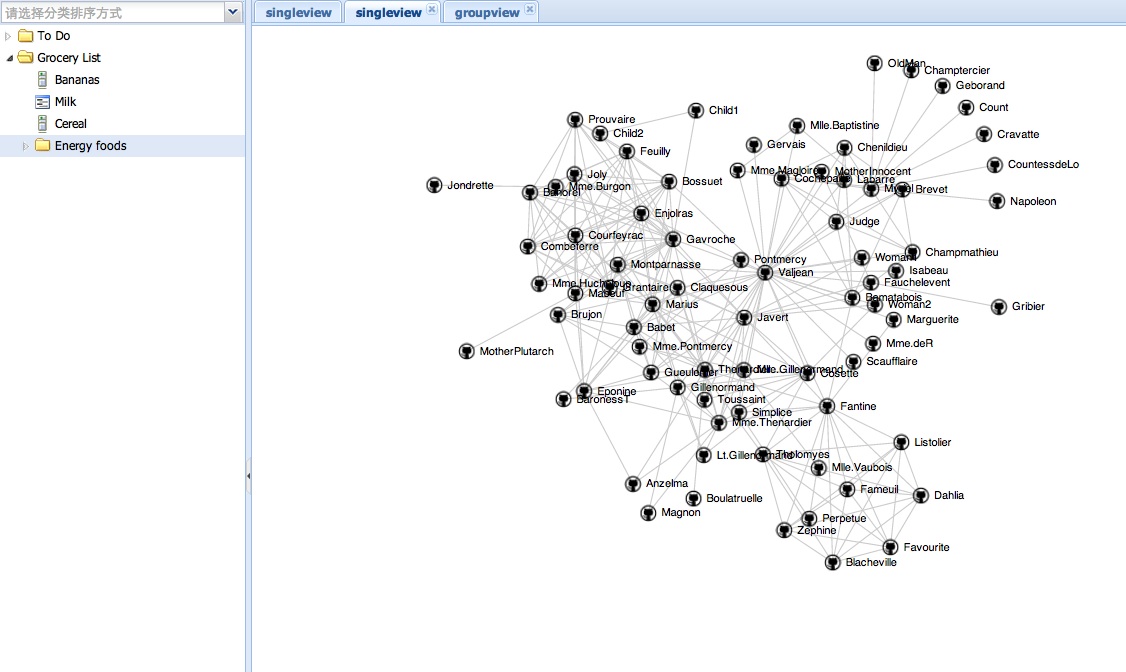
代码中的D3例子来自:
https://github.com/mbostock/d3/wiki/Force-Layout
可用于绘制拓扑结构图.
Ext.define('EB.view.content.SingleView', {
extend : 'Ext.panel.Panel',
alias : 'widget.singleview',
layout : 'fit',
title : 'single view',
initComponent : function() {
this.callParent(arguments);
},
onRender : function() {
var me = this;
me.doc = Ext.getDoc();
me.callParent(arguments);
me.drawMap();
},
drawMap : function() {
var width = 960, height = 500
var target = d3.select("#" + this.id+"-body");
var svg = target.append("svg").attr("width", width).attr("height",
height);
var force = d3.layout.force().gravity(.05).distance(100).charge(-100)
.size([width, height]);
// get from: https://github.com/mbostock/d3/wiki/Force-Layout
// example: force-directed images and labels
d3.json("graph.json", function(json) {
force.nodes(json.nodes).links(json.links).start();
var link = svg.selectAll(".link").data(json.links).enter()
.append("line").attr("class", "link");
var node = svg.selectAll(".node").data(json.nodes).enter()
.append("g").attr("class", "node").call(force.drag);
node.append("image").attr("xlink:href",
"https://github.com/favicon.ico").attr("x", -8).attr("y",
-8).attr("width", 16).attr("height", 16);
node.append("text").attr("dx", 12).attr("dy", ".35em").text(
function(d) {
return d.name
});
force.on("tick", function() {
link.attr("x1", function(d) {
return d.source.x;
}).attr("y1", function(d) {
return d.source.y;
}).attr("x2", function(d) {
return d.target.x;
}).attr("y2", function(d) {
return d.target.y;
});
node.attr("transform", function(d) {
return "translate(" + d.x + "," + d.y + ")";
});
});
});
}
});
posted @
2012-09-27 07:38 我爱佳娃 阅读(4525) |
评论 (0) |
编辑 收藏
到这里下载最新PKG:
http://www.mysql.com/downloads/
下来后先装:mysql-5.5.27-osx10.6-x86_64.pkg
它是装到/usr/local/mysql,到此目录运行下:
./scripts/mysql_install_db --user mysql
通过这个启动:
./bin/mysqld_safe
排错:
看下上面的LOG提示.
Can't find file: './mysql/host.frm' :一般是没权限,把DATA目录删除,再用上面命令建一次
unknow option:把/etc/my.cnf删除掉,里面有新版本不认识的上一版本遗留配置
说mysql.sock找不到,这个版本是在/tmp/目录下哦!
再把剩下两个包装了,就可以通过配置面板启动了:
MySQL.prefPane
MySQLStartupItem.pkg
下次升级可能要给下/usr/local/mysql/data目录的权限posted @
2012-08-05 16:43 我爱佳娃 阅读(2692) |
评论 (0) |
编辑 收藏
摘要: 非常浅显易懂的PERL编码说明.
一目了然PERL编码,注意是转的
阅读全文
posted @
2011-10-09 08:04 我爱佳娃 阅读(3301) |
评论 (0) |
编辑 收藏下面以MAC为例,如果是LINUX需要把DYLD发为LD
把下面代码加到代码开头,它就可以自启动了,不需要再EXPORT或者-I
BEGIN {
#需要加到LOADPATH的路径
my $need = '/usr/local/nagios/pkg/ebase/';
push @INC, $need;
if ( $^O !~ /MSWin32/ ) {
my $ld = $ENV{DYLD_LIBRARY_PATH};
if ( !$ld ) {
$ENV{DYLD_LIBRARY_PATH} = $need;
}
elsif ( $ld !~ m#(^|:)\Q$need\E(:|$)# ) {
$ENV{DYLD_LIBRARY_PATH} .= ':' . $need;
}
else {
$need = "";
}
if ($need) {
exec 'env', $^X, $0, @ARGV;
}
}
}
@import url(http://www.blogjava.net/CuteSoft_Client/CuteEditor/Load.ashx?type=style&file=SyntaxHighlighter.css);@import url(/css/cuteeditor.css);
posted @
2011-10-03 21:37 我爱佳娃 阅读(1816) |
评论 (0) |
编辑 收藏限制用户在自己目录下载文件:
建立nagiosdnld
指向软链接:/usr/local/nagios/dnld -> /Users/nagiosdnld/dnld
编辑/etc/sshd_config
Match User nagiosdnld
X11Forwarding no
AllowTcpForwarding no
ForceCommand internal-sftp
ChrootDirectory /Users/nagiosdnld
重启下服务:
launchctl stop org.openbsd.ssh-agent
launchctl start org.openbsd.ssh-agent
@import url(http://www.blogjava.net/CuteSoft_Client/CuteEditor/Load.ashx?type=style&file=SyntaxHighlighter.css);@import url(/css/cuteeditor.css);
posted @
2011-10-03 03:15 我爱佳娃 阅读(1867) |
评论 (0) |
编辑 收藏
摘要: iostat 输出解析
1. /proc/partitions
对于kernel 2.4, iostat 的数据的主要来源是 /proc/partitions,而对于kernel 2.6, 数据主要来自/proc/diskstats或者/sys/block/[block-device-name]/stat。
先看看 /proc/partitions 中有些什么。
# cat /proc/partitions
major minor #blocks name rio rmerge rsect ruse wio wmerge wsect wuse running use aveq
阅读全文
posted @
2011-09-17 11:37 我爱佳娃 阅读(1730) |
评论 (0) |
编辑 收藏
@import url(http://www.blogjava.net/CuteSoft_Client/CuteEditor/Load.ashx?type=style&file=SyntaxHighlighter.css);@import url(/css/cuteeditor.css);
@import url(http://www.blogjava.net/CuteSoft_Client/CuteEditor/Load.ashx?type=style&file=SyntaxHighlighter.css);@import url(/css/cuteeditor.css);
编译:
修改Makefile.PL:
$archname="universal64-macosx";
去除生成的makefile中所有-arch i386 -Werror
make all
最后把所有可执行文件拷到同一目录,再用
export DYLD_LIBRARY_PATH=/tmp/test
即可直接运行:
eb:tmp$ ls ./test/
Sigar.bundle cpu_info.pl
Sigar.pm libsigar-universal64-macosx.dylib
eb:tmp popeyecai$ perl -I./test ./test/cpu_info.pl
2 total CPUs..
Vendor........Intel
Model.........Macmini4,1
Mhz...........2660
Cache size....3072
Vendor........Intel
Model.........Macmini4,1
Mhz...........2660
Cache size....3072
posted @
2011-09-10 10:45 我爱佳娃 阅读(916) |
评论 (0) |
编辑 收藏
摘要: Stl 删除元素注意事项 STL中的容器按存储方式分为两类,一类是按以数组形式存储的容器(如:vector 、deque);另一类是以不连续的节点形式存储的容器(如:list、set、map)。在使用erase方法来删除元素时,需要注意一些问题。 在使用 list、set 或 m...
阅读全文
posted @
2011-07-18 17:02 我爱佳娃 阅读(1541) |
评论 (0) |
编辑 收藏目的:
限制用户在特定目录(不能看到上级或者根目录)
只能执行scp或者sftp拷贝特别目录下的文件
不能SSH登陆,其它命令不能执行
机制:
SSH登陆成功后,scponly会接管SHELL,并CHROOT到特别目录,让用户“以为”这个目录就是根目录
它只会响应SFTP和SCP命令
只影响配置SHELL为SCPONLY的用户,其它用户不受影响
MAC下安装:
LINUX下安装SCPONLY非常简单,不多说,特说下MAC的
GOOGLE一下scponly,下载解压后编译安装:
./configure --enable-chrooted-binary --enable-rsync-compat --enable-scp-compat --enable-sftp-logging-compat --with-sftp-server=/usr/libexec/sftp-server
make clean all
sudo make install
会安装好:/usr/local/sbin/scponlyc
用workgroup manager建立下载用户,比方说是dnld,并配置其login shell到上述路径
因为CHROOT后执行的命令都以用户目录/Users/dnld做为根目录,所以要把scponly用到的scp和sftp-server两个可执行文件和信赖库拷到其下。以ROOT用户登录,且CD至/Users/dnld,执行以下脚本就会把这件事做好:
perl ./printlib.pl /usr/bin/scp
perl ./printlib.pl /usr/libexec/sftp-server
我写的脚本源码,自动搜索信赖关系,并在当前目录建立目录结构:
#!/bin/perl
%result=();
$result{$ARGV[0]}=1;
sub addlib{
@a = `otool -L \"$_[0]\"`;
#print @a;
for $i (@a){
if ($i =~/\s*([a-z|A-Z|\.|0-9|\/|\+|\-]*)\s*/){
#print "$1\n";
$result{$1}=1;
}
}
}
$before = 1;
$after = 0;
while ($before != $after){
$before = scalar keys %result;
for $i (keys %result){
addlib($i);
}
$after = scalar keys %result;
print "before $before, after $after\n";
}
for $i (keys %result){
#print "$i\n";
if ($i =~ /(.*)\/([~\/]*)/){
system ("mkdir -p \.$1");
system ("cp $i \.$1/");
}
}
调试:
加大LOG级别:
cat 7 /usr/local/scponly/etc/scponly/debuglevel
从其它机器或者本机用dnld用户来拷贝文件,看登陆LOG:
tail -f /var/log/*
dstruss类似strace来看进程在做什么
直接到SCPONLY里加LOG,这个最直接了。
posted @
2011-07-13 02:25 我爱佳娃 阅读(833) |
评论 (0) |
编辑 收藏
brew install openssl安装完SSL库后,
Update the configure file for Mac OS X compatibility
- vim ./configure
- on line 6673 change the text to read
- if test -f “$dir/libssl.dylib”; then
这个是用BREW装的SSL,貌似MAC下是64位的,这个还用不了:
./configure --enable-command-args --with-ssl-inc=/usr/local/Cellar/openssl/0.9.8r/include --with-ssl-lib=/usr/local/Cellar/openssl/0.9.8r/lib
只能用MAC自带的成功了:
./configure --enable-command-args --with-ssl-inc=/Developer/SDKs/MacOSX10.6.sdk/usr/inclue/openssl --with-ssl-lib=/Developer/SDKs/MacOSX10.6.sdk/usr/lib
posted @
2011-06-03 21:29 我爱佳娃 阅读(425) |
评论 (0) |
编辑 收藏创建如下文件和内容:/etc/yum.repos.d/dag.repo
运行:yum install rrdtool
[dag]
name=Dag RPM Repository for Red Hat Enterprise Linux
baseurl=http://apt.sw.be/redhat/el$releasever/en/$basearch/dag
gpgcheck=1
gpgkey=http://dag.wieers.com/rpm/packages/RPM-GPG-KEY.dag.txt
enabled=1
posted @
2011-02-03 21:38 我爱佳娃 阅读(1651) |
评论 (2) |
编辑 收藏要SSH和系统两边都配置对才行,其实也很简单:
用命令:
dpkg-reconfigure locales
进去后只选择zh_CN.UTF-8,并设置成默认字符集。
再到/root/.bashrc里加上:
export LC_ALL=zh_CN.UTF-8
SSH客户端使用UTF-8字符集,如SECURECRT就在SESSION
OPTIONS->APPERANCE->CHARACTER ENCODING里选择UTF-8
posted @
2010-05-08 09:58 我爱佳娃 阅读(1499) |
评论 (0) |
编辑 收藏
一、设置YUM源
cd /etc/yum.repos.d/
wget http://centos.ustc.edu.cn/CentOS-Base.repo.5
mv CentOS-Base.repo.5 CentOS-Base.repo
因为默认的配置文件中服务器地址用的版本号是变量$releasever,所以需要将其替换为实际的版本号,否则是无法连接到服务器的,当前CentOS
最新版是5.3,所以我们修改CentOS-Base.repo
vi CentOS-Base.repo
在vi编辑器中进行全文件替换
:%s/$releasever/5.3/
二、安装
1:安装apache
yum install httpd httpd-devel
2:安装mysql
yum install mysql mysql-server mysql-devel
3:安装php
yum install php php-mysql php-common php-gd php-mbstring php-mcrypt php-devel php-xml
4:启动apache
测试php
建立以下文件/var/www/html/test.php
编辑其内容
// test.php
<?php
phpinfo();
?>
5:测试
在浏览器中输入:http://IP/test.php
看是否显示PHP的信息
6:设置开机启动
chkconfig httpd on
posted @
2010-04-20 09:56 我爱佳娃 阅读(2305) |
评论 (0) |
编辑 收藏
安装SAMBA后,配置下面SHARE:
[popeye]
path = /
valid users = root
read only = no
public = yes
writable = yes
发现可以浏览目录,但不可写,查了下是SELINUX在作怪,把它禁用即可:
先实时停止它:
setenforce 0
改配置:
vi /etc/sysconfig/selinux
修改成:
SELINUX=disabled
posted @
2010-04-07 14:36 我爱佳娃 阅读(2374) |
评论 (0) |
编辑 收藏
摘要: 经过一段时间知识积累后,你可能想在自己的网站建立一个WIKI。WIKI有专用的格式和标记,习惯了用M$的WORD,在它们之间转换会相当痛苦。
这里介绍了从各种格式文档向WIKI转化的办法:点这里。
阅读全文
posted @
2010-03-27 12:15 我爱佳娃 阅读(5310) |
评论 (2) |
编辑 收藏
摘要: 讲了SED的用法,特别是换行c\命令,以及多行替换。
阅读全文
posted @
2009-09-01 10:12 我爱佳娃 阅读(4027) |
评论 (1) |
编辑 收藏有个帖子论证HIBERNATE在批量插入时性能下降,以及一些解决方式。
其核心在于批量插入时,积攒一定量后就写库,并清除SESSION里的第一级缓存,以免后续插入操作受缓存查找而影响效率:
if ( j % batchNum2 == 0 ) {//执行物理批量插入
session.flush();
session.clear();
}
基于JPA的事务操作,SESSION不可见,此时,需要直接调用EntityManager的flush和clear。
但EntityManager也是被封装入JpaDaoSupport,实际的EntityManager对象也不容易取得。
此时可以用其JpaTemplate成员的execute方法来实现这两个操作:
getJpaTemplate().execute(new JpaCallback() {
public Object doInJpa(EntityManager em) throws PersistenceException {
em.flush();
em.clear();
return null;
}
}, true);
在我这里测试结果:
没有定期调用以上方法时,插入50个记录要2秒,并且随着记录增多,时间越来越长。
每插入50个调用以上方法后,插入50个记录小于300毫秒,且不随记录个数线性增长。
posted @
2009-07-16 21:20 我爱佳娃 阅读(6769) |
评论 (0) |
编辑 收藏
Linux 运行的时候,是如何管理共享库(*.so)的?在 Linux 下面,共享库的寻找和加载是由 /lib/ld.so 实现的。 ld.so 在标准路经(/lib, /usr/lib) 中寻找应用程序用到的共享库。
但是,如果需要用到的共享库在非标准路经,ld.so 怎么找到它呢?
目前,Linux 通用的做法是将非标准路经加入 /etc/ld.so.conf,然后运行 ldconfig 生成 /etc/ld.so.cache。 ld.so 加载共享库的时候,会从 ld.so.cache 查找。
传统上, Linux 的先辈 Unix 还有一个环境变量 -
LD_LIBRARY_PATH 来处理非标准路经的共享库。ld.so 加载共享库的时候,也会查找这个变量所设置的路经。但是,有不少声音主张要避免使用
LD_LIBRARY_PATH 变量,尤其是作为全局变量。这些声音是:
*
LD_LIBRARY_PATH is not the answer -
http://prefetch.net/articles/linkers.badldlibrary.html
* Why
LD_LIBRARY_PATH is bad -
http://xahlee.org/UnixResource_dir/_/ldpath.html
*
LD_LIBRARY_PATH - just say no -
http://blogs.sun.com/rie/date/20040710
解决这一问题的另一方法是在编译的时候通过 -R<path> 选项指定 run-time path。
posted @
2009-06-11 09:52 我爱佳娃 阅读(924) |
评论 (0) |
编辑 收藏
摘要: 今天搞了一天,JAVA调用一个PERL程序,得不得就退不出,千试万试,LOG精细到逐行,知道在哪停住了,但打死不知道为什么。
后来吃个饭都放弃了,居然又找到答案,要没看到它,那真以为里面有鬼了。
阅读全文
posted @
2009-05-15 21:04 我爱佳娃 阅读(14329) |
评论 (4) |
编辑 收藏
如需要,设置PROXY:
export http_proxy=http://127.0.0.1:3128
启动,然后设置MIRROR,直接安装:
perl -MCPAN -e shell
cpan> o conf urllist set http://www.perl87.cn/CPAN/
cpan> install JSON
posted @
2009-05-12 16:31 我爱佳娃 阅读(1262) |
评论 (0) |
编辑 收藏方法1:采用String的split,验证代码如下:
import java.util.Arrays;
public class TestSplit {
public static void main(String[] args) {
String orignString = new String("5,8,7,4,3,9,1");
String[] testString = orignString.split(",");
int[] test = { 0, 0, 0, 0, 0, 0, 0 };
//String to int
for (int i = 0; i < testString.length; i++) {
test[i] = Integer.parseInt(testString[i]);
}
//sort
Arrays.sort(test);
//asc sort
for (int j = 0; j < test.length; j++) {
System.out.println(test[j]);
}
System.out.println("next ");
// desc
for (int i = (test.length - 1); i >= 0; i--) {
System.out.println(test[i]);
}
}
}
方法2:采用StringTokenizer
import java.util.Arrays;
import java.util.StringTokenizer;
public class SplitStringTest {
public static void main(String[] args) {
String s = new String("5,8,7,4,3,9,1");
int length = s.length();
//split s with ","
StringTokenizer commaToker = new StringTokenizer(s, ",");
String[] result = new String[commaToker.countTokens()];
int k = 0;
while (commaToker.hasMoreTokens()) {
result[k] = commaToker.nextToken();
k++;
}
int[] a = new int[result.length];
for (int i = 0; i < result.length; i++) {
a[i] = Integer.parseInt(result[i]);
}
//sort
Arrays.sort(a);
//asc sort
for (int j = 0; j < result.length; j++) {
System.out.println(a[j]);
}
}
}
posted @
2009-04-24 13:07 我爱佳娃 阅读(544) |
评论 (0) |
编辑 收藏
摘要: mysqldump 是采用SQL级别的备份机制,它将数据表导成 SQL 脚本文件,在不同的 MySQL 版本之间升级时相对比较合适,这也是最常用的备份方法。
阅读全文
posted @
2009-03-29 17:02 我爱佳娃 阅读(2592) |
评论 (0) |
编辑 收藏
摘要: 在EXT里如果定义类和扩展类
阅读全文
posted @
2009-03-03 15:57 我爱佳娃 阅读(1146) |
评论 (1) |
编辑 收藏
update user set password = password ('xxxx') where user = "root";
grant all privileges on *.* to root@'%' identified by 'xxxx';
其它参数的例子:
grant select,insert,update,delete,create,drop on vtdc.employee to joe@10.163.225.87 identified by '123';
给来自10.163.225.87的用户joe分配可对数据库vtdc的employee表进行select,insert,update,delete,create,drop等操作的权限,并设定口令为123。
要重启一次MYSQL才能使本地用户密码生效:
/usr/local/mysql/support-files/mysql.server restart
posted @
2009-02-12 14:31 我爱佳娃 阅读(1749) |
评论 (0) |
编辑 收藏
由于EXTJS是用XMLHTTP来LOAD的,所以在本地会看到一直LOADING的画面。应该把它放到一个WEB服务器上,以HTTPD为例:
编辑文件:
/etc/httpd/conf.d/extjs.conf
内容如下:
Alias /extjs "/point/to/real/dir/ext/"
<Directory "/point/to/real/dir/ext/">
Options Indexes
AllowOverride AuthConfig Options
Order allow,deny
Allow from all
</Directory>
重启httpd:
service httpd restart
这样访问http://hostip/extjs/docs/index.html就能在本地看EXTJS的文档了。
注,经下面同学回复,有不用架设服务器的办法,我搜了一下,供大家参考,本人未尝试:
http://www.blogjava.net/mengyuan760/archive/2008/04/21/194510.html
posted @
2009-02-05 11:52 我爱佳娃 阅读(2512) |
评论 (2) |
编辑 收藏
继这篇动物机搭建起来后:
自己DIY了一个低功耗基于ADSL的JAVA J2EE服务器
又有新功能加入:
摘要: 以前家里动物机长开着只是下载电影,公司封了淘宝和MSN,现在又可以用它从公司上网了。
可以使用如下模式上网:
APP <=> HTTP TUNNEL <=> SERVER
HTTP TUNNEL有一个客户端,它可以起一个SOCKS本地代理来接收APP数据,然后打包发送到运行在家里的HTTP TUNNEL服务端,由这个服务端程序通过ADSL出到公网即可。
阅读全文
posted @
2008-12-03 17:55 我爱佳娃 阅读(1893) |
评论 (0) |
编辑 收藏
摘要: 摘要:
本文从介绍基础概念入手,探讨了在C/C++中对日期和时间操作所用到的数据结构和函数,并对计时、时间的获取、时间的计算和显示格式等方面进行了阐述。本文还通过大量的实例向你展示了time.h头文件中声明的各种函数和数据结构的详细使用方法。
关键字:UTC(世界标准时间),Calendar Time(日历时间),epoch(时间点),clock tick(时钟计时单元)
阅读全文
posted @
2008-11-28 09:57 我爱佳娃 阅读(15671) |
评论 (0) |
编辑 收藏
摘要: 当ManyToMany或者ManyToOne定义时,JoinTable中referencedColumnName指向的是非主键(non PK columns),将 报ClassCastException。这里有个简单解决办法。
阅读全文
posted @
2008-10-27 17:30 我爱佳娃 阅读(4080) |
评论 (1) |
编辑 收藏
摘要: RRD插入值的计算方式
阅读全文
posted @
2008-09-17 21:15 我爱佳娃 阅读(798) |
评论 (0) |
编辑 收藏
摘要: linux通过ntlm上网/vmware的image管理/yum更新系统
阅读全文
posted @
2008-09-08 09:57 我爱佳娃 阅读(1638) |
评论 (0) |
编辑 收藏
Ways to include code/library from another file (eval, do, require
and use)
1) do $file is like eval `cat $file`, except the former:
1.1: searches @INC.
1.2: bequeaths an *unrelated* lexical scope on the eval'ed code.
2) require $file is like do $file, except the former:
2.1: checks for redundant loading, slipping already loaded files.
2.2: raises an exception on failure to find, compile, or execute $file.
3) require Module is like require "Module.pm", except the former:
3.1: translates each "::" into your system's directory separator.
3.2: primes the parser to disambiguate class Module as an indirect object.
4) use Module is like require Module, except the former:
4.1: loads the module at compile time, not run-time.
4.2: imports symbols and semantics from that package to the current one.
eval除了可以形成动态CODE外,还可以做异常捕捉:
  eval {

...

};

if ($@) {

errorHandler($@);

}


$@在无异常时是NULL,否则是异常原因
posted @
2008-08-12 10:42 我爱佳娃 阅读(506) |
评论 (0) |
编辑 收藏
摘要: PERL开源打包程序PAR和PP(类似于商业程序的perl2exe/perlapp)
阅读全文
posted @
2008-08-11 21:13 我爱佳娃 阅读(636) |
评论 (0) |
编辑 收藏
摘要: 在多至上万台主机的系统中,集中定义配置,然后自动应用到所有主机。
阅读全文
posted @
2008-07-28 11:12 我爱佳娃 阅读(595) |
评论 (0) |
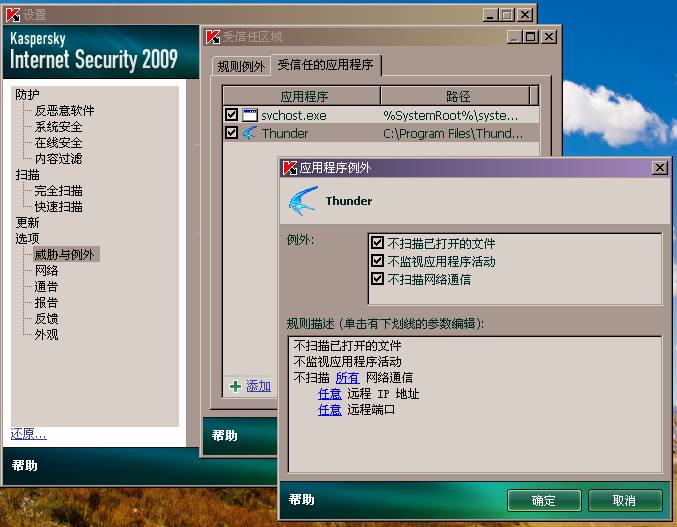
编辑 收藏如下图所示位置设置不扫描迅雷网络通信即可:
posted @
2008-06-28 08:11 我爱佳娃 阅读(3097) |
评论 (6) |
编辑 收藏
摘要: 相信很多人都有过这样的经验,改一个东西可能就几分钟,但找到在哪改、会影响到什么地方,却要花半小时。有了这个工具,让我们在非常大的项目里,在文件和代码的海洋里能马上找到所要关注的部分。有的人说,我有CTRL+SHIFT+T,可是你能记住几年前一个项目里的类名吗?而查阅文字描述的任务却要容易得多。
Mylyn的项目领队这样说道:这个新名字是向“髓磷脂”物质致敬,该物质通过使神经元更有效的传导电流来促进你的思考。我们已经听到使用者声称,Mylyn工具将他们的效率提高到了他们觉得正在以思考的速度编码的地步。减少阻碍我们生产力的UI摩擦就是Mylyn项目全部的内容。
此文是我之Mylyn初体验,不搞大而全,而只把我觉得这个工具最爽、最KILLER的功能介绍出来。
阅读全文
posted @
2008-06-15 13:02 我爱佳娃 阅读(45547) |
评论 (7) |
编辑 收藏
摘要: # Select location bar: Ctrl/Cmd+L or Alt+D
# Select search bar: Ctrl/Cmd+K
阅读全文
posted @
2008-06-02 12:56 我爱佳娃 阅读(2007) |
评论 (0) |
编辑 收藏
摘要: ECLIPSE的快捷键非常多,如果只挑3个,我就选择它们:
1
Alt + /
自动完成
2
Ctrl + O
Quick Outline:函数列表,可以定制这个窗口
3
Ctrl+K (加SHIFT是向上)
向下查找选中的字符串
阅读全文
posted @
2008-06-01 16:31 我爱佳娃 阅读(1504) |
评论 (0) |
编辑 收藏
摘要: FF是深受广大程序员喜爱,不是因为它的快,而是因为FIREBUG1.2版本(点这里)这个宇宙无敌插件,调试JS程序变成了一片小蛋糕。
最后,要说一下FF的几个小技巧
阅读全文
posted @
2008-05-30 13:43 我爱佳娃 阅读(3913) |
评论 (2) |
编辑 收藏
摘要: ASSERT是在调试与测试环境,让程序员和测试者及时发现运行时错误的极简极佳之方法。
它的语法因为简单所以美丽。
有的文章攻击ASSERT(点这里),是混淆了其使用目的的结果。
阅读全文
posted @
2008-05-30 11:54 我爱佳娃 阅读(2145) |
评论 (3) |
编辑 收藏命令行:
C:\Program Files\Rational\ClearCase\bin>clearfsimport -recurse -nsetevent d:\temp\cli D:\prj\pcrf\PCFFACN\web\
SNAPVIEW时,要把需加入的文件放到一临时目录,不能直接在SNAPVIEW对应的目录加入。
另外,要把需要加入的目录先行加入到CC,如上面的cli目录
posted @
2008-05-26 18:10 我爱佳娃 阅读(612) |
评论 (0) |
编辑 收藏
摘要: 回调函数是相当有用,它的意义不仅可以让调用者控制调用函数的执行,还可以有效的将“算法”与“数据”分离,将涉及数据的部分放入回调接口(inner class)中,算法就会相对独立。下面是一个示例。
阅读全文
posted @
2008-05-16 19:19 我爱佳娃 阅读(2687) |
评论 (3) |
编辑 收藏
摘要: 平时编程中经常遇到将多项内容放入字串,然后再一一解析出来的情况,常常是这样的字串操作不胜其烦。
我们可以使用JSON这一标准格式来组织内容到字符串,然后现成的类库来进行解析,准确而清晰。
阅读全文
posted @
2008-05-10 12:15 我爱佳娃 阅读(7150) |
评论 (4) |
编辑 收藏
摘要: 描述在WEB浏览器端的代码架构,主要讲得是有哪些功能点,JS代码结构如何划分。
阅读全文
posted @
2008-03-09 16:52 我爱佳娃 阅读(1644) |
评论 (0) |
编辑 收藏