如上图所示,主要通过
Apache-Server
作为中转服务器,实现多个
tomcat
服务器之间的分布式处理,用户直接请求
Apache-Server
,然后
Apache-Server
会将请求分发到具体的
tomcat-server
,之后
tomcat-server
响应客户请求并返回结果到
Apache-Server
,最后
Apache-Server
返回结果给用户
文件说明:
mod_jk.conf
主要定义
mod_jk
模块的位置以及
mod_jk
模块的连接日志设置,还有定义
worker.properties
文件的位置。
worker.properties
定义
worker
的参数,主要是连接
tomcat
主机的地址和端口信息。如果
Tomcat
与
apache
不在同一台机器上,或者需要做多台机器上
tomcat
的负载均衡只需要更改
workers.properties
文件中的相应定义即可。
%
APACHE_HOME
%为你的安装目录
环境说明:
主要使用了一个
Apache Server
和两个
Tomcat
,在同一台电脑上进行测试。
1.
准备软件
Jdk1.6
下载地址:
http://java.sun.com
tomcat -6.0.29
下载地址:
http://jakarta.apache.org
apache_2.2.4-win32-x86-no_ssl.msi
下载地址:
http://httpd.apache.org/download.cgi
mod_jk-1.2.31-httpd-2.0.52.so (
主要作用是建立
Apache Server
与
Tomcat
之间的连接
)
下载地址:
http://www.apache.org/dist/tomcat/tomcat-connectors/jk/binaries/
说明:
apache-server
安装完成后,可以在浏览器中输入
http://localhost/
来测试,如果出现
” It works!”
则表示安装成功。
2.
安装
mod_jk
连接模块
安装好
Jdk
、
tomcat
、
apache
后
,
加入
mod_jk
连接模块,就是把
mod_jk-
1.2.31
-httpd-2.2.3.so
文件
拷贝到%
APACHE_HOME
%
\modules
下,把
jk
模块的配置放到单独的文件中来,在%
APACHE_HOME
%
\conf
目录新建
mod_jk.conf
、
workers.properties
文件。
在
httpd.conf
最后加上:
# JK module settings
Include conf/mod_jk.conf
说明:以上表示将
mod_jk.conf
配置文件包含进来
3.
修改
mod_jk.conf
文件
为了保持
httpd.conf
文件的简洁,把
jk
模块的配置放到单独的文件中来。
在
mod_jk.conf
文件中添加以下内容:
# Load mod_jk2 module
LoadModule jk_module modules/mod_jk-1.2.31-httpd-2.2.3.so
# Where to find workers.properties(
引用
workers
配置文件
)
JkWorkersFile conf/workers.properties
# Where to put jk logs(log
文件路径
)
JkLogFile logs/mod_jk2.log
# Set the jk log level [debug/error/info](log
级别
)
JkLogLevel info
# Select the log format(log
格式
)
JkLogStampFormat "[%a %b %d %H:%M:%S %Y] "
# JkOptions indicate to send SSL KEY SIZE,
JkOptions +ForwardKeySize +ForwardURICompat -ForwardDirectories
# JkRequestLogFormat set the request format
JkRequestLogFormat "%w %V %T"
# Send JSPs for context / to worker named loadBalancer(URL
转发配置,匹配的
URL
才转发到
tomcat
进行处理
)
JkMount /*.jsp controller
# JkMount /*.* loadBalancer
4.
修改
workers.properties
文件
在
workers.properties
文件中添加以下内容:
#server
列表
worker.list =
controller,tomcat1,tomcat2
# tomcat1(ajp13
端口号,在tomcat下server.xml配置,默认8009)
worker.tomcat1.port=8009
#tomcat
的主机地址,如不为本机,请填写ip地址
worker.tomcat1.host=localhost
worker.tomcat1.type=ajp13
#server
的加权比重,值越高,分得的请求越多
worker.tomcat1.lbfactor = 1
# tomcat2
worker.tomcat2.port=9009
worker.tomcat2.host=localhost
worker.tomcat2.type=ajp13
worker.tomcat2.lbfactor = 1
# controller(
负载均衡控制器)
worker.controller.type=lb
#
指定分担请求的tomcat
worker.controller.balanced_workers=tomcat1,tomcat2
#worker.controller.sticky_session=true
说明:此文件配置了
2
个
tomcat
服务器进行负载均衡处理
5.
修改
tomcat
配置文件
server.xml
更改其中一个的设置打开
tomcat2/conf/server.xml
文件,修改里面所有的端口设置,将
8
改为
9
,如下:


6.
编写一个测试页面
teat1.jsp
建立一个
test
的
web
应用,里面新建一个
test1.jsp,
内容为
 <%
@ page language
=
"
java
"
contentType
=
"
text/html; charset=UTF-8
"
<%
@ page language
=
"
java
"
contentType
=
"
text/html; charset=UTF-8
"

 pageEncoding
=
"
UTF-8
"
%>
pageEncoding
=
"
UTF-8
"
%>

<!
DOCTYPE html PUBLIC "-//W3C//DTD HTML 4.01 Transitional//EN" "http://www.w3.org/TR/html4/loose.dtd"
>
<
html
>
<
head
>
<
meta
http-equiv
="Content-Type"
content
="text/html; charset=UTF-8"
>
<
title
>
test1
</
title
>
</
head
>
<
body
>
<%
System.out.println(
"
===========================
"
);
%>
</
body
>
</
html
>
7.
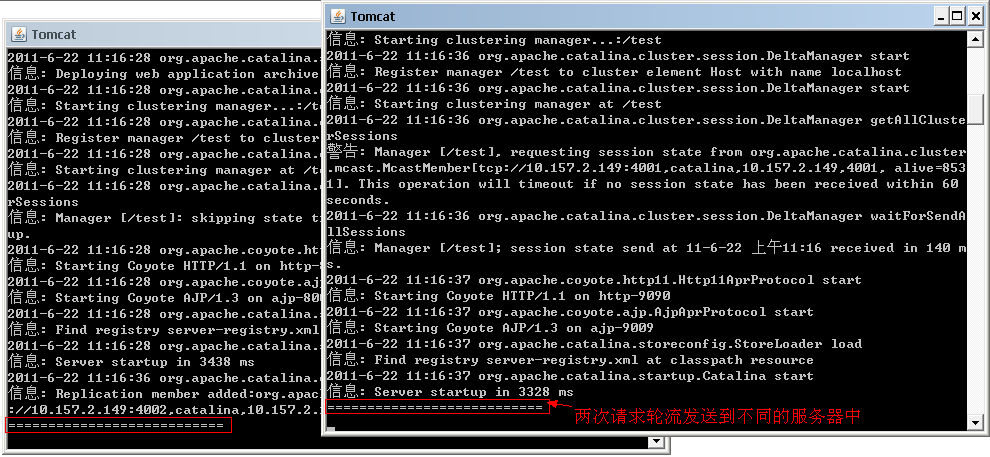
启动服务器并进行测试
依次启动
apache-server
、
tomcat1
、
tomcat2
,通过
http://localhost/test/test1.jsp
访问,查看
tomcat1
的窗口,可以看到打印了一行
"=========="
,再刷新一次,
tomcat2
也打印了一条,再刷新,可以看到请求会被
tomcat1,tomcat2
轮流处理
,
实现了负载均衡
三、集群
(session复制
)
只配置负载均衡还不行,还要
session
复制,也就是说其中任何一个
tomcat
的添加的
session
,是要同步复制到其它
tomcat
,
集群内的
tomcat
都有相同的
session
1.1
修改
tomcat1, tomcat2
的
server.xml
文件添加集群内容,
tomcat5.5
无需添加,只需要去掉注释符,
tomcat6.0
需要添加,内容如下:
<Cluster className="org.apache.catalina.cluster.tcp.SimpleTcpCluster"
managerClassName="org.apache.catalina.cluster.session.DeltaManager"
expireSessionsOnShutdown="false"
useDirtyFlag="true"
notifyListenersOnReplication="true">
<Membership
className="org.apache.catalina.cluster.mcast.McastService"
mcastAddr="228.0.0.4"
mcastPort="45564"
mcastFrequency="500"
mcastDropTime="3000"/>
<Receiver
className="org.apache.catalina.cluster.tcp.ReplicationListener"
tcpListenAddress="auto"
tcpListenPort="4001"
tcpSelectorTimeout="100"
tcpThreadCount="6"/>
<Sender
className="org.apache.catalina.cluster.tcp.ReplicationTransmitter"
replicationMode="pooled"
ackTimeout="15000"
waitForAck="true"/>
<Valve className="org.apache.catalina.cluster.tcp.ReplicationValve"
filter=".*\.gif;.*\.js;.*\.jpg;.*\.png;.*\.htm;.*\.html;.*\.css;.*\.txt;"/>
<Deployer className="org.apache.catalina.cluster.deploy.FarmWarDeployer"
tempDir="/tmp/war-temp/"
deployDir="/tmp/war-deploy/"
watchDir="/tmp/war-listen/"
watchEnabled="false"/>
<ClusterListener className="org.apache.catalina.cluster.session.ClusterSessionListener"/>
</Cluster>
分别添加以上内容后,在
tomcat2
中,修改
tcpListenPort="4001"
为
4002
1.2. Engine
增加
jvmRoute
属性设置,
jvmRoute
的值来自于
workers.properties
文件所设置的服务器名称。
<Engine name="Catalina" defaultHost="localhost"
jvmRoute="tomcat1"
>
#server
列表
worker.list =
controller,tomcat1,tomcat2
2.
添加
test.jsp
页面
2.1. test.jsp
添加以下内容:
<%
@ page contentType
=
"
text/html; charset=UTF-8
"
%>
<%
@ page import
=
"
java.util.*
"
%>
<
html
>
<
head
>
<
title
>
Cluster App Test
</
title
>
</
head
>
<
body
>
Server Info:
<%
out.println(request.getLocalAddr()
+
"
:
"
+
request.getLocalPort()
+
"
<br>
"
);
%>
<%
out.println(
"
<br> ID
"
+
session.getId()
+
"
<br>
"
);
//
如果有新的 Session 属性设置
String
dataName
=
request.getParameter(
"
dataName
"
);
if
(dataName !
=
null
&&
dataName.length()
>
0
) {
String
dataValue
=
request.getParameter(
"
dataValue
"
);
session.setAttribute(dataName, dataValue);
}
out.print(
"
<b>Session 列表</b>
"
);
Enumeration e
=
session.getAttributeNames();
while
(e.hasMoreElements()) {
String
name
=
(
String
) e.nextElement();
String
value
=
session.getAttribute(name).toString();
out.println(name
+
"
=
"
+
value
+
"
<br>
"
);
System.out.println(name
+
"
=
"
+
value);
}
%>
<
form
action
="test.jsp"
method
="POST"
>
名称:
<
input
type
=text
size
=20
name
="dataName"
>
<
br
>
值:
<
input
type
=text
size
=20
name
="dataValue"
>
<
br
>
<
input
type
=submit
></
form
>
</
body
>
</
html
>
2.2.
修改
web.xml
文件,加入
<distributable/>
节点,如下所示:
<?
xml version="1.0" encoding="UTF-8"
?>
<
web-app
xmlns:xsi
="http://www.w3.org/2001/XMLSchema-instance"
xmlns
="http://java.sun.com/xml/ns/javaee"
xmlns:web
="http://java.sun.com/xml/ns/javaee/web-app_2_5.xsd"
xsi:schemaLocation
="http://java.sun.com/xml/ns/javaee http://java.sun.com/xml/ns/javaee/web-app_2_5.xsd"
id
="WebApp_ID"
version
="2.5"
>
<
display-name
>
test
</
display-name
>
<
distributable
/>
<
welcome-file-list
>
<
welcome-file
>
index.html
</
welcome-file
>
<
welcome-file
>
index.htm
</
welcome-file
>
<
welcome-file
>
index.jsp
</
welcome-file
>
<
welcome-file
>
default.html
</
welcome-file
>
<
welcome-file
>
default.htm
</
welcome-file
>
<
welcome-file
>
default.jsp
</
welcome-file
>
</
welcome-file-list
>
</
web-app
>
测试步骤如下:
1)
启动
apache-server
、
tomcat1
、
tomcat2
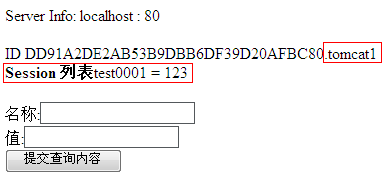
2)
访问
http://localhost/test/test.jsp
,输入名称:
test0001
、值:
123
并点击“提交查询内容”按钮,显示效果如下:
如上图所示,
tomcat1
创建了一个新的
session
,
session
中有属性
test0001,
值为
123
3)
关闭
tomcat1
服务器,
tomcat1
端口为
8080
,如下图:

4)
在页面中再次点击“提交查询内容”按钮,效果如下:

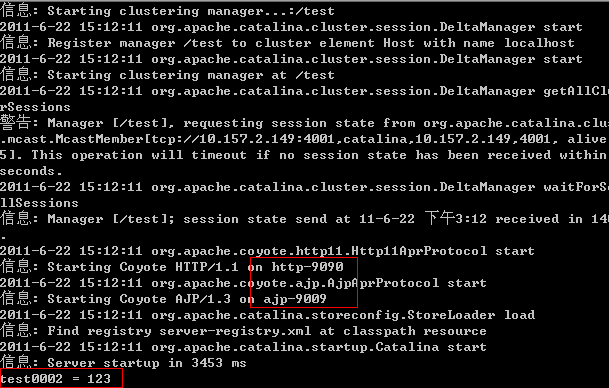
前端页面并没有发生改变,接下来查看后台情况:
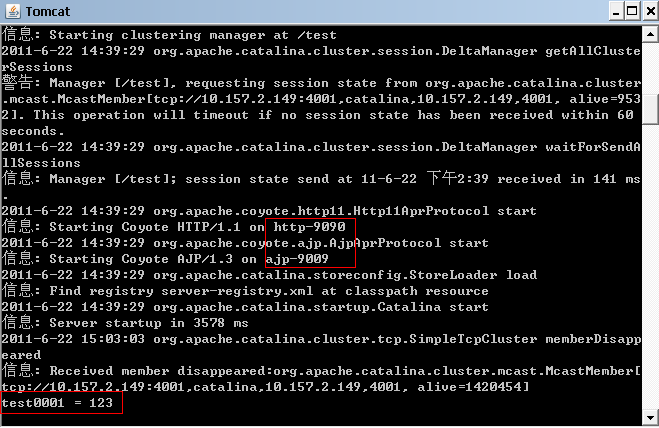
如图所示,可以发现
session
已成功复制到
tomcat2
中,以此证明
tomcat
集群已配置成功。
5)
另外来看看不关闭
tomcat1
服务器再次提交的情况

如图所示,请求并没有转发到
tomcat2
服务器,而是再次转回
tomcat1
服务器,这种情况是由于配置了
jvmRoute
所致,以个人理解,配置了此属性后,
apache-server
会根据
session
情况来进行路由,同一个
session
会转发给同一个服务器。
6)
打开一个新的
IE
窗口,并访问
http://localhost/test/test.jsp

新窗口的请求转发到了
tomcat2
服务器,
session
的
id
为
DD9E6C8181653B9BCCF534FC8760B264.tomcat2
,根据测试结果可以说明,在不发生服务器关闭的情况下,每个
session
会绑定到同一个服务器中,而不会在服务器间发生复制。