Display files are DDS files that enable us to create AS/400 menus and screens to interact with the user. Display files can have several records. Each record defines part of the screen's appearance. These records may or may not overlap each other.
显示文件是一些帮助我们创建和用户进行交互的AS400菜单和屏幕界面的DDS文件。显示文件能够包含多个纪录,每个记录定义了屏幕界面的一部分。这些记录或者相互覆盖。
The SDA application allows us to “draw” what should show up on the screen and creates the DDS code from our “drawing”. Next we'll create a screen with DDS and afterward we'll look at some code excerpts, because sometimes it's easier to alter the screen through its code.
SDA程序允许我们在屏幕上“画草稿”,它会根据我们所画的“草稿”生成相应的DDS代码。下面,我们将要创建利用DDS创建一个屏幕界面,然后查看这些代码的片断,因为,有些时候,利用代码来修改界面还是比较容易些。
In this chapter ,we'll create a screen to show a clients data.
在这一章,我们将创建一个显示客户数据的界面。
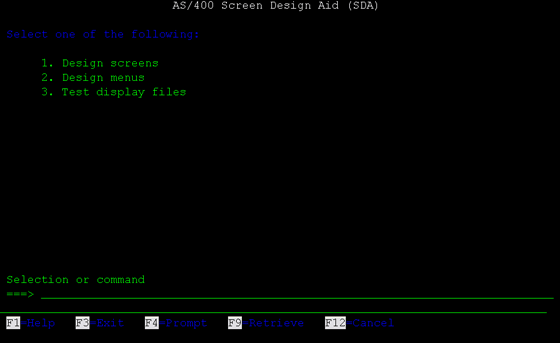
To open SDA type STRSDA on the system prompt. This screen should appear:
在系统命令行输入STRDA就可以打开SDA程序了,如下图显示:
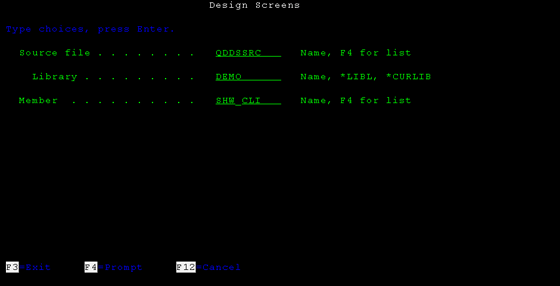
Choose option 1 and type the options as you see them on the image below. Source file is the file where the code will be stored. Member is the name of member we're creating.
选择1,然后输入相关的选项,如下图,Source file就是代码保存的文件了,在Member输入我们想要创建的成员(Member)。
Create file 创建文件
Press Enter. A new screen appears. Add a new record, named TOP, typing what you see on the image bellow.
按下回车键,然后我们添加记录,命名为Top,如下图
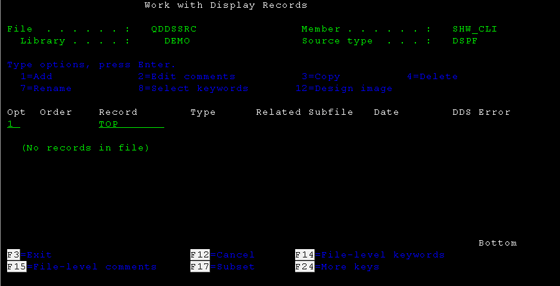
Now specify the record type, in this case it's RECORD:
接着我们输入记录类型,在这个例子中我们输入Record
After the Enter an empty screen appears. In this screen you can “draw” the top record. Add the content you see on the image bellow.
按下回车,现在我们就可以“草绘” top记录,添加内容了,如下图:
When you type a string you should place it between apostrophes. If you don't each word will be handled like a different field. Placing the apostrophes allows you to manipulate all the words as a single field.
当你想输入一个字符串的时候,请问打上单引号,假如你不这样做的话,系统会把他们当作分开的不同字符串。
The *USER function shows the username on the screen. There are other functions that retrieve information from the system: *DATE (shows the system current date), *TIME(shows the system current time), *SYSNAME (shows the system name).
*USER用来在屏幕上显示用户名
*DATE用来在屏幕上显示系统当前日期。
*TIME 用来在屏幕上显示系统的当前时间。
*SYSNAME 用来在屏幕上显示系统名称。
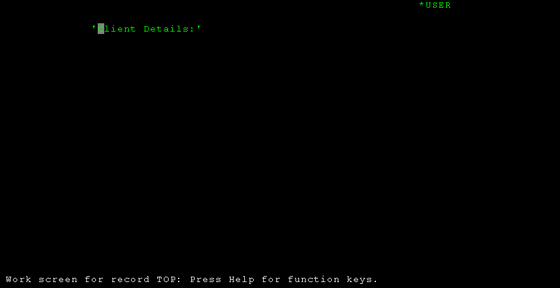
After typing what you see on the image press Enter. Always check what you've done before pressing Enter, because after that you can only alter the screen by manipulating its code. You can also exit the record editing without saving your work, but then you'll lose all you've done since you last opened the record for editing.
按照上图输入完成后按下回车,就可以看到下图了,请在按下回车之前仔细检查,因为按下回车之后,只能用代码进行修改了,当然,你也可以退出这条记录而不保存,但是你就会丢失这些工作成果。
Moving a field 移动字段
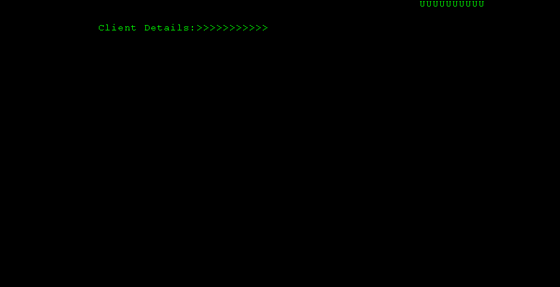
You can move a field to the right placing “>” characters to the right of the field. The number of > you type will be the number of columns the field will move. To move the field to the left place < signs on the left side of the field.
你可以通过在字段右边的输入〉来使字段向后移动,你输入〉符号的数量就是字段向右移动的位移量,向左是同样的道理。
Centering a field 字段居中
To center a field on the screen place an 'ac' at the left of the field and the 'c' must be overlapping the first character of the field. Then press Enter.
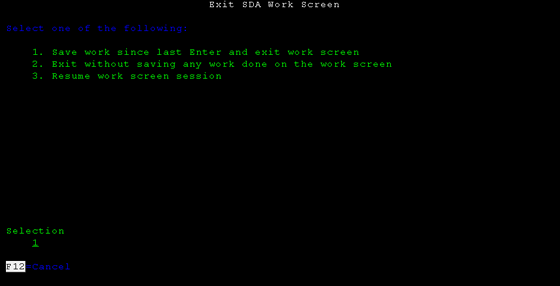
Press F3 to finish editing this record. Choose option 1 to save your work:
要是想将字段居中,你可以在字段的左边输入ac,c必须覆盖字段字段的第一个字符,然后按下回车,按下F3结束你对字段的编辑,选择1保存你的工作成果。
Create another record named BOTTOM, the same way you've created the TOP record.
现在我们创建另外一个记录叫做Bottom,方法是跟创建TOP字段是一样的。
When you open the new record for editing press F9. This menu will appear:
当你打开按下F9对新的记录,我们可以看见菜单显示出来了
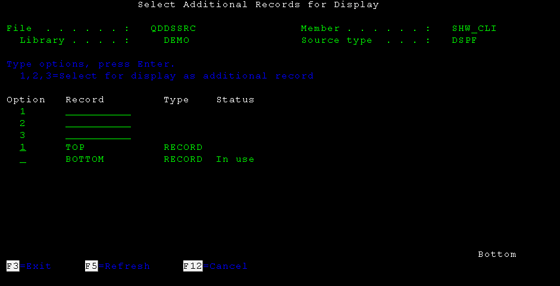
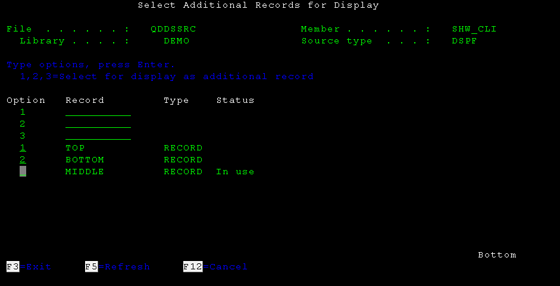
So that you don't overlap the records you can choose to visualize other records in the menu. You can see that the status of the BOTTOM record is “In Use” which means it is the one currently being edited. You can select at most 3 records to visualize. To do so place numbers 1 to 3 on the records you want. Select the TOP record and press Enter.
为了不要覆盖你的其他记录,你可以选择在菜单中对其他记录可视化,你可以发现Bottom记录处于正在使用“In Use”状态,意味着这正是我们正在编辑的记录,你可以选择最到3条记录进行可视化,将1,2,3 放在你想可视化的记录上面,然后按回车
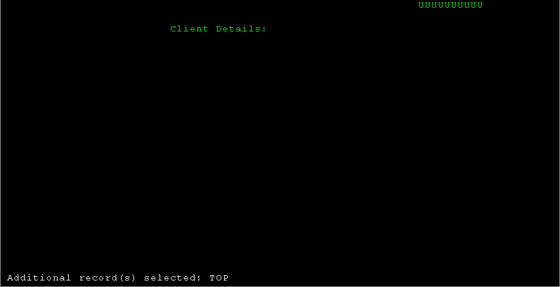
The names of the selected fields appear on the bottom of the screen. Don't forget you are only “drawing” on the record in use. The other records only help you place your elements on the right place.
可以看到,你所选的字段显示在屏幕的底部了,但是你不要忘记了,你只能“草绘”那个正在使用(“In Use”)的记录,其它记录只能辅佐那个正在使用的字段放置合适的位置而已。
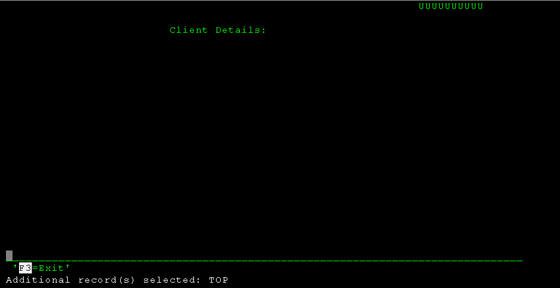
“Draw” something similar to what you see in the next image. Use the underscore to make the line.
像下图那样“草绘”我们的需要的界面,我们使用下划线描述出一条直线来
Changing field proprieties修改字段属性
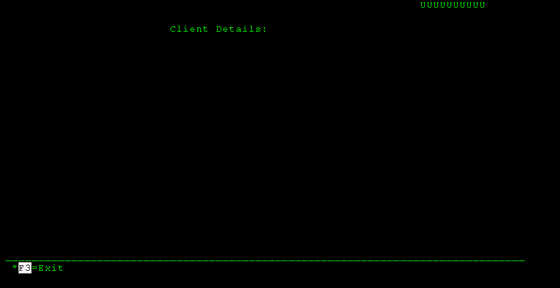
We're going to edit the proprieties of the “F3=Exit” field. Place an '*' at the left of the field and press Enter:
我们现在修改“F3=Exit” 字段的属性,在这个字段的左边输入*, 然后按下回车。
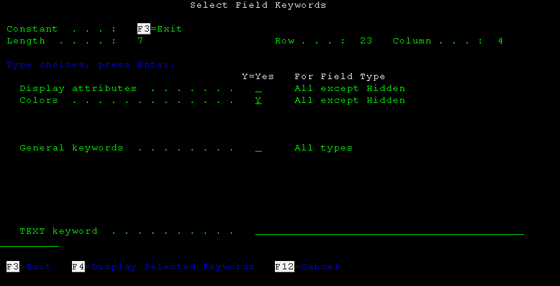
This screen appears. Place an 'Y' in the Colors option. We're going to change the color of the characters.
Place an 1 in the Blue field:
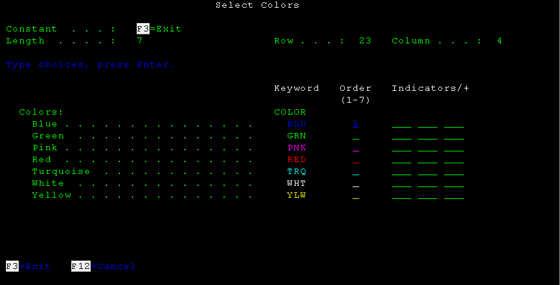
Select blue color 选择蓝色
Press Enter until you're back in the editing screen. The field is now blue. Exit the editing screen (F3) and save your work.
按回车返回,直至你返回编辑界面,现在可以看到字段已经变成蓝色了,按F3退出编辑界面然后保存你的工作成果。
Create a new record, MIDDLE, the same way you've created the previous records.
创建一个新的记录,MIDDLE,方法跟你之前的事一样的
Press F9 to visualize the records you already created:
按F9可视化你刚刚创建的记录
Draw what you can see in the following image. Press Enter when you're done.
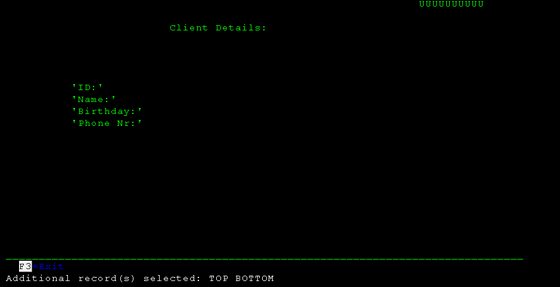
Add fields
添加字段
Using table records
使用表记录
We're going to select the fields from the Clients table to show them on the screen. Press F10. On that menu select the Database File Clients for output (option 3). You can also select fields for input or input/output choosing one of the other options. You should write this on the menu and press Enter:
现在我们将要在客户表中选择我们想要的字段,将他们显示在界面上面,按下F10,现在第3项(select the Database File Clients for output),你也可以为其它的选项,选择字段作为输出和输入。
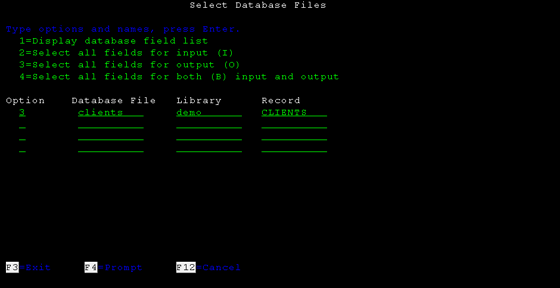
Select the table 选择表
On the bottom of the screen there's a message with all the Client's field names preceded by a number. To use a field on the screen you should write its correspondent number preceded with an '&'. You can see it in the next image. Be careful, because if you write a number and press Enter the order of the list on the bottom will change.
在下图中,你可以看到一条信息显示在最下面,显示了客户表的所有字段和字面名字前面附带着号码,要将这些字段显示在界面的,你需要将相关的字段的号码写在屏幕界面上,前边带上一个‘&’的符号,如下图,
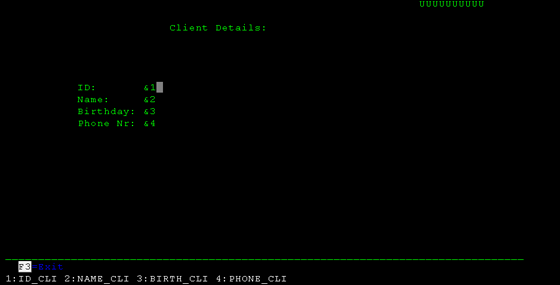
The final result: 最后结果
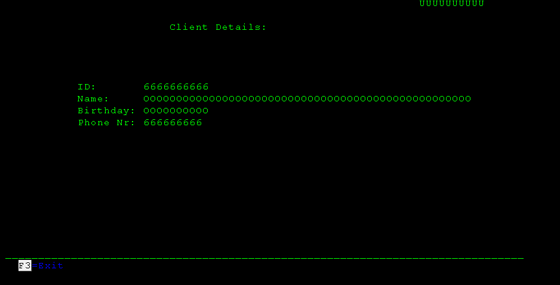
Exit the record editing. We now need to make a few adjustments to the file options.
推出记录编辑,我们需要对文件选项进行一些修改
Record level options (overlay) 记录层面选项(覆盖)
Choose option 8 to the TOP record: 在Top记录选择选项8
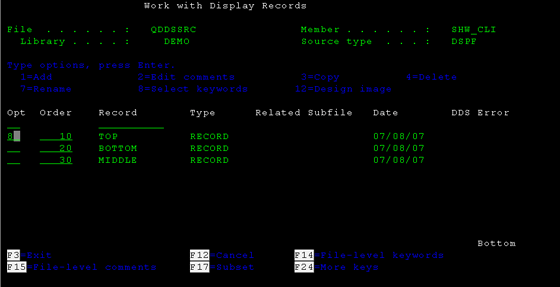
Change overlay option 修改覆盖选项
Select option Overlay Keywords: 选择覆盖关键字
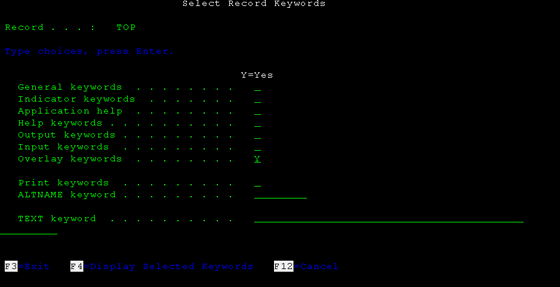
Change overlay option step 2 修改覆盖选项第二步
Place an Y at the option Overlay without erasing. This option allows to display this record on the screen together with the others. Press Enter until you reach the menu with the record listing. Activate this option on the other records.
在选项(Overlay without erasing)的地方输入Y,这个选项允许你在屏幕界面中同时显示其他的记录。一路回车直至你看到记录列表,在其他界面中激活这个选项
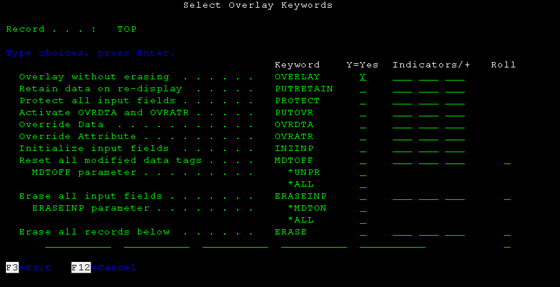
Change overlay option step 3
修改覆盖属性步骤3
File level options (indicators) 文件层面的选项(指示器)
We need to declare the indicator 03 (so that “F3=Exit” works) at the file level. On the menu with the record listing press F14 (F13=shift+F1; F14=shift+F2; F15=shift+F3, etc.). On the following screen choose the option Indicator Keywords.
要实现“F3=Exit”的功能,我们需要需要在文件的层面声明指示器03,在字段列表的菜单中我们输入F14 (F13=shift+F1; F14=shift+F2; F15=shift+F3, etc.).然后,我们选择指示器选项关键字,如下图
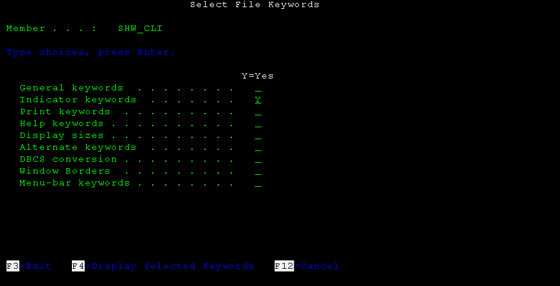
Insert the data you see on the image below:按照下图输入
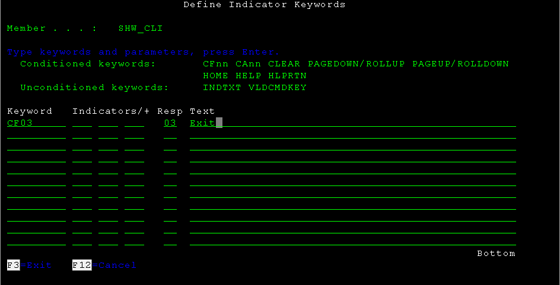
Press Enter until you've reached the starting menu. Press F3 and save the file.
一路回车直至看到开始菜单,按F3保存文件。
Display Files DDS code 显示DDS文件的代码
You can check out the code from this display at QDDSSRC, the member is SHW_CLI. At the beginning of the file should be something like this:
你可以查看上面步骤产生的DDS代码,位置在QDDSSRC,成员名字是SHW_CLI,在文件的开头我们可以看到这样两行:
A DSPSIZ(24 80 *DS3)
A CF03(03 'Exit')
These are the file-level options. You should add a line to this area that later will allow you to rename the indicators used. Add this line after the DSPSIZ line:
这是文件层面的选项,你迟些可以在这里增加一行,它允许你重命名这个已经用了的指示器,在DSPSIZ后面添加一行,如下
A INDARA
You should also have some lines like these: 你也可以添加几行像下面的:
A R TOP
A OVERLAY
A 1 65USER
A 3 27'Client Details:'
In these four lines are the definitions to the TOP record. Notice the OVERLAY option we had defined in SDA. The keyword USER is placed on the 1st line, column 65.
上面四行是关于TOP 记录的定义,要注意的是OVERLAY 选项是我们在SDA中定义的,关键字USER被放在第一行,第65列。
Look at this line from MIDDLE record: 现在我们看看MIDDLE的记录
A ID_CLI R O 8 23REFFLD(CLIENTS/ID_CLI DEMO/CLIENTS)
Here you have a reference to the ID_CLI field on the CLIENTS table and this reference is positioned at line 8 column 23, an can only be accessed for reading (O).
这里你定义了一个引用,指向CLIENTS表的ID_CL字段,这个字段的位置在第8行,第23列,是一个只读的字段。
Compile the file (option 14) after you've closed the member.
关闭了这个成员之后,你可以按F14编译这个文件。
Executing display files 执行显示文件
To run the screen you must create an RPGLE member which will handle all the possible events (pressing F3 for example). Check out the file QRPGLESRC.SHW_CLI to see how this member should be defined. Create a file like QRPGLESRC.SHW_CLI and run it. The result should be something like this:
要运行这个界面,你必须创建一个RPGLE成员,来处理所有可能的事件(例如按下F3),打开文件QRPGLESRC.SHW_CLI,看看我们英文怎么定义这个成员,创建一个像QRPGLESRC.SHW_CLI文件,然后我们运行,结果如下图,
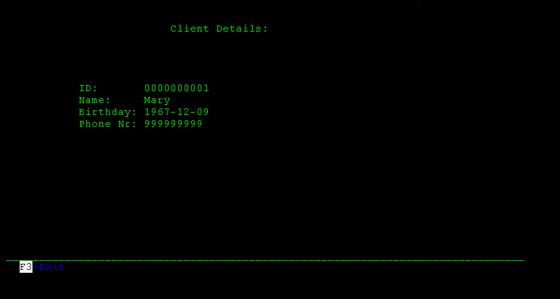
Execute display file 1
If you press Enter: