|
2009年5月6日
#
问题描述:将A数据库服务器上分离出的备份文件,附加到B数据库服务器上,想把之前的登录名删掉,提示“数据库主体在该数据库中拥有架构,无法删除”。解决办法:
 ALTER AUTHORIZATION ON SCHEMA::db_owner TO dbo ALTER AUTHORIZATION ON SCHEMA::db_owner TO dbo
ALTER AUTHORIZATION ON SCHEMA::db_owner TO db_owner
<asp:DropDownList ID="DropDownList1" runat="server" CssClass="style01">
<asp:ListItem Text="请选择" Value=""></asp:ListItem>
</asp:DropDownList>
<asp:Label ID="Label10" runat="server" Text="*" ForeColor="Red" Font-Size="Smaller"></asp:Label>
<asp:RequiredFieldValidator ID="RequiredFieldValidator1" runat="server" ControlToValidate="DropDownList1" InitialValue="" ErrorMessage="请选择信息" Font-Size="Smaller" ForeColor="Red"></asp:RequiredFieldValidator>
SharePoint webpart中悬浮窗口的webconfig路径在.../_layouts/15/下。
问题描述:不能以方法的方式使用不可调用的“system.web.httprequest.querystring”
解决办法:Request.QueryString["GoodsID"]而不是Request.QueryString("GoodsID")
“/”应用程序中的服务器错误。----------------------------------------文件“/_CONTROLTEMPLATES/....../XXXUserControl.ascx”不存在。解决办法:Install-SPSolution -Identity XXX.wsp -GACDeployment -CompatibilityLevel {14,15} -WebApplication http://XXX -force
第一步,选中需要导出脚本的数据库,右键选中
第二步,选取弹出菜单中的任务-生成脚本选项(会弹出一SQL生成脚本的向导)
第三步,在向导中点击下一步,弹出选择数据库界面(默认是自己之前选中的数据库),把下面,“为所选数据库中的所有对象编写脚本(A)”勾选,之后下一步
第四步,在弹出的选择脚本选项,为要编写脚本的对象选择选项页中,找到表/视图选项模块下的“编写数据的脚本”其默认是false改为true之后继续下一步(这一步最重要的)
第五步,在输出选项页中选择脚本保存模式,可以保存到文件中。
update-spsolution -identity XXX.wsp -literalpath D:\SPS2010Setup\XXX.wsp -gacdeployment
当打开一个MDB格式的ACCESS文件后,如果里面默认的都是窗体视图,要查看数据表的信息,可以“创建-查询设计”查看表信息,或是在SQL视图中编写SQL语句来实现。
或按着Shift键打开文件。
问题描述:无法识别的属性“targetFramework”。请注意属性名称区分大小写。 解决办法:修改.NET Framework 版本为相应版本即可,例如2.0换成4.0。 参考:http://blog.csdn.net/muchlin/article/details/6800863
生成32位程序的mdb连接串的 Provider为:
Provider=Microsoft.Jet.OLEDB.4.0 而生成64位代码时,则需要使用如下的 Provider
Provider=Microsoft.ACE.OLEDB.12.0 参考:http://blog.163.com/xiong_weidong/blog/static/9863215201282884442763/
问题现象: 1.未能加载文件或程序集“Interop.ADOX, Version=2.8.0.0, Culture=neutral, PublicKeyToken=bf2649b9bb8e6a82”或它的某一个依赖项。系统找不到指定的文件。 2.ADOX... 没有注册类。 解决办法: 将应用程序生成为Any CPU就可以了
反之,如果系统是64位的Win7,就应该将新项目的生成目标平台改为x86 综上:
64位的Win7 解决方案的生成目标平台设置为x86
32位操作系统 解决方案的生成目标平台设置为AnyCPU 另外一个网友的问题解决方法: 我遇到过这个问题有两次,不过环境不同。 第一次:Windows 2008 Server R2 64位; 第二次:Windows 7 64位; 原因分析:操作系统是64位的,但发布的程序引用了一些32位的ddl,所以出现了兼容性的问题。 解决方案:IIS——应用程序池——高级设置——启用32位应用程序 :true。
参考:http://www.jb51.net/article/31711.htm
最近使用VS,在引用COM组件的时候,出现了无法嵌入互操作类型“……”,请改用适用的接口的错误提示。查阅资料,找到解决方案,记录如下:
选中项目中引入的dll,鼠标右键,选择属性,把“嵌入互操作类型”设置为False。
为WebPart添加右侧的属性面板,方便将来对于WebPart的配置,我们只需要在CustomWebPart.cs文件里面,声明一下变量即可: private string url = string.Empty;
[WebBrowsable(true)]
[WebDisplayName("浏览页地址")]
[WebDescription("配置杂草信息的浏览页地址")]
[Category("杂项设置")]
[Personalizable(true)]
public string thisurl
{
get
{
return url;
}
set
{
url = value;
}
}
参考: http://www.cnblogs.com/jianyus/p/3458374.html
<!DOCTYPE html PUBLIC "-//W3C//DTD XHTML 1.0 Transitional//EN" "http://www.w3.org/TR/xhtml1/DTD/xhtml1-transitional.dtd">
<html xmlns="http://www.w3.org/1999/xhtml">
<head>
<title>Test生成二维码,支持中文</title>
<script type="text/javascript" src="http://code.jquery.com/jquery-1.6.1.min.js"></script>
<script src="jquery.qrcode.min.js" type="text/javascript"></script>
<script type="text/javascript">
function utf16to8(str) {
var out, i, len, c;
out = "";
len = str.length;
for (i = 0; i < len; i++) {
c = str.charCodeAt(i);
if ((c >= 0x0001) && (c <= 0x007F)) {
out += str.charAt(i);
} else if (c > 0x07FF) {
out += String.fromCharCode(0xE0 | ((c >> 12) & 0x0F));
out += String.fromCharCode(0x80 | ((c >> 6) & 0x3F));
out += String.fromCharCode(0x80 | ((c >> 0) & 0x3F));
} else {
out += String.fromCharCode(0xC0 | ((c >> 6) & 0x1F));
out += String.fromCharCode(0x80 | ((c >> 0) & 0x3F));
}
}
return out;
}
$(function () {
jQuery('#output').qrcode(utf16to8("速冻滑子菇,承德森源绿色食品有限公司,网址:http://xxxxxxx/SitePages/ProductViewNew.aspx?PID=7a988c8f-c148-4a90-a6a8-e713b82a183f"));
})
</script>
</head>
<body>
<div id="output"></div>
</body>
</html> /Files/jakin/JS文件.rar注意:此方法仅支持IE9及以上版本。
update S_ENTERPRISE set DAY_PROCESS=replace(DAY_PROCESS,'吨','') where DAY_PROCESS like '%吨%'
1.修改管理中心的Web.config文件,位置:
C:\inetpub\wwwroot\wss\VirtualDirectories\42903
2.修改应用程序的Web.config文件,位置:
C:\inetpub\wwwroot\wss\VirtualDirectories\80
3.修改STS (Secure Token Service)的Web.config文件,位置:
C:\Program Files\Common Files\Microsoft Shared\Web Server Extensions\15\WebServices\SecurityToken
.style01
{
height:27px;
vertical-align:middle;
line-height:27px;
font-family:微软雅黑;
font-size:13pt;
}
CS写法:
1 private bool _IsExpertCheck;
2 [WebBrowsable(true)]
3 [Personalizable(true)]
4 [WebDisplayName("是否按专家显示文件,默认为否")]
5 [WebDescription("是否按专家显示文件,默认为否")]
6 public bool IsExpertCheck
7 {
8 get { return _IsExpertCheck; }
9 set { _IsExpertCheck = value; }
10 }
11
12 protected override void CreateChildControls()
13 {
14 Control control = Page.LoadControl(_ascxPath);
15 if (control != null)
16 {
17 ((D_ZoneLimitViewUserControl)control).WebPart = this;
18 }
19 Controls.Add(control);
20 } 后台写法:
1 public D_ZoneLimitView WebPart { get; set; }
// 合并多行列值
public void GroupRows(GridView GridView1, int cellNum)
   { {
 int i = 0, rowSpanNum = 1; int i = 0, rowSpanNum = 1;
while (i < GridView1.Rows.Count - 1)
  { {
GridViewRow gvr = GridView1.Rows[i];
for (++i; i < GridView1.Rows.Count; i++)
{
GridViewRow gvrNext = GridView1.Rows[i];
if (gvr.Cells[cellNum].Text == gvrNext.Cells[cellNum].Text)
{
gvrNext.Cells[cellNum].Visible = false;
rowSpanNum++;
 } }
else
{
gvr.Cells[cellNum].RowSpan = rowSpanNum;
rowSpanNum = 1;
break;
}
if (i == GridView1.Rows.Count - 1)
{
gvr.Cells[cellNum].RowSpan = rowSpanNum;
}
}
}
 } }
protected void UpLoadDocument()
{
string filename = FileUpload1.PostedFile.FileName.Substring(FileUpload1.PostedFile.FileName.LastIndexOf("/")+1);
Response.Write("filename:"+filename+"<br/>");
Stream filedataStream = FileUpload1.PostedFile.InputStream;
int dataLen = FileUpload1.PostedFile.ContentLength;
Response.Write("dataLen:" + dataLen + "<br/>");
string fileType = FileUpload1.PostedFile.ContentType;
Response.Write("fileType:" + fileType + "<br/>");
byte[] fileData = new byte[dataLen];
filedataStream.Read(fileData, 0, dataLen);
SPSite sps = SPControl.GetContextSite(Context);
sps.AllowUnsafeUpdates = true;
SPWeb spw = sps.OpenWeb();
spw.AllowUnsafeUpdates = true;
SPList list = spw.Lists["TestDocs"];
SPFolder folder = list.RootFolder;
bool ex = false;
Response.Write("folder.Exists:" + folder.Exists + "<br/>");
//获取不带路径的纯文件名
filename = FileUpload1.FileName;
if (folder.Exists)
{
try
{
ex = folder.Files[filename].Exists;
Response.Write("已有同名文件。");
return;
}
catch
{
folder.Files.Add(filename, fileData, true);
}
}
}
stsadm -o deploysolution -name ***.wsp -immediate -allowGacDeployment -url http://*** -force
将用户管理程序部署到SharePoint 2013平台上,系统编译报错:未能找到类型名称"MembershipProvider",此类型已转发到程序集System.web.ApplicationServices. Version=4.0.0.0。。。
解决办法:添加引用System.Web.ApplicationServices(在 System.Web.ApplicationServices.dll 中)即可。
foreach (GridViewRow row in GridView1.Rows)
{
CheckBox cb = (CheckBox)row.FindControl("CheckBox1");
if (cb.Checked == true)
{
Response.Write(row.Cells[1].Text+"--------------");
}
}
Add-SPSolution
Install-SPSolution -Identity Grain2013.wsp -GACDeployment -CompatibilityLevel {14,15} -WebApplication http://web.perlong.cn
public bool IsDate(string str)
{
try
{
DateTime.Parse(str);
return true;
}
catch (Exception e)
{
return false;
}
}
CONVERT(varchar(12),DECL_Date,111)
OnClientClick="return confirm('是否确定排除?');"
public static bool RegexValidate(string validateString)
{
Regex regex = new Regex("^[0-9]+(.[0-9]{0,2})?$");
//验证有两位小数的正实数:^[0-9]+(.[0-9]{2})?$
//验证有1-3位小数的正实数:^[0-9]+(.[0-9]{1,3})?$
return regex.IsMatch(validateString.Trim());
}
CONVERT(float,weight)/1000
DataFormatString="{0:d}"
window.opener=null;
window.open('','_self');
window.close();
<fieldset>
<legend>权限种类</legend>
</fieldset>
style="border-bottom: 1px solid #CCCCCC;"
<%#Eval("KASTATE").ToString() == "" ? "暂无" : "【" + Eval("KASTATE") + "】"%>
<!DOCTYPE html PUBLIC "-//W3C//DTD XHTML 1.0 Transitional//EN" "http://www.w3.org/TR/xhtml1/DTD/xhtml1-transitional.dtd">
<html xmlns="http://www.w3.org/1999/xhtml">
<head>
<meta http-equiv="Content-Type" content="text/html; charset=gb2312" />
<title>DivTest</title>
<style type="text/css">
#abc {}{
width:160px;
height:100px;
background:#ccc;
/**//*word-break:break-all;*/
word-wrap:break-word;
overflow:auto;
/**//*自动出现滚动条*/
/**//*超出div部份则自动隐藏*/
/**//*overflow-x:hidden;*/
/**//*div自动出现垂直滚动条*/
/**//*overflow-y:auto;*/
}
</style>
</head>
<body>
<div id="abc">中国中国中国中国中国中国中国中国中国中国中国中国中国中国中国中国中国中国中国中国中国中国中国中国中国中国中国中国</div>
</body>
</html>
<AlternatingRowStyle BorderColor="#FF99CC" BorderStyle="Solid" />
.style01
{}{
height:27px;
vertical-align:middle;
line-height:27px;
font-family:微软雅黑;
font-size:13pt;
}
<link href="<% =SPContext.Current.Site.ServerRelativeUrl.ToString() %>/Style%20Library/Stylesheet1.css" type="text/css" rel="stylesheet"/>
一般说来,新购笔记本会预装64位的windows系统,而在网上下载软件时,32位会优先出现在页面中(现在来说是这个情况,但我认为未来64位会越来越普及)。
如果你是64位的系统,却安装了32位的JDK,就会导致上面的情况。
解决办法如下:
-
卸载掉原来安装的32位的JDK,然后安装64位的JDK到电脑中。 -
重新修改path 和 classpath 两个环境变量。因为在64系统当中,32位软件回安装到program files (*86)文件夹,64位软件会安装到program files 文件夹,当你先前安装32JDK时,你设置的环境变量路径当中当然会包括“program files (*86)”,而这时JDK已经转移到“program files”中了,修改过来即可。 -
注意你两次安装的JDK版本号,不一定相同,因为安装时会根据你的版本号建立JDK文件夹,如果两次的版本号不同,在环境变量里也要修改。
现在,Eclipse应该可以正常使用了,快去练习Java程序吧!
<style>
.zc_lan14 {}{
TEXT-ALIGN: center; FONT-FAMILY: "微软雅黑"; MARGIN-BOTTOM: 3px; COLOR: #0099ff; FONT-SIZE: 24px
}</style><div class="zc_lan14">测试标题</div>
1.冻结第一行:
视图->冻结窗格->冻结首行
2.第一行自动筛选:
选择要设置的行,数据->筛选->自动筛选
3.在单元格中添加下拉菜单:
(1)选中一列,数据->数据验证。
(2)在弹出的对话框中选取"设置"选项卡。
(3)在"允许"下拉列表框中选取"序列"。
(4)在"来源"编辑框中输入自定义的内容,用半角的","隔开,如输入中国,美国,日本。
(5)右边选中"提供下拉箭头",点击"确定"。
以下为SQL2008 缩小日志文件的脚本,在SQL Server Management Studio中打开数据库,将脚本里的数据库名称替换成需要缩小日志的库名称,然后
运行以下脚本。
USE WSS_Content_Keeptime2010_V2;
GO
-- Truncate the log by changing the database recovery model to SIMPLE.
ALTER DATABASE WSS_Content_Keeptime2010_V2
SET RECOVERY SIMPLE;
GO
-- Shrink the truncated log file to 1 MB.
DBCC SHRINKFILE (WSS_Content_Keeptime2010_V2_Log, 1);
GO
-- Reset the database recovery model.
ALTER DATABASE WSS_Content_Keeptime2010_V2
SET RECOVERY FULL;
GO
原因:Word或Excel文件包含的GridView没有查询到数据。
1.开启相关网站集功能。
2.若还是找不到可以在其它有内容编辑器的站点下,在“Web 部件”中找到并下载内容编辑器,上传至本站点即可。
最后实现效果如下: 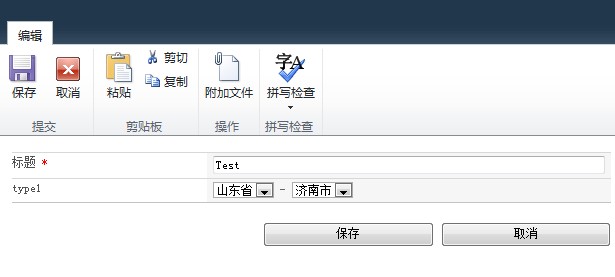 设置栏如下: 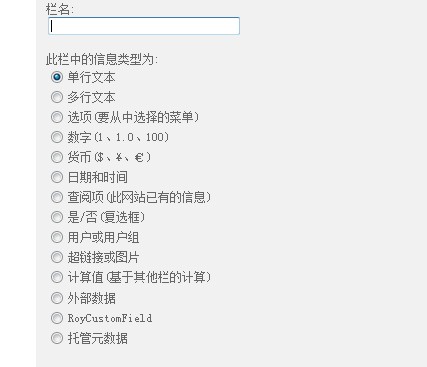 解决方案结构如下: 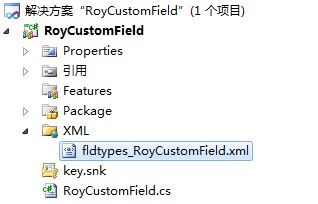 fldtypes_RoyCustomField.xml 内容如下:
<?xml version="1.0" encoding="utf-8" ?>
<FieldTypes>
<FieldType>
<Field Name="TypeName">RoyCustomField</Field>
<Field Name="ParentType">Text</Field>
<Field Name="TypeDisplayName">RoyCustomField</Field>
<Field Name="TypeShortDescription">RoyCustomField</Field>
<Field Name="UserCreatable">TRUE</Field>
<Field Name="FieldTypeClass">RoyCustomField.RoyCustomField,$SharePoint.Project.AssemblyFullName$</Field>
</FieldType>
</FieldTypes> RoyCustomField.cs 内容如下:
using Microsoft.SharePoint;
using Microsoft.SharePoint.WebControls;
using System.Web.UI.WebControls;
using System.Web.UI;
using System;
namespace RoyCustomField
{
public class RoyCustomField : SPFieldText
{
public RoyCustomField(SPFieldCollection field, string strFieldName)
: base(field, strFieldName)
{
}
public RoyCustomField(SPFieldCollection field, string strFieldName, string strDispName)
: base(field, strFieldName, strDispName)
{
}
public override BaseFieldControl FieldRenderingControl
{
get
{
BaseFieldControl fc = new RoyText();
fc.FieldName = this.InternalName;
return fc;
}
}
}
public class RoyText : BaseFieldControl
{
private DropDownList _ddlProvince;
private DropDownList _ddlCity;
#region Province of autoPostBack
void Province_SelectedIndexChanged(object sender, EventArgs e)
{
_ddlCity.Items.Clear();
if (_ddlProvince.SelectedValue.ToString() == "河北省")
{
_ddlCity.Items.Add(new ListItem("石家庄市", "石家庄市"));
}
else if (_ddlProvince.SelectedValue.ToString() == "山东省")
{
_ddlCity.Items.Add(new ListItem("济南市", "济南市"));
}
else
{
_ddlCity.Items.Add(new ListItem("北京市", "北京市"));
}
}
#endregion
protected override void CreateChildControls()
{
base.CreateChildControls();
this.TemplateContainer.FindControl("_ddlProvince");
_ddlProvince = new DropDownList();
_ddlProvince.Items.Add(new ListItem("河北省", "河北省"));
_ddlProvince.Items.Add(new ListItem("山东省", "山东省"));
_ddlProvince.AutoPostBack = true;
_ddlProvince.SelectedIndexChanged += Province_SelectedIndexChanged;
this.Controls.Add(_ddlProvince);
this.Controls.Add(new LiteralControl(" - "));
this.TemplateContainer.FindControl("_ddlCity");
_ddlCity = new DropDownList();
_ddlCity.Items.Add(new ListItem("石家庄市", "石家庄市"));
_ddlCity.Items.Add(new ListItem("济南市", "济南市"));
this.Controls.Add(_ddlCity);
}
public override object Value
{
get
{
this.EnsureChildControls();
return _ddlProvince.Text+"-"+_ddlCity.Text;
}
set
{
string fv = (string)this.ItemFieldValue;
if (fv.Contains("-"))
{
string[] all = fv.Split('-');
_ddlProvince.Text = all[0];
_ddlCity.Text = all[1];
}
}
}
}
} 注意事项:
1.xml的文件名必须以fldtypes_开头,否则不能识别。
2.如果要设置默认值请Override DefaultValue,如果要验证格式是否正确请Override GetValidatedString。 本文参考: http://www.cnblogs.com/Roy_Cao/archive/2012/08/14/2637542.html
在SharePoint平台上部署的程序出现错误时,页面总是被转向一个提示“发生意外错误”的页面,看不到出错的原因。通过修改web.config文件配置可以看到更详细的错误信息:
1、 将<SafeMode ... CallStack="false" ...... AllowPageLevelTrace="false">中的CallStack和AllowPageLevelTrace的属性设置为“true”。
2、 将<customErrors mode="On" />的mode改为"Off"
<script type="text/javascript">
function OpenFrameDialog3(bid,hs,hname,xname) {
var options = SP.UI.$create_DialogOptions();
options.url = "/mypages/TestFirst.aspx?BID=" + bid + "&HS="+hs+"&HNAME="+hname+"&XNAME="+xname;
options.height = 500;
options.width = 950;
options.dialogReturnValueCallback = Function.createDelegate(null, CloseDialogCallback);
SP.UI.ModalDialog.showModalDialog(options);
}
function CloseDialogCallback(result, target) {
if (result === SP.UI.DialogResult.OK) {
javascript: setTimeout('javascript:return true;', 8000);
messageId = SP.UI.Notify.addNotification("<img src='_layouts/images/loading.gif'/>Creating list<b>" + target + "</b>");
}
if (result === SP.UI.DialogResult.cancel) {
SP.UI.Notify.addNotification("Operation was cancelled", false, "", null)
}
}
</script>
<a href="Javascript:OpenFrameDialog();">查看数据</a> 弹出页面:
<html>
<head>
<script type="text/javascript">
//返回值方法
function ReturnPageValue() {
window.frameElement.commitPopup(document.getElementById('<%=txtValue.ClientID %>').value);
}
</script>
</head>
<body>
<input id="txtValue" type="text" runat="server" />
<input id="BtnOK" type="button" value="确定" onclick="ReturnPageValue();" />
<input id="BtnClose" type="button" value="关闭" onclick="window.frameElement.cancelPopUp();" />
</body>
</html>
前台调用:
<script type="text/javascript">
function ShowInfo() {
SP.UI.Notify.addNotification("操作成功!", false, "", null)
}
</script> Html代码:
<a href="Javascript:ShowInfo();">测试通知前台</a> 后台调用:
protected void Button1_Click(object sender, EventArgs e)
{
ShowInfo("本次操作成功!");
}
private void ShowInfo(string msg)
{
if (!Page.ClientScript.IsStartupScriptRegistered("showStatus"))
{
Page.ClientScript.RegisterStartupScript(typeof(string), "showStatus", "ExecuteOrDelayUntilScriptLoaded(function() {SP.UI.Notify.addNotification('" + msg + "', false, '', null); }, 'sp.js');", true);
}
}
<style type="text/css">
.overit{background-color: #00FF66;}
.outit{background-color: #FF0000;}
</style> Html中的代码:
<label onmouseover="this.className='overit'" onmouseout="this.className='outit'">Just a Test!</label>
错误描述:请求“System.Data.SqlClient.SqlClientPermission, System.Data, Version=2.0.0.0, Culture=neutral, PublicKeyToken=b77a5c561934e089”类型的权限已失败。
解决办法:在配置文件web.config中<trust></trust>节点,把<trust level="WSS_Minimal" originUrl="" />改为<trust level="Full" originUrl="" />,注意Full第一个字母大写。
.LinsW
{
line-height:16pt;
}
错误描述:“页面内容”字段值。 Lorem ipsum dolor sit amet, consectetur adipisicing elit, sed do eiusmod tempor incididunt ut labore et dolore magna aliqua. Ut enim ad minim veniam, quis nostrud exercitation ullamco laboris nisi ut aliquip ex ea commodo consequat. Duis aute irure dolor in reprehenderit in voluptate velit esse cillum dolore eu fugiat nulla pariatur. Excepteur sint occaecat cupidatat non proident, sunt in culpa qui officia deserunt mollit anim id est laborum.
原因:链接传值,参数名称为“id”,id是关键字。
安装Solution.bat:
"%systemdrive%\Program Files\Common Files\Microsoft Shared\web server extensions\14\BIN\stsadm.exe" -o addSolution -filename D:\SPS2010Setup\Test.wsp
pause
TFS在团队资源管理器中无法添加根目录下文件夹,若要添加根目录下文件夹,在VS中,文件-新建-团队项目,输入要建的文件夹名字即可。
问题描述:无法连接到XX.XX.XX.XX。其他信息:已成功与服务器建立连接,但是在登录过程中发生错误。(provider:TCP提供程序,error:0-远程主机强迫关闭了一个现在的连接。)(MicrosoftSQL Server,错误:10054)
问题原因:要连接的数据库服务器端口未开放。
1.安装64位Oracle11g客户端,获取ODBC驱动。
找到Oracle配置文件tnsnames.ora,把数据库连接串写进文件:
CIQ2000_17 =
(DESCRIPTION =
(ADDRESS = (PROTOCOL = TCP)(HOST = 10.31.0.17)(PORT = 1521))
(CONNECT_DATA =
(SERVER = DEDICATED)
(sid = oral1)
)
)
2.ODBC名称最好与链接字符串名称全部一致。
3.在SQLServer客户端执行查询:
ALTER SERVICE MASTER KEY REGENERATE;
GO
执行完成后重启SQLServer。
4.链接服务器-访问接口-OraOLEDB.Oracle选上“允许进程内”。
5.openquery中的单引号为''0708200000''格式。
解决办法为创建SessionState数据库,运行SharePoint 2010 Management Shell,执行如下命令:
Enable-SPSessionStateService –DefaultProvision
登陆到一台服务器上后在资源管理器里直接输地址,\\data0\f$,f$是F盘,访问哪个盘就改成哪个盘符。
select * from dba_jobs; //执行完的调度任务
select * from dba_jobs_running; //正在执行的调度任务
select * from user_jobs;//调度任务
select * from user_source where type = 'procedure';
select * from user_objects where object_type = 'procedure';
select text from user_source where type = 'procedure' and name = 'procedure_name'
1.ReadResponse请求因 HTTP 状态 401 失败Unauthorized:原因为程序调用webservice,数据所在的服务器和程序所在的服务器位于同一个服务器上。 2.外网程序报错/内网程序正常:外网和内网程序不在一台服务器上,需要同步两个web.config。 3.Microsoft.SharePoint.SoapServer.SoapServerException异常:错误原因:您无权查看整个列表,因为其大于管理员强制实施的列表视图阀值。 4.当某个方法莫名其妙不执行时,可以尝试换个方法名称。 5.CheckBoxList得不到值:后台生成CheckBoxList数据,用户提交表单时后台得不到值。原因为:每次页面加载都执行生成CheckBoxList数据,冲掉提交的值。修改:在生成CheckBoxList数据的代码上加上if(!IsPostBack) 6.列表库中8个日期字段超出后生成第二条数据,外连接查询。 7.解决查询速度慢可以复制到临时表中定时更新数据,查询临时表。
用JSCharts实现报表,后台传值到页面,发生如下错误:
JSChart:Input data in wrong format for selected chart type
JSChart:No data loaded
分析原因为:
var myData = new Array();
......
myChart.setDataArray(myData);
其中myData里面的值没有转换为数值类型,或不在数值范围之中。
解决办法为:
对于第一种情况需要强制转换一下类型,用parseFloat,parseInt,或直接*1即可。
对于第二中情况需要调整x轴和y轴的数值限制,包括数量限制和大小限制。
最近项目中用到JSCharts,但免费版本中统计图左上角总有个JSCharts字样的水印。查看jscharts.js源文件,尝试多次,终于搞定,去掉了水印。具体操作是,用开发工具打开jscharts.js源文件,查找fs.bg.2u(fX),有2处,全部删除,保存即可。
登陆远程桌面,显示错误:由于这台计算机没有远程桌面客户端访问许可证,远程会话被中断。请跟服务器管理员联系。
解决办法:用另外可以登陆的用户名登陆服务器上, 单击“开始”,“管理工具”,单击“终端服务配置”,“服务器设置”,双击“授权模式”。将“授权模式”更改为“每用户”,单击“确定”。
品质对于项目来说非常重要。项目中存在一个问题就是一个隐患,心中就会多份负担,只有重视起来,解决问题才能有更充足的信心去面对接下来可能发生的意外。昨晚那个问题困扰了将近两周,始终没有把他放在第一的位置上去解决,而到了非要解决的时候,认真分析原来还是程序的漏洞,判断的失误,排错的过程很简单,只需要细心,思维严密。如果我们找不到解决问题的办法,那就需要一套完整的错误跟踪及处理程序,甚至是更改设计,目的就是要在第一时间给出解决方案。态度决定一切。
项目的需求分析其实就是对业务的梳理和重构,项目的成败有百分之七十在于需求分析是否成功。需求的变动存在滚石效应,越早沟通影响力越小,越晚处理我们付出的代价就越大,风险也就越大。
如果一个系统正式上线,设计者必须要考虑一个统计目前系统使用情况的功能,内容包括系统主要数据表增加条数,按某个类别分析统计等。比如问卷调查系统,全国35个直属局,在首页显示各局的计划数,已完成数和完成率,如有需求还可以按完成率倒序排列,这无疑刺激了直属局领导的神经,调动了他们的积极性,系统的使用率进一步提高,系统本身也得到了推广。一个项目的成功不是以稳定上线然后客户验收为终点,而是可以持续收集大量数据,客户积极使用并自主的进行宣传和推广。此时系统运行情况统计功能就显的很重要了,如果可以,在系统设计之初我们就应该考虑这个功能。
非常简单,在开始菜单,点击“运行”,在运行窗口中输入“eventvwr”,在弹出的窗口中对左边菜单里的所有项目右键清除即可。
早上刚来,维护部的同事就急匆匆过来说系统出现问题,昨天加班也没解决,情况比较紧急。打开系统,操作是上传图片,系统提示:该 URL“Images/F_300.jpg”无效,它可能指向不存在的文件或文件夹,或者是指向不在当前网站中的有效文件或文件夹。检查了源程序没有问题,上周还能正常运行,怎么就报错了呢,经过仔细分析,原来是该系统的数据库服务器空间已用完,悲催的问题根源。
一.验收前的准备工作 (1)配置现场演示的运行环境,测试系统运行的稳定性,添加适量的演示数据。确保在系统演示过程中不出问题,获得良好的系统演示印象。 (2)编写项目汇报PPT,要求内容精简,界面大气。 (3)检查验收报告中的交付文件是否齐全,文档内容和格式等是否规范,必须保证文档的质量。 二.验收过程中的注意事项 (1)现场提交的文件保证是齐全的,并且一定要附有文件清单。避免在验收委员面前摆放一堆资料,没有顺序,也没有说明。 (2)现场提交的需求文件必须包括原始需求,新版的需求和需求变更确认文件。 (3)注意屏幕上字体的大小能否使后排人员看的清楚,解说时声音的大小能否保证在场所有人听的清楚。 (4)结合需求和设计来介绍系统,始终围绕需求来开展,避免直接介绍系统功能,委员有疑问时再解释出自需求之类的,此时已比较被动。 (5)不要针对一个问题进行反复解释,更不要和验收委员争论。 三.一些验收感触 文档很重要,文档是项目的初印象,验收委员首次接触项目可能就是看摆在面前的这些文档,所以必须保证文档的规范性。做惯了甲方的验收委员们阅历比较丰富,眼光也比较挑剔,如果第一印象不好的话后面很难打开局面。 在回答比较难缠的验收委员的质询时,声音要洪亮,对于自己很清楚的问题语气要坚决,心理上压倒对方,很可能他就不会再接着提问下一个问题。 一个优秀的项目经理必须精通业务,深度具备某行业业务背景,这样需求调研与分析才能做的更加细化,系统设计才会做的更加深化,做出来的系统或是产品才能获得更多的认可。
四个功能区: 第一个功能区包含首页,上一页,下一页,尾页。 第二个功能区显示总页数,当前页数,并可以输入页码跳转其他页。 第三个功能区可以选择每页显示多少条记录。 第四个功能区显示数据的总条数,当前页显示的数据范围。 如下图: 
报表中按类别统计发现相同类别有两条记录,怀疑这个类别字段在表中有部分数据可能有空格,SQL语句查询时会将前后带有空格的数据也查询出来。经验证,确实存在空格问题。考虑到要修改的数据量大,又是正式服务器,新的类别代码已经不存在空格,只需处理旧数据,最后在视图中用SQL语法Replace去掉空格解决问题。
添加系统服务命令:xxxsvc.exe -install -name myserver。 删除系统服务命令:xxxsvc.exe -uninstall myserver。
在ntext类型字段中会有些HTML标记,比如<div>/<br>/<font>等,当我们做统计查询时,这些内容会影响显示效果,下面编写的一个SQL函数可以去除这么标记。
USE [COMMON]
GO
SET ANSI_NULLS ON
GO
SET QUOTED_IDENTIFIER ON
GO
CREATE FUNCTION [dbo].[fun_RemoveHtml]
(
@input VARCHAR(8000)
)
RETURNS VARCHAR(8000)
AS
BEGIN
declare
@Result varchar(8000),
@start int,
@end int,
@len int
set @input = @input+'<>'
set @Result = ''
set @len=len(@input)
set @start = charindex('<',@input,1)
set @end = charindex('>',@input,@start)
while(@start<@end)
begin
if(@start<>1)
set @Result = @Result + substring(@input,1,@start-1)
set @len = @len - @end
set @input = substring(@input,@end+1,@len)
set @start = charindex('<',@input,1)
set @end = charindex('>',@input,@start)
end
RETURN replace(@Result,' ','')
END
函数名称fun_GetPinyin,内容为:
IF OBJECT_ID('[fun_GetPinyin]') IS NOT NULL
DROP FUNCTION [fun_GetPinyin]
GO
create function [dbo].[fun_GetPinyin](@words nvarchar(2000))
returns varchar(8000)
as
begin
declare @word nchar(1)
declare @pinyin varchar(8000)
declare @i int
declare @words_len int
declare @unicode int
set @i = 1
set @words = ltrim(rtrim(@words))
set @words_len = len(@words)
while (@i <= @words_len) --循环取字符
begin
set @word = substring(@words, @i, 1)
set @unicode = unicode(@word)
set @pinyin = ISNULL(@pinyin +SPACE(1),'')+
(case when unicode(@word) between 19968 and 19968+20901 then
(select top 1 py from (
select 'a' as py,N'厑' as word
union all select 'ai',N'靉'
union all select 'an',N'黯'
union all select 'ang',N'醠'
union all select 'ao',N'驁'
union all select 'ba',N'欛'
union all select 'bai',N'瓸' --韛兡瓸
union all select 'ban',N'瓣'
union all select 'bang',N'鎊'
union all select 'bao',N'鑤'
union all select 'bei',N'鐾'
union all select 'ben',N'輽'
union all select 'beng',N'鏰'
union all select 'bi',N'鼊'
union all select 'bian',N'變'
union all select 'biao',N'鰾'
union all select 'bie',N'彆'
union all select 'bin',N'鬢'
union all select 'bing',N'靐'
union all select 'bo',N'蔔'
union all select 'bu',N'簿'
union all select 'ca',N'囃'
union all select 'cai',N'乲' --縩乲
union all select 'can',N'爘'
union all select 'cang',N'賶'
union all select 'cao',N'鼜'
union all select 'ce',N'簎'
union all select 'cen',N'笒'
union all select 'ceng',N'乽' --硛硳岾猠乽
union all select 'cha',N'詫'
union all select 'chai',N'囆'
union all select 'chan',N'顫'
union all select 'chang',N'韔'
union all select 'chao',N'觘'
union all select 'che',N'爡'
union all select 'chen',N'讖'
union all select 'cheng',N'秤'
union all select 'chi',N'鷘'
union all select 'chong',N'銃'
union all select 'chou',N'殠'
union all select 'chu',N'矗'
union all select 'chuai',N'踹'
union all select 'chuan',N'鶨'
union all select 'chuang',N'愴'
union all select 'chui',N'顀'
union all select 'chun',N'蠢'
union all select 'chuo',N'縒'
union all select 'ci',N'嗭' --賜嗭
union all select 'cong',N'謥'
union all select 'cou',N'輳'
union all select 'cu',N'顣'
union all select 'cuan',N'爨'
union all select 'cui',N'臎'
union all select 'cun',N'籿'
union all select 'cuo',N'錯'
union all select 'da',N'橽'
union all select 'dai',N'靆'
union all select 'dan',N'饏'
union all select 'dang',N'闣'
union all select 'dao',N'纛'
union all select 'de',N'的'
union all select 'den',N'扽'
union all select 'deng',N'鐙'
union all select 'di',N'螮'
union all select 'dia',N'嗲'
union all select 'dian',N'驔'
union all select 'diao',N'鑃'
union all select 'die',N'嚸' --眰嚸
union all select 'ding',N'顁'
union all select 'diu',N'銩'
union all select 'dong',N'霘'
union all select 'dou',N'鬭'
union all select 'du',N'蠹'
union all select 'duan',N'叾' --籪叾
union all select 'dui',N'譵'
union all select 'dun',N'踲'
union all select 'duo',N'鵽'
union all select 'e',N'鱷'
union all select 'en',N'摁'
union all select 'eng',N'鞥'
union all select 'er',N'樲'
union all select 'fa',N'髮'
union all select 'fan',N'瀪'
union all select 'fang',N'放'
union all select 'fei',N'靅'
union all select 'fen',N'鱝'
union all select 'feng',N'覅'
union all select 'fo',N'梻'
union all select 'fou',N'鴀'
union all select 'fu',N'猤' --鰒猤
union all select 'ga',N'魀'
union all select 'gai',N'瓂'
union all select 'gan',N'灨'
union all select 'gang',N'戇'
union all select 'gao',N'鋯'
union all select 'ge',N'獦'
union all select 'gei',N'給'
union all select 'gen',N'搄'
union all select 'geng',N'堩' --亙堩啹喼嗰
union all select 'gong',N'兣' --熕贑兝兣
union all select 'gou',N'購'
union all select 'gu',N'顧'
union all select 'gua',N'詿'
union all select 'guai',N'恠'
union all select 'guan',N'鱹'
union all select 'guang',N'撗'
union all select 'gui',N'鱥'
union all select 'gun',N'謴'
union all select 'guo',N'腂'
union all select 'ha',N'哈'
union all select 'hai',N'饚'
union all select 'han',N'鶾'
union all select 'hang',N'沆'
union all select 'hao',N'兞'
union all select 'he',N'靏'
union all select 'hei',N'嬒'
union all select 'hen',N'恨'
union all select 'heng',N'堼' --堼囍
union all select 'hong',N'鬨'
union all select 'hou',N'鱟'
union all select 'hu',N'鸌'
union all select 'hua',N'蘳'
union all select 'huai',N'蘾'
union all select 'huan',N'鰀'
union all select 'huang',N'鎤'
union all select 'hui',N'顪'
union all select 'hun',N'諢'
union all select 'huo',N'夻'
union all select 'ji',N'驥'
union all select 'jia',N'嗧'
union all select 'jian',N'鑳'
union all select 'jiang',N'謽'
union all select 'jiao',N'釂'
union all select 'jie',N'繲'
union all select 'jin',N'齽'
union all select 'jing',N'竸'
union all select 'jiong',N'蘔'
union all select 'jiu',N'欍'
union all select 'ju',N'爠'
union all select 'juan',N'羂'
union all select 'jue',N'钁'
union all select 'jun',N'攈'
union all select 'ka',N'鉲'
union all select 'kai',N'乫' --鎎乫
union all select 'kan',N'矙'
union all select 'kang',N'閌'
union all select 'kao',N'鯌'
union all select 'ke',N'騍'
union all select 'ken',N'褃'
union all select 'keng',N'鏗' --巪乬唟厼怾
union all select 'kong',N'廤'
union all select 'kou',N'鷇'
union all select 'ku',N'嚳'
union all select 'kua',N'骻'
union all select 'kuai',N'鱠'
union all select 'kuan',N'窾'
union all select 'kuang',N'鑛'
union all select 'kui',N'鑎'
union all select 'kun',N'睏'
union all select 'kuo',N'穒'
union all select 'la',N'鞡'
union all select 'lai',N'籟'
union all select 'lan',N'糷'
union all select 'lang',N'唥'
union all select 'lao',N'軂'
union all select 'le',N'餎'
union all select 'lei',N'脷' --嘞脷
union all select 'leng',N'睖'
union all select 'li',N'瓈'
union all select 'lia',N'倆'
union all select 'lian',N'纞'
union all select 'liang',N'鍄'
union all select 'liao',N'瞭'
union all select 'lie',N'鱲'
union all select 'lin',N'轥' --轥拎
union all select 'ling',N'炩'
union all select 'liu',N'咯' --瓼甅囖咯
union all select 'long',N'贚'
union all select 'lou',N'鏤'
union all select 'lu',N'氇'
union all select 'lv',N'鑢'
union all select 'luan',N'亂'
union all select 'lue',N'擽'
union all select 'lun',N'論'
union all select 'luo',N'鱳'
union all select 'ma',N'嘛'
union all select 'mai',N'霢'
union all select 'man',N'蘰'
union all select 'mang',N'蠎'
union all select 'mao',N'唜'
union all select 'me',N'癦' --癦呅
union all select 'mei',N'嚜'
union all select 'men',N'們'
union all select 'meng',N'霥' --霿踎
union all select 'mi',N'羃'
union all select 'mian',N'麵'
union all select 'miao',N'廟'
union all select 'mie',N'鱴' --鱴瓱
union all select 'min',N'鰵'
union all select 'ming',N'詺'
union all select 'miu',N'謬'
union all select 'mo',N'耱' --耱乮
union all select 'mou',N'麰' --麰蟱
union all select 'mu',N'旀'
union all select 'na',N'魶'
union all select 'nai',N'錼'
union all select 'nan',N'婻'
union all select 'nang',N'齉'
union all select 'nao',N'臑'
union all select 'ne',N'呢'
union all select 'nei',N'焾' --嫩焾
union all select 'nen',N'嫩'
union all select 'neng',N'能' --莻嗯鈪銰啱
union all select 'ni',N'嬺'
union all select 'nian',N'艌'
union all select 'niang',N'釀'
union all select 'niao',N'脲'
union all select 'nie',N'钀'
union all select 'nin',N'拰'
union all select 'ning',N'濘'
union all select 'niu',N'靵'
union all select 'nong',N'齈'
union all select 'nou',N'譳'
union all select 'nu',N'搙'
union all select 'nv',N'衄'
union all select 'nue',N'瘧'
union all select 'nuan',N'燶' --硸黁燶郍
union all select 'nuo',N'桛'
union all select 'o',N'鞰' --毮夞乯鞰
union all select 'ou',N'漚'
union all select 'pa',N'袙'
union all select 'pai',N'磗' --鎃磗
union all select 'pan',N'鑻'
union all select 'pang',N'胖'
union all select 'pao',N'礮'
union all select 'pei',N'轡'
union all select 'pen',N'喯'
union all select 'peng',N'喸' --浌巼闏乶喸
union all select 'pi',N'鸊'
union all select 'pian',N'騙'
union all select 'piao',N'慓'
union all select 'pie',N'嫳'
union all select 'pin',N'聘'
union all select 'ping',N'蘋'
union all select 'po',N'魄'
union all select 'pou',N'哛' --兺哛
union all select 'pu',N'曝'
union all select 'qi',N'蟿'
union all select 'qia',N'髂'
union all select 'qian',N'縴'
union all select 'qiang',N'瓩' --羻兛瓩
union all select 'qiao',N'躈'
union all select 'qie',N'籡'
union all select 'qin',N'藽'
union all select 'qing',N'櫦'
union all select 'qiong',N'瓗'
union all select 'qiu',N'糗'
union all select 'qu',N'覻'
union all select 'quan',N'勸'
union all select 'que',N'礭'
union all select 'qun',N'囕'
union all select 'ran',N'橪'
union all select 'rang',N'讓'
union all select 'rao',N'繞'
union all select 're',N'熱'
union all select 'ren',N'餁'
union all select 'reng',N'陾'
union all select 'ri',N'馹'
union all select 'rong',N'穃'
union all select 'rou',N'嶿'
union all select 'ru',N'擩'
union all select 'ruan',N'礝'
union all select 'rui',N'壡'
union all select 'run',N'橍' --橍挼
union all select 'ruo',N'鶸'
union all select 'sa',N'栍' --櫒栍
union all select 'sai',N'虄' --簺虄
union all select 'san',N'閐'
union all select 'sang',N'喪'
union all select 'sao',N'髞'
union all select 'se',N'飋' --裇聓
union all select 'sen',N'篸'
union all select 'seng',N'縇' --閪縇
union all select 'sha',N'霎'
union all select 'shai',N'曬'
union all select 'shan',N'鱔'
union all select 'shang',N'緔'
union all select 'shao',N'潲'
union all select 'she',N'欇'
union all select 'shen',N'瘮'
union all select 'sheng',N'賸'
union all select 'shi',N'瓧' --鰘齛兙瓧
union all select 'shou',N'鏉'
union all select 'shu',N'虪'
union all select 'shua',N'誜'
union all select 'shuai',N'卛'
union all select 'shuan',N'腨'
union all select 'shuang',N'灀'
union all select 'shui',N'睡'
union all select 'shun',N'鬊'
union all select 'shuo',N'鑠'
union all select 'si',N'乺' --瀃螦乺
union all select 'song',N'鎹'
union all select 'sou',N'瘶'
union all select 'su',N'鷫'
union all select 'suan',N'算'
union all select 'sui',N'鐩'
union all select 'sun',N'潠'
union all select 'suo',N'蜶'
union all select 'ta',N'襨' --躢襨
union all select 'tai',N'燤'
union all select 'tan',N'賧'
union all select 'tang',N'燙'
union all select 'tao',N'畓' --討畓
union all select 'te',N'蟘'
union all select 'teng',N'朰' --霯唞朰
union all select 'ti',N'趯'
union all select 'tian',N'舚'
union all select 'tiao',N'糶'
union all select 'tie',N'餮'
union all select 'ting',N'乭' --濎乭
union all select 'tong',N'憅'
union all select 'tou',N'透'
union all select 'tu',N'鵵'
union all select 'tuan',N'褖'
union all select 'tui',N'駾'
union all select 'tun',N'坉'
union all select 'tuo',N'籜'
union all select 'wa',N'韤'
union all select 'wai',N'顡'
union all select 'wan',N'贎'
union all select 'wang',N'朢'
union all select 'wei',N'躛'
union all select 'wen',N'璺'
union all select 'weng',N'齆'
union all select 'wo',N'齷'
union all select 'wu',N'鶩'
union all select 'xi',N'衋'
union all select 'xia',N'鏬'
union all select 'xian',N'鼸'
union all select 'xiang',N'鱌'
union all select 'xiao',N'斆'
union all select 'xie',N'躞'
union all select 'xin',N'釁'
union all select 'xing',N'臖'
union all select 'xiong',N'敻'
union all select 'xiu',N'齅'
union all select 'xu',N'蓿'
union all select 'xuan',N'贙'
union all select 'xue',N'瀥'
union all select 'xun',N'鑂'
union all select 'ya',N'齾'
union all select 'yan',N'灩'
union all select 'yang',N'樣'
union all select 'yao',N'鑰'
union all select 'ye',N'岃' --鸈膶岃
union all select 'yi',N'齸'
union all select 'yin',N'檼'
union all select 'ying',N'譍'
union all select 'yo',N'喲'
union all select 'yong',N'醟'
union all select 'you',N'鼬'
union all select 'yu',N'爩'
union all select 'yuan',N'願'
union all select 'yue',N'鸙'
union all select 'yun',N'韻'
union all select 'za',N'雥'
union all select 'zai',N'縡'
union all select 'zan',N'饡'
union all select 'zang',N'臟'
union all select 'zao',N'竈'
union all select 'ze',N'稄'
union all select 'zei',N'鱡'
union all select 'zen',N'囎'
union all select 'zeng',N'贈'
union all select 'zha',N'醡'
union all select 'zhai',N'瘵'
union all select 'zhan',N'驏'
union all select 'zhang',N'瞕'
union all select 'zhao',N'羄'
union all select 'zhe',N'鷓'
union all select 'zhen',N'黮'
union all select 'zheng',N'證'
union all select 'zhi',N'豒'
union all select 'zhong',N'諥'
union all select 'zhou',N'驟'
union all select 'zhu',N'鑄'
union all select 'zhua',N'爪'
union all select 'zhuai',N'跩'
union all select 'zhuan',N'籑'
union all select 'zhuang',N'戅'
union all select 'zhui',N'鑆'
union all select 'zhun',N'稕'
union all select 'zhuo',N'籱'
union all select 'zi',N'漬' --漬唨
union all select 'zong',N'縱'
union all select 'zou',N'媰'
union all select 'zu',N'謯'
union all select 'zuan',N'攥'
union all select 'zui',N'欈'
union all select 'zun',N'銌'
union all select 'zuo',N'咗') t
where word >= @word collate Chinese_PRC_CS_AS_KS_WS
order by word collate Chinese_PRC_CS_AS_KS_WS ASC) else @word end)
set @i = @i + 1
end
return @pinyin
END
GO
使用方法:
select dbo.fun_GetPinyin([Title]),[Title] from Issue;
查询结果:
1 ma ling shu jia chong 马铃薯甲虫
DATEADD,在向指定日期加上一段时间的基础上,返回新的datetime值。
例如:dateadd(day,1,CreateTime)
select dateadd(day,1,CreateTime) from student;
1<html>
2<head>
3 <title>测试HTML导出内容至WORD</title>
4 <script type="text/javascript" language="javascript">
5 //指定页面区域内容导入Word
6 function exportToWord(controlId) {
7 var control = document.getElementById(controlId);
8 try {
9 var oWD = new ActiveXObject("Word.Application");
10 var oDC = oWD.Documents.Add("", 0, 1);
11 var oRange = oDC.Range(0, 1);
12 var sel = document.body.createTextRange();
13 try {
14 sel.moveToElementText(control);
15 } catch (notE) {
16 alert("导出数据失败,没有数据可以导出。");
17 window.close();
18 return;
19 }
20 sel.select();
21 sel.execCommand("Copy");
22 oRange.Paste();
23 oWD.Application.Visible = true;
24 //window.close();
25 }
26 catch (e) {
27 alert("导出数据失败,需要在客户机器安装Microsoft Office Word(不限版本),将当前站点加入信任站点,允许在IE中运行ActiveX控件。");
28 try { oWD.Quit(); } catch (ex) { }
29 //window.close();
30 }
31 }
32 </script>
33</head>
34<body>
35 <div id="TestDiv">
36 <div align="center">爱情公寓第三季成绩表</div>
37
38 <table width="100%">
39 <tr>
40 <td style="background-color: #F50AE5; font-weight: bold;text-align:center">
41 名次
42 </td>
43 <td style="background-color: #F50AE5; font-weight: bold;text-align:center">
44 姓名
45 </td>
46 <td style="background-color: #F50AE5; font-weight: bold;text-align:center">
47 总分
48 </td>
49 </tr>
50 <tr>
51 <td style="text-align:center">
52 2012001
53 </td>
54 <td style="text-align:center">
55 曾小贤
56 </td>
57 <td style="text-align:center">
58 86
59 </td>
60 </tr>
61 <tr>
62 <td style="text-align:center">
63 2012002
64 </td>
65 <td style="text-align:center">
66 胡一菲
67 </td>
68 <td style="text-align:center">
69 85
70 </td>
71 </tr>
72 </table>
73 </div>
74 <div>
75 <div style="text-align:center">
76 <input type="button" value="导出到WORD" onclick="return exportToWord('TestDiv')" />
77 </div>
78</body>
79</html>
80
JAVA配置环境变量:
JAVA_HOME
D:\Program Files\Java\jdk1.6.0_03
CLASSPATH
.;%JAVA_HOME%\lib;%JAVA_HOME%\lib\tools.jar;%JAVA_HOME%\lib\dt.jar
Path前面加上
D:\Program Files\Java\jdk1.6.0_03\bin;
第一种方法:
stsadm.exe -o backup -url http://contososrv/sites/backup -filename c:\back.dat
stsadm.exe -o restore -url http://contososrv/sites/backup -filename c:\back.dat -overwrite
如果在stsadm.exe找不到的话,应该是在C:\Program Files\Common Files\Microsoft Shared\Web Server Extensions\14\BIN 路径下。
第二种方法:
Export-SPWeb http://contososrv/sites/backup -path c:\temp.cmp
Import-SPWeb http://contososrv/sites/backup -path c:\temp.cmp
近日项目中用到ArcGis,客户给了套正版的ArcGis Desktop 9.2,可是尝试多次总是安装激活不了,又不想麻烦客户去请ESRI技术人员解决,只好研究破解版了,最后得出结论,还是破解版的好用!所用破解版本为ArcGis Desktop 9.3。安装步骤如下: 1.卸载已安装的ArcGIS软件,包括任何版本。 2.用记事本打开 ARCINFO9.lic 文件,将第一行中的SERVER think-THINK ESRI_SENTINEL_KEY 中间的“think-THINK”改为自己计算机的名称,然后保存。ARCINFO9.lic文件见附件。 3.安装ArcGIS License Manger - REQUIRED FOR 9.3(ArcGIS 9.3许可管理器)。当提示需要许可文件时,选择 "I received the license by email..." 然后单击 browse,选择第2步中修改的ARCINFO9.lic,安装完成后提示重新启动计算机,选择暂时不重新启动,先将 ARCGIS.exe和ARCINFO9.lic等附件中的文件复制到 C:\Program Files\ESRI\License\arcgis9x 目录下,然后双击附件中的 ESRIFloat.reg文件将其导入注册表。 4.重新启动计算机。 5.重启后,打开“开始”菜单,所有程序-ArcGIS-License Manager 9x-License Manager Tools,弹出许可配置对话框。选择 Service/License File 选项卡,并选中 "Configuration using Services" 项,然后在列表中选择 “ArcGIS License Manager”;选择 Configure Services 选项卡,确保 “ArcGIS License Manager” 位于“Service Name”列表框中,并将当前 License file 定位到 C:\Program Files\ESRI\License\arcgis9x\ARCINFO9.lic,选中“Start Server at Power up”项 和“Save Service to save the settings” 项。选择 Start/Stop/ReRead 选项卡,点击 Stop server,ReRead license file,然后 Start Server。 6.测试是否成功,选择Server Diagnostics选项卡,点击“Perform Diagnostics”按钮,等待运行完毕,如果看到This license can be checked out说明已经安装成功,如果出现异常则授权失败。 附件: /Files/jakin/AllData.rar
<!DOCTYPE html PUBLIC "-//W3C//DTD XHTML 1.0 Transitional//EN" "http://www.w3.org/TR/xhtml1/DTD/xhtml1-transitional.dtd">
<html xmlns="http://www.w3.org/1999/xhtml">
<head>
<meta http-equiv="Content-Type" content="text/html; charset=gb2312" />
<meta name="keywords" content="百度地图,百度地图API,百度地图自定义工具,百度地图所见即所得工具" />
<meta name="description" content="百度地图API自定义地图,帮助用户在可视化操作下生成百度地图" />
<title>百度地图API自定义地图</title>
<!--引用百度地图API-->
<style type="text/css">
html,body{margin:0;padding:0;}
.iw_poi_title {color:#CC5522;font-size:14px;font-weight:bold;overflow:hidden;padding-right:13px;white-space:nowrap}
.iw_poi_content {font:12px arial,sans-serif;overflow:visible;padding-top:4px;white-space:-moz-pre-wrap;word-wrap:break-word}
</style>
<script type="text/javascript" src="http://api.map.baidu.com/api?key=&v=1.1&services=true"></script>
</head>
<body>
<!--百度地图容器-->
<div style="width:697px;height:550px;border:#ccc solid 1px;" id="dituContent"></div>
</body>
<script type="text/javascript">
var opts = {
width : 100, // 信息窗口宽度
height: 50, // 信息窗口高度
title : "IBM中国股份有限公司" // 信息窗口标题
}
//创建和初始化地图函数:
function initMap() {
createMap(); //创建地图
setMapEvent(); //设置地图事件
addMapControl(); //向地图添加控件
}
//创建地图函数:
function createMap() {
var map = new BMap.Map("dituContent"); //在百度地图容器中创建一个地图
var point = new BMap.Point(104.114129, 37.550339); //定义一个中心点坐标
map.centerAndZoom(point, 5); //设定地图的中心点和坐标并将地图显示在地图容器中
window.map = map; //将map变量存储在全局
//向地图添加标注
var bounds = map.getBounds();
var point = new BMap.Point(116.326655,39.902095);
var marker = new BMap.Marker(point);
var label = new BMap.Label('IBM全球总部',{"offset":new BMap.Size(9,-15)});
marker.setLabel(label);
map.addOverlay(marker);
marker.addEventListener("click", function(){this.openInfoWindow(new BMap.InfoWindow("全球总部(北京)</br>Tel:010-10000000", opts));});
var point = new BMap.Point(103.809019, 30.850669);
var marker = new BMap.Marker(point);
var label = new BMap.Label('成都分公司',{"offset":new BMap.Size(9,-15)});
marker.setLabel(label);
map.addOverlay(marker);
marker.addEventListener("click", function(){this.openInfoWindow(new BMap.InfoWindow("成都分公司</br>Tel:暂无", opts));});
var point = new BMap.Point(114.059763,22.646821);
var marker = new BMap.Marker(point);
var label = new BMap.Label('香港分公司',{"offset":new BMap.Size(9,-15)});
marker.setLabel(label);
map.addOverlay(marker);
marker.addEventListener("click", function(){this.openInfoWindow(new BMap.InfoWindow("香港分公司</br>Tel:暂无", opts));});
var point = new BMap.Point(121.323246, 31.294085);
var marker = new BMap.Marker(point);
var label = new BMap.Label('上海分公司',{"offset":new BMap.Size(9,-15)});
marker.setLabel(label);
map.addOverlay(marker);
marker.addEventListener("click", function(){this.openInfoWindow(new BMap.InfoWindow("上海分公司</br>Tel:暂无", opts));});
}
// 编写自定义函数,创建标注
function addMarker(point, index) {
var myIcon = new BMap.Icon("http://api.map.baidu.com/img/markers.png", new BMap.Size(23, 25), {
offset: new BMap.Size(10, 25), // 指定定位位置
imageOffset: new BMap.Size(0, 0 - index * 25) // 设置图片偏移
});
var marker = new BMap.Marker(point, { icon: myIcon });
map.addOverlay(marker);
}
//地图事件设置函数:
function setMapEvent() {
map.enableDragging(); //启用地图拖拽事件,默认启用(可不写)
map.enableScrollWheelZoom(); //启用地图滚轮放大缩小
map.enableDoubleClickZoom(); //启用鼠标双击放大,默认启用(可不写)
map.enableKeyboard(); //启用键盘上下左右键移动地图
}
//地图控件添加函数:
function addMapControl() {
//向地图中添加缩放控件
var ctrl_nav = new BMap.NavigationControl({ anchor: BMAP_ANCHOR_TOP_LEFT, type: BMAP_NAVIGATION_CONTROL_LARGE });
map.addControl(ctrl_nav);
//向地图中添加缩略图控件
var ctrl_ove = new BMap.OverviewMapControl({ anchor: BMAP_ANCHOR_BOTTOM_RIGHT, isOpen: 1 });
map.addControl(ctrl_ove);
//向地图中添加比例尺控件
var ctrl_sca = new BMap.ScaleControl({ anchor: BMAP_ANCHOR_BOTTOM_LEFT });
map.addControl(ctrl_sca);
}
initMap(); //创建和初始化地图
</script>
</html>
表student结构如下:

求每个学生分数最高的科目及分数。
SQL:
select s.* from (select *,row_number() over (partition by name order by score desc) as rownumber from [COMMON].[dbo].[student]) s where s.rownumber=1;
查询结果:

帮同事分析一个问题,一个字符串用Substring截取,怎么操作都无效,后发现,这个字符串是增强型RTF类型,该类型可能包含图片、表格和超链接等。后试着将该字符先输出在文本框里,把其中的Html格式标签显示出来,清除,再截取即可。
今天准备停止使用BlogJava了,做出这个决定真的很难,从2007年11月份到今天2011年四月份,整整三年半,我从最底层的编码人员成长为系统设计师,感谢BlogJava的一路相陪。愿BlogJava人气越来越旺,祝BlogJava蓬勃发展。
当我们要导出一张自增ID的数据表,如果有需要修改ID,处理完数据后再导回原库,此时的ID都是重新生成的,和处理后的完全不一样了。解决这种问题,可以不用自增int类型的ID,设置主键类型为uniqueidentifier。
一 汇报和培训总结的经验
1.特别熟悉业务;
2.保证品质。
二 JV01系统
1.前期的需求整理;
2.企业端和局端分开,两套程序不利于CSS样式和Bean实体类的调整;
3.使用陌生的开发框架;
4.使用JBPM,与数据库交互太多,系统反应慢,开发速度也慢;
5.未与客户及时沟通,设计要贴近用户使用习惯,Excel监控报表就是比较失败的一例;
6.Linux运行环境的调试。
三 问卷调查系统
1.熟悉平台的基本操作,常用功能的配置,权限的设置等;
2.重视项目的收尾工作。
四 有害生物采集录入系统
首先看需求,有了整体的设计思路后搭建界面原型,待客户确认以后完善设计文档,开始开发。
五 2011年要求
设计方面:
1.讲究规范;
2.探索创新;
3.设计的系统力求简洁实用,美观大方;
4.与客户讨论问题时尝试把设计的优势展现出来。
开发方面:
1.保证品质,减少返工;
2.提高效率,坚持以工时管理开发任务。
需求:从学生表中查询出所有姓名和班级都相同的学生信息。
SQL:select distinct name,class,count(*) as recordcount from student group by name,class having count(*)>1;
将“终端服务配置”中的“授权模式”更改为“每用户”。为此,请按照下列步骤操作:
1.单击“开始”,“管理工具”,然后单击“终端服务配置”。
2.单击“服务器设置”,然后双击“授权模式”。
3.将“授权模式”更改为“每用户”,然后单击“确定”。
1.生成测试数据:
create table team(name varchar(32),person varchar(32));
insert into team values('A','Tom');
insert into team values('A','Jim');
insert into team values('A','Anny');
insert into team values('B','Ivy');
insert into team values('B','Henry');
insert into team values('C','Dar');
insert into team values('C','Rk');
insert into team values('D','Cenic');
select * from team;

2.创建合并团队成员姓名自定义函数:
create function fun_combName(@teamname varchar(32))
returns varchar(4000)
as
begin
declare @temp varchar(4000)
set @temp = ''
select @temp = @temp+';'+person from team where name = @teamname
set @temp = stuff(@temp,1,1,'')
return @temp
end
3.执行查询语句:
select name,person = dbo.fun_combName(name) from team group by name order by name;

注:测试完可以删除测试数据:
drop function fun_combName;
drop table team;
 1.从最简单的做起,在最短的时间内完成最多的模块,把难点放到最后,这样可以使开发效率提高,对客户也好反馈;
2.不要去等待客户,尽自己所能去做,最后即使出现问题客户也说不出什么。
student:name,sex,age
score:name,subject,score
想要的结果:name,sex,age,sum(score)
1.
select s.name,s.sex,s.age,(select sum(c.score) from score c where c.name = s.name) from student s;
2.
select s.name,s.sex,s.age,sc.total from (select sum(c.score) as total,c.name
from score c group by c.name) sc inner join student s on s.name = sc.name;
jFreeChart是Java开发中常用的统计类组件,主要包括柱状图,饼状图等。下面我们介绍一下jFreeChart最简单的用法。
首先需要导入jFreeChart的jar包,放在项目web\WEB-INF\lib文件夹下。然后我们以最简洁的代码实现一个统计功能。
1.柱状图
import java.awt.Color;
import java.awt.Font;
import java.io.FileNotFoundException;
import java.io.FileOutputStream;
import java.io.IOException;
import org.jfree.chart.ChartFactory;
import org.jfree.chart.ChartUtilities;
import org.jfree.chart.JFreeChart;
import org.jfree.chart.axis.CategoryAxis;
import org.jfree.chart.axis.NumberAxis;
import org.jfree.chart.plot.CategoryPlot;
import org.jfree.chart.plot.PlotOrientation;
import org.jfree.chart.title.TextTitle;
import org.jfree.data.category.DefaultCategoryDataset;
public class BarChartTest {
public static void main(String[] args) {
DefaultCategoryDataset dataset = new DefaultCategoryDataset();
dataset.addValue(20, "企业备案数", "北京局");
dataset.addValue(18, "企业备案数", "上海局");
dataset.addValue(16, "企业备案数", "天津局");
dataset.addValue(15, "企业备案数", "重庆局");
dataset.addValue(45, "企业备案数", "山东局");
JFreeChart chart = ChartFactory.createBarChart("企业备案图", "直属局", "企业备案数",dataset, PlotOrientation.HORIZONTAL, true, false, false);
/** *//***************A start*********/
//设置标题字体样式
TextTitle textTitle = chart.getTitle();
textTitle.setFont(new Font("黑体", Font.PLAIN, 20));
//设置柱状体颜色
CategoryPlot categoryplot = (CategoryPlot) chart.getPlot();
categoryplot.getRenderer().setSeriesPaint(0, new Color(228,109,10));
NumberAxis numberaxis = (NumberAxis) categoryplot.getRangeAxis();
CategoryAxis domainAxis = categoryplot.getDomainAxis();
//设置X轴坐标上的字体样式
domainAxis.setTickLabelFont(new Font("sans-serif", Font.PLAIN, 11));
//设置X轴的标题字体样式
domainAxis.setLabelFont(new Font("宋体", Font.PLAIN, 12));
//设置Y轴坐标上的字体样式
numberaxis.setTickLabelFont(new Font("sans-serif", Font.PLAIN, 12));
//设置Y轴的标题字体样式
numberaxis.setLabelFont(new Font("黑体", Font.PLAIN, 12));
//设置图片最底部字体样式
if (chart.getLegend() != null) {
chart.getLegend().setItemFont(new Font("宋体", Font.PLAIN, 12));
}
/** *//***************A end*********/
try {
ChartUtilities.writeChartAsPNG(new FileOutputStream("D:\\barChart.jpg"), chart, 400, 200);
} catch (FileNotFoundException e) {
e.printStackTrace();
} catch (IOException e) {
e.printStackTrace();
}
}
}
生成的文件显示效果如下:

2.饼状图
import java.awt.Color;
import java.awt.Font;
import java.io.FileNotFoundException;
import java.io.FileOutputStream;
import java.io.IOException;
import java.text.DecimalFormat;
import java.text.NumberFormat;
import org.jfree.chart.ChartFactory;
import org.jfree.chart.ChartUtilities;
import org.jfree.chart.JFreeChart;
import org.jfree.chart.labels.StandardPieSectionLabelGenerator;
import org.jfree.chart.plot.PiePlot;
import org.jfree.data.general.DefaultPieDataset;
public class PieChartTest {
public static void main(String[] args){
DefaultPieDataset pieDataset = new DefaultPieDataset();
pieDataset.setValue("北京局",20);
pieDataset.setValue("上海局",18);
pieDataset.setValue("天津局",16);
pieDataset.setValue("重庆局",15);
pieDataset.setValue("山东局",45);
JFreeChart chart = ChartFactory.createPieChart3D("企业备案图",pieDataset, true, false, false);
/** *//***************A start*********/
//设置标题字体样式
chart.getTitle().setFont(new Font("黑体",Font.BOLD,20));
//设置饼状图里描述字体样式
PiePlot piePlot= (PiePlot) chart.getPlot();
piePlot.setLabelFont(new Font("黑体",Font.BOLD,10));
//设置显示百分比样式
piePlot.setLabelGenerator(new StandardPieSectionLabelGenerator(
("{0}({2})"), NumberFormat.getNumberInstance(),
new DecimalFormat("0.00%")));
//设置统计图背景
piePlot.setBackgroundPaint(Color.white);
//设置图片最底部字体样式
chart.getLegend().setItemFont(new Font("黑体",Font.BOLD,10));
/** *//***************A end*********/
try {
ChartUtilities.writeChartAsPNG(new FileOutputStream("D:\\pieChart.jpg"), chart, 400, 300);
} catch (FileNotFoundException e) {
e.printStackTrace();
} catch (IOException e) {
e.printStackTrace();
}
}
}
生成的文件显示效果如下:

其中以上两段代码中的“A”代码块中的内容是为了解决图片生成过程中遇到的乱码问题,在实际开发中可以写到一个公共类中,此时应注意服务器的操作系统上是否缺少上述代码中所用到的字体。关于jFreeChart详细参数的使用请参考官方文档。
今天去总局部署项目了,经历实在坎坷。上午一到那,值班人员是临时接替的,不熟悉机房的环境,找显示器,找键盘,插接口,慢慢开始适应环境。一切准备就绪,开始装系统,系统顺利的装完了,可配IP地址出问题了,找不到网络邻居的本地连接,打了N个电话,最后确认,网卡没有驱动起来,这就开始了寻找合适网卡的艰难历程,从11:30到16:30五个小时,终于在机房维护人员与HP客服的协助下成功装上驱动,一切正常了,离工作人员下班只有半小时了,赶紧开始装软件部署环境,oracle9i安装出错了,没时间查找错误原因,还好带了一套10g,换装oracle10g,服务器很快装好,但客户端配置出现了问题,一样来不及找原因,换sqldeveloper,导数据,启动服务,部署项目,天哪,终于搞定了!总结一下去机房部署要注意的事项:
1.带上一个以上笔记本电脑;
2.带上USB鼠标,最好还能有USB键盘,小型显示器;
3.带上一根以上网线;
4.带上圆口转USB接口的转接头;
5.提前想好一切有可能发生的事情。
简单总计一下今天的经历,呵呵。
Java web程序中备份oracle数据库
1.生成备份文件:
public ActionForward createDmp(ActionMapping mapping, ActionForm form,
HttpServletRequest request, HttpServletResponse response)
throws Exception {
Calendar c = Calendar.getInstance();
SimpleDateFormat sdf = new SimpleDateFormat("yyyyMMddHHmmss");
String fileName = "data_oracle" + sdf.format(c.getTime());
String dmpFolder = request.getSession().getServletContext()
.getRealPath("")
+ "\\datas\\dmp\\";
String logFolder = request.getSession().getServletContext()
.getRealPath("")
+ "\\datas\\log\\";
String cmd = "exp username/password@orcl file='" + dmpFolder + fileName
+ ".dmp' log='" + logFolder + fileName + ".log' owner=username";
Runtime.getRuntime().exec(cmd);
Thread.sleep(100 * 1000);
request.setAttribute("msg", "备份成功,文件生成会有延迟,请稍等");
return mapping.findForward("dmpCreated");
}
2.查询备份文件:
public ActionForward findDmp(ActionMapping mapping, ActionForm form,
HttpServletRequest request, HttpServletResponse response)
throws Exception {
String dmpFolder = request.getSession().getServletContext()
.getRealPath("")
+ "\\datas\\dmp\\";
File folder = new File(dmpFolder);
File[] files = folder.listFiles();
List<String[]> fileList = new ArrayList<String[]>();
for (int i = 0; i < files.length; i++) {
if (files[i].getName().indexOf(".dmp") > 0) {
String[] one = new String[2];
one[0] = files[i].getName();
one[1] = files[i].length() / 1000 + "K";
fileList.add(one);
}
}
request.setAttribute("fileList", fileList);
return mapping.findForward("dmpList");
}
3.删除备份文件:
public ActionForward deleteDmp(ActionMapping mapping, ActionForm form,
HttpServletRequest request, HttpServletResponse response)
throws Exception {
String dmpFolder = request.getSession().getServletContext()
.getRealPath("")
+ "\\datas\\dmp\\";
File folder = new File(dmpFolder);
File[] files = folder.listFiles();
String fileName = request.getParameter("dmpName");
for (int i = 0; i < files.length; i++) {
if (files[i].getName().equals(fileName)) {
files[i].delete();
request.setAttribute("msg", "删除成功");
break;
}
}
return mapping.findForward("dmpList");
}
Linux系统下Jsp验证码显示不出来解决方法
错误提示:Could not initialize class sun.awt.X11GraphicsEnvironment
错误原因:tomcat没有加载java.awt.headless,修改tomcat下的/bin/catalina.sh文件:
找到-Djava.io.tmpdir="$CATALINA_TMPDIR",在这一行的下面加入:
-Djava.awt.headless=true \
需要修改六处,改完重启tomcat。
一个简单的apache rewrite问题
需求:当用户访问www.aaa.com时转向到127.0.0.1:8080/aaa;当用户访问www.bbb.com时转向到127.0.0.1:8080/bbb。
解决办法:
打开Apache Software Foundation\Apache2.2\conf下的httpd.conf文件:
设置相关modeul,将:
LoadModule rewrite_module modules/mod_rewrite.so
LoadModule proxy_module modules/mod_proxy.so
LoadModule proxy_http_module modules/mod_proxy_http.so
前的注释“#”去掉;
在httpd.cnof的文件里加上:
<virtualHost *>
RewriteEngine On
CustomLog "D:\\log\rewrite.log" combined
LogLevel debug
RewriteCond %{HTTP_HOST} ^(.+)\.aaa\.com$
RewriteRule $ http://localhost:8086/aaa [P,L]
RewriteCond %{HTTP_HOST} ^(.+)\.bbb\.com$
RewriteRule $ http://localhost:8086/bbb [P,L]
</virtualHost>
如果www.aaa.com或www.bbb.com不是公共域名的话需要在C:\WINDOWS\system32\drivers\etc的hosts文件中加上如下配置:
127.0.0.1 www.aaa.com
127.0.0.1 www.bbb.com
现在试一下,一切OK!apache中文文档:http://lamp.linux.gov.cn/Apache/ApacheMenu/
1.将图片放大或缩小 Alt+鼠标 或Ctrl+'+/-';
2.photoshop中都是针对图层操作的;先选择图层,再直接按向左向右键即可移动图层;
3.若想复制图片中的某部分,选中后Ctrl+Alt+向左向右键;
4.裁剪图片,用裁剪工具选定后,按向上向下工具或鼠标进行调整后双击;
PhotoShop三概念:选区/图层/路径
Ctrl+Del 填充背景色
Alt+Del 填充前景色
[] 画笔扩大缩小
Ctrl+U 色相饱和度
Ctrl+点击图层 选区
Ctrl+"+"/"-" 图片放大缩小
Ctrl+Alt+Z 后退
Ctrl+Z 后退一步
Ctrl+D 取消选区
Ctrl+T 自由变换 按Shift等比例变换
Ctrl+Shift+I 反选
D 将前景色背景色设为默认 X切换前景色背景色
Ctrl+E 合并图层
选中图层右键查看图层或Ctrl+点击图层查看左边图层窗口显示
调红眼:选上“着色”
去杂边:选择-修改-收缩
照片修复:滤镜-液化
修复旧照片:图像-调整-去色
1寸照片
长2.5cm 高3.5cm 分辨率300像素/英寸
9张排版 长8.6cm 高12.7cm
1.当要恢复默认的画笔,点击“复位画笔”,画笔格式为ABR;
2.画笔高级选项快捷键“F5”,图层快捷键“F7”;
3.用画笔画直线时按住shift自动为直线;
4.画笔三要素:直径,角度,间距。
5.给面部美白,图像-调整-曲线或色阶;
6.给面部化妆,描眼部时先用浅粉描眼的上周围,再用深一点的粉色描双眼皮,最后用深色粗线描眼线;
7.给图片添加镜头光晕,滤镜-渲染-镜头光晕;
8.当用画笔在新图层上画颜色比如复古效果时模式调成“叠加”;
9.若要文字实现渐变效果,先栅格化文字图层。
色彩美化效果,图像-调整里所有功能;
路径,使用“正片叠底”效果。
1.蒙板
前景色为黑色可以擦掉,为白色可以复原,为灰色可以制作透明效果;
2.渐变
线性渐变和径向渐变,彩虹是在特殊效果里的“罗素彩虹”;
3.裁剪画布,确定大小;
4.X为前景背景切换快捷键;
5.复制图层,Shift+Alt+鼠标拖动;
6.F键为全屏;
7.编辑文字,修改大小需要全选或是输入完毕后再调整,Alt+上下键是调整行距,Alt+左右键是调整字间距;
8.修脸部时要把画笔硬度调为0;
9.给图片加光:Ctrl+M
10.路径变选区:Ctrl+回车
11.羽化:Ctrl+Alt+D
12.磨皮效果:用选区或钢笔选上,羽化,滤镜选高斯模糊;
13.处理照片首先调整柔光;
14.盖印:Ctrl+Shift+Alt+E
15.制作彩唇:(1)将图片调成柔光效果;(2)新建图层取一个颜色,然后复制图层,用色相饱和度调成若干个颜色,然后将新建的几个图层合并;(3)选“颜色”叠加;(4)新建蒙板,擦掉多余的部分;(5)选中图层,高斯模糊;(6)合并盖印;(7)锐化。
16.反向:Ctrl+I 或在图像-调整里找反向菜单;
17.使用通道时,选择硬角画笔。
LINUX下使用VNC进行图形界面远程桌面控制
1、启用SUSE远程控制
SUSE默认安装了VNC,打开YaST,网络服务,远程管理(remote administration),选择“允许远程管理”,在下面的选项进行防火墙设置,选择“打开防火墙端口”,点击完成。
2、启动VNC服务。
登录后,执行命令:vncserver
提示:You will require a password to access your desktops.
设置远程访问的密码:
Password:(输入密码)
Verify: (再次输入)
提示:Would you like to enter a view-only password (y/n)? n(是否输入一个只能查看的密码,选择否)
提示信息如下:
New 'X' desktop is localhost:1(桌面编号为1)
Creating default startup script /root/.vnc/xstartup
Starting applications specified in /root/.vnc/xstartup
Log file is /root /.vnc/localhost:1.log
3、配置xstartup启动脚本。
用VI编辑/root/.vnc/xstartup脚本
内容如下:
#!/bin/sh
xrdb $HOME/.Xresources
xsetroot -solid grey
xterm -geometry 80x24+10+10 -ls -title "$VNCDESKTOP Desktop" &
twm &
将最后一行"twm &"更改为
gnome-session & (前提是已经安装了gnome)
就是启动gnome图形界面窗口。
保存后,重启vnc命令:vncserver -kill :1 ;vncserver :1。
启动成功后确认系统是否有 Listen Port 5901:
netstat -tnl | grep ‘5901’
确认系统是否有 VNCService 的 Process
ps aux | grep vnc
注意:
此时服务器最好用命令启动,不要用图形界面方式启动系统;
vi /etc/inittab
把ID改为3命令行,5为图形界面;
若此时在远处桌面还为命令行,则启动桌面命令:startx;
4、设置vnc在开机时启动
su -
setup
5、下载windows vnc客户端软件。
运行VNC查看器,输入服务器的IP和桌面编号:
如:192.168.7.114:1
而后输入VNC连接密码就可以登录进去了。
6、通过浏览器控制:
如:http://192.168.7.114:5801 (其中端口号=5800+桌面显示编号,前面我们配置时提示桌面编号是1,所以端口号就是5801),会出现登录界面。IE浏览器需要开启java applet。
7、如果要在vnc客户端使用中文输入法,需要在.vnc/xstartup文件里加上“scim -d”,再修改scim输入法的快捷键,因为默认打开输入法的快捷键为ctrl+space,与本地机器上切换输入法的快捷键冲突。
8、修改vncserver的密码命令为:vncpasswd。
在Linux下安装JDK:
1.下载JDK,网址
http://java.sun.com/javase/downloads/widget/jdk6.jsp 选中linux版本:
Java SE Development Kit 6u18 jdk-6u18-linux-i586-rpm.bin
点击下载后放在桌面上的java文件夹中。
进入安装目录
cd java
给所有用户添加可执行的权限
chmod +x jdk-6u18-linux-i586-rpm.bin
./jdk-6u18-linux-i586-rpm.bin
此时会生成文件jdk-6u18-linux-i586.rpm,同样给所有用户添加可执行的权限
chmod +x jdk-6u18-linux-i586.rpm
安装程序
rpm -ivh jdk-6u18-linux-i586.rpm
出现安装协议等,按接受即可。
2.设置环境变量。
vi /etc/profile
在最后面加入
#set java environment
JAVA_HOME=/usr/java/jdk-1_6
CLASSPATH=.:$JAVA_HOME/lib.tools.jar
PATH=$JAVA_HOME/bin:$PATH
export JAVA_HOME CLASSPATH PATH
保存退出。
3.在终端使用echo命令检查环境变量设置情况。
echo $JAVA_HOME
echo $CLASSPATH
echo $PATH
4.检查JDK是否安装成功。
java -version
如果看到JVM版本及相关信息,即安装成功。
在linux下安装Tomcat:
1.下载Tomcat,网址
http://tomcat.apache.org/download-55.cgi 选中tar.gz文件包下载。
把tar.gz文件包解压缩到任意一个路径下,比如桌面上server文件夹下,server/tomcat。
2.在终端输入命令进入步骤2中解压的路径下至bin目录:
cd server/tomcat/bin
./startup.sh 启动tomcat
./shutdown.sh 关闭tomcat
Linux上修改oracle字符集
在SuSE Linux 11上安装oracle 10g时进入oracle安装界面总是出现乱码,主要原因是oracle用到了自带的jre自动选择语言所致。一种方法是把操作系统语言改英文,oracle安装界面也是英文;另一种方法就是首先安装jre,然后让oracle调用装好的jre:./runInstaller -jreLoc /usr/lib/jvm/java-1.5.0-sun-1.5.0.06/jre。笔者用的是第一种,但装好后,oracle默认的字符集为WE8ISO8859P1,存放中文的话会产生乱码现象。网上搜集资料,试图将字符由WE8ISO8859P1改为AL32UTF8,但AL32UTF8不是WE8ISO8859P1的超集,不能修改。最后将字符集改为ZHS16GBK,支持中文。
在sqlplus中执行:
查看字符集:
select * from V$NLS_PARAMETERS;
修改字符集:
shutdown immediate
startup mount
ALTER SYSTEM ENABLE RESTRICTED SESSION;
ALTER SYSTEM SET JOB_QUEUE_PROCESSES=0;
ALTER SYSTEM SET AQ_TM_PROCESSES=0;
ALTER DATABASE OPEN;
alter database character set INTERNAL_USE ZHS16GBK
注意修改之前先备份数据,删除所有的表,修改成功后再imp导入,则乱码能正常显示为中文。
1.cd /home 查看根目录
2.cd oracle 查看某个文件夹
3.ls 查看目录下的文件
4.cp jdk(.按tab)显示-6u18-linux-i586.bin ../ 复制到上一层文件夹
5.sudo cp jdk(.按tab)显示-6u18-linux-i586.bin ../ 以root身份复制到上一层文件夹
6./sbin/ifconfig 查看IP
7.netstat -anp | grep oracle
netstat anp | grep oracle
netstat -anp | grep 1521
netstat anp | grep 1521
8.cat 查看文件
vi 编辑文件
9.startx 启动桌面
10.who 查看当前用户
11.vi /etc/inittab 修改启动方式
12.ls -a 查看隐藏文件
13.reboot 重启系统
1.java.lang.NoClassDefFoundError: JSONString
手动关联jar文件,在Libraries中Add JARs... ezmorph-1.0.6.jar和json-lib-2.3-jdk15.jar
2.Command: Commit
Modified: RD\mosaiq_training\Core
Error: Commit failed (details follow):
Error: File or directory '.' is out of date; try updating
Error: resource out of date; try updating
Finished!:
可能是在eclipse中直接复制文件夹,把svn信息也复制过来了,删除.svn提交;
3.下载excel出现打不开站点的问题,可能是文件名包含中文;
4.hibernate配置错误,提示索引超出,可能是某个类的配置文件有误,比如name为空;
5.ORACLE 不可用
数据库服务进程启动,但是数据库没有加载
以DBA身份进入Enterprise Manager Console,在sqlplus中执行命令:
conn sys/sys as sysdba
startup force
后会打开数据库;
注意windows防火墙关闭。
6.数据库链接不上:.pertite不编译;
7.修改eclipse中svn用户信息:删除掉C:\Documents and Settings\jakin\Application Data\Subversion\auth\svn.simple文件夹下的文件,再次访问时,会弹出要求输入用户名和密码,jakin是用户名,Application Data是一个隐藏的文件夹;
8.Error in invoking target 'client_sharedlib'
Could you be installing x86 Oracle on an x86_64 server, which is not certified/supported?
Do 'uname -a' and see if it shows x86_64?
Then check in $ORACLE_HOME and see if you have both a lib and lib32 directories or just a lib directory.
If
the result of uname -a shows x86_64 and there is only an
$ORACLE_HOME/lib you are installing Oracle x86 on a Linux x86_64 box
and that is not supported.
You will want to download and install the Oracle x86_64 for your server and it will install correctly;
openSuSE11.1安装oracle10g步骤
1.增加oinstall用户组和dba用户组,增加oracle用户,并加入到这两个用户组中,默认组是dba用户组;
2.修改oracle用户的环境变量(一定以oracle用户登录系统操作此步骤,su oracle),命令:
vi ~/.bashrc ("."代表隐藏文件,h—right,j—down ,k—up,l—left,o—insert,:w—save,:q—exit,i—在当前行插入,x—删除,u—撤销,esc—回普通模式,dd--删除)(此处若配置不成功则装完以后可能会出现在程序里连接不上等一系列问题)
增加内容:
export ORACLE_BASE=/home/oracle/oracle
export ORACLE_HOME=$ORACLE_BASE/product/10.2.0/db_6
export ORACLE_SID=orcl
export PATH=$PATH:$HOME/bin:$ORACLE_HOME/bin
export LD_LIBRARY_PATH=$ORACLE_HOME/lib:/usr/lib
完成之后,多按几次Esc键,Shift+":","w",保存成功,多按几次Esc键,Shift+":","q",退出成功.
(VI基本命令:http://blog.tianya.cn/blogger/post_show.asp?BlogID=126326&PostID=1537776&idWriter=0&Key=0)
3.增加核心参数:
vi /etc/sysctl.conf(需要root用户执行,su root)
增加内容:
kernel.shmall = 2097152
kernel.shmmax = 2147483648
kernel.shmmni = 4096
kernel.sem = 250 32000 100 128
fs.file-max = 65536
net.ipv4.ip_local_port_range = 1024 65000
执行命令以确认:
sysctl -p
chkconfig boot.sysctl on(作用:解决在系统重新启动之后不能自动读取刚才创建的文件的问题)
4.修改oracle安装目录的install目录下的oraparame.ini,找到[Certified Versions],加上SuSE-11;
5.运行安装oracle10g安装目录下的./runInstaller,出现图形界面(以oracle用户);
6.安装过程中可能会出现版本不符合或软件包缺少的情况,此时不要cancel或 ignore,可以使用 zypper install ...命令安装需要的软件包,然后 retry;
"缺少Ntcontab.o":以root用户执行:zypper install gcc-c++(记得插入光盘)
"缺少all_no_orcl ihsodbc":以root用户执行:zypper install libstdc++33(记得插入光盘)
安装结束时会让执行两行脚本,执行时如遇见:Enter the full pathname of the local bin directory: [/usr/local/bin]:,直接回车通过;
7.(1)以oracle用户登录,su oracle;
(2)启动TNS监听器
$ORACLE_HOME/bin/lsnrctl start (要带$)
(3)用sqlplus启动数据库
$ORACLE_HOME/bin/sqlplus /nolog
SQL> connect system/change_on_install as sysdba
SQL> startup
出现如下显示,表示Oracle已经成功启动;
ORACLE instance started
Total System Global Area 205520896 bytes
Fixed Size 778392 bytes
Variable Size 74456936 bytes
Database Buffers 130023424 bytes
Redo Buffers 262144 bytes
Database mounted.
Database opened.
(4)用sqlplus停止数据库
$ORACLE_HOME/bin/sqlplus /nolog
SQL> connect system/change_on_install as sysdba
SQL> shutdown
出现如下显示,表示oracle已经停止
Database closed.
Database dismounted.
ORACLE instance shut down.
注:shutdown可加关闭选项,从最温和到最粗暴的行为选项为(shutdown、shutdown transactional、shutdown immediate、shutdown abort)
shutdown:关闭,等待每个用户退出系统戓被取消后退出关闭数据库;
shutdown transactional:事务性关闭,等待每个用户提交戓回退当前的事务,然后oracle取消对话,在所有用户退出系统后执行关闭;
shutdown immediate:直接关闭,取消所有用户对话(促使回退),执行正常的关闭程序;
shutdown abort:终止关闭,关闭数据库时没有自动检查点戓日志开关。
8.关闭linux防火墙:
(1)临时关闭:sudo /sbin/rcSuSEfirewall2 stop
(2)永久关闭:
chkconfig --list|grep fire
chkconfig --level 5 SuSEfirewall2_final off
chkconfig --level 5 SuSEfirewall2_setup off
chkconfig --level 5 SuSEfirewall2_init off
9.开启isqlplus:
$ORACLE_HOME/bin/isqlplusctl start
$ORACLE_HOME/bin/isqlplusctl stop
iSQL*Plus URL:
http://localhost:5560/isqlplus
iSQL*Plus DBA URL:
http://localhost:5560/isqlplus/dba
10.开启dbconsole:
$ORACLE_HOME/bin/emctl start dbconsole
$ORACLE_HOME/bin/emctl stop dbconsole
Enterprise Manager 10g Database Control URL:
http://localhost:1158/em
11.导入数据:
oracle@localhost:~/Desktop> imp
Import file: expdat.dmp > feq.dmp //输入要导入的数据文件
Enter insert buffer size (minimum is 8192) 30720> 10000 //输入缓冲区大小,可以默认也可以自定义,如果数据文件较大,建议设置的大一些
List contents of import file only (yes/no): no > no //只列出导入文件的内容
Ignore create error due to object existence (yes/no): no > yes //由于对象已存在, 忽略创建错误
Import grants (yes/no): yes > yes //导入权限
Import table data (yes/no): yes > yes //导入表数据,如果选NO,则导入表结构
Import entire export file (yes/no): no > yes //导入整个导出文件
12.附加sql语句:
connect as sysdba
connect
create user aaa identified by bbb; (创建一个用户名为aaa,密码为bbb的用户)
grant dba to aaa; (将dba的权限分配给用户aaa)
参考文档:
http://www.oracle.com/technology/global/cn/pub/articles/smiley_10gdb_install.html
http://hi.baidu.com/zxpvikey/blog/item/dad391b72ed1daf631add1ac.html
错误提示:三个“未知”;
解决方法:找到oracle的安装文件下的install目录,右键点击setup.exe,选择 属性 -> 兼容性,然后在兼容模式下打勾,选择Windows Server 2003 (Service Pack 1),再选择以管理员身份运行此程序即可。
<%@ taglib prefix = "fn" uri = "http://java.sun.com/jsp/jstl/functions" %>
fn:contains 判定字符串是否包含另外一个字符串 < c:if test = "${fn:contains(name, searchString)}" >
fn:containsIgnoreCase 判定字符串是否包含另外一个字符串(大小写无关) < c:if test = "${fn:containsIgnoreCase(name, searchString)}" >
fn:endsWith 判定字符串是否以另外字符串结束 < c:if test = "${fn:endsWith(filename, " .txt")}" >
fn:escapeXml 把一些字符转成XML表示,例如 < 字符应该转为 < ${fn:escapeXml(param:info)}
fn:indexOf 子字符串在母字符串中出现的位置 ${fn:indexOf(name, "-")}
fn:join 将数组中的数据联合成一个新字符串,并使用指定字符格开 ${fn:join(array, ";")}
fn:length 获取字符串的长度,或者数组的大小 ${fn:length(shoppingCart.products)}
fn:replac e 替换字符串中指定的字符 ${fn:replace(text, "-", "?")}
fn:split 把字符串按照指定字符切分 ${fn:split(customerNames, ";")}
fn:startsWith 判定字符串是否以某个子串开始 < c:if test ="${fn:startsWith(product.id, " 100 -")}" >
fn:substring 获取子串 ${fn:substring(zip, 6, -1)}
fn:substringAfter 获取从某个字符所在位置开始的子串
${fn:substringAfter(zip, "-")}
fn:substringBefore 获取从开始到某个字符所在位置的子串 ${fn:substringBefore(zip, "-")}
fn:toLowerCase 转为小写 ${fn.toLowerCase(product.name)}
fn:toUpperCase 转为大写字符 ${fn.UpperCase(product.name)}
fn:trim 去除字符串前后的空格 ${fn.trim(name)}
描述
fn:contains(string, substring)
假如参数string中包含参数substring,返回true
fn:containsIgnoreCase(string, substring)
假如参数string中包含参数substring(忽略大小写),返回true
fn:endsWith(string, suffix)
假如参数 string 以参数suffix结尾,返回true
fn:escapeXml(string)
将有非凡意义的XML (和HTML)转换为对应的XML character entity code,并返回
fn:indexOf(string, substring)
返回参数substring在参数string中第一次出现的位置
fn:join(array, separator)
将一个给定的数组array用给定的间隔符separator串在一起,组成一个新的字符串并返回。
fn:length(item)
返回参数item中包含元素的数量。参数Item类型是数组、collection或者String。假如是String类型,返回值是String中的字符数。
fn:replace(string, before, after)
返回一个String对象。用参数after字符串替换参数string中所有出现参数before字符串的地方,并返回替换后的结果
fn:split(string, separator)
返回一个数组,以参数separator 为分割符分割参数string,分割后的每一部分就是数组的一个元素
fn:startsWith(string, prefix)
假如参数string以参数prefix开头,返回true
fn:substring(string, begin, end)
返回参数string部分字符串, 从参数begin开始到参数end位置,包括end位置的字符
fn:substringAfter(string, substring)
返回参数substring在参数string中后面的那一部分字符串
fn:substringBefore(string, substring)
返回参数substring在参数string中前面的那一部分字符串
fn:toLowerCase(string)
将参数string所有的字符变为小写,并将其返回
fn:toUpperCase(string)
将参数string所有的字符变为大写,并将其返回
fn:trim(string)
去除参数string 首尾的空格,并将其返回
public static void main(String[] args) {
NumberFormat nf = NumberFormat.getPercentInstance();
nf.setMinimumFractionDigits(2); // 设置两位小数位
double result = (double) 1 / 32;
System.out.println(nf.format(result));
}
运行结果:3.12%
数据表结构及数据:
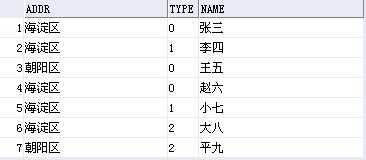
要统计的报表格式:

SQL语句:
1.只统计最右边的合计人数:
select t.addr,
sum( case when(t.type='0') then 1 else 0 end ) as "甲流人数",
sum( case when(t.type='1') then 1 else 0 end ) as "流感人数",
sum( case when(t.type='2') then 1 else 0 end ) as "它病人数",
count(*) as "合计人数"
from test t
group by t.addr;
2.最右边和下边的合计都统计:
(select t.addr as "区域",
sum( case when(t.type='0') then 1 else 0 end ) as "甲流人数",
sum( case when(t.type='1') then 1 else 0 end ) as "流感人数",
sum( case when(t.type='2') then 1 else 0 end ) as "它病户数",
count(*) as "合计人数"
from test t
group by t.addr)
union
(select null, sum( case when(t.type='0') then 1 else 0 end ),
sum( case when(t.type='1') then 1 else 0 end ),
sum( case when(t.type='2') then 1 else 0 end ),
count(*)
from test t);
今天遇到一个问题:由myeclipse7.5导出项目war包,放在服务器上运行时总是出错,可在本机上可以运行。查看console,显示Bad version...,原来是编译环境和运行环境不同,编译版本jdk为1.6,而运行环境jdk为1.5。高版本的jdk编译的.class文件在低版本jdk中不能运行。解决办法:调整开发环境,使用jdk1.5,在myeclipse中Window-Preferences-Java-Compiler修改。
摘要: validateCode.jsp:
<%@ page language="java" import="java.util.*" pageEncoding="UTF-8"%>
<%
String path = request.getContextPath();
String basePath&n... 阅读全文
js代码:
function setIframeHeight() {
var dHeight = 502; //基础高度
var main = document.getElementById("mainIframe");
var left = document.getElementById("leftIframe");
//var leftFrame = document.getElementsByName("left")[0];
var cHeight = main.contentWindow.document.body.scrollHeight; //当前高度
var sHeight = 0; //准备设置的高度值
if (cHeight <= dHeight) {
sHeight = dHeight + "px";
} else {
sHeight = cHeight + "px";
}
main.style.height = sHeight;
left.style.height = sHeight;
if (left.contentWindow.document.getElementById("leftFrameCont")) {
left.contentWindow.document.getElementById("leftFrameCont").style.height = sHeight;
}
}
index.jsp部分页面代码:
<div id="content_bottom2" style="width:auto;">
<iframe name="left" class="vipIf_left" scrolling="no" marginwidth="0px" frameborder="0" src="left.jsp" id="leftIframe"></iframe>
<iframe name="main" class="vipIf_right" frameborder="0" src="main.jsp" onload="setIframeHeight();" id="mainIframe"></iframe>
</div>
left.jsp部分页面代码:
<body>
<div class="cont_left" id="leftFrameCont">
</div>
</body>
package com.jakin.util;
import java.util.ArrayList;
import java.util.Collection;
import java.util.Collections;
import java.util.List;
import org.apache.commons.collections.CollectionUtils;
import org.apache.commons.lang.ArrayUtils;
public class CollectionUtilsTest {
@SuppressWarnings("unchecked")
public static void main(String[] args) {
List<String> aList = new ArrayList<String>();
aList.add("aaa");
aList.add("bbb");
aList.add("ccc");
List<String> bList = new ArrayList<String>();
bList.add("aaa");
bList.add("ddd");
bList.add("eee");
// 并集
Collection<String> unionList = CollectionUtils.union(aList, bList);
// 交集
Collection<String> intersectionList = CollectionUtils.intersection(aList, bList);
// 是否存在交集
boolean isContained = CollectionUtils.containsAny(aList, bList);
// 交集的补集
Collection<String> disjunctionList = CollectionUtils.disjunction(aList, bList);
// 集合相减
Collection<String> subtractList = CollectionUtils.subtract(aList, bList);
// 排序
Collections.sort((List<String>) unionList);
Collections.sort((List<String>) intersectionList);
Collections.sort((List<String>) disjunctionList);
Collections.sort((List<String>) subtractList);
// 测试
System.out.println("A: " + ArrayUtils.toString(aList.toArray()));
System.out.println("B: " + ArrayUtils.toString(bList.toArray()));
System.out.println("A has one of B? : " + isContained);
System.out.println("Union(A, B): "
+ ArrayUtils.toString(unionList.toArray()));
System.out.println("Intersection(A, B): "
+ ArrayUtils.toString(intersectionList.toArray()));
System.out.println("Disjunction(A, B): "
+ ArrayUtils.toString(disjunctionList.toArray()));
System.out.println("Subtract(A, B): "
+ ArrayUtils.toString(subtractList.toArray()));
}
}
a.properties放在D:\根目录下,b.properties为要生成的文件名:
D:\native2ascii -encoding gb2312 a.properties b.properties;
转换为ISO-8859-1进行传递
String organizationName = java.net.URLEncoder.encode(organization.getName(),"GB2312");
把ISO-8859-1转换为GBK进行获取
String organizationName = new String(organizationName.getBytes("ISO-8859-1"),"GBK");
|