In this exercise, you will create an AWS Lambda function to make the application a distributed system. This means that the photo labels being processed by Amazon Rekognition will now be processed in an asynchronous manner. To asynchronously process them, when a photo gets uploaded, an Amazon S3 bucket event notification triggers the AWS Lambda function, which talks to Amazon Rekognition to process the photo labels.
Note: Make sure to sign-in to your AWS account with the AWS IAM user edXProjectUser credentials.
To begin, follow the steps below.
1. Start the Amazon RDS database instance.
- In the AWS Console, click Services, then click Relational Database Service to open the Amazon RDS dashboard.
- In the left navigation pane, click Instances. From the list of instances, select edx-photos-db.
- At the top, click Instance actions, and then click Start.
2. Create a NAT instance via AWS CloudFormation to allow internet access to the AWS Lambda function.
In this section, you will create a NAT instance by updating the AWS CloudFormation stack edx-vpc-stack. By creating a NAT instance, you are ensuring that the AWS Lambda function has internet access so that it can execute. While creating the AWS Lambda function, you placed the function in the edx-build-aws-vpc network. This caused the AWS Lambda function to lose default internet access. Since you need external internet access for the function to execute and communicate with Amazon Rekognition and your Amazon RDS database, you need to ensure that the edx-build-aws-vpc network has a NAT instance. In the third exercise, you created an AWS CloudFormation stack, edx-vpc-stack, which created the edx-build-aws-vpc network and the subnets. In this section, you will update the stack to create the NAT instance.
- Download the AWS CloudFormation template to create the NAT instance. Save it locally on your computer.
- In the AWS Console, click Services, then click CloudFormation to open the AWS CloudFormation dashboard.
- Make sure you are still in the Oregon region.
- Click the check box against edx-vpc-stack from the list of stacks.
- Click Actions -> Update Stack at the top.
- Click Choose file to select the AWS CloudFormation template you just downloaded.
- Click Next.
- For KeyName, select the key pair you created in the third exercise.
- Click Next.
- Skip the Options page and click Next.
- On the Review page, scroll down and click Update.
You will notice that the status of the template is UPDATE_IN_PROGRESS. The template should finish updating in a minute. - After you see the status as UPDATE_COMPLETE, open the Amazon EC2 dashboard.
- Click Instances in the left navigation menu. You can view the status of the NAT instance, edx-nat-instance. Make sure that your instance has passed its status checks. You can view this information in the Status Checks column.
Note: It takes a few minutes for the status checks to pass.
3. Create an AWS IAM role for the AWS Lambda function.
In this section, you will create an AWS IAM role to authenticate the AWS Lambda function to talk to Amazon Rekognition and Amazon S3. If you are familiar with AWS IAM roles, you may want to attempt to complete this section before reading the step-by-step instructions.
Trusted entity: Lambda Permissions: AWSLambdaVPCAccessExecutionRole, AmazonRekognitionReadOnlyAccess, AmazonS3ReadOnlyAccess Role name: labels-lambda-role
- In the AWS Console, click Services, then click IAM to open the IAM dashboard.
- On the left navigation menu, click Roles.
- Click Create role.
- For Select type of trusted entity, scroll down and select Lambda.
- Click Next: Permissions.
- In the search text box, type LambdaVPCAccess
- Select AWSLambdaVPCAccessExecutionRole.
- In the search text box, type Rekognition
- Select AmazonRekognitionReadOnlyAccess.
- In the search text box, type S3
- Select AmazonS3ReadOnlyAccess.
- Click Next: Review.
- For Role name, type labels-lambda-role
- Click Create role.
4. Create a security group in edx-build-aws-vpc for the AWS Lambda function.
In this section, you will create a security group for the AWS Lambda function in edx-build-aws-vpc. The security group for the AWS Lambda function has no inbound rules; it only has outbound rules. You will later reference the security group to allow AWS Lambda access to the database. If you are familiar with security groups, you may want to attempt to complete this section before reading the step-by-step instructions.
Security group name: labels-lambda-sg Region: Oregon (us-west-2) VPC: edx-build-aws-vpc
- In the AWS Console, click Services, then click EC2 to open the Amazon EC2 dashboard.
- Make sure you are still in the Oregon (us-west-2) region.
- On the left navigation menu, under NETWORK & SECURITY, click Security Groups.
- Click Create Security Group.
- For Security group name, type labels-lambda-sg
- For Description, type a description for the security group.
- For VPC, select edx-build-aws-vpc.
- Click Create.
5. Modify the security group of the Amazon RDS database instance.
In this section, you will modify the security group of the Amazon RDS database instance to allow it to communicate with the AWS Lambda function. Follow the steps below.
- In the AWS Console, click Services, then click Relational Database Service to open the Amazon RDS dashboard.
- On the left navigation menu, click Instances and select edx-photos-db.
- Scroll down to the Details section.
- Under Security and network, click the security group. The security group should have a name like rds-launch-wizard-xxx. A new page displaying the security group you just clicked should appear.
- On the bottom pane, click Inbound.
- Click Edit.
- Click Add Rule.
- For Type, select MYSQL/Aurora.
- In the Source textbox, type labels-lambda-sg and select the security group that is displayed.
- Click Save.
6. Create a placeholder AWS Lambda function.
In this section, you will create a placeholder AWS Lambda function. This AWS Lambda function will later be updated with the exercise code. If you are familiar with AWS Lambda, you may want to attempt to complete this section before reading the step-by-step instructions.
Region: Oregon (us-west-2) Name: labels-lambda Runtime: Python3.6 Role: labels-lambda-role Network: edx-build-aws-vpc Subnets: Select the two private subnets in edx-build-aws-vpc. Security group: labels-lambda-sg Sample function code: print("Hello")
- In the AWS Console, click Services, then click Lambda to open the Lambda dashboard.
- Make sure you are still in the Oregon (us-west-2) region.
- Click Create a function.
- For Name, type labels-lambda
- For Runtime, select Python 3.6.
- For Role, leave the default selection, Select an existing role.
- For Existing Role, select labels-lambda-role.
- Click Create function.
Note: You may ignore the warning message at the top that reads Not authorized to perform: kms:ListAliases on resource: *. - Once the AWS Lambda function is created, scroll down to the Network section.
- For VPC, select edx-build-aws-vpc.
- For Subnets, select a private subnet in the edx-build-aws-vpc network.
- You should see a warning message that reads We recommend you select at least 2 subnets for Lambda to run your functions in high availability mode. Select the second private subnet in the edx-build-aws-vpc network.
- For Security groups, select labels-lambda-sg.
- Scroll back up to the Function Code section and type print("Hello") in the function code body.
- Click Save at the top right corner.
7. Test the placeholder AWS Lambda function by simulating an Amazon S3 event.
- In the AWS Console, go the Lambda dashboard, click Functions on the left navigation menu, and select the AWS Lambda function you just created.
- Click Test at the top right corner.
- On the Configure test event page, for Event template, select S3 Put.
- For Event name, type a name for the event.
- Scroll to the bottom and click Create.
- On the AWS Lambda page, at the top right corner, click Test. You should see that the function is being executed.
- After the AWS Lambda function has successfully executed, under Execution result: succeeded(logs), expand the Details section.
In the Log Output, you should see the Hello message you printed in the AWS Lambda function.
8. Download and explore the exercise code.
- Type the command below in your AWS Cloud9 terminal to make sure you are in the ~/environment directory of your AWS Cloud9 instance.
cd ~/environment - In your AWS Cloud9 environment, download the exercise code by typing the command below in the terminal.
wget https://us-west-2-tcdev.s3.amazonaws.com/courses/AWS-100-ADG/v1.0.0/exercises/ex-lambda.zip
- Unzip the exercise code .zip file by typing the command below in your AWS Cloud9 terminal.
unzip ex-lambda.zip
The contents of the .zip file should be extracted to a folder with similar name. You can view the folder on the left tree view.
- Open the exercise-lambda/LambdaImageLabels/lambda_function.py file.
- Notice that the Amazon Rekognition code for processing the photo labels has been removed from the application.py file to the lambda_function.py file. This means that the photo labels are now being processed asynchronously by the AWS Lambda function.
- In the exercise-lambda/FlaskApp/application.py file, scroll down to the myphotos route and notice that the all_labels variable now displays a message, Processing labels asynchronously. This message will be displayed on the GUI until the labels are being processed and returned back by the AWS Lambda function.
9. Test the AWS Lambda function locally in your AWS Cloud9 environment.
- Open the exercise-lambda/LambdaImageLabels/lambda_function.py file.
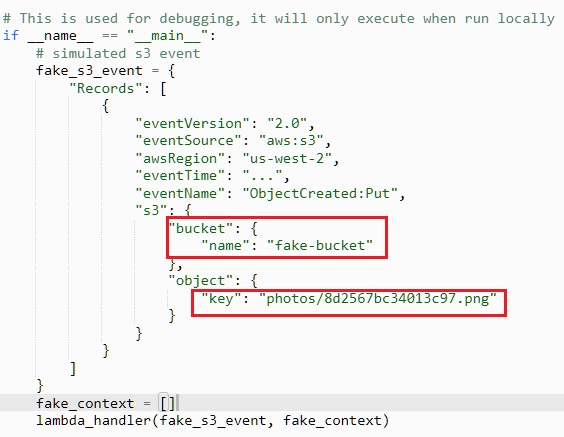
- Search for the fake_s3_event variable in the file. You will notice a JSON snippet simulating an Amazon S3 event.
- In the JSON snippet, replace fake_bucket with the name of your Amazon S3 bucket name that stores the application photos. For more information, refer the screenshot below the next instruction.
- In the AWS Console, open the Amazon S3 dashboard, select your photos Amazon S3 bucket, copy the object key of a photo, and paste it the JSON snippet against key. For more information, refer to the screenshot below.
- Save the lambda_function.py file.
- To run the AWS Lambda function locally, point the Run Configuration to the correct exercise folder. On Python3RunConfiguration pane at the bottom, type the text shown below in the Command textbox and click Run.
exercise-lambda/LambdaImageLabels/lambda_function.py
You should see a message similar to below:
Received event. Bucket: [photosbucket], Key: [photos/4369c8f6e689306c.png]
Detect_labels finished. Key: [photos/4369c8f6e689306c.png], Labels: [File, Webpage, Text, Page, Landscape, Nature, Outdoors, Scenery, Label, Diagram, Map]
This means that the AWS Lambda function has executed successfully.
10. Package the libraries needed for the AWS Lambda function and update the AWS Lambda function.
In this section, you will package the AWS Lambda function along with the MySQL connector libraries AWS Lambda needs to execute successfully.
- Type the command below in your AWS Cloud9 terminal to make sure you are in the ~/environment directory of your AWS Cloud9 instance.
cd ~/environment - In your AWS Cloud9 environment, create a folder called libraries by typing the command below.
mkdir libraries
- To include the SQL connector libraries, type the command below.
pip-3.6 install 'mysql_connector_python<8.1' -t libraries
- Change your working directory to the Libraries folder by typing the command below.
cd libraries/
- Create a .zip file named lambda.zip and zip the MySql connector libraries by typing the command below.
zip -r ~/environment/lambda.zip *
- To include the AWS Lambda function code files in the lambda.zip file, change the directory to the exercise folder by typing the command below.
cd ~/environment/exercise-lambda/LambdaImageLabels/
- Zip the AWS Lambda function code files in the lambda.zip file by typing the command below.
zip ~/environment/lambda.zip *.py
The lambda.zip file is now ready with the code and its dependency libraries.
- Change your working directory to the ~/environment folder by typing the command below.
cd ~/environment
- Using the AWS CLI command below, update the AWS Lambda function you created in an earlier section of this exercise with the function code.
aws lambda update-function-code --function-name labels-lambda --zip-file fileb://lambda.zip
Upon executing the AWS CLI command, you should see a JSON output with the information of the AWS Lambda function. This means that the function has been successfully updated with the Python code and libraries.
11. Configure the AWS Lambda function with the Amazon RDS database environment variables.
- In the AWS Console, click Services, then click Lambda to open the Lambda dashboard.
- Click Functions in the left navigation menu.
- Click the AWS Lambda Function you updated in the previous section.
- Scroll down to the Environment variables section.
- Configure the Amazon RDS database environment variables in the Key and Value text boxes in the Environment variables section. Refer to the table below.
|
Key |
Value |
|
DATABASE_HOST |
Database endpoint of the Amazon RDS database |
|
DATABASE_USER |
web_user |
|
DATABASE_PASSWORD |
Password for the web_user you noted earlier |
|
DATABASE_DB_NAME |
Photos |
- Click Save at the top right corner.
12. Test the AWS Lambda function by simulating an Amazon S3 event.
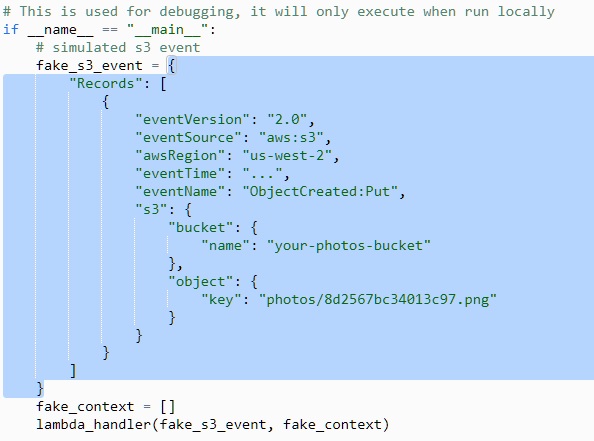
- In your AWS Cloud9 environment, open the lambda_function.py file and scroll down to the fake_s3_event JSON snippet.
This JSON snippet is pointing to the Amazon S3 photos bucket of your application and an object key for one of the photos stored in that bucket. - Copy the entire fake_s3_event JSON snippet as highlighted in the screenshot below.
- In the AWS Console, open the Lambda dashboard and click Functions in the left navigation menu.
- Click the AWS Lambda function that you updated in a previous section.
- Click the drop-down list next to the Test button at the top right corner.
- Click Configure test events.
- Leave the default selection as Edit saved test events.
- Replace the JSON code you see on your screen with the fake_s3_event JSON snippet you copied earlier from the lambda_function.py file.
- Scroll to the bottom and click Save.
- Click Test at the top right corner.
- Upon successful execution, expand the Details section. You should see a log output similar to the example below.
START RequestId: bb62e964-02c3-11e8-9883-1da37a524b85 Version: $LATEST
Received event. Bucket: [photosbucket], Key: [photos/4369c8f6e689306c.png]
Detect_labels finished. Key: [photos/4369c8f6e689306c.png], Labels: [File, Webpage, Text, Page, Landscape, Nature, Outdoors, Scenery, Label, Diagram, Map]
Updating key:[photos/4369c8f6e689306c.png] with labels:[File, Webpage, Text, Page, Landscape, Nature, Outdoors, Scenery, Label, Diagram, Map]
You are now ready to test your AWS Lambda function in the application.
13. Configure the photos Amazon S3 bucket to trigger the AWS Lambda function.
In this section, you will configure your photos Amazon S3 bucket to trigger the AWS Lambda function whenever a new photo is uploaded. To configure, follow the steps below.
- In the AWS Console, open the Amazon S3 dashboard.
- From the list of buckets, select the bucket where your application photos are uploaded.
- Click Properties tab.
- Scroll down to Advanced settings and click Events.
- Click Add notification.
- For Events, select ObjectCreate (All).
- For Send to, select Lambda Function.
- For Lambda, select the AWS Lambda function you created in this exercise.
- Click Save.
Your Amazon S3 bucket will now trigger the AWS Lambda function to execute as soon as a photo gets uploaded to the bucket.
14. Test the application.
- Establish an SSH tunnel to your AWS Cloud9 instance.
Note: Remember, the public IP address of your AWS Cloud9 instance can change when the environment hibernates. Make sure you get the latest public IP address of your AWS Cloud9 instance. - To run the code, you will need to point the Run Configuration to the correct exercise folder. In the Python3RunConfiguration pane at the bottom, type the text shown below in the Command textbox and click Run.
exercise-lambda/FlaskApp/application.py
You should see a message like the one below:
Running on http://0.0.0.0:5000/
- Open your browser and type http://localhost:5000
- You should see the application load. Log in to the application and upload a photo.
- As soon as the photo is uploaded, you should see a label, Processing labels asynchronously, below the photo. This means that the labels are being processed by the AWS Lambda function.
- Click My photos in the top right corner. You should now see the labels populated in the table against the photo you just uploaded.
Note: This might take a few attempts as you are waiting for AWS Lambda function to start executing.
Optional Challenge
The code supplied doesn't have any X-Ray tracing. Add to the Lambda function the code for the xray_recorder, and to patch libraries. Deploy the updated code to Lambda and enable active tracing. For more information, seeEmitting Trace Segments from a Lambda Function. You will now see traces appear in the X-Ray console for your Lambda function invocations. Your Lambda function role will need AWSXrayWriteOnlyAccess permissions to access X-Ray.
15. Stop the NAT instance.
In order to keep your AWS account bill to a minimum, stop the NAT instance by following the steps below.
- In the AWS Console, click Services, then click EC2 to open the Amazon EC2 dashboard.
- In the navigation pane, click Instances. In the list of instances, select edx-nat-instance.
- Click Actions, then Instance State, and then Stop.
16. Stop the Amazon RDS database instance.
In order to keep your AWS account bill to a minimum, stop the Amazon RDS instance by following the steps below.
- In the AWS Console, open the Amazon RDS dashboard.
- In the left navigation pane, click Instances. From the list of instances, select edx-photos-db.
- At the top, click Instance actions, and then click Stop. You will get a prompt. Click Yes, stop now.
眼镜蛇