In this exercise, you will analyze and collect diagnostics information related to your application with AWS X-Ray. With AWS X-Ray, you can understand how your application and its underlying services are performing to identify and troubleshoot the root cause of performance issues. AWS X-Ray traces user requests as they travel through your entire application. It then aggregates the data generated by the individual services and resources that make up your application, providing you with a trace map of how your application is performing.
Note: Make sure to sign in to your AWS account with the AWS IAM user edXProjectUser credentials.
To begin, follow the steps below.
1. Start the RDS database instance
- In the AWS Console, click Services, then click Relational Database Service to open the Amazon RDS dashboard.
- In the left navigation pane, click Instances. From the list of instances, select edx-photos-db.
- At the top, click Instance actions, and then click Start.
2. Download and explore the exercise code.
- Type the command below in your AWS Cloud9 terminal to make sure you are in the ~/environment directory of your AWS Cloud9 instance.
cd ~/environment - In your AWS Cloud9 environment, download the exercise code by typing the command below in the terminal.
wget https://us-west-2-tcdev.s3.amazonaws.com/courses/AWS-100-ADG/v1.0.0/exercises/ex-xray.zip
- Unzip the exercise code .zip file by typing the command below in your AWS Cloud9 terminal.
unzip ex-xray.zip
The contents of the .zip file should be extracted to a folder with a similar name. You can view the folder on the left tree view.
- Open the exercise-xray/FlaskApp/application.py file and explore the code. Notice that the AWS X-Ray libraries, such as aws_xray_sdk.core, xray_recorder, and XRayMiddleware, are now being imported in the application.py file. AWS X-Ray is configured with XRayMiddleware to gather tracing information for different services and report the information back into the AWS cloud.
- Open the exercise-xray/util.py file. Notice that there is a @xray_recorder.capture() decorator, which captures the time needed to resize the uploaded photo to a desired size. This information is reported back to the AWS cloud.
3. Download and run the AWS X-Ray daemon on your AWS Cloud9 instance.
4. Run the exercise code and test the application.
- To run the exercise code, you will need to point the Run Configuration to the correct exercise folder. In the Python3RunConfiguration pane at the bottom, in the Command text box, type the text shown below and then click Run.
exercise-xray/FlaskApp/application.py
A message like the one below should appear.
Running on http://0.0.0.0:5000/
- Make sure to establish an SSH tunnel to your AWS Cloud9 instance. You may refer to the steps in the previous exercise for creating an SSH tunnel.
- Open http://localhost:5000, log in to the application with your credentials, and upload a photo. Click My photos at the top-right corner of the application. You should see your uploaded photo.
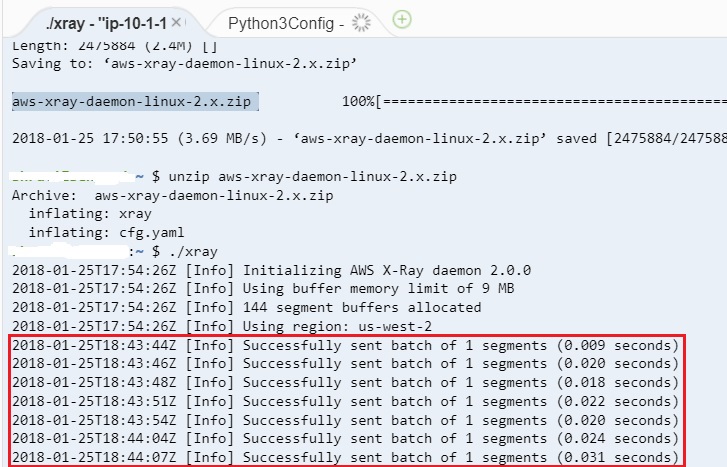
- Go to your AWS Cloud9 instance terminal and notice that the AWS X-Ray daemon is sending diagnostics information to your AWS account. You should see information as shown in the screenshot below.
5. Explore the diagnostics information collected by AWS X-Ray.
- In the AWS Console, click Services, then click X-Ray to open the AWS X-Ray dashboard.
- If you are using AWS X-Ray for the first time, you may have to click Get Started and then click Cancel to exit the wizard.
- Click Service map in the left navigation menu. The service map has information about AWS services communicating with each other and the processing time each service needs.
- On the left side, click Traces. You should see response times and time taken by each component in the application.
- In the Trace list at the bottom, click the trace item where the Method column contains POST. You should see timing information for all the calls made in your application, as shown in the screenshot below. This particular trace information should be about the POST made to the application to upload a photo. Notice the time needed for Amazon S3, Amazon RDS and Amazon Rekognition to process the photo. You can also see the time needed to resize the image against the resize_image label.
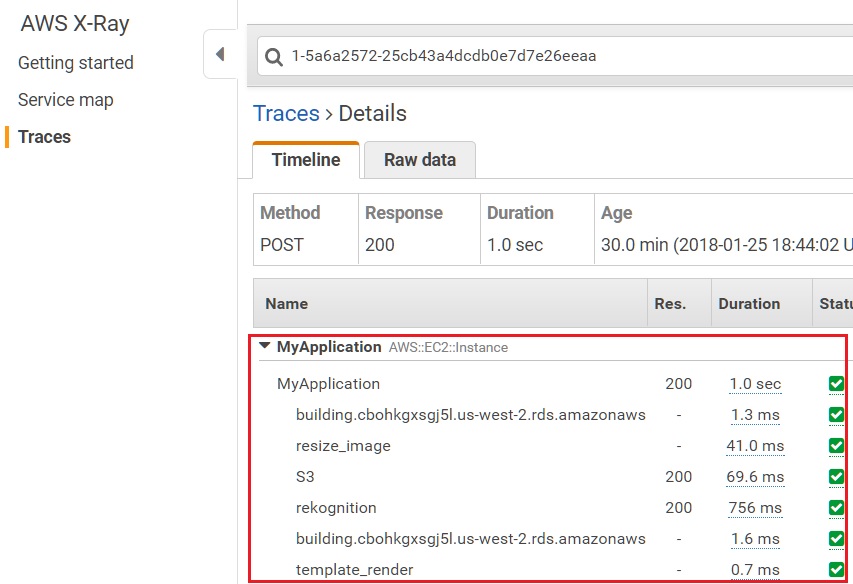
With this diagnostics information, you can now find out which component in your application is taking longer to process.
Optional Challenge 1
AWS X-Ray allows us to add searchable annotations to the trace segment. For more information, see Recording Annotations with the X-Ray SDK for Python.
The code below will pick up the current X-Ray segment from the xray_recorder.
from aws_xray_sdk.core import xray_recorder
...
document = xray_recorder.current_segment()
Inside the homepage route, can you add an annotation to the current segment containing the user's nickname? When this is reported back to AWS Cloud9, you will be able to search traces by username.
Optional Challenge 2
AWS X-ray will capture and report exceptions. Can you add some code to create an exception - for example, a new route that simply divides a number by zero? Run this new code with X-Ray configured. You will see the stack trace captured and viewable in the X-Ray console.
6. Stop the Amazon RDS database instance.
In order to keep your AWS account bill to a minimum, consider stopping the Amazon RDS instance and then starting it again when needed. Follow the steps below to stop the Amazon RDS database instance.
- In the AWS Console, go to the Amazon RDS dashboard.
- In the left navigation pane, click Instances. From the list of instances, select edx-photos-db.
- At the top, click Instance actions, and then click Stop. A prompt will appear. Click Yes, stop now.
眼镜蛇