 2009年11月12日
最近在网上看到的相关材料都比较陈旧,也太简略,参看了一下其他人的内容,针对Hive2.1.1做点分享:
1)下载apache-hive-2.1.1-bin.tar.gz
2)解压缩,下面的命令行如启动报错,请自行查略Hive启动配置
3)启动
hiveserver2 (非必须,使用jdbc访问的时候才使用)
bin目录下
hive --service hiveserver2 -p10001来启动hiveserver2 服务(默认为10000端口)
nohup hive --service hiverserver2 -p10001可以在后台跑
4)
hive脚本运行流程bin目录下,使用命令方法为:
./hive <parameters> --service serviceName <service parameters>
举例:hive --debug :
查看bin/hive文件
流程中会判断$1=‘--debug’则$DEBUG=‘--debug’
if [ "$DEBUG" ]; then
if [ "$HELP" ]; then //如还有--help,就会执行debug_help方法。
debug_help
exit 0
else
get_debug_params "$DEBUG"
export HADOOP_CLIENT_OPTS="$HADOOP_CLIENT_OPTS $HIVE_MAIN_CLIENT_DEBUG_OPTS"//设置HIVE_MAIN_CLIENT_DEBUG_OPTS的参数中加入debug相应参数
fi
fi
if [ "$SERVICE" = "" ] ; then
if [ "$HELP" = "_help" ] ; then
SERVICE="help"
else
SERVICE="cli" //默认赋值cli
fi
fi
这个shell脚本很多变量应该是在其他sh文件中定义,其中$SERVICE_LIST就是其他很多sh文件的最开始形成的:export SERVICE_LIST="${SERVICE_LIST}${THISSERVICE} "
hive脚本最后的$TORUN "$@" ,默认情况下TORUN其实就是cli,即执行/ext/cli.sh脚本,该脚本中主要是调用/ext/util/execHiveCmd.sh 来执行最后的CliDriver。
【
shell脚本中的$*,$@和$#举例说:
脚本名称叫test.sh 入参三个: 1 2 3
运行test.sh 1 2 3后
$*为"1 2 3"(一起被引号包住)
$@为"1" "2" "3"(分别被包住)
$#为3(参数数量)
】即exec $HADOOP jar ${HIVE_LIB}/$JAR $CLASS $HIVE_OPTS "$@" //1
其中:
$HADOOP=$HADOOP_HOME/bin/hadoop 【hive脚本中定义HADOOP=$HADOOP_HOME/bin/hadoop】
$CLASS=org.apache.hadoop.hive.cli.CliDriver【传入的第一个参数,在cli.sh中有定义】
hadoop脚本(2.7.3为例)中最终会执行:
# Always respect HADOOP_OPTS and HADOOP_CLIENT_OPTS
HADOOP_OPTS="$HADOOP_OPTS $HADOOP_CLIENT_OPTS"
#make sure security appender is turned off
HADOOP_OPTS="$HADOOP_OPTS -Dhadoop.security.logger=${HADOOP_SECURITY_LOGGER:-INFO,NullAppender}"
export CLASSPATH=$CLASSPATH
exec "$JAVA" $JAVA_HEAP_MAX $HADOOP_OPTS $CLASS "$@" //2
hive的debug参数就是在启动hive脚本时放到HADOOP_OPTS中的
1和2处结合可得到最终的运行命令,查看一下运行结果:ps -ef|grep CliDriver
/usr/java/jdk1.8.0_101/bin/java -Xmx256m -Djava.net.preferIPv4Stack=true -Dhadoop.log.dir=.. -Dhadoop.log.file=hadoop.log -Dhadoop.home.dir=.. -Dhadoop.id.str=root -Dhadoop.root.logger=INFO,console -Djava.library.path=.. -Dhadoop.policy.file=hadoop-policy.xml -Djava.net.preferIPv4Stack=true -Xmx512m -Dproc_hivecli -XX:+UseParallelGC -agentlib:jdwp=transport=dt_socket,server=y,address=8000,suspend=y -Dlog4j.configurationFile=hive-log4j2.properties -Djava.util.logging.config.file=..
-Dhadoop.security.logger=INFO,NullAppender org.apache.hadoop.util.RunJar /yuxh/app/apache-hive-2.*/lib/hive-cli-2.*.jar org.apache.hadoop.hive.cli.CliDriver
appfuse3.5使用Hibernate4.3.6, 而Hibernate日志框架使用了jboss-logging,想在后台打出sql的参数一直无法生效。
检查配置文件,框架里面的两个配置文件,src/test/resources/log4j2.xml(单元测试时配置),src/main/resources/log4j2.xml(运行时配置)
搞清log4j2的配置后,各种修改(主要是
<Logger name="org.hibernate.SQL" level="trace"/>
<Logger name="org.hibernate.type" level="trace"/>)
用junit测试任然无法打印出真实参数。根据这些实践,确定log4j2是使用无误生效的,只是org.hibernate这部分的logger一直未起效
参考国内外网站,一直无人回答hibernate4的这个问题,有人指出这部分Hibernate官方文档只是提了一句,一直未更新相关内容。最后有人提到应该是 jboss-logging 的LoggerProviders这个类的问题,看实现对log4j2已经做支持。最后发现 jboss-logging使用的是3.2.0.beta,对比相关类的源代码,更改为3.2.0.Final,生效!
P.S 把这个问题提交给Appfuse官网,issue APF-1478,作者标志为4.0版本修复。
新电脑装上eclipse4.4.2,导入maven项目之后,依赖库总是有很多错误。最后搜索到可能是eclipse的bug(据说是
JAVA_HOME没有正确传递),查看到eclipse默认的是安装的jre目录,修改到jdk目录下,依赖问题解决。
不过目前版本仍然没有解决pom文件的“Plugin execution not covered by lifecycle configuration”错误,暂时忽略不管吧。
本打算继承一个API中的Parent类(Parent继承自GrandParent类),重写其中的service方法,copy了Parent的service方法。不过发现Parent的service中也有super.service方法。当时考虑直接调用GrandParent的service方法。。。未遂(包括反射也不行)。正好看到老外写的一篇文章,翻译:
在Son类里面写一个test方法:
public void test() {
super.test();
this.test();
}
反编译之后:
public void test()
{
// 0 0:aload_0
// 1 1:invokespecial #2 <Method void Parent.test()>
// 2 4:aload_0
// 3 5:invokevirtual #3 <Method void test()>
// 4 8:return
}
使用ASM可以完成对GrandParent方法的调用
public class GrandParent {
public void test() {
System.out.println("test of GrandParent");
}
}
public class Parent extends GrandParent{
public void test() {
System.out.println("test of Parent");
}
}
public class Son extends Parent{
public void test() {
System.out.println("test of Son");
}
}
调用Son实例的test方法只会执行Son的test方法。而ASM可以修改class,先写一个Example类继承Son,重写test方法
1 import java.io.FileOutputStream;
2
3 import org.objectweb.asm.ClassWriter;
4 import org.objectweb.asm.MethodVisitor;
5 import org.objectweb.asm.Opcodes;
6
7 public class ASMByteCodeManipulation extends ClassLoader implements Opcodes {
8
9 public static void main(String args[]) throws Exception {
10 ClassWriter cw = new ClassWriter(0);
11 cw.visit(V1_1, ACC_PUBLIC, "Example", null, "Son", null);
12
13 // creates a MethodWriter for the (implicit) constructor
14 MethodVisitor mw = cw.visitMethod(ACC_PUBLIC, "<init>", "()V", null,null);
15 mw.visitVarInsn(ALOAD, 0);
16 mw.visitMethodInsn(INVOKESPECIAL, "Son", "<init>", "()V");
17 mw.visitInsn(RETURN);
18 mw.visitMaxs(1, 1);
19 mw.visitEnd();
20
21 // creates a MethodWriter for the 'test' method
22 mw = cw.visitMethod(ACC_PUBLIC, "test", "()V", null, null);
23 mw.visitFieldInsn(GETSTATIC, "java/lang/System", "out","Ljava/io/PrintStream;");
24 mw.visitLdcInsn("test of AI3");
25 mw.visitMethodInsn(INVOKEVIRTUAL, "java/io/PrintStream", "println",
26 "(Ljava/lang/String;)V");
27 //Call test() of GrandParent
28 mw.visitVarInsn(ALOAD, 0);
29 mw.visitMethodInsn(INVOKESPECIAL, "GrandParent", "test", "()V");
30 //Call test() of GrandParent
31 mw.visitVarInsn(ALOAD, 0);
32 mw.visitMethodInsn(INVOKESPECIAL, "Parent", "test", "()V");
33 //Call test() of GrandParent
34 mw.visitVarInsn(ALOAD, 0);
35 mw.visitMethodInsn(INVOKESPECIAL, "Son", "test", "()V");
36 mw.visitInsn(RETURN);
37 mw.visitMaxs(2, 1);
38 mw.visitEnd();
39
40 byte[] code = cw.toByteArray();
41 FileOutputStream fos = new FileOutputStream("Example.class");
42 fos.write(code);
43 fos.close();
44
45 ASMByteCodeManipulation loader = new ASMByteCodeManipulation();
46 Class<?> exampleClass = loader.defineClass("Example", code, 0,
47 code.length);
48 Object obj = exampleClass.newInstance();
49 exampleClass.getMethod("test", null).invoke(obj, null);
50
51 }
52 }
输出:
test of AI3
test of GrandParent
test of Parent
test of Son
看看怎样实现的,11行定义一个新的类Example继承Son。22行,Example重写test方法,先打印“test of AI3”,再分别在29、32、35行调用
GrandParent、Parent、Son的test方法。 main方法中,45行创建Example的实例,再用反射调他的test方法。
使用invokespecial这种方式也有局限,只能从子类调用。否则报错:
Exception in thread "main" java.lang.VerifyError: (class: Example, method: test1 signature: (LAI2;)V) Illegal use of nonvirtual function call
使用Google calendar v3 API的时候,大量发现Builder使用。比如Credential类,查了查Builder模式的讲解,始终感觉代码的实现和标准定义不太相同。最后发现这种实现方式是《Effective java 2nd》中的一种实现(Item 2: Consider a builder when faced with many constructor parameters)。静态工厂和构造器都有一个通病:对于存在大量可选构造参数的对象,扩展性不好。经典的解决方案是提供多个构造函数,第一个构造函数只有必须的参数,第二个构造函数除了必须参数还有一个可选参数,第三个除了必须参数还有两个可选参数。。。这样下去知道最后一个可选参数出现(
telescoping constructor)。这种方案的问题是,当构建对象的时候很容易把其中两个参数的位置放反。。。。
(难发现的bug)。
另一种解决方案是JavaBean 模式,先调用无参构造函数再调用各个set方法来组装对象。这种方案的问题是不能强制一致性。如果没有set某些必须的参数的话,对象可能处于不一致(
inconsistent)的状态(难发现的bug)。另外一个缺点是JavaBean模式不能让类immutable,需要程序员额外工作保证线程安全。
第三种方式就是Builder设计模式。这种方式混合了
telescoping constructor模式的安全性和JavaBean模式的可读性。客户端调用有所有必填参数的构造器(或静态工厂),得到一个builder对象。然后调用builder对象的方法去set各个选填参数。最后调用无参的build方法产生一个immutable的对象实例。immutable对象有非常多优点而且可能很有用。builder的set方法都是返回builder本身,所以调用也是可以chained。如:
GoogleCredential credentialNew = new GoogleCredential.Builder().setTransport(HTTP_TRANSPORT)
.setJsonFactory(JSON_FACTORY).setClientSecrets(clientSecrets)
.addRefreshListener(new CredentialStoreRefreshListener(userID, new DBCredentialStore())).build()
.setAccessToken(accessToken).setRefreshToken(refreshToken)
客户端代码很好写,更重要的是易读。Builder模式模拟了在Ada和Python语言里的命名可选参数(
named optional parameters)。
同时Builder类设置为static也是对Item 22:Favor static member classes over nonstatic的实践
以典型的客户端-服务器端授权为例
一 基本流程
使用Google Calendar v3 ,如果以servlet作为代理,可以使用官方示例,自己写一个类A.java继承AbstractAuthorizationCodeServlet类,这个类主要用于跳转到google提供的授权页面,如果用户同意授权,则根据A类中的URL(这个必须和注册的google 回调路径相同,比如oauth_callback否则报错)重定向到B类,B.java 继承AbstractAuthorizationCodeCallbackServlet类,这个访问路径类似http://www.example.com/oauth_callback?code=ABC1234。这里我配置oauth_callback为servlet的访问路径,B类中的
onSuccess方法将根据获得的access Token(这是根据传过来的code获得的)做业务操作。
二 需要参数的情况
有些业务需要用户传参数,
直接传参数给A,再试图在B中获取是不行的!B类中只能获取某些
固定的参数,如code。要想传用户参数,我们可以在A中先获取,把几个参数组装为json格式字符串(还可以继续base64编码),把这个字符串作为state的值,再重定向到授权页面,同意后state参数可以传到B类,取值解析json字符串(或先base64解码),得到参数。
由于API中AuthorizationCodeRequestUrl有处理state的方法,而AbstractAuthorizationCodeServlet已经直接封装,为了使用setState,直接在A类中继承HttpServlet重写service方法,复制大部分AbstractAuthorizationCodeServlet的内容,稍作修改:
resp.sendRedirect(flow.newAuthorizationUrl()
.setState(json).setRedirectUri(redirectUri).build());
三 关于refresh token
默认情况下,用户授权之后token会有一个小时的有效期,之后你可以通过refresh token再重新获取token。所以,如果不需要用户再次授权,可以在第一次,保存好token、refresh token、ExpirationTime。实例中用了JDO来实现,自己如果使用数据库保存,可类似写一个类实现CredentialStore类。使用的时候,现在数据库中取出,再创建credential,如:
GoogleCredential credentialNew = new GoogleCredential.Builder().setTransport(HTTP_TRANSPORT)
.setJsonFactory(JSON_FACTORY).setClientSecrets(clientSecrets)
.addRefreshListener(new CredentialStoreRefreshListener(userID, new DBCredentialStore())).build()
.setAccessToken(accessToken).setRefreshToken(refreshToken)
.setExpirationTimeMilliseconds(expirationTimeMilliseconds);
在无效的情况下,Listener会自动去用refresh token请求。
json格式经常需要用到,google提供了一个处理json的项目:GSON,能很方便的处理转换java对象和JSON表达。他不需要使用annotation,也不需要对象的源代码就能使用。
以字符串为例介绍:
1 。构造json 字符串
例如要传送json格式的字符串
String appID = req.getParameter("appID");
String userID = req.getParameter("userID");
Map map = new HashMap();
map.put("appID", appID);
map.put("userID", userID);
Gson gson = new Gson();
String state = gson.toJson(map);
2.解析json字符串
JsonParser jsonparer = new JsonParser();//初始化解析json格式的对象
String state = req.getParameter("state");
String appID = jsonparer.parse(state).getAsJsonObject().get("appID").getAsString();
String userID = jsonparer.parse(state).getAsJsonObject().get("userID").getAsString();
通用协调时(UTC, Universal Time Coordinated),格林尼治平均时(GMT, Greenwich Mean Time) 由于历史原因,这两个时间是一样的。
北京时区是东八区,领先UTC八个小时,在电子邮件信头的Date域记为+0800。
转换中,最重要的公式就是:
UTC + 时区差 = 本地时间
public static Calendar convertToGmt(Calendar cal) {
Date date = cal.getTime();
TimeZone tz = cal.getTimeZone();
System.out.println("input calendar has date [" + date + "]");
// Returns the number of milliseconds since January 1, 1970, 00:00:00 GMT
long msFromEpochGmt = date.getTime();
// gives you the current offset in ms from GMT at the current date
int offsetFromUTC = tz.getOffset(msFromEpochGmt);
System.out.println("offset is " + offsetFromUTC);
// create a new calendar in GMT timezone, set to this date and add the offset
Calendar gmtCal = Calendar.getInstance(TimeZone.getTimeZone("GMT"));
Calendar utcCal = Calendar.getInstance(TimeZone.getTimeZone("UTC"));
gmtCal.setTime(date);
//根据东西时区,选择offsetFromUTC为正或负数
gmtCal.add(Calendar.MILLISECOND, offsetFromUTC);
utcCal.setTime(date);
utcCal.add(Calendar.MILLISECOND, offsetFromUTC);
System.out.println("Created GMT cal with date [" + gmtCal.getTime()
+ "==" + utcCal.getTime() + "]");
return gmtCal;
}
Andriod 到3.2版本为止,webview方式下使用<input type="file" />点击后都没有反应。实际上顶层是有隐含的接口没实现的,可以自己重写这个方法来实现。以phonegap为例:
public class App extends DroidGap {
private ValueCallback<Uri> mUploadMessage;
private final static int FILECHOOSER_RESULTCODE = 1;
/** Called when the activity is first created. */
@Override
public void onCreate(Bundle savedInstanceState) {
super.onCreate(savedInstanceState);
super.init();
// WebView wv = new WebView(this);
// wv.setWebViewClient(new WebViewClient());
this.appView.setWebChromeClient(new CordovaChromeClient(App.this) {
// For Android 3.0+
public void openFileChooser(ValueCallback<Uri> uploadMsg, String acceptType) {
mUploadMessage = uploadMsg;
Intent i = new Intent(Intent.ACTION_GET_CONTENT);
i.addCategory(Intent.CATEGORY_OPENABLE);
i.setType("image/*");
App.this.startActivityForResult(Intent.createChooser(i, "File Chooser"), FILECHOOSER_RESULTCODE);
}
// The undocumented magic method override
// Eclipse will swear at you if you try to put @Override here
public void openFileChooser(ValueCallback<Uri> uploadMsg) {
mUploadMessage = uploadMsg;
Intent i = new Intent(Intent.ACTION_GET_CONTENT);
i.addCategory(Intent.CATEGORY_OPENABLE);
i.setType("image/*");
App.this.startActivityForResult(Intent.createChooser(i, "File Chooser"), App.FILECHOOSER_RESULTCODE);
}
});
// setContentView(wv);
super.loadUrl("file:///android_asset/www/login.html");
}
@Override
protected void onActivityResult(int requestCode, int resultCode, Intent intent) {
if (requestCode == FILECHOOSER_RESULTCODE) {
if (null == mUploadMessage)
return;
Uri result = intent == null || resultCode != RESULT_OK ? null : intent.getData();
mUploadMessage.onReceiveValue(result);
mUploadMessage = null;
}
}
}
如果直接的webview方式,extends WebChromeClient即可。
参考:http://stackoverflow.com/questions/5907369/file-upload-in-webview
weather.jsp:
<%@ page language="java" contentType="text/html; charset=UTF-8" pageEncoding="UTF-8"%>
<%@ page import="java.io.*,java.net.*"%>
<%
StringBuffer sbf = new StringBuffer();
//Access the page
try {
//如果网络设置了代理
System.setProperty("http.proxyHost", "xxx");
System.setProperty("http.proxyPort", "80");
URL url = new URL("http://www.google.com/ig/api?weather=london");
URLConnection urlConn = url.openConnection();
BufferedReader in = new BufferedReader(new InputStreamReader(urlConn.getInputStream()));
String inputLine;
while ((inputLine = in.readLine()) != null)
sbf.append(inputLine);
in.close();
System.out.println("last="+sbf.toString());
} catch (MalformedURLException e) {
System.out.println("MalformedURLException"+e);
} catch (IOException e) {
System.out.println("IOException"+e);
}
%><%=sbf.toString()%>
前台js部分:
var childData = function(selector, arg)
{
return selector.find(arg).attr('data');
}
$.ajax({
type : "GET",
data : "where=" ,
url : "weather.jsp",
success : function(data) {
console.debug('data='+data);
forecast = $(data).find('forecast_information');
cCondition = $(data).find('current_conditions');
city = childData(forecast, 'city');
if (city != undefined) {
date = childData(forecast, 'forecast_date');
condition = childData(cCondition, 'condition');
tempC = childData(cCondition, 'temp_c');
humidity = childData(cCondition, 'humidity');
icon = childData(cCondition, 'icon');
$('#city').text(city);
$('#date').text(date);
$('#condition').text(condition);
$('#tempC').html(tempC + '° C');
$('#humidity').text(humidity);
$('#icon').attr({
'src' : 'http://www.google.com' + icon
});
$('#data').stop().show('fast');
} else {
$('#error').stop().show('fast');
}
}
});
1. Code first approach:可能不能完全发挥框架和web services的能量,但能完成目标。减少了学习曲线,不用非常透彻了解web services概念,只要对某个框架有一定了解就能完成任务。
2.Contract first approach:根据服务先写WSDL文件,写好之后使用框架的工具把WSDL转换为依赖框架的代码。
一 介绍
当客户端调用你的web service的时候,他会发送一个消息过来(可能是soap 消息),如:
<foo:concatRequest>
<s1>abc</s1>
<s2>123</s2>
</foo:concatRequest>
这时候如果有一个转换器把这个soap消息转换成java对象,然后调用你提供的java对象(方法)的话将会是非常方便的。几个最流行的库就是充当了这种转换器功能,比如CXF, Axis2 , Metro (jdk6自带的有)。
手动创建WSDL文件比较容易出错,可以使用eclipse进行可视化编辑。
二 生成服务代码
像CXF这样的 web service库可以创建转换器把进来的SOAP 消息转换为Java对象,然后作为参数传给方法。生成这些代码,只需创建一个main:
1 CXF方式:
public static void main(String[] args) {
    WSDLToJava.main(new String[] {
    "-server",
    "-d", "src/main/java",
    "src/main/resources/SimpleService.wsdl" });
    System.out.println("Done!");
}
运行后会生成service endpoint interface(SEI),我们再写一个类(比如SimpleServiceImpl)来实现这个接口,写入自己的业务。还会生成传入消息对应的java对象。同时生成一个服务器类:
public class SimpleService_P1_Server {
    protected SimpleService_P1_Server() throws Exception {
        System.out.println("Starting Server");
        Object implementor = new SimpleServiceImpl();
        String address = "http://localhost:8080/ss/p1";
        Endpoint.publish(address, implementor);
    }
    public static void main(String args[]) throws Exception {
        new SimpleService_P1_Server();
        System.out.println("Server ready...");
        Thread.sleep(5 * 60 * 1000);
        System.out.println("Server exiting");
        System.exit(0);
    }
}
运行这个类你的web service就可以服务了。
2 Axis2 方式
用类似的写main方法,或者配置eclipse的axis2插件可生成:在WSDL文件上,右键->web service->generate java bean skeleton
界面的上半部分针对服务端,可以根据需要调整生成的级别,下半部分是生成客户端。具体的级别可参考eclipse的帮助文档。一路下一步,最后根据命名空间生成包路径的文件,里面有XXSkeletonInterface.java 文件(如果生成的时候选择了生成接口的话),还有一个XXSkeleton实现了这个接口,也是我们需要修改这部分代码完成我们业务的地方。实际上有一个XXMessageReceiverInOut.java的类接收请求的消息,并调用XXSkeletonInterface。使用eclipse的axis2插件的时候,会自动在web-inf文件夹下生成service\xx(你的wsdl服务名),这下面还要一个meta-inf文件夹装有wsd文件和一个services.xml配置文件。services.xml文件可配置包括XXMessageReceiverInOut类在内的选项。
二 生成客户端代码
为了调用这些web service,同样可以用CXF这些库来生成在客户端运行的转换器(称为service stub)。当调用stub里的方法的时候,他会把你的数据/对象 转换为正确的XML格式,然后发送给真正的web service。当他收到响应的时候,又会把XML转回Java。
1 CXF 方式
和生成服务器端类似,使用方法
WSDLToJava.main(new String[] {
"-client",
"-d", "src/main/java",
"src/main/resources/SimpleService.wsdl" });
运行后会生成客户端代码:
public final class SimpleService_P1_Client {
    private static final QName SERVICE_NAME = new QName("http://ttdev.com/ss",
        "SimpleService");
    private SimpleService_P1_Client() {}

    public static void main(String args[]) throws Exception {
        URL wsdlURL = SimpleService_Service.WSDL_LOCATION;
        if (args.length > 0) {
            File wsdlFile = new File(args[0]);
            try {
                if (wsdlFile.exists()) {
                wsdlURL = wsdlFile.toURI().toURL();
            } else {
                wsdlURL = new URL(args[0]);
            }
            } catch (MalformedURLException e) {
                e.printStackTrace();
            }
        }
        SimpleService_Service ss =
        new SimpleService_Service(wsdlURL, SERVICE_NAME);
        SimpleService port = ss.getP1();
        {
            System.out.println("Invoking concat...");
            com.ttdev.ss.ConcatRequest _concat_parameters = null;
            java.lang.String _concat__return = port.concat(_concat_parameters);
            System.out.println("concat.result=" + _concat__return);
        }
        System.exit(0);
    }
}
SimpleService_Service是创建的service stub,他模拟了客户端的服务。我们需要修改这个类中的_concat_parameters部分,加入参数:
com.ttdev.ss.ConcatRequest _concat_parameters = new ConcatRequest();
_concat_parameters.setS1("abc");
_concat_parameters.setS2("123");
现在就可以运行客户端代码了。SEI中有一些注解,可以修改,不细说。
2 Axis2 方式
和生成服务端类似,利用eclipse插件直接生成,包路径类似,有一个XXStub类,这个类里面有包括请求和应答消息在内的内部类。使用的时候,先对请求消息参数类按业务需求赋值,最后调用Stub的请求方法。可以使用Stub的构造函数指定目标endpoint。
有两种SOAP message风格,document 和RPC,他们定义了SOAP message body的格式。使用document风格时(包括wrapped和unwrapped),在wsdl中有一个非空的types部分,这个部分用XML Schema language定义了web service要用到的类型。wsgen工具从SIB(有SEI就足够了)中生成与XSD对应的java类。用java代码生成WSDL文件的时候需要一些java类,wsgen工具可以生成这些Java类,生成的这些java类被称为wsgen artifacts,底层的JWS类库会用到这些类,特别是JAX-B系列的包,会用来转换(marshal)java类实例(that is, Java in-memory objects)为XML类型的XML实例(满足XML Schema document的XML文档实例),
The inverse operation is used to convert (unmarshal) an XML document instance to an in-memory
object, an object of a Java type or a comparable type in some other language。因此wsgen工具生成的artifacts,支持了Java为基础的web service的互操作性。JAX-B类库提供了Java和XSD类型转换的底层支持。
For the most part, the wsgen utility can be used without our bothering to inspect the artifacts that it produces. For the most part, JAX-B remains unseen infrastructure.
wsgen artifacts实际上是wsdl message的数据类型,他们和XML Schema type绑定,每个message的XML Schema types从这些java类型得来的。注:在当前的jdk1.6.24中,已经融入wsgen自动生成的过程,不需手动调用。
wsgen工具可用来生成wsdl文件,如:% wsgen -cp "." -wsdl ch01.ts.TimeServerImpl 。这为TimeServer服务生成了wsdl。用wsgen生成的wsdl和通过访问发布的服务生成的wsdl 有个很大的区别:wsgen生成的没有endpoint,因为这个URL是在发布服务的时候决定的。其他地方两个wsdl是相同的。
wsimport(以前叫wsdl2java和 java2wsdl更形象)工具可使用WSDL生成用来帮助写客户端的artifacts .
1 先契约再编码方式
一个例子:得到一个tempConvert.wsdl文件,使用命令 wsimport -keep -p ch02.tc tempConvert.wsdl ,命令根据wsdl的portType生成一个SEI类,把SEI的interface换为class,再把方法改为实现就可变为SIB。把该SIB发布,再使用命令wsimport -keep -p clientTC http://localhost:5599/tc?wsdl,来生成客户端辅助类
2 编码优先
服务被发布之后,会自动生成WSDL供客户端使用。然而,使用annotations可以控制WSDL或WSDL-generated artifacts的生成。
来自
http://stackoverflow.com/questions/1099300/whats-the-difference-between-getpath-getabsolutepath-and-getcanonicalpath
C:\temp\file.txt" - this is a path, an absolute path, a canonical path
.\file.txt This is a path, It's not an absolute path nor canonical path.
C:\temp\myapp\bin\..\\..\file.txt This is a path, and an absolute path, it's not a canonical path
Canonical path is always an absolute path.
Converting from a path to a canonical path makes it absolute (通常会处理改变当前目录,所以像. ./file.txt 变为c:/temp/file.txt). The canonical path of a file just "purifies" the path, 去除和解析类似“ ..\” and resolving symlinks(on unixes)
In short:
- getPath() gets the path string that the File object was constructed with, and it may be relative current directory.
- getAbsolutePath() gets the path string after resolving it against the current directory if it's relative, resulting in a fully qualified path.
- getCanonicalPath() gets the path string after resolving any relative path against current directory, and removes any relative pathing (. and ..), and any file system links to return a path which the file system considers the canonical means to reference the file system object to which it points.
Also, each of this has a File equivalent which returns the corresponding File object.
The best way I have found to get a feel for things like this is to try them out:
import java.io.File;
public class PathTesting {
        public static void main(String [] args) {
                File f = new File("test/.././file.txt");
                System.out.println(f.getPath());
                System.out.println(f.getAbsolutePath());
                try {
                        System.out.println(f.getCanonicalPath());
                }
                catch(Exception e) {}
        }
}
Your output will be something like:
test\..\.\file.txt
C:\projects\sandbox\trunk\test\..\.\file.txt
C:\projects\sandbox\trunk\file.txt
So, getPath() gives you the path based on the File object, which may or may not be relative; getAbsolutePath() gives you an absolute path to the file; and getCanonicalPath() gives you the unique absolute path to the file. Notice that there are a huge number of absolute paths that point to the same file, but only one canonical path.
When to use each? Depends on what you're trying to accomplish, but if you were trying to see if two
Files are pointing at the same file on disk, you could compare their canonical paths.
DTDs
Introduced as part of the XML 1.0 specification, DTDs are the oldest constraint model around in the XML world. They're simply to use, but this simplicity comes at a price: DTDs are inflexible, and offer you little for data type validation as well.
XML Schema (XSD)
XML Schema is the W3C's anointed successor to DTDs. XML Schemas are literally orders of magnitude more flexible than DTDs, and offer an almost dizzying array of support for various data types. However, just as DTDs were simple and limited, XML Schemas are flexible, complex, and (some would argue) bloated. It takes a lot of work to write a good schema, even for 50- or 100-line XML documents. For this reason, there's been a lot of dissatisfaction with XML Schema, even though they are widely being used.
[prefix]:[element name]
元素:
root元素必须包含所有文档中的元素,只能有一个root元素。元素名只能以下划线或字母开头,不能有空格,区分大小写。开元素必须有对应闭元素(也有类似html的简写,如<img src="/images/xml.gif" />)。文档由DTD或schema来限制它是否合格。
属性:
什么时候用属性?基本原则:多个值的数据用元素,单值的数据用元素。如果数据有很多值或者比较长,数据最可能属于元素。他主要被当作文本,容<rss:author>Doug Hally</rss:author> <journal:author>Neil Gaiman</journal:author>易搜索,好用。比如一本书的章节描述。然而如果数据主要作为单值处理的话,最好作为属性。如果搞不清楚,可以安全的使用元素。
命名空间Namespaces:
xml的命名空间是一种用一个特定的URI来关联XML文档里的一个或多个元素的方法。意味着元素是由名字和命名空间一起来识别的。许多复杂的XML文件里,同一个名字会有多个用途。比如,一个RSS feed有一个作者,这个作者同时是每个日记的。虽然这些数据都用author元素来表示,但他们不应该被当作同一个类型的数据。命名空间很好的解决了这个问题,命名空间说明书要求一个前缀和唯一的URI联合起来区分不同命名空间里的元素。如http://www.neilgaiman.com/entries作为URI,联合前缀journal用来表示日志相关的元素。
<rdf:RDF xmlns:rss="http://www.w3.org/1999/02/22-rdf-syntax-ns#" xmlns:journal="http://www.neilgaiman.com/entries">,然后就可使用了:
<rss:author>Doug Hally</rss:author> <journal:author>Neil Gaiman</journal:author>实际上在使用命名空间前缀的时候再定义也可以的:
<rss:author xmlns:rss="http://www.w3.org/1999/02/22-rdf-syntax-ns#">Doug Hally</rss:author>
如果名字没有命名空间,不代表在默认命名空间中,而是xml处理器以在任何命名空间以外方式解释他。要声明默认命名空间的话就不用后面冒号部分,如<Insured xmlns="http://www.IBM.com/software">
使用的一些术语:
-
The name of a namespace (such as http://www.ibm.com/software) is the namespace URI.
-
The element or attribute name can include a prefix and a colon (as in prod:Quantity). A name in that form is called a qualified name, or QName, and the identifier that follows the colon is called a local name. If a prefix is not in use, neither is the colon, and the QName and local name are identical.
-
An XML identifier (such as a local name) that has no colon is sometimes called an NCName. (The NC comes from the phrase no colon.)
Entity references:
用来处理转义字符,语法是& [entity name] ;XML解析器碰到这种entity reference,就会用对应的值替换掉他。如<(<),>(>),&(&),"("),'(')。注意entity reference是用户可定义的。比如多处用到版权提示,自己定义后以后更改就方便了:<ora:copyright>&OReillyCopyright;</ora:copyright>。除了用来表示数据中的复杂或特殊字符外,entity reference还会有更多用途。
不解析的数据:
当传输大量数据给应用且不用xml解析的时候,CDATA就有用了。当大量的字符需要用entity reference转义的时候,或空格必须保留的时候,使用CDATA。<![CDATA[….]]>
转自
http://www.bennadel.com/blog/1504-Ask-Ben-Parsing-CSV-Strings-With-Javascript-Exec-Regular-Expression-Command.htm,把csv文件按分隔符切割后放在数组中。
 // This will parse a delimited string into an array of arrays.
// The default delimiter is the comma, but this
// can be overriden in the second argument.

 CSVToArray:function(strData, strDelimiter)
 {
{

// Check to see if the delimiter is defined. If not,
// then default to comma.
strDelimiter = (strDelimiter || ",");
// Create a regular expression to parse the CSV values.
var objPattern = new RegExp(
(
// Delimiters.
"(\\" + strDelimiter + "|\\r?\\n|\\r|^)" +
// Quoted fields.
"(?:\"([^\"]*(?:\"\"[^\"]*)*)\"|" +
// Standard fields.
"([^\"\\" + strDelimiter + "\\r\\n]*))"
),
"gi"
);
// Create an array to hold our data. Give the array
// a default empty first row.
var arrData = [[]];
// Create an array to hold our individual pattern
// matching groups.
var arrMatches = null;
// Keep looping over the regular expression matches
// until we can no longer find a match.
while (arrMatches = objPattern.exec( strData )){
// Get the delimiter that was found.
var strMatchedDelimiter = arrMatches[ 1 ];
// Check to see if the given delimiter has a length
// (is not the start of string) and if it matches
// field delimiter. If id does not, then we know
// that this delimiter is a row delimiter.
if (
strMatchedDelimiter.length &&
(strMatchedDelimiter != strDelimiter)
){
// Since we have reached a new row of data,
// add an empty row to our data array.
arrData.push( [] );
}
// Now that we have our delimiter out of the way,
// let's check to see which kind of value we
// captured (quoted or unquoted).
if (arrMatches[ 2 ]){
// We found a quoted value. When we capture
// this value, unescape any double quotes.
var strMatchedValue = arrMatches[ 2 ].replace(
new RegExp( "\"\"", "g" ),
"\""
);
} else {
// We found a non-quoted value.
var strMatchedValue = arrMatches[ 3 ];
 }
}
// Now that we have our value string, let's add
// it to the data array.
arrData[ arrData.length - 1 ].push( strMatchedValue );
}
// Return the parsed data.
return( arrData );
}
31
while (i != 0)
i >>>= 1; //无符号右移,不管正负左边都是补0
为了表达式合法,这里的i必须是整型(byte, char, short, int, or long)。谜题的关键在于>>>= 是一个复合赋值操作符,不幸的是复合赋值操作符会默默的做narrowing primitive conversions,即从一个数据类型转换为一个更小的数据类型。Narrowing primitive conversions can lose information about the magnitude or precision of numeric values。为了使问题更具体,假设这样定义:
short i = -1; 因为初始值i ((short)0xffff) 非零,循环执行。第一步位移会把i提升为int。short, byte, or char类型的操作数都会做这样的操作。这是widening primitive conversion,没有信息丢失。这种提升有符号扩展,因此结果是int值0xffffffff。无符号右移一位产生int值0x7fffffff。为了把int值存回short变量,Java执行了可怕的narrowing primitive conversion,即简单去掉高十六位。这样又变回了(short)0xffff。如果定义类似short or byte型的负数,都会得到类似结果。你如果定义的是char话,则不会无限循环,因为char值非负,位移之前的宽扩展不会做符号扩展。
总结:不要在short, byte, or char变量上使用复合赋值操作符。这种表达式进行混合类型计算,非常容易混淆。更糟糕的是隐含的窄映射会丢掉信息。
32
while (i <= j && j <= i && i != j) {}
i <= j and j <= i, surely i must equal j?对于实数来说是这样的。他非常重要,有个名称:The ≤ relation on the real numbers is said to be antisymmetric。Java's <= operator used to be antisymmetric before release 5.0, but no longer.Java 5之前数据比较符号(<, <=, >, and >=) 需要两边的操作数必须为基础类型(byte, char, short, int, long, float, or double).在Java 5变为两边操作数为凡是可转变为基础类型的类型。java 5引入autoboxing and auto-unboxing 。The boxed numeric types are Byte, Character, Short, Integer, Long, Float, and Double。具体点,让上面进入无限循环:
Integer i = new Integer(0);
Integer j = new Integer(0);
(i <= j and j <= i) perform unboxing conversions on i and j and compare the resulting int values numerically。i和j表示0,所以表达式为true。i != j比较的是对象引用,也为true。很奇怪规范没有把等号改为比较值。原因很简单:兼容性。当一种语言广泛应用的时候,不能破坏已存在的规范来改变程序的行为。System.out.println(new Integer(0) == new Integer(0));总是输出false,所以必须保留。当一个是boxed numeric 类型,另一个是基本类型的时候可以值比较。因为java 5之前这是非法的,具体点:
System.out.println(new Integer(0) == 0); //之前的版本非法,Java 5输出True
总结:当两边的操作数是boxed numeric类型的时候,数字比较符和等于符号是根本不同的:数字比较符是值比较,等号比较的是对象引用。
33
while (i != 0 && i == -i) {}
有负号表示i一定是数字,NaN不行,因为他不等于任何数。事实上,没有实数可以出现这种情况。但Java的数字类型并没有完美表达实数。浮点数由一个符号位,一个有效数字(尾数),一个指数构成。浮点数只有0才会和自己的负数相等,所以i肯定是整数。有符号整数用的是二进制补码计算:取反加一。补码的一大优势是用一个唯一的数来表示0。然而有一个对应的缺点:本来可表达偶数个值,现在用一个表达了0,剩下奇数个来表示正负数,意味着正数和负数的数量不一样。比如int值,他的Integer.MIN_VALUE(-231)。十六进制表达0x8000000。通过补码计算可知他的负数仍然不变。对他取负数是溢出了的,不过Java在整数计算中忽略了溢出。
总结:Java使用二进制补码,是不对称的。有符号整数(int, long, byte, and short) 负数值比整数值多一个。
34
final int START = 2000000000;
int count = 0;
for (float f = START; f < START + 50; f++)
count++;
System.out.println(count);
注意循环变量是float。回忆谜题28 ,明显f++没有任何作用。f的初始化值接近Integer.MAX_VALUE,因此需要31位来准确表达,但是float类型只提供了24位精度。增加这样大的一个float值不会改变值。看起来会死循环?运行程序会发现,输出0。循环中f和(float)(START + 50)做比较。但int和float比较的时候,自动把int先提示为float。不幸的是三个会引起精度丢失的宽基本类型转换的其中之一(另外两个是long到float,long到double)。f的初始值巨大,加50再转换为float和直接把f转换为float是一样的效果,即(float)2000000000 == 2000000050,所以f < START + 50 失败。只要把float改为int即可修正。
没有计算器,你怎么知道 2,000,000,050 和float表示2,000,000,000一样?……
The moral of this puzzle is simple: Do not use floating-point loop indices, because it can lead to unpredictable behavior. If you need a floating-point value in the body of a loop, take the int or long loop index and convert it to a float or double. You may lose precision when converting an int or long to a float or a long to a double, but at least it will not affect the loop itself. When you use floating-point, use double rather than float unless you are certain that float provides enough precision and you have a compelling performance need to use float. The times when it's appropriate to use float rather than double are few and far between。
35
下面程序模拟一个简单的时钟
int minutes = 0;
for (int ms = 0; ms < 60*60*1000; ms++)
if (ms % 60*1000 == 0)
minutes++;
System.out.println(minutes);
结果是60000,问题在于布尔表达式ms % 60*1000 == 0,最简单的修改方法是:if (ms % (60 * 1000) == 0)
更好的方法是用合适命名的常量代替魔力数字:
private static final int MS_PER_HOUR = 60 * 60 * 1000;
private static final int MS_PER_MINUTE = 60 * 1000;
public static void main(String[] args) {
int minutes = 0;
for (int ms = 0; ms < MS_PER_HOUR; ms++)
if (ms % MS_PER_MINUTE == 0)
minutes++;
System.out.println(minutes);
}
绝不要用空格来分组;使用括号来决定优先级
24
for (byte b = Byte.MIN_VALUE; b < Byte.MAX_VALUE; b++) {
if (b == 0x90)
System.out.print("Joy!");
}
Ox90 超过了byte的取值范围-128到127。byte和int比较是一种混合类型比较。考虑个表达式((byte)0x90 == 0x90)得到的是false。byte和int做比较的时候,Java先对byte进行了widening primitive conversion 再比较两个int值。因为byte是有符号类型,转变做了符号扩展,把负的byte值转换为相应的int值。这个例子中(byte)0x90被转变为-112,当然不等于int值 0x90或者说+144。混合比较总让人迷惑,因为总是强迫系统去提升一个操作数来和另一种类型匹配。有几种方式可避免混合比较。可以把int映射为byte,之后比较两个byte值:
if (b == (byte)0x90)
System.out.println("Joy!");
另外,可用mask抑制符号扩展,把byte转换为int,之后比较两个int值:
if ((b & 0xff) == 0x90)
System.out.println("Joy!");
但最好的方法是把常量值移出循环放到常量声明中。
private static final byte TARGET = 0x90; // Broken!
public static void main(String[] args) {
for (byte b = Byte.MIN_VALUE; b < Byte.MAX_VALUE; b++)
if (b == TARGET)
System.out.print("Joy!");
}
不幸的是,上面编译通不过:0x90对于byte类型来说不是一个有效值。这样修改即可:
private static final byte TARGET = (byte)0x90;
To summarize: Avoid mixed-type comparisons, because they are inherently confusing (Puzzle 5). To help achieve this goal, use declared constants in place of "magic numbers." You already knew that this was a good idea; it documents the meanings of constants, centralizes their definitions, and eliminates duplicate definitions.现在你知道他还可以强制你为每一个常量定义适用的类型,避免一种混合类型比较的来源。
25
int j = 0;
for (int i = 0; i < 100; i++)
j = j++;
System.out.println(j); //打印出的是0
问题出在 j = j++; 等同于下列操作:
int tmp = j; j = j + 1; j = tmp;
这次的教训和难题7一样:在一个表达式中不要给同一个变量赋值超过一次。
26
public static final int END = Integer.MAX_VALUE;
public static final int START = END - 100;
public static void main(String[] args) {
int count = 0;
for (int i = START; i <= END; i++)
count++;
System.out.println(count);
}
看起来像100,再仔细看循环是小于等于,应该是101?结果是程序没有输出任何值,陷入一个死循环。问题出在Integer.MAX_VALUE,当继续增加的时候,他悄悄变为Integer.MIN_VALUE。如果你需要循环int值边界,最好用long变量做索引:
for (long i = START; i <= END; i++) //输出101
教训是:ints are not integers。无论何时用基本类型,注意边界值。上溢或下溢会出现什么情况?一般来说最好用大一点的类型(基本类型是byte, char, short, int, and long)。也可以不用long:
int i = START;
do {
count++;
} while (i++ != END);
考虑到清晰和简单,总是用long索引,除了一种特殊情况:如果要遍历所有int值,这样用int索引的话会快两倍。
一个循环四十亿int值,调用方法的常规用法:
// Apply the function f to all four billion int values
int i = Integer.MIN_VALUE;
do {
f(i);
} while (i++ != Integer.MAX_VALUE);
27 位移
记住java是使用二进制补码计算,在任何有符号基本类型中(byte, short, int, or long)都是用所有位置1来表示-1。
int i = 0;
while (-1 << i != 0) //左位移
i++;
System.out.println(i);
int型的-1用0xffffffff 表示。不断左移,右边由0补位。移位32次,变为全0,跳出循环打印32?实际上程序会死循环。问题出在-1<<32不等于0而是等于-1,因为位移符号只用右边操作数的低五位作为移动距离,如果左操作数是long的话用六位。三个位移操作符:<<,>>,>>>都是这样。移动距离总是0到31,左边操作数是long的话0到63。位移距离用32取模,左边是long则用64取模。给int值位移32位或给long值位移64位只会返回本身。所以不可能用位移完全移除一个数据。幸运的是,有一个简单的办法解决这个问题。保存上一次的位移结果,每一次迭代多移动一位。
int distance = 0;
for (int val = -1; val != 0; val <<= 1)
distance++;
System.out.println(distance);
修改后的程序说明了一个原则:位移距离如果可能的话,用常量。
另外一个问题,许多程序员认为右移一个负的移动距离,就和左移一样,反之亦然。事实上不是这样,左移是左移,右移就是右移。负数距离只留下低五位(long留六位),其余的置0就变为了正数距离。比如,左移一个int值-1的距离,实际上是左移31位。
28 无穷的表示
for (int i = start; i <= start + 1; i++) {
}
看起来循环两次就会结束,如果这样定义呢:
int start = Integer.MAX_VALUE - 1;//死循环
while (i == i + 1) {
}
这个不可能死循环?如果i是无穷呢?Java采用IEEE 754浮点数算术,用double或float来表示无穷。所以可以用任何浮点数计算表达式得出无穷来初始化i。比如:double i = 1.0 / 0.0;
更好的是可以利用标准库提供的常量:double i = Double.POSITIVE_INFINITY;
事实上,根本用不着用无穷初始化i来引起死循环。只要足够大的浮点数就够了:double i = 1.0e40;
这是因为浮点数越大,他的值和下一个数的值距离也就越大。distribution of floating-point values is a consequence of their representation with a fixed number of significant bits. 给足够大的浮点数加一不会改变值,因为他不能填充这个数和下一个数之间的距离。浮点数操作返回最接近准确数学结果的浮点值。一旦两个相邻浮点值之间的距离大于2,加1就不会有效果。float类型来说,超过225(或33,554,432)再加1就无效;对double来说超过254(接近1.8 x 10¹⁶)再加1就无效。
相邻浮点数之间的距离称为ulp(unit in the last place的缩写)。在Java 5里 Math.ulp方法被引入来计算float或double值的ulp。
总结:不可能用float或double来表示无穷。另外,在一个大的浮点数上加一个小的浮点数,值不会改变。有点不合常理,实数并不是这样。记住二进制浮点数计算只是近似于实数计算。
29 NaN
while (i != i) { }
IEEE 754 浮点数计算保留了一个特殊值来来表示不是数字的数量。NaN是浮点计算不能很好定义的数,比如0.0 / 0.0。规范定义NaN不等于任何数包括自己。因此double i = 0.0 / 0.0; 可让开始的等式不成立。也有标准库定义的常量:double i = Double.NaN; 如果一个或多个操作数为NaN,那么浮点数计算就会等于NaN。
总结:float和doule存在特殊的值NaN,小心处理。
30
while (i != i + 0) { } 这一次不能使用float或者double。
+操作符除了数字,就只能处理String。+操作符会被重载:对于String类型,他做的是连接操作。如果操作数有非String类型,会先做转换变为String之后再做连接。i一般用作数字,要是对String型变量这么命名容易引起误解。
总结:操作符重载非常容易误导人。好的变量名,方法名,类名和好的注释对于程序的可读性一样重要。
19 单行注释
public static void main(String[] args) {
System.out.println(classify('n') + classify('+') + classify('2'));
}
static String classify(char ch) {
if ("0123456789".indexOf(ch) >= 0)
return "NUMERAL ";
if ("abcdefghijklmnopqrstuvwxyz".indexOf(ch) >= 0)
return "LETTER ";
/* (Operators not supported yet)
if ("+-
*/&|!=".indexOf(ch) >= 0)
return "OPERATOR ";
*/
return "UNKNOWN ";
}
编译出错,块注释不能嵌套,在注释内的文本都不会被特殊对待。
// Code commented out with an if statement - doesn't always work!
if (false) {
/* Add the numbers from 1 to n */
int sum = 0;
for (int i = 1; i <= n; i++)
sum += i;
}
这是语言规范推荐的一种条件编译的技术,但不是非常适合注释代码。除非包含的语句都是有效的表达式,否则这种条件编译不能用作注释。最好的注释代码方法是用单行注释。
20 反斜杠
Me.class.getName() 返回的是Me类的完整名,如
"com.javapuzzlers.Me"。
System.out.println( Me.class.getName().replaceAll(".", "/") + ".class");
应该得到
com/javapuzzlers/Me.class?不对。问题出在
String.replaceAll把正则表达式作为第一个参数,而不是字符。正则表达是“.”表示配对任何单独的字符,所以类名的每一个字符都被斜线替代。为了只匹配句号,必须用反斜线(\)转义。因为反斜线在字符串中有特殊意义——它是escape sequence的开始——反斜线自身也必须用一个反斜线转义。
正确:System.out.println( Me.class.getName().replaceAll(
"\\.", "/") + ".class");
为了解决这类问题,java 5提供了一个新的静态方法
java.util.regex.Pattern.quote。用一个字符串作为参数,增加任何需要的转义,返回一个和输入字符串完全匹配的正则表达式字符串:
System.out.println(Me.class.getName().replaceAll(
Pattern.quote("."), "/") + ".class");
这个程序的另外一问题就是依赖于平台。不是所有的文件系统都是用斜线来组织文件。为了在你运行的平台取得正确的文件名,你必须使用正确的平台分隔符来替换斜线。
21
System.out.println(MeToo.class.getName().
replaceAll("\\.", File.separator) + ".class");
java.io.File.separator 是一个公共的
String 属性,指定用来包含平台依赖的文件名分隔符。在UNIX上运行打印
com/javapuzzlers/MeToo.class。然而,在Windows上程序抛出异常:
StringIndexOutOfBoundsException: String index out of range: 1
结果是
String.replaceAll 的第二个参数不是普通字符串而是一个在
java.util.regex 规范中定义的
replacement string,反斜线转义了后面的字符。当在Windows上运行的时候,替换字符是一个单独的反斜线,无效。JAVA 5提供了两个新方法来解决这个问题,一个是java.util.regex.Matcher.quoteReplacement,它替换字符串为相应的替换字符串:
System.out.println(MeToo.class.getName().replaceAll(
"\\.", Matcher.quoteReplacement(File.separator))+".class");
第二个方法提供了更好的解决方法。String.replace(CharSequence, CharSequence)和String.replaceAll做同样的事情,但他把两个参数都作为字符串处理:System.out.println(MeToo.class.getName().replace(".", File.separator) + ".class");
如果用的是java早期版本就没有简单的方法产生替换字符串。完全不用正则表达式,使用String.replace(char, char)跟容易一些:
System.out.println(MeToo.class.getName().replace('.', File.separatorChar) + ".class");
教训:当用不熟悉的库方法的时候,小心点。有怀疑的话,查看Javadoc。当然正则表达式也很棘手:他编译时可能没问题运行时却更容易出错。
22
statement label
认真写注释,及时更新。去掉无用代码。如果有东西看起来奇怪不真实,很有可能是错误的。
23
private static Random rnd = new Random();
public static void main(String[] args) {
StringBuffer word = null;
switch(rnd.nextInt(2)) {
case 1: word = new StringBuffer('P');
case 2: word = new StringBuffer('G');
default: word = new StringBuffer('M');
}
word.append('a');
word.append('i');
word.append('n');
System.out.println(word);
}
在一次又一次的运行中,以相等的概率打印出Pain,Gain或 Main?答案它总是在打印ain。一共有三个bug导致这种情况。
一是 Random.nextInt(int) ,看规范可知这里返回的是0到int值之间的前闭后开区间的随机数。因此程序中永远不会返回2。这是一个相当常见的问题源,被熟知为“栅栏柱错误(fencepost error)”。这个名字来源于对下面这个问题最常见的但却是错误的答案,如果你要建造一个100英尺长的栅栏,其栅栏柱间隔为10英尺,那么你需要多少根栅栏柱呢?11根或9根都是正确答案,这取决于是否要在栅栏的两端树立栅栏柱,但是10根却是错误的。要当心栅栏柱错误,每当你在处理长度、范围或模数的时候,都要仔细确定其端点是否应该被包括在内,并且要确保你的代码的行为要与其相对应。
第二个bug是 case没有配套的break。
从5.0版本起,javac提供了-Xlint:fallthrough标志,当你忘记在一个case与下一个case之间添加break语句是,它可以生成警告信息。不要从一个非空的case向下进入了另一个case。这是一种拙劣的风格,因为它并不常用,因此会误导读者。十次中有九次它都会包含错误。如果Java不是模仿C建模的,那么它倒是有可能不需要break。对语言设计者的教训是:应该考虑提供一个结构化的switch语句。
最后一个,也是最微妙的一个bug是表达式new StringBuffer(‘M')可能没有做哪些你希望它做的事情。StringBuffer(char)构造器根本不存在。StringBuffer有一个无参数的构造器,一个接受一个String作为字符串缓冲区初始内容的构造器,以及一个接受一个int作为缓冲区初始容量的构造器。在本例中,编译器会选择接受int的构造器,通过拓宽原始类型转换把字符数值'M'转换为一个int数值77[JLS 5.1.2]。换句话说,new StringBuffer(‘M')返回的是一个具有初始容量77的空的字符串缓冲区。该程序余下的部分将字符a、i和n添加到了这个空字符串缓冲区中,并打印出该字符串缓冲区那总是ain的内容。 为了避免这类问题,不管在什么时候,都要尽可能使用熟悉的惯用法和API。如果你必须使用不熟悉的API,那么请仔细阅读其文档。在本例中,程序应该使用常用的接受一个String的StringBuffer构造器。
11 字符相加
System.out.print("H" + "a");System.out.print('H' + 'a'); //貌似输出
HaHa?
最后输出的是
Ha169。
'H' 和
'a' 都是
char,不是String,+操作符做的是加法操作而不是拼接字符串。编译器提升两个char值到int值,从16位零扩展到32位的int。一个是72另一个是97。从语义上说,char值和字符串的相似是非常迷惑的。java语言仅仅把char看做无符号的16位基本整数。库不这样认为,他里面有许多方法把char参数当作Unicode字符在处理。怎样连接字符?可以使用库方法,如:
StringBuffer sb = new StringBuffer();
sb.append('H');sb.append('a');
System.out.println(sb); //可行但丑陋
有很多方法避免这种繁琐,只要一个操作符是string就能强制+操作符做拼接操作。习惯用法是在前面加一个空字符串“”,如:
System.out.print("" + 'H' + 'a');//虽然有用,但还是有点不雅而且容易导致一点困惑
试试:System.out.println("2 + 2 = " + 2+2); 如果用的是java 5还可以使用printf:System.out.printf("%c%c", 'H', 'a');
总结:小心应对字符串拼接操作符。
“+”只有至少一个是String的时候才做字符串拼接;否则做加法。如果没有String型,有几个选择:加空字符串;用String.valueOf把第一个值显示转换为String;用String buffer;java 5的话用printf 。
12 字符数组
String letters = "ABC";
char[] numbers = { '1', '2', '3' };
System.out.println(letters + " easy as " + numbers); //返回
ABC easy as [C@16f0472
char 虽是基本整数类型,但char值常常表示字符而不是整数,很多库对他特殊对待。比如,把char传给
println 输出的是Unicode 字符而不是数字码。char数组获得同样对待:
char[] 的重载是println输出数组中的所有字符,char[]对
String.valueOf 和
StringBuffer.append 的重载也类似。但是字符拼接操作符不是像这些方法,他是对两边做字符串转换然后再拼接。对于对象引用包括数组,字符串转换是这样定义的:如果应用是null,转换为字符串
"null",否则调用被引用对象的
toString 无参数方法;如果
toString 方法返回的是null,还是用“null”字符串。非null的char数组调用toString做什么操作?数组从
Object 继承来的toString,定义,“返回字符串含有对象实例类名,字符
'@',对象的用无符号十六进制表示的hash码”。
Class.getName 的说明表示对
char[] 该类对象调用该方法返回
"[C"。两个方法修正,拼接之前可显示转换数组为String:
System.out.println(letters + " easy as " + String.valueOf(numbers));
还可以把the
System.out.println 分开成两个来利用
char[] 对println的重载:
System.out.print(letters + " easy as ");System.out.println(numbers);
注意这些修正只是在你正确重载
valueOf 和
println方法才起效。换句话说,他们严重依赖编译时数组引用的类型。 下面例子看起来用来第二个修正方法,但还是输出丑陋字符串。因为他调用了Object对println的重载而不是char[]的重载。
// Broken - invokes the wrong overloading of println!
class Abc {
public static void main(String[] args) {
String letters = "ABC";
Object numbers = new char[] { '1', '2', '3' };
System.out.print(letters + " easy as ");
System.out.println(numbers);
// Invokes println(Object)
}
}
总结:char数组不是字符串。
把char数组转换为字符串,调用 String.valueOf(char[])。一些库方法给char数组提供了像字符串的支持,典型的是给Object提供一个重载再给char[]提供一个重载;后一个才是理想的操作。
13 Interning
final String pig = "length: 10";
final String dog = "length: " + pig.length();
System.out.println("Animals are equal: " + pig == dog);
compile-time constants of type
String are
interned.换句话说,任何两个有相同字符的String类型的常量表达式是同一个对象引用表示的。所以如果用常量表达式初始化的话,pig和dog会指向同一个对象,但dog没用常量表达式。Java语言限制哪些操作可以出现在常量表达式中,方法调用是不允许的。因此,程序应该输出 Animals are equal: false,对吧?事实上不是,运行发现只输出false 。操作符的优先级体现出来,事实上是
System.out.println(("Animals are equal: " + pig) == dog);
有一种方法能避免这种困难:但使用字符拼接操作符的时候,总是给重要操作数加上括号:System.out.println("Animals are equal: " + (pig == dog));
辩证的说,这样还是有问题。Your code should rarely, if ever, depend on the interning of string constants。Interning 只是用来减少虚拟机内存的,不是用来当作程序员工具的。由于字符串intern 失败带来的bug非常难以检测。对比两个对象引用的时候,应该用equals方法而不是==操作符除非你是想比较对象identity而不是值。所以我们的例子应该这样:System.out.println("Animals are equal: " + pig.equals(dog));
14 转义符
下面程序使用
Unicode escapes:用他们的十六进制数字码表示Unicode 字符。
// \u0022 is the Unicode escape for double quote (")
System.out.println("a\u0022.length() + \u0022b".length());
Java provides no special treatment for Unicode escapes within string literals。编译器在把Unicode escapes程序解析为字符串之前,先变为了他们表示的字符。可以使用
escape sequences:即用\"表示双引号 ,例System.out.println("a\".length() + \"b".length());
还有很多escape sequences : single quote (\'), linefeed (\n), tab (\t), and backslash (\\). escape sequences 等程序先解析为符号之后才处理。ASCII是Unicode的子集。ASCII是最小的字符集,只有128个字符,Unicode有 65,000的字符。Unicode escape 能被用来把Unicode 字符插入只能使用ASCII字符的程序中。一个 Unicode escape意味着和他代表的字符完全相同的东西。但程序员用源文件的字符集不能插入一些字符的时候,可以使用 Unicode escape,主要是把非ASCII字符变为标志符,字符串,注释等。
总结:在字符串和字符文字中,用escape sequences不用Unicode escapes 。不要用Unicode escapes 表示ASCII字符。在字符串和字符文字中,用escape sequences;在外面的话直接把ASCII 字符插入源文件。
15
Unicode escapes must be well formed, even if they appear in comments. 下面这个例子编译出错
/**
* Generated by the IBM IDL-to-Java compiler, version 1.0
* from F:\TestRoot\apps\a1\units\include\PolicyHome.idl
* Wednesday, June 17, 1998 6:44:40 o'clock AM GMT+00:00
*/
工具在把Windows 文件名放入注释之前,必须把\去掉。
总之,\u不要出现在有效Unicode escape范围之外,即使注释也不行。特别是自动产生代码的时候。
16
line separator 用来表示分割文本行的字符,每个平台的line separator 不一样。Windows 上,CR character (carriage return) followed by the LF character (linefeed)。UNIX上只有LF字符(经常被较为newline character)。下面把这些字符传给println
// Note: \u000A is Unicode representation of linefeed (LF)
char c = 0x000A;
System.out.println(c);
结果编译错误!仍然是由于注释中Unicode escape,编译器再抛弃注释内容和空格之前就把Unicode escapes 转换为字符。\u000A 代表linefeed character,因此程序最后转换为
// Note:
is Unicode representation of linefeed (LF)
char c = 0x000A;
System.out.println(c);
最简单的修改方法是去掉 Unicode escape ,但更好的方法是用escape sequence 初始化c,而不是用十六进制整数,排除注释的需要
char c = '\n';
System.out.println(c);
这样改后程序还是有问题,有平台依赖。在某些平台,如UNIX,他将输出两行完整的分割符;另外一些平台,如Windows,则不会。虽然肉眼看起来一样,但如果存在一个文件或管道里供其他程序处理话 是很容易出问题的。 如果打算输出两行空白,应该调用println两次。Java 5,你可以使用printf带上格式"%n%n"来代替println,每一个出现的 %n是printf打印出平台相应的行分隔符。
道理:非必需尽量不用Unicode escapes
17
Unicode escapes are essential when you need to insert characters that can't be represented in any other way into your program. Avoid them in all other cases.Unicode escapes 减少程序的清晰性,增加bug的出现。对语言设计者来说,应该使Unicode escapes表示ASCII字符非法。
18 字符集
byte bytes[] = new byte[256];
for(int i = 0; i < 256; i++)
bytes[i] = (byte)i;
String str = new String(bytes);
for(int i = 0, n = str.length(); i < n; i++)
System.out.print((int)str.charAt(i) + " ");
在不同的机器上运行,结果完全不一样。原因是String(byte[])构造器。规范说“用平台默认的字符集给指定的byte数组解码创建一个新字符串。新字符串的长度是字符集的功能,因此可能和byte数组的长度不一样。当给定的字节在默认字符集中无效时,该构造器行为不确定”。什么是字符集?技术上说,他是“the combination of a coded character set and a character-encoding scheme”。换句话说,是一堆字符,表达字符的数字编码,以及一序列字符编码和字节互相转换的方法。转换方案在不同的字符集中差异巨大。一些字符和字节一一对应;大多数不这样。只有默认字符集是 ISO-8859-1(更多被称为Latin-1 )的时候上面的程序才会输出0到255的整数。J2SE运行环境的默认编码是由底层操作系统和区域决定的。在早期的JAVA版本读取系统属性 "file.encoding"来得到JRE默认编码,JAVA 5后以后的版本,可使用 java.nio.charset.Charset.defaultCharset()方法。幸运的是,你不是非得要面对默认字符集的变化多端。char序列和byte序列互相转换的时候,你可以并且大多数时候应当显式的指定字符集。一个以字符集名字和byte数组为参数的String构造器可完成此任务。用下面方法,上面程序就不会受默认字符集的影响了:String str = new String(bytes, "ISO-8859-1"); 该构造器抛出UnsupportedEncodingException,你必须捕获,当更好的方法是声明一个main方法来抛出他否则不能编译通过。事实上,上面的程序不会抛出异常。因为Charset 的规范指明任何JAVA平台的实现必须支持某些字符集,ISO-8859-1是其中之一。
教训:每次从byte序列转换为String,不管显示或隐式都在使用一种字符集。如果想程序不出意外,每次使用时显示指定一种字符集。
1 奇数判断
误:public static boolean isOdd(int i) { return i % 2 == 1; } //没有考虑到负奇数的情况
正:return i % 2 != 0; 更好的性能:return (i & 1) != 0;
总结:求余操作需要考虑符号!
2 浮点数计算
public static void main(String args[]) { System.out.println(2.00 - 1.10); } //天真以为得到0.90
如果熟悉
Double.toString 的文档,估计会觉得
double 会转为string,程序会打印出足够区分
double值的小数部分,小数点前或后面至少一位。这样说来应该是0.9,可惜运行程序发现是
0.8999999999999999。问题是数字1.1不能被double准确表示!只能用最接近的double值表示。遗憾的是结果不是最接近0.9的double值。更普遍的看这问题是:
不是所有的十进制数都能用二进制浮点数准确的表示 。如果用jdk5或以后版本,你可能会使用
printf来准确设置:
// Poor solution - still uses binary floating-point!
System.out.printf("%.2f%n", 2.00 - 1.10);
现在打印出来是正确的了,但治标不治本:它仍然使用的是
double运算(二进制浮点),浮点计算在大范围内提供近似计算,但不总是产生准确的结果。二进制浮点数特别不适合金融计算,因为他不可能表示0.1——或任何10的负幂——exactly as a finite-length binary fraction。
一种解决办法是使用基本类型,比如int long,然后扩大操作数倍数做计算。如果用这种流程,确保基本类型足够大来表示你所有你用到的数据,这个例子中,int足够了System.out.println((200 - 110) + " cents");
另一种办法使用
BigDecimal,他进行准确的十进制计算,他还能通过JDBC和SQL的DECIMAL类型合作。有一个箴言:总是使用BigDecimal(String)构造器,绝不使用BigDecimal(double).后面这个构造函数用参数的准确值创建一个实例:new BigDecimal(.1)返回一个BigDecimal表示0.1000000000000000055511151231257827021181583404541015625。正确使用会得到预期结果0.90: System.out.println(new BigDecimal("2.00"). subtract(new BigDecimal("1.10"))); 这个例子不是特别漂亮,java没有给BigDecimal提供语言学上的支持,BigDecimal也可能比使用基本类型(对大量使用十进制计算的程序比较有用)更慢,大多数情况没有这个需要。
总结:但需要准确答案的时候,避免使用
float and
double;金融计算,使用int, long, or
BigDecimal。对语言设计者来说,提供十进制计算的语言支持。一个方法是给操作符重载提供有限的支持,这样计算操作符就能和数字引用类型比如BigDecimal一起工作?。另一种方法就是像COBOL and PL/I一样,提供基本十进制类型。
3 长整型除法
被除数表示一天的微秒数,除数表示一天的毫秒数:
public static void main(String[] args) {
final long MICROS_PER_DAY = 24 * 60 * 60 * 1000 * 1000;
final long MILLIS_PER_DAY = 24 * 60 * 60 * 1000;
System.out.println(MICROS_PER_DAY / MILLIS_PER_DAY);
}
你在想程序应该输出
1000,很不幸输出的是5!问题出在计算
MICROS_PER_DAY 时溢出了,虽然结果是满足long的,但不满足int。这个计算过程全部是按int 计算的,计算完之后才转为long。因此很明显计算过程中溢出。为什么会用int计算?因为因子都是int型的,Java没有
target typing特性(就是根据结果的类型来确定计算过程所用类型)。解决这个问题很简单,把第一个因子设置为long,这样会强制所有以后的计算都用long进行。虽然很多地方都不需要这么做,但这是一个好习惯。
final long MICROS_PER_DAY = 24
L * 60 * 60 * 1000 * 1000;
final long MILLIS_PER_DAY = 24
L * 60 * 60 * 1000;
我们得到一个教训:和大数据打交道的时候,小心溢出!一个变量能装得下结果,并不代表计算过程中会确保得到正确类型。
4 小学生都知道的事情
System.out.println(12345 + 5432l); // 毫无疑问的66666? 看仔细了!输出17777
教训:使用long的时候用大写的L,绝不用小写的l,类似的避免用l作为变量名。很难看出输出的是1还是l
// Bad code - uses el (l) as a variable name
List<String> l = new ArrayList<String>();
l.add("Foo");
System.out.println(1);
5 十六进制的快乐
System.out.println(Long.toHexString(0x100000000L + 0xcafebabe)); //输出cafebabe,最左边的1丢了!
十进制有一个十六或八进制都没有的优点:数字都是正的,想表达负数需要一个负号。这样的话写十进制的int或long,不管正负都很方便。十六或八进制就不这样了,必须由高位来决定正负。这个例子中,0xcafebabe 是一个int常量,最高位是1,因此是负数=十进制 -889275714。这里还有一个混合类型计算的额外操作:左边操作数是long,右边是int,计算时Java通过widening primitive conversion 把int变为long,再加这两个long。因为int是有符号整型,转变执行了一个符号扩展:把负的int值提升为数值相等的long值。右边的0xcafebabe被提升为long值 0xffffffffcafebabeL,再加到左边0x100000000L上。当被看作int型的时候,0xcafebabe扩展出来的高32位是-1,而左边操作数高32位是1,相加之后为0,这解释了为什么最高位的1丢失。解决方法是把右边的操作数也写上long,这样就避免了符号扩展的破坏。
System.out.println(Long.toHexString(0x100000000L + 0xcafebabeL));
教训:考虑十六或八进制自身带正负,混合类型计算让人迷惑。为避免出错,最好不要使用混合类型计算。对语言设计者来说,考虑支持无符号整数类型来去掉符号扩展的可能。有人争论十六或八进制负数应该被禁止,但对于程序员来说非常不好,他们经常使用十六进制来表示符号没有意义的数值。
6 多重映射
System.out.println((int) (char) (byte) -1);
以int 类型的-1开始,映射到byte,到char,最后返回int。第一次32位变到8位,到16位,最后回到32位。最后发现值并没有回到原始!输出65535
问题来自映射时的符号扩展问题。int值-1的所有32位都是1,转为8位byte很直观,只留下低八位就行,仍然是-1.转char的时候,就要小心了,byte是有符号的,char无符号。通常有可能保留数值的同时把一个整型转到更“宽”的类型,但不可能用char来表示一个负的byte值。Therefore, the conversion from byte to char is not considered a widening primitive conversion [JLS 5.1.2], but a widening and narrowing primitive conversion [JLS 5.1.4]: The byte is converted to an int and the int to a char。看起来较复杂,但有一个简单规则描述窄变宽转换时的符号扩展:原始值有符号就做符号扩展;不管转换成什么类型,char只做零扩展。因为byte是有符号的,byte -1转成char会有符号扩展。结果是全1的16位,也就是 216 – 1或65,535。char到int宽扩展,规则告诉我们做零扩展。int类型的结果是65535。虽然规则简单,但最好不要写依赖这规则的程序。如果你是宽转换到char,或从char转换(char总是无符号整数),最好显式说明。
如果从char类型的c宽转换,并且不想符号扩展,虽然不需要,但为了清晰可以这样:
int i = c & 0xffff;
还可以写注释:
int i = c; // Sign extension is not performed
如果从char类型的c宽转换,并且想符号扩展,强制char到short(宽度一样但有符号)
int i = (short) c; // Cast causes sign extension
byte到char,不要符号,必须用位屏蔽抑制他,这是惯例不用注释(
0xff这种0x开头的默认是int类型的?)
char c = (char) (b & 0xff);
byte to a
char ,要符号,写注释
char c = (char) b; // Sign extension is performed
这一课很简单:
如果你不能清晰看出程序在干什么,他可能就没有按你希望的在运行。拼命寻求清晰,虽然整数转换的符号扩展规则简单,但大多程序员不知道。如果你的程序依赖于他,让你的意图明显。
7 交换美味
在一个简单表达式中,不要对一个变量赋值超过一次。更普遍的说,不要用“聪明”的程序技巧。
8 Dos Equis
char x = 'X';
int i = 0;
System.out.print(true ? x : 0);
System.out.print(false ? i : x);
输出XX?可惜输出的是X88。注意第二三个操作数类型不一样,第5点说过,混合类型计算让人迷惑!条件表达式中是最明显的地方。虽然觉得两个表达式结果应该相同,毕竟他们类型相似,只是位置相反而已,但结果并不是这样。
决定条件表达式结果类型的规则很多,但有三个关键点:
1 如果第二三个操作数类型一样,表达式也是这个类型,这样就避免了混合类型计算。
2 3 复杂略过 总之第一个表达式是调用了PrintStream.print(char),第二个是PrintStream.print(int) 造成结果不同
总结:最好在条件表达式中第二三个操作数用同一种类型
9
x += i; // 等同于x = x + i;?
compound assignment expressions automatically cast the result of the computation they perform to the type of the variable on their left-hand side// 暗含映射
例如 short x = 0;int i = 123456;
x += i; // –7,616,int值123456太大,short装不下,高位两个字节被去掉
x = x + i; // 编译错误- "possible loss of precision"
为避免危险,不要在byte, short, or char上面用复合赋值符。当在int上用时,确保右边不是long, float, or double类型。在float上用,确保右边不是double。
10 复合赋值符需要两边操作数都为基本类型或boxed primitives,如int ,Integer。有一例外:+= 左边为String的话,允许右边为任意类型。这时做的是字符串拼接操作。
Object x = "Buy ";
String i = "Effective Java!";
x = x + i; //x+i 为String,和Object兼容,因此表达式正确
x += i; //非法左边不是String
注意返回类型:The arithmetic, increment and decrement, bitwise, and shift operators return a double if at least one of the operands is a double. Otherwise, they return a float if at least one of the operands is a float. Otherwise, they return a long if at least one of the operands is a long. Otherwise, they return an int, even if both operands are byte, short, or char types that are narrower than int.
What Is JDBC ?
JDBC 是java编程中一系列允许简单连接到很多数据库(特别是关系型数据库)编程APIs . In Java 2 Platform, Standard Edition (J2SE) 5.0,
JDBC API 由两个包定义:
java.sql :提供java访问处理贮存在数据源(特别是关系型数据库)中的数据,有最基础常用的对象如Connection, ResultSet, Statement, and PreparedStatement。这个包j2se 和j2ee平台都可使用。
javax.sql:提供java访问处理服务器端数据源。这个包给j2ee提供服务,如DataSource 和RowSet。
ODBC bridge是以ODBC标准 C API 方式实现JDBC 的库。
简而言之,JDBC是一个和database-independent 的访问数据库的API。
DriverManager是唯一可以创建数据库连接的类。DriverManager根据各个厂商(如Oracle, MySQL, and Sybase)提供的驱动创建数据库。
What Is ODBC ?
Open Database Connectivity (ODBC) 是一种来自微软的编程接口,他为Windows应用程序访问网络上数据库提供了通用语言。 ODBC is a C-based interface
to SQL-based database systems. It provides a consistent interface for communicating with a database and for accessing database metadata (information about the database system vendor and how the tables, views, and data are stored).ODBC作为标准出现。厂商为各自的DBMS提供了各种的驱动或bridges。从java客户端访问ODBC-based数据库,可以使用JDBC-ODBC bridge,因此可以使用JDBC-ODBC bridge访问支持ODBC的数据库,比如Microsoft Access。微软为他的操作系统提供ODBC driver manager。ODBC driver manager协调访问ODBC驱动和对应的数据源。
问题:如果用c++写数据库客户端,你不得不在另一平台重新写客户端;PC版的不能在Macintosh上运行。两个原因:1.c++不是跨平台的,很多东西没有特别指定(如int型用多少位表示)2 更重要的是,想网络访问,GUI框架库等在各个平台不同。ODBC的另一个问题是,接口复杂学习时间长。JDBC去除了这些问题,为访问关系数据库引入平台无关的解决方案。因为性能问题和缺少事务支持, JDBC-ODBC bridge 驱动只适合实验用或没有其他可选方法。
What Is a JDBC-ODBC Bridge?
简而言之,JDBC-ODBC bridge通过大多数ODBC驱动来提供JDBC访问。它是一个把JDBC操作转换为ODBC操作的JDBC驱动。(ODBC操作是由 C-based libraries实现的——ODBC功能仍然在二进制代码库中;如果数据库或硬件平台更换,需要替换ODBC库)。brige作为sun.jdbc.odbc包实现,包含一个native library用来访问ODBC。sun.jdbc.odbc包在/jre/lib/rt.jar中,包含一个sun.jdbc.odbc.JdbcOdbcDriver类,用来JDBC驱动。注意,JDBC-ODBC bridge是一种“万能”的方式,因此可能比一些特别设计的JDBC驱动慢。
SQL is a Data Manipulation Language (DML—影响数据库对象内容的命令集) and a Data Definition Language (DDL—影响数据库对象结构的命令集).SQL also 提供控制事务命令 (such as commit and rollback)
连接jdbc的过程参考JDBC加载分析 。总之JDBC驱动的作用是提供各种数据库的具体实现(实现了java.sql.Driver接口),隐藏具体数据库的细节(每个数据库厂商可能会为同一个数据库提供不止一个驱动,这些效率,价格/性能会有不同)。
在fianlly中立刻关闭/释放 JDBC资源(such as the ResultSet, Statement, PreparedStatement, and Connection objects),而不是等他们自己关闭,会改进应用程序的性能。写一个工具类释放这些资源是一个好办法。
JDBC API主要用来传SQL statement给数据库,但也能读写表格式数据源的数据,这种来自javax.sql.RowSet组接口的读写能力可以被定制去使用更新spreadsheet,flat file 类似表格式数据源的数据。
JDBC有四种类型的驱动连接数据库。
异常:SQLException:有getNextException()可以链接一系列异常,还有很多方法可以展示额外的错误/异常信息。SQLWarning:SQLException的子类,表示非致命可忽略BatchUpdateException:批量更新时出现的错误,除了SQLException提供的信息,还有错误发生前已成功执行多少条数据DataTruncation:意外truancate 数据抛出。
Java Naming and Directory Interface (JNDI) is an API that supports accessing naming and directory services in Java programs.
命名服务目的:把命名和对象联系起来,提供用命名访问对象的方法。
目录服务:允许属性和对象联系,比如用户对象的email地址属性,(命名服务不提供),因此能利用目录服务访问对象属性或以属性为基础查找对象。
HTTP在TCP/IP的顶层,他是一种有web特性的网络协议。HTTP会话结构是一种简单的请求/响应序列;浏览器请求,服务器响应 。HTTP 响应可以 包含HTML,HTTP在响应内容(服务器返回的任何东西)之上添加头信息。浏览器利用头信息来帮助处理html页面。把hml内容看作粘贴在HTTP响应中的数据。HTTP请求中有几个方法,最常用的是POST和GET(区别)。HTTP响应中包含状态代码(如404),内容类型(也称为MIME类型,他告诉浏览器将会收到什么类型的数据以便处理,比如展示图片,提供html),响应的真实内容(html,图片等)。
接口的方法默认为public,不能定义为private。
If a class implements two or more interfaces that call for methods with identical signatures,we need only implement one such method in the implementing class—that method will do “double duty” in satisfying both interfaces’ implementation requirements as far as the compiler is concerned.
定义 属性,方法参数,返回类型的时候尽可能使用接口,客户端代码调用这样的类会更加灵活。
List和Set都是Collection接口的子类,使用Collection可以更通用。
如果一定要自己创建集合类而且不通过扩展存在的ArrayList等的话,至少实现Collection接口,这样才能在使用Collection的环境使用。
静态方法不能为abstract,不能调用非静态的属性或方法。我们经常利用静态方法,属性实现一些“工具类”,比如java.lang中的Math.
接口不允许定义变量,除了定义public static final 变量来作为全局常量。但是final类型的变量必须显示初始化,且初始化的方法必须是在申明时或者在构造方法中直接赋值,而不能通过调用函数赋值。
j2se 5引入 :import static Administrator.*; 这样在代码中可以直接使用Administrator类的静态变量。
查询了下关于是否用final限定方法参数以及局部变量的问题,有争议(
http://stackoverflow.com/questions/316352?sort=votes#sort-top),类似习惯问题,不过对传入的参数重新赋值不是好习惯!否则在方法中使用该参数的时候你会考虑前面的代码是否对参数处理过,还有可能失误的进行了赋值。倾向于方法参数使用final,局部变量不使用。折中的办法是设置eclipse的重赋值警告。
数组可以装基本类型或者引用,collections只能装引用。
通常有两种方法可以扩展collection 来满足一些需要:继承某种集合类型和封装某种集合类型。第一种的优点是初始化的时候在内存中只产生一个对象,这是继承特性决定的。后者的优点是我们可以方便控制被封装集合的各种属性。
Whenever possible, it’s desirable to bury implementation details inside of a class rather than exposing client code to such details。例:
法1:
public class Student {
private String name;
private String studentId;
private ArrayList<TranscriptEntry> transcript; //成绩报告单
public void addTranscriptEntry(TranscriptEntry te) { // 操作transcript达到记录成绩
// Store the TranscriptEntry in our ArrayList.
transcript.add(te);
}
}
客户端调用代码:
Student s = new Student("1234567", "James Huddleston");
Course c = new Course("LANG 800", "Advanced Language Studies");
TranscriptEntry te = new TranscriptEntry(c, "Fall 2006", "B+");
s.addTranscriptEntry(te);
法2:
建立新对象,封装一个ArrayList:
public class Transcript {
private ArrayList<TranscriptEntry> transcriptEntries;
public void courseCompleted(Course c, String semester, String grade) {
// Instantiate and insert a brand-new TranscriptEntry object into the
// ArrayList - details hidden away!
transcriptEntries.add(new TranscriptEntry(c, semester, grade);
}
}
public class Student {
private String name;
private String studentId;
// This used to be declared as an ArrayList.
private Transcript transcript;
// etc.
}
客户端代码:
s.courseCompleted(c, "Spring 2006", "A+");
第二种方法使Student处理更少的细节,不用管transcripts怎么表达,看不到TranscriptEntry的存在。客户端代码更简单。
Aggregation is a special form of association, alternatively referred to as the “consists of”, “is composed of”, or “has a” relationship.Like an association, an aggregation is used to represent a relationship between two classes, A and B. But, with an aggregation, we’re representing more than mere relationship: we’re stating that an object belonging to class A, known as an
aggregate,is composed of, or contains,
component objects belonging to class B.
Note that these aggregation statements appear very similar to associations, where the name of the association just so happens to be is composed of or contains. That’s because an aggregation is an association in the broad sense of the term(aggregation 是association的一种特殊表现形式)!aggregation 和associations UML表现不同但最终代码表现形式一样
Composition is a strong form of aggregation, in which the “parts” cannot exist without the “whole.” As an example, given the relationship “a Book is composed of many Chapters”, we could argue that a chapter cannot exist if the book to which it belongs ceases to exist; whereas given the relationship “a Car is composed of many Wheels”, we know that a wheel can be removed from a car and still serve a useful purpose. Thus, we’d categorize the Book–Chapter relationship as composition and the Car–Wheel relationship as aggregation.
继承没留意的好处:
•
Best of all, we can derive a new class from an existing class even if we don’t own the source code for the latter! As long as we have the compiled bytecode version of a class, the inheritance mechanism works just fine; we don’t need the original source code of a class in order to extend it.
This is one of the most dramatic ways to achieve productivity with an objectoriented language: find a class (either one written by someone else or one that is built into the language) that does much of what you need, and create a subclass of that class,adding just those features that you need for your own purposes.
•
classification is the natural way that humans organize information; so, it only makes sense that we’d organize software along the same lines, making it much more intuitive and hence easier to develop, maintain,extend, and communicate with users about.
继承与Association, aggregation异同(P186):
Association, aggregation, and inheritance are all said to be relationships between classes. Where inheritance differs from association and aggregation is at the
object level.inheritance is indeed a relationship between
classes, but
not between distinct
objects.
注意:避免连锁反应,
Whenever possible, avoid adding features to non-leaf classes once they have been established in code form in an application, to avoid ripple effects throughout an inheritance hierarchy. 说比做容易,这就要求在编码之前尽可多的花时间在需求分析和对象建模阶段,虽然不能避免新需求出现,但至少避免忽视遗漏了当前的需求。
Overriding:子类继承父类,重写唯一能改变的是方法的访问控制,而且只能比父类更宽松,如父类用的是private,子类可以用public。参考了下thinking in java 4th P202 发现这种说法不对,而且是一个
陷阱:父类的该方法根本对子类不可见!子类的该方法实际上是一个全新的方法,连重载都算不上。所以只能重写non-private方法。遇到private方法你得小心,没有编译错误,但不会像你想象的工作,最好给方法重新取名,避免陷阱。
不要做的事情:
We shouldn’t change the semantics—that is, the intention, or meaning—of a feature.For example:
• If the print method of a superclass such as Student is intended to display the values of all of an object’s attributes in the command window, then the print method of a subclass such as GraduateStudent shouldn’t, for example, be overridden so that it directs all of its output to a file instead.
• If the name attribute of a superclass such as Person is intended to store a person’s name in “last name, first name” order, then the name attribute of a subclass such as Student should be used in the same fashion.
We can’t physically eliminate features, nor should we effectively eliminate them by ignoring them. To attempt to do so would break the spirit of the “is a” hierarchy. By definition, inheritance requires that all features of all ancestors of a class A must also apply to class A itself in order for A to truly be a proper subclass. If a GraduateStudent could eliminate the degreeSought attribute that it inherits from Student, for example, is a GraduateStudent really a Student after all? Strictly speaking, the answer is no.
进一步从实用角度说,如果我们重写一个方法但不在这方法里做任何事情,其他继承我们类的人就会出问题:他们觉得我们的方法是有意义的(特别是他们不能看到我们源代码的时候)。而我们则打破了“is a” 原则,所以绝不要这样做!
protected关键字的运用,用于控制继承的访问控制。
运用super(arguments) 减少子类构造函数重复父类构造函数代码,和this类似必须在构造函数最开始调用。
Student s = new Student("Fred", "123-45-6789"); 执行这段代码,Object的构造函数会自动执行,接着Student 的父类Person构造函数仔细,然后是我们调用的Student构造函数,如果调用的Student构造函数没有显示调用父类构造函数,则相当于默认调用super() 。
java没有类的多继承,多继承很复杂的一点,如果两个父类都有相同的方法,子类怎么处理?
We may wish to instantiate additional objects related to the Student object:
初始化与对象相关的一些额外对象:
public class Student() {
// Every Student maintains a handle on his/her own individual Transcript object.
private Transcript transcript;
public Student() {
// Create a new Transcript object for this new Student.
transcript = new Transcript();
// etc.
}
}
读取数据库来初始化对象属性:
public class Student {
// Attributes.
String studentId;
String name;
double gpa;
// etc.
// Constructor.
public Student(String id) {
studentId = id;
// Pseudocode.
use studentId as a primary key to retrieve data from the Student table of a
relational database;
if (studentId found in Student table) {
retrieve all data in the Student record;
name = name retrieved from database;
gpa = value retrieved from database;
// etc.
}
}
// etc.
}
和其他已存在的对象交流:
public class Student {
// Details omitted.
// Constructor.
public Student(String major) {
// Alert the student's designated major department that a new student has
// joined the university.
// Pseudocode.
majorDept.notify(about this student ...);
// etc.
}
// etc.
}
好习惯:如果需要有参数的构造函数,最好同时显示声明一个无参构造函数。
容易出现的bug:如果给构造函数加上void编译会通过!不过会被当作方法而不是构造函数!
当有多个构造函数,而且都有共同的初始化内容时,就会出现很多重复的代码,比如构造一个新学生,我们会做:
1 通知登记办公室学生的存在
2 给学生创建学生成绩报告单
重复引起以后修改必须修改多处,如果使用this 会得到改善
public class Student {
// Attribute details omitted.
// Constructor #1.
public Student() {
// Assign default values to selected attributes ... details omitted.
// Do the things common to all three constructors in this first
// constructor ...
// Pseudocode.
alert the registrar's office of this student's existence
// Create a transcript for this student.
transcript = new Transcript();
}
// Constructor #2.
public Student(String s) {
// ... then, REUSE the code of the first constructor within the second!
this();
// Then, do whatever else extra is necessary for constructor #2.
this.setSsn(s);
}
// Constructor #3.
public Student(String s, String n, int i) {
// ... and REUSE the code of the first constructor within the third!
this();
// Then, do whatever else extra is necessary for constructor #3.
this.setSsn(s);
this.setName(n);
this.setAge(i);
}
// etc.
}
注意:this必须在方法最前面调用
应用一:解决tomcat下中文乱码问题(先来个简单的)
在tomcat下,我们通常这样来解决中文乱码问题:
过滤器代码:
- package filter;
-
- import java.io.*;
- import javax.servlet.*;
- import javax.servlet.http.*;
- import wrapper.GetHttpServletRequestWrapper;
-
- public class ContentTypeFilter implements Filter {
-
- private String charset = "UTF-8";
- private FilterConfig config;
-
- public void destroy() {
- System.out.println(config.getFilterName()+"被销毁");
- charset = null;
- config = null;
- }
-
- public void doFilter(ServletRequest request, ServletResponse response,
- FilterChain chain) throws IOException, ServletException {
-
- request.setCharacterEncoding(charset);
- response.setCharacterEncoding(charset);
-
- HttpServletRequest req = (HttpServletRequest)request;
-
-
- System.out.println("----请求被"+config.getFilterName()+"过滤");
-
- chain.doFilter(req, response);
-
- System.out.println("----响应被"+config.getFilterName()+"过滤");
-
- }
-
- public void init(FilterConfig config) throws ServletException {
- this.config = config;
- String charset = config.getServletContext().getInitParameter("charset");
- if( charset != null && charset.trim().length() != 0)
- {
- this.charset = charset;
- }
- }
-
- }
web.xml中过滤器配置
<!--将采用的字符编码配置成应用初始化参数而不是过滤器私有的初始化参数是因为在JSP和其他地方也可能需要使用-->
<context-param>
<param-name>charset</param-name>
<param-value>UTF-8</param-value>
</context-param>
<filter>
<filter-name>ContentTypeFilter</filter-name>
<filter-class>filter.ContentTypeFilter</filter-class>
</filter>
<filter-mapping>
<filter-name>ContentTypeFilter</filter-name>
<url-pattern>/*</url-pattern>
</filter-mapping>
equest.setCharacterEncoding(charset); 必须写在第一次使用request.getParameter()之前,这样才能保证参数是按照已经设置的字符编码来获取。
response.setCharacterEncoding(charset);必须写在PrintWriter out = request.getWriter()之前,这样才能保证out按照已经设置的字符编码来进行字符输出。
通过过滤器,我们可以保证在Servlet或JSP执行之前就设置好了请求和响应的字符编码。
但是这样并不能完全解决中文乱码问题:
对于post请求,无论是“获取参数环节”还是“输出环节"都是没问题的;
对于get请求,"输出环节"没有问题,但是"获取参数环节"依然出现中文乱码,所以在输出时直接将乱码输出了。
原因是post请求和get请求存放参数位置是不同的:
post方式参数存放在请求数据包的消息体中。 get方式参数存放在请求数据包的请求行的URI字段中,以?开始以param=value¶me2=value2的形式附加在URI字段之后。而request.setCharacterEncoding(charset); 只对消息体中的数据起作用,对于URI字段中的参数不起作用,我们通常通过下面的代码来完成编码转换:
String paramValue = request.getParameter("paramName");
paramValue = new String(paramValue.trim().getBytes("ISO-8859-1"), charset);
但是每次进行这样的转换实在是很麻烦,有没有统一的解决方案呢?
解决方案1: 在tomcat_home"conf"server.xml 中的Connector元素中设置URIEncoding属性为合适的字符编码
<Connector port="8080" protocol="HTTP/1.1"
connectionTimeout="20000"
redirectPort="8443"
URIEncoding="UTF-8"
/>
这样做的缺点是,同一个tomcat下的其他应用也将受到影响。而其每次部署时都需要类修改配置也很麻烦。
解决方案2:自定义请求包装器包装请求,将字符编码转换的工作添加到getParameter()方法中
package wrapper;
import java.io.UnsupportedEncodingException;
import java.net.URLDecoder;
import javax.servlet.http.HttpServletRequest;
import javax.servlet.http.HttpServletRequestWrapper;
public class GetHttpServletRequestWrapper extends HttpServletRequestWrapper {
private String charset = "UTF-8";

 public GetHttpServletRequestWrapper(HttpServletRequest request) {
super(request);
 }
}
/** *//**
* 获得被装饰对象的引用和采用的字符编码
*
* @param request
* @param charset
*/
public GetHttpServletRequestWrapper(HttpServletRequest request,
String charset) {
super(request);
this.charset = charset;
}
/** *//**
* 实际上就是调用被包装的请求对象的getParameter方法获得参数,然后再进行编码转换
*/
public String getParameter(String name) {
String value = super.getParameter(name);
value = value == null ? null : convert(value);
return value;
}
public String convert(String target) {
System.out.println("编码转换之前:" + target);
try {
return new String(target.trim().getBytes("ISO-8859-1"), charset);
} catch (UnsupportedEncodingException e) {
return target;
}
}
}
修改过滤器的doFilter方法 代码如下:
public void doFilter(ServletRequest request, ServletResponse response,
FilterChain chain) throws IOException, ServletException {
// 设置请求响应字符编码
request.setCharacterEncoding(charset);
response.setCharacterEncoding(charset);
// 新增加的代码
HttpServletRequest req = (HttpServletRequest) request;
if (req.getMethod().equalsIgnoreCase("get")) {
req = new GetHttpServletRequestWrapper(req, charset);
}
System.out.println("----请求被" + config.getFilterName() + "过滤");
// 传递给目标servlet或jsp的实际上时包装器对象的引用,而不是原始的HttpServletRequest对象
chain.doFilter(req, response);
System.out.println("----响应被" + config.getFilterName() + "过滤");
}
这样一来,在servlet中调用包装器的getParameters方法来获取参数,就已经完成了字符编码的转换过程,我们就不需要在每次获取参数时来进行字符编码转换了。
总结:自己写类继承HttpServletRequestWrapper,HttpServletRequestWrapper实现了HttpServletRequest接口。看tomcat的源代码可以发现,ServletRequest作为一个Component ,ServletRequestWrapper作为一个比较标准的Decorator ,实现ServletRequest接口并把ServletRequest当作成员变量,其他继承Decorator 的类(比如本例中的GetHttpServletRequestWrapper )就可以很好的操控ServletRequest及其子类(比如本例中的HttpServletRequest),HttpServletRequest的很多方法就可以根据我们的需求做改变,比如设置字符,去掉空格。
参考:
http://www.javaeye.com/topic/483158
http://fishhappy365.javaeye.com/blog/484185
http://www.javaeye.com/topic/220230
- HTTP 定义了与服务器交互的不同方法,最基本的方法是 GET 和 POST。事实上 GET 适用于多数请求,而保留 POST 仅用于更新站点。根据 HTTP 规范,GET 用于信息获取,而且应该是 安全的和 幂等的。所谓安全的意味着该操作用于获取信息而非修改信息。换句话说,GET 请求一般不应产生副作用。幂等的意味着对同一 URL 的多个请求应该返回同样的结果。完整的定义并不像看起来那样严格。从根本上讲,其目标是当用户打开一个链接时,她可以确信从自身的角度来看没有改变资源。比如,新闻站点的头版不断更新。虽然第二次请求会返回不同的一批新闻,该操作仍然被认为是安全的和幂等的,因为它总是返回当前的新闻。反之亦然。POST 请求就不那么轻松了。POST 表示可能改变服务器上的资源的请求。仍然以新闻站点为例,读者对文章的注解应该通过 POST 请求实现,因为在注解提交之后站点已经不同了(比方说文章下面出现一条注解);
- 在FORM提交的时候,如果不指定Method,则默认为GET请求,Form中提交的数据将会附加在url之后,以?分开与url分开。字母数字字符原样发送,但空格转换为“+“号,其它符号转换为%XX,其中XX为该符号以16进制表示的ASCII(或ISO Latin-1)值。GET请求请提交的数据放置在HTTP请求协议头中,而POST提交的数据则放在实体数据中;
- GET方式提交的数据最多只能有1024字节,而POST则没有此限制。
Web 上最常用的两种 Http 请求就是 Get 请求和 Post 请求了。我们在做 java web 开发时,也总会在 servlet 中通过 doGet 和 doPost 方法来处理请求;更经常地,我们会在 doGet 方法的实现中调用 doPost 方法。尽管做了近两年的 web 开发,我对诸如 Get 请求和 Post 请求的基本概念仍不是十分了解。近日阅读《 javascript 高级程序设计》重新整理了一下 Get 请求和 Post 请求的概念,算是读书笔记吧。
Get 是从服务器上获取数据,这是最常见的请求类型。每次在浏览器中输入 URL 打开页面时,就是向服务器发送一个 Get 请求。 Get 请求的参数是用问号追加到 URL 结尾,后面跟着用&连接起来的名称/值对。比如网址 http://bt.neupioneer.com/viewthread.php?tid=87813 ,其中 tid 为参数名, 87813 为参数的值。在编程中,使用 Get 最多的地方就是超链接列表,其中的参数多是从数据库读出的字段拼接而成。在 Ajax 中,我们也经常使用 Get ,通过提取出页面的标签值,拼成串后构造一个 URL 。 Get 在使用上是有限制的, URL 的最大长度为 2KB ,因此,如果表单中包含textarea这样的大文本段,就不要用Get了。对于表单来说, Get 是把参数数据队列加到提交表单的 ACTION 属性所指的 URL 中,值和表单内各个字段一一对应,通过 URL 可以看到中传递的参数。因此,相比于 Post ,它是不安全的。
Post 的使用场合多是在表单提交的地方,因为和 Get 相比, Post 可以发送更多的数据,《 javascript 高级程序设计》中说最多可以发送 2GB ,这多少让我不太相信,网上一些文章说 IIS4 中最大量为 80KB , IIS5 中为 100KB ,不知道 Tomcat 中的情况如何。 Post 是通过 HTTP Post 机制,将表单内各个字段与其内容放置在 HTML Header 内一起传送到 ACTION 属性所指的 URL 地址。 和 Get 相比, Post 的内容是不会在 URL 中显现出来的,这多少是安全一些的。 我在做登录这样的表单时,只是将请求方式设为 Post ,使得用户名和密码信息不在浏览器中显现,但不清楚的是,是否有更好的方法加密密码等信息(实在不知道如果请求不传到服务器的话,怎么对未知的请求加密,清楚的朋友不妨给个解决方案)。在 Ajax 中,如果要和服务器交互,记得加上 request.setRequestHeader(“Content-Type”,”application/x-www-urlencoded”); 这一脚本,尽管很多 Ajax 教材中都提到了这一点。另外要说的是,被传递的参数是要经过编码的。在 javascript 中,编码函数是 encodeURIComponent(xx) 。
以上转自 http://blog.csdn.net/yoland/archive/2009/03/19/4005740.aspx
一个get的发送请求例子:
GET /select/selectBeerTaste.jsp?color=dark&taste=malty HTTP/1.1
Host: www.wickedlysmart.com
User-Agent: Mozilla/5.0 (Macintosh; U; PPC Mac OS X Mach-O; en-US; rv:1.4) Gecko/
20030624 Netscape/7.1
Accept: text/xml,application/xml,application/xhtml+xml,text/html;q=0.9,text/
plain;q=0.8,video/x-mng,image/png,image/jpeg,image/gif;q=0.2,*/*;q=0.1
Accept-Language: en-us,en;q=0.5
Accept-Encoding: gzip,deflate
Accept-Charset: ISO-8859-1,utf-8;q=0.7,*;q=0.7
Keep-Alive: 300
Connection: keep-alive
一个post的发送请求例子:
POST /advisor/selectBeerTaste.do HTTP/1.1
Host: www.wickedlysmart.com
User-Agent: Mozilla/5.0 (Macintosh; U; PPC Mac OS X Mach-O; en-US; rv:1.4) Gecko/
20030624 Netscape/7.1
Accept: text/xml,application/xml,application/xhtml+xml,text/html;q=0.9,text/
plain;q=0.8,video/x-mng,image/png,image/jpeg,image/gif;q=0.2,*/*;q=0.1
Accept-Language: en-us,en;q=0.5
Accept-Encoding: gzip,deflate
Accept-Charset: ISO-8859-1,utf-8;q=0.7,*;q=0.7
Keep-Alive: 300
Connection: keep-alive
color=dark&taste=malty (Request headers 后面有一个传参数的body)
两个例子的红色的部分很好的看出了get和post传参数区别
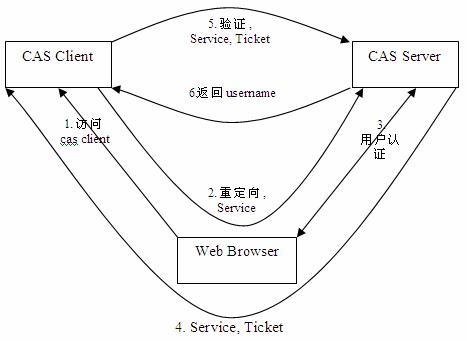 上面是CAS 基础协议图
CAS 介绍
CAS 具有以下特点:
-
开源的企业级单点登录解决方案。
-
CAS Server 为需要独立部署的 Web 应用。
-
CAS Client 支持非常多的客户端(这里指单点登录系统中的各个 Web 应用),包括 Java, .Net, PHP, Perl, Apache, uPortal, Ruby 等。
CAS 原理和协议
从结构上看,CAS 包含两个部分: CAS Server 和 CAS Client。CAS Server 需要独立部署,主要负责对用户的认证工作;CAS Client 负责处理对客户端受保护资源的访问请求,需要登录时,重定向到 CAS Server。
CAS Client 与受保护的客户端应用部署在一起,以 Filter 方式保护受保护的资源。对于访问受保护资源的每个 Web
请求,CAS Client 会分析该请求的 Http 请求中是否包含 Service
Ticket,如果没有,则说明当前用户尚未登录,于是将请求重定向到指定好的 CAS Server 登录地址,并传递 Service
(也就是要访问的目的资源地址),以便登录成功过后转回该地址。用户在第 3 步中输入认证信息,如果登录成功,CAS Server
随机产生一个相当长度、唯一、不可伪造的 Service Ticket,并缓存以待将来验证,之后系统自动重定向到 Service
所在地址,并为客户端浏览器设置一个 Ticket Granted Cookie(TGC),CAS Client 在拿到 Service
和新产生的 Ticket 过后,在第 5,6 步中与 CAS Server 进行身份合适,以确保 Service Ticket 的合法性。
在该协议中,所有与 CAS 的交互均采用 SSL 协议,确保,ST 和 TGC 的安全性。协议工作过程中会有 2 次重定向的过程,但是 CAS Client 与 CAS Server 之间进行 Ticket 验证的过程对于用户是透明的。
另外,CAS 协议中还提供了 Proxy (代理)模式,以适应更加高级、复杂的应用场景,具体介绍可以参考 CAS 官方网站上的相关文档。
在 Tomcat 上部署一个完整的 CAS Server 主要按照以下几个步骤:
配置 Tomcat 使用 Https 协议
如果希望 Tomcat 支持 Https,主要的工作是配置 SSL 协议,其配置过程和配置方法可以参考 Tomcat 的相关文档。不过在生成证书的过程中,会有需要用到主机名的地方,CAS 建议不要使用 IP 地址,而要使用机器名或域名。(项目过程中没使用)
部署 CAS Server
CAS
Server 是一个 Web 应用包,将前面下载的 cas-server-3.1.1-release.zip 解开,把其中的
cas-server-webapp-3.1.1.war 拷贝到 tomcat的 webapps 目录,并更名为
cas.war。由于前面已配置好 tomcat 的 https 协议,可以重新启动
tomcat,然后访问:https://localhost:8443/cas(没配置ssh应该是http://localhost:8080/cas) ,如果能出现正常的 CAS 登录页面,则说明 CAS
Server 已经部署成功。
虽然 CAS Server 已经部署成功,但这只是一个缺省的实现,在实际使用的时候,还需要根据实际概况做扩展和定制,最主要的是扩展认证 (Authentication) 接口和 CAS Server 的界面。
参考http://www.ibm.com/developerworks/cn/opensource/os-cn-cas/index.html
项目也采用jdbc验证,文章介绍了三个基于 JDBC 的 AuthenticationHandler,我使用的cas-server 3.3 多了一个AbstractJdbcUsernamePasswordAuthenticationHandler 直接使用。
部署客户端应用
单点登录的目的是为了让多个相关联的应用使用相同的登录过程,使用的是cas-client-core- 3.1.9.jar 放入要使用单点登录项目的lib下。cas客户端使用的是过滤器,在web.xml配置。可以使用spring配置bean。官方网站http://www.ja-sig.org/wiki/display/CASC/Configuring+the+JA- SIG+CAS+Client+for+Java+using+Spring 有配置。
用类扩展 Cas20ProxyReceivingTicketValidationFilter复写onSuccessfulValidation方法,写入验证成功后做的事情,比如把用户信息放入session。写了一个a.jsp用于跳转,过滤器针对他,访问这个页面的时候,会到cas服务器端,如果成功的话,返回到a.jsp,这个页面用sendRedirect调用了一个action方法处理登录成功后直接进入项目首页。
1 . SSL(Server Socket Layer) 简介
在网络上信息在源 -
宿的传递过程中会经过其它的计算机。一般情况下,中间的计算机不会监听路过的信息。但在使用网上银行或者进行信用卡交易的时候有可能被监视,从而导致个人
隐私的泄露。由于 Internet 和 Intranet
体系结构的原因,总有某些人能够读取并替换用户发出的信息。随着网上支付的不断发展,人们对信息安全的要求越来越高。因此 Netscape
公司提出了 SSL 协议,旨在达到在开放网络 (Internet) 上安全保密地传输信息的目的,这种协议在 WEB 上获得了广泛的应用。 之后
IETF(ietf.org) 对 SSL 作了标准化,即 RFC2246 ,并将其称为 TLS ( Transport Layer
Security ),从技术上讲, TLS1.0 与 SSL3.0 的差别非常微小。
2 . SSL 工作原理
SSL 协议使用不对称加密技术实现会话双方之间信息的安全传递。可以实现信息传递的保密性、完整性,并且会话双方能鉴别对方身份。不同于常用的 http 协议,我们在与网站建立 SSL 安全连接时使用 https 协议,即采用 https://ip:port/ 的方式来访问。当我们与一个网站建立 https 连接时,我们的浏览器与 Web Server 之间要经过一个握手的过程来完成身份鉴定与密钥交换,从而建立安全连接。具体过程如下:
用户浏览器将其 SSL 版本号、加密设置参数、与 session 有关的数据以及其它一些必要信息发送到服务器。
服务器将其 SSL 版本号、加密设置参数、与 session 有关的数据以及其它一些必要信息发送给浏览器,同时发给浏览器的还有服务器的证书。如果配置服务器的 SSL 需要验证用户身份,还要发出请求要求浏览器提供用户证书。
客户端检查服务器证书,如果检查失败,提示不能建立 SSL 连接。如果成功,那么继续。客户端浏览器为本次会话生成 pre-master
secret
,并将其用服务器公钥加密后发送给服务器。如果服务器要求鉴别客户身份,客户端还要再对另外一些数据签名后并将其与客户端证书一起发送给服务器。
如果服务器要求鉴别客户身份,则检查签署客户证书的 CA 是否可信。如果不在信任列表中,结束本次会话。如果检查通过,服务器用自己的私钥解密收到的 pre-master secret ,并用它通过某些算法生成本次会话的 master secret 。
客户端与服务器均使用此 master secret 生成本次会话的会话密钥 ( 对称密钥 ) 。在双方 SSL 握手结束后传递任何消息均使用此会话密钥。这样做的主要原因是对称加密比非对称加密的运算量低一个数量级以上,能够显著提高双方会话时的运算速度。
客户端通知服务器此后发送的消息都使用这个会话密钥进行加密。并通知服务器客户端已经完成本次 SSL 握手。
服务器通知客户端此后发送的消息都使用这个会话密钥进行加密。并通知客户端服务器已经完成本次 SSL 握手。
本次握手过程结束,会话已经建立。双方使用同一个会话密钥分别对发送以及接受的信息进行加、解密。