|
|
Posted on 2007-03-15 19:38 京山游侠 阅读(13528) 评论(42) 编辑 收藏 所属分类: SpringSide开发实战

Web 2.0时代时代的Web项目,是无论如何也少不了一个在线编辑器的,因此在我们的项目中整合一个Web编辑器就显得至关重要。在这里,我依然以前面的xkland项目为例,来探讨在项目中整合FCKeditor的方方面面。
一、关于用户发表文章的功能设计
用户发表文章的功能,大家见过不少,也用过不少,最简单的,莫过于提供一个文本框,数据提交后直接写入数据库了事,稍复杂一点的最少也要提供一个输入标题和选择分类的功能。当然,我们也可以把我们的功能设计得更有特色。在这个示例项目中,我假设开发的是一个以图文为中心的网络社区,我们每一篇文章都需要用户在它上传的图片中选择一个作为主题图片,那么,在网站首页的文章列表上,大家看到的将不仅仅只是一个文字的标题,还有主题图片的缩略图。
先来看看数据表的结构,创建数据表的SQL语句如下:
 CREATE
TABLE
`topics` (
CREATE
TABLE
`topics` (
`id`
int
(
11
)
NOT
NULL
auto_increment,
`catalogid`
int
(
11
)
NOT
NULL
,
`subject`
varchar
(
60
)
default
NULL
,
`content`
text
,
`pictures`
varchar
(
2000
)
NOT
NULL
,
`mainpicture`
varchar
(
40
)
NOT
NULL
,
`userid`
int
(
11
)
NOT
NULL
,
`time`
timestamp
NOT
NULL
default
CURRENT_TIMESTAMP
on
update
CURRENT_TIMESTAMP
,
`lastedittime`
timestamp
NOT
NULL
default
'
2007-01-01 00:00:00
'
,
`lastreplytime`
timestamp
NOT
NULL
default
'
2007-01-01 00:00:00
'
,
`visitcount`
int
(
11
)
NOT
NULL
,
PRIMARY
KEY
(`id`),
KEY
`subject` (`subject`),
KEY
`userid` (`userid`),
KEY
`time` (`time`),
KEY
`lastreplytime` (`lastreplytime`)
) ENGINE
=
InnoDB
DEFAULT
CHARSET
=
utf8
|
其中,catalogid字段为文章分类,subject字段为标题,content字段为正文。比较特殊的是pictures字段和mainpicture字段,pictures保存文章中包含的所有图片的url,以“|”符号分割,如“001.jpg|002.jpg|003.jpg...”,而mainpicture就是主题图片的url了。有人会问:“保存主题图片的url就够了,为什么还要保存所有的图片url呢?”,这样设计主要是为了考虑到用户有时候会修改文章,重新选择别的图片作为主题图片,这个时候pictures字段就派上用场了,因为它可以向用户提供候选项。
这样的功能设计应该提供如下的用户界面,该页面文件名为EditPosts.jsp:
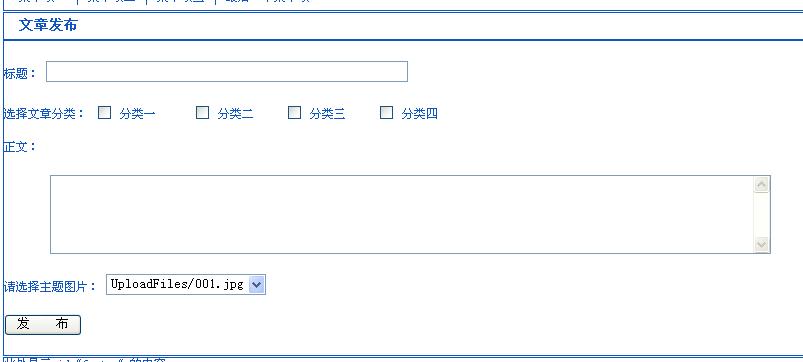
在这里,我们还没有Web编辑器可用,暂时用一个文本区域代替。
二、初识FCKeditor
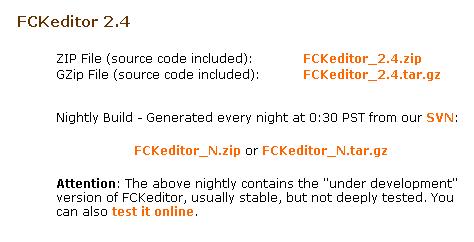
在听说FCKeditor之前,我用过一个在线编辑器eWebEditor,提供ASP/JSP/PHP等好几个版本,功能是非常的好,文档也很详细,但是听说只支持IE浏览器;而FCKeditor在网上大名鼎鼎,是一个受关注非常高的开源项目,并且能够跨浏览器支持。因此我选择FCKeditor。FCKeditor的最新版本是2.4,大家可以到
http://www.fckeditor.net/download这里下载,如下图
下载并解压缩到fckeditor文件夹,打开该文件夹,我们可以看到如下文件及目录:
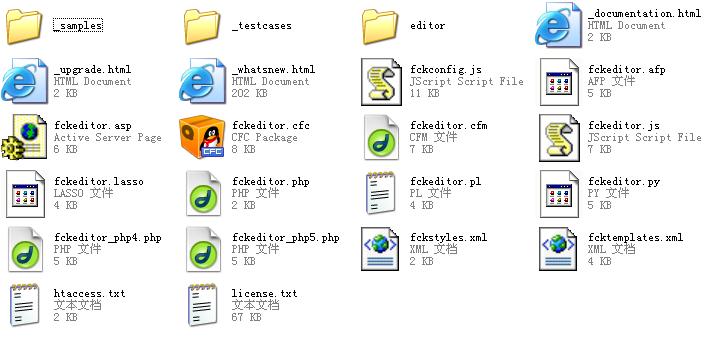
其中_samples目录下是示例,_testcases目录下是测试用例,editor目录下是编辑器的主要文件;此外,从该目录中的文件不难看出,FCKeditor提供支持asp、php、perl、python等等各种服务器技术的版本,但不支持.net和Java Web。不过不要担心,FCKeditor与Java Web之间的整合早就有人做好了,稍后我们就会用到。
了解浏览器技术的人都不难想到,Web编辑器其实应该是客户端技术,它是通过JavaScript来控制页面上的元素和通过弹出窗口来模拟对话框而做到的;只有在提交文章或者上传文件的时候才需要跟服务器端交互。因此,要将该编辑器快速整合到项目中以看到效果,是非常简单的。
三、使用JavaScript整合FCKeditor
将刚刚解压得到的fckeditor目录拷贝到我们的项目中的src\main\webapp目录下,打开刚才建立的EditPosts.jsp,加入如下代码:
1
<
script src
=
"
fckeditor/fckeditor.js
"
></
script
>
2
<
script language
=
"
javascript
"
>
3

 window.onload
=
function
() window.onload
=
function
()
 {
{
4
 var
oFCKeditor
=
new
FCKeditor( 'myTextArea' ) ;
var
oFCKeditor
=
new
FCKeditor( 'myTextArea' ) ;
5
oFCKeditor.BasePath
=
"
fckeditor/
"
;
6
oFCKeditor.ReplaceTextarea();
7
 } }
</scrip>
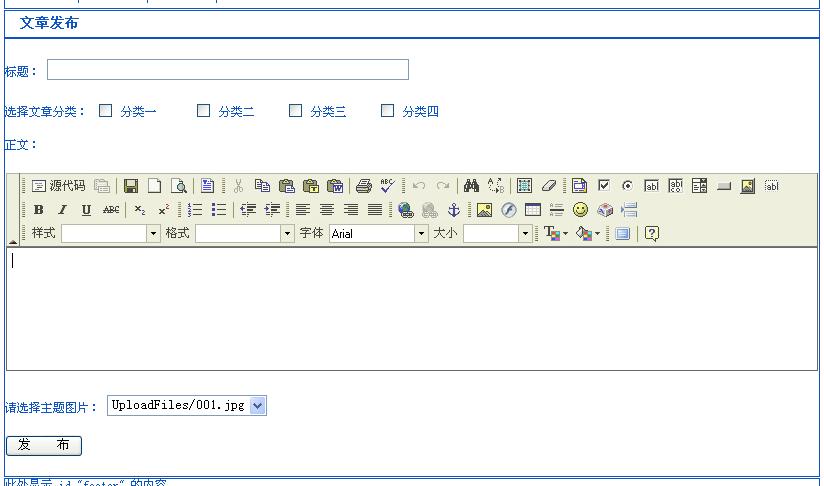
在这里,第一行代码是引入fckeditor中的fckeditor.js文件,其中定义了FCKeditor类,第四行就是利用该类创建一个编辑器对象,而myTextArea是表单中文本区域的名字,在第六行,通过FCKeditor类的ReplaceTextArea方法,文本区域就被替换成了Web编辑器。刷新页面,就可以看到效果:
FCKeditor类提供几个基本属性,可以让我们对编辑器进行简单的控制,它们是:
InstanceName:返回编辑器示例的名字 Width:设置编辑器的宽度,默认为100% Height:设置编辑器的高度,默认值为200 ToolbarSet:设置编辑器的工具条集合,默认值为"default",稍后会讲到怎样自定义工具条 Value:设置显示在编辑器中的内容(包含HTML),默认值为空 BasePath:编辑器的目录,一定要设置正确,否则编辑器会找不到它需要的文件,在本例中,由于我们直接将fckeditor目录放到项目的根目录下,因此设置为"fckeditor/" CheckBrowser:设置是否检测浏览器,默认为true DisplayErrors:设置是否显示错误信息,默认为true 此外,FCKeditor类还有一个集合属性 Config[ key ] = value,通过该集合属性,我们可以进行一个更高级的设置,如设置默认语言、更换皮肤等等。 综上所述,下面的代码将重新设置编辑器的高和宽、将工具条设置为基本工具条,将皮肤设置为office2003样式:
<script src="fckeditor/fckeditor.js"></script>
<script language="javascript">
window.onload = function(){
var oFCKeditor = new FCKeditor( 'myTextArea' ) ;
oFCKeditor.BasePath = "fckeditor/";
oFCKeditor.Width = "800";
oFCKeditor.Height = "300";
oFCKeditor.ToolbarSet = "Basic";
oFCKeditor.Config["SkinPath"] = "skins/office2003/";
oFCKeditor.ReplaceTextarea();
}
</script> 效果图: 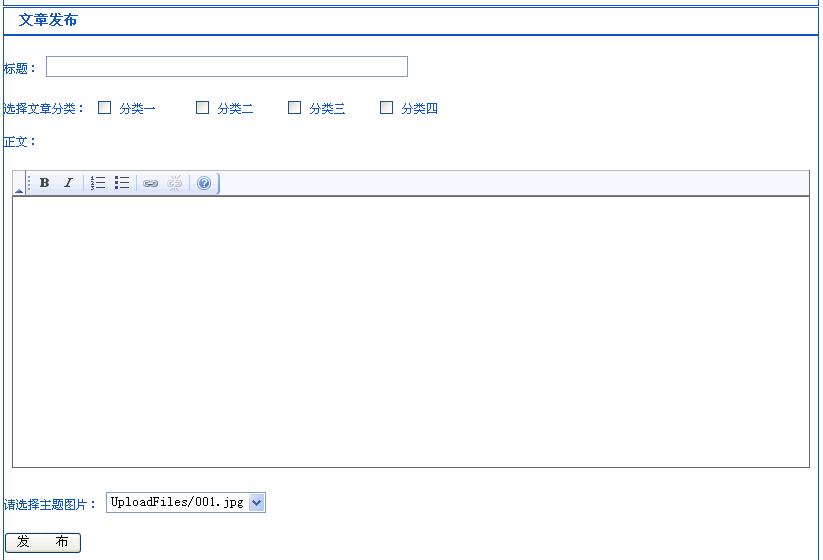 四、通过FCKeditor.java整合FCKeditor 四、通过FCKeditor.java整合FCKeditor
使用JavaScript整合FCKeditor,我们很快就能看到编辑器的效果,并进行文章的编辑。但是,在需要和服务器端进行交互的时候(比如上传图片),就会出错。因此,我们不得不在服务器端做一点手脚。这里,我们需要使用的是FCKeditor.java,其最新版本是2.3,还是在刚才的下载页面,找到下载链接,如下图:  将下载文件解压,我们可以看到有doc目录,有src目录,甚至还有一个build.xml,让我们可以重新构建项目;但是,这些我们统统都不需要,我们只要web\WEB-INF目录下的东西,在这个目录下,提供了一个web.xml,同时在lib目录下提供了两个.jar文件,这便是全部。看到这里,大家肯定能够想到,Java Web项目的灵魂是什么?那就是web.xml。我们所要做的,就是把lib目录下的两个.jar文件拷贝到我们项目的src/main/webapp/WEB-INF/lib下,同时将web.xml中的内容整合到我们项目的src/main/webapp/WEB-INF/web.xml中。 web.xml中的内容很简单,只定义了两个Servlet映射,并且对上传文件的目录和允许哪些文件上传、拒绝哪些文件上传做了设置,如下:
<servlet>
<servlet-name>Connector</servlet-name>
<servlet-class>com.fredck.FCKeditor.connector.ConnectorServlet</servlet-class>
<init-param>
<param-name>baseDir</param-name>
<param-value>/UploadFiles/</param-value>
</init-param>
<init-param>
<param-name>debug</param-name>
<param-value>true</param-value>
</init-param>
<load-on-startup>1</load-on-startup>
</servlet>
<servlet>
<servlet-name>SimpleUploader</servlet-name>
<servlet-class>com.fredck.FCKeditor.uploader.SimpleUploaderServlet</servlet-class>
<init-param>
<param-name>baseDir</param-name>
<param-value>/UploadFiles/</param-value>
</init-param>
<init-param>
<param-name>debug</param-name>
<param-value>true</param-value>
</init-param>
<init-param>
<param-name>enabled</param-name>
<param-value>true</param-value>
</init-param>
<init-param>
<param-name>AllowedExtensionsFile</param-name>
<param-value></param-value>
</init-param>
<init-param>
<param-name>DeniedExtensionsFile</param-name>
<param-value>php|php3|php5|phtml|asp|aspx|ascx|jsp|cfm|cfc|pl|bat|exe|dll|reg|cgi</param-value>
</init-param>
<init-param>
<param-name>AllowedExtensionsImage</param-name>
<param-value>jpg|gif|jpeg|png|bmp</param-value>
</init-param>
<init-param>
<param-name>DeniedExtensionsImage</param-name>
<param-value></param-value>
</init-param>
<init-param>
<param-name>AllowedExtensionsFlash</param-name>
<param-value>swf|fla</param-value>
</init-param>
<init-param>
<param-name>DeniedExtensionsFlash</param-name>
<param-value></param-value>
</init-param>
<load-on-startup>1</load-on-startup>
</servlet>
<servlet-mapping>
<servlet-name>Connector</servlet-name>
<url-pattern>/fckeditor/editor/filemanager/browser/default/connectors/jsp/connector</url-pattern>
</servlet-mapping>
<servlet-mapping>
<servlet-name>SimpleUploader</servlet-name>
<url-pattern>/fckeditor/editor/filemanager/upload/simpleuploader</url-pattern>
</servlet-mapping> 请注意,这两个servlet的url-pattern我都在原来代码的前面加上了/fckeditor。 然后,我们就可以抛开JavaScript,而在服务器端使用标签来创建Web编辑器了。先在EditPosts.jsp中引入标签库:
<%@ taglib uri="http://fckeditor.net/tags-fckeditor" prefix="FCK" %> 再在原来放textarea的地方,放如下代码:
<FCK:editor id="EditorDefault" basePath="/xkland/fckeditor/"
imageBrowserURL="/xkland/fckeditor/editor/filemanager/browser/default/browser.html?Type=Image&Connector=connectors/jsp/connector"
linkBrowserURL="/xkland/fckeditor/editor/filemanager/browser/default/browser.html?Connector=connectors/jsp/connector"
flashBrowserURL="/xkland/fckeditor/editor/filemanager/browser/default/browser.html?Type=Flash&Connector=connectors/jsp/connector"
imageUploadURL="/xkland/fckeditor/editor/filemanager/upload/simpleuploader?Type=Image"
linkUploadURL="/xkland/fckeditor/editor/filemanager/upload/simpleuploader?Type=File"
flashUploadURL="/xkland/fckeditor/editor/filemanager/upload/simpleuploader?Type=Flash">
This is some <strong>sample text</strong>. You are using <a href="http://www.fredck.com/fckeditor/">FCKeditor</a>.
</FCK:editor>
这里有一点一定要注意,那就是这里的属性都要避免使用相对路径。 刷新页面,又见编辑器,此时,可以顺利的上传文件了。整合编辑器的任务到此完成。下一步,就是怎样对编辑器进行更多的控制了。
五、对编辑器进行更多控制
1、自定义工具条:打开fckeditor目录下的fckconfig.js文件,添加如下代码: FCKConfig.ToolbarSets["Usable"] = [
['Source','Preview'],
['Undo','Redo','-','SelectAll','Cut','Copy','Paste','-','RemoveFormat','-','Find','Replace'],
['Link','Unlink','Anchor'],
['FitWindow','-','About'],
'/',
['Bold','Italic','Underline','StrikeThrough','-','Subscript','Superscript'],
['OrderedList','UnorderedList','-','Outdent','Indent'],
['JustifyLeft','JustifyCenter','JustifyRight','JustifyFull'],
['Image','Flash','Table','Rule','Smiley'],
'/',
['Style','FontFormat','FontName','FontSize'],
['TextColor','BGColor']
] ;
2、添加常用的中文字体:在上面打开的文件中找到
FCKConfig.FontNames = 'Arial;Comic Sans MS;Courier New;Tahoma;Times New Roman;Verdana' ; 加上几种我们常用的字体
FCKConfig.FontNames = '宋体;黑体;隶书;楷体_GB2312;Arial;Comic Sans MS;Courier New;Tahoma;Times New Roman;Verdana' ; 3、更改JSP页面中定义编辑器的标签,如下:
<FCK:editor id="EditorDefault" basePath="/xkland/fckeditor/"
skinPath="/xkland/fckeditor/editor/skins/office2003/"
toolbarSet="Usable"
imageBrowserURL="/xkland/fckeditor/editor/filemanager/browser/default/browser.html?Type=Image&Connector=connectors/jsp/connector"
linkBrowserURL="/xkland/fckeditor/editor/filemanager/browser/default/browser.html?Connector=connectors/jsp/connector"
flashBrowserURL="/xkland/fckeditor/editor/filemanager/browser/default/browser.html?Type=Flash&Connector=connectors/jsp/connector"
imageUploadURL="/xkland/fckeditor/editor/filemanager/upload/simpleuploader?Type=Image"
linkUploadURL="/xkland/fckeditor/editor/filemanager/upload/simpleuploader?Type=File"
flashUploadURL="/xkland/fckeditor/editor/filemanager/upload/simpleuploader?Type=Flash">
This is some <strong>sample text</strong>. You are using <a href="http://www.fredck.com/fckeditor/">FCKeditor</a>.
</FCK:editor> 刷新页面,可以看到编辑器的效果如下:

六、如何获取编辑器中插入的图片
从文章开头的功能设计我们可以看出,当用户编辑完文章后,我们应该能获取文章中插入的图片信息。怎样获取编辑器中的插入的图片呢?IT进行时在他的文章FCKeditor的几点重要改进和使用心得,值得分享 中是这样做的:在上传图片的对话框的JavaScript中添加代码,使得当用户插入图片点OK后通知列表框,代码如下: try {
var obj = window.dialogArguments.Editor.parent.document;
obj.getElementById( " tip.c_tip_has_pic " ).value = " 1 " ;
} catch (e) {}
我认为这个方法不好,第一,这个方法是侵入性的,需要修改FCKeditor的代码;第二,这种方法能够在用户插入图片的时候获得图片信息,但是如果用户插入的图片,接着又把图片从文章中删除了呢?这时候是无法跟踪的。
正确的思路应该是在编辑器失去焦点的时候,获取编辑器中的文档,通过DOM取得文章中所有的图片。代码如下: function FCKeditor_OnComplete( editorInstance )
{
editorInstance.Events.AttachEvent( 'OnBlur', onEditorBlur ) ;
}
function onEditorBlur(){
var oSelect = $("img_select");
  for(var i=oSelect.options.length-1; i>0; i--){ for(var i=oSelect.options.length-1; i>0; i--){
oSelect.options[i] = null;
 } }
oEditor = FCKeditorAPI.GetInstance('EditorDefault');
var imgs = oEditor.EditorDocument.body.all.tags("img");
for(var i=0; i < imgs.length; i++){
var oOption = document.createElement("option");
oOption.appendChild(document.createTextNode(imgs[i].src));
oSelect.appendChild(oOption);
}
}
上面是我在探索FCKeditor中的一些心得,有问题的地方,欢迎大家探讨。
评论
# re: SpringSide开发实战(七):在项目中整合FCKeditor 回复 更多评论
2007-03-15 22:41 by
# re: SpringSide开发实战(七):在项目中整合FCKeditor 回复 更多评论
2007-03-15 22:57 by
请问站长
cnblogs是用的哪个编辑器啊?
# re: SpringSide开发实战(七):在项目中整合FCKeditor 回复 更多评论
2007-03-15 23:20 by
CuteEditor和FreeTextBox。
# re: SpringSide开发实战(七):在项目中整合FCKeditor 回复 更多评论
2007-03-15 23:35 by
我最喜欢的就是博客园的贴代码的功能。
还有对上传的图片的管理也是我喜欢的。
对这两个编辑器,我也要试试看。
# re: SpringSide开发实战(七):在项目中整合FCKeditor 回复 更多评论
2007-03-15 23:52 by
今天晚上也在整合这个东西 ,不过我第一次 看你文章的时候,还是只有 第一段
# re: SpringSide开发实战(七):在项目中整合FCKeditor 回复 更多评论
2007-03-16 08:47 by
@海边沫沫
CuteEditor、FreeTextBox只支持.NET。
# re: SpringSide开发实战(七):在项目中整合FCKeditor 回复 更多评论
2007-03-16 12:55 by
很好的东西,试一下看看:)
# re: SpringSide开发实战(七):在项目中整合FCKeditor 回复 更多评论
2007-03-16 12:56 by
不错啊,借鉴借鉴:)
# re: SpringSide开发实战(七):在项目中整合FCKeditor 回复 更多评论
2007-03-25 23:15 by
通过上面的一篇文章,使我又认识到一个问题,那就是数据库中其实根本不需要pictures字段,因为在客户端使用DOM解析也很方便,正如文中代码所示。
# re: SpringSide开发实战(七):在项目中整合FCKeditor 回复 更多评论
2007-03-25 23:27 by
还有其它几个表,它们的创建代码分别如下:
存储文章类别的表
CREATE TABLE `catalogs` (
`id` int(11) NOT NULL auto_increment,
`name` varchar(20) NOT NULL,
`image` varchar(40) NOT NULL,
PRIMARY KEY (`id`)
) ENGINE=InnoDB DEFAULT CHARSET=utf8
存储文章回复的表
CREATE TABLE `replys` (
`id` int(11) NOT NULL auto_increment,
`subject` varchar(50) NOT NULL,
`content` text,
`pictures` varchar(2000) default NULL,
`userid` int(11) NOT NULL,
`time` timestamp NOT NULL default CURRENT_TIMESTAMP,
PRIMARY KEY (`id`)
) ENGINE=InnoDB DEFAULT CHARSET=utf8
这里其实也可以完全不要pictures字段,因为管理上传图片的工作已经完全由FCKeditor编辑器代劳了。
如果要开发一个完善的系统,还有很多问题需要考虑。比如说安全问题。如果有的用户希望自己上传的图片和发表的主题只有自己可以看,那么我们需要让用户选择是公开发表,还是仅群内用户可见,还是只有自己能看见。因此需要修改topics表,以判断一篇文章是能够公开的,还是属于群组的,还是只有自己可以看的。另外,由于一个用户可以属于多个组,而有时他并不想一篇文章让所有的组都可见,所以还需要加入groups_topics表,以帮助某个主题在哪些群组里面可以看见。
create table groups_topics(
id int not null auto_increment primary key,
groupid int not null,
topicid int not null,
index(groupid),
index(topicid));
alter table topics
add column ispublic tinyint not null,
add column isgroupvisiable tinyint not null;
此外,由于所有上传图片的工作都由编辑器代劳了,所以不需要专门的表来对上传文件进行维护。
# re: SpringSide开发实战(七):在项目中整合FCKeditor 回复 更多评论
2007-03-25 23:32 by
此外,还有一个难题,那就是如何给每一个用户分配一个单独的目录用来保存用户上传的图片。
经过我对FCKeditor的文档的反复阅读,发现FCKeditor自带的API没有办法实现这样的功能,所以,修改的重点还是在FCKeditor.java中。我们可以对源代码进行如下修改:
1、打开FCKeditor-2.3\src\com\fredck\FCKeditor\uploader目录下的SimpleUploaderServlet.java文件,找到SimpleUploaderServlet类的doPost方法,它的代码如下:
public void doPost(HttpServletRequest request, HttpServletResponse response) throws ServletException, IOException {
if (debug) System.out.println("--- BEGIN DOPOST ---");
response.setContentType("text/html; charset=UTF-8");
response.setHeader("Cache-Control","no-cache");
PrintWriter out = response.getWriter();
String typeStr=request.getParameter("Type");
String currentPath=baseDir+typeStr;
String userName = request.getSession().getUser().getName();
currentPath = currentPath + userName + "/";
String currentDirPath=getServletContext().getRealPath(currentPath);
currentPath=request.getContextPath()+currentPath;
if (debug) System.out.println(currentDirPath);
String retVal="0";
String newName="";
String fileUrl="";
String errorMessage="";
if(enabled) {
DiskFileUpload upload = new DiskFileUpload();
try {
List items = upload.parseRequest(request);
Map fields=new HashMap();
Iterator iter = items.iterator();
while (iter.hasNext()) {
FileItem item = (FileItem) iter.next();
if (item.isFormField())
fields.put(item.getFieldName(),item.getString());
else
fields.put(item.getFieldName(),item);
}
FileItem uplFile=(FileItem)fields.get("NewFile");
String fileNameLong=uplFile.getName();
fileNameLong=fileNameLong.replace('\\','/');
String[] pathParts=fileNameLong.split("/");
String fileName=pathParts[pathParts.length-1];
String nameWithoutExt=getNameWithoutExtension(fileName);
String ext=getExtension(fileName);
File pathToSave=new File(currentDirPath,fileName);
fileUrl=currentPath+"/"+fileName;
if(extIsAllowed(typeStr,ext)) {
int counter=1;
while(pathToSave.exists()){
newName=nameWithoutExt+"("+counter+")"+"."+ext;
fileUrl=currentPath+"/"+newName;
retVal="201";
pathToSave=new File(currentDirPath,newName);
counter++;
}
uplFile.write(pathToSave);
}
else {
retVal="202";
errorMessage="";
if (debug) System.out.println("Invalid file type: " + ext);
}
}catch (Exception ex) {
if (debug) ex.printStackTrace();
retVal="203";
}
}
else {
retVal="1";
errorMessage="This file uploader is disabled. Please check the WEB-INF/web.xml file";
}
out.println("");
out.flush();
out.close();
if (debug) System.out.println("--- END DOPOST ---");
}
我们要做的就是在String currentPath=baseDir+typeStr;这一句之后加入从Session中取出用户名,并添加到currentPath字符串之后的操作,如代码中加亮部分所示。
2、打开FCKeditor-2.3\src\com\fredck\FCKeditor\connector目录中的ConnectorServlet.java文件,进行同法处理。
最后,重新编译打包即可,记得一定要import com.xkland.domain.User类才能编译通过哦。
至此,经过简单的修改即可实现我们想要的功能。
# re: SpringSide开发实战(七):在项目中整合FCKeditor 回复 更多评论
2007-07-15 09:32 by
正确的思路应该是在编辑器失去焦点的时候,获取编辑器中的文档,通过DOM取得文章中所有的图片。代码如下:
请问一下这个代码 直接复制到文件里就能用吗?
失去焦点 事件怎么添加进去???
# re: SpringSide开发实战(七):在项目中整合FCKeditor 回复 更多评论
2007-07-16 21:02 by
不错,这段代码是Javascript代码,直接拷贝到jsp页面的<script></script>标签中,就会对这个页面中的编辑器起作用。
失去焦点事件是怎么加进去的呢?因为在编辑器加载完成后,它会自动调用FCKeditor_OnComplete事件,而我们就是在这个事件里面注册OnBlur事件的,如下代码:
function FCKeditor_OnComplete( editorInstance )
{
editorInstance.Events.AttachEvent( 'OnBlur', onEditorBlur ) ;
}
而OnBlur事件就会调用下面的函数
function onEditorBlur(){
var oSelect = $("img_select");
for(var i=oSelect.options.length-1; i>0; i--){
oSelect.options[i] = null;
}
oEditor = FCKeditorAPI.GetInstance('EditorDefault');
var imgs = oEditor.EditorDocument.body.all.tags("img");
for(var i=0; i < imgs.length; i++){
var oOption = document.createElement("option");
oOption.appendChild(document.createTextNode(imgs[i].src));
oSelect.appendChild(oOption);
}
}
# re: SpringSide开发实战(七):在项目中整合FCKeditor 回复 更多评论
2007-07-30 16:25 by
回帖,好,越来越喜欢blog主了
# re: SpringSide开发实战(七):在项目中整合FCKeditor 回复 更多评论
2007-08-13 19:59 by
可不可以发一下你修改后的源文件给我啊??谢谢了。。
我的邮箱;shendiao_no.1@163.com
# re: SpringSide开发实战(七):在项目中整合FCKeditor 回复 更多评论
2007-08-23 11:03 by
我想问下楼主我在利用FCK上传图片的时候出现 this file uploader is disabled,please check the WEB-INF/web.xml file,是什么问题啊?
# re: SpringSide开发实战(七):在项目中整合FCKeditor 回复 更多评论
2007-08-26 17:47 by
@乌龙
因为我的电脑曾多次重新分区重装系统,因此也不知道原来的代码到哪里去了。
抱歉!
# re: SpringSide开发实战(七):在项目中整合FCKeditor 回复 更多评论
2007-08-26 17:50 by
@Jessica
请看我文章中的第四大点
# re: SpringSide开发实战(七):在项目中整合FCKeditor 回复 更多评论
2007-08-28 14:24 by
好东东,收藏
# re: SpringSide开发实战(七):在项目中整合FCKeditor 回复 更多评论
2007-10-09 17:04 by
@Jessica
<init-param>
<param-name>enabled</param-name>
<param-value>true</param-value>
</init-param>
在web.xml中设enabled为true
# re: SpringSide开发实战(七):在项目中整合FCKeditor[未登录] 回复 更多评论
2007-10-13 00:19 by
好东东,收藏啦。
# re: SpringSide开发实战(七):在项目中整合FCKeditor 回复 更多评论
2008-02-18 22:43 by
有深度,学习。
# re: SpringSide开发实战(七):在项目中整合FCKeditor 回复 更多评论
2008-02-19 09:03 by
好东西!
# re: SpringSide开发实战(七):在项目中整合FCKeditor 回复 更多评论
2008-03-25 21:35 by
记号!
# re: SpringSide开发实战(七):在项目中整合FCKeditor 回复 更多评论
2008-04-04 15:28 by
博主真是好人。加油,继续关注您的博客
# re: SpringSide开发实战(七):在项目中整合FCKeditor 回复 更多评论
2008-06-17 22:20 by
博主真历害,讲得非常好!
想请教一个问题,为什么我在FCKeditor编辑器里粘贴来自网上的文章或word中的文章,前提是不去除原有的格式信息,当我点击发布后,JSP的POST页面出现出错误,在此上下文中不允许使用'times'。此处只允许使用常量、表达式或变量。不允许使用列名等错误,不知是什么原因,我如果在编辑器里粘贴的信息是去除掉格式的,那我点发布时没有问题,会正常保存到SQL2000的数据库的CONTENT字段中去,我的CONTENT字段用的是NTEXT类型.谢谢了!希望能帮我一下
郭中革
13867353043
# re: SpringSide开发实战(七):在项目中整合FCKeditor[未登录] 回复 更多评论
2008-08-05 12:44 by
你用的是哪个模板啊
# re: SpringSide开发实战(七):在项目中整合FCKeditor 回复 更多评论
2008-08-13 08:13 by
你用的是哪个模板啊
# re: SpringSide开发实战(七):在项目中整合FCKeditor 回复 更多评论
2009-01-09 02:05 by
博主写的真好
# re: SpringSide开发实战(七):在项目中整合FCKeditor 回复 更多评论
2009-04-02 16:56 by
嗯,不错。好像ECshop也是用的这个编辑器吧。
# re: SpringSide开发实战(七):在项目中整合FCKeditor 回复 更多评论
2009-04-27 21:34 by
博主,小弟资质愚钝,想请教个问题,var oSelect = $("img_select"); 是什么意思,我没看懂。因为在执行过程中,运行到这句时会报错。如果能解答的话,非常感谢
# re: SpringSide开发实战(七):在项目中整合FCKeditor[未登录] 回复 更多评论
2009-05-04 18:10 by
这个语句用到了Prototype库的$函数,要成功运行必须在你的页面中导入该库
# re: SpringSide开发实战(七):在项目中整合FCKeditor 回复 更多评论
2009-05-08 10:02 by
那么实际上var oSelect = $("img_select"); 和var oSelect = document.getElementById("img_select");是一回事吧?
# re: SpringSide开发实战(七):在项目中整合FCKeditor[未登录] 回复 更多评论
2009-05-11 18:15 by
是的
# re: SpringSide开发实战(七):在项目中整合FCKeditor 回复 更多评论
2009-05-13 21:21 by
谢谢博主!
# re: SpringSide开发实战(七):在项目中整合FCKeditor[未登录] 回复 更多评论
2009-05-26 17:10 by
有个问题啊,如果放在失去焦点事件里的话,切换到其他任何窗口时都会触发这个事件啊?但是这个时候实际上是不用触发事件的。所以这个楼主这个方法还不见得是最好的。
# re: SpringSide开发实战(七):在项目中整合FCKeditor 回复 更多评论
2009-05-26 17:48 by
楼上的有道理,不过在这个案例中这不是问题,因为我们只是要提取文章中的所有图片信息并加入下面的选择框而已。当然,如果是对于一些要弹出对话框这样的应用,那就比较烦人了。
# re: SpringSide开发实战(七):在项目中整合FCKeditor 回复 更多评论
2009-06-26 23:58 by
另外我还有个问题,就是在fck编辑器里,查看源代码,图片的路径是 src="/ztc/pubfile/image/2009/05/351117.jpg" ,但是为什么在选择框中出现的却是 http://localhost:8080/ztc/pubfile/image/2009/05/351117.jpg" target="_new" rel="nofollow"> http://localhost:8080/ztc/pubfile/image/2009/05/351117.jpg
,为什么会出现前面的那一串东西 http://localhost:8080?为什么选择框中不是/ztc/pubfile/image/2009/05/351117.jpg
# re: SpringSide开发实战(七):在项目中整合FCKeditor 回复 更多评论
2009-06-27 00:01 by
另外我还有个问题,就是在fck编辑器里,查看源代码,图片的路径是 src="/ztc/pubfile/image/2009/05/351117.jpg" ,但是为什么在选择框中出现的却是 http://localhost:8080/ztc/pubfile/image/2009/05/351117.jpg"" target="_new" rel="nofollow"> http://localhost:8080/ztc/pubfile/image/2009/05/351117.jpg",为什么会出现前面的那一串东西 http://localhost:8080?为什么选择框中不是/ztc/pubfile/image/2009/05/351117.jpg
# re: SpringSide开发实战(七):在项目中整合FCKeditor 回复 更多评论
2009-10-13 16:19 by
站长 这个编辑器 2.3 跟 2.4 之间有个问题,2.3 选择字体,鼠标点击不会还原上一个字体,但是 2.4选择字体后,鼠标点击时会还原上一个字体。这是配置问题,还是代码问题?
# re: SpringSide开发实战(七):在项目中整合FCKeditor 回复 更多评论
2009-10-30 19:29 by
LZ真强大 谢谢啦 研究研究
# re: SpringSide开发实战(七):在项目中整合FCKeditor 回复 更多评论
2012-04-03 13:10 by
<url-pattern>/fckeditor/editor/filemanager/browser/default/connectors/jsp/connector</url-pattern>
</servlet-mapping>
<servlet-mapping>
<servlet-name>SimpleUploader</servlet-name>
<url-pattern>/fckeditor/editor/filemanager/upload/simpleuploader</url-pattern>
楼主我的connectors下没jsp这个文件呀!!!
# re: SpringSide开发实战(七):在项目中整合FCKeditor[未登录] 回复 更多评论
2013-03-28 13:57 by
博主 我想您能给我发一份Java应用 fckeditor 的源码文件给我吗? 931594331@qq.com 或者 liaomingfu_java@163.com 非常谢谢!!!急求
|