温馨提示:您的每一次转载,体现了我写此文的意义!!!烦请您在转载时注明出处http://www.blogjava.net/sxyx2008/谢谢合作!!!

雪山飞鹄

温馨提示:您的每一次转载,体现了我写此文的意义!!!烦请您在转载时注明出处http://www.blogjava.net/sxyx2008/谢谢合作!!!

BlogJava 首页 新随笔 联系 聚合 管理
  215 Posts :: 1 Stories :: 674 Comments :: 0 Trackbacks

#

本文转自http://xphnet.hpsbhq.com/paperdetail.aspx?paperid=31

      1、功能讲解:
  innerHTML 设置或获取位于对象起始和结束标签内的 HTML
  outerHTML 设置或获取对象及其内容的 HTML 形式
  innerText 设置或获取位于对象起始和结束标签内的文本
  outerText 设置(包括标签)或获取(不包括标签)对象的文本
  2、示例代码(可直接复制后转存执行):
  <html>
  <head>
  <title>Demo</title>
  <style><!--
  body {font-family:"宋体";color="blue";font-size="9pt"}
  --> </style>
  <script language="JavaScript">
  //.innerHTML
  function innerHTMLDemo()
  {
   test_id1.innerHTML="<i><u>设置或获取位于对象起始和结束标签内的 HTML.</u></i>";
  }
  //.innerText
  function innerTextDemo()
  {
   test_id2.innerText="<i><u>设置或获取位于对象起始和结束标签内的文本.</u></i>";
  }
  //.outerHTML
  function outerHTMLDemo()
  {
   test_id3.outerHTML="<i><u>设置或获取对象及其内容的 HTML 形式.</u></i>";
  }
  //.outerText
  function outerTextDemo()
  {
   test_id4.outerText="<i><u>设置(包括标签)或获取(不包括标签)对象的文本.</u></i>";
  }
  </script>
  </head>
  <body>
  <ul>
  <li id="test_id1" onclick="innerHTMLDemo()">innerHTML效果.</li>
  <li id="test_id2" onclick="innerTextDemo()">innerText效果.</li>
  <li id="test_id3" onclick="outerHTMLDemo()">outerHTML效果.</li>
  <li id="test_id4" onclick="outerTextDemo()">outerText效果.</li>
  </ul>
  </body>
  </html>
  3、不同之处:
  简单的说innerHTML和outerHTML、innerText与outerText的不同之处在于:
  1)、innerHTML与outerHTML在设置对象的内容时包含的HTML会被解析,而innerText与outerText则不会。
  2)、在设置时,innerHTML与innerText仅设置标签内的文本,而outerHTML与outerText设置包括标签在内的文本。

posted @ 2010-11-03 10:38 雪山飞鹄 阅读(2096) | 评论 (2)编辑 收藏

点我下载工程代码
由于项目需求,在处理文件上传时需要使用到文件的异步上传。这里使用Jquery Ajax File Uploader这个组件下载地址http://www.phpletter.com/download_project_version.php?version_id=6
服务器端采用struts2来处理文件上传。
所需环境:
jquery.js
ajaxfileupload.js
struts2所依赖的jar包
及struts2-json-plugin-2.1.8.1.jar
编写文件上传的Action

package com.ajaxfile.action;

import java.io.File;
import java.io.FileInputStream;
import java.io.FileOutputStream;

import org.apache.struts2.ServletActionContext;

import com.opensymphony.xwork2.ActionSupport;

@SuppressWarnings(
"serial")
public class FileAction extends ActionSupport {

    
private File file;
    
private String fileFileName;
    
private String fileFileContentType;

    
private String message = "你已成功上传文件";
    
    
public String getMessage() {
        
return message;
    }

    
public void setMessage(String message) {
        
this.message = message;
    }

    
public File getFile() {
        
return file;
    }

    
public void setFile(File file) {
        
this.file = file;
    }

    
public String getFileFileName() {
        
return fileFileName;
    }

    
public void setFileFileName(String fileFileName) {
        
this.fileFileName = fileFileName;
    }

    
public String getFileFileContentType() {
        
return fileFileContentType;
    }

    
public void setFileFileContentType(String fileFileContentType) {
        
this.fileFileContentType = fileFileContentType;
    }

    @SuppressWarnings(
"deprecation")
    @Override
    
public String execute() throws Exception {
        
        String path 
= ServletActionContext.getRequest().getRealPath("/upload");

        
try {
            File f 
= this.getFile();
            
if(this.getFileFileName().endsWith(".exe")){
                message
="对不起,你上传的文件格式不允许!!!";
                
return ERROR;
            }
            FileInputStream inputStream 
= new FileInputStream(f);
            FileOutputStream outputStream 
= new FileOutputStream(path + "/"+ this.getFileFileName());
            
byte[] buf = new byte[1024];
            
int length = 0;
            
while ((length = inputStream.read(buf)) != -1) {
                outputStream.write(buf, 
0, length);
            }
            inputStream.close();
            outputStream.flush();
        } 
catch (Exception e) {
            e.printStackTrace();
            message 
= "对不起,文件上传失败了!!!!";
        }
        
return SUCCESS;
    }

}
struts.xml
<?xml version="1.0" encoding="UTF-8" ?>
<!DOCTYPE struts PUBLIC "-//Apache Software Foundation//DTD Struts Configuration 2.1//EN" "http://struts.apache.org/dtds/struts-2.1.dtd">
<struts>
    
<package name="struts2" extends="json-default">
        
<action name="fileUploadAction" class="com.ajaxfile.action.FileAction">
            
<result type="json" name="success">
                
<param name="contentType">
                    text/html
                
</param>
            
</result>
            
<result type="json" name="error">
                
<param name="contentType">
                    text/html
                
</param>
            
</result>
        
</action>
    
</package>
</struts>    
注意结合Action观察struts.xml中result的配置。 

contentType参数是一定要有的,否则浏览器总是提示将返回的JSON结果另存为文件,不会交给ajaxfileupload处理。这是因为struts2 JSON Plugin默认的contentType为application/json,而ajaxfileupload则要求为text/html。
文件上传的jsp页面

<%@ page language="java" contentType="text/html; charset=UTF-8"
    pageEncoding
="UTF-8"%>
<!DOCTYPE html PUBLIC "-//W3C//DTD HTML 4.01 Transitional//EN" "http://www.w3.org/TR/html4/loose.dtd">
<html>
    
<head>
        
<meta http-equiv="Content-Type" content="text/html; charset=UTF-8">
        
<title>Insert title here</title>
        
<script type="text/javascript" src="js/jquery.js"></script>
        
<script type="text/javascript" src="js/ajaxfileupload.js"></script>
        
<script type="text/javascript">
    
function ajaxFileUpload()
    {
        
        $(
"#loading")
        .ajaxStart(
function(){
            $(
this).show();
        })
//开始上传文件时显示一个图片
        .ajaxComplete(function(){
            $(
this).hide();
        });
//文件上传完成将图片隐藏起来
        
        $.ajaxFileUpload
        (
            {
                url:'fileUploadAction.action',
//用于文件上传的服务器端请求地址
                secureuri:false,//一般设置为false
                fileElementId:'file',//文件上传空间的id属性  <input type="file" id="file" name="file" />
                dataType: 'json',//返回值类型 一般设置为json
                success: function (data, status)  //服务器成功响应处理函数
                {
                    alert(data.message);
//从服务器返回的json中取出message中的数据,其中message为在struts2中action中定义的成员变量
                    
                    
if(typeof(data.error) != 'undefined')
                    {
                        
if(data.error != '')
                        {
                            alert(data.error);
                        }
else
                        {
                            alert(data.message);
                        }
                    }
                },
                error: 
function (data, status, e)//服务器响应失败处理函数
                {
                    alert(e);
                }
            }
        )
        
        
return false;

    }
    
</script>
    
</head>
    
<body>
        
<img src="loading.gif" id="loading" style="display: none;">
        
<input type="file" id="file" name="file" />
        
<br />
        
<input type="button" value="上传" onclick="return ajaxFileUpload();">
    
</body>
</html>

 注意观察<body>中的代码,并没有form表单。只是在按钮点击的时候触发ajaxFileUpload()方法。需要注意的是js文件引入的先后顺序,ajaxfileupload.js依赖于jquery因此你知道的。
点我下载工程代码

posted @ 2010-11-02 16:57 雪山飞鹄 阅读(60608) | 评论 (11)编辑 收藏

     摘要: 点我下载工程代码 实体类 Department package com.sj.bean; import java.util.Set; import javax.persistence.CascadeType; import javax.persistence.Column; import javax.persistence.E...  阅读全文
posted @ 2010-11-02 10:47 雪山飞鹄 阅读(20135) | 评论 (7)编辑 收藏

环境

UserDAO
package com.spring.dao;

import org.springframework.stereotype.Component;

@Component(
"userDAO")
public class UserDao {

    
public void say() {
        System.out.println(
"say method is called");
    }

    
public void smile() {
        System.out.println(
"smile method is called");
    }
    
    
public void cry() {
        System.out.println(
"cry method is called");
    }
    
    
public void jump() {
        System.out.println(
"jump method is called");
    }
}
不做过多解释,不清楚的可参考上篇Spring AOP之HelloWorld xml配置
UserService
package com.spring.service;

import javax.annotation.Resource;

import org.springframework.stereotype.Component;

import com.spring.dao.UserDao;

@Component(
"userService")
public class UserService {
    
    @Resource(name
="userDAO")
    
private UserDao dao;

    
public UserDao getDao() {
        
return dao;
    }

    
public void setDao(UserDao dao) {
        
this.dao = dao;
    }
    
    
public void say() {
        dao.say();
    }

    
public void smile() {
        dao.smile();
    }
    
    
public void cry() {
        dao.cry();
    }
    
    
public void jump() {
        dao.jump();
    }
}
Aop拦截类
package com.spring.aop;

import org.aspectj.lang.annotation.After;
import org.aspectj.lang.annotation.AfterThrowing;
import org.aspectj.lang.annotation.Aspect;
import org.aspectj.lang.annotation.Before;
import org.springframework.stereotype.Component;

@Component(
"logIntercepter")
@Aspect
public class LogIntercepter {
    
    
/*public void before(){
        System.out.println("----------before-------------");
    }
    
    public void after(){
        System.out.println("----------after-------------");
    }
    
    public void exception(){
        System.out.println("----------exception-------------");
    }
    
    public void around(){
        System.out.println("----------exception-------------");
    }
*/
    
    @Before(
"execution(* com.spring.service..*.*(..))")
    
public void before(){
        System.out.println(
"----------before-------------");
    }
    
    @After(
"execution(* com.spring.service..*.*(..))")
    
public void after(){
        System.out.println(
"----------after-------------");
    }
    
    @AfterThrowing(
"execution(* com.spring.service..*.*(..))")
    
public void exception(){
        System.out.println(
"----------exception-------------");
    }
    
    
/*@Around("execution(* com.spring.service..*.*(..))")
    public void around(){
        System.out.println("----------exception-------------");
    }
*/


}
注意观察
此类使用了@Aspect注解,你需要在spring配置文件中使用<aop:aspectj-autoproxy/>标签开启注解功能
接下来依次定义了一系列方法before、after、exception、around依次标注注解为@Before("execution(* com.spring.service..*.*(..))") 、@After("execution(* com.spring.service..*.*(..))")、@AfterThrowing("execution(* com.spring.service..*.*(..))")、@Around("execution(* com.spring.service..*.*(..))") ,分别为spring aop 的前置通知、后置通知、异常通知、环绕通知,当进入com.spring.service包或子包下的所有方法时他们都会起作用,其中异常通知,只有在该方法出现异常时才会调用
applicationContext.xml
<?xml version="1.0" encoding="UTF-8"?>
<beans xmlns="http://www.springframework.org/schema/beans"
    xmlns:xsi
="http://www.w3.org/2001/XMLSchema-instance" 
    xmlns:p
="http://www.springframework.org/schema/p"
    xmlns:context
="http://www.springframework.org/schema/context"
    xmlns:aop
="http://www.springframework.org/schema/aop"
    xsi:schemaLocation
="http://www.springframework.org/schema/beans 
    http://www.springframework.org/schema/beans/spring-beans-3.0.xsd
    http://www.springframework.org/schema/context 
    http://www.springframework.org/schema/context/spring-context-3.0.xsd
    http://www.springframework.org/schema/aop
    http://www.springframework.org/schema/aop/spring-aop-3.0.xsd"
>
    
<context:annotation-config/>
    
<context:component-scan base-package="com.spring.*"/>
    
<aop:aspectj-autoproxy/>
    
    
<!-- 
        <aop:config>
            <aop:aspect id="aspect" ref="logIntercepter">
                <aop:pointcut expression="execution(* com.spring.service..*(..))" id="pointCut"/>
                <aop:before method="before" pointcut-ref="pointCut"/>
                <aop:after method="after" pointcut-ref="pointCut"/>
                <aop:after-throwing method="exception" pointcut-ref="pointCut"/>
                    <aop:around method="around" pointcut-ref="pointCut"/>
            </aop:aspect>
        </aop:config>
    
-->
        
</beans>
内容很简单
就这三行
<context:annotation-config/>
<context:component-scan base-package="com.spring.*"/>
<aop:aspectj-autoproxy/>
其中注视部分为xml配置部分的代码
单元测试
package com.spring.test;

import javax.annotation.Resource;

import org.junit.Test;
import org.springframework.test.context.ContextConfiguration;
import org.springframework.test.context.junit4.AbstractJUnit4SpringContextTests;

import com.spring.service.UserService;

@ContextConfiguration(locations
="classpath:applicationContext.xml")
public class SpringTest extends AbstractJUnit4SpringContextTests {

    @Resource(name
="userService")
    
private UserService userService;
    
    @Test
    
public void test1(){
        userService.say();
        System.out.println();
        userService.smile();
        System.out.println();
        userService.cry();
    }
    
}
运行结果

----------before-------------
say method is called
----------after-------------

----------before-------------
smile method is called
----------after-------------

----------before-------------
cry method is called
----------after-------------

点我下载工程代码

posted @ 2010-10-29 11:11 雪山飞鹄 阅读(2067) | 评论 (0)编辑 收藏

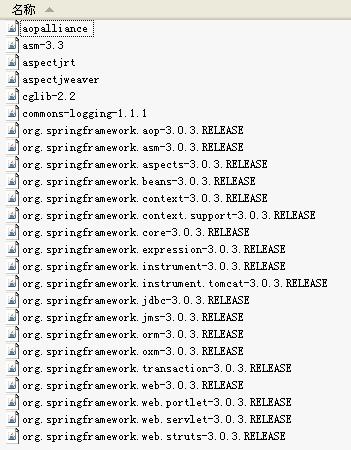
所需jar包

编写dao
package com.spring.dao;

import org.springframework.stereotype.Component;

@Component(
"userDAO")
public class UserDao {

    
public void say() {
        System.out.println(
"say method is called");
    }

    
public void smile() {
        System.out.println(
"smile method is called");
    }
    
    
public void cry() {
        System.out.println(
"cry method is called");
    }
    
    
public void jump() {
        System.out.println(
"jump method is called");
    }
}
注意观察包名。@Component("userDAO")等价于在spring配置文件中定义一个<bean id="userDAO"/>
编写Service
package com.spring.service;

import javax.annotation.Resource;

import org.springframework.stereotype.Component;

import com.spring.dao.UserDao;

@Component(
"userService")
public class UserService {
    
    @Resource(name
="userDAO")
    
private UserDao dao;

    
public UserDao getDao() {
        
return dao;
    }

    
public void setDao(UserDao dao) {
        
this.dao = dao;
    }
    
    
public void say() {
        dao.say();
    }

    
public void smile() {
        dao.smile();
    }
    
    
public void cry() {
        dao.cry();
    }
    
    
public void jump() {
        dao.jump();
    }
}
注意观察包名。@Component("userService")等价于在spring配置文件中定义一个<bean id="userService"/> @Resource(name="userDAO")将userDA注入进来
写一个拦截器的类
package com.spring.aop;

import org.springframework.stereotype.Component;

@Component(
"logIntercepter")
public class LogIntercepter {
    
    
public void before(){
        System.out.println(
"----------before-------------");
    }
    
    
public void after(){
        System.out.println(
"----------after-------------");
    }
    
    
public void exception(){
        System.out.println(
"----------exception-------------");
    }
    
    
public void around(){
        System.out.println(
"----------exception-------------");
    }
}
注意观察包名。@Component("logIntercepter")等价于在spring配置文件中定义一个<bean id="logIntercepter"/>
applicationContext.xml
<?xml version="1.0" encoding="UTF-8"?>
<beans xmlns="http://www.springframework.org/schema/beans"
    xmlns:xsi
="http://www.w3.org/2001/XMLSchema-instance" 
    xmlns:p
="http://www.springframework.org/schema/p"
    xmlns:context
="http://www.springframework.org/schema/context"
    xmlns:aop
="http://www.springframework.org/schema/aop"
    xsi:schemaLocation
="http://www.springframework.org/schema/beans 
    http://www.springframework.org/schema/beans/spring-beans-3.0.xsd
    http://www.springframework.org/schema/context 
    http://www.springframework.org/schema/context/spring-context-3.0.xsd
    http://www.springframework.org/schema/aop
    http://www.springframework.org/schema/aop/spring-aop-3.0.xsd"
>
    
<context:annotation-config/>
    
<context:component-scan base-package="com.spring.*"/>
        
<aop:config>
            
<aop:aspect id="aspect" ref="logIntercepter">
                
<aop:pointcut expression="execution(* com.spring.service..*(..))" id="pointCut"/>
                
<aop:before method="before" pointcut-ref="pointCut"/>
                
<aop:after method="after" pointcut-ref="pointCut"/>
                
<aop:after-throwing method="exception" pointcut-ref="pointCut"/>
                
<!-- 
                    <aop:around method="around" pointcut-ref="pointCut"/>
                 
-->
            
</aop:aspect>
        
</aop:config>
</beans>
<context:annotation-config/>
 <context:component-scan base-package="com.spring.*"/>
两行为开启spring的注解配置
<aop:aspect id="aspect" ref="logIntercepter"> 引入具体的AOP操作类
<aop:pointcut expression="execution(* com.spring.service..*(..))" id="pointCut"/>声明一个切入点,注意execution表达式的写法
<aop:before method="before" pointcut-ref="pointCut"/> aop前置通知
<aop:after method="after" pointcut-ref="pointCut"/> aop后置通知,
<aop:after-throwing method="exception" pointcut-ref="pointCut"/> aop异常通知
以上结合起来意思就是在调用com.spring.service包或子包下的所有方法之前或之后或抛出异常时依次调用id为logIntercepter的类中的before after exception方法
测试用例
package com.spring.test;

import javax.annotation.Resource;

import org.junit.Test;
import org.springframework.test.context.ContextConfiguration;
import org.springframework.test.context.junit4.AbstractJUnit4SpringContextTests;

import com.spring.service.UserService;

@ContextConfiguration(locations
="classpath:applicationContext.xml")
public class SpringTest extends AbstractJUnit4SpringContextTests {

    @Resource(name
="userService")
    
private UserService userService;
    
    @Test
    
public void test1(){
        userService.say();
        System.out.println();
        userService.smile();
        System.out.println();
        userService.cry();
    }
    
}
此单元测试基于spring的AbstractJUnit4SpringContextTests,你需要添加spring的关于单元测试的支持
在类上标注@ContextConfiguration(locations="classpath:applicationContext.xml")意思是去classpath路径下加载applicationContext.xml
@Resource(name="userService")意思是把userService注入进来

最终输出结果为:

----------before-------------
say method is called
----------after-------------

----------before-------------
smile method is called
----------after-------------

----------before-------------
cry method is called
----------after-------------


点我下载工程代码
posted @ 2010-10-29 10:36 雪山飞鹄 阅读(2618) | 评论 (0)编辑 收藏

温馨提示:
        以下异常仅在Spring3.0.3版本中遇到,其他版本可能也会遇到,读者可作参考。不保证会顺利通过。
        近期在学习Spring3的一些新特性,一般在项目开发中为了方便期间,都是借助myeclipse工具来添加ssh支持,很少手动添jar包。这里想自虐一下,体验一下jar包冲突或找不到类的那种感觉,在此也将在Spring3.0中AOP开发过程中遇到的异常什么的记录出来,可以方便更多人,快速定位错误。

第一个异常
java.lang.NoClassDefFoundError: org/apache/commons/logging/LogFactory
有过开发经验的一眼就可以看出,这是缺少commons-logging.jar包,因为spring中使用它来记录日志,而spring3.0.3这个版本中并没有该jar,自行到apache网站下载添加该jar即可

第二个异常
在使用AOP的注解时需要用到aopalliance.jar 、aspectjrt.jar 、aspectjweaver.jar,而此三个jar包并未在spring3.0.3的发布中提供需要开发者自行添加

第三个异常
org.springframework.aop.framework.AopConfigException: Cannot proxy target class because CGLIB2 is not available. Add CGLIB to the class path or specify proxy interfaces
从异常信息可以看出是cglib的问题,而我们去检查项目,却发现项目中并未cglib的jar,那么你可能想到的是缺少cglib这个jar包,没错,你的思路是正确的,你具有做javaee开发的思维,添加cglib-2.2.jar即可
第四个异常,这也是开发中每个人都会遇到的一个异常,堪称ssh开发中的经典,如果你是一位技术主管,那么你可以同过此异常去考查一个新人,一看便知,他有没有javaee开发经验。呵呵,废话这么多了,不知道你有没有猜到是什么了。还是我来告诉你吧,那就是经典的asm.jar包冲突,你的答案正确吗?不正确,没关系,你只要记下如何解决就可以了,这个异常保证你在工作中遇到或在面试中问到,那么它的重要性可想而知了。

下面分环境来介绍该jar包冲突的解决方案。

在spring3.0以下的环境中(适应于ssh),若出现该jar包冲突,你需要删除带版本号的那个asm.jar,而保留不带版本号的那个asm.jar即可

在spring3.0的环境中,大家仔细检查的话发现spring也带了一个名为org.springframework.asm-3.0.3.RELEASE.jar的jar包,而在开发中仅仅使用这个jar包还是不够的,你还需要额外的去添加asm.jar,那么这个asm.jar到底是那个版本了?用大腿想想?记得胡叔叔上台的时候提过与时俱进这个词,呵呵,人家是说政治的,我这是说开发的,既然spring是3.0的版本,那么asm.jar这个jar包版本肯定也是3.0以上版本啦,要与时俱进嘛。下载地址http://forge.ow2.org/projects/asm/ 我们会看到一个3.3的版本。
可能见到的异常信息
 java.lang.NoClassDefFoundError: org/objectweb/asm/Type
org.objectweb.asm.ClassVisitor.visit
asm3.3.jar,你值得拥有!

posted @ 2010-10-29 09:46 雪山飞鹄 阅读(4932) | 评论 (3)编辑 收藏

     摘要: 使用javamail接收电子邮件代码 import java.io.BufferedInputStream; import java.io.BufferedOutputStream; import java.io.File; import java.io.FileOutputStream; import java.io.InputStre...  阅读全文
posted @ 2010-10-21 11:45 雪山飞鹄 阅读(2550) | 评论 (3)编辑 收藏

        在这一年多时间里,由于项目多半使用的是jdbc,很少使用到Hibernate、JPA、Ibatis等持久层框架。最多使用上spring的jdbcTemplate 久而久之,之前学习的这些持久层框架的映射配置忘的差不多了。借近期有时间,抽空复习了下以上三个持久层框架。现将项目中常用的映射关系的关联配置整理如下:
JPA:

JPA主键双向关联一对一映射

JPA外键双向关联一对一映射

JPA双向关联多对一映射

JPA多对多双向关联


Hibernate:

Hibernate一对一主键双向关联映射(xml配置)

Hibernate一对一主键双向关联映射(Annotation配置)

Hibernate一对一外键双向关联(xml配置篇)

Hibernate一对一外键双向关联(Annotation配置篇)

Hibernate多对一双向关联(xml配置)

Hibernate多对一双向关联(Annotation配置)

Hibernate多对多双向关联(xml配置)

Hibernate多对多双向关联(Annotation配置)


使用Xdoclet和Ant构建Hibernate映射和配置文件

使用Xdoclet和Ant构建Hibernate映射和配置文件


Ibatis
使用ibatis完成持久化工作


ibatis陆续更新中。。。。。期待下篇ibatis多对一双向关联映射
posted @ 2010-10-18 21:41 雪山飞鹄 阅读(2343) | 评论 (1)编辑 收藏


Role.java
package com.many2many.bean;

import java.util.Set;

import javax.persistence.CascadeType;
import javax.persistence.Column;
import javax.persistence.Entity;
import javax.persistence.GeneratedValue;
import javax.persistence.GenerationType;
import javax.persistence.Id;
import javax.persistence.ManyToMany;
import javax.persistence.Table;

@Entity
@Table(name
="roles",catalog="Hibernate_Many2Many")
public class Role {
    
    
private int id;
    
private String name;
    
private Set<User> users;
    @Id
    @Column(name
="id")
    @GeneratedValue(strategy
=GenerationType.AUTO)
    
public int getId() {
        
return id;
    }
    
public void setId(int id) {
        
this.id = id;
    }
    @Column(name
="name")
    
public String getName() {
        
return name;
    }
    
public void setName(String name) {
        
this.name = name;
    }
    @ManyToMany(mappedBy
="roles",cascade=CascadeType.ALL)
    
public Set<User> getUsers() {
        
return users;
    }
    
public void setUsers(Set<User> users) {
        
this.users = users;
    }
    
}
User.java
package com.many2many.bean;

import java.util.Set;

import javax.persistence.CascadeType;
import javax.persistence.Column;
import javax.persistence.Entity;
import javax.persistence.GeneratedValue;
import javax.persistence.GenerationType;
import javax.persistence.Id;
import javax.persistence.JoinColumn;
import javax.persistence.JoinTable;
import javax.persistence.ManyToMany;
import javax.persistence.Table;

@Entity
@Table(name
="users",catalog="Hibernate_Many2Many")
public class User {
    
    
private int id;
    
private String name;
    
private Set<Role> roles;
    @Id
    @Column(name
="id")
    @GeneratedValue(strategy
=GenerationType.AUTO)
    
public int getId() {
        
return id;
    }
    
public void setId(int id) {
        
this.id = id;
    }
    @Column(name
="name")
    
public String getName() {
        
return name;
    }
    
public void setName(String name) {
        
this.name = name;
    }
    @ManyToMany(cascade
=CascadeType.ALL)
    @JoinTable(
            name
="user_role",
            joinColumns
=@JoinColumn(name="user_id"),
            inverseJoinColumns
=@JoinColumn(name="role_id")
    )
    
public Set<Role> getRoles() {
        
return roles;
    }
    
public void setRoles(Set<Role> roles) {
        
this.roles = roles;
    }
    
}
导出的sql
create table Hibernate_Many2Many.roles (
        id 
integer not null auto_increment,
        name 
varchar(255),
        
primary key (id)
    )

    
create table Hibernate_Many2Many.users (
        id 
integer not null auto_increment,
        name 
varchar(255),
        
primary key (id)
    )

    
create table user_role (
        
user_id integer not null,
        role_id 
integer not null,
        
primary key (user_id, role_id)
    )

    
alter table user_role 
        
add index FK143BF46ADA6B394F (role_id), 
        
add constraint FK143BF46ADA6B394F 
        
foreign key (role_id) 
        
references Hibernate_Many2Many.roles (id)

    
alter table user_role 
        
add index FK143BF46A7F95FD2F (user_id), 
        
add constraint FK143BF46A7F95FD2F 
        
foreign key (user_id
        
references Hibernate_Many2Many.users (id)

测试代码
@Test
    
public void insert(){
        Session session
=HibernateSessionFactory.getSession();
        Transaction transaction
=session.beginTransaction();
        
try {
            transaction.begin();
            User user
=new User();
            user.setName(
"张三");
            
            Role role
=new Role();
            role.setName(
"管理员");
            Set
<Role> roles=new HashSet<Role>();
            roles.add(role);
            user.setRoles(roles);
            
            session.persist(user);
            
            transaction.commit();
        } 
catch (HibernateException e) {
            e.printStackTrace();
            transaction.rollback();
        }
    }
    
    
    @Test
    
public void select(){
        Session session
=HibernateSessionFactory.getSession();
        User user
=(User) session.get(User.class1);
        System.out.println(user.getName());
        Set
<Role> roles=user.getRoles();
        
for (Iterator<Role> iterator = roles.iterator(); iterator.hasNext();) {
            Role role 
= (Role) iterator.next();
            System.out.println(role.getName());
        }
    }
posted @ 2010-10-18 21:15 雪山飞鹄 阅读(2116) | 评论 (1)编辑 收藏


Role.java
package com.many2many.bean;

import java.util.Set;

public class Role {
    
    
private int id;
    
private String name;
    
private Set<User> users;
    
public int getId() {
        
return id;
    }
    
public void setId(int id) {
        
this.id = id;
    }
    
public String getName() {
        
return name;
    }
    
public void setName(String name) {
        
this.name = name;
    }
    
public Set<User> getUsers() {
        
return users;
    }
    
public void setUsers(Set<User> users) {
        
this.users = users;
    }
    
}
User.java
package com.many2many.bean;

import java.util.Set;

public class User {
    
    
private int id;
    
private String name;
    
private Set<Role> roles;
    
public int getId() {
        
return id;
    }
    
public void setId(int id) {
        
this.id = id;
    }
    
public String getName() {
        
return name;
    }
    
public void setName(String name) {
        
this.name = name;
    }
    
public Set<Role> getRoles() {
        
return roles;
    }
    
public void setRoles(Set<Role> roles) {
        
this.roles = roles;
    }
    
}
映射文件
Role.hbm.xml
<?xml version="1.0" encoding="UTF-8"?>
<!DOCTYPE hibernate-mapping PUBLIC 
    "-//Hibernate/Hibernate Mapping DTD 3.0//EN"
    "http://hibernate.sourceforge.net/hibernate-mapping-3.0.dtd"
>
    
<hibernate-mapping package="com.many2many.bean">
        
<class name="Role" table="roles" catalog="Hibernate_Many2Many">
            
<id name="id" column="id">
                
<generator class="native"/>
            
</id>
            
<property name="name" column="name"/>
            
<set name="users" table="user_role" cascade="all">
                
<key>
                    
<column name="role_id"/>
                
</key>
                
<many-to-many column="user_id" class="User"/>
            
</set>
        
</class>
    
</hibernate-mapping>

User.hbm.xml
<?xml version="1.0" encoding="UTF-8"?>
<!DOCTYPE hibernate-mapping PUBLIC 
    "-//Hibernate/Hibernate Mapping DTD 3.0//EN"
    "http://hibernate.sourceforge.net/hibernate-mapping-3.0.dtd"
>
    
<hibernate-mapping package="com.many2many.bean">
        
<class name="User" table="users" catalog="Hibernate_Many2Many">
            
<id name="id" column="id">
                
<generator class="native"/>
            
</id>
            
<property name="name" column="name"/>
            
<set name="roles" table="user_role" cascade="all">
                
<key>
                    
<column name="user_id"/>
                
</key>
                
<many-to-many column="role_id" class="Role"/>
            
</set>
        
</class>
    
</hibernate-mapping>

导出的sql
create table Hibernate_Many2Many.roles (
        id 
integer not null auto_increment,
        name 
varchar(255),
        
primary key (id)
    )

    
create table Hibernate_Many2Many.users (
        id 
integer not null auto_increment,
        name 
varchar(255),
        
primary key (id)
    )

    
create table user_role (
        role_id 
integer not null,
        
user_id integer not null,
        
primary key (user_id, role_id)
    )

    
alter table user_role 
        
add index FK143BF46ADA6B394F (role_id), 
        
add constraint FK143BF46ADA6B394F 
        
foreign key (role_id) 
        
references Hibernate_Many2Many.roles (id)

    
alter table user_role 
        
add index FK143BF46A7F95FD2F (user_id), 
        
add constraint FK143BF46A7F95FD2F 
        
foreign key (user_id
        
references Hibernate_Many2Many.users (id)

测试代码
@Test
    
public void insert(){
        Session session
=HibernateSessionFactory.getSession();
        Transaction transaction
=session.beginTransaction();
        
try {
            transaction.begin();
            User user
=new User();
            user.setName(
"张三");
            
            Role role
=new Role();
            role.setName(
"管理员");
            Set
<Role> roles=new HashSet<Role>();
            roles.add(role);
            user.setRoles(roles);
            
            session.persist(user);
            
            transaction.commit();
        } 
catch (HibernateException e) {
            e.printStackTrace();
            transaction.rollback();
        }
    }
    
    
    @Test
    
public void select(){
        Session session
=HibernateSessionFactory.getSession();
        User user
=(User) session.get(User.class1);
        System.out.println(user.getName());
        Set
<Role> roles=user.getRoles();
        
for (Iterator<Role> iterator = roles.iterator(); iterator.hasNext();) {
            Role role 
= (Role) iterator.next();
            System.out.println(role.getName());
        }
    }
posted @ 2010-10-18 21:06 雪山飞鹄 阅读(4360) | 评论 (0)编辑 收藏

仅列出标题
共22页: First 上一页 6 7 8 9 10 11 12 13 14 下一页 Last