
2011年5月24日
import org.eclipse.swt.SWT;
import org.eclipse.swt.events.SelectionAdapter;
import org.eclipse.swt.events.SelectionEvent;
import org.eclipse.swt.layout.GridLayout;
import org.eclipse.swt.widgets.Combo;
import org.eclipse.swt.widgets.Display;
import org.eclipse.swt.widgets.Shell;
public class ComboTest {
public static void main(String[] args) {
String[] WEEK = { "Monday", "Tuesday", "Wednesday"};
Display display = new Display();
Shell shell = new Shell(display);
shell.setBounds(500, 100, 500, 300);
shell.setText("Combo");
shell.setLayout(new GridLayout(3, true));
//创建Combo组件,为下拉列表样式
final Combo dc = new Combo(shell, SWT.DROP_DOWN);
dc.setItems(WEEK);
dc.addSelectionListener(new SelectionAdapter(){
@Override
public void widgetSelected(SelectionEvent e) {
String key = ""+dc.getSelectionIndex();
String value = dc.getText();
System.out.println("key:"+key+" value:"+value);
}
});
//创建Combo组件,为下拉列表样式,且只读
final Combo rc = new Combo(shell, SWT.DROP_DOWN | SWT.READ_ONLY);
//在界面中显示的是123
rc.add("123");
//第一个值是key从0开始 ,第二个值为value
rc.setData("0", "321");
rc.add("456");
rc.setData("1", "654");
rc.addSelectionListener(new SelectionAdapter(){
@Override
public void widgetSelected(SelectionEvent e) {
String key = ""+rc.getSelectionIndex();
System.out.println("key:"+key);
String value = (String) rc.getData(key);
System.out.println("key:"+key+" value:"+value);
}
});
//rc.setItems(MONTHS);
//创建Combo组件,为List组件样式
Combo sc = new Combo(shell, SWT.SIMPLE);
sc.setItems(WEEK);
shell.open();
while (!shell.isDisposed()) {
if (!display.readAndDispatch()) {
display.sleep();
}
}
display.dispose();
}
}
posted @
2011-08-02 14:22 secret_x15 阅读(12929) |
评论 (0) |
编辑 收藏
1.点击 window -->Preferences -->XML -->XML Catalog -->Add..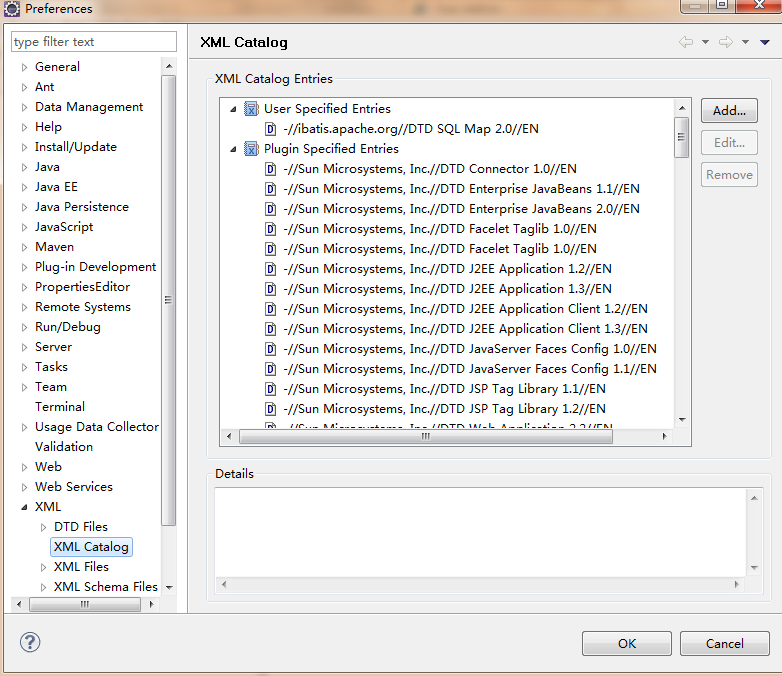
2.点击Add 弹出一个对话框,如图所示:
 :
:
3.填写文本框中的内容
Location : dtd的路径。可以是eclipse工作空间的dtd,也可以是文件中的dtd。
Key type:选择 Public ID
Key:为ibatis xml文件头中<!DOCTYPE sqlMapConfig PUBLIC 后面的一段。即:-//ibatis.apache.org//DTD SQL Map Config 2.0//EN
4. 点击OK 按钮,重启eclipse.
posted @
2011-06-29 18:18 secret_x15 阅读(5495) |
评论 (0) |
编辑 收藏"window.location.href"、"location.href"是本页面跳转.
"parent.location.href" 是上一层页面跳转.
"top.location.href" 是最外层的页面跳转.
举例说明:
如果A,B,C,D都是html,D是C的iframe,C是B的iframe,B是A的iframe,如果D中js这样写
"window.location.href"、"location.href":D页面跳转
"parent.location.href":C页面跳转
"top.location.href":A页面跳转
如果D页面中有form的话,
<form>: form提交后D页面跳转
<form target="_blank">: form提交后弹出新页面
<form target="_parent">: form提交后C页面跳转
<form target="_top"> : form提交后A页面跳转
如果访问的是iframe里面的页面,重新加载最外层的页面
<html>
<head>
<title></title>
<script language="javascript">
function escapeFrame(){
if (window.top.location.href != window.location.href) {
window.top.location.reload();
}
}
</script>
</head>
<body onload="escapeFrame()">
<iframe src="b.html" ></iframe>
</body>
</html>
posted @
2011-06-28 10:25 secret_x15 阅读(5536) |
评论 (1) |
编辑 收藏main方法:
public class Test {
public static void main(String[] args) {
/**
*
* sort()方法详解
* 1.Collections.sort(List<T> list)
* 根据元素的自然顺序 对指定列表按升序进行排序。
* 2.Collections.sort(List<T> list, Comparator<? super T> c)
* 根据指定比较器产生的顺序对指定列表进行排序。
*
*/
List<Integer> list = new ArrayList<Integer>();
list.add(3);
list.add(1);
list.add(2);
//自然顺序
Collections.sort(list);
for(Integer i:list){
System.out.println(i);
}
System.out.println("===============================================");
Point point2 = new Point(2,2,2);
Point point1 = new Point(1,1,1);
Point point3 = new Point(3,1,2);
List<Point> points = new ArrayList<Point>();
points.add(point2);
points.add(point1);
points.add(point3);
System.out.println("===============================================");
//根据point中的升序输出
Collections.sort(points, new SortByXdesc());
for(Point point:points){
System.out.println("x:"+point.getX()+" y:"+point.getY()+" z:"+point.getZ());
}
System.out.println("===============================================");
//根据point中的x降序输出
Collections.sort(points, new SortByXasc());
for(Point point:points){
System.out.println("x:"+point.getX()+" y:"+point.getY()+" z:"+point.getZ());
}
}
}
降序输出类SortByXdesc:
public class SortByXdesc implements Comparator<Object> {
//根据point中的x降序输出
@Override
public int compare(Object o1, Object o2) {
Point point1 =(Point)o1;
Point point2 =(Point)o2;
if(point1.getX()>point2.getX()){
return 1;
}else{
return 0;
}
}
}
升序输出类SortByXasc:
public class SortByXasc implements Comparator<Object> {
//根据point中的x升序输出
@Override
public int compare(Object o1, Object o2) {
Point point1 =(Point)o1;
Point point2 =(Point)o2;
if(point1.getX()>point2.getX()){
return 0;
}else{
return 1;
}
}
}
posted @
2011-06-22 16:03 secret_x15 阅读(6522) |
评论 (1) |
编辑 收藏 jquery radio取值,checkbox取值,select取值,radio选中,checkbox选中,select选中,及其相关
获取一组radio被选中项的值
var item = $('input[@name=items][@checked]').val();
获取select被选中项的文本
var item = $("select[@name=items] option[@selected]").text();
select下拉框的第二个元素为当前选中值
$('#select_id')[0].selectedIndex = 1;
radio单选组的第二个元素为当前选中值
$('input[@name=items]').get(1).checked = true;
获取值:
文本框,文本区域:
$("#txt").attr("value");
多选框checkbox:
$("#checkbox_id").attr("value");
单选组radio:
$("input[@type=radio][@checked]").val();
下拉框select: $('#sel').val();
控制表单元素:
文本框,文本区域:
$("#txt").attr("value",'');//清空内容
$("#txt").attr("value",'11');//填充内容
多选框checkbox:
$("#chk1").attr("checked",'');//不打勾
$("#chk2").attr("checked",true);//打勾
if($("#chk1").attr('checked')==undefined) //判断是否已经打勾
单选组radio:
$("input[@type=radio]").attr("checked",'2');//设置value=2的项目为当前选中项
下拉框select:
$("#sel").attr("value",'-sel3');//设置value=-sel3的项目为当前选中项
$("<option value='1'>1111</option><option value='2'>2222</option>").appendTo("#sel")//添加下拉框的option
$("#sel").empty();//清空下拉框
posted @
2011-06-21 15:00 secret_x15 阅读(306) |
评论 (0) |
编辑 收藏struts2里增加了一个新的UT标签s:checkboxlist,下面介绍下使用方法。
s:checkboxlist用于画面上显示一组复选框,缺省是横排输出,后面将介绍如何修改ftl文件使得它能按任意方式输出。
标签格式:
<s:checkboxlist name="" list="" listKey="" listValue="" value="" />
name-定义标签名,用于接收画面上选中的复选框,故应与Action里定义的属性一致,且多为数组;
list-定义集合变量,用于输出复选框到画面上,一般在Action里定义一个List或Map属性;
listKey-如果在Action里定义的是一个List,则往往会在List里定义一个Bean,它只有两个属性,其中一个(比如id)就在这里设置;
如果在Action里定义的是一个Map,则Map的key就在这里设置;
listValue-如果在Action里定义的是一个List,则往往会在List里定义一个Bean,它只有两个属性,另外一个(比如name)就在这里设置;
如果在Action里定义的是一个Map,则Map的value就在这里设置;
value-用于回显画面上被选中的复选框,假如画面有输入检查,如果有错则返回原画面并显示出错信息,这时候就需要使用它。
一般把它设成和name一致就可以了。
注意点:
为了能正确显示已被选中的复选框,一定要使得name的数组类型与listKey的类型一致。
比如,name设成String[] users,则listKey就要设成String id;如果name设成Integer[] users,则listKey就要设成Integer id;
修改ftl文件改变输出方式:
1.搜索struts2-core-xxx.jar,找到checkboxlist.ftl文件,拷贝出来;
2.在自己的工程的src下新建template.simple包,放置上述文件;
3.用文本编辑器打开该文件,修改成自己希望输出的格式,保存,OK;
例子:
希望画面上每3个复选框输出为一行。
<#--
/*
* $Id: checkboxlist.ftl 804072 2009-08-14 03:16:35Z musachy $
*
* Licensed to the Apache Software Foundation (ASF) under one
* or more contributor license agreements. See the NOTICE file
* distributed with this work for additional information
* regarding copyright ownership. The ASF licenses this file
* to you under the Apache License, Version 2.0 (the
* "License"); you may not use this file except in compliance
* with the License. You may obtain a copy of the License at
*
* http://www.apache.org/licenses/LICENSE-2.0
*
* Unless required by applicable law or agreed to in writing,
* software distributed under the License is distributed on an
* "AS IS" BASIS, WITHOUT WARRANTIES OR CONDITIONS OF ANY
* KIND, either express or implied. See the License for the
* specific language governing permissions and limitations
* under the License.
*/
-->
<#assign itemCount = 0/>
<#if parameters.list?exists>
<@s.iterator value="parameters.list">
<#assign itemCount = itemCount + 1/>
<#if parameters.listKey?exists>
<#assign itemKey = stack.findValue(parameters.listKey)/>
<#else>
<#assign itemKey = stack.findValue('top')/>
</#if>
<#if parameters.listValue?exists>
<#assign itemValue = stack.findString(parameters.listValue)/>
<#else>
<#assign itemValue = stack.findString('top')/>
</#if>
<#assign itemKeyStr=itemKey.toString() />
<#if (itemCount-1)%3 == 0>
<tr>
</#if>
<td>
<input type="checkbox" name="${parameters.name?html}" value="${itemKeyStr?html}" id="${parameters.name?html}-${itemCount}"<#rt/>
<#if tag.contains(parameters.nameValue, itemKey)>
checked="checked"<#rt/>
</#if>
<#if parameters.disabled?default(false)>
disabled="disabled"<#rt/>
</#if>
<#if parameters.title?exists>
title="${parameters.title?html}"<#rt/>
</#if>
<#include "/${parameters.templateDir}/simple/scripting-events.ftl" />
<#include "/${parameters.templateDir}/simple/common-attributes.ftl" />
/>
<label for="${parameters.name?html}-${itemCount}" class="checkboxLabel">${itemValue?html}</label>
</td>
<#if itemCount%3 == 0>
</tr>
</#if>
</@s.iterator>
</#if>
<input type="hidden" id="__multiselect_${parameters.id?html}" name="__multiselect_${parameters.name?html}" value=""<#rt/>
<#if parameters.disabled?default(false)>
disabled="disabled"<#rt/>
</#if>
/>
posted @
2011-06-14 12:18 secret_x15 阅读(3186) |
评论 (0) |
编辑 收藏 BodyTagSupport类的方法:
编写标签对应的实现类时,需要重载BodyTagSupport类几个方法:doStartTag(), setBodyContent(), doInitBody(), doAfterBody(), doEndTag();
他们执行顺序如下:
doStartTag()→doInitBody()→setBodyContent()→doAfterBody()→doEndTag()
doStartTag()方法可返回EVAL_BODY_INCLUDE或SKIP_BODY,
如果返回EVAL_BODY_INCLUDE则继续执行;
如果返回SKIP_BODY则接下来的doInitBody(),setBodyContent(), doAfterBody()三个方法不会被执行,
而直接执行doEndTag()方法。
setBodyContent()方法用于设置标签体内容,如果在此之前要作一些初始化工作,则在doInitBody()方法中完成。
标签体内容执行完后,会调用doAfterBody()方法,此方法可返回EVAL_BODY_TAG, SKIP_BODY,
EVAL_PAGE或SKIP_PAGE。
如果返回EVAL_BODY_TAG则会再次设置标签体内容,直到返回SKIP_BODY;
如果返回EVAL_PAGE则标签体执行完后会继续执行JSP页面中接下来的部分;
如果返回SKIP_PAGE,则JSP页面的后续内容将不再执行。
标签中静态常量:
EVAL_BODY_INCLUDE:告诉服务器正文的内容,并把这些内容送入输出流
SKIP_BODY:告诉服务器不要处理正文内容
EVAL_PAGE:让服务器继续执行页面
SKIP_PAGE:让服务器不要处理剩余的页面
EVAL_BODY_AGAIN:让服务器继续处理正文内容,只有doAfterBody方法可以返回
EVAL_BODY_BUFFERED:BodyTag接口的字段,在doStartTag()返回
EVAL_BODY_INCLUDE、SKIP_BODY一般由doStartTag()返回,而EVAL_PAPGE、SKIP_PAGE由doEndTag()返回。 |
posted @
2011-06-14 12:16 secret_x15 阅读(637) |
评论 (0) |
编辑 收藏TagSupport与BodyTagSupport的区别
标签: TagSupport与BodyTagSupport的区别
1、 TagSupport与BodyTagSupport的区别
TagSupport与BodyTagSupport的区别主要是标签处理类是否需要与标签体交互,如果不需要交互的就用TagSupport,否则如果需要交互就用BodyTagSupport。
交互就是标签处理类是否要读取标签体的内容和改变标签体返回的内容。
用TagSupport实现的标签,都可以用BodyTagSupport来实现,因为BodyTagSupport继承了TagSupport。
2 、doStartTag(),doEndTag(),doAfterBody(),
doStartTag()方法是遇到标签开始时会呼叫的方法,其合法的返回值是EVAL_BODY_INCLUDE与SKIP_BODY,前者表示将显示标签间的文字,后者表示不显示标签间的文字;
doEndTag()方法是在遇到标签结束时呼叫的方法,其合法的返回值是EVAL_PAGE与 SKIP_PAGE,前者表示处理完标签后继续执行以下的JSP网页,后者是表示不处理接下来的JSP网页
doAfterBody()这个方法是在显示完标签间文字之后呼叫的,其返回值有EVAL_BODY_AGAIN与SKIP_BODY,前者会再显示一次标签间的文字,后者则继续执行标签处理的下一步。
EVAL_BODY_INCLUDE:把Body读入存在的输出流中,doStartTag()函数可用
EVAL_PAGE:继续处理页面,doEndTag()函数可用
SKIP_BODY:忽略对Body的处理,doStartTag()和doAfterBody()函数可用
SKIP_PAGE:忽略对余下页面的处理,doEndTag()函数可用
EVAL_BODY_TAG:已经废止,由EVAL_BODY_BUFFERED取代
EVAL_BODY_BUFFERED:申请缓冲区,由setBodyContent()函数得到的BodyContent对象来处理tag的body,如果类实现了BodyTag,那么doStartTag()可用,否则非法
EVAL_BODY_BUFFERED 要将BodyContent的内容输出 如:
JspWriter w = pageContext.getOut();
if (bodyContent != null) {
if (w instanceof BodyContent) {
w = ((BodyContent) w).getEnclosingWriter();
}
}
String cnt = this.bodyContent.getString();
try {
w.write(cnt);
} catch (IOException e) {
e.printStackTrace();
}
预定的处理顺序是:doStartTag()返回SKIP_BODY,doAfterBodyTag()返回SKIP_BODY,doEndTag()返回EVAL_PAGE.
如果继承了TagSupport之后,如果没有改写任何的方法,标签处理的执行顺序是:
doStartTag() ->不显示文字 ->doEndTag()->执行接下来的网页
如果您改写了doStartTag(),则必须指定返回值,如果指定了EVAL_BODY_INCLUDE,则执行顺序是
doStartTag()->显示文字->doAfterBodyTag()->doEndTag()->执行下面的网页
display.tld 源码
xml 代码:
<?xml version="1.0" encoding="UTF-8"?>
<!DOCTYPE taglib PUBLIC "-//Sun Microsystems, Inc.//DTD JSP Tag Library 1.1//EN" "http://java.sun.com/j2ee/dtds/web-jsptaglibrary_1_1.dtd">
<taglib>
<tlibversion>1.0</tlibversion>
<jspversion>1.1</jspversion>
<shortname>bean</shortname>
<uri>/WEB-INF/tld/display.tld</uri>
<tag>
<name>display</name>
<tagclass>com.liuzhe.common.DisplayTag</tagclass>
<bodycontent>JSP</bodycontent>
<info>display content</info>
<attribute>
<name></name>
<required></required>
<rtexprvalue></rtexprvalue>
</attribute>
</tag>
</taglib>
DisplayTag.java 源码
java 代码:
package com.liuzhe.common;
import java.io.IOException;
import javax.servlet.jsp.JspException;
import javax.servlet.jsp.JspWriter;
import javax.servlet.jsp.tagext.TagSupport;
public class DisplayTag extends TagSupport {
private static final long serialVersionUID = 4540106083884185193L;
@Override
public int doStartTag() throws JspException {
System.out.println("doStartTag()");
return EVAL_BODY_INCLUDE;
}
@Override
public int doAfterBody() throws JspException {
System.out.println("doAfterBody()");
return SKIP_BODY;
}
@Override
public int doEndTag() throws JspException {
System.out.println("doEndTag()");
JspWriter out = this.pageContext.getOut();
try {
out.print("hello!");
} catch (IOException e) {
e.printStackTrace();
}
return super.doEndTag();
}
}
index.jsp 源码
<%@ page language="java" contentType="text/html; charset=UTF-8" pageEncoding="UTF-8"%>
<%@ taglib uri="/WEB-INF/tld/display.tld" prefix="test" %>
<html>
<head>
<meta http-equiv="Content-Type" content="text/html; charset=UTF-8">
<title>Insert title here</title>
</head>
<body>
<test:display>test<br></test:display>
</body>
</html>
注意:这里的“test” 显示在 hello 前面证明啦 它是先执行index.jsp 中标签中的内容后才执行doEndTag()
posted @
2011-06-14 09:54 secret_x15 阅读(586) |
评论 (0) |
编辑 收藏
import java.util.Formatter;
public class Receipt {
private double total = 0;
private Formatter f = new Formatter(System.out);
public void printTitle(){
f.format("%-15s %5s %10s\n", "Item","Qty","Price");
f.format("%-15s %5s %10s\n", "----","---","-----");
}
public void print(String name,int qty,double price){
f.format("%-15.15s %5d %10.2f\n", name,qty,price);
total += price;
}
public void printTotal(){
f.format("%-15.15s %5s %10.2f\n", "Tax","",total*0.06);
f.format("%-15.15s %5s %10s\n", "","","-----");
f.format("%-15s %5s %10.2f\n", "Total","",total*1.06);
}
public static void main(String[] args) {
Receipt receipt = new Receipt();
receipt.printTitle();
receipt.print("Jack's Magic Beans", 4, 4.25);
receipt.print("Princess Peas", 3, 5.1);
receipt.print("Three Bears Porridge", 1, 14.29);
receipt.printTotal();
}
/*
%[argument_index$][flag][width][.precision]conversion
在默认的情况下,数据是右对齐,通过“-”标志来改变对齐方向
width可以用于各种类型的数据转换
precision不是所有类型的数据都能使用precision,用于不同数据时的意义不同。
1.应用于String时,它表示打印String时输出字符的最大数量。
2.应用于浮点数时,它表示小数部分显示出来的位数(默认是6位小数),如果小数位数过多四舍五入,太少尾部补零。
3.应用于整数时,由于整数没有小数部分,则会触发异常。
*/
}
类型转换字符
d 整数类型
e 浮点数(科学计数)
c Unicode字符
x 整数(十六进制)
b Boolean值
h 散列码(十六进制)
s String % 字符%
f 浮点数(十进制)
posted @
2011-05-24 12:47 secret_x15 阅读(536) |
评论 (0) |
编辑 收藏