今天我们进行SSH配置的最后一步Hibernate的集成。
四,集成Hibernate
4.1 集成Hibernate相关的:
a) 这里我们采用的proxool连接池。
据说在Hibernate提供的三种连接池中,效率最好的一个。这里我且听信网络大众的话,等以后我有技术有能力了,一定会亲自测试一下。
b) Hibernate映射采用Hibernate Annonations 技术。
还是在网上,翻了一堆资料后,发现annonations是最为优雅,也是最为省力,效率最高的
4.2 先创建一个数据库。这里我创建一个叫 miziData 的数据库,并新建了一个叫User的表,这用来最后我们测试用。

 /**//*==============================================================*/
/**//* DBMS name: MySQL5 */
/**//* Created on: 2009-04-27 22:50*/
/**//*==============================================================*/
 SET FOREIGN_KEY_CHECKS=0;
DROP DATABASE IF EXISTS `miziData`;
CREATE DATABASE `miziData`
CHARACTER SET 'utf8'
COLLATE 'utf8_general_ci';
USE `miziData`;
/**//*==============================================================*/
/**//* Table: USER */
/**//*==============================================================*/
create table USER (
ID varchar(32) not null,
USERNAME varchar(32) null,
SEX int null,
AGE int null,
PASSWORD varchar(32) null,
CREATEDATE datetime null,
constraint PK_USER primary key (ID)
)
type = InnoDB;
4.3 配置proxool连接池信息,在src下面新建一个proxool.xml文件,并修改内容如下:
<?xml version="1.0" encoding="utf-8"?>
<!-- the proxool configuration can be embedded within your own application's.
Anything outside the "proxool" tag is ignored. -->
<something-else-entirely>
<proxool>
<!-- ### 连接池别名########### -->
<alias>DbPool</alias>
<!-- ### proxool只能管理自己产生的连接########### -->
<driver-url>jdbc:mysql://localhost:3306/miziData?characterEncoding=UTF-8</driver-url>
<!-- ###JDBC驱动程式########### -->
<driver-class>com.mysql.jdbc.Driver</driver-class>
<!-- ### 数据库信息########### -->
<driver-properties>
<property name="user" value="root"/>
<property name="password" value="root"/>
</driver-properties>
<!-- ### proxool自动侦察各个连接状态的时间间隔(毫秒),侦察到空闲的连接就马上回收,超时的销毁 ########### -->
<house-keeping-sleep-time>28000</house-keeping-sleep-time>
<!-- ### 空闲连接最少保持数########### -->
<prototype-count>10</prototype-count>
<!-- ### 最大/最小连接数########### -->
<maximum-connection-count>50</maximum-connection-count>
<minimum-connection-count>10</minimum-connection-count>
<!-- ### 最大/最小连接数########### -->
<maximum-active-time>3600000</maximum-active-time>
<!-- ### 如果发现了空闲的数据库连接
house keeper 将会用这个语句来测试.这个语句最好非常快的被执行.
如果没有定义,测试过程将会被忽略########### -->
<house-keeping-test-sql>select CURRENT_DATE</house-keeping-test-sql>
<!-- ### 如果为true,在每个连接被测试前都会服务这个连接,如果一个连接失败,那么将被丢弃,
另一个连接将会被处理,如果所有连接都失败,一个新的连接将会被建立。否则将会抛出一个SQLException异常########### -->
<test-before-use>true</test-before-use>
<!-- ### 如果为true,那么每个被执行的SQL语句将会在执行期被log记录(DEBUG LEVEL).
你也可以注册一个ConnectionListener (参看ProxoolFacade)得到这些信息########### -->
<trace>true</trace>
<!-- ### 日志统计跟踪类型 ########### -->
<statistics-log-level>DEBUG</statistics-log-level>
</proxool>
</something-else-entirely>
4.4 在Src下新建hibernate.xml,并修改内容如下:
<?xml version='1.0' encoding='UTF-8'?>
<!DOCTYPE hibernate-configuration PUBLIC
"-//Hibernate/Hibernate Configuration DTD 3.0//EN"
"http://hibernate.sourceforge.net/hibernate-configuration-3.0.dtd">
<hibernate-configuration>
<session-factory>
<!-- ### 定义Hibernate的连接加载类 ########### -->
<property name="hibernate.connection.provider_class">org.hibernate.connection.ProxoolConnectionProvider</property>
<!-- ### 连接池别名,注意要与proxool的别名一致 ########### -->
<property name="hibernate.proxool.pool_alias">DbPool</property>
<!-- ### 向Hibernate声明连接池的配置文件位置,通常与proxool在同一位置,如果不同请注意路径 ########### -->
<property name="hibernate.proxool.xml">proxool.xml</property>
<!-- ### 声明SQL语句的方言 ##########-->
<property name="dialect">org.hibernate.dialect.MySQLDialect</property>
<!-- ### 解决hibernate和jdbc不能同时使用proxool的问题 ########## -->
<!-- ### <property name="hibernate.proxool.existing_pool">true</property> ###########-->
<!-- ### Echo all executed SQL to stdout ########## -->
<!-- ### 定义是否显示Hibernate生成的SQL语言,一般在调试阶段设为true,完成后再改成false,这样有利于调试 ##########-->
<property name="show_sql">true</property>
</session-factory>
</hibernate-configuration>
4.5 修改application.xml 内容如下:
<?xml version="1.0" encoding="UTF-8"?>
<beans xmlns="http://www.springframework.org/schema/beans"
xmlns:xsi="http://www.w3.org/2001/XMLSchema-instance"
xmlns:p="http://www.springframework.org/schema/p"
xmlns:aop="http://www.springframework.org/schema/aop"
xmlns:tx="http://www.springframework.org/schema/tx"
xsi:schemaLocation="http://www.springframework.org/schema/beans http://www.springframework.org/schema/beans/spring-beans-2.5.xsd
http://www.springframework.org/schema/aop http://www.springframework.org/schema/aop/spring-aop-2.5.xsd
http://www.springframework.org/schema/tx http://www.springframework.org/schema/tx/spring-tx-2.5.xsd">
<!-- ### AnnotationSessionFactoryBean是从LocalSessionFactoryBean类继承过来的 ########## -->
<bean id="sessionFactory" class="org.springframework.orm.hibernate3.annotation.AnnotationSessionFactoryBean">
<property name="configLocation" value="classpath:hibernate.xml" />
</bean>
<!--
* 这里bean的ID对应的是 struts.xml action的class
****************-->
<bean id="Hello" class="test.action.Hello" scope="prototype"></bean>
</beans>
4.6 web.xml 加入 proxoolAdmn 监听,内容如下,
<?xml version="1.0" encoding="UTF-8"?>
<web-app id="WebApp_ID" version="2.4" xmlns="http://java.sun.com/xml/ns/j2ee" xmlns:xsi="http://www.w3.org/2001/XMLSchema-instance" xsi:schemaLocation="http://java.sun.com/xml/ns/j2ee http://java.sun.com/xml/ns/j2ee/web-app_2_4.xsd">
<!-- ###################################### -->
<!-- ########## Struts2 ################## -->
<!-- ###################################### -->
<!--
* Struts2的主要的Filter,负责四个方面的功能:
* (1)执行Actions
* (2)清除ActionContext
* (3)维护静态内容
* (4)清除request生命周期内的XWork的interceptors
* 另注:该过滤器应该过滤所有的请求URL。一般被设置为/*
************ -->
<filter>
<filter-name>struts2</filter-name>
<filter-class>org.apache.struts2.dispatcher.FilterDispatcher</filter-class>
</filter>
<!-- ### Proxool连接池监听 ########### -->
<!-- @Version ver1.0 | 20090428 -->
<servlet>
<servlet-name>ProxoolAdmin</servlet-name>
<servlet-class>
org.logicalcobwebs.proxool.admin.servlet.AdminServlet
</servlet-class>
</servlet>
<!-- ###################################### -->
<!-- ########## Spring2 ################## -->
<!-- ###################################### -->
<!--
* [ <context-param></context-param ] =>用来设定web站台的环境参数
* [ <param-name></param-name> ] (子元素)=> 用来指定参数的名称
* [ <param-value></param-value> ] (子元素)=> 用来设定参数值
* ************
* 从类路径下加载spring的配置文件, 多个配置文件可以用逗号和空格区分
* classpath: 关键字特指类路径下加载
******************** -->
<context-param>
<param-name>contextConfigLocation</param-name>
<param-value>classpath:applicationContext*.xml</param-value>
</context-param>
<!--
* [<listener></listener>]=>用来设定监听接口
* [<listener-class></listener-class>](子元素)=>定义Listener的类名称
* *******
* 负责启动spring的监听器
* 它将引用处的上下文参数获得spring配置文件地址
* 指定Spring提供的ContextLoaderListener Web 容器监听器,
* 该监听器在web容器启动时自动运行并且根据ContextLoaderListener参数
* 获取Spring配置文件,并启动Spring容器。
************** -->
<listener>
<listener-class>
org.springframework.web.context.ContextLoaderListener
</listener-class>
</listener>
<filter-mapping>
<filter-name>struts2</filter-name>
<url-pattern>/*</url-pattern>
</filter-mapping>
<servlet-mapping>
<servlet-name>ProxoolAdmin</servlet-name>
<url-pattern>/proxoolPool</url-pattern>
</servlet-mapping>
<display-name>miziStudy</display-name>
<welcome-file-list>
<welcome-file>index.html</welcome-file>
<welcome-file>index.htm</welcome-file>
<welcome-file>index.jsp</welcome-file>
<welcome-file>default.html</welcome-file>
<welcome-file>default.htm</welcome-file>
<welcome-file>default.jsp</welcome-file>
</welcome-file-list>
</web-app>
4.7 导入相关包,这次关联到的包很多,其中有包括hibernate,annotations,proxool等

我试过了 这些包 缺一不可。。。
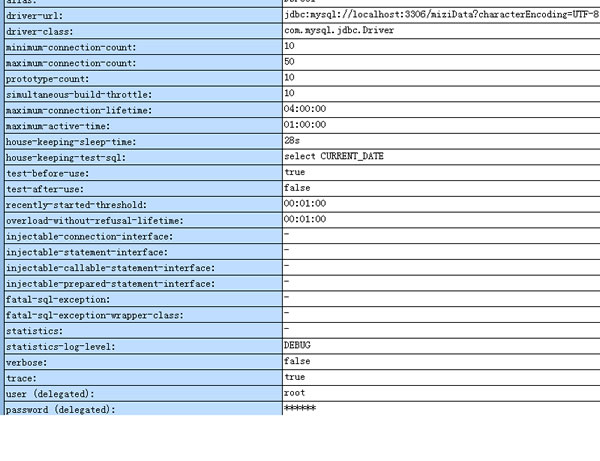
4.8 测试proxool 数据连接池是否工作。启动tomcat..成功后在浏览器中输入http://localhost/miziStudy/proxoolPool
如果你得出的页面和我一致,那么数据库连接成功。
可以这么说吧,SSH(Spring2.5+Struts2+Hibernate3.4)的最简配置到这里已经结束了,但是这是永远不够了,还缺了好多东西没有,比如web.xxml的filter,spring 的AOP,切片,hibernate的事务等等许多还没有在这里显示出来,但是起码我们配置成功了,接下来我会不断用新的实例来丰富这个简单的配置,大家拭目以待吧!!!其实偶自己是最期待的,因为每个实例出来,就代表着我又进一步。。。。加油!!