在Android系统中,键盘按键事件是由WindowManagerService服务来管理的,然后再以消息的形式来分发给应用程序处理,不过和普通消息不一样,它是由硬件中断触发的;在上一篇文章《Android应用程序消息处理机制(Looper、Handler)分析》中,我们分析了Android应用程序的消息处理机制,本文将结合这种消息处理机制来详细分析Android应用程序是如何获得键盘按键消息的。
在系统启动的时候,SystemServer会启动窗口管理服务WindowManagerService,WindowManagerService在启动的时候就会通过系统输入管理器InputManager来总负责监控键盘消息。这些键盘消息一般都是分发给当前激活的Activity窗口来处理的,因此,当前激活的Activity窗口在创建的时候,会到WindowManagerService中去注册一个接收键盘消息的通道,表明它要处理键盘消息,而当InputManager监控到有键盘消息时,就会分给给它处理。当当前激活的Activity窗口不再处于激活状态时,它也会到WindowManagerService中去反注册之前的键盘消息接收通道,这样,InputManager就不会再把键盘消息分发给它来处理。
由于本文的内容比较多,在接下面的章节中,我们将分为五个部分来详细描述Android应用程序获得键盘按键消息的过程,每一个部分都是具体描述键盘消息处理过程中的一个过程。结合上面的键盘消息处理框架,这四个过程分别是InputManager的启动过程、应用程序注册键盘消息接收通道的过程、InputManager分发键盘消息给应用程序的过程以及应用程序注销键盘消息接收通道的过程。为了更好地理解Android应用程序获得键盘按键消息的整个过程,建议读者首先阅读Android应用程序消息处理机制(Looper、Handler)分析一文,理解了Android应用程序的消息处理机制后,就能很好的把握本文的内容。
1. InputManager的启动过程分析
前面说过,Android系统的键盘事件是由InputManager来监控的,而InputManager是由窗口管理服务WindowManagerService来启动的。
从前面一篇文章Android系统进程Zygote启动过程的源代码分析中,我们知道在Android系统中,Zygote进程负责启动系统服务进程SystemServer,而系统服务进程SystemServer负责启动系统中的各种关键服务,例如我们在前面两篇文章Android应用程序安装过程源代码分析和Android系统默认Home应用程序(Launcher)的启动过程源代码分析中提到的Package管理服务PackageManagerService和Activity管理服务ActivityManagerService。这里我们所讨论的窗口管理服务WindowManagerService也是由SystemServer来启动的,具体的启动过程这里就不再详述了,具体可以参考PackageManagerService和ActivityManagerService的启动过程。
了解了WindowManagerService的启动过程之后,我们就可以继续分析InputManager的启动过程了。我们先来看一下InputManager启动过程的序列图,然后根据这个序列图来一步步分析它的启动过程:
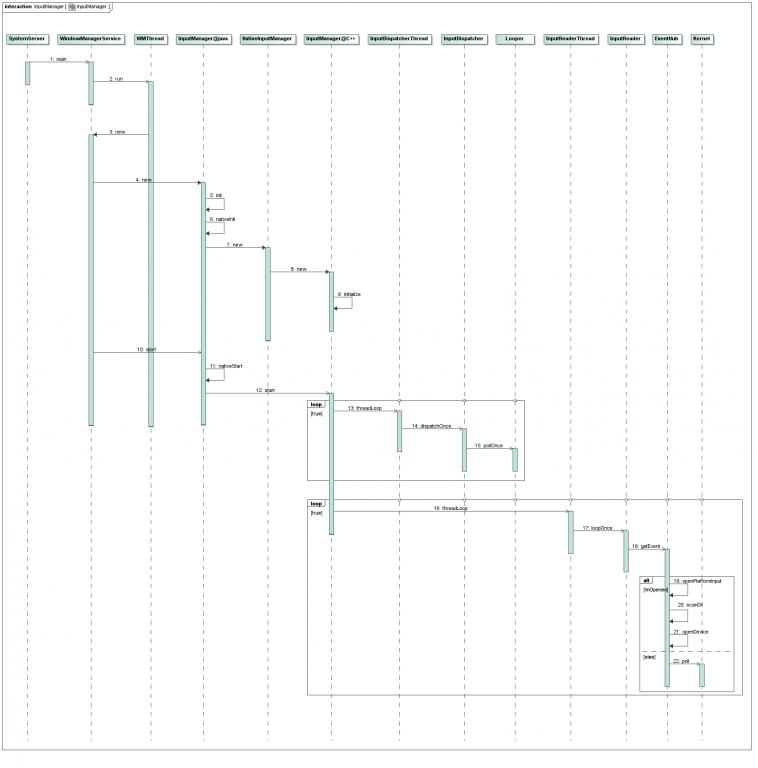
点击查看大图
Step 1. WindowManagerService.main
这个函数定义在frameworks/base/services/java/com/android/server/WindowManagerService.java文件中:
public class WindowManagerService extends IWindowManager.Stub
		implements Watchdog.Monitor {
	......

	public static WindowManagerService main(Context context,
			PowerManagerService pm, boolean haveInputMethods) {
		WMThread thr = new WMThread(context, pm, haveInputMethods);
		thr.start();

		synchronized (thr) {
			while (thr.mService == null) {
				try {
					thr.wait();
				} catch (InterruptedException e) {
				}
			}
			return thr.mService;
		}
	}

	......
}
它通过一个线程WMThread实例来执行全局唯一的WindowManagerService实例的启动操作。这里调用WMThread实例thr的start成员函数时,会进入到WMThread实例thr的run函数中去。
Step 2. WMThread.run
这个函数定义在frameworks/base/services/java/com/android/server/WindowManagerService.java文件中:
public class WindowManagerService extends IWindowManager.Stub
		implements Watchdog.Monitor {
	......

	static class WMThread extends Thread {
		......

		public void run() {
			......

			WindowManagerService s = new WindowManagerService(mContext, mPM,
				mHaveInputMethods);
			......
		}
	}


	......
}
这里执行的主要操作就是创建一个WindowManagerService实例,这样会调用到WindowManagerService构造函数中去。
Step 3. WindowManagerService<init>
WindowManagerService类的构造函数定义在frameworks/base/services/java/com/android/server/WindowManagerService.java文件中:
public class WindowManagerService extends IWindowManager.Stub
		implements Watchdog.Monitor {
	......

	final InputManager mInputManager;

	......

	private WindowManagerService(Context context, PowerManagerService pm,
			boolean haveInputMethods) {
		......

		mInputManager = new InputManager(context, this);

		......

		mInputManager.start();

		......
	}


	......
}
这里我们只关心InputManager的创建过程,而忽略其它无关部分。首先是创建一个InputManager实例,然后再调用它的start成员函数来监控键盘事件。在创建InputManager实例的过程中,会执行一些初始化工作,因此,我们先进入到InputManager类的构造函数去看看,然后再回过头来分析它的start成员函数。
Step 4. InputManager<init>@java
Java层的InputManager类的构造函数定义在frameworks/base/services/java/com/android/server/InputManager.java文件中:
public class InputManager {
	......

	public InputManager(Context context, WindowManagerService windowManagerService) {
		this.mContext = context;
		this.mWindowManagerService = windowManagerService;

		this.mCallbacks = new Callbacks();

		init();
	}

	......
}
这里只是简单地初始化InputManager类的一些成员变量,然后调用init函数进一步执行初始化操作。
Step 5. InputManager.init
这个函数定义在frameworks/base/services/java/com/android/server/InputManager.java文件中:
public class InputManager {
	......

	private void init() {
		Slog.i(TAG, "Initializing input manager");
		nativeInit(mCallbacks);
	}

	......
}
函数init通过调用本地方法nativeInit来执行C++层的相关初始化操作。
Step 6. InputManager.nativeInit
这个函数定义在frameworks/base/services/jni$ vi com_android_server_InputManager.cpp文件中:
static void android_server_InputManager_nativeInit(JNIEnv* env, jclass clazz,
        jobject callbacks) {
    if (gNativeInputManager == NULL) {
        gNativeInputManager = new NativeInputManager(callbacks);
    } else {
        LOGE("Input manager already initialized.");
        jniThrowRuntimeException(env, "Input manager already initialized.");
    }
}
这个函数的作用是创建一个NativeInputManager实例,并保存在gNativeInputManager变量中。由于是第一次调用到这里,因此,gNativeInputManager为NULL,于是就会new一个NativeInputManager对象出来,这样就会执行NativeInputManager类的构造函数来执其它的初始化操作。
Step 7. NativeInputManager<init>
NativeInputManager类的构造函数定义在frameworks/base/services/jni$ vi com_android_server_InputManager.cpp文件中:
NativeInputManager::NativeInputManager(jobject callbacksObj) :
	mFilterTouchEvents(-1), mFilterJumpyTouchEvents(-1), mVirtualKeyQuietTime(-1),
	mMaxEventsPerSecond(-1),
	mDisplayWidth(-1), mDisplayHeight(-1), mDisplayOrientation(ROTATION_0) {
	JNIEnv* env = jniEnv();

	mCallbacksObj = env->NewGlobalRef(callbacksObj);

	sp<EventHub> eventHub = new EventHub();
	mInputManager = new InputManager(eventHub, this, this);
}
这里只要是创建了一个EventHub实例,并且把这个EventHub作为参数来创建InputManager对象。注意,这里的InputManager类是定义在C++层的,和前面在Java层的InputManager不一样,不过它们是对应关系。EventHub类是真正执行监控键盘事件操作的地方,后面我们会进一步分析到,现在我们主要关心InputManager实例的创建过程,它会InputManager类的构造函数里面执行一些初始化操作。
Step 8. InputManager<init>@C++
C++层的InputManager类的构造函数定义在frameworks/base/libs/ui/InputManager.cpp 文件中:
InputManager::InputManager(
        const sp<EventHubInterface>& eventHub,
        const sp<InputReaderPolicyInterface>& readerPolicy,
        const sp<InputDispatcherPolicyInterface>& dispatcherPolicy) {
    mDispatcher = new InputDispatcher(dispatcherPolicy);
    mReader = new InputReader(eventHub, readerPolicy, mDispatcher);
    initialize();
}
这里主要是创建了一个InputDispatcher对象和一个InputReader对象,并且分别保存在成员变量mDispatcher和mReader中。InputDispatcher类是负责把键盘消息分发给当前激活的Activity窗口的,而InputReader类则是通过EventHub类来实现读取键盘事件的,后面我们会进一步分析。创建了这两个对象后,还要调用initialize函数来执行其它的初始化操作。
Step 9. InputManager.initialize
这个函数定义在frameworks/base/libs/ui/InputManager.cpp 文件中:
void InputManager::initialize() {
	mReaderThread = new InputReaderThread(mReader);
	mDispatcherThread = new InputDispatcherThread(mDispatcher);
}
这个函数创建了一个InputReaderThread线程实例和一个InputDispatcherThread线程实例,并且分别保存在成员变量mReaderThread和mDispatcherThread中。这里的InputReader实列mReader就是通过这里的InputReaderThread线程实列mReaderThread来读取键盘事件的,而InputDispatcher实例mDispatcher则是通过这里的InputDispatcherThread线程实例mDisptacherThread来分发键盘消息的。
至此,InputManager的初始化工作就完成了,在回到Step 3中继续分析InputManager的进一步启动过程之前,我们先来作一个小结,看看这个初始化过程都做什么事情:
A. 在Java层中的WindowManagerService中创建了一个InputManager对象,由它来负责管理Android应用程序框架层的键盘消息处理;
B. 在C++层也相应地创建一个InputManager本地对象来负责监控键盘事件;
C. 在C++层中的InputManager对象中,分别创建了一个InputReader对象和一个InputDispatcher对象,前者负责读取系统中的键盘消息,后者负责把键盘消息分发出去;
D. InputReader对象和一个InputDispatcher对象分别是通过InputReaderThread线程实例和InputDispatcherThread线程实例来实键盘消息的读取和分发的。
有了这些对象之后,万事就俱备了,回到Step 3中,调用InputManager类的start函数来执行真正的启动操作。
Step 10. InputManager.start
这个函数定义在frameworks/base/services/java/com/android/server/InputManager.java文件中:
public class InputManager {
	......

	public void start() {
		Slog.i(TAG, "Starting input manager");
		nativeStart();
	}

	......
}
这个函数通过调用本地方法nativeStart来执行进一步的启动操作。
Step 11. InputManager.nativeStart
这个函数定义在frameworks/base/services/jni$ vi com_android_server_InputManager.cpp文件中:
static void android_server_InputManager_nativeStart(JNIEnv* env, jclass clazz) {
    if (checkInputManagerUnitialized(env)) {
        return;
    }

    status_t result = gNativeInputManager->getInputManager()->start();
    if (result) {
        jniThrowRuntimeException(env, "Input manager could not be started.");
    }
}
这里的gNativeInputManager对象是在前面的Step 6中创建的,通过它的getInputManager函数可以返回C++层的InputManager对象,接着调用这个InputManager对象的start函数。
Step 12. InputManager.start
这个函数定义在frameworks/base/libs/ui/InputManager.cpp 文件中:
status_t InputManager::start() {
	status_t result = mDispatcherThread->run("InputDispatcher", PRIORITY_URGENT_DISPLAY);
	if (result) {
		LOGE("Could not start InputDispatcher thread due to error %d.", result);
		return result;
	}

	result = mReaderThread->run("InputReader", PRIORITY_URGENT_DISPLAY);
	if (result) {
		LOGE("Could not start InputReader thread due to error %d.", result);

		mDispatcherThread->requestExit();
		return result;
	}

	return OK;
}
这个函数主要就是分别启动一个InputDispatcherThread线程和一个InputReaderThread线程来读取和分发键盘消息的了。这里的InputDispatcherThread线程对象mDispatcherThread和InputReaderThread线程对象是在前面的Step 9中创建的,调用了它们的run函数后,就会进入到它们的threadLoop函数中去,只要threadLoop函数返回true,函数threadLoop就会一直被循环调用,于是这两个线程就起到了不断地读取和分发键盘消息的作用。
我们先来分析InputDispatcherThread线程分发消息的过程,然后再回过头来分析InputReaderThread线程读取消息的过程。
Step 13. InputDispatcherThread.threadLoop
这个函数定义在frameworks/base/libs/ui/InputDispatcher.cpp文件中:
bool InputDispatcherThread::threadLoop() {
    mDispatcher->dispatchOnce();
    return true;
}
这里的成员变量mDispatcher即为在前面Step 8中创建的InputDispatcher对象,调用它的dispatchOnce成员函数执行一次键盘消息分发的操作。
Step 14. InputDispatcher.dispatchOnce
这个函数定义在frameworks/base/libs/ui/InputDispatcher.cpp文件中:
void InputDispatcher::dispatchOnce() {
	nsecs_t keyRepeatTimeout = mPolicy->getKeyRepeatTimeout();
	nsecs_t keyRepeatDelay = mPolicy->getKeyRepeatDelay();

	nsecs_t nextWakeupTime = LONG_LONG_MAX;
	{ // acquire lock
		AutoMutex _l(mLock);
		dispatchOnceInnerLocked(keyRepeatTimeout, keyRepeatDelay, & nextWakeupTime);

		if (runCommandsLockedInterruptible()) {
			nextWakeupTime = LONG_LONG_MIN;  // force next poll to wake up immediately
		}
	} // release lock

	// Wait for callback or timeout or wake.  (make sure we round up, not down)
	nsecs_t currentTime = now();
	int32_t timeoutMillis;
	if (nextWakeupTime > currentTime) {
		uint64_t timeout = uint64_t(nextWakeupTime - currentTime);
		timeout = (timeout + 999999LL) / 1000000LL;
		timeoutMillis = timeout > INT_MAX ? -1 : int32_t(timeout);
	} else {
		timeoutMillis = 0;
	}

	mLooper->pollOnce(timeoutMillis);
}
这个函数很简单,把键盘消息交给dispatchOnceInnerLocked函数来处理,这个过程我们在后面再详细分析,然后调用mLooper->pollOnce函数等待下一次键盘事件的发生。这里的成员变量mLooper的类型为Looper,它定义在C++层中,具体可以参考前面
Android应用程序消息处理机制(Looper、Handler)分析一文。
Step 15. Looper.pollOnce
这个函数定义在frameworks/base/libs/utils/Looper.cpp文件中,具体可以参考前面Android应用程序消息处理机制(Looper、Handler)分析一文,这里就不再详述了。总的来说,就是在Looper类中,会创建一个管道,当调用Looper类的pollOnce函数时,如果管道中没有内容可读,那么当前线程就会进入到空闲等待状态;当有键盘事件发生时,InputReader就会往这个管道中写入新的内容,这样就会唤醒前面正在等待键盘事件发生的线程。
InputDispatcher类分发消息的过程就暂时分析到这里,后面会有更进一步的分析,现在,我们回到Step 12中,接着分析InputReader类读取键盘事件的过程。在调用了InputReaderThread线程类的run就函数后,同样会进入到InputReaderThread线程类的threadLoop函数中去。
Step 16. InputReaderThread.threadLoop
这个函数定义在frameworks/base/libs/ui/InputReader.cpp文件中:
bool InputReaderThread::threadLoop() {
    mReader->loopOnce();
    return true;
}
这里的成员变量mReader即为在前面Step 8中创建的InputReader对象,调用它的loopOnce成员函数执行一次键盘事件的读取操作。
Step 17. InputReader.loopOnce
这个函数定义在frameworks/base/libs/ui/InputReader.cpp文件中:
void InputReader::loopOnce() {
	RawEvent rawEvent;
	mEventHub->getEvent(& rawEvent);

#if DEBUG_RAW_EVENTS
	LOGD("Input event: device=0x%x type=0x%x scancode=%d keycode=%d value=%d",
		rawEvent.deviceId, rawEvent.type, rawEvent.scanCode, rawEvent.keyCode,
		rawEvent.value);
#endif

	process(& rawEvent);
}
这里通过成员函数mEventHub来负责键盘消息的读取工作,如果当前有键盘事件发生或者有键盘事件等待处理,通过mEventHub的getEvent函数就可以得到这个事件,然后交给process函数进行处理,这个函数主要就是唤醒前面的InputDispatcherThread线程,通知它有新的键盘事件发生了,它需要进行一次键盘消息的分发操作了,这个函数我们后面再进一步详细分析;如果没有键盘事件发生或者没有键盘事件等待处理,那么调用mEventHub的getEvent函数时就会进入等待状态。
Step 18. EventHub.getEvent
这个函数定义在frameworks/base/libs/ui/EventHub.cpp文件中:
bool EventHub::getEvent(RawEvent* outEvent)
{
	outEvent->deviceId = 0;
	outEvent->type = 0;
	outEvent->scanCode = 0;
	outEvent->keyCode = 0;
	outEvent->flags = 0;
	outEvent->value = 0;
	outEvent->when = 0;

	// Note that we only allow one caller to getEvent(), so don't need
	// to do locking here...  only when adding/removing devices.

	if (!mOpened) {
		mError = openPlatformInput() ? NO_ERROR : UNKNOWN_ERROR;
		mOpened = true;
		mNeedToSendFinishedDeviceScan = true;
	}

	for (;;) {
		// Report any devices that had last been added/removed.
		if (mClosingDevices != NULL) {
			device_t* device = mClosingDevices;
			LOGV("Reporting device closed: id=0x%x, name=%s\n",
				device->id, device->path.string());
			mClosingDevices = device->next;
			if (device->id == mFirstKeyboardId) {
				outEvent->deviceId = 0;
			} else {
				outEvent->deviceId = device->id;
			}
			outEvent->type = DEVICE_REMOVED;
			outEvent->when = systemTime(SYSTEM_TIME_MONOTONIC);
			delete device;
			mNeedToSendFinishedDeviceScan = true;
			return true;
		}

		if (mOpeningDevices != NULL) {
			device_t* device = mOpeningDevices;
			LOGV("Reporting device opened: id=0x%x, name=%s\n",
				device->id, device->path.string());
			mOpeningDevices = device->next;
			if (device->id == mFirstKeyboardId) {
				outEvent->deviceId = 0;
			} else {
				outEvent->deviceId = device->id;
			}
			outEvent->type = DEVICE_ADDED;
			outEvent->when = systemTime(SYSTEM_TIME_MONOTONIC);
			mNeedToSendFinishedDeviceScan = true;
			return true;
		}

		if (mNeedToSendFinishedDeviceScan) {
			mNeedToSendFinishedDeviceScan = false;
			outEvent->type = FINISHED_DEVICE_SCAN;
			outEvent->when = systemTime(SYSTEM_TIME_MONOTONIC);
			return true;
		}

		// Grab the next input event.
		for (;;) {
			// Consume buffered input events, if any.
			if (mInputBufferIndex < mInputBufferCount) {
				const struct input_event& iev = mInputBufferData[mInputBufferIndex++];
				const device_t* device = mDevices[mInputDeviceIndex];

				LOGV("%s got: t0=%d, t1=%d, type=%d, code=%d, v=%d", device->path.string(),
					(int) iev.time.tv_sec, (int) iev.time.tv_usec, iev.type, iev.code, iev.value);
				if (device->id == mFirstKeyboardId) {
					outEvent->deviceId = 0;
				} else {
					outEvent->deviceId = device->id;
				}
				outEvent->type = iev.type;
				outEvent->scanCode = iev.code;
				if (iev.type == EV_KEY) {
					status_t err = device->layoutMap->map(iev.code,
						& outEvent->keyCode, & outEvent->flags);
					LOGV("iev.code=%d keyCode=%d flags=0x%08x err=%d\n",
						iev.code, outEvent->keyCode, outEvent->flags, err);
					if (err != 0) {
						outEvent->keyCode = AKEYCODE_UNKNOWN;
						outEvent->flags = 0;
					}
				} else {
					outEvent->keyCode = iev.code;
				}
				outEvent->value = iev.value;

				// Use an event timestamp in the same timebase as
				// java.lang.System.nanoTime() and android.os.SystemClock.uptimeMillis()
				// as expected by the rest of the system.
				outEvent->when = systemTime(SYSTEM_TIME_MONOTONIC);
				return true;
			}

			// Finish reading all events from devices identified in previous poll().
			// This code assumes that mInputDeviceIndex is initially 0 and that the
			// revents member of pollfd is initialized to 0 when the device is first added.
			// Since mFDs[0] is used for inotify, we process regular events starting at index 1.
			mInputDeviceIndex += 1;
			if (mInputDeviceIndex >= mFDCount) {
				break;
			}

			const struct pollfd& pfd = mFDs[mInputDeviceIndex];
			if (pfd.revents & POLLIN) {
				int32_t readSize = read(pfd.fd, mInputBufferData,
					sizeof(struct input_event) * INPUT_BUFFER_SIZE);
				if (readSize < 0) {
					if (errno != EAGAIN && errno != EINTR) {
						LOGW("could not get event (errno=%d)", errno);
					}
				} else if ((readSize % sizeof(struct input_event)) != 0) {
					LOGE("could not get event (wrong size: %d)", readSize);
				} else {
					mInputBufferCount = readSize / sizeof(struct input_event);
					mInputBufferIndex = 0;
				}
			}
		}

		......

		mInputDeviceIndex = 0;

		// Poll for events.  Mind the wake lock dance!
		// We hold a wake lock at all times except during poll().  This works due to some
		// subtle choreography.  When a device driver has pending (unread) events, it acquires
		// a kernel wake lock.  However, once the last pending event has been read, the device
		// driver will release the kernel wake lock.  To prevent the system from going to sleep
		// when this happens, the EventHub holds onto its own user wake lock while the client
		// is processing events.  Thus the system can only sleep if there are no events
		// pending or currently being processed.
		release_wake_lock(WAKE_LOCK_ID);

		int pollResult = poll(mFDs, mFDCount, -1);

		acquire_wake_lock(PARTIAL_WAKE_LOCK, WAKE_LOCK_ID);

		if (pollResult <= 0) {
			if (errno != EINTR) {
				LOGW("poll failed (errno=%d)\n", errno);
				usleep(100000);
			}
		}

	}
}
这个函数比较长,我们一步一步来分析。
首先,如果是第一次进入到这个函数中时,成员变量mOpened的值为false,于是就会调用openPlatformInput函数来打开系统输入设备,在本文中,我们主要讨论的输入设备就是键盘了。打开了这些输入设备文件后,就可以对这些输入设备进行是监控了。如果不是第一次进入到这个函数,那么就会分析当前有没有输入事件发生,如果有,就返回这个事件,否则就会进入等待状态,等待下一次输入事件的发生。在我们这个场景中,就是等待下一次键盘事件的发生了。
我们先分析openPlatformInput函数的实现,然后回过头来分析这个getEvent函数的具体的实现。
Step 19. EventHub.openPlatformInput
这个函数定义在frameworks/base/libs/ui/EventHub.cpp文件中:
bool EventHub::openPlatformInput(void)
{
	......

	res = scanDir(device_path);
	if(res < 0) {
		LOGE("scan dir failed for %s\n", device_path);
	}

	return true;
}
这个函数主要是扫描device_path目录下的设备文件,然后打开它们,这里的变量device_path定义在frameworks/base/libs/ui/EventHub.cpp文件开始的地方:
static const char *device_path = "/dev/input";
在设备目录/dev/input中,一般有三个设备文件存在,分别是event0、mice和mouse0设备文件,其中,键盘事件就包含在event0设备文件中了。
Step 20. EventHub.scanDir
这个函数定义在frameworks/base/libs/ui/EventHub.cpp文件中:
int EventHub::scanDir(const char *dirname)
{
	char devname[PATH_MAX];
	char *filename;
	DIR *dir;
	struct dirent *de;
	dir = opendir(dirname);
	if(dir == NULL)
		return -1;
	strcpy(devname, dirname);
	filename = devname + strlen(devname);
	*filename++ = '/';
	while((de = readdir(dir))) {
		if(de->d_name[0] == '.' &&
			(de->d_name[1] == '\0' ||
			(de->d_name[1] == '.' && de->d_name[2] == '\0')))
			continue;
		strcpy(filename, de->d_name);
		openDevice(devname);
	}
	closedir(dir);
	return 0;
}
根据上面一步的分析,这个函数主要就是调用openDevice函数来分别打开/dev/input/event0、/dev/input/mice和/dev/input/mouse0三个设备文件了。
Step 21. EventHub.openDevice
这个函数定义在frameworks/base/libs/ui/EventHub.cpp文件中:
int EventHub::openDevice(const char *deviceName) {
	int version;
	int fd;
	struct pollfd *new_mFDs;
	device_t **new_devices;
	char **new_device_names;
	char name[80];
	char location[80];
	char idstr[80];
	struct input_id id;

	LOGV("Opening device: %s", deviceName);

	AutoMutex _l(mLock);

	fd = open(deviceName, O_RDWR);
	if(fd < 0) {
		LOGE("could not open %s, %s\n", deviceName, strerror(errno));
		return -1;
	}

	......

	int devid = 0;
	while (devid < mNumDevicesById) {
		if (mDevicesById[devid].device == NULL) {
			break;
		}
		devid++;
	}

	......

	mDevicesById[devid].seq = (mDevicesById[devid].seq+(1<<SEQ_SHIFT))&SEQ_MASK;
	if (mDevicesById[devid].seq == 0) {
		mDevicesById[devid].seq = 1<<SEQ_SHIFT;
	}

	new_mFDs = (pollfd*)realloc(mFDs, sizeof(mFDs[0]) * (mFDCount + 1));
	new_devices = (device_t**)realloc(mDevices, sizeof(mDevices[0]) * (mFDCount + 1));
	if (new_mFDs == NULL || new_devices == NULL) {
		LOGE("out of memory");
		return -1;
	}
	mFDs = new_mFDs;
	mDevices = new_devices;

	......

	device_t* device = new device_t(devid|mDevicesById[devid].seq, deviceName, name);
	if (device == NULL) {
		LOGE("out of memory");
		return -1;
	}

	device->fd = fd;
	mFDs[mFDCount].fd = fd;
	mFDs[mFDCount].events = POLLIN;
	mFDs[mFDCount].revents = 0;

	// Figure out the kinds of events the device reports.

	uint8_t key_bitmask[sizeof_bit_array(KEY_MAX + 1)];
	memset(key_bitmask, 0, sizeof(key_bitmask));

	LOGV("Getting keys...");
	if (ioctl(fd, EVIOCGBIT(EV_KEY, sizeof(key_bitmask)), key_bitmask) >= 0) {
		// See if this is a keyboard.  Ignore everything in the button range except for
		// gamepads which are also considered keyboards.
		if (containsNonZeroByte(key_bitmask, 0, sizeof_bit_array(BTN_MISC))
			|| containsNonZeroByte(key_bitmask, sizeof_bit_array(BTN_GAMEPAD),
			sizeof_bit_array(BTN_DIGI))
			|| containsNonZeroByte(key_bitmask, sizeof_bit_array(KEY_OK),
			sizeof_bit_array(KEY_MAX + 1))) {
				device->classes |= INPUT_DEVICE_CLASS_KEYBOARD;

				device->keyBitmask = new uint8_t[sizeof(key_bitmask)];
				if (device->keyBitmask != NULL) {
					memcpy(device->keyBitmask, key_bitmask, sizeof(key_bitmask));
				} else {
					delete device;
					LOGE("out of memory allocating key bitmask");
					return -1;
				}
		}
	}

	......

	if ((device->classes & INPUT_DEVICE_CLASS_KEYBOARD) != 0) {
		char tmpfn[sizeof(name)];
		char keylayoutFilename[300];

		// a more descriptive name
		device->name = name;

		// replace all the spaces with underscores
		strcpy(tmpfn, name);
		for (char *p = strchr(tmpfn, ' '); p && *p; p = strchr(tmpfn, ' '))
			*p = '_';

		// find the .kl file we need for this device
		const char* root = getenv("ANDROID_ROOT");
		snprintf(keylayoutFilename, sizeof(keylayoutFilename),
			"%s/usr/keylayout/%s.kl", root, tmpfn);
		bool defaultKeymap = false;
		if (access(keylayoutFilename, R_OK)) {
			snprintf(keylayoutFilename, sizeof(keylayoutFilename),
				"%s/usr/keylayout/%s", root, "qwerty.kl");
			defaultKeymap = true;
		}
		status_t status = device->layoutMap->load(keylayoutFilename);
		if (status) {
			LOGE("Error %d loading key layout.", status);
		}

		// tell the world about the devname (the descriptive name)
		if (!mHaveFirstKeyboard && !defaultKeymap && strstr(name, "-keypad")) {
			// the built-in keyboard has a well-known device ID of 0,
			// this device better not go away.
			mHaveFirstKeyboard = true;
			mFirstKeyboardId = device->id;
			property_set("hw.keyboards.0.devname", name);
		} else {
			// ensure mFirstKeyboardId is set to -something-.
			if (mFirstKeyboardId == 0) {
				mFirstKeyboardId = device->id;
			}
		}
		char propName[100];
		sprintf(propName, "hw.keyboards.%u.devname", device->id);
		property_set(propName, name);

		// 'Q' key support = cheap test of whether this is an alpha-capable kbd
		if (hasKeycodeLocked(device, AKEYCODE_Q)) {
			device->classes |= INPUT_DEVICE_CLASS_ALPHAKEY;
		}

		// See if this device has a DPAD.
		if (hasKeycodeLocked(device, AKEYCODE_DPAD_UP) &&
			hasKeycodeLocked(device, AKEYCODE_DPAD_DOWN) &&
			hasKeycodeLocked(device, AKEYCODE_DPAD_LEFT) &&
			hasKeycodeLocked(device, AKEYCODE_DPAD_RIGHT) &&
			hasKeycodeLocked(device, AKEYCODE_DPAD_CENTER)) {
				device->classes |= INPUT_DEVICE_CLASS_DPAD;
		}

		// See if this device has a gamepad.
		for (size_t i = 0; i < sizeof(GAMEPAD_KEYCODES)/sizeof(GAMEPAD_KEYCODES[0]); i++) {
			if (hasKeycodeLocked(device, GAMEPAD_KEYCODES[i])) {
				device->classes |= INPUT_DEVICE_CLASS_GAMEPAD;
				break;
			}
		}

		LOGI("New keyboard: device->id=0x%x devname='%s' propName='%s' keylayout='%s'\n",
			device->id, name, propName, keylayoutFilename);
	}

	......

	mDevicesById[devid].device = device;
	device->next = mOpeningDevices;
	mOpeningDevices = device;
	mDevices[mFDCount] = device;

	mFDCount++;
	return 0;
}
函数首先根据文件名来打开这个设备文件:
fd = open(deviceName, O_RDWR);
系统中所有输入设备文件信息都保存在成员变量mDevicesById中,因此,先在mDevicesById找到一个空位置来保存当前打开的设备文件信息:
mDevicesById[devid].seq = (mDevicesById[devid].seq+(1<<SEQ_SHIFT))&SEQ_MASK;
if (mDevicesById[devid].seq == 0) {
	mDevicesById[devid].seq = 1<<SEQ_SHIFT;
}
找到了空闲位置后,就为这个输入设备文件创建相应的device_t信息:
mDevicesById[devid].seq = (mDevicesById[devid].seq+(1<<SEQ_SHIFT))&SEQ_MASK;
if (mDevicesById[devid].seq == 0) {
	mDevicesById[devid].seq = 1<<SEQ_SHIFT;
}

new_mFDs = (pollfd*)realloc(mFDs, sizeof(mFDs[0]) * (mFDCount + 1));
new_devices = (device_t**)realloc(mDevices, sizeof(mDevices[0]) * (mFDCount + 1));
if (new_mFDs == NULL || new_devices == NULL) {
	LOGE("out of memory");
	return -1;
}
mFDs = new_mFDs;
mDevices = new_devices;

......

device_t* device = new device_t(devid|mDevicesById[devid].seq, deviceName, name);
if (device == NULL) {
	LOGE("out of memory");
	return -1;
}

device->fd = fd;
同时,这个设备文件还会保存在数组mFDs中:
mFDs[mFDCount].fd = fd;
mFDs[mFDCount].events = POLLIN;
mFDs[mFDCount].revents = 0;
接下来查看这个设备是不是键盘:
// Figure out the kinds of events the device reports.

uint8_t key_bitmask[sizeof_bit_array(KEY_MAX + 1)];
memset(key_bitmask, 0, sizeof(key_bitmask));

LOGV("Getting keys...");
if (ioctl(fd, EVIOCGBIT(EV_KEY, sizeof(key_bitmask)), key_bitmask) >= 0) {
	// See if this is a keyboard.  Ignore everything in the button range except for
	// gamepads which are also considered keyboards.
	if (containsNonZeroByte(key_bitmask, 0, sizeof_bit_array(BTN_MISC))
		|| containsNonZeroByte(key_bitmask, sizeof_bit_array(BTN_GAMEPAD),
		sizeof_bit_array(BTN_DIGI))
		|| containsNonZeroByte(key_bitmask, sizeof_bit_array(KEY_OK),
		sizeof_bit_array(KEY_MAX + 1))) {
			device->classes |= INPUT_DEVICE_CLASS_KEYBOARD;

			device->keyBitmask = new uint8_t[sizeof(key_bitmask)];
			if (device->keyBitmask != NULL) {
				memcpy(device->keyBitmask, key_bitmask, sizeof(key_bitmask));
			} else {
				delete device;
				LOGE("out of memory allocating key bitmask");
				return -1;
			}
	}
}
如果是的话,还要继续进一步初始化前面为这个设备文件所创建的device_t结构体,主要就是把结构体device的classes成员变量的INPUT_DEVICE_CLASS_KEYBOARD位置为1了,以表明这是一个键盘。
如果是键盘设备,初始化工作还未完成,还要继续设置键盘的布局等信息:
if ((device->classes & INPUT_DEVICE_CLASS_KEYBOARD) != 0) {
	char tmpfn[sizeof(name)];
	char keylayoutFilename[300];

	// a more descriptive name
	device->name = name;

	// replace all the spaces with underscores
	strcpy(tmpfn, name);
	for (char *p = strchr(tmpfn, ' '); p && *p; p = strchr(tmpfn, ' '))
		*p = '_';

	// find the .kl file we need for this device
	const char* root = getenv("ANDROID_ROOT");
	snprintf(keylayoutFilename, sizeof(keylayoutFilename),
		"%s/usr/keylayout/%s.kl", root, tmpfn);
	bool defaultKeymap = false;
	if (access(keylayoutFilename, R_OK)) {
		snprintf(keylayoutFilename, sizeof(keylayoutFilename),
			"%s/usr/keylayout/%s", root, "qwerty.kl");
		defaultKeymap = true;
	}
	status_t status = device->layoutMap->load(keylayoutFilename);
	if (status) {
		LOGE("Error %d loading key layout.", status);
	}

	// tell the world about the devname (the descriptive name)
	if (!mHaveFirstKeyboard && !defaultKeymap && strstr(name, "-keypad")) {
		// the built-in keyboard has a well-known device ID of 0,
		// this device better not go away.
		mHaveFirstKeyboard = true;
		mFirstKeyboardId = device->id;
		property_set("hw.keyboards.0.devname", name);
	} else {
		// ensure mFirstKeyboardId is set to -something-.
		if (mFirstKeyboardId == 0) {
			mFirstKeyboardId = device->id;
		}
	}
	char propName[100];
	sprintf(propName, "hw.keyboards.%u.devname", device->id);
	property_set(propName, name);

	// 'Q' key support = cheap test of whether this is an alpha-capable kbd
	if (hasKeycodeLocked(device, AKEYCODE_Q)) {
		device->classes |= INPUT_DEVICE_CLASS_ALPHAKEY;
	}

	// See if this device has a DPAD.
	if (hasKeycodeLocked(device, AKEYCODE_DPAD_UP) &&
		hasKeycodeLocked(device, AKEYCODE_DPAD_DOWN) &&
		hasKeycodeLocked(device, AKEYCODE_DPAD_LEFT) &&
		hasKeycodeLocked(device, AKEYCODE_DPAD_RIGHT) &&
		hasKeycodeLocked(device, AKEYCODE_DPAD_CENTER)) {
			device->classes |= INPUT_DEVICE_CLASS_DPAD;
	}

	// See if this device has a gamepad.
	for (size_t i = 0; i < sizeof(GAMEPAD_KEYCODES)/sizeof(GAMEPAD_KEYCODES[0]); i++) {
		if (hasKeycodeLocked(device, GAMEPAD_KEYCODES[i])) {
			device->classes |= INPUT_DEVICE_CLASS_GAMEPAD;
			break;
		}
	}

	LOGI("New keyboard: device->id=0x%x devname='%s' propName='%s' keylayout='%s'\n",
		device->id, name, propName, keylayoutFilename);
}
到这里,系统中的输入设备文件就打开了。
回到Step 18中,我们继续分析EventHub.getEvent函数的实现。
在中间的for循环里面,首先会检查当前是否有输入设备被关闭,如果有,就返回一个设备移除的事件给调用方:
// Report any devices that had last been added/removed.
if (mClosingDevices != NULL) {
	device_t* device = mClosingDevices;
	LOGV("Reporting device closed: id=0x%x, name=%s\n",
		device->id, device->path.string());
	mClosingDevices = device->next;
	if (device->id == mFirstKeyboardId) {
		outEvent->deviceId = 0;
	} else {
		outEvent->deviceId = device->id;
	}
	outEvent->type = DEVICE_REMOVED;
	outEvent->when = systemTime(SYSTEM_TIME_MONOTONIC);
	delete device;
	mNeedToSendFinishedDeviceScan = true;
	return true;
}
接着,检查当前是否有新的输入设备加入进来:
if (mOpeningDevices != NULL) {
	device_t* device = mOpeningDevices;
	LOGV("Reporting device opened: id=0x%x, name=%s\n",
		device->id, device->path.string());
	mOpeningDevices = device->next;
	if (device->id == mFirstKeyboardId) {
		outEvent->deviceId = 0;
	} else {
		outEvent->deviceId = device->id;
	}
	outEvent->type = DEVICE_ADDED;
	outEvent->when = systemTime(SYSTEM_TIME_MONOTONIC);
	mNeedToSendFinishedDeviceScan = true;
	return true;
}
接着,再检查是否需要结束监控输入事件:
if (mNeedToSendFinishedDeviceScan) {
	mNeedToSendFinishedDeviceScan = false;
	outEvent->type = FINISHED_DEVICE_SCAN;
	outEvent->when = systemTime(SYSTEM_TIME_MONOTONIC);
	return true;
}
最后,就是要检查当前是否有还未处理的输入设备事件发生了:
// Grab the next input event.
for (;;) {
	// Consume buffered input events, if any.
	if (mInputBufferIndex < mInputBufferCount) {
		const struct input_event& iev = mInputBufferData[mInputBufferIndex++];
		const device_t* device = mDevices[mInputDeviceIndex];

		LOGV("%s got: t0=%d, t1=%d, type=%d, code=%d, v=%d", device->path.string(),
			(int) iev.time.tv_sec, (int) iev.time.tv_usec, iev.type, iev.code, iev.value);
		if (device->id == mFirstKeyboardId) {
			outEvent->deviceId = 0;
		} else {
			outEvent->deviceId = device->id;
		}
		outEvent->type = iev.type;
		outEvent->scanCode = iev.code;
		if (iev.type == EV_KEY) {
			status_t err = device->layoutMap->map(iev.code,
				& outEvent->keyCode, & outEvent->flags);
			LOGV("iev.code=%d keyCode=%d flags=0x%08x err=%d\n",
				iev.code, outEvent->keyCode, outEvent->flags, err);
			if (err != 0) {
				outEvent->keyCode = AKEYCODE_UNKNOWN;
				outEvent->flags = 0;
			}
		} else {
			outEvent->keyCode = iev.code;
		}
		outEvent->value = iev.value;

		// Use an event timestamp in the same timebase as
		// java.lang.System.nanoTime() and android.os.SystemClock.uptimeMillis()
		// as expected by the rest of the system.
		outEvent->when = systemTime(SYSTEM_TIME_MONOTONIC);
		return true;
	}

	// Finish reading all events from devices identified in previous poll().
	// This code assumes that mInputDeviceIndex is initially 0 and that the
	// revents member of pollfd is initialized to 0 when the device is first added.
	// Since mFDs[0] is used for inotify, we process regular events starting at index 1.
	mInputDeviceIndex += 1;
	if (mInputDeviceIndex >= mFDCount) {
		break;
	}

	const struct pollfd& pfd = mFDs[mInputDeviceIndex];
	if (pfd.revents & POLLIN) {
		int32_t readSize = read(pfd.fd, mInputBufferData,
			sizeof(struct input_event) * INPUT_BUFFER_SIZE);
		if (readSize < 0) {
			if (errno != EAGAIN && errno != EINTR) {
				LOGW("could not get event (errno=%d)", errno);
			}
		} else if ((readSize % sizeof(struct input_event)) != 0) {
			LOGE("could not get event (wrong size: %d)", readSize);
		} else {
			mInputBufferCount = readSize / sizeof(struct input_event);
			mInputBufferIndex = 0;
		}
	}
}
未处理的输入事件保存在成员变量mInputBufferData中,如果有的话,就可以直接返回了,否则的话,就要通过系统调用poll来等待输入设备上发生新的事件了,在我们这个场景中,就是等待键盘有键被按下或者松开了。:
int pollResult = poll(mFDs, mFDCount, -1);
这里的mFDs包含了我们所要监控的输入设备的打开文件描述符,这是在前面的openPlatformInput函数中初始化的。
Step 22. poll
这是一个Linux系统的文件操作系统调用,它用来查询指定的文件列表是否有有可读写的,如果有,就马上返回,否则的话,就阻塞线程,并等待驱动程序唤醒,重新调用poll函数,或超时返回。在我们的这个场景中,就是要查询是否有键盘事件发生,如果有的话,就返回,否则的话,当前线程就睡眠等待键盘事件的发生了。
这样,InputManager的启动过程就分析完了,下面我们再分析应用程序注册键盘消息接收通道的过程。
2. 应用程序注册键盘消息接收通道的过程分析
InputManager启动以后,就开始负责监控键盘输入事件了。当InputManager监控到键盘输入事件时,它应该把这个键盘事件分发给谁呢?当然是要把这个键盘消息分发给当前激活的Activity窗口了,不过,当前激活的Activity窗口还需要主动注册一个键盘消息接收通道到InputManager中去,InputManager才能把这个键盘消息分发给它处理。那么,当前被激活的Activity窗口又是什么时候去注册这个键盘消息接收通道的呢?在前面一篇文章Android应用程序启动过程源代码分析中,我们分析Android应用程序的启动过程时,在Step 33中分析到ActivityThread类的handleLaunchActivity函数中,我们曾经说过,当函数handleLaunchActivity调用performLaunchActivity函数来加载这个完毕应用程序的默认Activity后,再次回到handleLaunchActivity函数时,会调用handleResumeActivity函数来使这个Activity进入Resumed状态。在调用handleResumeActivity函数的过程中,ActivityThread会通过android.view.WindowManagerImpl类为该Activity创建一个ViewRoot实例,并且会通过调用ViewRoot类的setView成员函数把与该Activity关联的View设置到这个ViewRoot中去,而Activity正是通过ViewRoot类的setView成员函数来注册键盘消息接收通道的。
有了这些背影知识后,接下来,我们就可以从ViewRoot.setView函数开始分析应用程序注册键盘消息接收通道的过程了。首先看一下这个注册过程的序列图,然后再详细分析每一个步骤:
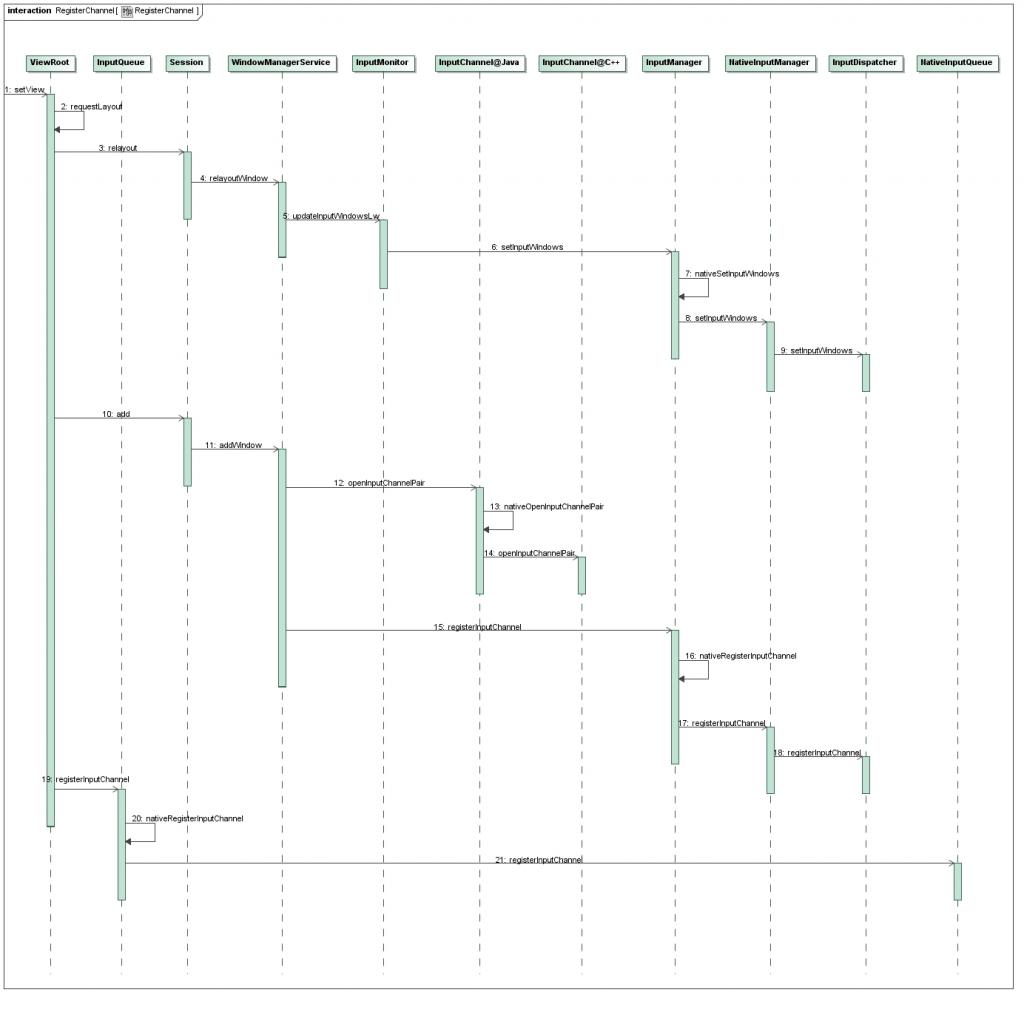
点击查看大图
Step 1. ViewRoot.setView
这个函数定义在frameworks/base/core/java/android/view/ViewRoot.java文件中:
public final class ViewRoot extends Handler implements ViewParent,
		View.AttachInfo.Callbacks {
	......

	public void setView(View view, WindowManager.LayoutParams attrs,
			View panelParentView) {
		......

		synchronized (this) {
			if (mView == null) {
				......

				// Schedule the first layout -before- adding to the window
				// manager, to make sure we do the relayout before receiving
				// any other events from the system.
				requestLayout();
				mInputChannel = new InputChannel();
				try {
					res = sWindowSession.add(mWindow, mWindowAttributes,
						getHostVisibility(), mAttachInfo.mContentInsets,
						mInputChannel);
				} catch (RemoteException e) {
					......
				} finally {
					......
				}

				......

				if (view instanceof RootViewSurfaceTaker) {
					mInputQueueCallback =
						((RootViewSurfaceTaker)view).willYouTakeTheInputQueue();
				}
				if (mInputQueueCallback != null) {
					mInputQueue = new InputQueue(mInputChannel);
					mInputQueueCallback.onInputQueueCreated(mInputQueue);
				} else {
					InputQueue.registerInputChannel(mInputChannel, mInputHandler,
						Looper.myQueue());
				}

				......
			}
		}
	}

}
这个函数中与注册键盘消息接收通道(InputChannel)相关的逻辑主要有三处,一是调用requestLayout函数来通知InputManager,这个Activity窗口是当前被激活的窗口,二是调用sWindowSession(WindowManagerService内部类Session的远程接口)的add成员函数来把键盘消息接收通道的一端注册在InputManager中,三是调用InputQueue的registerInputChannel成员函数来把键盘消息接收通道的另一端注册在本应用程序的消息循环(Looper)中。这样,当InputManager监控到有键盘消息时,就会先找到当前被激活的窗口,然后找到其在InputManager中对应的键盘消息接收通道,通过这个通道在InputManager中的一端来通知在应用程序消息循环中的另一端,就把键盘消息分发给当前激活的Activity窗口了。
在接下来的内容中,我们首先描述requestLayout函数是如何告诉InputManager当前的Activity窗口便是激活窗口的,接着再回过头来分析应用程序是如何把键盘消息接收通道的一端注册到InputManager中去的,最后分析应用程序是如何键盘消息接收通道的另一端注册到本应用程序的消息循环中去了。
Step 2. ViewRoot.requestLayout
这个函数定义在frameworks/base/core/java/android/view/ViewRoot.java文件中:
public final class ViewRoot extends Handler implements ViewParent,
		View.AttachInfo.Callbacks {
	......

	public void requestLayout() {
		......
		mLayoutRequested = true;
		scheduleTraversals();
	}

	......
}
这个函数调用了scheduleTraversals函数来进一步执行操作,由于篇幅关系,我们就不详细描述scheduleTraversals函数了,简单来说,在scheduleTraversals函数中,会通过sendEmptyMessage(DO_TRAVERSAL)发送一个消息到应用程序的消息队列中,这个消息最终由ViewRoot的handleMessage函数处理,而ViewRoot的handleMessage函数把这个消息交给ViewRoot类的performTraversals来处理,在performTraversals函数中,又会调用ViewRoot类的relayoutWindow函数来进一步执行操作,最后在relayoutWindow函数中,就会通过WindowManagerService内部类Session的远程接口sWindowSession的relayout函数来进入到WindowManagerService中。
Step 3. WindowManagerService.Session.relayout
这个函数定义在frameworks/base/services/java/com/android/server/WindowManagerService.java 文件中:
public class WindowManagerService extends IWindowManager.Stub
		implements Watchdog.Monitor {
	......

	private final class Session extends IWindowSession.Stub
			implements IBinder.DeathRecipient {
		......

		public int relayout(IWindow window, WindowManager.LayoutParams attrs,
				int requestedWidth, int requestedHeight, int viewFlags,
				boolean insetsPending, Rect outFrame, Rect outContentInsets,
				Rect outVisibleInsets, Configuration outConfig, Surface outSurface) {
			//Log.d(TAG, ">>>>>> ENTERED relayout from " + Binder.getCallingPid());
			int res = relayoutWindow(this, window, attrs,
					requestedWidth, requestedHeight, viewFlags, insetsPending,
					outFrame, outContentInsets, outVisibleInsets, outConfig, outSurface);
			//Log.d(TAG, "<<<<<< EXITING relayout to " + Binder.getCallingPid());
			return res;
		}

		......
	}

	......
}
这个函数只是简单地调用WindowManagerService的成员函数relayoutWIndow来进一步处理。
Step 4. WindowManagerService.relayoutWIndow
这个函数定义在frameworks/base/services/java/com/android/server/WindowManagerService.java 文件中:
public class WindowManagerService extends IWindowManager.Stub
		implements Watchdog.Monitor {
	......

	public int relayoutWindow(Session session, IWindow client,
			WindowManager.LayoutParams attrs, int requestedWidth,
			int requestedHeight, int viewVisibility, boolean insetsPending,
			Rect outFrame, Rect outContentInsets, Rect outVisibleInsets,
			Configuration outConfig, Surface outSurface) {
		......

		synchronized(mWindowMap) {
			......

			mInputMonitor.updateInputWindowsLw();
		}

		......
	}

	......
}
这个函数又会继续调用mInputMonitor的updateInputWindowsLw成员函数来更新当前的输入窗口,mInputMonitor是WindowManagerService的成员变量,它的类型为InputMonitor。
Step 5. InputMonitor.updateInputWindowsLw
这个函数定义在frameworks/base/services/java/com/android/server/WindowManagerService.java 文件中:
public class WindowManagerService extends IWindowManager.Stub
		implements Watchdog.Monitor {
	......

	final class InputMonitor {
		......

		/* Updates the cached window information provided to the input dispatcher. */
		public void updateInputWindowsLw() {
			// Populate the input window list with information about all of the windows that
			// could potentially receive input.
			// As an optimization, we could try to prune the list of windows but this turns
			// out to be difficult because only the native code knows for sure which window
			// currently has touch focus.
			final ArrayList<WindowState> windows = mWindows;
			final int N = windows.size();
			for (int i = N - 1; i >= 0; i--) {
				final WindowState child = windows.get(i);
				if (child.mInputChannel == null || child.mRemoved) {
					// Skip this window because it cannot possibly receive input.
					continue;
				}

				......

				// Add a window to our list of input windows.
				final InputWindow inputWindow = mTempInputWindows.add();

				......
			}

			// Send windows to native code.
			mInputManager.setInputWindows(mTempInputWindows.toNullTerminatedArray());

			......
		}

		......
	}

	......
}
这个函数将当前系统中带有InputChannel的Activity窗口都设置为InputManager的输入窗口,但是后面我们会看到,只有当前激活的窗口才会响应键盘消息。
Step 6. InputManager.setInputWindows
这个函数定义在frameworks/base/services/java/com/android/server/InputManager.java文件中:
public class InputManager {
	......

	public void setInputWindows(InputWindow[] windows) {
		nativeSetInputWindows(windows);
	}

	......
}
这个函数调用了本地方法nativeSetInputWindows来进一步执行操作。
Step 7. InputManager.nativeSetInputWindows
这个函数定义在frameworks/base/services/jni/com_android_server_InputManager.cpp 文件中:
static void android_server_InputManager_nativeSetInputWindows(JNIEnv* env, jclass clazz,
        jobjectArray windowObjArray) {
    if (checkInputManagerUnitialized(env)) {
        return;
    }

    gNativeInputManager->setInputWindows(env, windowObjArray);
}
这里的gNativeInputManager我们前面分析InputManager的启动过程时已经见过了,这是一个本地InputManager对象,通过它进一步设置当前系统的输入窗口。
Step 8. NativeInputManager.setInputWindows
这个函数定义在frameworks/base/services/jni/com_android_server_InputManager.cpp 文件中:
void NativeInputManager::setInputWindows(JNIEnv* env, jobjectArray windowObjArray) {
	Vector<InputWindow> windows;

	jsize length = env->GetArrayLength(windowObjArray);
	for (jsize i = 0; i < length; i++) {
		jobject inputTargetObj = env->GetObjectArrayElement(windowObjArray, i);
		if (! inputTargetObj) {
			break; // found null element indicating end of used portion of the array
		}

		windows.push();
		InputWindow& window = windows.editTop();
		bool valid = populateWindow(env, inputTargetObj, window);
		if (! valid) {
			windows.pop();
		}

		env->DeleteLocalRef(inputTargetObj);
	}

	mInputManager->getDispatcher()->setInputWindows(windows);
}
这个函数首先将Java层的Window转换成C++层的InputWindow,然后放在windows向量中,最后将这些输入窗口设置到InputDispatcher中去。
Step 9. InputDispatcher.setInputWindows
这个函数定义在frameworks/base/libs/ui/InputDispatcher.cpp文件中:
void InputDispatcher::setInputWindows(const Vector<InputWindow>& inputWindows) {
	......

	{ // acquire lock
		AutoMutex _l(mLock);

		// Clear old window pointers.
		sp<InputChannel> oldFocusedWindowChannel;
		if (mFocusedWindow) {
			oldFocusedWindowChannel = mFocusedWindow->inputChannel;
			mFocusedWindow = NULL;
		}

		mWindows.clear();

		// Loop over new windows and rebuild the necessary window pointers for
		// tracking focus and touch.
		mWindows.appendVector(inputWindows);

		size_t numWindows = mWindows.size();
		for (size_t i = 0; i < numWindows; i++) {
			const InputWindow* window = & mWindows.itemAt(i);
			if (window->hasFocus) {
				mFocusedWindow = window;
				break;
			}
		}

		......

	} // release lock

	......
}
这里InputDispatcher的成员变量mFocusedWindow就代表当前激活的窗口的。这个函数首先清空mFocusedWindow,然后再通过一个for循环检查当前的输入窗口中的哪一个窗口是获得焦点的,获得焦点的输入窗口即为当前激活的窗口。
这样,InputManager就把当前激活的Activity窗口保存在InputDispatcher中了,后面就可以把键盘消息分发给它来处理。
回到Step 1中的ViewRoot.setView函数中,接下来就调用下面语句来注册键盘消息接收通道的一端到InputManager中去:
mInputChannel = new InputChannel();
try {
	res = sWindowSession.add(mWindow, mWindowAttributes,
			getHostVisibility(), mAttachInfo.mContentInsets,
			mInputChannel);
} catch (RemoteException e) {
	......
} finally {
	......
}
前面说过,这里的sWindowSession是WindowManagerService内部类Session的一个远程接口,通过它可以进入到WindowManagerService中去。
Step 10. WindowManagerService.Session.add
这个函数定义在frameworks/base/services/java/com/android/server/WindowManagerService.java 文件中:
public class WindowManagerService extends IWindowManager.Stub
		implements Watchdog.Monitor {
	......

	private final class Session extends IWindowSession.Stub
			implements IBinder.DeathRecipient {
		......

		public int add(IWindow window, WindowManager.LayoutParams attrs,
				int viewVisibility, Rect outContentInsets, InputChannel outInputChannel) {
			return addWindow(this, window, attrs, viewVisibility, outContentInsets,
				outInputChannel);
		}

		......
	}

	......
}
这里调用WindowManagerService类的addWindow函数来进一步执行操作。
Step 11. WindowManagerService.addWindow
这个函数定义在frameworks/base/services/java/com/android/server/WindowManagerService.java 文件中:
public class WindowManagerService extends IWindowManager.Stub
		implements Watchdog.Monitor {
	......

	public int addWindow(Session session, IWindow client,
			WindowManager.LayoutParams attrs, int viewVisibility,
			Rect outContentInsets, InputChannel outInputChannel) {
		......

		WindowState win = null;

		synchronized(mWindowMap) {
			......

			win = new WindowState(session, client, token,
				attachedWindow, attrs, viewVisibility);

			......

			if (outInputChannel != null) {
				String name = win.makeInputChannelName();
				InputChannel[] inputChannels = InputChannel.openInputChannelPair(name);
				win.mInputChannel = inputChannels[0];
				inputChannels[1].transferToBinderOutParameter(outInputChannel);
				mInputManager.registerInputChannel(win.mInputChannel);
			}

			......
		}

		......
	}

	......
}
这里的outInputChannel即为前面在Step 1中创建的InputChannel,它不为NULL,因此,这里会通过InputChannel.openInputChannelPair函数来创建一对输入通道,其中一个位于WindowManagerService中,另外一个通过outInputChannel参数返回到应用程序中:
inputChannels[1].transferToBinderOutParameter(outInputChannel);
创建输入通道之前,WindowManagerService会为当前Activity窗口创建一个WindowState对象win,用来记录这个Activity窗口的状态信息。当创建这对输入管道成功以后,也会把其中的一个管道保存在这个WindowState对象win的成员变量mInputChannel中,后面要注销这个管道的时候,就是从这个WindownState对象中取回这个管道的:
win.mInputChannel = inputChannels[0];
接下来我们就看一下InputChannel.openInputChannelPair函数的实现。
Step 12. InputChannel.openInputChannelPair
这个函数定义在frameworks/base/core/java/android/view/InputChannel.java文件中:
public final class InputChannel implements Parcelable {
	......

	/**
	* Creates a new input channel pair.  One channel should be provided to the input
	* dispatcher and the other to the application's input queue.
	* @param name The descriptive (non-unique) name of the channel pair.
	* @return A pair of input channels.  They are symmetric and indistinguishable.
	*/
	public static InputChannel[] openInputChannelPair(String name) {
		......

		return nativeOpenInputChannelPair(name);
	}

	......
}
这个函数调用本地方法nativeOpenInputChannelPair来进一步执行操作。
Step 13. InputChannel.nativeOpenInputChannelPair
这个函数定义在frameworks/base/core/jni/android_view_InputChannel.cpp文件中:
static jobjectArray android_view_InputChannel_nativeOpenInputChannelPair(JNIEnv* env,
		jclass clazz, jstring nameObj) {
	 const char* nameChars = env->GetStringUTFChars(nameObj, NULL);
	 String8 name(nameChars);
	 env->ReleaseStringUTFChars(nameObj, nameChars);

	 sp<InputChannel> serverChannel;
	 sp<InputChannel> clientChannel;
	 status_t result = InputChannel::openInputChannelPair(name, serverChannel, clientChannel);

	 if (result) {
		 LOGE("Could not open input channel pair.  status=%d", result);
		 jniThrowRuntimeException(env, "Could not open input channel pair.");
		 return NULL;
	 }

	 // TODO more robust error checking
	 jobject serverChannelObj = android_view_InputChannel_createInputChannel(env,
		 new NativeInputChannel(serverChannel));
	 jobject clientChannelObj = android_view_InputChannel_createInputChannel(env,
		 new NativeInputChannel(clientChannel));

	 jobjectArray channelPair = env->NewObjectArray(2, gInputChannelClassInfo.clazz, NULL);
	 env->SetObjectArrayElement(channelPair, 0, serverChannelObj);
	 env->SetObjectArrayElement(channelPair, 1, clientChannelObj);
	 return channelPair;
}
这个函数根据传进来的参数name在C++层分别创建两个InputChannel,一个作为Server端使用,一个作为Client端使用,这里的Server端即是指InputManager,而Client端即是指应用程序。这两个本地的InputChannel是通过InputChannel::openInputChannelPair函数创建的,创建完成后,再相应地在Java层创建相应的两个InputChannel,然后返回。
Step 14. InputChannel.openInputChannelPair
这个函数定义在frameworks/base/libs/ui/InputTransport.cpp文件中:
status_t InputChannel::openInputChannelPair(const String8& name,
		sp<InputChannel>& outServerChannel, sp<InputChannel>& outClientChannel) {
	status_t result;

	int serverAshmemFd = ashmem_create_region(name.string(), DEFAULT_MESSAGE_BUFFER_SIZE);
	if (serverAshmemFd < 0) {
		......
	} else {
		result = ashmem_set_prot_region(serverAshmemFd, PROT_READ | PROT_WRITE);
		if (result < 0) {
			......
		} else {
			// Dup the file descriptor because the server and client input channel objects that
			// are returned may have different lifetimes but they share the same shared memory region.
			int clientAshmemFd;
			clientAshmemFd = dup(serverAshmemFd);
			if (clientAshmemFd < 0) {
				......
			} else {
				int forward[2];
				if (pipe(forward)) {
					......
				} else {
					int reverse[2];
					if (pipe(reverse)) {
						......
					} else {
						String8 serverChannelName = name;
						serverChannelName.append(" (server)");
						outServerChannel = new InputChannel(serverChannelName,
							serverAshmemFd, reverse[0], forward[1]);

						String8 clientChannelName = name;
						clientChannelName.append(" (client)");
						outClientChannel = new InputChannel(clientChannelName,
							clientAshmemFd, forward[0], reverse[1]);
						return OK;
					}
					......
				}
				......
			}
		}
	}
	......
}
在阅读这个函数之前,我们首先了解一下C++层的InputChannel的构造函数:
InputChannel::InputChannel(const String8& name, int32_t ashmemFd, int32_t receivePipeFd,
	int32_t sendPipeFd) :
	mName(name), mAshmemFd(ashmemFd), mReceivePipeFd(receivePipeFd), mSendPipeFd(sendPipeFd) {
	......
}
为了创建一个InputChannel,我们需要准备四个参数,一个是输入通道的名称name,一个是
匿名共享内存文件描述符,一个是管道的读端文件描述符,一个是管道的写端文件描述符。在上面的openInputChannelPair函数,输入通道的名称已经作为参数传递进来,因此,还需要创建匿名共享内存文件,还有管道。这里需要创建两个管道,一个称为前向管道(forward pipe),一个称为反向管道(reverse pipe),它们交叉使用在Server端和Client端的InputChannel中,这样就使入Server和Client可以互相通信了。
具体来说,Server端和Client端的InputChannel分别是这样构成的:
Server Input Channel: ashmem - reverse(read) - forward(write)
Client Input Channel: ashmem - forward(read) - reverse(write)
前面我们在Android应用程序消息处理机制(Looper、Handler)分析一文中学习Android应用程序的消息处理机制时知道,管道可以用作进程间通信,其中一个进程在管道的读端等待新的内空可读,另一个进程在管道的写端写入新的内容以唤醒在管道读端等待的进程,这样就实现了进程间通信。在我们这个情景中,Client端可以在前向管道(forward pipe)的读端睡眠等待新的内容可读,而Server端可以通过向前向管道(forward pipe)的写端写入新的内容来唤醒Client端,同样,把前向管道(forward pipe)换成反向管道(reverse pipe),也能实现Client端唤醒Server端。在后面我们分析InputDispatcher分发键盘消息时,会看到它们的用法。
有了这些背景知识后,相信上面的openInputChannelPair的代码就容易理解了,这里就不再详述了。
创建好了这两个输入通道后,回到Step 11中的WindowManagerService.addWindow函数中,一方面它把刚才创建的Client端的输入通道通过outInputChannel参数返回到应用程序中:
inputChannels[1].transferToBinderOutParameter(outInputChannel);
另一方面,它还要把刚才创建的Server端的输入通道注册到InputManager中:
mInputManager.registerInputChannel(win.mInputChannel);
Step 15. InputManager.registerInputChannel
这个函数定义在frameworks/base/services/java/com/android/server/InputManager.java文件中:
public class InputManager {
	......

	/**
	* Registers an input channel so that it can be used as an input event target.
	* @param inputChannel The input channel to register.
	*/
	public void registerInputChannel(InputChannel inputChannel) {
		if (inputChannel == null) {
			throw new IllegalArgumentException("inputChannel must not be null.");
		}

		nativeRegisterInputChannel(inputChannel, false);
	}

	......
}
它通过调用本地方法nativeRegisterInputChannel来执行进一步的操作。
Step 16. InputManager.nativeRegisterInputChannel
这个函数定义在frameworks/base/services/jni/com_android_server_InputManager.cpp 文件中:
static void android_server_InputManager_nativeRegisterInputChannel(JNIEnv* env, jclass clazz,
		jobject inputChannelObj, jboolean monitor) {
	......

	sp<InputChannel> inputChannel = android_view_InputChannel_getInputChannel(env,
	   inputChannelObj);
	......

	status_t status = gNativeInputManager->registerInputChannel(
	   env, inputChannel, inputChannelObj, monitor);

	......
}
这里首先通过Java层的InputChannel对象获得C++层的InputChannel对象,它们之间的对应关系是在前面的Step 13中设置好的,接着调用NativeInputManager的registerInputChannel执行进一步的操作。
Step 17. NativeInputManager.registerInputChannel
这个函数定义在frameworks/base/services/jni/com_android_server_InputManager.cpp 文件中:
status_t NativeInputManager::registerInputChannel(JNIEnv* env,
		const sp<InputChannel>& inputChannel, jobject inputChannelObj, bool monitor) {
	......

	status = mInputManager->getDispatcher()->registerInputChannel(inputChannel, monitor);

	......
}
这个函数主要是调用了InputDispatcher的registerInputChannel来真正执行注册输入通道的操作。
Step 18. InputDispatcher.registerInputChannel
这个函数定义在frameworks/base/libs/ui/InputDispatcher.cpp文件中:
status_t InputDispatcher::registerInputChannel(const sp<InputChannel>& inputChannel, bool monitor) {
	......

	{ // acquire lock
		AutoMutex _l(mLock);

		if (getConnectionIndexLocked(inputChannel) >= 0) {
			LOGW("Attempted to register already registered input channel '%s'",
				inputChannel->getName().string());
			return BAD_VALUE;
		}

		sp<Connection> connection = new Connection(inputChannel);
		status_t status = connection->initialize();
		if (status) {
			LOGE("Failed to initialize input publisher for input channel '%s', status=%d",
				inputChannel->getName().string(), status);
			return status;
		}

		int32_t receiveFd = inputChannel->getReceivePipeFd();
		mConnectionsByReceiveFd.add(receiveFd, connection);

		if (monitor) {
			mMonitoringChannels.push(inputChannel);
		}

		mLooper->addFd(receiveFd, 0, ALOOPER_EVENT_INPUT, handleReceiveCallback, this);

		runCommandsLockedInterruptible();
	} // release lock
	return OK;
}
这个函数首先会通过getConnectionIndexLocked检查从参数传进来的InputChannel是否已经注册过了,如果已经注册过了,就返回一个BAD_VALUE值了,否则的话,就会创建一个Connection对象来封装即将要注册的inputChannel,我们可以不关心这个Connection对象的实现,接着还通过调用inputChannel->getReceivePipeFd获得一个管
道的读端描述符。回忆一下Step 14中的InputChannel.openInputChannelPair函数,我们创建了一个Server端的InputChannel,就是对应这里的inputChannel了,这个inputChannel的Receive Pipe Fd就是我们前面说的反向管道的读端描述符了。有了这个Receive Pipe Fd后,就以它作为Key值来把前面创建的Connection对象保存在InputDispatcher中,这样就基本完成键盘消息接收通道的注册了。但是,注册的工作还未完成,最后,还要把这个Receive Pipe Fd添加到InputDispatcher的成员变量mLooper中去,这里的成员变量mLooper的类型为Looper,我们在前面介绍InputManager的启动过程的Step 15中已经见过了,这里就不再详述了,不过这里仍然值得介绍一下它的addFd函数。
在前面一篇文章Android应用程序消息处理机制(Looper、Handler)分析中,我们在介绍到Android应用程序的消息循环一节时,曾经说过,在Looper类内部,会创建一个管道,然后Looper会睡眠在这个管道的读端,等待另外一个线程来往这个管道的写端写入新的内容,从而唤醒等待在这个管道读端的线程,除此之外,Looper还可以同时睡眠等待在其它的文件描述符上,因为它是通过Linux系统的epoll机制来批量等待指定的文件有新的内容可读的。这些其它的文件描述符就是通过Looper类的addFd成函数添加进去的了,在添加的时候,还可以指定回调函数,即当这个文件描述符所指向的文件有新的内容可读时,Looper就会调用这个hanldeReceiveCallback函数,有兴趣的读者可以自己研究一下Looper类的addFd函数的实现,它位于frameworks/base/libs/utils/Looper.cpp文件中。
分析到这里,Server端的InputChannel就注册完成了。回忆一下前面介绍InputManager启动过程的Step 14,这时InputDispatcherThread同时睡眠在InputDispatcher的成员变量mLooper内部的管道的读端以及这里的Server端InputChannel里面的反向管道的读端上,mLooper内部的管道的读端等待键盘事件的发生而被唤醒,而Server端InputChannel里面的反向管道的读端等待Client端InputChannel里面的反向管道的写端被写入新的内容而被唤醒。
Server端的InputChannel注册完成后,回到Step 11中的WindowManagerService.addWindow函数,接下来就是把Client端的InputChannel转换成addWindow的参数outInputChannel中,然后返回到Step 1中的ViewRoot.setView函数中,继续执行Client端的InputChannel的注册过程,即为应用程序这一侧注册键盘消息接收通道:
if (view instanceof RootViewSurfaceTaker) {
	mInputQueueCallback =
		((RootViewSurfaceTaker)view).willYouTakeTheInputQueue();
}
if (mInputQueueCallback != null) {
	mInputQueue = new InputQueue(mInputChannel);
	mInputQueueCallback.onInputQueueCreated(mInputQueue);
} else {
	InputQueue.registerInputChannel(mInputChannel, mInputHandler,
		Looper.myQueue());
}
这里的变量view一般不为RootViewSurfaceTaker的实例,因此,最后会执行下面语句:
InputQueue.registerInputChannel(mInputChannel, mInputHandler,
	Looper.myQueue());
它调用InputQueue的registerInputChannel函数为应用程序注册键盘消息接收通道,这里的mInputChannel即为我们在前面Step 14中创建的Client端的InputChannel;Looper.myQueue函数返回的便是应用程序主线程的消息队列,具体可以参考前面一篇文章
Android应用程序消息处理机制(Looper、Handler)分析;参数mInputHandler是一个回调对象,当有键盘事件发生时,这个mInputHandler的handleKey函数就会被调用,在后面的分析中,我们将会看到。
Step 19. InputQueue.registerInputChannel
这个函数定义在frameworks/base/core/java/android/view/InputQueue.java文件中:
public final class InputQueue {
	......

	public static void registerInputChannel(InputChannel inputChannel, InputHandler inputHandler,
			MessageQueue messageQueue) {
		......

		synchronized (sLock) {
			......

			nativeRegisterInputChannel(inputChannel, inputHandler, messageQueue);
		}
	}

	......
}
这个函数调用本地方法nativeRegisterInputChannel函数来执行进一步的操作。
Step 20. InputQueue.nativeRegisterInputChannel
这个函数定义在frameworks/base/core/jni/android_view_InputQueue.cpp文件中:
static void android_view_InputQueue_nativeRegisterInputChannel(JNIEnv* env, jclass clazz,
		jobject inputChannelObj, jobject inputHandlerObj, jobject messageQueueObj) {
	status_t status = gNativeInputQueue.registerInputChannel(
	   env, inputChannelObj, inputHandlerObj, messageQueueObj);

	......
}
这里继续调用NativeInputQueue的registerInputChannel函数来执行真正的键盘消息接收通道的工作。
Step 21. NativeInputQueue.registerInputChannel
这个函数定义在frameworks/base/core/jni/android_view_InputQueue.cpp文件中:
status_t NativeInputQueue::registerInputChannel(JNIEnv* env, jobject inputChannelObj,
		jobject inputHandlerObj, jobject messageQueueObj) {
	sp<InputChannel> inputChannel = android_view_InputChannel_getInputChannel(env,
		inputChannelObj);
	......

	sp<Looper> looper = android_os_MessageQueue_getLooper(env, messageQueueObj);

	{ // acquire lock
		AutoMutex _l(mLock);

		if (getConnectionIndex(inputChannel) >= 0) {
			LOGW("Attempted to register already registered input channel '%s'",
				inputChannel->getName().string());
			return BAD_VALUE;
		}

		uint16_t connectionId = mNextConnectionId++;
		sp<Connection> connection = new Connection(connectionId, inputChannel, looper);
		status_t result = connection->inputConsumer.initialize();
		if (result) {
			LOGW("Failed to initialize input consumer for input channel '%s', status=%d",
				inputChannel->getName().string(), result);
			return result;
		}

		connection->inputHandlerObjGlobal = env->NewGlobalRef(inputHandlerObj);

		int32_t receiveFd = inputChannel->getReceivePipeFd();
		mConnectionsByReceiveFd.add(receiveFd, connection);

		looper->addFd(receiveFd, 0, ALOOPER_EVENT_INPUT, handleReceiveCallback, this);
	} // release lock

	......
	return OK;
}
这里注册应用程序的InputChannel的逻辑和前面介绍的Step 18中在InputDispatcher中注册Server端的InputChannel是一样的,所不同的是,这里用的looper是应用程序主线程中的消息循环对象Looper,而添加到这个looper对象中的Receive Pipe Fd是前面在Step 14中创建的前向管道的读端文件描述符,而使用的回调函数是NativeInputQueue的成员函数handleReceiveCallback。
介绍到这里,应用程序注册键盘消息接收通道的过程就分析完成了。这个过程比较复杂,这里小结一下:
A. 即将会被激活的Activity窗口,会通知InputManager,它是当前激活的窗口,因此,一旦发生键盘事件的时候,InputManager就把这个键盘事件抛给这个Activity处理;
B. 应用程序会为这个Activity窗口和InputManager之间创建一个键盘消息接收通道,这个通道的一端由一个Server端的InputChannel构成,另一端由Client端的InputChannel构成,Server端的InputChannel注册在由InputManager所管理的InputDispatcher中,而Client端的InputChannel注册在由应用程序主线程的消息循环对象Looper中;
C. 注册在InputDispatcher中的InputChannel由一个反向管道的读端和一个前向管道的写端组成,而注册在应用程序主线程的消息循环对象Looper中的InputChannel由这个前向管道的读端和反向管道的写端组成,这种交叉结构使得当有键盘事件发生时,InputDispatcher可以把这个事件通知给应用程序。
应用程序注册好键盘消息接收通道后,接下来就开始分析InputManager分发键盘消息给应用程序的过程了。
3. InputManager分发键盘消息给应用程序的过程分析
在分析InputManager分发键盘消息给应用程序的过程之前,我们先假设现在没有键盘事件发生,因此,InputManager中的InputReader正在睡眠等待键盘事件的发生,而InputManager中的InputDispatcher正在等待InputReader从睡眠中醒过来并且唤醒它,而应用程序也正在消息循环中等待InputDispatcher从睡眠中醒过来并且唤醒它。这时候,用户按下键盘中的一个键,于是,一系列唤醒的事件就依次发生了,一直到应用程序中正在显示的Activity得到通知,有键盘事件发生了。我们先来看这个过程的序列图,然后再详细分析每一个步骤:

点击查看大图
Step 1. InputReader.pollOnce
Step 2. EventHub.getEvent
这两个函数分别定义在frameworks/base/libs/ui/InputReader.cpp和frameworks/base/libs/ui/EventHub.cpp文件中,前面我们在分析InputManager的启动过程的Step 17和Step 18时,已经看到过这两个函数了。InputReaderThread线程会不民地循环调用InputReader.pollOnce函数来读入键盘事件,而实际的键盘事件读入操作是由EventHub.getEvent函数来进行的。如果当前没有键盘事件发生,InputReaderThread线程就会睡眠在EventHub.getEvent函数上,而当键盘事件发生后,就会把这个事件封装成一个RawEvent对象,然后返回到pollOnce函数中,执行process函数进一步处理:
void InputReader::loopOnce() {
	RawEvent rawEvent;
	mEventHub->getEvent(& rawEvent);

	......

	process(& rawEvent);
}
Step 3. InputReader.process
这个函数定义在frameworks/base/libs/ui/InputReader.cpp文件中:
void InputReader::process(const RawEvent* rawEvent) {
	switch (rawEvent->type) {
	case EventHubInterface::DEVICE_ADDED:
		addDevice(rawEvent->deviceId);
		break;

	case EventHubInterface::DEVICE_REMOVED:
		removeDevice(rawEvent->deviceId);
		break;

	case EventHubInterface::FINISHED_DEVICE_SCAN:
		handleConfigurationChanged(rawEvent->when);
		break;

	default:
		consumeEvent(rawEvent);
		break;
	}
}
当键盘事件发生时,rawEvent->type的值为EV_KEY,这是一个宏定义,具体可以参考bionic/libc/kernel/common/linux/input.h文件:
#define EV_KEY 0x01
因此,接下来会调用consumeEvent函数进一步处理。
Step 4. InputReader.consumeEvent
这个函数定义在frameworks/base/libs/ui/InputReader.cpp文件中:
void InputReader::consumeEvent(const RawEvent* rawEvent) {
	int32_t deviceId = rawEvent->deviceId;

	{ // acquire device registry reader lock
		RWLock::AutoRLock _rl(mDeviceRegistryLock);

		ssize_t deviceIndex = mDevices.indexOfKey(deviceId);
		if (deviceIndex < 0) {
			LOGW("Discarding event for unknown deviceId %d.", deviceId);
			return;
		}

		InputDevice* device = mDevices.valueAt(deviceIndex);
		if (device->isIgnored()) {
			//LOGD("Discarding event for ignored deviceId %d.", deviceId);
			return;
		}

		device->process(rawEvent);
	} // release device registry reader lock
}
首先从rawEvent中取得触发键盘事件设备对象device,然后调用它的process函数进行处理。
Step 5. InputDevice.process
这个函数定义在frameworks/base/libs/ui/InputReader.cpp文件中:
void InputDevice::process(const RawEvent* rawEvent) {
    size_t numMappers = mMappers.size();
    for (size_t i = 0; i < numMappers; i++) {
        InputMapper* mapper = mMappers[i];
        mapper->process(rawEvent);
    }
}
这里的mMapper成员变量保存了一系列输入设备事件处理象,例如负责处理键盘事件的KeyboardKeyMapper对象、负责处理轨迹球事件的TrackballInputMapper对象以及负责处理触摸屏事件的TouchInputMapper对象, 它们是在InputReader类的成员函数createDevice中创建的。这里查询每一个InputMapper对象是否要对当前发生的事件进行处理。由于发生的是键盘事件,真正会对该事件进行处理的只有KeyboardKeyMapper对象。
Step 6. KeyboardInputMapper.process
这个函数定义在frameworks/base/libs/ui/InputReader.cpp文件中:
void KeyboardInputMapper::process(const RawEvent* rawEvent) {
    switch (rawEvent->type) {
    case EV_KEY: {
        int32_t scanCode = rawEvent->scanCode;
        if (isKeyboardOrGamepadKey(scanCode)) {
            processKey(rawEvent->when, rawEvent->value != 0, rawEvent->keyCode, scanCode,
                    rawEvent->flags);
        }
        break;
    }
    }
}
这个函数首先会检查一下键盘扫描码是否正确,如果正确的话,就会调用processKey函数进一步处理。
Step 7. KeyboardInputMapper.processKey
这个函数定义在frameworks/base/libs/ui/InputReader.cpp文件中:
void KeyboardInputMapper::processKey(nsecs_t when, bool down, int32_t keyCode,
		int32_t scanCode, uint32_t policyFlags) {
	int32_t newMetaState;
	nsecs_t downTime;
	bool metaStateChanged = false;

	{ // acquire lock
	 AutoMutex _l(mLock);

	 if (down) {
		 // Rotate key codes according to orientation if needed.
		 // Note: getDisplayInfo is non-reentrant so we can continue holding the lock.
		 if (mAssociatedDisplayId >= 0) {
			 int32_t orientation;
			 if (! getPolicy()->getDisplayInfo(mAssociatedDisplayId, NULL, NULL, & orientation)) {
				 return;
			 }

			 keyCode = rotateKeyCode(keyCode, orientation);
		 }

		 // Add key down.
		 ssize_t keyDownIndex = findKeyDownLocked(scanCode);
		 if (keyDownIndex >= 0) {
			 // key repeat, be sure to use same keycode as before in case of rotation
			 keyCode = mLocked.keyDowns.itemAt(keyDownIndex).keyCode;
		 } else {
			 // key down
			 if ((policyFlags & POLICY_FLAG_VIRTUAL)
				 && mContext->shouldDropVirtualKey(when, getDevice(), keyCode, scanCode)) {
					 return;
			 }
			 mLocked.keyDowns.push();
			 KeyDown& keyDown = mLocked.keyDowns.editTop();
			 keyDown.keyCode = keyCode;
			 keyDown.scanCode = scanCode;
		 }

		 mLocked.downTime = when;
	 } else {
		 // Remove key down.
		 ssize_t keyDownIndex = findKeyDownLocked(scanCode);
		 if (keyDownIndex >= 0) {
			 // key up, be sure to use same keycode as before in case of rotation
			 keyCode = mLocked.keyDowns.itemAt(keyDownIndex).keyCode;
			 mLocked.keyDowns.removeAt(size_t(keyDownIndex));
		 } else {
			 // key was not actually down
			 LOGI("Dropping key up from device %s because the key was not down.  "
				 "keyCode=%d, scanCode=%d",
				 getDeviceName().string(), keyCode, scanCode);
			 return;
		 }
	 }

	 int32_t oldMetaState = mLocked.metaState;
	 newMetaState = updateMetaState(keyCode, down, oldMetaState);
	 if (oldMetaState != newMetaState) {
		 mLocked.metaState = newMetaState;
		 metaStateChanged = true;
	 }

	 downTime = mLocked.downTime;
	} // release lock


	if (metaStateChanged) {
		getContext()->updateGlobalMetaState();
	}

	getDispatcher()->notifyKey(when, getDeviceId(), AINPUT_SOURCE_KEYBOARD, policyFlags,
		down ? AKEY_EVENT_ACTION_DOWN : AKEY_EVENT_ACTION_UP,
		AKEY_EVENT_FLAG_FROM_SYSTEM, keyCode, scanCode, newMetaState, downTime);
}
这个函数首先对对按键作一些处理,例如,当某一个DPAD键被按下时,根据当时屏幕方向的不同,它所表示的意义也不同,因此,这里需要根据当时屏幕的方向来调整键盘码:
// Rotate key codes according to orientation if needed.
// Note: getDisplayInfo is non-reentrant so we can continue holding the lock.
if (mAssociatedDisplayId >= 0) {
	int32_t orientation;
	if (! getPolicy()->getDisplayInfo(mAssociatedDisplayId, NULL, NULL, & orientation)) {
		return;
	}

	keyCode = rotateKeyCode(keyCode, orientation);
}
如果这个键是一直按着不放的,不管屏幕的方向如何,必须保证后面的键盘码和前面的一样:
// Add key down.
ssize_t keyDownIndex = findKeyDownLocked(scanCode);
if (keyDownIndex >= 0) {
	// key repeat, be sure to use same keycode as before in case of rotation
	keyCode = mLocked.keyDowns.itemAt(keyDownIndex).keyCode;
} else {
	// key down
	if ((policyFlags & POLICY_FLAG_VIRTUAL)
		&& mContext->shouldDropVirtualKey(when, getDevice(), keyCode, scanCode)) {
		 return;
	}
	mLocked.keyDowns.push();
	KeyDown& keyDown = mLocked.keyDowns.editTop();
	keyDown.keyCode = keyCode;
	keyDown.scanCode = scanCode;
}
如果是第一次按下某个键,还必须把它保存在mLocked.keyDowns里面,就是为了处理上面讲的当这个键盘一直按着不放的时候屏幕方向发生改变的情况。
如果是松开键盘上的某个键,就把它从mLocked.keyDowns里面删除:
// Remove key down.
ssize_t keyDownIndex = findKeyDownLocked(scanCode);
if (keyDownIndex >= 0) {
	// key up, be sure to use same keycode as before in case of rotation
	keyCode = mLocked.keyDowns.itemAt(keyDownIndex).keyCode;
	mLocked.keyDowns.removeAt(size_t(keyDownIndex));
} else {
	// key was not actually down
	LOGI("Dropping key up from device %s because the key was not down.  "
		"keyCode=%d, scanCode=%d",
		getDeviceName().string(), keyCode, scanCode);
	return;
}
当然,对键盘事件的这些处理不是本文的重点,本文的重点是分析从键盘事件到当前激活的Activity窗口接收到这个键盘消息的过程。
最后,KeyboardInputMappger函数通知InputDispatcher,有键盘事件发生了:
getDispatcher()->notifyKey(when, getDeviceId(), AINPUT_SOURCE_KEYBOARD, policyFlags,
	down ? AKEY_EVENT_ACTION_DOWN : AKEY_EVENT_ACTION_UP,
	AKEY_EVENT_FLAG_FROM_SYSTEM, keyCode, scanCode, newMetaState, downTime);
Step 8. InputDispatcher.notifyKey
这个函数定义在frameworks/base/libs/ui/InputDispatcher.cpp文件中:
void InputDispatcher::notifyKey(nsecs_t eventTime, int32_t deviceId, int32_t source,
	uint32_t policyFlags, int32_t action, int32_t flags,
	int32_t keyCode, int32_t scanCode, int32_t metaState, nsecs_t downTime) {
	......

	if (! validateKeyEvent(action)) {
		return;
	}

	/* According to http://source.android.com/porting/keymaps_keyboard_input.html
	* Key definitions: Key definitions follow the syntax key SCANCODE KEYCODE [FLAGS...],
	* where SCANCODE is a number, KEYCODE is defined in your specific keylayout file
	* (android.keylayout.xxx), and potential FLAGS are defined as follows:
	*     SHIFT: While pressed, the shift key modifier is set
	*     ALT: While pressed, the alt key modifier is set
	*     CAPS: While pressed, the caps lock key modifier is set
	*     Since KeyEvent.java doesn't check if Cap lock is ON and we don't have a
	*     modifer state for cap lock, we will not support it.
	*/
	if (policyFlags & POLICY_FLAG_ALT) {
		metaState |= AMETA_ALT_ON | AMETA_ALT_LEFT_ON;
	}
	if (policyFlags & POLICY_FLAG_ALT_GR) {
		metaState |= AMETA_ALT_ON | AMETA_ALT_RIGHT_ON;
	}
	if (policyFlags & POLICY_FLAG_SHIFT) {
		metaState |= AMETA_SHIFT_ON | AMETA_SHIFT_LEFT_ON;
	}

	policyFlags |= POLICY_FLAG_TRUSTED;
	mPolicy->interceptKeyBeforeQueueing(eventTime, deviceId, action, /*byref*/ flags,
		keyCode, scanCode, /*byref*/ policyFlags);

	bool needWake;
	{ // acquire lock
		AutoMutex _l(mLock);

		int32_t repeatCount = 0;
		KeyEntry* newEntry = mAllocator.obtainKeyEntry(eventTime,
			deviceId, source, policyFlags, action, flags, keyCode, scanCode,
			metaState, repeatCount, downTime);

		needWake = enqueueInboundEventLocked(newEntry);
	} // release lock

	if (needWake) {
		mLooper->wake();
	}
}
函数首先是调用validateKeyEvent函数来验证action参数是否正确:
static bool isValidKeyAction(int32_t action) {
    switch (action) {
    case AKEY_EVENT_ACTION_DOWN:
    case AKEY_EVENT_ACTION_UP:
        return true;
    default:
        return false;
    }
}

static bool validateKeyEvent(int32_t action) {
    if (! isValidKeyAction(action)) {
        LOGE("Key event has invalid action code 0x%x", action);
        return false;
    }
    return true;
}
正确的action参数的值只能为AKEY_EVENT_ACTION_DOWN(按下)或者AKEY_EVENT_ACTION_UP(松开)。
参数action检查通过后,还通过policyFlags参数来检查一下同时是否有ALT和SHIFT键被按下:
if (policyFlags & POLICY_FLAG_ALT) {
	metaState |= AMETA_ALT_ON | AMETA_ALT_LEFT_ON;
}
if (policyFlags & POLICY_FLAG_ALT_GR) {
	metaState |= AMETA_ALT_ON | AMETA_ALT_RIGHT_ON;
}
if (policyFlags & POLICY_FLAG_SHIFT) {
	metaState |= AMETA_SHIFT_ON | AMETA_SHIFT_LEFT_ON;
}
最后,调用enqueueInboundEventLocked函数把这个按键事件封装成一个KeyEntry结构加入到InputDispatcher类的mInboundQueue队列中去:
bool InputDispatcher::enqueueInboundEventLocked(EventEntry* entry) {
    bool needWake = mInboundQueue.isEmpty();
    mInboundQueue.enqueueAtTail(entry);

    switch (entry->type) {
    case EventEntry::TYPE_KEY: {
        KeyEntry* keyEntry = static_cast<KeyEntry*>(entry);
        if (isAppSwitchKeyEventLocked(keyEntry)) {
            if (keyEntry->action == AKEY_EVENT_ACTION_DOWN) {
                mAppSwitchSawKeyDown = true;
            } else if (keyEntry->action == AKEY_EVENT_ACTION_UP) {
                if (mAppSwitchSawKeyDown) {
		    ......
                    mAppSwitchDueTime = keyEntry->eventTime + APP_SWITCH_TIMEOUT;
                    mAppSwitchSawKeyDown = false;
                    needWake = true;
                }
            }
        }
        break;
    }
    }

    return needWake;
}
从这个函数我们可以看出,在两种情况下,它的返回值为true,一是当加入该键盘事件到mInboundQueue之前,mInboundQueue为空,这表示InputDispatccherThread线程正在睡眠等待InputReaderThread线程的唤醒,因此,它返回true表示要唤醒InputDispatccherThread线程;二是加入该键盘事件到mInboundQueue之前,mInboundQueue不为空,但是此时用户按下的是Home键,按下Home键表示要切换App,我们知道,在切换App时,新的App会把它的键盘消息接收通道注册到InputDispatcher中去,并且会等待InputReader的唤醒,因此,在这种情况下,也需要返回true,表示要唤醒InputDispatccherThread线程。如果不是这两种情况,那么就说明InputDispatccherThread线程现在正在处理前面的键盘事件,不需要唤醒它。
回到前面的notifyKey函数中,根据enqueueInboundEventLocked函数的返回值来决定是否要唤醒InputDispatccherThread线程:
if (needWake) {
	mLooper->wake();
}
这里,假设needWake为true,于是,就会调用mLooper对象的wake函数来唤醒InputDispatccherThread线程了。
Step 9. Looper.wake
这个函数定义在frameworks/base/libs/utils/Looper.cpp文件中,在前面一篇文章Android应用程序消息处理机制(Looper、Handler)分析中,我们已经分析过这个函数了,这里不再详述,简单来说,它的作用就是用来唤醒睡眠在Looper对象内部的管道读端的线程,在我们的这个场景中,睡眠在Looper对象内部的管道读端的线程就是InputDispatccherThread线程了。
从上面InputManager启动过程的Step 15中,我们知道,此时InputDispatccherThread线程正在InputDispatcher类的dispatchOnceb函数中通过调用mLooper->loopOnce函数进入睡眠状态。当它被唤醒以后,它就会从InputDispatcher类的dispatchOnceb函数返回到InputDispatcherThread类的threadLoop函数,而InputDispatcherThread类的threadLoop函数是循环执行的,于是,它又会再次进入到InputDispatcher类的dispatchOnce函数来处理当前发生的键盘事件。
Step 10. InputDispatcher.dispatchOnce
这个函数定义在frameworks/base/libs/ui/InputDispatcher.cpp文件中:
void InputDispatcher::dispatchOnce() {
	nsecs_t keyRepeatTimeout = mPolicy->getKeyRepeatTimeout();
	nsecs_t keyRepeatDelay = mPolicy->getKeyRepeatDelay();

	nsecs_t nextWakeupTime = LONG_LONG_MAX;
	{ // acquire lock
		AutoMutex _l(mLock);
		dispatchOnceInnerLocked(keyRepeatTimeout, keyRepeatDelay, & nextWakeupTime);

		......
	} // release lock

	......
}
它调用dispatchOnceInnerLocked函数来进一步处理这个键盘事件。
Step 11. InputDispatcher.dispatchOnceInnerLocked
这个函数定义在frameworks/base/libs/ui/InputDispatcher.cpp文件中:
void InputDispatcher::dispatchOnceInnerLocked(nsecs_t keyRepeatTimeout,
	nsecs_t keyRepeatDelay, nsecs_t* nextWakeupTime) {
	......

	// Ready to start a new event.
	// If we don't already have a pending event, go grab one.
	if (! mPendingEvent) {
		if (mInboundQueue.isEmpty()) {
			......
		} else {
			// Inbound queue has at least one entry.
			EventEntry* entry = mInboundQueue.headSentinel.next;

			......

			mInboundQueue.dequeue(entry);
			mPendingEvent = entry;
		}

		......
	}

	......

	switch (mPendingEvent->type) {
	......

	case EventEntry::TYPE_KEY: {
		KeyEntry* typedEntry = static_cast<KeyEntry*>(mPendingEvent);
		......
		done = dispatchKeyLocked(currentTime, typedEntry, keyRepeatTimeout,
			&dropReason, nextWakeupTime);
		break;
							   }

	......
	}

	......
}
我们忽略了这个函数的次要逻辑,主要关注键盘事件的主要处理流程。首先,如果前面发生的键盘事件都已经处理完毕,那么这里的mPendingEvent就为NULL,又因为前面我们把刚刚发生的键盘事件加入了mInboundQueue队列,因此,这里mInboundQueue不为NULL,于是,这里就把mInboundQueue队列中的键盘事件取出来,放在mPendingEvent变量中:
mInboundQueue.dequeue(entry);
mPendingEvent = entry;
由于这里发生的是键盘事件,即mPendingEvent->type的值为EventEntry::TYPE_KEY,于是,在接下来的switch语句中就会执行dispatchKeyLocked函数来分发键盘消息。
Step 12. InputDispatcher.dispatchKeyLocked
这个函数定义在frameworks/base/libs/ui/InputDispatcher.cpp文件中:
bool InputDispatcher::dispatchKeyLocked(
		nsecs_t currentTime, KeyEntry* entry, nsecs_t keyRepeatTimeout,
		DropReason* dropReason, nsecs_t* nextWakeupTime) {
	......

	// Identify targets.
	if (! mCurrentInputTargetsValid) {
		int32_t injectionResult = findFocusedWindowTargetsLocked(currentTime,
			entry, nextWakeupTime);

		......
	}

	// Dispatch the key.
	dispatchEventToCurrentInputTargetsLocked(currentTime, entry, false);
	return true;
}
InputDispatcher类中的mCurrentInputTargetsValid成员变量表示InputDispatcher是否已经标志出谁是当前激活的Activity窗口,如果没有,就需要通过findFocusedWindowTargetsLocked函数来把它找出来。当把当前激活的Activity窗口找出来以后,接下来就调用dispatchEventToCurrentInputTargetsLocked函数把键盘事件分发给它了。
我们先来看一InputDispatcher是如何找到当前激活的Activity窗口的,然后再分析它把键盘事件分发给当前激活Activity窗口的过程。
Step 13. InputDispatcher.findFocusedWindowTargetsLocked
这个函数定义在frameworks/base/libs/ui/InputDispatcher.cpp文件中:
int32_t InputDispatcher::findFocusedWindowTargetsLocked(nsecs_t currentTime,
		const EventEntry* entry, nsecs_t* nextWakeupTime) {
	mCurrentInputTargets.clear();

	int32_t injectionResult;

	// If there is no currently focused window and no focused application
	// then drop the event.
	if (! mFocusedWindow) {
		if (mFocusedApplication) {
			......
			injectionResult = handleTargetsNotReadyLocked(currentTime, entry,
				mFocusedApplication, NULL, nextWakeupTime);
			goto Unresponsive;
		}

		......
		injectionResult = INPUT_EVENT_INJECTION_FAILED;
		goto Failed;
	}

	// Check permissions.
	if (! checkInjectionPermission(mFocusedWindow, entry->injectionState)) {
		injectionResult = INPUT_EVENT_INJECTION_PERMISSION_DENIED;
		goto Failed;
	}

	// If the currently focused window is paused then keep waiting.
	if (mFocusedWindow->paused) {
		......
		injectionResult = handleTargetsNotReadyLocked(currentTime, entry,
			mFocusedApplication, mFocusedWindow, nextWakeupTime);
		goto Unresponsive;
	}

	// If the currently focused window is still working on previous events then keep waiting.
	if (! isWindowFinishedWithPreviousInputLocked(mFocusedWindow)) {
		......
		injectionResult = handleTargetsNotReadyLocked(currentTime, entry,
			mFocusedApplication, mFocusedWindow, nextWakeupTime);
		goto Unresponsive;
	}

	// Success!  Output targets.
	injectionResult = INPUT_EVENT_INJECTION_SUCCEEDED;
	addWindowTargetLocked(mFocusedWindow, InputTarget::FLAG_FOREGROUND, BitSet32(0));

	......

	return injectionResult;
}
回忆前面我们分析应用程序注册键盘消息接收通道的过程时,在Step 9中,当前处于激活状态的应用程序会通过调用InputDispatcher类setInputWindows函数把把当前获得焦点的Activity窗口设置到mFocusedWindow中去,因此,这里的mFocusedWindow不为NULL,于是,就通过了第一个if语句的检查。
第二个if语句检查权限问题,原来,这个键盘事件除了是由硬件触发的外,也可以由其它进程注入进来的,如果这个键盘事件是由其它进程注入进来的,那么entry->injectState就不为NULL,它里面包含了事件注册者的进程ID和用户ID,于是,这里就会调用checkInjectionPermission来检查这个事件注入者的进程ID和用户ID,看看它是否具有这个权限。这里我们不考虑这种情况,因此,这里的entry->injectState为NULL,于是,这个if语句的检查也通过了。
第三个if语句检查当前激活的Activity窗口是否是处于paused状态,如果是的话,也不用进一步处理了。一般情况下,当前激活的Activity窗口都是处于resumed状态的,于是,这个if语句的检查也通过了。
第四个if语句检查当前激活的Activity窗口是否还正在处理前一个键盘事件,如果是的话,那就要等待它处理完前一个键盘事件后再来处理新的键盘事件了。这里我们也假设当前激活的Activity窗口不是正在处理前面的键盘事件,因此,这个if语句的检查也通过了。
最后,就调用addWindowTargetLocked函数把当前激活的Activity窗口添加到InputDispatcher类的mCurrentInputTargets成员变量中去。
Step 14. InputDispatcher.addWindowTargetLocked
这个函数定义在frameworks/base/libs/ui/InputDispatcher.cpp文件中:
void InputDispatcher::addWindowTargetLocked(const InputWindow* window, int32_t targetFlags,
        BitSet32 pointerIds) {
    mCurrentInputTargets.push();

    InputTarget& target = mCurrentInputTargets.editTop();
    target.inputChannel = window->inputChannel;
    target.flags = targetFlags;
    target.xOffset = - window->frameLeft;
    target.yOffset = - window->frameTop;
    target.pointerIds = pointerIds;
}
这个函数简单,就是把传进来的参数window添加到mCurrentInputTargets中去就完事了,后面InputDispatcher就会从mCurrentInputTargets中取出恰当的Activity窗口,然后把键盘事件分发给它。
回到Step 12中的dispatchKeyLocked函数,它接下来就调用dispatchEventToCurrentInputTargetsLocked来进一步处理了。
Step 15. InputDispatcher.dispatchEventToCurrentInputTargetsLocked
这个函数定义在frameworks/base/libs/ui/InputDispatcher.cpp文件中:
void InputDispatcher::dispatchEventToCurrentInputTargetsLocked(nsecs_t currentTime,
		EventEntry* eventEntry, bool resumeWithAppendedMotionSample) {
   ......

   for (size_t i = 0; i < mCurrentInputTargets.size(); i++) {
	   const InputTarget& inputTarget = mCurrentInputTargets.itemAt(i);

	   ssize_t connectionIndex = getConnectionIndexLocked(inputTarget.inputChannel);
	   if (connectionIndex >= 0) {
		   sp<Connection> connection = mConnectionsByReceiveFd.valueAt(connectionIndex);
		   prepareDispatchCycleLocked(currentTime, connection, eventEntry, & inputTarget,
			   resumeWithAppendedMotionSample);
	   } else {
		   ......
   }
}
这个函数的实现也比较简单,前面我们已经把当前需要接受键盘事件的Activity窗口添加到mCurrentInputTargets中去了,因此,这里就分别把它们取出来,然后调用prepareDispatchCycleLocked函数把键盘事件分发给它们处理。
前面我们在分析应用程序注册键盘消息接收通道的过程时,在Step 18中(InputDispatcher.registerInputChannel),把Server端的InputChannel封装成了一个Connection,然后以这个InputChannel中的Receive Pipe Fd作为键值把这个Connection对象保存在mConnectionsByReceiveFd中。这里,既然我们已经通过mCurrentInputTargets得到了表示当前需要接收键盘事件的Activity窗口的InputTarget对象,而且这个InputTarget对象的inputChannel就表示当初在InputDispatcher中注册的Server端InputChannel,因此,这里就可以把这个Connection对象取出来,最后调用prepareDispatchCycleLocked函数来进一步处理。
Step 16. InputDispatcher.prepareDispatchCycleLocked
这个函数定义在frameworks/base/libs/ui/InputDispatcher.cpp文件中:
void InputDispatcher::prepareDispatchCycleLocked(nsecs_t currentTime,
		const sp<Connection>& connection, EventEntry* eventEntry, const InputTarget* inputTarget,
		bool resumeWithAppendedMotionSample) {
	 ......


	 // Resume the dispatch cycle with a freshly appended motion sample.
	 // First we check that the last dispatch entry in the outbound queue is for the same
	 // motion event to which we appended the motion sample.  If we find such a dispatch
	 // entry, and if it is currently in progress then we try to stream the new sample.
	 bool wasEmpty = connection->outboundQueue.isEmpty();

	 if (! wasEmpty && resumeWithAppendedMotionSample) {
		 ......
		 return;
	 }

	 // This is a new event.
	 // Enqueue a new dispatch entry onto the outbound queue for this connection.
	 DispatchEntry* dispatchEntry = mAllocator.obtainDispatchEntry(eventEntry, // increments ref
		 inputTarget->flags, inputTarget->xOffset, inputTarget->yOffset);

	 ......

	 // Enqueue the dispatch entry.
	 connection->outboundQueue.enqueueAtTail(dispatchEntry);

	 // If the outbound queue was previously empty, start the dispatch cycle going.
	 if (wasEmpty) {
		 ......

		 startDispatchCycleLocked(currentTime, connection);
	 }
}
在开始处理键盘事件之前,这个函数会检查一下传进来的参数connection中的outboundQueue事件队列是否为空,如果不为空,就要看看当前要处理的事件和outboundQueue队列中的最后一个事件是不是同一个motion事件,如果是的话,并且从上面传进来的resumeWithAppendedMotionSample参数为true,这时候就要以流水线的方式来处理这些motion事件了。在我们这个情景中,要处理的是键盘事件,因此在上面Step 12中传进来的resumeWithAppendedMotionSample参数为false,因此,我们略过这种情况。
接下来,就会把当前的键盘事件封装成一个DispatchEntry对象,然后添加到connection对象的outboundQueue队列中去,表示当前键盘事件是一个待处理的键盘事件。
当connection中的outboundQueue事件队列不为空,即wasEmpty为false时,说明当前这个Activity窗口正在处键盘事件了,因此,就不需要调用startDispatchCycleLocked来启动Activity窗口来处理这个事件了,因为一旦这个Activity窗口正在处键盘事件,它就会一直处理下去,直到它里的connection对象的outboundQueue为空为止。当connection中的outboundQueue事件队列为空时,就需要调用startDispatchCycleLocked来通知这个Activity窗口来执行键盘事件处理的流程了。
Step 17. InputDispatcher.startDispatchCycleLocked
这个函数定义在frameworks/base/libs/ui/InputDispatcher.cpp文件中:
void InputDispatcher::startDispatchCycleLocked(nsecs_t currentTime,
	const sp<Connection>& connection) {
	......

	DispatchEntry* dispatchEntry = connection->outboundQueue.headSentinel.next;

	// Mark the dispatch entry as in progress.
	dispatchEntry->inProgress = true;

	// Update the connection's input state.
	EventEntry* eventEntry = dispatchEntry->eventEntry;
	......

	// Publish the event.
	status_t status;
	switch (eventEntry->type) {
	case EventEntry::TYPE_KEY: {
		KeyEntry* keyEntry = static_cast<KeyEntry*>(eventEntry);

		// Apply target flags.
		int32_t action = keyEntry->action;
		int32_t flags = keyEntry->flags;

		// Publish the key event.
		status = connection->inputPublisher.publishKeyEvent(keyEntry->deviceId, keyEntry->source,
			action, flags, keyEntry->keyCode, keyEntry->scanCode,
			keyEntry->metaState, keyEntry->repeatCount, keyEntry->downTime,
			keyEntry->eventTime);

		......
		break;
	}
    ......
	}

	// Send the dispatch signal.
	status = connection->inputPublisher.sendDispatchSignal();

	......
}
这个函数主要围绕传进来的Connection对象做两件事情,一是从它的outboundQueue队列中取出当前需要处理的键盘事件,然后把这个事件记录在它的内部对象inputPublisher中,二是通过它的内部对象inputPublisher通知它所关联的Activity窗口,现在有键盘事件需要处理了。第一件事情是通过调用它的InputPublisher对象的publishKeyEvent函数来完成的,而第二件事情是通过调用它的InputPublisher对象的sendDispatchSignal来完成的。我们先来看InputPublisher的成员函数publishKeyEvent的实现,然后再回来分析它的另外一个成员函数sendDispatchSignal的实现。
Step 18. InputPublisher.publishKeyEvent
这个函数定义在frameworks/base/libs/ui/InputTransport.cpp文件中:
status_t InputPublisher::publishKeyEvent(
	int32_t deviceId,
	int32_t source,
	int32_t action,
	int32_t flags,
	int32_t keyCode,
	int32_t scanCode,
	int32_t metaState,
	int32_t repeatCount,
	nsecs_t downTime,
	nsecs_t eventTime) {
	......

	status_t result = publishInputEvent(AINPUT_EVENT_TYPE_KEY, deviceId, source);
	if (result < 0) {
		return result;
	}

	mSharedMessage->key.action = action;
	mSharedMessage->key.flags = flags;
	mSharedMessage->key.keyCode = keyCode;
	mSharedMessage->key.scanCode = scanCode;
	mSharedMessage->key.metaState = metaState;
	mSharedMessage->key.repeatCount = repeatCount;
	mSharedMessage->key.downTime = downTime;
	mSharedMessage->key.eventTime = eventTime;
	return OK;
}
这个函数主要就是把键盘事件记录在InputPublisher类的成员变量mSharedMessage中了,这个mSharedMessage成员变量指向的是一个匿名共享内存。
这个匿名共享内存是什么时候创建的呢?前面我们在分析应用程序注册键盘消息接收通道的过程时,在Step 18中(InputDispatcher.registerInputChannel),在把Server端的InputChannel封装成一个 Connection对象时,会调用它的initialize成员函数来执行一些初始化工作,就是在这个时候创建这个匿名共享内存的了:
sp<Connection> connection = new Connection(inputChannel);
status_t status = connection->initialize();
我们来看一下这个initialize函数的实现,它定义在frameworks/base/libs/ui/InputTransport.cpp文件中:
status_t InputPublisher::initialize() {
	......

	int ashmemFd = mChannel->getAshmemFd();
	int result = ashmem_get_size_region(ashmemFd);
	......

	mAshmemSize = (size_t) result;

	mSharedMessage = static_cast<InputMessage*>(mmap(NULL, mAshmemSize,
		PROT_READ | PROT_WRITE, MAP_SHARED, ashmemFd, 0));
	......

	mPinned = true;
	mSharedMessage->consumed = false;

	return reset();
}
InputPublisher的成员变量mChannel就是指注册在InputDispatcher中的Server端InputChannel了。我们知道,这个InputChannel除了拥有一个反向管道的读端文件描述符和一个前向管道的写端文件描述符之后,还有一个匿名共享文件描述符,这个匿名共享文件描述符就是用来创建匿名共享内存mSharedMessage的了。
这个匿名共享内存mSharedMessage的作用是什么呢?原来,在InputChannel中,前向管道和反向管道的作用只是用来在Server端和Client端之间相互通知有事件发生了,但是具体是什么样的事件,还需要去读取这个匿名共享内存的内容才知道。前面我们在分析应用程序注册键盘消息接收通道的过程时,在Step 14中(InputChannel.openInputChannelPair)创建Server端和Client端的InputChannel对时,创建一个匿名共享内存,这个匿名共享内存有两个文件描述符同时指向它,其中一个放在Server端的InputChannel中,另外一个放在Client端的InputChannel中。这样,当InputDispatcher通过Server端的InputChannel的前向管道来通知Client端有键盘事件发生时,Client端只要通过它的InputChannel中的匿名共享内存文件描述符去读取匿名共享内存中的内容,就可以知道发生了什么事情了。有关匿名共享内存的相关知识,请参考Android系统匿名共享内存Ashmem(Anonymous Shared Memory)简要介绍和学习计划一文。
回到Step 17中,接下来就是调用InputPublisher的成员函数sendDispatchSignal来通知Activity窗口处理键盘事件了。
Step 19. InputPublishe.sendDispatchSignal
这个函数定义在frameworks/base/libs/ui/InputTransport.cpp文件中:
status_t InputPublisher::sendDispatchSignal() {
	......

	mWasDispatched = true;
	return mChannel->sendSignal(INPUT_SIGNAL_DISPATCH);
}
这个函数很简单,它通过调用内部成员变量mChannel的sendSignal函数来通知相应的Activity窗口来处理键盘事件。
Step 20. InputChannel.sendSignal
这个函数定义在frameworks/base/libs/ui/InputTransport.cpp文件中:
status_t InputChannel::sendSignal(char signal) {
	ssize_t nWrite;
	do {
		nWrite = ::write(mSendPipeFd, & signal, 1);
	} while (nWrite == -1 && errno == EINTR);

	if (nWrite == 1) {
		......
		return OK;
	}

	return -errno;
}
这里所谓的发送信号通知,其实是通过向其内部一个管道的写端写入一个字符来实现的。前面我们分析应用程序注册键盘消息接收通道的过程时,在Step 21中(NativeInputQueue.registerInputChannel),它把一个InputChannel注册到应用程序主线程中的Looper对象中,然后应用程序的主线程就通过这个Looper对象睡眠等待在这个InputChannel中的前向管道中有新的内容可读了,这里的mSendPipeFd就是对应这个前向管道的写端。现在既然向这个前向管道的写端写入新的内容了,于是,应用程序的主线程就被唤醒了。
在前面分析应用程序注册键盘消息接收通道过程的Step 21中,我们也说过,当应用程序的主线程因为这个InputChannel中的前向管道的写端唤醒时,NativeInputQueue的成员函数handleReceiveCallback就会被回调,因此,接下来,应用程序的主线程就会被唤醒,然后执行NativeInputQueue的成员函数handleReceiveCallback。
Step 21. NativeInputQueue.handleReceiveCallback
这个函数定义在frameworks/base/core/jni/android_view_InputQueue.cpp文件中:
int NativeInputQueue::handleReceiveCallback(int receiveFd, int events, void* data) {
	NativeInputQueue* q = static_cast<NativeInputQueue*>(data);
	JNIEnv* env = AndroidRuntime::getJNIEnv();

	sp<Connection> connection;
	InputEvent* inputEvent;
	jobject inputHandlerObjLocal;
	jlong finishedToken;
	{ // acquire lock
		AutoMutex _l(q->mLock);

		ssize_t connectionIndex = q->mConnectionsByReceiveFd.indexOfKey(receiveFd);
		......

			connection = q->mConnectionsByReceiveFd.valueAt(connectionIndex);
		......


			status_t status = connection->inputConsumer.receiveDispatchSignal();
		if (status) {
			......
				return 0; // remove the callback
		}

		......

		status = connection->inputConsumer.consume(& connection->inputEventFactory, & inputEvent);
		......

		finishedToken = generateFinishedToken(receiveFd, connection->id, connection->messageSeqNum);

		inputHandlerObjLocal = env->NewLocalRef(connection->inputHandlerObjGlobal);
	} // release lock

	......

	int32_t inputEventType = inputEvent->getType();

	jobject inputEventObj;
	jmethodID dispatchMethodId;
	switch (inputEventType) {
	case AINPUT_EVENT_TYPE_KEY:
		......
			inputEventObj = android_view_KeyEvent_fromNative(env,
			static_cast<KeyEvent*>(inputEvent));
		dispatchMethodId = gInputQueueClassInfo.dispatchKeyEvent;
		break;
	}
	......
	}

	......

	env->CallStaticVoidMethod(gInputQueueClassInfo.clazz,
						  dispatchMethodId, inputHandlerObjLocal, inputEventObj,
						  jlong(finishedToken));

	......

	return 1;
}
这个函数首先是通过参数data获得当初注册InputChannel的NativeInputQueue对象,具体可以参考前面介绍的应用程序注册键盘消息接收通道过程的Step 21。接下来再通过参数receiveFd获得保存在这个NativeInputQueue对象中的mConnectionsByReceiveFd成员变量中的Connection对象。有了这个Connection对象后,就可以获得它内部的InputConsumer对象,这个InputConsumer对象是和上面的Step 18中介绍的InputPublisher对象相应的。
在InputChannel内部中,分别有一个InputPublisher对象和一个InputConsumer对象,对于Server端的InputChannel来说,它使用的是InputPublisher对象,通过它进行键盘消息的分发,而对于Client端的InputChannel来说,它使用的是InputConsumer对象,通过它进行键盘消息的读取。
获得了这个InputConsumer对象后首先是调用它的receiveDispatchSignal来确认是否是接收到了键盘消息的通知,如果是的话,再调用它的consume函数来把键盘事件读取出来,最后,调用Java层的回调对象InputQueue的DispatchKeyEvent来处理这个键盘事件。下面,我们就依次来分析这些过程。
Step 22. InputConsumer.receiveDispatchSignal
这个函数定义在frameworks/base/libs/ui/InputTransport.cpp文件中:
status_t InputConsumer::receiveDispatchSignal() {
	......

	char signal;
	status_t result = mChannel->receiveSignal(& signal);
	if (result) {
		return result;
	}
	if (signal != INPUT_SIGNAL_DISPATCH) {
		......
		return UNKNOWN_ERROR;
	}
	return OK;
}
这个函数很简单,它通过它内部对象mChannel来从前向管道的读端读入一个字符,看看是否是前面的Step 20中写入的INPUT_SIGNAL_DISPATCH字符。
InputChannel类的receiveSignal函数也是定义在frameworks/base/libs/ui/InputTransport.cpp文件中:
status_t InputChannel::receiveSignal(char* outSignal) {
	ssize_t nRead;
	do {
		nRead = ::read(mReceivePipeFd, outSignal, 1);
	} while (nRead == -1 && errno == EINTR);

	if (nRead == 1) {
		......
		return OK;
	}

	......
	return -errno;
}
Step 23. InputConsumer.consume
这个函数定义在frameworks/base/libs/ui/InputTransport.cpp文件中:
status_t InputConsumer::consume(InputEventFactoryInterface* factory, InputEvent** outEvent) {
	......

	*outEvent = NULL;

	int ashmemFd = mChannel->getAshmemFd();
	int result = ashmem_pin_region(ashmemFd, 0, 0);
	......

	if (mSharedMessage->consumed) {
		......
		return INVALID_OPERATION;
	}

	// Acquire but *never release* the semaphore.  Contention on the semaphore is used to signal
	// to the publisher that the message has been consumed (or is in the process of being
	// consumed).  Eventually the publisher will reinitialize the semaphore for the next message.
	result = sem_wait(& mSharedMessage->semaphore);
	......

	mSharedMessage->consumed = true;

	switch (mSharedMessage->type) {
	case AINPUT_EVENT_TYPE_KEY: {
		KeyEvent* keyEvent = factory->createKeyEvent();
		if (! keyEvent) return NO_MEMORY;

		populateKeyEvent(keyEvent);

		*outEvent = keyEvent;
		break;
	}
	......
	}

	return OK;
}
这个函数很简单,只要对照前面的Step 18(InputPublisher.publishKeyEvent)来逻辑来看就可以了,后者是往匿名共享内存中写入键盘事件,前者是从这个匿名共享内存中把这个键盘事件的内容读取出来。
回到Step 21中的handleReceiveCallback函数中,从InputConsumer中获得了键盘事件的内容(保存在本地变量inputEvent中)后,就开始要通知Java层的应用程序了。在前面分析应用程序注册键盘消息接收通道的过程时,在Step 21中(NativeInputQueue.registerInputChannel),会把传进来的对象inputHandlerObj保存在Connection对象中:
connection->inputHandlerObjGlobal = env->NewGlobalRef(inputHandlerObj);
这个inputHandlerObj对象的类型为Java层的InputHandler对象,因此,这里首先把它取回来:
inputHandlerObjLocal = env->NewLocalRef(connection->inputHandlerObjGlobal);
取回来之后,我们要把作为参数来调用InputQueue类的dispatchKeyEvent静态成员函数来通知应用程序,有键盘事件发生了,因此,先找到InputQueue类的静态成员函数dispatchKeyEvent的ID:
dispatchMethodId = gInputQueueClassInfo.dispatchKeyEvent;
在回调用这个InputQueue类的dispatchKeyEvent静态成员函数之前,还要把前面获得的inputEvent对象转换成Java层的KeyEvent对象:
inputEventObj = android_view_KeyEvent_fromNative(env,
	static_cast<KeyEvent*>(inputEvent));
万事具备了,就可以通知Java层的InputQueue来处理这个键盘事件了:
env->CallStaticVoidMethod(gInputQueueClassInfo.clazz,
		dispatchMethodId, inputHandlerObjLocal, inputEventObj,
		jlong(finishedToken));
Step 24. InputQueue.dispatchKeyEvent
这个函数定义在frameworks/base/core/java/android/view/InputQueue.java文件中:
public final class InputQueue {
	......

	private static void dispatchKeyEvent(InputHandler inputHandler,
			KeyEvent event, long finishedToken) {
		Runnable finishedCallback = FinishedCallback.obtain(finishedToken);
		inputHandler.handleKey(event, finishedCallback);
	}

	......
}
这个函数首先会创建一个FinishedCallback类型的对象finishedCallback,FinishedCallback是InputQueue的一个内部类,它继承于Runnable类。这个finishedCallback对象是提供给当前Activity窗口的,当它处理完毕键盘事件后,需要通过消息分发的方式来回调这个finishedCallback对象,以及InputQueue类处理一个手尾的工作,后面我们会分析到。
这里的inputHandler对象是在前面分析应用程序注册键盘消息接收通道的过程时,在Step 1(ViewRoot.setView)中传进来的:
InputQueue.registerInputChannel(mInputChannel, mInputHandler,
	Looper.myQueue());
它是ViewRoot类的一个成员变量mInputHandler。因此,这里将调用ViewRoot类的内部对象mInputHandler的成员函数handleKey来处理键盘事件。
Step 25. InputHandler.handleKey
这个函数定义在frameworks/base/core/java/android/view/ViewRoot.java文件中:
public final class ViewRoot extends Handler implements ViewParent,
		View.AttachInfo.Callbacks {
	......

	private final InputHandler mInputHandler = new InputHandler() {
		public void handleKey(KeyEvent event, Runnable finishedCallback) {
			startInputEvent(finishedCallback);
			dispatchKey(event, true);
		}
		......
	};

	......
}
这个函数首先调用其外部类ViewRoot的startInputEvent成员函数来把回调对象finishedCallback保存下来:
public final class ViewRoot extends Handler implements ViewParent,
		View.AttachInfo.Callbacks {
	......

	private void startInputEvent(Runnable finishedCallback) {
		......

		mFinishedCallback = finishedCallback;
	}

	......
}
然后再调用其外部类ViewRoot的dispatchKey成员函数来进一步处这个键盘事件。
Step 26. ViewRoot.dispatchKey
这个函数定义在frameworks/base/core/java/android/view/ViewRoot.java文件中:
public final class ViewRoot extends Handler implements ViewParent,
		View.AttachInfo.Callbacks {
	......

	private void dispatchKey(KeyEvent event, boolean sendDone) {
		......

		Message msg = obtainMessage(DISPATCH_KEY);
		msg.obj = event;
		msg.arg1 = sendDone ? 1 : 0;

		......

		sendMessageAtTime(msg, event.getEventTime());
	}

	......
}
ViewRoot不是直接处理这个键盘事件,而是把作为一个消息(DISPATCH_KEY)它放到消息队列中去处理,这个消息最后由ViewRoot类的deliverKeyEvent成员函数来处理。
Step 27. ViewRoot.deliverKeyEvent
这个函数定义在frameworks/base/core/java/android/view/ViewRoot.java文件中:
public final class ViewRoot extends Handler implements ViewParent,
		View.AttachInfo.Callbacks {
	......

	private void deliverKeyEvent(KeyEvent event, boolean sendDone) {
		// If mView is null, we just consume the key event because it doesn't
		// make sense to do anything else with it.
		boolean handled = mView != null
			? mView.dispatchKeyEventPreIme(event) : true;
		......

		// If it is possible for this window to interact with the input
		// method window, then we want to first dispatch our key events
		// to the input method.
		if (mLastWasImTarget) {
			InputMethodManager imm = InputMethodManager.peekInstance();
			if (imm != null && mView != null) {
				......

				imm.dispatchKeyEvent(mView.getContext(), seq, event,
					mInputMethodCallback);
				return;
			}
		}
		......
	}

	......
}
ViewRoot在把这个键盘事件分发给当前激活的Activity窗口处理之前,首先会调用InputMethodManager的dispatchKeyEvent成员函数来处理这个键盘事件。InputMethodManager处理完这个键盘事件后,再回调用这里的mInputMethodCallback对象的finishedEvent成员函数来把键盘事件分发给当前激活的Activity窗口处理。当然,在把这个键盘事件分发给InputMethodManager处理之前,ViewRoot也会先把这个键盘事件分发给当前激活的Activity窗口的dispatchKeyEventPreIme成员函数处理。
Step 28. InputMethodManager.dispatchKeyEvent
这个函数定义在frameworks/base/core/java/android/view/inputmethod/InputMethodManager.java文件中。这是一个输入法相关的类,我们这里就不关注了,只要知道当输入法处理完成之后,它就会调用ViewRoot类的mInputMehtodCallback对象的finishedEvent成员函数。
Step 29. InputMethodCallack.finishedEvent
这个函数定义在frameworks/base/core/java/android/view/ViewRoot.java文件中:
public final class ViewRoot extends Handler implements ViewParent,
		View.AttachInfo.Callbacks {
	......

	static class InputMethodCallback extends IInputMethodCallback.Stub {
		private WeakReference<ViewRoot> mViewRoot;

		public InputMethodCallback(ViewRoot viewRoot) {
				mViewRoot = new WeakReference<ViewRoot>(viewRoot);
		}

		public void finishedEvent(int seq, boolean handled) {
			final ViewRoot viewRoot = mViewRoot.get();
			if (viewRoot != null) {
				viewRoot.dispatchFinishedEvent(seq, handled);
			}
		}

		......
	}

	......
}
这个函数最终调用ViewRoot的dispatchFinishedEvent来进一步处理。
Step 30. ViewRoot.dispatchFinishedEvent
这个函数定义在frameworks/base/core/java/android/view/ViewRoot.java文件中:
public final class ViewRoot extends Handler implements ViewParent,
		View.AttachInfo.Callbacks {
	......

	public void dispatchFinishedEvent(int seq, boolean handled) {
		Message msg = obtainMessage(FINISHED_EVENT);
		msg.arg1 = seq;
		msg.arg2 = handled ? 1 : 0;
		sendMessage(msg);
	}

	......
}
和前面的Step 26一样,ViewRoot不是直接处理这个键盘事件,而是把它作为一个消息(FINISHED_EVENT)放在消息队列中去,最后,这个消息由ViewRoot的handleFinishedEvent函数来处理。
Step 31. ViewRoot.handleFinishedEvent
这个函数定义在frameworks/base/core/java/android/view/ViewRoot.java文件中:
public final class ViewRoot extends Handler implements ViewParent,
		View.AttachInfo.Callbacks {
	......

	void handleFinishedEvent(int seq, boolean handled) {
		final KeyEvent event = (KeyEvent)retrievePendingEvent(seq);
		......

		if (event != null) {
			final boolean sendDone = seq >= 0;
			if (!handled) {
				deliverKeyEventToViewHierarchy(event, sendDone);
				return;
			} else if (sendDone) {
				......
			} else {
				......
			}
		}
	}

	......
}
如果InputMethodManager没有处理这个键盘事件,那么ViewRoot就会调用deliverKeyEventToViewHierarchy函数来把这个键盘事件分发给当前激活的Activity窗口来处理。
Step 32. ViewRoot.deliverKeyEventToViewHierarchy
这个函数定义在frameworks/base/core/java/android/view/ViewRoot.java文件中:
public final class ViewRoot extends Handler implements ViewParent,
		View.AttachInfo.Callbacks {
	......

	private void deliverKeyEventToViewHierarchy(KeyEvent event, boolean sendDone) {
		try {
			if (mView != null && mAdded) {
				......

				boolean keyHandled = mView.dispatchKeyEvent(event);
			}

			......
		} finally {
			if (sendDone) {
				finishInputEvent();
			}
		}
	}

	......
}
这个函数首先会调用ViewRoot类的成员变量mView的dispatchKeyEvent来处理这个键盘事件,然后最调用ViewRoot类的finishInputEvent来处理手尾工作。
ViewRoot类的成员变量mView的类型为DecorView,它是由ActivityThread类第一次Resume当前的Activity窗口时创建的,具体可以参考ActivityThread类的handleResumeActivity成员函数,这里就不关注了。
Step 33. DecorView.dispatchKeyEvent
这个函数定义在frameworks/base/policy/src/com/android/internal/policy/impl/PhoneWindow.java文件中,它是PhoneWindow类的一个内部类:
public class PhoneWindow extends Window implements MenuBuilder.Callback {
	......

	private final class DecorView extends FrameLayout implements RootViewSurfaceTaker {
		......

		@Override
		public boolean dispatchKeyEvent(KeyEvent event) {
			......

			final Callback cb = getCallback();
			final boolean handled = cb != null && mFeatureId < 0 ? cb.dispatchKeyEvent(event)
				: super.dispatchKeyEvent(event);

			......
		}

		......
	}

	......
}
这里通过getCallback函数返回的是当前应用程序的激活的Activity窗口的Window.Callback接口,一般它不为NULL,因此,这个函数会调用Activity类的dispatchKeyEvent来处理这个键盘事件。
Step 34. Activity.dispatchKeyEvent
这个函数定义在frameworks/base/core/java/android/app/Activity.java文件中:
public class Activity extends ContextThemeWrapper
		implements LayoutInflater.Factory,
		Window.Callback, KeyEvent.Callback,
		OnCreateContextMenuListener, ComponentCallbacks {
	......

	public boolean dispatchKeyEvent(KeyEvent event) {
		......

		View decor = mDecor;
		if (decor == null) decor = win.getDecorView();
		return event.dispatch(this, decor != null
			? decor.getKeyDispatcherState() : null, this);
	}

	......
}
这里,Activity不是直接处理这个键盘事件,而是通过KeyEvent的dispatch转发一下。注意,KeyEvent的成中函数dispatch的第一个参数的类型是KeyEvent.Callback,而Activity实现了这个接口,因此,这里可以传this引用过去。
Step 35. KeyEvent.dispatch
这个函数定义在frameworks/base/core/java/android/view/KeyEvent.java文件中:
public class KeyEvent extends InputEvent implements Parcelable {
	......

	public final boolean dispatch(Callback receiver, DispatcherState state,
			Object target) {
		switch (mAction) {
		case ACTION_DOWN: {
			......
			boolean res = receiver.onKeyDown(mKeyCode, this);
			......
			return res;
		}
		case ACTION_UP:
			......
			return receiver.onKeyUp(mKeyCode, this);
		case ACTION_MULTIPLE:
			final int count = mRepeatCount;
			final int code = mKeyCode;
			if (receiver.onKeyMultiple(code, count, this)) {
				return true;
			}
			......
			return false;
		}
		return false;
	}

	......
}
这里就根据一个键是按下(ACTION_DOWN)、还是松开(ACTION_UP)或者是一个相同的键被多次按下和松开(ACTION_MULTIPLE)等不同事件类型来分别调用Activity的onKeyDown、onKeyUp和onKeyMultiple函数了。
Activity窗口处理完这个键盘事件后,层层返回,最后回到Step 32中,调用finishInputEvent事件来处理一些手尾工,下面我们将会看到这些手尾工是什么。
Step 36. ViewRoot.finishInputEvent
这个函数定义在frameworks/base/core/java/android/view/ViewRoot.java文件中:
public final class ViewRoot extends Handler implements ViewParent,
		View.AttachInfo.Callbacks {
	......

	private void finishInputEvent() {
		......

		if (mFinishedCallback != null) {
			mFinishedCallback.run();
			mFinishedCallback = null;
		} else {
			......
		}
	}

	......
}
ViewRoot类里面的成员变量mFinishedCallback是在前面Step 25中由InputQueue设置的,它是一个Runnable对象,实际类型是定义在InputQueue的内部类FinishedCallback,因此,这里调用它的run方法时,接下来就会调用InputQueue的内部类FinishedCallback的run成员函数:
public final class InputQueue {
	......

	private static class FinishedCallback implements Runnable {
		......

		public void run() {
			synchronized (sLock) {
				......

				nativeFinished(mFinishedToken);

				......
			}
		}

		......
	}

	......
}
这里它调用外部类InputQueue的本地方法nativeFinished来进一步处理。
Step 37. InputQueue.nativeFinished
这个函数定义在frameworks/base/core/jni/android_view_InputQueue.cpp文件中:
static void android_view_InputQueue_nativeFinished(JNIEnv* env, jclass clazz,
		jlong finishedToken) {
	status_t status = gNativeInputQueue.finished(
		env, finishedToken, false /*ignoreSpuriousFinish*/);

	......
}
这个函数只是简单只调用NativeInputQueue的finished方法来进一处处理。
Step 38. NativeInputQueue.finished
这个函数定义在frameworks/base/core/jni/android_view_InputQueue.cpp文件中:
status_t NativeInputQueue::finished(JNIEnv* env, jlong finishedToken, bool ignoreSpuriousFinish) {
	int32_t receiveFd;
	uint16_t connectionId;
	uint16_t messageSeqNum;
	parseFinishedToken(finishedToken, &receiveFd, &connectionId, &messageSeqNum);

	{ // acquire lock
		AutoMutex _l(mLock);

		ssize_t connectionIndex = mConnectionsByReceiveFd.indexOfKey(receiveFd);
		......

		sp<Connection> connection = mConnectionsByReceiveFd.valueAt(connectionIndex);
		......

		connection->messageInProgress = false;

		status_t status = connection->inputConsumer.sendFinishedSignal();

		......
	} // release lock

	return OK;
}
这个函数最重要的参数便是finishedToken了,通过它可以获得之前通知Java层的InputQueue类来处理键盘事件的Connection对象,它的值是在上面的Step 21(NativeInputQueue.handleReceiveCallback)中生成的:
finishedToken = generateFinishedToken(receiveFd, connection->id, connection->messageSeqNum);
函数generateFinishedToken的定义如下:
jlong NativeInputQueue::generateFinishedToken(int32_t receiveFd, uint16_t connectionId,
        uint16_t messageSeqNum) {
    return (jlong(receiveFd) << 32) | (jlong(connectionId) << 16) | jlong(messageSeqNum);
}
它的实现很简单,只是把receiveFd(前向管道的读端文件描述符)、connectionId(Client端的InputChannel对应的Connection对象在NativeInputQueue中的索引)和messageSeqNum(键盘消息的序列号)三个数值通过移位的方式编码在一个jlong值里面,即编码在上面的finishedToken参数里面。
因此,在上面的finished函数里面,首先就是要对参数值finishedToken进行解码,把receiveFd、connectionId和messageSeqNum三个值分别取回来:
parseFinishedToken(finishedToken, &receiveFd, &connectionId, &messageSeqNum);
parseFinishedToken的定义如下:
void NativeInputQueue::parseFinishedToken(jlong finishedToken,
        int32_t* outReceiveFd, uint16_t* outConnectionId, uint16_t* outMessageIndex) {
    *outReceiveFd = int32_t(finishedToken >> 32);
    *outConnectionId = uint16_t(finishedToken >> 16);
    *outMessageIndex = uint16_t(finishedToken);
}
有了这个receiveFd和connectionId之后,就可以把相应的Connection对象取回来了:
ssize_t connectionIndex = mConnectionsByReceiveFd.indexOfKey(receiveFd);
		......

sp<Connection> connection = mConnectionsByReceiveFd.valueAt(connectionIndex);
接下来就是调用这个connection对象中的inputConsumer对象来发送信号通知Server端的InputChannel,应用程序这一侧处理完刚才发生的键盘事件了:
status_t status = connection->inputConsumer.sendFinishedSignal();
Step 39. InputConsumer.sendFinishedSignal
这个函数定义在frameworks/base/libs/ui/InputTransport.cpp文件中:
status_t InputConsumer::sendFinishedSignal() {
	......

	return mChannel->sendSignal(INPUT_SIGNAL_FINISHED);
}
这个函数的实现很简单,只是调用其内部对象mChannel的sendSignal函数来执行发送信号的通知。前面我们已经说过,这里的mChannel的类型为InputChannel,它是注册在应用程序一侧的Client端InputChannel,它的成员函数sendSignal的定义我们在上面的Step 20中已经分析过了,这里不再详述,不过,这里和上面Step 20不一样的地方是,它里的通知方向是从反向管道的写端(在应用程序这一侧)到反向管道的读端(在InputDispatcher这一侧)。
前面我们在分析应用程序注册键盘消息接收通道的过程时,在Step 18(InputDispatcher.registerInputChannel)中,说到InputDispatcher把一个反向管道的读端文件描述符添加到WindowManagerService所运行的线程中的Looper对象中去,然后就会在这个反向管道的读端上睡眠等待有这个管道有新的内容可读。现在,InputConsumer往这个反向管道写入新的内容了,于是,InputDispatcher就被唤醒过来了,唤醒过来后,它所调用的函数是InputDispatcher.handleReceiveCallback函数,这与前面的Step 21的逻辑是一样的。
Step 40. InputDispatcher.handleReceiveCallack
这个函数定义在frameworks/base/libs/ui/InputDispatcher.cpp文件中:
int InputDispatcher::handleReceiveCallback(int receiveFd, int events, void* data) {
	InputDispatcher* d = static_cast<InputDispatcher*>(data);

	{ // acquire lock
		AutoMutex _l(d->mLock);

		ssize_t connectionIndex = d->mConnectionsByReceiveFd.indexOfKey(receiveFd);
		......

		nsecs_t currentTime = now();

		sp<Connection> connection = d->mConnectionsByReceiveFd.valueAt(connectionIndex);
		......

		status_t status = connection->inputPublisher.receiveFinishedSignal();
		if (status) {
			......
			return 0; // remove the callback
		}

		d->finishDispatchCycleLocked(currentTime, connection);
		......

		return 1;
	} // release lock
}
这个函数首先是通过传进来的receiveFd参数(反向管道的读端文件描述符)的值取得相应的Connection对象:
ssize_t connectionIndex = d->mConnectionsByReceiveFd.indexOfKey(receiveFd);
     ......

sp<Connection> connection = d->mConnectionsByReceiveFd.valueAt(connectionIndex);
然后通过调用这个connection对象的内部对象inputPublisher的receiveFinishedSignal函数来确认是否真的收到键盘事件处理完成的信号,确认之后,就会调用InputDispatcher对象d的finishDispatchCycleLocked函数来执行一些善后工作。下面我们就依次分析这两个过程。
Step 41. InputPublisher.receiverFinishedSignal
这个函数定义在frameworks/base/libs/ui/InputTransport.cpp文件中:
status_t InputPublisher::receiveFinishedSignal() {
    ....

    char signal;
    status_t result = mChannel->receiveSignal(& signal);
    if (result) {
        return result;
    }
    if (signal != INPUT_SIGNAL_FINISHED) {
        .......
        return UNKNOWN_ERROR;
    }
    return OK;
}
这里的逻辑和前面的Step 22中NativeInputQueue确认是否真的收到键盘事件分发的信号的逻辑是一致的,都是通过InputChannel的receiveSignal函数来确认是否在管道中收到了某一个约定的字符值,不过,这里约定的字符值为INPUT_SIGNAL_FINISHED。
回到前面的Step 40中,确认了是真的收到了键盘事件处理完成的信号后,就调用InputDispatcher的finishDispatchCycleLocked函数来执行一些善后工作了。
Step 42. InputDispatcher.finishDispatchCycleLocked
这个函数定义在frameworks/base/libs/ui/InputDispatcher.cpp文件中:
void InputDispatcher::finishDispatchCycleLocked(nsecs_t currentTime,
		const sp<Connection>& connection) {
	......

	// Notify other system components.
	onDispatchCycleFinishedLocked(currentTime, connection);

	// Reset the publisher since the event has been consumed.
	// We do this now so that the publisher can release some of its internal resources
	// while waiting for the next dispatch cycle to begin.
	status_t status = connection->inputPublisher.reset();
	......

	startNextDispatchCycleLocked(currentTime, connection);
}
这个函数主要就是做了三件事情:
一是通知其它系统,InputDispatcher完成了一次键盘事件的处理:
// Notify other system components.
onDispatchCycleFinishedLocked(currentTime, connection);
二是调用相应的connection对象的内部对象inputPublisher来的reset函数来回收一些资源,它里面其实就是释放前面在Step 18(InputPublisher.publishKeyEvent)使用的匿名共享内存了:
// Reset the publisher since the event has been consumed.
// We do this now so that the publisher can release some of its internal resources
// while waiting for the next dispatch cycle to begin.
status_t status = connection->inputPublisher.reset();
三是调用InputDispatcher的startNextDispatchCycleLocked函数来处理下一个键盘事件:
startNextDispatchCycleLocked(currentTime, connection);
因为正在处理当前这个键盘事件的时候,很有可能又同时发生了其它的键盘事件,因此,这里InputDispatcher还不能停下来,需要继续调用startNextDispatchCycleLocked继续处理键盘事件,不过下一个键盘事件的处理过程和我们现在分析的过程就是一样的了。
至此,InputManager分发键盘消息给应用程序的过程就分析完成了,这是一个比较复杂的过程,不过,只要我们抓住主要的线索,就不难理解了,现在我们就小结一下这个过程的四个主要线索:
A. 键盘事件发生,InputManager中的InputReader被唤醒,此前InputReader睡眠在/dev/input/event0这个设备文件上;
B. InputReader被唤醒后,它接着唤醒InputManager中的InputDispatcher,此前InputDispatcher睡眠在InputManager所运行的线程中的Looper对象里面的管道的读端上;
C. InputDispatcher被唤醒后,它接着唤醒应用程序的主线程来处理这个键盘事件,此前应用程序的主线程睡眠在Client端InputChannel中的前向管道的读端上;
D. 应用程序处理处理键盘事件之后,它接着唤醒InputDispatcher来执行善后工作,此前InputDispatcher睡眠在Server端InputChannel的反向管道的读端上,注意这里与第二个线索处的区别。
4. 应用程序注销键盘消息接收通道的过程分析
当Activity窗口创建时,它会向InputManager注册键盘消息接收通道,而当Activity窗口销毁时,它就会向InputManager注销前面注册的键盘消息接收通道了,本节内容就来看看应用程序注销键盘消息接收通道的过程。
当我们按下键盘上的Back键时,当前激活的Activity窗口就会被失去焦点,但是这时候它还没有被销毁,它的状态被设置为Stopped;当新的Activity窗口即将要显示时,它会通知WindowManagerService,这时候WindowManagerService就会处理当前处理Stopped状态的Activity窗口了,要执行的操作就是销毁它们了,在销毁的时候,就会注销它们之前所注册的键盘消息接收通道。
新的Activity窗口通知WindowManagerService它即将要显示的过程比较复杂,但是它与我们本节要介绍的内容不是很相关,因此,这里就略过大部过程了,我们从ActvitiyRecord的windowsVisible函数开始分析。注意,这里的ActivityRecord是新的Activity窗口在ActivityManangerService的代表,而那些处于Stopped状态的Activity窗口
会放在ActivityStack类的一个等待可见的mWaitingVisibleActivities列表里面,事实于,对于那些Stopped状态的Activity窗口来说,它们是等待销毁,而不是等待可见。
像前面一样,我们先来看一张应用程序注销键盘消息接收通道的过程的序列图,然后根据这个序列图来详细分析互一个步骤:

点击查看大图
Step 1. ActivityRecord.windowsVisible
这个函数定义在frameworks/base/services/java/com/android/server/am/ActivityRecord.java文件中:
class ActivityRecord extends IApplicationToken.Stub {
	......
	boolean nowVisible;     // is this activity's window visible?
	boolean idle;           // has the activity gone idle?
	......


	public void windowsVisible() {
		synchronized(service) {
			......

			if (!nowVisible) {
				nowVisible = true;
				if (!idle) {
					.......
				} else {
					// If this activity was already idle, then we now need to
					// make sure we perform the full stop of any activities
					// that are waiting to do so.  This is because we won't
					// do that while they are still waiting for this one to
					// become visible.
					final int N = stack.mWaitingVisibleActivities.size();
					if (N > 0) {
						for (int i=0; i<N; i++) {
							ActivityRecord r = (ActivityRecord)
								stack.mWaitingVisibleActivities.get(i);
							r.waitingVisible = false;
							......
						}
						stack.mWaitingVisibleActivities.clear();

						Message msg = Message.obtain();
						msg.what = ActivityStack.IDLE_NOW_MSG;
						stack.mHandler.sendMessage(msg);

					}
				}
				......
			}
		}
	}

	......
}
应用程序中的每一个Activity在ActivityManagerService都有一个代表ActivityRecord,它们以堆栈的形式组织在ActivityManaerService中的ActivityStack中。一个即将要显示,但是还没有显示的Activity,它在ActivityManagerService中的ActivityRecord的成员变量nowVisible为false,而成员变量idle为ture,表示这个即将要显示的Activity窗口处于空闲状态。因此,在上面的这个函数中,会执行下面的语句:
final int N = stack.mWaitingVisibleActivities.size();
if (N > 0) {
	for (int i=0; i<N; i++) {
		ActivityRecord r = (ActivityRecord)
		stack.mWaitingVisibleActivities.get(i);
		r.waitingVisible = false;
		......
	}
	stack.mWaitingVisibleActivities.clear();

	Message msg = Message.obtain();
	msg.what = ActivityStack.IDLE_NOW_MSG;
	stack.mHandler.sendMessage(msg);

}
前面我们说过,当用户按下键盘上的Back键时,当前激活的Activity记录就被放在ActivityStack对象stack的成员变量mWaitingVisibleActivities中了,这时候就要对它进行处理了。首先是将它们的Activity记录的waitingVisible设置为false,然后就把它们从ActivityStack对象stack的成员变量mWaitingVisibleActivities清空,最后向ActivityStack对象stack发送一个ActivityStack.IDLE_NOW_MSG消息。这个消息最终是由ActivityStack类的activityIdleInternal函数来处理的。
Step 2. ActivityStack.activityIdleInternal
这个函数定义在frameworks/base/services/java/com/android/server/am/ActivityStack.java文件中:
public class ActivityStack {
	......

	final void activityIdleInternal(IBinder token, boolean fromTimeout,
			Configuration config) {
		......

		ArrayList<ActivityRecord> stops = null;
		......

		int NS = 0;
		......

		synchronized (mService) {
			......

			// Atomically retrieve all of the other things to do.
			stops = processStoppingActivitiesLocked(true);
			NS = stops != null ? stops.size() : 0;
			......
		}

		int i;

		......

		// Stop any activities that are scheduled to do so but have been
		// waiting for the next one to start.
		for (i=0; i<NS; i++) {
			ActivityRecord r = (ActivityRecord)stops.get(i);
			synchronized (mService) {
				if (r.finishing) {
					finishCurrentActivityLocked(r, FINISH_IMMEDIATELY);
				} else {
					......
				}
			}
		}

		......
	}

	......
}
这个函数首先会调用processStoppingActivitiesLocked函数把所有处于Stopped状态的Activity取回来,然后逐个分析它们,如果它们的ActivityRecord中的finishing成员变量为true,就说明这个Activity需要销毁了,于是,就调用finishCurrentActivityLocked函数来销毁它们。
Step 3. ActivityStack.finishCurrentActivityLocked
这个函数定义在frameworks/base/services/java/com/android/server/am/ActivityStack.java文件中:
public class ActivityStack {
	......

	private final ActivityRecord finishCurrentActivityLocked(ActivityRecord r,
			int mode) {
		......

		return finishCurrentActivityLocked(r, index, mode);
	}

	private final ActivityRecord finishCurrentActivityLocked(ActivityRecord r,
			int index, int mode) {
		......

		// make sure the record is cleaned out of other places.
		mStoppingActivities.remove(r);
		mWaitingVisibleActivities.remove(r);
		......

		final ActivityState prevState = r.state;
		r.state = ActivityState.FINISHING;

		if (mode == FINISH_IMMEDIATELY
			|| prevState == ActivityState.STOPPED
			|| prevState == ActivityState.INITIALIZING) {
			// If this activity is already stopped, we can just finish
			// it right now.
			return destroyActivityLocked(r, true) ? null : r;
		} else {
			......
		}

		return r;
	}

	......
}
从上面的Step 2中传进来的参数mode为FINISH_IMMEDIATELY,并且这个即将要被销毁的Activity的状态为Stopped,因此,接下来就会调用destroyActivityLocked函数来销毁它。
Step 4. ActivityStack.destroyActivityLocked
这个函数定义在frameworks/base/services/java/com/android/server/am/ActivityStack.java文件中:
public class ActivityStack {
	......

	final boolean destroyActivityLocked(ActivityRecord r,
			boolean removeFromApp) {
		......

		boolean removedFromHistory = false;

		......

		final boolean hadApp = r.app != null;

		if (hadApp) {
			......

			try {
				......
				r.app.thread.scheduleDestroyActivity(r, r.finishing,
					r.configChangeFlags);
			} catch (Exception e) {
				......
			}

			......
		} else {
			......
		}

		......

		return removedFromHistory;
	}

	......
}
在前面一篇文章
Android应用程序启动过程源代码分析中,我们说到,每一个应用程序进程在ActivityManagerService中,都ProcessRecord记录与之对应,而每一个Activity,都是运行在一个进程上下文中,因此,在ActivityManagerService中,每一个ActivityRecord的app成员变量都应该指向一个ProcessRecord记录,于是,这里得到的hadApp为true。在ProcessRecord类中,有一个成员变量thread,它的类型为IApplicationThread。在文章
Android应用程序启动过程源代码分析中,我们也曾经说过,每一个应用程序在启动的时候,它都会在内部创建一个ActivityThread对象,而在这个ActivityThread对象中,有一个成员变量mAppThread,它的类型为ApplicationThread,这是一个Binder对象,专门用来负责在应用程序和ActivityManagerService之间执行进程间通信工作的。应用程序在启动的时候,就会将这个Binder对象传递给ActivityManagerService,而ActivityManagerService就会把它保存在相应的ProcessRecord记录的thread成员变量中。因此,ProcessRecord记录的thread成员变量其实就是ApplicationThread对象的远程接口,于是,执行下面这个语句的时候:
r.app.thread.scheduleDestroyActivity(r, r.finishing,
	r.configChangeFlags);
就会进入到ApplicationThread类中的scheduleDestroyActivity函数来。
Step 5. ApplicationThread.scheduleDestroyActivity
这个函数定义在frameworks/base/core/java/android/app/ActivityThread.java文件中:
public final class ActivityThread {
	......

	private final class ApplicationThread extends ApplicationThreadNative {
		......

		public final void scheduleDestroyActivity(IBinder token, boolean finishing,
				int configChanges) {

			queueOrSendMessage(H.DESTROY_ACTIVITY, token, finishing ? 1 : 0,
					configChanges);
		}

		......
	}

	......
}
这个函数调用外部类ActivityThread的queueOrSendMessage函数来往应用程序的消息队列中发送一个H.DESTROY_ACTIVITY消息,这个消息最终由ActivityThread类的handleDestroyActivity函数来处理。
Step 6. ActivityThread.handleDestroyActivity
这个函数定义在frameworks/base/core/java/android/app/ActivityThread.java文件中:
public final class ActivityThread {
	......

	private final void handleDestroyActivity(IBinder token, boolean finishing,
			int configChanges, boolean getNonConfigInstance) {
		......

		ActivityClientRecord r = performDestroyActivity(token, finishing,
			configChanges, getNonConfigInstance);
		if (r != null) {
			WindowManager wm = r.activity.getWindowManager();
			View v = r.activity.mDecor;
			if (v != null) {
				......

				if (r.activity.mWindowAdded) {
					wm.removeViewImmediate(v);
				}

				......
			}
			......
		}

		......
	}

	......
}
这里首先调用performDestroyActivity来执行一些销毁Activity的操作,期间就会调用Activity的onDestroy函数让Activity本身有机会执行一些销毁前的工作了。这里通过r.activity.getWindowManager函数返回的是一个LocalWindowManager对象,而通过r.activity.mDecor得到的是一个DecorView对象,这些都是在Activity启动的时候设置好的。函数最后调用LocalWindowManager对象wm的removeViewImmediate函员来从LocalWindowManager移除这个DecorView对象。
Step 7. LocalWindowManager.removeViewImmediate
这个函数定义在frameworks/base/core/java/android/view/Window.java文件中:
public abstract class Window {
	......

	private class LocalWindowManager implements WindowManager {
		......

		public final void removeViewImmediate(View view) {
			mWindowManager.removeViewImmediate(view);
		}

		......

		private final WindowManager mWindowManager;
	}

	......
}
LocalWindowManager类的成员变量mWindowManager是一个WndowManagerImpl对象,这个函数只是简单地调用WndowManagerImpl类的removeViewImmediate来进一步处理。
Step 8. WndowManagerImpl.removeViewImmediate
这个函数定义在frameworks/base/core/java/android/view/WindowManagerImpl.java文件中:
public class WindowManagerImpl implements WindowManager {
	......

	public void removeViewImmediate(View view) {
		synchronized (this) {
			int index = findViewLocked(view, true);
			ViewRoot root = mRoots[index];
			......

			root.die(true);

			......
		}
	}

	......
}
这个函数首先是找到这个view所属的ViewRoot对象root,然后调用这个root对象的die函数来销毁它。
Step 9. ViewRoot.die
这个函数定义在frameworks/base/core/java/android/view/ViewRoot.java文件中:
public final class ViewRoot extends Handler implements ViewParent,
		View.AttachInfo.Callbacks {
	......

	public void die(boolean immediate) {
		if (immediate) {
			doDie();
		} else {
			......
		}
	}

	......
}
上面Step 8传进来的immediate参数为true,因此,这里直接调用doDie函数来进一步处理。
Step 10. ViewRoot.doDie
这个函数定义在frameworks/base/core/java/android/view/ViewRoot.java文件中:
public final class ViewRoot extends Handler implements ViewParent,
		View.AttachInfo.Callbacks {
	......

	void doDie() {
		......

		synchronized (this) {
			......

			if (mAdded) {
				mAdded = false;
				dispatchDetachedFromWindow();
			}
		}
	}

	......
}
当我们把Activity窗口中的View添加到一个ViewRoot对象时,就会把它的成员变量mAdded设置为true,这样就表示这个ViewRoot中有View存在,于是,这里就会调用dispatchDetachedFromWindow函数来进一步处理。
Step 11. ViewRoot.ispatchDetachedFromWindow
这个函数定义在frameworks/base/core/java/android/view/ViewRoot.java文件中:
public final class ViewRoot extends Handler implements ViewParent,
		View.AttachInfo.Callbacks {
	......

	void dispatchDetachedFromWindow() {
		......

		if (mInputChannel != null) {
			if (mInputQueueCallback != null) {
				......
			} else {
				InputQueue.unregisterInputChannel(mInputChannel);
			}
		}

		try {
			sWindowSession.remove(mWindow);
		} catch (RemoteException e) {
		}

		......
	}

	......
}
前面在介绍应用程序注册键盘消息接收通道的过程时,在Step 18,我们说到,ViewRoot类中的mInputQueueCallback为null,表示由这个ViewRoot自己来管理键盘输入事件,因此,这里首先会调用InputQueue的unregisterInputChannel函数来注销注册在应用程序这一侧的Client端InputChannel,然后再调用sWindowSession的remove函数来注销注册在InputManager这一侧的Server端InputChannel,这个逻辑是和前面介绍应用程序注册键盘消息接收通道的逻辑相对应的,前面分别注册了这两个InputChannel,现在Activity要销毁了,当然就要把它们注销了。
我们先来看注销注册在应用程序这一侧的Client端InputChannel,然后再回过头来分析注销注册在InputManager这一侧的Server端InputChannel。
Step 12. InputQueue.unregisterInputChannel
这个函数定义在frameworks/base/core/java/android/view/InputQueue.java文件中:
public final class InputQueue {
	......

	public static void unregisterInputChannel(InputChannel inputChannel) {
		......

		synchronized (sLock) {
			......

			nativeUnregisterInputChannel(inputChannel);
		}
	}

	......
}
这个函数只是简单地调用本地方法nativeUnregisterInputChannel来执行具体的操作。
Step 13. InputQueue.nativeUnregisterInputChannel
这个函数定义在frameworks/base/core/jni/android_view_InputQueue.cpp文件中:
static void android_view_InputQueue_nativeUnregisterInputChannel(JNIEnv* env, jclass clazz,
		jobject inputChannelObj) {
	status_t status = gNativeInputQueue.unregisterInputChannel(env, inputChannelObj);

	......
}
这里调用NativeInputQueue的成员函数unregisterInputChannel来进一步处理。
Step 14. NativeInputQueue.unregisterInputChannel
这个函数定义在frameworks/base/core/jni/android_view_InputQueue.cpp文件中:
status_t NativeInputQueue::unregisterInputChannel(JNIEnv* env, jobject inputChannelObj) {
	sp<InputChannel> inputChannel = android_view_InputChannel_getInputChannel(env,
		inputChannelObj);
	......

	{ // acquire lock
		AutoMutex _l(mLock);

		ssize_t connectionIndex = getConnectionIndex(inputChannel);
		......

		sp<Connection> connection = mConnectionsByReceiveFd.valueAt(connectionIndex);
		mConnectionsByReceiveFd.removeItemsAt(connectionIndex);

		connection->status = Connection::STATUS_ZOMBIE;

		connection->looper->removeFd(inputChannel->getReceivePipeFd());

		env->DeleteGlobalRef(connection->inputHandlerObjGlobal);
		connection->inputHandlerObjGlobal = NULL;
		......
	} // release lock

	......
	return OK;
}
真正的注销工作就是这里实现的了,读者可以对照前面介绍应用程序注册键盘消息接收通道过程中的Step 21(NativeInputQueue.registerInputChannel)来分析,它首先是将在之前创建的Connection对象从NativeInputQueue中的mConnectionByReceiveFd向量中删除:
ssize_t connectionIndex = getConnectionIndex(inputChannel);
......

sp<Connection> connection = mConnectionsByReceiveFd.valueAt(connectionIndex);
mConnectionsByReceiveFd.removeItemsAt(connectionIndex);
然后再把这个Client端InputChannel的前向管道的读端文件描述符从应用程序主线程中的Looper对象中删除:
connection->looper->removeFd(inputChannel->getReceivePipeFd());
这样,这个Activity窗口以后就不会接收到键盘事件了。
最后将Connection对象中的回调对象inputHandlerOjbGlobal对象删除:
env->DeleteGlobalRef(connection->inputHandlerObjGlobal);
connection->inputHandlerObjGlobal = NULL;
回忆一下前面我们在分析InputManager分发键盘消息给应用程序处理时,曾经说到,每当有键盘事件发生时,InputManager首先就会调用NativeInputQueue类的handleReceiveCallback函数。在这个handleReceiveCallback函数里面,NativeInputQueue会找到相应的Connection对象,然后把它里面的内部对象inputHandlerOjbGlobal作为参数来调用Java层的InputQueue类的dispatchKeyEvent函数来通知应用程序,有键盘事件发生了。在InputQueue类的dispatchKeyEvent函数里面,就是通过这个inputHandlerOjbGlobal对象来直正通知到当前激活的Activity窗口来处理这个键盘事件的。
注册在应用程序这一侧的Client端InputChannel被注销以后,回到前面的Step 11中,我们继续分析注销注册在InputManager这一侧的Server端InputChannel。
Step 15. WindowManagerService.Session.remove
这个函数定义在frameworks/base/services/java/com/android/server/WindowManagerService.java文件中:
public class WindowManagerService extends IWindowManager.Stub
		implements Watchdog.Monitor {
	......

	private final class Session extends IWindowSession.Stub
			implements IBinder.DeathRecipient {
		......

		public void remove(IWindow window) {
			removeWindow(this, window);
		}

		......
	}

	......
}
这个函数只是简单地调用其外部类WindowManagerService的removeWindow函数来进一步执行操作。
Step 16. WindowManagerService.removeWindow
这个函数定义在frameworks/base/services/java/com/android/server/WindowManagerService.java文件中:
public class WindowManagerService extends IWindowManager.Stub
		implements Watchdog.Monitor {
	......

	public void removeWindow(Session session, IWindow client) {
		synchronized(mWindowMap) {
			WindowState win = windowForClientLocked(session, client, false);
			if (win == null) {
				return;
			}
			removeWindowLocked(session, win);
		}
	}

	......
}
回忆一下前面我们在分析应用程序注册键盘消息管道的过程时,在Step 11(WindowManagerService.addWindow)中,WindowManagerService为这个即将要激活的Activity窗口创建了一个WindowState对象win,创建的时候,使用了从ViewRoot中传过来的两个参数,分别是一个Session对象session和一个IWindow对象client。
在这个函数中,ViewRoot传过来的两个参数session和client和上面说的两个参数是一致的,因此,这个函数首先通过参数session和client得到一个WindowState对象win,然后调用removeWindowLocked来把它从WindowManagerService删除。
Step 17. WindowManagerService.removeWindowLocked
这个函数定义在frameworks/base/services/java/com/android/server/WindowManagerService.java文件中:
public class WindowManagerService extends IWindowManager.Stub
		implements Watchdog.Monitor {
	......

	public void removeWindowLocked(Session session, WindowState win) {
		......

		win.disposeInputChannel();

		......
	}

	......
}
我们忽略了这个函数的其它逻辑,只关注注销之前注册的Server端InputChannel的逻辑,这里,注销的操作就是调用win的disposeInputChannel进行的了。
Step 18. WindowState.disposeInputChannel
这个函数定义在frameworks/base/services/java/com/android/server/WindowManagerService.java文件中:
public class WindowManagerService extends IWindowManager.Stub
		implements Watchdog.Monitor {
	......

	private final class WindowState implements WindowManagerPolicy.WindowState {
		......

		void disposeInputChannel() {
			if (mInputChannel != null) {
				mInputManager.unregisterInputChannel(mInputChannel);

				mInputChannel.dispose();
				mInputChannel = null;
			}
		}

		......
	}

	......
}
上面说到,在前面分析应用程序注册键盘消息管道的过程时,在Step 11(WindowManagerService.addWindow)中,为当前这个Activity窗口创建了一个WindowState对象,接着创建了一个输入管道后,把Server端的InputChannel保存了在这个WindowState对象的成员变量mInputChannel中,因此,这里,就可以把它取回来,然后调用mInputManager对象的unregisterInputChannel函数来把它注销掉了。
Step 19. InputManager.unregisterInputChannel
这个函数定义在frameworks/base/services/java/com/android/server/InputManager.java文件中:
public class InputManager {
	......

	public void unregisterInputChannel(InputChannel inputChannel) {
		......

		nativeUnregisterInputChannel(inputChannel);
	}

	......
}
这个函数很简单,它调用本地方法nativeUnregisterInputChannel来进一步处理。
Step 20. InputManager.nativeUnregisterInputChannel
这个函数定义在frameworks/base/services/jni/com_android_server_InputManager.cpp文件中:
static void android_server_InputManager_nativeUnregisterInputChannel(JNIEnv* env, jclass clazz,
		jobject inputChannelObj) {
	......


	sp<InputChannel> inputChannel = android_view_InputChannel_getInputChannel(env,
						inputChannelObj);
	......


	status_t status = gNativeInputManager->unregisterInputChannel(env, inputChannel);

	......
}
这个函数首先调用android_view_InputChannel_getInputChannel函数根据Java层的InputChannel对象找到C++层的InputChannel对象,然后调用NativeInputManager的unregisterInputChannel函数来执行注销的操作。
Step 21. NativeInputManager.unregisterInputChannel
这个函数定义在frameworks/base/services/jni/com_android_server_InputManager.cpp文件中:
status_t NativeInputManager::unregisterInputChannel(JNIEnv* env,
		const sp<InputChannel>& inputChannel) {
	......

	return mInputManager->getDispatcher()->unregisterInputChannel(inputChannel);
}
这个函数与前面分析应用程序注册键盘消息通道的Step 17(NativeInputManager.registerInputChannel)相对应,主要是调用InputDispatcher对象的unregisterInputChannel函数来执行真正注销的操作。
Step 22. InputDispatcher.unregisterInputChannel
这个函数定义在frameworks/base/libs/ui/InputDispatcher.cpp文件中:
status_t InputDispatcher::unregisterInputChannel(const sp<InputChannel>& inputChannel) {
	......

	{ // acquire lock
		AutoMutex _l(mLock);

		ssize_t connectionIndex = getConnectionIndexLocked(inputChannel);
		......

		sp<Connection> connection = mConnectionsByReceiveFd.valueAt(connectionIndex);
		mConnectionsByReceiveFd.removeItemsAt(connectionIndex);

		......

		mLooper->removeFd(inputChannel->getReceivePipeFd());

		.....

	} // release lock

	......

	return OK;
}
这一步与前面的Step 14注销应用程序一侧的Client端InputChannel是差不多的,只不过这里是从InputDispatcher中把Server端的InputChannel注销掉。首先是根据传进来的参数inputChannel找到它在InputDispatcher中对应的Connection对象在mConnectionsByReceiveFd中的索引,然后把它从mConnectionsByReceiveFd中删除:
ssize_t connectionIndex = getConnectionIndexLocked(inputChannel);
    ......

sp<Connection> connection = mConnectionsByReceiveFd.valueAt(connectionIndex);
mConnectionsByReceiveFd.removeItemsAt(connectionIndex);
最后,还需要把这个InputChannel中的反向管道读端文件描述符从InputDispatcher的内部对象mLooper中删除,因为这个文件描述符是在前面注册Server端的InputChannel时加入到mLooper对象去的,具体可以参考上面分析应用程序注册键盘消息接收通道的过程中的Step 18(InputDispatcher.registerInputChannel)。
这样, 应用程序注销键盘消息接收通道的过程就分析完成了,整个应用程序键盘消息处理机制也分析完成了,这是一个比较复杂的过程,要完全理解它还需要花费一些努力和时间,不过,理解了这个过程之后,对Android应用程序框架层的理解就更进一步了。
作者:Luoshengyang 发表于2011-10-24 0:59:47
原文链接
posted on 2012-04-17 21:32
mixer-a 阅读(4948)
评论(0) 编辑 收藏