|
|
2006年9月7日
Linux birt3.7环境中,部分导出pdf的汉字不能正确显示,解决办法: 打开org.eclipse.birt.report.engine.fonts_2.3.2.r232_20090202.jar文件,修改fontsConfig_pdf.xml文件中下面行 <font font -family="STSong-Light" catalog="Chinese" />  <composite-font name="all-fonts"> <composite-font name="all-fonts">
<font font-family="Times-Roman" catalog="Western" />
<font font-family="STSong-Light" catalog="Chinese" />
<font font-family="HeiseiKakuGo-W5" catalog="Japanese" />
<font font-family="HYGoThic-Medium" catalog="Korean" />
</composite-font>
1、下载 wget http://mirror.bit.edu.cn/apache/subversion/subversion-1.8.3.tar.gz2、下载依赖包 ./get-deps.sh 3.install apr ./configur make make install 4.install apr-util ./configure --with-apr=/usr/local/apr make make install 5.update sqlite sqlite-amalgamation下载安装最新版本sqlite,解压 4.yum install glibc gcc expat expat-devel openssl openssl-devel 下载有关依赖包 5.compile svn ./configure --with-apr=/usr/local/apr --with-apr-util=/usr/local/apr --with-zlib \ --with-openssl --enable-maintainer-mode --with-serf=/usr/local/serf --enable-mod-activation 可能错误现象:
/tools/svn/bin/svn: symbol lookup error: /tools/svn/lib/libsvn_subr-1.so.0: undefined symbol: apr_atomic_xchgptr
错误解决
新配置的服务器,在运行svn命令时,全部出错显示上面的错误信息。
在网上搜索发现,原来这个错误是由于系统已经安装了apr的库文件,而在编译Svn时已经指定了httpd的apr库。
在执svn命令时,优先从系统自带的apr库载入,而引起不必要的错误。 只需要执行以下命令,将apr和apr-util都卸载即可 rpm -e --allmatches apr-util --nodeps
rpm -e --allmatches apr --nodeps
1、打包文件命名规则
根据JavaEE规范,打包的EAR文件可以不适用部署描述符部署,因此需要使用一些默认的约定规则,例如
•EJBs and client archives are packaged as .jar files.
•Web applications are packaged as .war files.
•Resource adapters are packaged as .rar files.
•Enterprise applications are packaged as .ear files, and can contain other Java EE modules such as EJBs, JDBC, JMS, Web applications, and Resource Adapters.
•Web Services can be packaged either as .war files or as .jar files, depending on whether they are implemented using Java classes or EJBs. Typically, the .war or .jar files are then packaged in an Enterprise Application .ear file.
•Java EE libraries are packaged either as an Enterprise Application (.ear file) or as a standard Java EE module.
•Client applications and optional packages are packaged as .jar files.
2、Java EE默认部署规则
通常EAR应用也可以使用开放式目录部署,此时也应该参考以上的规范配置相应的文件夹,例如
war应用目录名必须为XX.war
EAR==>xx.ear
RAR==>XX.rar
EJB==>xx.jar
3、Java EE标准的部署规则
a. 应用包中所有扩展名是.war 的文件被看作是 web 模块。Web 模块的上下文根
的名字是相对于应用包根的名字,但要去掉.war 扩展名。
b. 应用包中所有扩展名是.rar 的文件都被看作是资源适配器。
c. 名字为 lib 的目录被看作是库目录,正如在节 8.2.1“捆绑的库”中所述。
d. 对于应用包中所有以扩展名是.jar 但不包含在 lib 目录内的文件来说,按下面 的方式来处理:
i. 如果 JAR 文件中包含带有 Main‐Class 属性的 META‐INF/MANINFEST.MF 文件, 或者包含 META‐INF/application‐client.xml 文件,那么这个 JAR 文件被看作 是应用客户端模块。
ii. 如果 JAR 文件包含 META‐INF/ejb‐jar.xml 文件,或者包含任何带有 EJB 组件 注释符(Stateless,等等)的类,那么这个 JAR 文件被看作是 EJB 模块。
iii. 所有其他的 JAR 文件都被忽略,除非它被上面的 JAR 文件使用 JAR 文件引 用机制(如在 mainfest 文件中的 Class‐Path 头library-directory)引用。
在Jboss环境中,可以在application.xml中手工指定library-directory,例如:
<library-directory>APP-INF/lib</library-directory>
其他的jboss遵循标准规范
4、Weblogic的部署规则
对于weblogic使用下面的一些规则处理目录结构:
•For an exploded archived Web application, in the absence of WEB-INF/web.xml descriptor, the name of the directory should have a .war suffix.
•For an exploded archived Enterprise Application without a META-INF/application.xml descriptor, the directory should have an .ear suffix. Within the application, the directory of exploded Web module should have a .war suffix. Similarly, the exploded EJB module should have a .jar suffix and the exploded RAR module should have a .rar suffix.
•If an exploded Enterprise Application contains no META-INF/application.xml descriptor, the order in which modules are deployed is undefined and is dependent on the underlying File.listFiles() method order. To ensure a specific order in which modules are deployed, you must add an application.xml descriptor and list the modules in the desired order.
如果在weblogic下面如果不使用上面的规则,则需要在application.xml 文件中指定对应的uri路径
或者在应用模块中使用下面的manifest路径规则
4.1 classloader的路径引用
在weblogic中EAR里面的所有应用共有一个classloader,所以对于ear里面的war,通常不需要在WEB-INF里面包含lib,weblogic提供了一个默认的目录:
APP-INF\lib:存放jar包
APP-INF\classes:存放classes
注意对于其他的应用服务器,可能没有这样的规则
5、Manifest Class-Path规则
在java EE规范中,可以使用manifest文件指定当前的应用模块对与其他classpath路径的关联引用,该文件位于
META-INF/MANIFEST.MF
路径下面,内容例如下面,多个引用路径使用空格分隔:
Manifest-Version: 1.0
Class-Path: utility.jar ../xxx/classes ../xxxlib/xxx.jar
META-INF/MANIFEST.MF
Manifest Class-Path
参考页面:
http://docs.oracle.com/cd/E12839_01/web.1111/e13706/classloading.htm
http://docs.oracle.com/cd/E12839_01/web.1111/e13702/deployunits.htm#DEPGD142
1、安装编译器 Objective-C的编译器有很多,其中LLVM属于从GCC发展出来的,主要使用在苹果的平台中,GNU可以使用GnuStep,网址是http://wwwmain.gnustep.org/,从这里可以下载Windows版本的gcc编译器,配合codeblocks可以编译调试object c程序。

进入下载页面,下载上面3个软件包,安装,例如安装到D:\GNUstep, 2、安装CodeBlocks IDE环境 下载地址:http://www.codeblocks.org/ 3、配置编译器 安装好codeblocks之后,进入Settings->Compiler and debugger...,选择GNU GCC Compiler编译器,复制重新命名为“GNUstep MinGW Compiler“配置 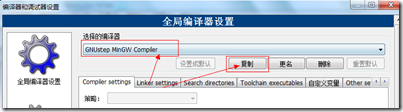 编译其他选项录入:-fconstant-string-class=NSConstantString -std=c99 
同时指定搜索目录:
》编译器的搜索目录是D:\GNUstep\GNUstep\System\Library\Headers
》linker的搜索目录设置为D:\GNUstep\GNUstep\System\Library\Libraries,同时设置linker的参数:-lobjc -lgnustep-base
或者可以在linker选项中加入D:\GNUstep\GNUstep\System\Library\Libraries下面的2个文件libgnustep-base.dll.a,libobjc.dll.a 

设置编译器、连接器的搜索目录 
4、配置语法、文件类型,关键字等 添加文件类型支持 1) 进入Settings->Environment... 2) 选择 Files extension handling 添加*.m 3) 进入 Project->Project tree->Edit file types & categories... 4) 在Sources, 下面添加 *.m到文件类型列表中. 
添加语法高亮支持 1) 进入 Settings->Editor... 2) 选择 Syntax highlighting 进入Filemasks.... 添加*.m 到文件类型列表中. 3) 进入 Keywords... (紧靠Filemasks...) 添加下面的关键字到列表中
| @interface @implementation @end @class @selector @protocol @public @protected @private id BOOL YES NO SEL nil NULL self | 语法高亮中,加入*.m扩展名
 5、代码测试 新建一个工程,修改main.c为main.m,录入下面代码 #import <Foundation/Foundation.h>
int main (int argc, const char *argv[])
{
NSAutoreleasePool *pool = [[NSAutoreleasePool alloc] init];
NSLog(@"%@",@"hello world");
[pool drain];
return 0;
}编译运行效果如下:
|
2012-03-07 17:33:49.711 objc1[6080] hello world
Process returned 0 (0x0) execution time : 0.220 s
Press any key to continue. |
在linux环境部署应用时,有时候需要用到AWT处理图片的功能,典型的就是图片的缩放处理等等,可能会遇到下面错误:
java.lang.NoClassDefFoundError
at java.lang.Class.forName0(Native Method)
at java.lang.Class.forName(Class.java:141)
at java.awt.GraphicsEnvironment.getLocalGraphicsEnvironment(GraphicsEnvironment.java:62)
at java.awt.image.BufferedImage.createGraphics(BufferedImage.java:1041) 甚至在默写情况下面可能导致jvm崩溃,对于该问题的解决办法是 1、配置java启动参数java -Djava.awt.headless=true
在jdk1.4及以上的环境中,允许使用没有键盘、鼠标、x window显示启动的headless虚拟机模式,通过加上上面的属性即可 2、配置合适的DISPLAY属性 例如通过当前用户启动了一个x window的图形界面,可以将设置类似export DISPLAY=localhost:10.0这样的环境变量将awt定位到一个实际存在的环境处理。 配置成功之后,可能可以看到这样的提示 nl.ikarus.nxt.priv.imageio.icoreader.lib.ICOReader loaded, version: 0.06.064 build: 691 配置好之后就不会报错了 网上还有一种办法,启动Xvfb 使用 ls -l /tmp/.X*lock 可以查看当前启动了那些xwindow,如果发现X0,可能0.0已经被使用了 使用两个命令:
------------------------------------
Xvfb :1 -screen 0 800x600x16 & 启动Xwindows的虚拟设备
export DISPLAY=localhost:1.0 配置本地环境
------------------------------------
参考:http://javatechniques.com/blog/linux-x11-libraries-for-headless-mode/
安装好的CentOS会自带OpenJdk,用命令 java -version ,会有下面的信息:
java version "1.6.0"
OpenJDK Runtime Environment (build 1.6.0-b09)
OpenJDK 64-Bit Server VM (build 1.6.0-b09, mixed mode)
最好还是先卸载掉openjdk,在安装sun公司的jdk.
先查看 rpm -qa | grep java
显示如下信息:
java-1.4.2-gcj-compat-1.4.2.0-40jpp.115
java-1.6.0-openjdk-1.6.0.0-1.7.b09.el5
卸载:
rpm -e --nodeps java-1.4.2-gcj-compat-1.4.2.0-40jpp.115
rpm -e --nodeps java-1.6.0-openjdk-1.6.0.0-1.7.b09.el5
还有一些其他的命令
rpm -qa | grep gcj
rpm -qa | grep jdk
如果出现找不到openjdk source的话,那么还可以这样卸载
yum -y remove java java-1.4.2-gcj-compat-1.4.2.0-40jpp.115
yum -y remove java java-1.6.0-openjdk-1.6.0.0-1.7.b09.el5
最近需要把android手机root一下,找到了这个刷机精灵,的确很好用,经过测试,在华为C8650,U8800,HTC S710D,HTC Sensation上面都测试通过,对于不想深入研究的用户来说,的确够简单!推荐一下。
1、连接手机数据线,安装必要的驱动,打开开发调试开关 
2、点击root解锁,等待几十秒就大功告成了!

碰到中文乱码的时候,可以考虑使用一个熟悉的中心字符串入手进行调试跟踪转换过程的变化,这里记录一下“中文”汉字的编码变化过程 UNICODE编码:4e2d 6587
通常在JAVA的内置处理机制中是这样存储的,不同的环境中返回的byte[]不一样,例如windows环境,使用getBytes()返回的是getBytes(“GBK”),linux环境,通常如果设置LANG=zh_CN.UTF-8,这相当于getBytes(“utf-8”). GBK编码:d6d0 cec4,byte[]={-42,-48,-50,-60} UTF8编码:e4 b8 ad e6 96 87,byte[]={-28,-72,-83,-26,-106,-121} ISO8859-1编码:如果试图将byte[]={-42,-48,-50,-60}采用new String(byte[],”iso8859-1”)读取,由于不能正确转换,所以是2个问号byte[]={63,63}
但是从存储的角度看,gbk和iso8859-1有类似之处,GBK采用char(2),而iso8859-1采用byte[4],拆分为{-42,-48,-50,-60} Javascript:可以使用var str=”\u4E2D\u6587”;来表示 HTML中,可以使用中文,相当于吧16进制转换为10进制,再加上转义控制&#和;结尾。 如果需要从utf byte[]和GBK byte[]之间互相转换,在支持unicode的java平台,可以使用下面的转换规则 byte[] utf8={-28,-72,-83,-26,-106,-121};
String str=new String(utf8,”utf-8”);//转换为正确的中文
byte[] gbk=str.getBytes(“GBK”);或者:
byte[] gbk={-42,-48,-50,-60};
String str=new String(utf8,"GBK");//转换为正确的中文
byte[] utf8=str.getBytes("utf-8")
注意上面的byte[]为java的,与.net不一样,需要转换
1、使用apktool反编译
apktool d [file.apk] [path]
2、根据需要修改配置文件、smali文件,如果需要反编译成jar文件,可以使用dex2jar,然后使用jd-gui查看代码
3、重新编译成apk文件
apktool b [path] file.apk
4、签名
使用JDK自带工具keytool创建keystore
c:\>keytool -genkey -alias android.keystore -keyalg RSA -validity 10000 -keystore mystore.keystore
其中validity 为有效期天数,这里创建的keystore文件也可以供eclipse打包apk时使用,注意记住密码。
使用JDK自带工具jarsigner签名apk文件,需要输入keystore的密码
c:\>jarsigner -verbose -keystore mystore.jks -signedjar [签名后的文件.jar] [需要签名的文件.apk] my
5、安装到手机上面测试
adb -d install -r signed-file.apk
摘要: 转载:http://pallergabor.uw.hu/androidblog/dalvik_opcodes.html
Dalvik opcodes
Author: Gabor PallerVx values in the table denote a Dalvik register. Depending on the instruction, 16, 256 or 64k r... 阅读全文
已经有一段时间了,经过半天时间的多次尝试,还是没能在redhat EL6上面安装成功oracle 10g,虽然说该版本的oracle没有在经过redhat el6的认证,但是网络上还是可以找到不少相关的文章好像是可以安装成功的,不过通过这次尝试,也获得不少相关当面的经验,那就是接下来重装为CentOS5.5,然后安装Oracle 10g,一次成功,1个小时内完成,呵呵。 接下来再记录一下相关的一些资料
为了安装软件包方便,通常需要配置使用yum来安装,或者在机房里面,不能使用互联网的时候,不希望使用rpm来安装,如何配置等等问题,为了方便以后使用,记录下备忘:
1、基于ISO安装包的repo配置
首先需要将iso文件mount起来,可以使用mount –o loop /FILE_TO_DVD.iso /mnt/cdrom
进入yum repo目录:/etc/yum.repos.d,编辑一个文件iso.repo
|
[root@linux yum.repos.d]# cat iso.repo
[iso]
name=iso
baseurl=file:///mnt/cdrom
gpgkey=file:///mnt/cdrom/RPM-GPG-KEY-beta
gpgcheck=0 |
把原来的文件CentOS-Base.repo CentOS-Media.repo可以加个.bak扩展名备份一下。
或者可以使用参数
yum --disablerepo=* --enablerepo=iso
控制不同的repo使用
接下来安装软件就可以方便的使用类似这样的命令安装了
yum install glibc
使用yum list可以测试一下是否包含了刚才的软件库,或者可以使用'yum clean all' 清除metadata
2、配置yum代理
可以修改/etc/yum.conf 文件,加入:
# 代理服务器 - proxy server:port number
proxy=http://mycache.mydomain.com:3128
# 用于 yum 连接的帐户细节
proxy_username=yum-user
proxy_password=pass
或者可以通过环境变量加入当前用户的全局代理,可以修改.bash_profile文件:
http_proxy="http://yum-user:qwerty@mycache.mydomain.com:3128"
export http_proxy
测试发帖,直接粘贴图片看看效果如何! 
摘要: 通常,如果需要在应用中使用tomcat的jndi数据源,需要修改context配置,例如
<?xml version="1.0" encoding="UTF-8"?>
<Context path="/app" docBase="E:\appweb">
<Resource name="jnd... 阅读全文
通过jconsole可以远程监控web应用服务器,可以在启动参数中加上
-Dcom.sun.management.jmxremote -Dcom.sun.management.jmxremote.port=8888 -Dcom.sun.management.jmxremote.ssl=false -Dcom.sun.management.jmxremote.authenticate=false
首先,下载openssl安装,windows环境从http://www.openssl.org/related/binaries.html下载。
我这里测试下载的版本是:http://www.slproweb.com/download/Win32OpenSSL-0_9_8h.exe
安装完成之后,修改bin目录下面的openssl.cfg为openssl.cnf,在请求证书时需要用到这个配置文件,生成证书,为了方便,编写了下面的批处理文件,供参考:
@echo off
echo 1.CA 创建一个 RSA 私用密钥
openssl genrsa -out %1.key 1024
echo.
echo 2.利用 CA 的 RSA 密钥创建一个自签署的 CA 证书(X.509结构)
openssl req -new -x509 -days 36500 -key %1.key -out %1.crt -subj /C=CN/ST=GuangDong/L=GuangZhou/O=SinoTech/OU=CA-SinoTech
echo.
echo 3.CA 创建一个 服务端 RSA 私用密钥
openssl genrsa -out %2.key 1024
echo.
echo 4.创建服务端签署请求 CSR
openssl req -new -key %2.key -out %2.csr -subj "/C=CN/ST=GuangDong/L=GuangZhou/O=SinoTech/OU=Serv-SinoTech/CN=SinoTech Weblogic Server"
echo.
echo 5.签署证书
rem 准备一些默认文件、目录,否则运行时会报错
if exist "%cd%\newcerts" goto got1
md newcerts
:got1
if exist "%cd%\index.txt" goto got2
echo tmp >_tmp
del _tmp >index.txt
:got2
if exist "%cd%\serial" goto got3
echo AD >serial
:got3
openssl ca -in %2.csr -out %2.crt -cert %1.crt -keyfile %1.key
echo.
echo 处理完成
pause
运行批处理
genca.cmd [CA证书名] [服务端证书名]
例如genca.cmd ca server
通过上面命令,会生成server.crt,server.key,然后将上面参数加到tomcat的配置中就可以使用SSL连接方式访问网站应用了
<Connector
port="8443" minSpareThreads="5" maxSpareThreads="75"
enableLookups="true" disableUploadTimeout="true"
acceptCount="100" maxThreads="200"
scheme="https" secure="true" SSLEnabled="true"
SSLCertificateFile="C:\apache-tomcat-6.0.16\conf\server.crt"
SSLCertificateKeyFile="C:\apache-tomcat-6.0.16\conf\server.key"
clientAuth="false" sslProtocol="TLS"/>
个人知识管理的29个原则
1、持续的学习成为个人生存和发展的基础。持续学习不一定能带来成功,但不学习一定失败;
2、信息和知识爆炸,在一段时间和时期内,学习的内容必须聚焦。起码要在一个领域内成为专家。
3、你应该学习的内容取决于你的价值观、特长、个性和目标。
4、你必须学会如何有效的评估信息和知识,所以你必须根据你的价值观、特长、个性和目标确立自己对信息和知识的“过滤器”;
5、人是知识获取的重要渠道,所以你应该知道谁最擅长什么?遇到问题时知道可以向谁学习和请教;
6、你牛了你的朋友也一定牛,建立人际资源的基础是自己的知识基础、个性和激情、自己优势的合理展示和帮助别人的意愿;
7、人际关系需要维护;捷径是找到那些愿意共享自己朋友资源的人,你也应该做这样的人;
8、信息如果不经过处理,不能称为知识。所以你存储的知识起码你应该简单看过、知道是在讲什么;
9、信息和知识存储前应该尽可能做规范化的工作,例如你做的摘要、感触、觉得最有价值的部分、将来能做什么用等等;
10、建立自己的分类字典,而不是每次想起什么就建立什么样的文件夹或者标签。分类字典,持之以恒坚持,适当调整;
11、知识存储中分类不宜过宽,过宽则等于没有分类;分类不宜过深,过深后你就不会再去看;
12、充分利用各种工具,尤其是web2.0工具做知识存储和获取工作;
13、知识存储时适当共享,听取和收集别人的意见和建议;
14、有意识的做知识显性化的工作,既方便知识传播也促进知识学习和建立人际网络;
15、知识传播中必须考虑传播的方式和效率;
16、不能用简单朴素的语言表述的知识证明你还没有深入理解;
17、多用举例子、讲故事的方法传播你的知识、见解。这个过程是你对知识的再深化过程;
18、你的知识传播的越广,你的影响力越大;
19、你的目的决定了你知识利用的方式。如果目的是要写论文,则你的知识就是明确、简洁的表达;如果是想要在市场上销售,就必须产品化、规范化或者专利化;
20、知识本身没有价值,只有被利用时才能展现其价值;
21、知识必须跟任务、项目结合起来才能发挥作用;
22、单独的一个主题的知识很难被很好的利用,所以你必须将你的知识融入团队中或者找到自己的合作伙伴;
23、知识创新最简单的方法是总结和分析;
24、知识创新是一种习惯;
25、学习或者实践---总结----将总结出来的内容投入实践检验和请行家批评—继续总结和实践;
26、不能光做,还要思考;
27、个人竞争力的源泉不是你现在知道的或者掌握的,而是你选择方向和快速学习的能力,是你能够将知识用足用好的能力;
28、环境造就人,太安逸的环境对个人的发展弊大于利。如果不能找到好的环境,那就自己给自己压力;
29、既要会做,也要会展示自己做的,要有树立个人品牌意识。
一般的数据库中,DATE字段仅仅表示日期,不包括日期信息,而Oracle数据库中的DATE数据类型是包括日期、时间的,对于不同的Oracle jdbc驱动版本,对于该问题的处理都有些区别,如果你使用9i或者11g
的驱动程序,可能不会发现什么困惑,不幸的话,你使用Oracle10g的JDBC驱动,问题就来了,你会发现时间不见了?
看下面的程序
• 表结构如下
create table t_test(
id int,
date1 date,
date2 timestamp,
primary key(id)
)
1  try try  { {
2 Class.forName("oracle.jdbc.OracleDriver"); Class.forName("oracle.jdbc.OracleDriver");
3 java.sql.Connection connection1 = DriverManager.getConnection("jdbc:oracle:thin:@192.168.8.200:1521:cdb", "sysusr", "sys");
4 System.out.println(connection1);
5 System.out.println(connection1.getMetaData().getDriverName()+" "+connection1.getMetaData().getDriverVersion());
6 ResultSet rs = connection1.createStatement().executeQuery("select date1,date2 from t_test");
7 rs.next();
8 printInfo(rs,1);
9 printInfo(rs,2);
10 } }
11 catch (Exception exception1) {
12 exception1.printStackTrace();
13 }
14
15
16public static void printInfo(ResultSet rs,int i) throws SQLException{
17 ResultSetMetaData meta=rs.getMetaData();
18 System.out.printf("Colname=%s,Type=%s,TypeName=%s,val=[%s];\n",meta.getColumnName(i),meta.getColumnType(i),meta.getColumnTypeName(i),rs.getObject(i).toString());
19 }
• 如果使用9i或者11g的驱动连接数据库,返回结果如下:
9i数据库JDBC
oracle.jdbc.driver.OracleConnection@16930e2
Oracle JDBC driver 9.2.0.8.0
Colname=DATE1,Type=91,TypeName=DATE,val=[2008-06-13 13:48:21.0];
Colname=DATE2,Type=93,TypeName=TIMESTAMP,val=[oracle.sql.TIMESTAMP@18d107f];
11g数据库JDBC
oracle.jdbc.driver.T4CConnection@a61164
Oracle JDBC driver 11.1.0.6.0-Production+
Colname=DATE1,Type=93,TypeName=DATE,val=[2008-06-13 13:48:21.0];
Colname=DATE2,Type=93,TypeName=TIMESTAMP,val=[oracle.sql.TIMESTAMP@c4aad3];
如果使用10g JDBC驱动,结果如下:
oracle.jdbc.driver.T4CConnection@1bac748
Oracle JDBC driver 10.2.0.2.0
Colname=DATE1,Type=91,TypeName=DATE,val=[2008-06-13];
Colname=DATE2,Type=93,TypeName=TIMESTAMP,val=[oracle.sql.TIMESTAMP@b8df17];
结果是让人困惑,时间怎么不见了?
对于该问题,在Oracle的JDBC FAQ中有提到解决办法:
Prior to 9.2, the Oracle JDBC drivers mapped the DATE SQL type to java.sql.Timestamp. This made a certain amount of sense because the Oracle DATE SQL type contains both date and time information as does java.sql.Timestamp. The more obvious mapping to java.sql.Date was somewhat problematic as java.sql.Date does not include time information. It was also the case that the RDBMS did not support the TIMESTAMP SQL type, so there was no problem with mapping DATE to Timestamp.
In 9.2 TIMESTAMP support was added to the RDBMS. The difference between DATE and TIMESTAMP is that TIMESTAMP includes nanoseconds and DATE does not. So, beginning in 9.2, DATE is mapped to Date and TIMESTAMP is mapped to Timestamp. Unfortunately if you were relying on DATE values to contain time information, there is a problem.
There are several ways to address this problem:
Alter your tables to use TIMESTAMP instead of DATE. This is probably rarely possible, but it is the best solution when it is.
Alter your application to use defineColumnType to define the columns as TIMESTAMP rather than DATE. There are problems with this because you really don't want to use defineColumnType unless you have to (see What is defineColumnType and when should I use it?).
Alter you application to use getTimestamp rather than getObject. This is a good solution when possible, however many applications contain generic code that relies on getObject, so it isn't always possible.
Set the V8Compatible connection property. This tells the JDBC drivers to use the old mapping rather than the new one. You can set this flag either as a connection property or a system property. You set the connection property by adding it to the java.util.Properties object passed to DriverManager.getConnection or to OracleDataSource.setConnectionProperties. You set the system property by including a -D option in your java command line.
java -Doracle.jdbc.V8Compatible="true" MyApp
参照上面的解释,修改代码如下可以解决10g JDBC驱动的问题:
try {
Class.forName("oracle.jdbc.OracleDriver");
Properties prop=new Properties();
prop.setProperty("user","sysuser");
prop.setProperty("password","sys");
prop.setProperty("oracle.jdbc.V8Compatible","true");
java.sql.Connection connection1 = DriverManager.getConnection("jdbc:oracle:thin:@192.168.8.200:1521:cdb", prop);
System.out.println(connection1);
System.out.println(connection1.getMetaData().getDriverName()+" "+connection1.getMetaData().getDriverVersion());
ResultSet rs = connection1.createStatement().executeQuery("select date1,date2 from t_test");
rs.next();
printInfo(rs,1);
printInfo(rs,2);
}
catch (Exception exception1) {
exception1.printStackTrace();
}
或者在系统变量中使用参数-Doracle.jdbc.V8Compatible="true",例如
java -Doracle.jdbc.V8Compatible="true" MyApp
结果如下:
oracle.jdbc.driver.T4CConnection@9664a1
Oracle JDBC driver 10.2.0.2.0
Colname=DATE1,Type=93,TypeName=DATE,val=[2008-06-13 13:48:21.0];
Colname=DATE2,Type=93,TypeName=DATE,val=[oracle.sql.TIMESTAMP@1172e08];
众所周知,Oracle的数据库、中间件都可以在网上自由下载,没有任何license注册码的限制。
现在,Oracle以85亿美元收购了BEA,带来的最直接的好处是,以前严格保密的License文件现在都可以直接下载了。请看下面页面:
http://commerce.bea.com/products/all_products.jsp#WL
WebLogic Family License Keys
http://download2.bea.com/pub/license/All%20Products/BEA_WebLogic.zip
AquaLogic Family License Keys
http://download2.bea.com/pub/license/All%20Products/BEA_AquaLogic.zip
摘录部分内容如下:
========================================
= Read Me -- BEA WebLogic License Keys =
========================================
Some BEA products require multiple license keys for full functionality, or use a license key which is not intuitively identified as being for that product.
Please refer to the legend below to determine which license keys are required for the BEA products you own.
BEA WebLogic Server Products (Product, Version, License ID/file)
================================================================
BEA WebLogic Server Advantage Edition 10.0 - 10.0mp1 LIC-WLSA10.txt
9.2 - 9.2mp3 LIC-WLSA92.txt
9.0 LIC-WLSA90.txt
BEA WebLogic Server Premium Edition 10.0 - 10.0mp1 LIC-WLSP10.txt
9.2 - 9.2mp3 LIC-WLSP92.txt
9.0 LIC-WLSP90.txt
BEA WebLogic Server SDK 10.x LIC-WLSP10-DEV
9.2 LIC-WLSP92-DEV
9.1 LIC-WLSP91-DEV
9.0 LIC-WLSP90-DEV
BEA WebLogic Server Premium for Linux s/390 and z/Series
7.0sp1 LIC-WLS70-CLS-56
BEA WebLogic Server Mid-Market Edition 10.0 - 10.0mp1 LIC-WLS10-MME.txt
9.2 - 9.2mp3 LIC-WLS92-MME.txt
BEA WebLogic Platform Products (Product, Version, License ID/file)
==================================================================
BEA WebLogic Platform 10.2 ISV LIC-PLAT102-ISVED
10.2 LIC-AUTONOMY
LIC-PORT102
LIC-WLI102
9.2mp3 ISV LIC-PLAT92-ISVED
9.2 - 9.2mp3 LIC-PFRM92.txt
8.1 - 8.1sp6 LIC-PFRM81-128.txt
7.0 - 7.0sp7 LIC-PFRM70-128.txt
<license
component="WebLogic"
cpus="unvalued"
expiration="never"
ip="any"
licensee="Customer"
serial="454493271161-2642447506228"
type="RTK"
units="unlimited"
signature="MCwCFHRYQyBkRqhyayiKQBDxfTq/bWfYAhQj+RMMeDMVxjiYhBaXuHobbHe/JA=="
/>
呵呵,都什么年代了,您还在Google、baidu中搜索“weblogic 破解”这样的关键字吗,用不着了。但是这并不意味着您可以免费使用这些产品,熟悉Oracle的人都知道,如果您想在企业级应用中部署这些产品,您还是得付money!
称为是最好的JAVA IDE开发平台!包括:J2EE支持、Ant、JUnit、集成CVS。包含一个智能编辑器,代码辅助和增强的自动代码工具。可提高JAVA开发人员的效率。
JetBrains已经发布了IntelliJ IDEA 7.0,IntelliJ IDEA 7里程碑1包括许多新的特性和提高,尤其是在对Java EE的支持上,包括Spring和Hibernate,代码分析,扩展版本控制支持,Rational ClearCase集成,增强了调试,代码查询,可用性和性能。
正使用IntelliJ IDEA 6.0的用户可以免费使用IntelliJ IDEA 7.0到2007年12月31号,评估用户可以从官方网站下载并有30天的免费试用期。
IntelliJ IDEA 7.0的新特性包括:
1.性能提高
IDE的启动速度得到改善
编辑JSP的速度加快
更快的XML的格式化
2.对Hibernate的支持
代码助手
3.对Spring的支持
代码助手
观察依赖的可视化图表
专门的文件设置编辑器
4.与Eclipse的协作能力
导入(从现有的Eclipse工程中创建IntelliJ IDEA .iml和.ipr文件 )
导出(从现有的IntelliJ IDEA .iml文件中创建Eclipse工程文件)
同步
5.版本控制
支持Rational ClearCase
6.JavaScript
支持JSON文件类型
JSDoc和DoJo样式类型注释提供了更准确的完成和参数类型信息
JSDoc和DoJo样式注释的丰富文档
JavaScript命名空间完成/验证
一份注册码如下,Enjoy!
=============================================================
user name:在路上...
License:12008-M3132-RY84C-0GSMK-V7TNK-33XV0
customer id:12008
product id:IDEA
license type:COMMERCIAL
major version:7
minor version:0
generationDate:Mon Oct 22 16:31:47 CST 2007
expirationDate:Sun Jan 20 16:31:47 CST 2008
一个典型应用中,使用delphi作为客户端,J2EE服务端,两者之间用XML作为数据交换,为了提高效率,对XML数据进行压缩,为此需要找到一种压缩/解压算法能够两个平台之间交互处理,使用ZLIB算法就是一个不错的解决方案。
1、JAVA实现
在JDK中,在java.util.zip包中已经内置了ZLIB的实现,示例代码如下:
1//解压
2 public String decompressData(String encdata) {
3  try { try {
4 ByteArrayOutputStream bos = new ByteArrayOutputStream();
5 InflaterOutputStream zos = new InflaterOutputStream(bos);
6 zos.write(convertFromBase64(encdata));
7 zos.close();
8 return new String(bos.toByteArray());
9 } catch (Exception ex) {
10 ex.printStackTrace();
11 return "UNZIP_ERR";
12 } }
13 }
14
15 //压缩
16 public String compressData(String data) {
17 try {
18 ByteArrayOutputStream bos = new ByteArrayOutputStream();
19 DeflaterOutputStream zos = new DeflaterOutputStream(bos);
20 zos.write(data.getBytes());
21 zos.close();
22 return new String(convertToBase64(bos.toByteArray()));
23 } catch (Exception ex) {
24 ex.printStackTrace();
25 return "ZIP_ERR";
26 }
27 }
2、DELPHI中的实现
在DELPHI中,有第3方的控件可以利用来实现压缩/解压,这里我们选择VCLZIP V3.04,可以从这里下载http://www.vclzip.net
为了提高通用性,我们可以编写一个标准的DLL,就可以在Win32平台随意调用了,关键代码如下:
function Cmip_CompressStr(txt: PChar): pchar; stdcall;
var
zip: TVclZip;
compr: string;
data: PChar;
begin
zip := TVclZip.Create(nil);
compr := zip.ZLibCompressString(txt);
data := pchar(Base64EncodeStr(compr));
Result := StrNew(data);
zip.Free
end;
function Cmip_DeCompressStr(txt: PChar): pchar; stdcall;
var
zip: TVCLUnZip;
compr: string;
data: PChar;
begin
zip := TVCLUnZip.Create(nil);
compr := zip.ZLibDecompressString(Base64DecodeStr(txt));
data := StrNew(pchar(compr));
Result := data;
zip.Free
end;
在我们当前的项目中,采用的方案是Powerbuilder +DLL与J2EE平台进行xml数据交换的方式。
在这里可以下载Resin Plugin for IntelliJ IDEA ,但是对于3.1X好像还不支持。http://plugins.intellij.net/plugin/?id=215
作者更新太慢,不好意思自己动手反编译修改了几个地方,现在可以支持Resin Pro 3.1.2,如果需要地可以从这里
* 下载:Resin_2640_31.zip
* 安装:
修改文件名为Resin_2640_31.jar,复制到C:\Documents and Settings\[username]\.IntelliJIdea60\config\plugins下面
* 修改记录
1、将3.1.2的resin.conf文件命名为resin31.conf加到org\intellij\j2ee\web\resin\resin下面
2、将ResinVersion.java修改为如下方法判断是否3.1版本
public static final ResinVersion VERSION_3_X = new ResinVersion("Resin 3.x") {
public boolean isOfVersion(File file)
{
return (new File(new File(file, "lib"), "jsdk-15.jar")).exists();
}
public String getStartupClass()
{
return "com.caucho.server.resin.Resin";
}
}
3、修改Resin3XConfigurationStrategy.java文件中部分判断http port、host的代码
原来的XML节点为root->server->host->http->port and root->server->host->web-app
3.1下面的XML节点为root->cluster->server-default->http->port and root->cluster->host->web-app
改过的代码为
Element httpElement = document.getRootElement().getChild("cluster", ns).getChild("server-default", ns).getChild("http", ns);
Element host = getHost(document.getRootElement().getChild("cluster", ns), ns, webApp);
List hosts = document.getRootElement().getChild("cluster", ns).getChildren("host", ns);
public InputStream getDefaultResinConfContent()
{
return getClass().getResourceAsStream("/org/intellij/j2ee/web/resin/resin/resin31.conf");
}
原来的作者没有开源,所以不好做进一步的修改完善,对于3.0的版本应该就不支持了。
PowerBuilder在显示图片方面的确是一个弱项,以前一直没有找到好的方法,如果自己用delphi写个ActiveX控件,在关闭的时候总会出现错误,实在是很郁闷,后来发现Kodak Image Edit Control就没有这个问题,而且可以支持BMP,DCX,GIF,JPG-JFIF,PCX,TIFF,WIFF,XIF等常见的图片格式,该控件在win98,win2000等环境中都已经安装好了,对于XP环境也可以简单的从Win2000移植过来。
1、鼠标放大、缩小效果
在OLE控件的other事件中加入下面的代码
1 Choose Case Message.Number Choose Case Message.Number
2 Case 522
3 if IntHigh(message.wordparm) = 120 then //鼠标滚轮向上
4 if int(ole_1.object.zoom)<=20 then return
5 ole_1.object.zoom= ole_1.object.zoom -10
6 else
7 ole_1.object.zoom= ole_1.object.zoom+10
8 end if
9 ole_1.object.display()
10End Choose
2、鼠标拖动效果
如果不想选择框老是出现的话,需要加入
ole_1.object.SelectionRectangle = False
1//1.定义Instance变量
2int mousex,mousey
3int moveon
以下代码属于OLE控件的事件
1//Event MouseDown事件
2moveon=1
3mousex=ocx_x
4mousey=ocx_y
1//MouseMove事件
2if moveon=0 then return
3ole_1.object.ScrollPositionX =ole_1.object.ScrollPositionX+(MouseX -ocx_x)
4ole_1.object.ScrollPositionY =ole_1.object.ScrollPositionY+(MouseY -ocx_y)
5ole_1.object.refresh()
6mousex=ocx_x
7mousey=ocx_y
1//mouseUp事件
2moveon=0
通常在weblogic的config.xml文件中,对于关键字符串、密码会自动加密,例如LDAP密码、数据库JDBC连接池连接密码等。通常加密之后前面会加上{3DES}的标识。
3DES就是DES算法的增强,相关资料如下:
1、DES(Data Encryption Standard)是一种经典的对称算法。其数据分组长度为64位,使用的密钥为64位,有效密钥长度为56位(有8位用于奇偶校验)。它由IBM公司在70年代开发,经过政府的加密标准筛选后,于1976年11月被美国政府采用,随后被美国国家标准局和美国国家标准协会(American National Standard Institute, ANSI) 承认。
该技术算法公开,在各行业有着广泛的应用。DES算法从公布到现在已有20多年的历史,由于计算机能力的飞速发展,DES的56位密钥长度显得有些太短了,已经有可能通过穷举的
方法来对其进行攻击。但是除此以外,直到现在还没有发现穷举以外的能有效破译DES的方法。
2、DES算法现在已经不能提供足够的安全性,因为其有效密钥只有56位。因此,后来又提出了三重DES(或称3DES),该方法的强度大约和112比特的密钥强度相当。
这种方法用两个密钥对明文进行三次运算。设两个密钥是K1和K2,其算法的步骤如图3所示:
1. 用密钥K1进行DES加密。
2. 用K2对步骤1的结果进行DES解密。
3. 用步骤2的结果使用密钥K1进行DES加密。
首先需要找到加密的密钥,根据BEA文档可以发现是文件SerializedSystemIni.dat,查找一下安装目录就可以找到整个问见,通常系统管理员应该将该文件设置为不能直接访问,以提高安全性。
加密、解密的大致演示算法代码如下,在WebLogic 9.2下面调试通过,运行编译前应该先运行setExamplesEnv.cmd(参考)的环境变量,以保证相关类库已经被引用了。对于低版本的WebLogic,例如WebLogic 7.0/8.1可能不能直接在命令行执行,因为SerializedSystemIni必须在控制台Console环境下面才能调用,有兴趣的朋友可以自行测试看看。
1import weblogic.security.internal.*;
2import weblogic.security.internal.encryption.EncryptionService;
3import weblogic.utils.encoders.BASE64Decoder;
4import weblogic.utils.encoders.BASE64Encoder;
5public class CrackData
6 { {
7 public static void main(String[] args)
8 {
9 byte[] salt,keys;
10 salt=SerializedSystemIni.getSalt();
11 keys=SerializedSystemIni.getEncryptedSecretKey();
12 String data="";
13 for(int i=0;i<salt.length;i++){
14 data+=salt[i]+",";
15 }
16 System.out.println("salt:"+data);
17 data="";
18 for(int i=0;i<keys.length;i++){
19 data+=keys[i]+",";
20 }
21 System.out.println("Key:"+data);
22 //EncryptionService svr=SerializedSystemIni.getExistingEncryptionService();
23 EncryptionService svr=SerializedSystemIni.getEncryptionService();
24 System.out.println(svr);
25 System.out.println(svr.getAlgorithm());
26 if(args.length>1){
27 if(args[0].equals("encrypt")){
28 byte[] edata=svr.encryptString(args[1]);
29 String s = (new BASE64Encoder()).encodeBuffer(edata);
30 System.out.println("Encode:"+s);
31 }
32 if(args[0].equals("decrypt")){
33 try{
34 byte[] edata = (new BASE64Decoder()).decodeBuffer(args[1]);
35 String txt=svr.decryptString(edata);
36 System.out.println("Decode:"+txt);
37 }catch(Exception ex){
38 ex.printStackTrace();
39 }
40 }
41 }
42
43 }
44}
45
测试运行结果如下:
root@srdsh # /rdsh/bea92/jdk150_04/bin/java CrackData decrypt nMttUc5jNe9RNJXslXjbJQ==
-86,123,19,107,
-42,-28,-75,-100,31,0,25,-93,75,115,40,-3,-15,42,-53,41,-25,-13,-6,8,36,85,-81,2
8,66,-110,31,38,-29,-79,-44,-48,
weblogic.security.internal.encryption.JSafeEncryptionServiceImpl@199f91c
3DES
Decode:weblogic
root@srdsh # /rdsh/bea92/jdk150_04/bin/java CrackData decrypt erzD515N5z2zSnOk7uG1cYQthCbYA5OU6Bw+Zt5BsjPruTQaOZASh+ZZW4kuBGvfbZ2BXWSACbgOZ2MY4bHtpOPps/6WfZJg
-86,123,19,107,
-42,-28,-75,-100,31,0,25,-93,75,115,40,-3,-15,42,-53,41,-25,-13,-6,8,36,85,-81,2
8,66,-110,31,38,-29,-79,-44,-48,
weblogic.security.internal.encryption.JSafeEncryptionServiceImpl@199f91c
3DES
Decode:0xa778f572127d2282247ec653147c35d4e4040aca016c6d1e06ab325af5798fca
root@srdsh #
|