WebService 是一套标准,而不是一种具体的技术。不同的平台,不同的语言,大都提供了对 WebService 的开发实现。
在 JAVA 领域里,WebService 的框架有不少,常用的就有 AXIS,XFire , CXF 等 .
Apache CXF 是一个开源的 Services 框架 , 它 的前身是 Apache CeltiXfire , 继承自 Celtix 和 XFire 两大开源项目 ,
CXF 实现了 JAX-WS (Java API For XML-WebService) API,对 JAX-WS 提供了全面的支持 , 而且可以和 Spring 进行无缝集成。
CXF 支持多种标准 :
支持 JAX-WS 、 JAX-WSA 、JSR-181 和 SAAJ;
支持 SOAP 1.1 、1.2 、WS-I BasicProfile 、WS-Security 、WS-Addressing 、WS-RM 和 WS-Policy;
支持 WSDL ( Web Services Description Language ) 1.1 、2.0;
支持 MTOM;
为帮助理解,下面引用一段摘自网络的文字内容 :
" 什么是 WebServices
从表面上看,Webservice 就是一个应用程序,它向外界暴露出一个能够通过 Web 进行调用的 API 。也就是说,可以利用编程的方法通过 Web 来调用这个应用程序。
对 Webservice 更精确的解释 : Webservice 是建立可互操作的分布式应用程序的新平台。Webservice 平台是一套标准,它定义了应用程序如何在 Web 上实现互操作性。
你可以用任何你喜欢的语言,在任何你喜欢的平台上写 Webservice ,只要我们可以通过 Webservice 标准对这些服务进行查询和访问。
不管你的 Webservice 是用什么工具,什么语言写出来的,只要你用 SOAP 协议通过 HTTP 来调用它,总体结构都一致。通常,你用你自己喜欢的语言(如VB 6或者VB.NET)
来构建你的 Webservice,然后用 SOAP Toolkit 或者 .NET 的内建支持来把它暴露给 Web 客户。于是,任何语言,任何平台上的客户都可以阅读其WSDL文档,
以调用这个 Webservice。客户根据 WSDL 描述文档,会生成一个 SOAP 请求消息。Webservice 都是放在 Web 服务器 (如IIS) 后面的,客户生成的 SOAP 请求
会被嵌入在一个 HTTP POST 请求中,发送到 Web 服务器来。Web 服务器再把这些请求转发给 Webservice 请求处理器。请求处理器的作用在于,解析收到的 SOAP 请求,
调用 Webservice,然后再生成相应的 SOAP 应答。Web 服务器得到 SOAP 应答后,会再通过 HTTP 应答的方式把它送回到客户端。 "
环境 :
JDK 1.6
eclipse 3.6
CXF 2.5.3
spring 3.0
编写 HelloWorld :
下载 Apache CXF : http://cxf.apache.org/download.html
导入 CXF 所需的 jar 包 :
commons-logging-1.1.1.jar
cxf-2.5.3.jar
geronimo-activation_1.1_spec-1.1.jar
geronimo-annotation_1.0_spec-1.1.1.jar
geronimo-javamail_1.4_spec-1.7.1.jar
geronimo-jaxws_2.2_spec-1.1.jar
geronimo-jms_1.1_spec-1.1.1.jar
geronimo-servlet_2.5_spec-1.1.2.jar
geronimo-stax-api_1.0_spec-1.0.1.jar
geronimo-ws-metadata_2.0_spec-1.1.3.jar
jaxb-api-2.2.3.jar
jaxb-impl-2.2.4-1.jar
neethi-3.0.2.jar
saaj-api-1.3.4.jar
saaj-impl-1.3.12.jar
wsdl4j-1.6.2.jar
wss4j-1.6.5.jar
xml-resolver-1.2.jar
xmlschema-core-2.0.2.jar
也可以将 CXF lib 下的 jar 包全部导入,以及导入 spring 所需 jar 包 .
服务器端 ( web project,项目名 : ws ) ---
1 . 编写 HelloWorld 接口,并将其标注成 WebService 的标准 java 接口
package com.fancy.service;
import javax.jws.WebService;
@WebService
public interface HelloWorld {
public String sayHi(String message);
}
2 . 编写 HelloWorld 的实现类
package com.fancy.service.impl;
import javax.jws.WebService;
import com.fancy.service.HelloWorld;
@WebService(endpointInterface = "com.fancy.service.HelloWorld")
public class HelloWorldImpl implements HelloWorld {
public String sayHi(String message) {
return "Hi " + message + " !";
}
}
applicationContext.xml 配置
<?xml version="1.0" encoding="UTF-8"?>
<beans xmlns="http://www.springframework.org/schema/beans"
xmlns:xsi="http://www.w3.org/2001/XMLSchema-instance"
xmlns:p="http://www.springframework.org/schema/p"
xmlns:tx="http://www.springframework.org/schema/tx"
xmlns:aop="http://www.springframework.org/schema/aop"
xmlns:jaxws="http://cxf.apache.org/jaxws"
xmlns:cxf="http://cxf.apache.org/core"
xsi:schemaLocation="http://www.springframework.org/schema/beans
http://www.springframework.org/schema/beans/spring-beans-3.0.xsd
http://www.springframework.org/schema/tx
http://www.springframework.org/schema/tx/spring-tx-3.0.xsd
http://www.springframework.org/schema/aop
http://www.springframework.org/schema/aop/spring-aop-3.0.xsd
http://cxf.apache.org/jaxws
http://cxf.apache.org/schemas/jaxws.xsd">
<!-- 配置请参考官网: http://cxf.apache.org/docs/jax-rs-and-jax-ws.html -->
<import resource="classpath:META-INF/cxf/cxf.xml" />
<import resource="classpath:META-INF/cxf/cxf-extension-soap.xml" />
<import resource="classpath:META-INF/cxf/cxf-servlet.xml" />
<bean id="helloWorld" class="com.fancy.service.impl.HelloWorldImpl" />
<!-- JAX-WS -->
<!-- implementor 指定 WebService 实现类, address 指定访问地址 -->
<jaxws:endpoint implementor="#helloWorld" address="/helloworld" publish="true" />
</beans>
以上配置中的 cxf.xml,cxf-extension-soap.xml,cxf-servlet.xml 实际上是放在 cxf-2.5.3.jar 里面的 META-INF 文件夹的 cxf 目录下,由于我们已经导入了这个 jar 包,
所以在这里,我们只需要这样配置就行,其他的就可以不用管了,至于更多的详细信息,请参考帮助文档 : http://cxf.apache.org/docs/jax-rs-and-jax-ws.html
web.xml 配置
<?xml version="1.0" encoding="UTF-8"?>
<web-app version="2.5" xmlns="http://java.sun.com/xml/ns/javaee" xmlns:xsi="http://www.w3.org/2001/XMLSchema-instance"
xsi:schemaLocation="http://java.sun.com/xml/ns/javaee http://java.sun.com/xml/ns/javaee/web-app_2_5.xsd">
<context-param>
<param-name>contextConfigLocation</param-name>
<param-value>/WEB-INF/applicationContext.xml</param-value>
</context-param>
<listener>
<listener-class>org.springframework.web.context.ContextLoaderListener</listener-class>
</listener>
<servlet>
<servlet-name>CXFServlet</servlet-name>
<servlet-class>org.apache.cxf.transport.servlet.CXFServlet</servlet-class>
</servlet>
<servlet-mapping>
<servlet-name>CXFServlet</servlet-name>
<url-pattern>/webservice/*</url-pattern>
</servlet-mapping>
<welcome-file-list>
<welcome-file>index.jsp</welcome-file>
</welcome-file-list>
</web-app>
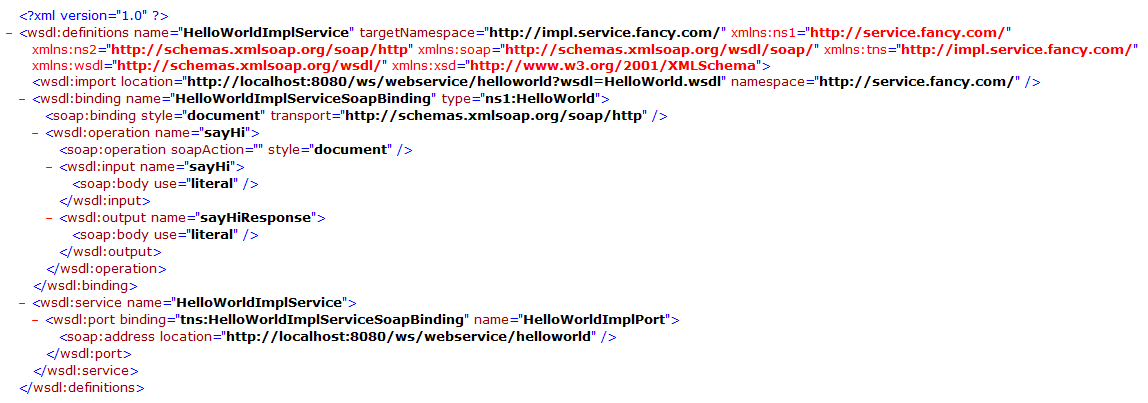
OK,到此服务器端已经开发完成,部署运行,打开你最熟悉的浏览器,访问 : http://localhost:8080/ws/webservice/helloworld?wsdl
如果能查看到 WSDL 文件的内容信息如下,说明服务器端已经没问题了 :
客户端 ( web project,项目名 : ws_client ) ---
如果你对 CXF 或 Axis 比较熟悉的话,可以使用 wsdl2java 命令来根据 wsdl 文件直接生成客户端的 java 代码,其中,CXF 的 WSDL to Java 的命令参数
请自行参考官网文档 : https://cwiki.apache.org/CXF20DOC/wsdl-to-java.html 顺便说一下,使用 CXF 的 wsdl2java 命令需要配置一下环境变量,
下面采用手工方式编写客户端测试代码 :
1 . 首先需要创建一个与服务器端相同的 HelloWorld 接口,这是服务端给我们暴露的服务,客户端的这个 HelloWorld 接口代码的编写需与服务端的一致 .
package com.fancy.service.client;
import javax.jws.WebService;
@WebService
public interface HelloWorld {
public String sayHi(String message);
}
2 . applicationContext.xml 配置
<?xml version="1.0" encoding="UTF-8"?>
<beans xmlns="http://www.springframework.org/schema/beans"
xmlns:xsi="http://www.w3.org/2001/XMLSchema-instance"
xmlns:p="http://www.springframework.org/schema/p"
xmlns:tx="http://www.springframework.org/schema/tx"
xmlns:aop="http://www.springframework.org/schema/aop"
xmlns:jaxws="http://cxf.apache.org/jaxws"
xmlns:cxf="http://cxf.apache.org/core"
xsi:schemaLocation="http://www.springframework.org/schema/beans
http://www.springframework.org/schema/beans/spring-beans-3.0.xsd
http://www.springframework.org/schema/tx
http://www.springframework.org/schema/tx/spring-tx-3.0.xsd
http://www.springframework.org/schema/aop
http://www.springframework.org/schema/aop/spring-aop-3.0.xsd
http://cxf.apache.org/jaxws
http://cxf.apache.org/schemas/jaxws.xsd">
<bean id="wsclient" class="com.fancy.service.client.HelloWorld" factory-bean="wsclientFactory" factory-method="create" />
<bean id="wsclientFactory" class="org.apache.cxf.jaxws.JaxWsProxyFactoryBean">
<property name="serviceClass" value="com.fancy.service.client.HelloWorld" />
<property name="address" value="http://192.168.1.113:8080/ws/webservice/helloworld" />
</bean>
</beans>
Tips : 这里配置的 <property name="address" value="http://192.168.1.113:8080/ws/webservice/helloworld" />,其中 address 的属性值 value 要与服务器端
applicationContext.xml 配置中的 <jaxws:endpoint implementor="#helloWorld" address="/helloworld" publish="true" /> 的 address 对应起来。
3 . Junit 测试
package junit.test;
import org.junit.AfterClass;
import org.junit.BeforeClass;
import org.junit.Test;
import org.springframework.context.ApplicationContext;
import org.springframework.context.support.ClassPathXmlApplicationContext;
import com.fancy.service.client.HelloWorld;
/**
* -----------------------------------------
* @描述 客户端测试
* @作者 fancy
* @邮箱 fancydeepin@yeah.net
* @日期 2012-10-4 <p>
* -----------------------------------------
*/
public class ClientTestApp {
private static ApplicationContext context = null;
@BeforeClass
public static void setUpBeforeClass() throws Exception {
context = new ClassPathXmlApplicationContext("applicationContext.xml");
}
@AfterClass
public static void tearDownAfterClass() throws Exception {
context = null;
}
@Test
public void clientTest(){
HelloWorld helloworld = (HelloWorld)context.getBean("wsclient");
String message = helloworld.sayHi("fancy");
System.out.println(message);
}
}
测试的时候,必须保证服务器是开着的,后台打印输出结果 :
Hi fancy !
posted on 2012-10-04 16:13
fancydeepin 阅读(6914)
评论(4) 编辑 收藏