接着介绍extjs的基础吧,Tabpanel组件大家喜欢吧!

  Ext.onReady(function() Ext.onReady(function() { {
  var tabsDemo=new Ext.TabPanel( var tabsDemo=new Ext.TabPanel( { {
 renderTo:Ext.getBody(), renderTo:Ext.getBody(),
 width:300, width:300,
 activeTab:0,//当前激活标签 activeTab:0,//当前激活标签
 frame:true, frame:true,
  items:[ items:[ { {
 contentEl:"tabOne",//标签页的页面元素id(加入你想显示的话) contentEl:"tabOne",//标签页的页面元素id(加入你想显示的话)
 title:"浪曦", title:"浪曦",
 closable:true//是否现实关闭按钮,默认为false closable:true//是否现实关闭按钮,默认为false
  }, }, { {
 contentEl:"tabTwo", contentEl:"tabTwo",
 title:"博客园兄弟们可好" title:"博客园兄弟们可好"
 }] }]
 }); });
 }); }); <body style="margin:10px;"> <body style="margin:10px;">
 <div> <div>
 <div id="tabOne" class="x-hide-display">i am tabOne!</div> <div id="tabOne" class="x-hide-display">i am tabOne!</div>
 <div id="tabTwo" class="x-hide-display">i am tabTwo!</div> <div id="tabTwo" class="x-hide-display">i am tabTwo!</div>
 </div> </div>
 </body> </body>
 <!--注意class类型,设为x-hide-display,以正常显示--> <!--注意class类型,设为x-hide-display,以正常显示-->
在这里例举几个参数:
//几个相关参数
1.tabPosition:"bottom"//选项卡的位置,枚举值bottom,top.默认为top(只有top的时候才能选项卡的滚动!)
2.tabTip:"提示"//必须先调用Ext.QuickTips.init();才有效果
经常我们有这么个情况,一个选项卡加载一个页面,这里我提供一种不是很好但是很稳定的简单方法(已经在项目中验证没有出现问题).
就是: 使用iframe作为tab的标签页内容.
2.动态添加tabpanel的标签页

html代码:
 <body style="margin:10px;"> <body style="margin:10px;">
 <div> <div>
 <a id="AddNewTab" href="javascript:void(0)">添加新标签页</a> <a id="AddNewTab" href="javascript:void(0)">添加新标签页</a>
 </div> </div>
 </body> </body>  Ext.onReady(function() Ext.onReady(function() { {
 Ext.QuickTips.init(); Ext.QuickTips.init();
  var tabsDemo=new Ext.TabPanel( var tabsDemo=new Ext.TabPanel( { {
 renderTo:Ext.getBody(), renderTo:Ext.getBody(),
 activeTab:0, activeTab:0,
 height:700, height:700,
 frame:true, frame:true,
  items:[ items:[ { {
 title:"autoLoad为html简单页面演示", title:"autoLoad为html简单页面演示",
  autoLoad: autoLoad: {url:"tab1.htm",scripts:true} {url:"tab1.htm",scripts:true}
 }] }]
 }); });
 //下面是添加新标签页的关键代码,很简单方便 //下面是添加新标签页的关键代码,很简单方便
 var index=0; var index=0;
  Ext.get("AddNewTab").on("click",function() Ext.get("AddNewTab").on("click",function() { {
  tabsDemo.add( tabsDemo.add( { {
 title:"newtab", title:"newtab",
 id:"newtab"+index, id:"newtab"+index,
 html:"new tab", html:"new tab",
 closable:true closable:true
 }); });
 tabsDemo.setActiveTab("newtab"+index); tabsDemo.setActiveTab("newtab"+index);
 index++; index++;
 }) })
 }); });
简单说明:
其实添加的话,只要add()方法就可以了,但是我们还要激活这个新的标签页,就必须setActiveTab(newtab的索引或id),关键就是我们不好判断这个索引,所以只好设置个递增的全局变量index来给newtab取名,这样我们也就能准确的获取新的不重复的newtab了,也就容易激活了。而且我们可以通过下图看出来。
3.稍微修改上面的例子tabpanel(官方的例子)

我就不多说了,关键的几个参数注释了下
 <body style="margin:10px;"> <body style="margin:10px;">
 <div> <div>
 <div id="AddBtn"></div> <div id="AddBtn"></div>
 </div> </div>
 </body> </body>  Ext.onReady(function() Ext.onReady(function() { {
 Ext.QuickTips.init(); Ext.QuickTips.init();
  var tabsDemo=new Ext.TabPanel( var tabsDemo=new Ext.TabPanel( { {
 renderTo:Ext.getBody(), renderTo:Ext.getBody(),
 //resizeTabs:true,宽度能自动变化,但是影响标题的显示 //resizeTabs:true,宽度能自动变化,但是影响标题的显示
 activeTab:0, activeTab:0,
 height:200, height:200,
 enableTabScroll:true,//挤的时候能够滚动收缩 enableTabScroll:true,//挤的时候能够滚动收缩
 width:200, width:200,
 frame:true, frame:true,
  items:[ items:[ { {
 title:"tab advantage", title:"tab advantage",
 html:"sample1" html:"sample1"
 }] }]
 }); });

 var index=0; var index=0;

 //就是下面这个函数,关键的地方,非常简单也非常实用 //就是下面这个函数,关键的地方,非常简单也非常实用
 function addTab() function addTab()
   { {
  tabsDemo.add( tabsDemo.add( { {
 title:"newtab", title:"newtab",
 id:"newtab"+index, id:"newtab"+index,
 html:"new tab"+index, html:"new tab"+index,
 closable:true closable:true
 }); });
 tabsDemo.setActiveTab("newtab"+index); tabsDemo.setActiveTab("newtab"+index);
 index++; index++;
 } }

 //设置一个按钮(上面的是一个链接,应用有点不同哦) //设置一个按钮(上面的是一个链接,应用有点不同哦)
  new Ext.Button( new Ext.Button( { {
 text:"添加新标签页", text:"添加新标签页",
 handler:addTab handler:addTab
 }).render(document.body,"AddBtn"); }).render(document.body,"AddBtn");
 }); });

//几个参数说明
1.enableTabScroll:true//前面已经说过了
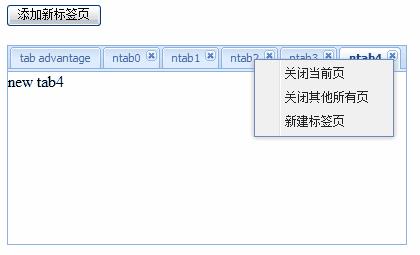
2. listeners:{"contextmenu":function(参数1,参数2,参数3){ .}} .}}
//右键菜单事件,三个参数分别为当前tabpanel,当前标签页panle,时间对象e
3.//扩充2,每个标签页都有激活和去激活事件
activate和deactivate,他们的执行函数有个参数,就是当前标签页。
例如: items:[{
title:"tab advantage",
listeners:{
deactivate:function(a){alert("删除,a表示当前标签页");},
activate:function(){alert("激活");}
},
html:"sample1"
}]
4.menu=new Ext.menu.Menu()//menu组件,就不多说了,后面会专门分析下,不过不要忘记menu.showAt(e.getPoint());了
  Ext.onReady(function() Ext.onReady(function() { {
 Ext.QuickTips.init(); Ext.QuickTips.init();
  var tabsDemo=new Ext.TabPanel( var tabsDemo=new Ext.TabPanel( { {
 renderTo:Ext.getBody(), renderTo:Ext.getBody(),
 //resizeTabs:true,宽度能自动变化,但是影响标题的显示 //resizeTabs:true,宽度能自动变化,但是影响标题的显示
 activeTab:0, activeTab:0,
 height:200, height:200,
 enableTabScroll:true,//挤的时候能够滚动收缩 enableTabScroll:true,//挤的时候能够滚动收缩
 width:400, width:400,
 frame:true, frame:true,

 //下面是比上面例子新增的关键右键菜单代码 //下面是比上面例子新增的关键右键菜单代码
  listeners: listeners: { {
 //传进去的三个参数分别为:这个tabpanel(tabsDemo),当前标签页,事件对象e //传进去的三个参数分别为:这个tabpanel(tabsDemo),当前标签页,事件对象e
  "contextmenu":function(tdemo,myitem,e) "contextmenu":function(tdemo,myitem,e) { {
  menu=new Ext.menu.Menu([ menu=new Ext.menu.Menu([ { {
 text:"关闭当前页", text:"关闭当前页",
  handler:function() handler:function() { {
 tdemo.remove(myitem); tdemo.remove(myitem);
 } }
  }, }, { {
 text:"关闭其他所有页", text:"关闭其他所有页",
  handler:function() handler:function() { {
 //循环遍历 //循环遍历
  tdemo.items.each(function(item) tdemo.items.each(function(item) { {
 if(item.closable&&item!=myitem) if(item.closable&&item!=myitem)
   { {
 //可以关闭的其他所有标签页全部关掉 //可以关闭的其他所有标签页全部关掉
 tdemo.remove(item); tdemo.remove(item);
 } }
 }); });
 } }
  }, }, { {
 text:"新建标签页", text:"新建标签页",
 handler:addTab handler:addTab
 }]); }]);
 //显示在当前位置 //显示在当前位置
 menu.showAt(e.getPoint()); menu.showAt(e.getPoint());
 } }
 }, },

  items:[ items:[ { {
 title:"tab advantage", title:"tab advantage",
 html:"sample1" html:"sample1"
 }] }]
 }); });

 var index=0; var index=0;

 function addTab() function addTab()
   { {
  tabsDemo.add( tabsDemo.add( { {
 title:"ntab"+index, title:"ntab"+index,
 id:"newtab"+index, id:"newtab"+index,
 html:"new tab"+index, html:"new tab"+index,
 closable:true closable:true
 }); });
 tabsDemo.setActiveTab("newtab"+index); tabsDemo.setActiveTab("newtab"+index);
 index++; index++;
 } }
  new Ext.Button( new Ext.Button( { {
 text:"添加新标签页", text:"添加新标签页",
 handler:addTab handler:addTab
 }).render(document.body,"AddBtn"); }).render(document.body,"AddBtn");
 }); });

|