2014年12月18日
#
2014年11月13日
#
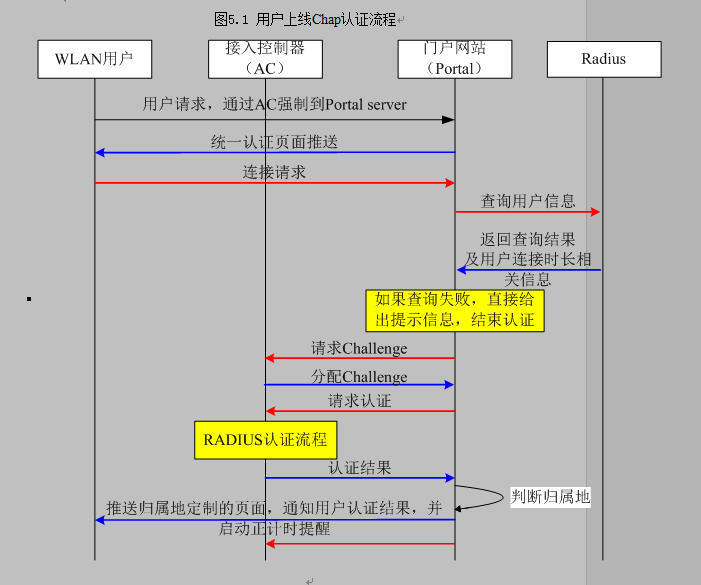
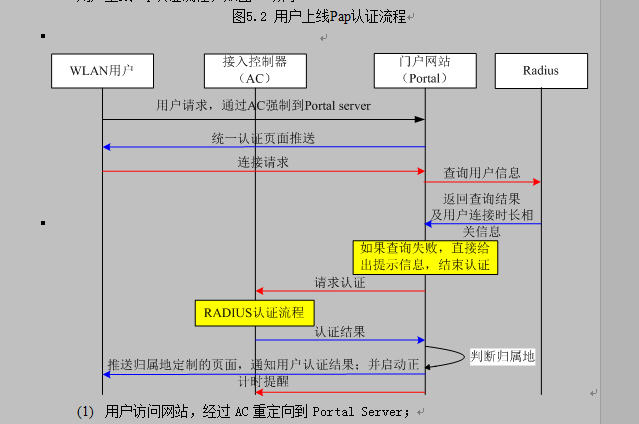
用java实现中国移动WLAN业务PORTAL协议规范
有需要代码的可联系本人。
QQ:316909543
2013年8月30日
#
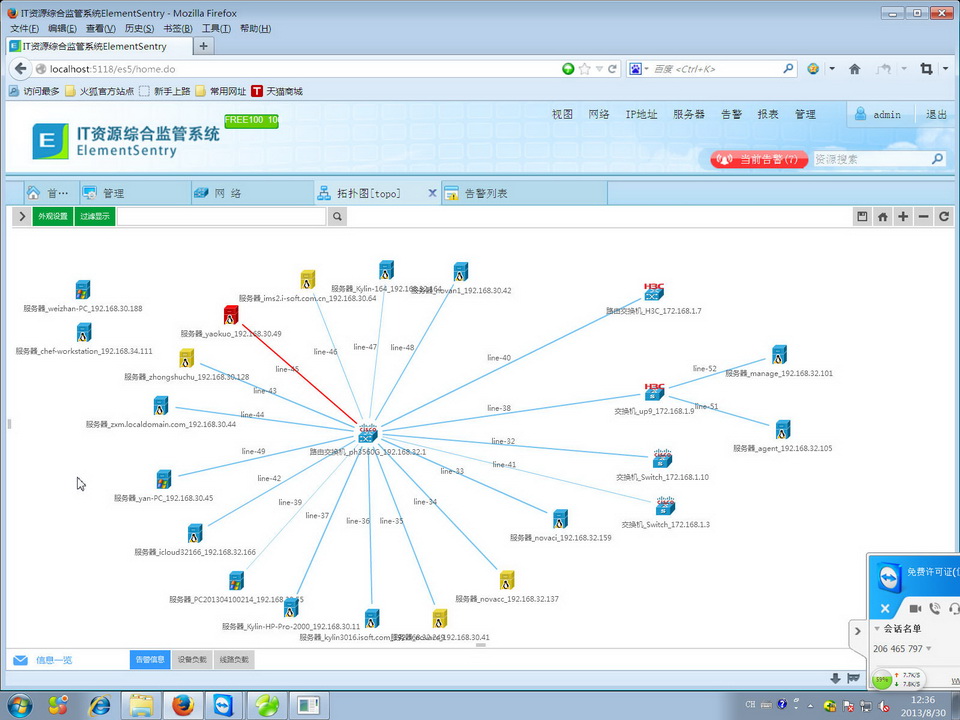
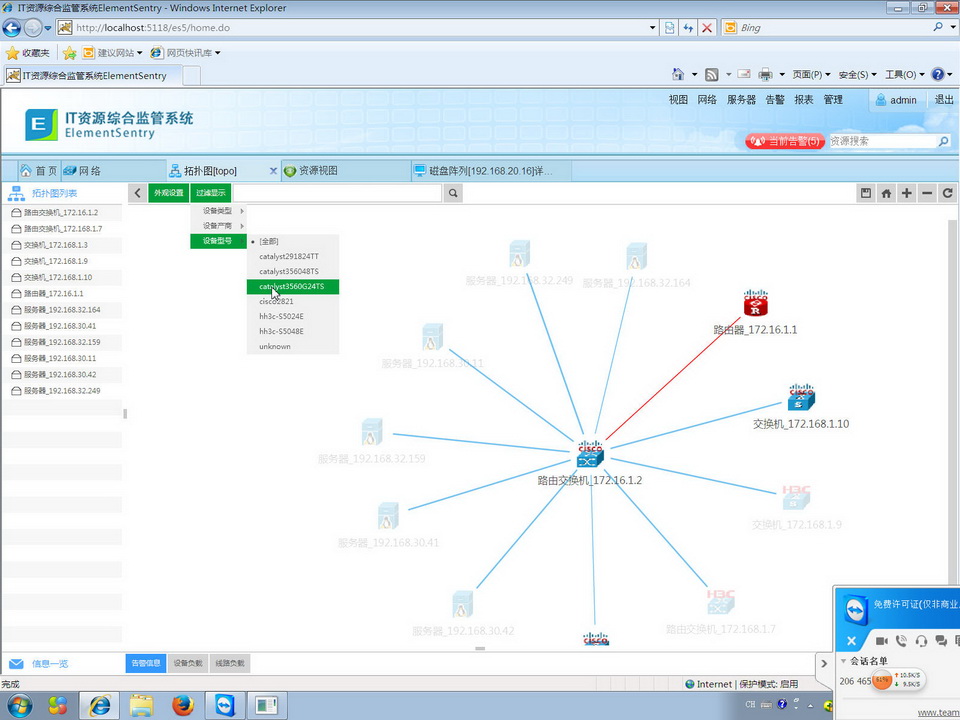
广州速方软件IT资源监管系统ElementSentry
V5.8,提供免费下载试用。http://www.soofound.com/biz/product/es/intro.htmQQ:316909543Email:afunms@soofound.com

2012年7月24日
#
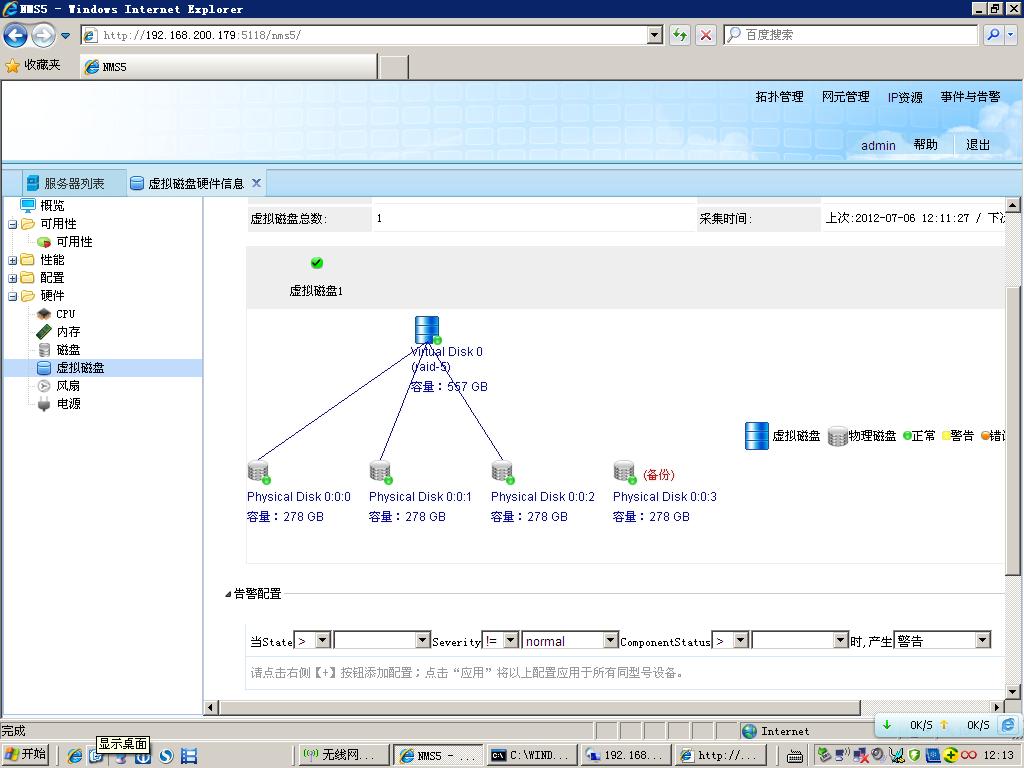
通过SNMP实现对磁盘阵列的监控
2012年5月4日
#
Simple Network Management Protocol i.e. SNMP is a simple request/response protocol in which SNMP manager communicates with SNMP agents/managed devices using SNMP PDU’s (Packet Data Unit). These PDUs are encapsulated in SNMP Messages. An snmp message consists of a sequence that contains SNMP version, Community String, and SNMP PDU and an SNMP PDU forms the body of the message. Look here to read about seven types of SNMP PDUs.
We need to understand that SNMP Message is different from SNMP PDU and hence their formats. Let us now understand SNMP Message Format and SNMP PDUD Format for SNMPv1, SNMPv2 and SNMPv3.
SNMPv1 Message Format

- SNMP Version – It is an Integer that identifies the version of SNMP. For SNMPv1, it is 0.
- Community String – An Octet String that may contain a string used to add security to SNMP devices.
- SNMP PDU – The SNMP PDU (Protocol Data Unit) is used for communication between the SNMP entities.
SNMPv1 PDU Format
For SNMPv1, there are two pdu formats, one for Trap and other for rest of the pdu types.
Below PDU format is applicable for Get, GetNext, Set and Response PDUs:

- PDU Type – Specifies the type of PDU
- Request ID – Associates SNMP requests with responses.
- Error status – Indicates one of a number of errors and error types. It is set only in Response PDU, for rest it is set as 0.
- Error index – Associates an error with a particular object instance. It is set only in Response PDU, for rest it is set as 0.
- Variable bindings – Each variable binding associates a particular object instance with its current value. For Get and GetNext requests, the value is ignored.
Below PDU format is applicable for Trap PDU:

- PDU Type – Specifies the type of PDU as Trap
- Enterprise – Identifies the management enterprise under whose registration authority the trap was defined.
- Agent address – IP address of the agent
- Generic trap type – Used to identiy the generic trap. There are six types of generic traps.
- Specific trap type – Used to identify a specific trap.
- Time Stamp – Value of the sysUpTime mib object
SNMPv2 Message Format

- SNMP Version – It is an Integer that identifies the version of SNMP. For SNMPv2, it is 1.
- Community String – An Octet String that may contain a string used to add security to SNMP devices.
- SNMP PDU – The SNMP PDU (Protocol Data Unit) is used for communication between the SNMP entities.
SNMPv2 PDU Format
For SNMPv2, there are two pdu formats, one for GetBulk and other for rest of the pdu types.
Below PDU format is applicable for Get, GetNext, Set, Response, Trap and Inform PDUs:

- PDU Type- Specifies the type of PDU
- Request ID- Associates SNMP requests with responses.
- Error Status- Indicates one of a number of errors and error types. It is set only in Response PDU, for rest it is set as 0.
- Error Index- Associates an error with a particular object instance. It is set only in Response PDU, for rest it is set as 0.
- Variable Bindings- Each variable binding associates a particular object instance with its current value. For Get and GetNext requests, the value is ignored.
Below PDU format is applicable for GetBulk PDU:

- PDU Type – Specifies the type of PDU as GetBulk
- Request ID- Associates SNMP requests with responses.
- Non repeaters- Specifies the number of object instances in the variable bindings field that should be retrieved no more than once from the beginning of the request.
- Max repetitions- Defines the maximum number of times that other variables beyond those specified by the Non repeaters field should be retrieved.
- Variable Bindings- Each variable binding associates a particular object instance with its current value.
SNMPv3 Message Format
SNMPv3 message format is very different from the above two because of lot of security parameters introduced in this version. Below is how it looks like:

- Version – It is an Integer that identifies the version of SNMP. For SNMPv3, it is 3.
- ID – This field contains the SNMP message identifier which is a unique ID associated with the message. The msgID field is different from the reqID field available in the PDU.
- Max Size – This field represents the maximum size of message which the requesting SNMP entity can accept.
- Flags – This field contains the message security level. 0 – message is authenticated, 1 – message uses privacy, 2 – a report PDU is expected for the message
- Security Model – This field indicates the security model used to generate the message. When USM is used, it has a value of 3
- Engine ID – This field has the SNMPEngineID of the authoritative SNMP entity involved in the transaction. When a request PDU is generated from an SNMP engine, the remote peer (agent for Get request and manager for Trap request) is the authoritative SNMP entity.
- Engine Boots – This field has the snmpEngineBoots value of the authoritative SNMP entity involved in the transaction
- Engine Time – This field has the snmpEngineTime value of the authoritative SNMP entity involved in the transaction
- User Name – This field contains the principal who originated the request.
- Security Parameters – This field contains the security parameters that are security model dependent. It contains the authentication parameters and the privacy parameters for USM.
- Context Engine ID – Within an administrative domain, the contextEngineID uniquely identifies an SNMP entity that may realize an instance of a context with a particular contextName.
- Context Name – A contextName is used to name a context. Each contextName must be unique within an SNMP entity.
- PDU – The SNMP PDU (Protocol Data Unit) is used for communication between the SNMP entities.
SNMPv3 PDU Format
The PDU types for SNMPv3 are the same as the SNMPv2.
Thus, above are the message and pdu formats for SNMPv1, SNMPv2 and SNMPv3. Hope you find the information presented here useful. Feel free to leave your footprints for any queries, feedback or suggestions in the comments section below.
2012年5月3日
#
- Why is SNMP4J free?
Currently there is a lack of an affordable well object
oriented designed SNMP implementation for Java. SNMP4J tries to fill this gap.
It is free to get the best support and feedback from the Internet community. In
addition it is a small compensation for the help we got from other open source
projects.
Nevertheless you are welcome to support the development of SNMP4J
by purchasing commercial e-mail support.
- Where can I find examples for SNMP4J API usage?
Simple examples are provided by
the JavaDoc of the SNMP class which can be viewed here.
A (nearly) complete example for the SNMP4J API usage
is the console tool. It can be found in the org.snmp4j.tools.console.SnmpRequest
class.
- Is SNMP4J thread-safe?
Yes, SNMP4J is designed for multi-threaded
environments. Nevertheless, objects put into a PDU must not be modified while
the corresponding SNMP request is being processed.
- Why do I get sometimes a time-out (response == null) on a request although I see log
messages like “Received response that cannot be matched to any outstanding
request...”?
The response of the agent has been received after the
request had been timed out. To solve this, increase the time-out value for the
target.
- Why am I always getting a time-out (response == null) when sending a request?
Probably you have forgotten to call the listen() method of the
TransportMapping (once) or the Snmp class before sending the
request.
- Can I use a single Snmp instance to request data from multiple SNMP agents at the same time?
Yes, of course! You can either use asynchronous requests and
collect their responses in a one or more callback listeners or you can use
synchronous requests that are send from several threads concurrently.
- Can SNMP4J be used with Java EE?
Yes, the SNMP4JSettings class provides the
option to replace the default thread and timer factories by custom ones that use
Java EE resources instead of Java SE threads (timers).
2012年5月2日
#
Difference between SNMPv1 and SNMPv2
SNMP aka Simple
Network Management Protocol is a simple request/response protocol. Network
manager aka SNMP manager issues a request and managed device aka
SNMP agent returns
the response. This request/response behavior is implemented using protocol
operations and information between manager and agent is transferred using
SNMP PDUs (Packet Data Unit).
SNMPv1 is the
initial implementation of the protocol and SNMPv2 is an enhancement over
version 1. The significant differences between SNMPv1 and SNMPv2 are as below:
•Protocol operations used in SNMPv1 are Get,
GetNext, Set and Trap. SNMPv2 defines two more protocol options GetBulk and
Inform.
•Trap PDU format is different than other
PDU’s formats in SNMPv1. In version 2, trap pdu format is same as the format of
get and set pdu’s.
•In SNMPv1, if in a get request one of the
object instance in multiple-attribute request does not exist or is invalid, no
response would be given, only an error message would return. In SNMPv2, in such
a scenario, response would return for all other object instances or attributes except
the invalid value i.e. partial response would be there rather than error.
To know about the difference in implementation of security in SNMP version 1 & 2, please refer this link.
2012年5月1日
#
Difference Between SNMP Trap and SNMP Notification
We always try to clarify the differences between terminologies that otherwise seem to be similar. In our previous posts, we provided clarification on difference between trap and alarm & difference between trap and inform. As the title suggests, this post talks about difference between SNMP trap and SNMP notification.
If you refer to the SNMP PDU Formats for SNMPv1 and SNMPv2 here, you will realize that SNMPv1 has two different pdu formats, one for trap and another for all remaining snmp operations (get, set etc.). However, in SNMPv2 the pdu format for trap and all other snmp operations (except getbulk) is identical. To standardize the PDU Format of SNMPv1 traps, concept of Notification was introduced in SNMPv2 and same was carried forward to SNMPv3.
Thus, asynchronous event sent to manager by agent is known as Trap in SNMPv1 and Notification in SNMPv2 and SNMPv3.
With respect to the MIB definitions and PDU formats, below are the significant difference between Trap and Notification:
•The macro used for setting trap in SNMPv1 is TRAP-TYPE MACRO and the macro used for setting notifications in SNMPv2/v3 is NOTIFICATION-TYPE MACRO.
•Trap PDU contains agent address whereas Notification PDU contains error status and error index.
•TRAP PDU contains information about generic and specific traps whereas Notification PDU contains Trap OID.
•TRAP is asynchronous. Notification is asynchronous too but SNMV2/SNMPv3 supports confirmed notification known as Inform.
With reference to RFC2576, if a MIB module is changed to conform to the SMIv2, then each occurrence of the TRAP-TYPE macro MUST be changed to a corresponding invocation of the NOTIFICATION-TYPE macro. Have a look at RFC2576 here for translation rules and further clarification on traps and notifications.
Hope you find the information presented here useful. Feel free to leave your inputs in the comments section below.
2012年2月23日
#


先用ldapbrowser测试下AD服务器,保证AD是可用的。
以下是java代码:
 package com.coreware.ems;
import java.util.Hashtable;
import javax.naming.Context;
import javax.naming.NamingEnumeration;
import javax.naming.NamingException;
import javax.naming.directory.*;

 public class SimpleLDAPClient
  {
{

 public static void main(String[] args) {
 Hashtable env = new Hashtable();
env.put(Context.INITIAL_CONTEXT_FACTORY,"com.sun.jndi.ldap.LdapCtxFactory");
env.put(Context.PROVIDER_URL, "ldap://192.168.80.130:389/dc=coreware,dc=com");
env.put(Context.SECURITY_AUTHENTICATION, "simple");
env.put(Context.SECURITY_PRINCIPAL, "cn=wangfm,cn=Users,dc=coreware,dc=com");
env.put(Context.SECURITY_CREDENTIALS, "abc123!@#");
DirContext ctx = null;
NamingEnumeration results = null;
try {
ctx = new InitialDirContext(env);
SearchControls controls = new SearchControls();
controls.setSearchScope(SearchControls.SUBTREE_SCOPE);
results = ctx.search("", "(objectclass=person)", controls);
while (results.hasMoreElements()) {
SearchResult searchResult = (SearchResult) results.next();
Attributes attributes = searchResult.getAttributes();
Attribute attr = attributes.get("cn");
String cn = (String) attr.get();
System.out.println(" Person Common Name = " + cn);
 }
}
} catch (NamingException e) {
e.printStackTrace();
} finally {
if (results != null) {
try {
results.close();
} catch (Exception e) {
}
}
if (ctx != null) {
try {
ctx.close();
} catch (Exception e) {
}
}
}
}
 }
}
运行结果:
Person Common Name = Administrator
Person Common Name = Guest
Person Common Name = afunms
Person Common Name = db2admin
Person Common Name = AFUNMS-WIN2008
Person Common Name = krbtgt
Person Common Name = wangfm
2011年10月31日
#
spring3---json
在applicationContext.xml中加入
<bean class="org.springframework.web.servlet.mvc.annotation.AnnotationMethodHandlerAdapter">
<property name="messageConverters">
<util:list id="beanList">
<ref bean="mappingJacksonHttpMessageConverter" />
</util:list>
</property>
</bean>
<bean id="mappingJacksonHttpMessageConverter"
class="org.springframework.http.converter.json.MappingJacksonHttpMessageConverter" />
这样在action方法加返回bean或map,spring3会把它处理成json格式。如:
@Controller
public class JsonTestController {
@RequestMapping("/getJsonList")
@ResponseBody
public List<ItemTest> searchItemsList()
{
ItemTest item = new ItemTest();
item.setItemnum("123");
item.setItemDesc("123desc");
ItemTest item1 = new ItemTest();
item1.setItemnum("456");
item1.setItemDesc("456desc");
List<ItemTest> list = new ArrayList<ItemTest>();
list.add(item);
list.add(item1);
return list;
}
}
访问getJsonList.do返回的就是json形式的数据,注意要加上 @ResponseBody
================================================
spring3---ajax---json
网上搜索到一般都是这样:
$(function(){
$("#doImport").click(
function(){
var importInfo = $("#importInfo").serializeObject();
$.ajax({
url:"${base}cmb/doImport.do",
contentType :"application/json",
cache:false,
type:"POST",
data:JSON.stringify(importInfo),
dataType:"json",
success: function(data){
$('#result').val(data.message)
alert(data.message);
},
error:function(){
alert("失败");
}
});
});
});
我觉得这个方法写得太复杂了,于是改了它:
function doImport(){
$.ajaxSetup({ cache:false });
var data = {excelFileName:$("#excelFileName").val(),
sheetName:$("#sheetName").val(),
tableName:$("#tableName").val(),
startRow:$("#startRow").val(),
startCol:$("#startCol").val()};
$.getJSON("${base}cmb/doImport.do",data,function(form){
$("#result").val(form.message);
alert(form.message); });
}
action:
@RequestMapping("/cmb/doImport.do")
public @ResponseBody Map<String,String> doImport(HttpServletRequest request, ModelMap model){
System.out.println("===doImport===>>" + DateUtil.getCurrentDateTime());
String excelFileName = request.getParameter("excelFileName");
String sheetName = request.getParameter("sheetName");
String tableName = request.getParameter("tableName");
int startRow = Integer.parseInt(request.getParameter("startRow"));
int startCol = Integer.parseInt(request.getParameter("startCol"));
System.out.println("excelFileName=" + excelFileName);
System.out.println("sheetName=" + sheetName);
System.out.println("tableName="+tableName);
System.out.println("startRow="+startRow);
System.out.println("startCol="+startCol);
Map<String,String> result = new HashMap<String,String>();
result.put("message", "导入成功!");
return result;
}
注意以下几点:
1. ajax必须清缓存:$.ajaxSetup({ cache:false });
2. 将表单的数据组成json格式:
var data = {excelFileName:$("#excelFileName").val(),
sheetName:$("#sheetName").val(),
tableName:$("#tableName").val(),
startRow:$("#startRow").val(),
startCol:$("#startCol").val()};
# XX与表单组件中的ID对应,如
<input type="hidden" id="excelFileName" value="${excelFileName}" />
3.表单上必须有一个地方能存放返回值:
<input type="hidden" id="message" />
action中的返回值为json格式,
$("#result").val(form.message) 这句话将返回值中的result属性取出赋给表单中的message
2011年10月9日
#
public static void main(String[] args) throws Exception {
POIFSFileSystem pfs = new POIFSFileSystem(new FileInputStream("D:\\test_xls.xls"));
HSSFWorkbook hwk = new HSSFWorkbook(pfs);
HSSFSheet sheet = hwk.getSheet("Sheet1");
try{
int lrn = sheet.getLastRowNum();
for(int r = 0;r<lrn;r++){
Row row = sheet.getRow(r);
int lcn = row.getLastCellNum();
for(int c = 0;c<lcn;c++){
if(row.getCell(c)==null)
System.out.println("R=" + r + ",C=" + c + ":NULL");
else
System.out.println("R=" + r + ",C=" + c + ":" + row.getCell(c).toString());
}
}
}catch(Exception e){
e.printStackTrace();
}
}
2011年9月30日
#
2011年9月28日
#
从apache网上下载pluto-2.0.3-bundle.zip
解压后,修改bin\startup.bat,配置上jdk
set JAVA_HOME=../../jdk1.6.0_03
然后启动pluto,发现有错。查看日志
Caused by: java.lang.LinkageError: JAXB 2.0 API is being loaded from the bootstrap classloader, but this RI (from jar:file:/E:/nms4/pluto/webapps/pluto/WEB-INF/lib/jaxb-impl-2.1.9.jar!/com/sun/xml/bind/v2/model/impl/ModelBuilder.class) needs 2.1 API. Use the endorsed directory mechanism to place jaxb-api.jar in the bootstrap classloader. (See
http://java.sun.com/j2se/1.5.0/docs/guide/standards/)
at com.sun.xml.bind.v2.model.impl.ModelBuilder.<clinit>(ModelBuilder.java:173)
at com.sun.xml.bind.v2.runtime.JAXBContextImpl.getTypeInfoSet(JAXBContextImpl.java:432)
at com.sun.xml.bind.v2.runtime.JAXBContextImpl.<init>(JAXBContextImpl.java:297)
at com.sun.xml.bind.v2.ContextFactory.createContext(ContextFactory.java:139)
at com.sun.xml.bind.v2.ContextFactory.createContext(ContextFactory.java:117)
at com.sun.xml.bind.v2.ContextFactory.createContext(ContextFactory.java:188)
估计是jaxb造成的,于是将webapps\pluto\WEB-INF\lib下的jaxb-impl-2.1.9.jar删除。
再启动pluto,成功!
2011年9月8日
#
下载ipmiutil-2.7.8-win32,不用安装直接能用。
只可惜还没有开源或免费的java包来支持ipmi。
在dell服务器上测试
C:\ipmiutil>ipmiutil health
ipmiutil ver 2.78
ihealth ver 2.78
BMC version = 1.55, IPMI v2.0
BMC manufacturer = 0002a2 (Dell), product = 0100
BIOS Version = 1.2.2
IPMI driver type = 10 (ms)
Chassis Status = 21 00 00 (on, restore=last_state, last_pwr=)
Power State = 2a (unknown)
Selftest status = 0055 (OK)
Power On Hours = 0 hours (0 days)
get_chan_auth error: ret = c1
ipmiutil health, Invalid Command
C:\ipmiutil>ipmiutil sensor
ipmiutil ver 2.78
isensor: version 2.78
-- BMC version 1.55, IPMI version 2.0
supports device sdrs
_ID_ SDR_Type_xx ET Own Typ S_Num Sens_Description Hex & Interp Reading
0001 SDR Full 01 01 20 a 01 snum 01 CPU 1 Temp = 59 OK -39.00 degrees C
0002 SDR Full 01 01 20 a 01 snum 02 CPU 2 Temp = 56 OK -42.00 degrees C
0003 SDR Full 01 01 20 a 01 snum 03 CPU 3 Temp = 56 OK -42.00 degrees C
0004 SDR Full 01 01 20 a 01 snum 04 CPU 4 Temp = 56 OK -42.00 degrees C
0005 SDR Full 01 01 20 a 01 snum 05 PS 1 Temp = 00 Init 0.00 degrees C
0006 SDR Full 01 01 20 a 01 snum 06 PS 2 Temp = 00 Init 0.00 degrees C
0007 SDR Full 01 01 20 a 01 snum 07 PS 3 Temp = a6 OK 38.00 degrees C
0008 SDR Full 01 01 20 a 01 snum 08 PS 4 Temp = a3 OK 35.00 degrees C
0009 SDR Full 01 01 20 a 01 snum 09 IOR Temp = 9d OK 29.00 degrees C
000a SDR Full 01 01 20 a 01 snum 0c IOH 1 Temp = ab Warn-hi 43.00 degrees
C
000b SDR Full 01 01 20 a 01 snum 0d IOH 2 Temp = b0 Crit-hi 48.00 degrees
C
000c SDR Full 01 01 20 a 01 snum 0e Ambient Temp = 99 OK 25.00 degrees C
000d SDR Full 01 01 20 a 01 snum 0f Planar Temp = a1 OK 33.00 degrees C
000e SDR Full 01 01 20 a 01 snum b0 DIMM Bank A = 9d OK 29.00 degrees C
000f SDR Full 01 01 20 a 01 snum b1 DIMM Bank B = 00 Init 0.00 degrees C
0010 SDR Full 01 01 20 a 01 snum b2 DIMM Bank C = 9c OK 28.00 degrees C
0011 SDR Full 01 01 20 a 01 snum b3 DIMM Bank D = 00 Init 0.00 degrees C
0012 SDR Full 01 01 20 a 01 snum b4 DIMM Bank E = 9c OK 28.00 degrees C
0013 SDR Full 01 01 20 a 01 snum b5 DIMM Bank F = 00 Init 0.00 degrees C
0014 SDR Full 01 01 20 a 01 snum b6 DIMM Bank G = 9c OK 28.00 degrees C
0015 SDR Full 01 01 20 a 01 snum b7 DIMM Bank H = 00 Init 0.00 degrees C
0016 SDR Comp 02 6f 20 a 29 snum 10 CMOS Battery = 0000 OK
0017 SDR Comp 02 6f 20 a 29 snum 11 ROMB Battery = 0000 OK
0018 SDR Comp 02 03 20 a 02 snum 12 VCORE PG = 0001 Crit-hi
0019 SDR Comp 02 03 20 a 02 snum 13 VCORE PG = 0001 Crit-hi
001a SDR Comp 02 03 20 a 02 snum 14 VCORE = 0001 Crit-hi
001b SDR Comp 02 03 20 a 02 snum 15 VCORE = 0001 Crit-hi
001c SDR Comp 02 03 20 a 02 snum 16 VCACHE PG = 0001 Crit-hi
001d SDR Comp 02 03 20 a 02 snum 17 VCACHE PG = 0001 Crit-hi
001e SDR Comp 02 03 20 a 02 snum 18 VCACHE = 0001 Crit-hi
001f SDR Comp 02 03 20 a 02 snum 19 VCACHE = 0001 Crit-hi
0020 SDR Comp 02 03 20 a 02 snum 1a VIO PG = 0001 Crit-hi
0021 SDR Comp 02 03 20 a 02 snum 1b VIO PG = 0001 Crit-hi
0022 SDR Comp 02 03 20 a 02 snum 1c CPU 1.8 PLL PG = 0001 Crit-hi
0023 SDR Comp 02 03 20 a 02 snum 1d 8V Rear PG = 0001 Crit-hi
0024 SDR Comp 02 03 20 a 02 snum 1e 8V Front PG = 0001 Crit-hi
0025 SDR Comp 02 03 20 a 02 snum 1f 5V Rear PG = 0001 Crit-hi
0026 SDR Comp 02 03 20 a 02 snum 20 5V Front PG = 0001 Crit-hi
0027 SDR Comp 02 03 20 a 02 snum 21 3.3V PG = 0001 Crit-hi
0028 SDR Comp 02 03 20 a 02 snum 22 1.8V PG = 0001 Crit-hi
0029 SDR Comp 02 03 20 a 02 snum 23 1.5V PG = 0001 Crit-hi
002a SDR Comp 02 03 20 a 02 snum 24 1.1V PG = 0001 Crit-hi
002b SDR Comp 02 03 20 a 02 snum 25 0.9V PG = 0001 Crit-hi
002c SDR Comp 02 03 20 a 02 snum 26 Mem VR PG = 0001 Crit-hi
002d SDR Comp 02 03 20 a 02 snum 27 Mem VR PG = 0001 Crit-hi
002e SDR Comp 02 03 20 a 02 snum 28 Mem VR PG = 0001 Crit-hi
002f SDR Comp 02 03 20 a 02 snum 29 Mem VR PG = 0001 Crit-hi
0030 SDR Comp 02 03 20 a 02 snum 2a Mem VR PG = 0001 Crit-hi
0031 SDR Comp 02 03 20 a 02 snum 2b Mem VR PG = 0001 Crit-hi
0032 SDR Comp 02 03 20 a 02 snum 2c Mem VR PG = 0001 Crit-hi
0033 SDR Comp 02 03 20 a 02 snum 2d Mem VR PG = 0001 Crit-hi
0034 SDR Comp 02 03 20 a 02 snum 2f VR PG = 0001 Crit-hi
0035 SDR Comp 02 03 20 a 02 snum 2e VR1 PG = 0001 Crit-hi
0036 SDR Comp 02 03 20 a 02 snum a0 VR2 PG = 0001 Crit-hi
0037 SDR Comp 02 03 20 a 01 snum a1 IOH1 THERMTRIP = 0000 OK
0038 SDR Comp 02 03 20 a 01 snum a2 IOH2 THERMTRIP = 0000 OK
0039 SDR Comp 02 03 20 a 02 snum 5f PFault Fail Safe = 0000 Unknown
003a SDR Comp 02 6f 20 a 25 snum 5d Heatsink Pres = 0001 OK*
003b SDR Comp 02 6f 20 a 25 snum 70 iDRAC6 Ent Pres = 0001 OK*
003c SDR Comp 02 6f 20 a 25 snum 59 USB Cable Pres = 0001 OK*
003d SDR Comp 02 6f 20 a 25 snum 5a Stor Adapt Pres = 0001 OK*
003e SDR Comp 02 6f 20 a 25 snum 5b PCIe Riser Pres = 0002 Present
003f SDR Comp 02 6f 20 a 25 snum 5c IO Riser Pres = 0000 NotAvailable
0040 SDR Full 01 01 20 a 04 snum 30 FAN 1 RPM = 1b OK 3240.00 RPM
0041 SDR Full 01 01 20 a 04 snum 31 FAN 2 RPM = 1b OK 3240.00 RPM
0042 SDR Full 01 01 20 a 04 snum 32 FAN 3 RPM = 00 Crit-lo 0.00 RPM
0043 SDR Full 01 01 20 a 04 snum 33 FAN 4 RPM = 1d OK 3480.00 RPM
0044 SDR Full 01 01 20 a 04 snum 34 FAN 5 RPM = 1d OK 3480.00 RPM
0045 SDR Full 01 01 20 a 04 snum 35 FAN 6 RPM = 1d OK 3480.00 RPM
0046 SDR Full 01 01 20 a 04 snum 36 Fan RPM = 00 OK 0.00 RPM
0047 SDR Full 01 01 20 a 04 snum 37 Fan RPM = 00 OK 0.00 RPM
0048 SDR Full 01 01 20 a 04 snum 38 Fan RPM = 10 OK 1920.00 RPM
0049 SDR Full 01 01 20 a 04 snum 39 Fan RPM = 11 OK 2040.00 RPM
004a SDR Comp 02 6f 20 a 25 snum 50 Presence = 0001 OK*
004b SDR Comp 02 6f 20 a 25 snum 51 Presence = 0001 OK*
004c SDR Comp 02 6f 20 a 25 snum 52 Presence = 0001 OK*
004d SDR Comp 02 6f 20 a 25 snum 53 Presence = 0001 OK*
004e SDR Comp 02 6f 20 a 25 snum 54 Presence = 0001 OK*
004f SDR Comp 02 6f 20 a 25 snum 55 Presence = 0001 OK*
0050 SDR Comp 02 6f 20 a 25 snum 56 Presence = 0001 OK*
0051 SDR Comp 02 6f 20 a 25 snum 57 Presence = 0001 OK*
0052 SDR Comp 02 6f 20 a 25 snum 58 Presence = 0001 OK*
0053 SDR Comp 02 6f 20 a 07 snum 60 Status = 0080 ProcPresent
0054 SDR Comp 02 6f 20 a 07 snum 61 Status = 0080 ProcPresent
0055 SDR Comp 02 6f 20 a 07 snum 62 Status = 0080 ProcPresent
0056 SDR Comp 02 6f 20 a 07 snum 63 Status = 0080 ProcPresent
0057 SDR Comp 02 6f 20 a 08 snum 64 Status = 0009 AC_Lost
0058 SDR Comp 02 6f 20 a 08 snum 65 Status = 0009 AC_Lost
0059 SDR Comp 02 6f 20 a 08 snum 66 Status = 0001 Present
005a SDR Comp 02 6f 20 a 08 snum 67 Status = 0001 Present
005b SDR Full 01 01 20 a 03 snum 94 Current = 00 Unknown 0.00 Requested
sensor, data, or record not present
005c SDR Full 01 01 20 a 03 snum 95 Current = 00 Unknown 0.00 Requested
sensor, data, or record not present
005d SDR Full 01 01 20 a 03 snum 9a Current = 20 OK 1.28 Amps
005e SDR Full 01 01 20 a 03 snum 9b Current = 1e OK 1.20 Amps
005f SDR Full 01 01 20 a 02 snum 96 Voltage = 00 Unknown 0.00 Requested
sensor, data, or record not present
0060 SDR Full 01 01 20 a 02 snum 97 Voltage = 00 Unknown 0.00 Requested
sensor, data, or record not present
0061 SDR Full 01 01 20 a 02 snum 9c Voltage = 61 OK 194.00 Volts
0062 SDR Full 01 01 20 a 02 snum 9d Voltage = 61 OK 194.00 Volts
0063 SDR Comp 02 6f 20 a 1b snum 68 Riser Config = 0001 _
0064 SDR Comp 02 6f 20 a 23 snum 71 OS Watchdog = 0000 OK
0065 SDR Comp 02 6f 20 a 10 snum 72 SEL = 0000 Unknown
0066 SDR Comp 02 6f 20 a 05 snum 73 Intrusion = 0001 ChassisIntrus
0067 SDR Comp 02 0b 20 a 08 snum 74 PS Redundancy = 0040 NotAvailable
0068 SDR Comp 02 0b 20 a 04 snum 75 Fan Redundancy = 0002 RedunLost
0069 SDR Full 01 01 20 a 03 snum 98 System Level = 2e OK 460.00 Watts
006a SDR Comp 02 6f 20 a c0 snum 99 Power Optimized = 0001 Enabled
006b SDR Comp 02 6f 20 a 0d snum 80 Drive = 0001 Absent
006c SDR Comp 02 6f 20 a 0d snum 8f Drive 15 = 0000 Unused
006d SDR Comp 02 6f 20 a 1b snum 90 Cable SAS A = 0001 _
006e SDR Comp 02 6f 20 a 1b snum 91 Cable SAS B = 0001 _
006f SDR Comp 02 70 20 a 15 snum d0 SD1 Status = 0000 _
0070 SDR Comp 02 70 20 a 15 snum d1 SD2 Status = 0000 _
0071 SDR Comp 02 0b 20 a 15 snum d2 SD Redundancy = 0001 _
0072 SDR Comp 02 70 20 a 15 snum d3 VFlash Media = 0000 _
0073 SDR Full 01 01 20 a 01 snum b8 Mem Rsr A Temp = 9f OK 31.00 degrees C
0074 SDR Full 01 01 20 a 01 snum b9 Mem Rsr B Temp = 00 Init 0.00 degrees C
0075 SDR Full 01 01 20 a 01 snum ba Mem Rsr C Temp = 9f OK 31.00 degrees C
0076 SDR Full 01 01 20 a 01 snum bb Mem Rsr D Temp = 00 Init 0.00 degrees C
0077 SDR Full 01 01 20 a 01 snum bc Mem Rsr E Temp = 9e OK 30.00 degrees C
0078 SDR Full 01 01 20 a 01 snum bd Mem Rsr F Temp = 00 Init 0.00 degrees C
0079 SDR Full 01 01 20 a 01 snum be Mem Rsr G Temp = 9f OK 31.00 degrees C
007a SDR Full 01 01 20 a 01 snum bf Mem Rsr H Temp = 00 Init 0.00 degrees C
007b SDR Full 01 01 20 a 01 snum c0 MB A-A Temp = 98 OK 24.00 degrees C
007c SDR Full 01 01 20 a 01 snum c1 MB A-B Temp = 99 OK 25.00 degrees C
007d SDR Full 01 01 20 a 01 snum c2 MB B-A Temp = 00 Init 0.00 degrees C
007e SDR Full 01 01 20 a 01 snum c3 MB B-B Temp = 00 Init 0.00 degrees C
007f SDR Full 01 01 20 a 01 snum c4 MB C-A Temp = 96 OK 22.00 degrees C
0080 SDR Full 01 01 20 a 01 snum c5 MB C-B Temp = 98 OK 24.00 degrees C
0081 SDR Full 01 01 20 a 01 snum c6 MB D-A Temp = 00 Init 0.00 degrees C
0082 SDR Full 01 01 20 a 01 snum c7 MB D-B Temp = 00 Init 0.00 degrees C
0083 SDR Full 01 01 20 a 01 snum c8 MB E-A Temp = 93 OK 19.00 degrees C
0084 SDR Full 01 01 20 a 01 snum c9 MB E-B Temp = 98 OK 24.00 degrees C
0085 SDR Full 01 01 20 a 01 snum ca MB F-A Temp = 00 Init 0.00 degrees C
0086 SDR Full 01 01 20 a 01 snum cb MB F-B Temp = 00 Init 0.00 degrees C
0087 SDR Full 01 01 20 a 01 snum cc MB G-A Temp = 98 OK 24.00 degrees C
0088 SDR Full 01 01 20 a 01 snum cd MB G-B Temp = 98 OK 24.00 degrees C
0089 SDR Full 01 01 20 a 01 snum ce MB H-A Temp = 00 Init 0.00 degrees C
008a SDR Full 01 01 20 a 01 snum cf MB H-B Temp = 00 Init 0.00 degrees C
008b SDR Comp 02 03 20 a 02 snum a3 10G Power = 0001 Crit-hi
008c SDR Comp 02 01 20 a 01 snum ab VCORE Temp = 0000 Unknown
008d SDR Comp 02 01 20 a 01 snum ac VCACHE Temp = 0000 Unknown
008e SDR Comp 02 01 20 a 01 snum ad Mem VR Temp = 0000 Unknown
008f SDR Comp 02 03 20 a 01 snum ae Critical Cooling = 0000 Unknown
0090 SDR Comp 02 03 20 a 02 snum af Sys Pwr Draw = 0000 Unknown
0091 SDR IPMB 12 11 dev: 20 00 df 07 01 iDRAC6
0092 SDR FRU 11 17 dev: 20 00 80 00 07 01 System Board
0093 SDR FRU 11 0f dev: 20 b0 02 00 03 01 CPU1
0094 SDR FRU 11 0f dev: 20 b0 02 00 03 02 CPU2
0095 SDR FRU 11 0f dev: 20 b0 02 00 03 03 CPU3
0096 SDR FRU 11 0f dev: 20 b0 02 00 03 04 CPU4
0097 SDR FRU 11 0f dev: 20 02 80 00 0a 01 PS 1
0098 SDR FRU 11 0f dev: 20 03 80 00 0a 02 PS 2
0099 SDR FRU 11 0f dev: 20 04 80 00 0a 03 PS 3
009a SDR FRU 11 0f dev: 20 05 80 00 0a 04 PS 4
009b SDR FRU 11 12 dev: 20 06 80 00 1a 03 Storage
009c SDR FRU 11 12 dev: 20 07 80 00 1a 01 Storage
009d SDR FRU 11 13 dev: 20 08 02 00 10 01 IO Riser
009e SDR FRU 11 16 dev: 20 09 02 00 08 01 Mem Riser A
009f SDR FRU 11 16 dev: 20 0a 02 00 08 02 Mem Riser B
00a0 SDR FRU 11 16 dev: 20 0b 02 00 08 03 Mem Riser C
00a1 SDR FRU 11 16 dev: 20 0c 02 00 08 04 Mem Riser D
00a2 SDR FRU 11 16 dev: 20 0d 02 00 08 05 Mem Riser E
00a3 SDR FRU 11 16 dev: 20 0e 02 00 08 06 Mem Riser F
00a4 SDR FRU 11 16 dev: 20 0f 02 00 08 07 Mem Riser G
00a5 SDR FRU 11 16 dev: 20 10 02 00 08 08 Mem Riser H
00a6 SDR FRU 11 15 dev: 20 b0 02 00 10 02 PCIe Riser
00a7 SDR FRU 11 0b dev: 20 b0 02 00 0b 01
00a8 SDR FRU 11 0b dev: 20 b0 02 00 0b 02
00a9 SDR Comp 02 6f b1 a 0c snum 01 ECC Corr Err = 0000 Unknown
00aa SDR Comp 02 6f b1 a 0c snum 02 ECC Uncorr Err = 0000 Unknown
00ab SDR Comp 02 6f b1 a 13 snum 03 I/O Channel Chk = 0000 Unknown
00ac SDR Comp 02 6f b1 a 13 snum 04 PCI Parity Err = 0000 Unknown
00ad SDR Comp 02 6f b1 a 13 snum 05 PCI System Err = 0000 Unknown
00ae SDR Comp 02 6f b1 a 10 snum 06 SBE Log Disabled = 0000 Unknown
00af SDR Comp 02 6f b1 a 10 snum 07 Logging Disabled = 0000 Unknown
00b0 SDR Comp 02 6f b1 a 12 snum 08 Unknown = 0000 Unknown
00b1 SDR Comp 02 07 b1 a 07 snum 0a CPU Protocol Err = 0000 Unknown
00b2 SDR Comp 02 07 b1 a 07 snum 0b CPU Bus PERR = 0000 Unknown
00b3 SDR Comp 02 07 b1 a 07 snum 0c CPU Init Err = 0000 Unknown
00b4 SDR Comp 02 07 b1 a 07 snum 0d CPU Machine Chk = 0000 Unknown
00b5 SDR Comp 02 0b b1 a 0c snum 11 Memory Spared = 0000 Unknown
00b6 SDR Comp 02 0b b1 a 0c snum 12 Memory Mirrored = 0000 Unknown
00b7 SDR Comp 02 0b b1 a 0c snum 13 Memory RAID = 0000 Unknown
00b8 SDR Comp 02 6f b1 a 0c snum 14 Memory Added = 0000 Unknown
00b9 SDR Comp 02 6f b1 a 0c snum 15 Memory Removed = 0000 Unknown
00ba SDR Comp 02 6f b1 a 0c snum 16 Memory Cfg Err = 0000 Unknown
00bb SDR Comp 02 0b b1 a 0c snum 17 Mem Redun Gain = 0000 Unknown
00bc SDR Comp 02 6f b1 a 13 snum 18 PCIE Fatal Err = 0000 Unknown
00bd SDR Comp 02 6f b1 a 13 snum 19 Chipset Err = 0000 Unknown
00be SDR Comp 02 7e b1 a c1 snum 1a Err Reg Pointer = 0000 Unknown
00bf SDR Comp 02 07 b1 a 0c snum 1b Mem ECC Warning = 0000 Unknown
00c0 SDR Comp 02 07 b1 a 0c snum 1c Mem CRC Err = 0000 Unknown
00c1 SDR Comp 02 07 b1 a 0c snum 1d USB Over-current = 0000 Unknown
00c2 SDR Comp 02 6f b1 a 0f snum 1e POST Err = 0000 Unknown
00c3 SDR Comp 02 6f b1 a 2b snum 1f Hdwr version err = 0000 Unknown
00c4 SDR Comp 02 6f b1 a 0c snum 20 Mem Overtemp = 0000 Unknown
00c5 SDR Comp 02 6f b1 a 0c snum 21 Mem Fatal SB CRC = 0000 Unknown
00c6 SDR Comp 02 6f b1 a 0c snum 22 Mem Fatal NB CRC = 0000 Unknown
00c7 SDR Comp 02 6f b1 a 11 snum 23 OS Watchdog Time = 0000 Unknown
00c8 SDR Comp 02 6f b1 a c2 snum 26 Non Fatal PCI Er = 0000 Unknown
00c9 SDR Comp 02 6f b1 a c3 snum 27 Fatal IO Error = 0000 Unknown
00ca SDR Comp 02 6f b1 a c1 snum 28 MSR Info Log = 0000 Unknown
00cb SDR Comp 02 6f b1 a c2 snum 29 Non Fatal QPI Er = 0000 Unknown
00cc SDR Comp 02 6f b1 a c8 snum 30 QPIRC Warning = 0000 Unknown
00cd SDR Comp 02 6f b1 a c8 snum 31 MRC Non Fatal Er = 0000 Unknown
00ce SDR Comp 02 6f b1 a c8 snum 32 MRC SMI LFO = 0000 Unknown
00cf SDR Comp 02 6f b1 a c8 snum 33 MRC Warning = 0000 Unknown
00d0 SDR EntA 08 10 07 01 c0: 03 01 03 04 0a 01 0a 04
00d1 SDR EntA 08 10 07 01 c0: 10 01 10 02 08 01 08 08
00d2 SDR EntA 08 10 10 01 c0: 0b 01 0b 02 00 00 00 00
ipmiutil sensor, completed successfully
2011年8月29日
#
1.下载ow2-jotm-dist-2.2.1
2.把jotm所有的jar放到Tomcat/lib下
3.创建文件carol.properties
# # JNDI (Protocol Invocation)
carol.protocols=jrmp
# Local RMI Invocation
carol.jvm.rmi.local.call=true
# do not use CAROL JNDI wrapper
carol.start.jndi=false
# do not start a name server
carol.start.ns=false
# Naming Factory
carol.jndi.java.nameing.factory.url.pkgs=org.apache.nameing
4.修改数据源配置文件
<?xml version='1.0' encoding='utf-8'?>
<Context path="/xflow" debug="0" reloadable="false" docBase="D:\workspace\xflow\WebRoot\">
<Resource name="jdbc/afunms"
auth="Container"
type="javax.sql.DataSource"
factory="org.objectweb.jotm.datasource.DataSourceFactory"
driverClassName="com.mysql.jdbc.Driver"
username="root"
password="root"
url="jdbc:mysql://localhost:3306/netflow?useUnicode=true&characterEncoding=utf-8" />
<Resource name="UserTransaction"
auth="Container"
type="javax.transaction.UserTransaction" />
<Transaction factory="org.objectweb.jotm.UserTransactionFactory"
jotm.timeout="60" />
</Context>
5.java代码这样写:
Context ctx = new InitialContext();
DataSource ds = (DataSource)ctx.lookup("java:comp/env/jdbc/afunms");
UserTransaction ut = (UserTransaction)ctx.lookup("java:comp/UserTransaction");