实例(参考了 axis-bin-1_4.zip "axis-1_4"samples"userguide 中的例子)使用版本为Axis1.4, axis-bin-1_4.zip 下载地址:
http://www.apache.org/dist/ws/axis/1_4/
工程axis_example目录结构如下:
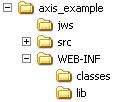
目录说明如下:
jws :存放*.jws文件
src :java源码
WEB-INF/classes :java编译后的class文件
WEB-INF/lib :需要用到的jar包
Axis 支持三种web service开发方式,分别为:
1 、Dynamic Invocation Interface ( DII)
2 、Dynamic Proxy方式
3 、Stubs方式
通过下面三个例子进行说明。
在开始例子前,把
① axis-bin-1_4.zip "axis-1_4"lib 下的所有包拷贝到axis_example/WEB-INF/lib目录下,
② axis-bin-1_4.zip "axis-1_4"webapps"axis"WEB-INF 下的web.xml文件拷贝到axis_example/WEB-INF目录下。
实例1(DII)步骤 :
1. 在axis_example /src 下 新建一MyServic.java文件,内容为:
public class MyService {
public String processService(String arg){
return arg;
}
}
2. 无需编译 (编译由axis进行),拷贝MyServic.java到axis_example/jws目录下,更改文件名为MyService.jws
3. 在axis_example/src新建一Client.java文件,内容为:
import org.apache.axis.client.Call;
import org.apache.axis.client.Service;
import javax.xml.namespace.QName;
import javax.xml.rpc.ServiceFactory;
import java.net.URL;
public class Client {
public static void main(String [] args) throws Exception {
// 指出service所在URL
String endpoint = "http://localhost:" + "8081" + "/axis_example/jws/MyService.jws";
// 创建一个服务(service)调用(call)
Service service = new Service();
Call call = (Call) service.createCall();// 通过service创建call对象
// 设置service所在URL
call.setTargetEndpointAddress(new java.net.URL(endpoint));
// 方法名(processService)与MyService.java方法名保持一致
call.setOperationName("processService");
// Object 数组封装了参数,参数为"This is Test!",调用processService(String arg)
String ret = (String) call.invoke(new Object[]{"This is Test!"});
System.out.println(ret);
}
}
4. axis_example 工程放入tomcat/webapps,启动tomcat。
5. 编译Client.java,运行其中的main方法进行测试,可以看到屏幕打印出:"This is Test!",可以看到axis_example/WEB-INF目录下生jwsClasses/jws/MyService.class文件——axis会根据你访问时的endpoint,自动编译其中的*.jws文件,并置于生成的jwsClasses相应目录下。
(通过http://localhost:8081/axis_example/jws/MyService.jws?wsdl可以查看生成的WSDL文件——SOAP服务描述文件)
注1: 在上面的 new Object[]{"This is Test!"} 语句中,只传递了一个参数。如果MyServic.java中
processService(String arg) 改写为
processService(String arg,String arg2)
你可以通过new Object[]{"test","test2"}传递多个参数。
注2: 启动tomcat 后控制台出现下面警告:
- Unable to find required classes (javax.activation.DataHandler and javax.mail.i
nternet.MimeMultipart). Attachment support is disabled.
这是因为缺少activation.jar和mail.jar(本文中的实例可以忽略此警告)。
activation.jar (目前版本为1.1)下载地址
http://java.sun.com/products/javabeans/jaf/downloads/index.html
mail.jar (目前版本为1.4)下载地址
http://java.sun.com/products/javamail/downloads/
实例2(Dynamic Proxy)步骤 :
1. 在axis_example /src 下 新建一MyServiceInterface.java文件,内容为:
import java.rmi.Remote;
import java.rmi.RemoteException;
public interface MyServiceInterface extends Remote {
public String processService(String arg) throws RemoteException;
}
编译 MyServiceInterface.java
2. 修改axis_example /src 下 的MyServic.java文件,把类声明
public class MyService
改为
public class MyService implements MyServiceInterface
3. 无需编译,拷贝MyServic.java到axis_example/jws目录下,更改文件名为MyService.jws
4. 更改axis_example/src/Client.java中的main方法,内容为:
public static void main(String [] args) throws Exception {
String wsdlUrl = "http://localhost:8081/axis_example/jws/MyService.jws?wsdl";
String nameSpaceUri = "http://localhost:8081/axis_example/jws/MyService.jws";
String serviceName = "MyServiceService";
ServiceFactory serviceFactory = ServiceFactory.newInstance();
javax.xml.rpc.Service service = serviceFactory.createService(new URL(wsdlUrl), new QName(nameSpaceUri, serviceName));
MyServiceInterface proxy = (MyServiceInterface)
service.getPort(new QName(nameSpaceUri, portName), MyServiceInterface.class);
System.out.println("This is " + proxy.processService("Dynamic Proxy test!"));
}
5. axis_example 工程放入tomcat/webapps,启动tomcat。
6. 编译Client.java,运行其中的main方法进行测试,可以看到屏幕打印出:" This is Dynamic Proxy test!" 。
实例3(Stubs)步骤 :
1. 在axis_example/src下新建一MyServic.java文件,内容为:
public class MyService {
public String processService(String arg){
return arg;
}
}
编译 MyServic.java
2. 在新建一deploy.wsdd(可参考 axis-bin-1_4.zip "axis-1_4"samples 中的deploy.wsdd)文件,内容为:
<deployment xmlns="http://xml.apache.org/axis/wsdd/"
xmlns:java="http://xml.apache.org/axis/wsdd/providers/java">
<service name="MyService" provider="java:RPC">
<parameter name="className" value="MyService"/>
<parameter name="allowedMethods" value="processService"/>
</service>
</deployment>
3. 启动tomcat
4. 在axis_example/WEB-INF目录下执行:
java -Djava.ext.dirs=lib org.apache.axis.client.AdminClient -lhttp://localhost:8081/axis_example/servlet/AxisServlet deploy.wsdd
执行后可看到在axis_example/WEB-INF目录下生成server-config.wsdd文件。
5. 重新启动tomcat ,以便加载 server-config.wsdd 文件。
6. 更改axis_example/src/Client.java中的main方法,内容为:
public static void main(String [] args) throws Exception {
// 指出service所在URL
String endpoint = "http://localhost:" + "8081" + "/axis_example/services/MyService";
// 创建一个服务(service)调用(call)
Service service = new Service();
Call call = (Call) service.createCall();// 通过service创建call对象
// 设置service所在URL
call.setTargetEndpointAddress(new java.net.URL(endpoint));
// 方法名(processService)与MyService.java方法名保持一致
call.setOperationName("processService");
// Object 数组封装了参数,参数为"This is Test!",调用processService(String arg)
String ret = (String) call.invoke(new Object[]{"This is Test!"});
System.out.println(ret);
}
注: 在这里可以看出, DII 方式安全性不高(url MyService.jws为axis自动生成),且无法进行一些复杂的配置, Dynamic Invocation Interface(DII) 和 Stubs 方式的区别主要有两个地方:
① 两种不同的 endpoint ,
DII :http://localhost:8081/axis_example/jws/MyService.jws
Stubs :http://localhost:8081/axis_example/services/MyService
② 两种不同的编译方式
DII :根据endpoint访问web service时,axis自动编译endpoint指定的*.jws文件,并放在生成的WEB-INF/jwsClasses目录下。
Stubs :手工编译java文件,手工编写server-config.wsdd配置文件(这里可以编写deploy.wsdd,用axis提供的java -Djava.ext.dirs=lib org.apache.axis.client.AdminClient -lhttp://localhost:8081/axis_example/servlet/AxisServlet deploy.wsdd
命令生成server-config.wsdd文件中的其他通用部分)
而Dynamic Proxy方式仅仅在DII的基础上采用了代理机制,实际上和DII区别不大,。
7. 编译Client.java,运行其中的main方法进行测试,可以看到屏幕打印出:" This is Dynamic Proxy test!"
(通过http://localhost:8081/axis_example/services/MyService?wsdl可以查看生成的WSDL文件——SOAP服务描述文件)
附 :
axis 提供了wsdl2java工具,web service服务器端提供了一个地址,可以访问到WSDL文件,wsdl2java工具格式为:java org.apache.axis.wsdl.WSDL2Java [options] WSDL-URI
采用DII方式,可以使用
java -Djava.ext.dirs= E:"project"axis_example"WEB-INF"lib org.apache.axis.wsdl.WSDL2Java http://localhost:8081/axis_example/jws/MyService.jws?wsdl -p test.mytest -o E:"project"axis_example"src
生成相应的客户端java文件。
采用Stubs方式,可以使用
java -Djava.ext.dirs= E:"project"axis_example"WEB-INF"lib org.apache.axis.wsdl.WSDL2Java http://localhost:8081/axis_example/services/MyService?wsdl -p test.mytest -o E:"project"axis_example"src
生成相应的客户端java文件。
参数
-p 指定生成的java文件包名
-o 指定生成的java文件输出目录
如果不指定包名,axis会根据命令参数 WSDL-URI 生成相应的包名,如localhost"axis_example"jws"MyService_jws
上述命令会在 E:"project"axis_example"src"test"mytest 目录下生成四个文件:
MyServiceSoapBindingStub.java (相当于上面的MyService.java)
MyService_PortType.java (相当于上面的MyServiceInterface.java)
MyServiceService.java/MyServiceServiceLocator.java (Service Locator模式,隐藏了具体的业务逻辑)
编写junit单元测试,在axis_example"src"test"mytest下新建一TestClient.java文件(拷贝junit.jar包到axis_example/WEB-INF目录下),内容为:
package test.mytest;
import junit.framework.TestSuite;
import junit.framework.TestCase;
import junit.framework.Test;
public class TestClient extends TestCase {
public TestClient(String string) {
super(string);
}
public void MyServiceClient() throws Exception {
MyServiceService service = new MyServiceServiceLocator();
MyService_PortType client = service.getMyService() ;
String ret = client.processService("This is Junit Test!");
System.out.println(ret);
}
public static Test suite() {
TestSuite suite = new TestSuite();
suite.addTest(new TestClient("MyServiceClient"));
return suite;
}
}
8. 编译上面四个service文件,并编译运行 TestClient.java ,看到屏幕打印出:" This is Junit Test!"
名称: ♪4C.ESL | .↗Evon
口号: 遇到新问题♪先要寻找一个方案乄而不是创造一个方案こ
mail: 联系我