
同样,经过不断的摸索和网友的帮助,终于搞定了:),主要的问题还是出在我的服务器上的原因,不知道为什么,我的服务器上部署了sqlite3.0导致apache2.2.6始终无法运行,总是提示找不到"libsqlite3.so.0",不得以,只能换台服务器测试,轻松搞定,现将过程描述如下,一共参考:
一.安装apache2.2.6
1. tar fvxz httpd-2.2.2.tar.gz
2. 进入解压后的目录。进行配置:
./configure --prefix=/usr/apache --enable-module=so --enable-proxy --enable-proxy-ajp --enable-forward --enable-proxy-connect --enable-proxy-http --enable-so --enable-deflate --enable-headers --enable-include
解释:
-- prefix=/usr/apache是配置将要安装到的目录位置;
--enable-module=so配置Apache支持Dynamic Shared Objects (DSO)模式;
--enable-* 配置添加相应的模块;
3. 编译(编译如果不成功,确认一下你的linux是否安装有编译所需要的c环境和其他需要的类库):
make
4. 安装:
make install
5. 编辑/usr/apache/conf/httpd.conf文件,把端口改为80(别跟tomcat的端口冲突):
ServerName:80
二、安装tomcat5.5.17
直接解压压缩包到指定目录就可以,再次就不多少说了(当然,最好在进行以上两项操作前先按装好jdk,1.5或以上版本)
三、简单的apche2.2.6+tomcat5.5.17配置说明:
使用使用proxy_ajp整合apache和tomcat,由于Apache2.2对以往版本有较大改动,引进了proxy
模块,所以Apache2.2和Tomcat5.5的配置需要用到mod_proxy.so等文件(不再使用jk 或 jk2 等tomcat连接器)
.基本配置如下:
(一)加载解析模块
windows下,或linux采用动态加载(DSO)模式下需配置。前面我们的linux编译时把下面的模块嵌入到了 apache中,所以不用再加载,因此下面的两行也不用再httpd.conf文件中添加了
LoadModule proxy_module modules/mod_proxy.so
LoadModule proxy_ajp_module
modules/mod_proxy_ajp.so
(二)使用proxy_ajp代理, 下面的配置,是把所有目录全用代理
使用vi编辑器打开apache的配置文件/conf/httpd.conf,在#LoadModule××××××行的后面添加 以下两行即可:
ProxyPass / ajp://127.0.0.1:8009/
ProxyPassReverse /
ajp://127.0.0.1:8009/
(三)禁止使用proxy_ajp代理的目录:
如果对于某些目录不想使用proxy_ajp代理转发,可以按照如下配置(配置方式同上面(二)的操 作):
ProxyPass /images/ !
(禁止images目录下的内容使用proxy_ajp代理转发)
配置到现在,重启一下apache,就可通过apache来访问tomcat的服务了。
特别鸣谢:http://groups.csdn.net/Apache/topic/b70ad273-f66f-4699-83c0-e11d354d262a.aspx
posted @
2007-12-24 18:03 雪地孤鸿 阅读(993) |
评论 (1) |
编辑 收藏exp user1/psw1@service1 owner=user1 file=d:\user_data_20060822.dmp log = d:\user_logout_20060822.log
imp user2/psw2@service2 file=d:\user_data_20060822.dmp log =d:\user_login_20060822.log fromuser=user1 touser=user2
posted @
2007-08-03 14:02 雪地孤鸿 阅读(344) |
评论 (0) |
编辑 收藏
现在安装netbeans 5.5默认的UI 语言为中文,如果需要修改为中文,只需在netbeans的安装目录中进行适当的设置就可以了:
1.进入$netbeans/etc
2.使用文本编辑器打开netbeans.conf.
3.在“netbeans_default_options”项后添加“--locale language=en”。
4.重启netbeans即可见到e文的netbeans 的UI
以上的设置在windows xp下测试通过,在linux的下的设置类似。
posted @
2007-07-15 15:17 雪地孤鸿 阅读(1066) |
评论 (1) |
编辑 收藏
在部署roller3.0的源代码的时候,每次启动tomcat后访问首页的时候就报错,提示找不到c.tld,但是standard.jar和jstl.jar都以放到lib目录下了,郁闷之极,最后发现是因为在lib下放了一个jsp-api.jar的包导致的
,只要将该包从lib下移除即可了,在此感谢网络上不吝赐教的朋友们:)
posted @
2006-12-04 15:27 雪地孤鸿 阅读(2354) |
评论 (3) |
编辑 收藏1.首先是去下载rller2.3的源代码文件,下载地址:http://rollerweblogger.org/
由于roller采用了xdoclet,所以在下载的源代码中有些内容是没有的,主要缺少的内容如下:
(1)package org.roller.presentation.forms
(2)src下缺少相关的hbm文件
(3)version.properties
(4)roller.tld
2.由于缺少以上的东西,导致源代码导入工程后,编译都不能通过。我不是太懂xdoclet的使用,所以只好缺什么,就给他什么了,尽量满足他的要求了。在roller-src(roller2.3解压后的文件)下有ant的脚本,所以我猜想,通过脚本,一定可以生成所有缺少的文件,事实也确实如此,只是在使用ant脚本生成roller web的过程也是坎坷的:),主要是应为roller开发小组为了省事,把一些开源的第三方包给去掉了,所以需要自己给补上。不然就会生成不成功。现记录如下:
(1)加上hibernate3.2.1.jar
在/roller/src/tools目录下建立/hibernate-3.1/lib文件夹,将hibernate3.jar文件copy到该目录下面
(2)加上j2ee.jar
将j2ee.jar(或jboss-j2ee.jar)copy到/roller-src/tools/buildtime/xdoclet-1.2.3/文件夹下
(3)添加javamail的相关包:mail.jar,actiivation.jar
将mail.jar,activation.jar copy到/roller-src/tools/lib目录下面。
然后在windows下进入roller-src目录,使用下面命令即可生成roller web,同时可以生成以上缺省的文件:
> build all
然后就可以在roller-src/build目录寻找你需要的文件,同时也有发布好的roller web了
roller2.3的安装发布可以参考roller官方发布的安装文档即可。
大功告成,可以开始学习和修改roller2.3的源码了!:)
posted @
2006-11-01 15:28 雪地孤鸿 阅读(1029) |
评论 (1) |
编辑 收藏linux+php5.1.6+mysql5.0.2+apache2.0.55安装配置说明:
一、mysql5.0.2的安装配置过程及说明:
1、 #tar -zvxf mysql-5.0.2-alpha.tar.gz
2、 cd mysql5.0.2
3、 ./configure --prefix=/usr/local/mysql --sysconfdir=/etc --localstatedir=/var/lib/mysql --with-charset=gbk
#--prefix=/usr/local/mysql mysql安装的目标目录
#sysconfdir=/etc my.ini配置文件的路径
#localstatedir=/var/lib/mysql 数据库存放的路径
#--with-charset=gbk 数据库默认的字符集(如果需要支持中文,则必须加上该选项)
4、make
5、make install
6、make clean
安装完成......
7、初始化数据库
cd /usr/local/mysql/bin
./mysql_install_db
如果系统没有mysql这个用户的话,最好做以下这步:
useradd -M -o -r -d /var/lib/mysql -s /bin/bash -c "MySQL Server" -u 27 mysql
然后我启动mysql
/usr/local/mysql/bin/mysqld_safe &
ok,先看看mysql能否正常工作
mysql -uroot mysql
如果一切正常则表示数据库启动成功,恭喜你了... ...
8、做完上面的步骤,然后把你编译目录的一个脚本COPY过去
(mysql.server在/usr/local/mysql/share/mysql/目录下)
cp support-files/mysql.server /etc/rc.d/init.d/mysqld
chkconfig --add mysqld
以后启动/停止数据库就可以使用下面的命令:
/etc/rc.d/init.d/mysqld start
/etc/rc.d/init.d/mysqld stop
二、apache20.55的安装配置说明:(DSO动态编译)
# tar -zvxf httpd-2.0.55.tar.gz
# cd httpd-2.0.55
# ./configure --prefix=/usr/local/apache2 --enable-mods-shared=most --enable-so
# make
# make install
# make clean
apache2安装完成,可以启动apache,看看能否看到那可爱的羽毛... ...
三、php5的安装配置说明:
在安装php5的过程中,真是一波三折,后来还是参考了网上的文章,加载了N多的库才搞定,所以这记录如下
1、 libxml2安装
源代码:libxml2-2.6.26.tar.gz
操作指令:
# tar -zxvf libxml2-2.6.26.tar.gz
# cd libxml2-2.6.26
# ./configure
# make
# make install
# make clean
2、zlib安装
源代码:zlib-1.2.3.tar.tar
操作指令:
# tar -zxvf zlib-1.2.3.tar.tar
# cd zlib-1.2.3
# ./configure
# make
# make install
# make clean
3、libpng安装
源代码:libpng-1.2.12.tar.gz
操作指令:
# tar -zxvf libpng-1.2.12.tar.gz
# cd libpng-1.2.12
# cp scripts/makefile.std makefile
编辑 makefile 将 prefix 改为 prefix=/usr/local/libpng2
# make
# mkdir /usr/local/libpng2
# make install
# make clean
4、jpeg安装
源代码:jpegsrc.v6b.tar.tar
操作指令:
# tar -zxvf jpegsrc.v6b.tar.tar
# cd jpeg-6b
# ./configure --prefix=/usr/local/jpeg6 --enable-shared
# make
# mkdir /usr/local/jpeg6
# mkdir /usr/local/jpeg6/include
# mkdir /usr/local/jpeg6/lib
# mkdir /usr/local/jpeg6/bin
# mkdir /usr/local/jpeg6/man
# mkdir /usr/local/jpeg6/man/man1
# make install-lib
# make install
# make clean
5、GD安装
源代码:gd-2.0.33.tar.gz
操作指令:
# tar -zxvf gd-2.0.33.tar.gz
# cd gd-2.0.33
# ./configure --prefix=/usr/local/gd2 --with-zlib --with-png=/usr/local/libpng2 --with-jpeg=/usr/local/jpeg6
编辑 Makefile 231行 将
CPPFLAGS = -I/usr/local/jpeg6/include (该选项也可能为空,只要参考下面的修改就可以了)
改为
CPPFLAGS = -I/usr/local/jpeg6/include -I/usr/local/libpng2/include
# make
# make install
# make clean
6、libiconv安装
源代码:libiconv-1.9.2.tar.gz
操作指令:
# tar -zxvf libiconv-1.9.2.tar.gz
# cd libiconv-1.9.2
# ./configure --prefix=/usr/local/libiconv
# make
# make install
# make clean
将iconv.h连接到php的安装源程序中(php的安装源程序必须要和iconv.h在同一磁盘目录下面,否则link会出错),否则会php make会出错
# cd /usr/home/ty/php-5.1.6/ext/iconv/(该目录为php的安装源程序目录)
#这里的php-5.1.6就是下面解压缩的路径
# link /usr/local/libiconv/include/iconv.h iconv.h
7、开始安装PHP5
源代码:php-5.1.6.tar.gz
操作指令:
# tar -zxvf php-5.1.6.tar.gz
# cd php-5.1.6
# ./configure --prefix=/usr/local/php --with-apxs2=/usr/local/apache2/bin/apxs --with-xml --with-mysql=/usr/local/mysql --with-zlib --with-jpeg-dir=/usr/local/jpeg6 --with-png-dir=/usr/local/libpng2 --with-iconv=/usr/local/libiconv --with-config-file-path=/usr/local/lib --disable-debug --enable-safe-mode --enable-trans-sid --enable-memory-limit --enable-short-tags --disable-posix --enable-exif --enable-ftp --enable-sockets
# make
# make install
# make clean
# cp /usr/src/php-5.1.6/php.ini-dist /usr/local/lib/php.ini
php安装完成 ... ...
8、把php加到apache里去
操作指令:
# vi /usr/local/apache2/conf/httpd.conf
(1)在httpd.conf文件相应的地方添加下面几行(如果在安装php5时,有的配置可以已经加上了,就不需要再重新添加了)
LoadModule php5_module modules/libphp5.so
AddType application/x-httpd-php .php
在DirectoryIndex index.html index.html.var 后面添加index.php
配置完成... ...
四、测试
然后放个info.php文件上去测试看看成功
vi /usr/local/apache2/htdocs/test.php
输入以下代码,保存。
<?
phpinfo();
?>
然后启动apache,访问http://your ip(or your website)/info.php
如果能够看看php的相关信息,恭喜你,你的所有的配置成功了。!
以上的配置,一共花了我将经两天的时间,终于成功了,衷心的感谢网上无偿提供帮助的朋友,在此记录下来,希望对其他人也能提供一定的帮助!
时隔多日,重新安装apache2.2.11+php5.2.9+mysql6.0
三个应用的安装基本没有太大的变化,只是更加友好了:),关键是配置让我花了点时间,很是郁闷,几天没有关注,事情就变样了。IT界发展的就是快啊:),下面就详细说说配置中遇到的问题吧:
一、apache2.2.11配置
相对以前的版本,apache的配置文件分成了多个配置文件,本想配置一个vhost,但是在httpd.conf中就是没有找到,最后G了一下才发现,虚拟主机的配置已经被单独为一个配置文件了。在httpd.conf文件中去掉“Include conf/extra/httpd-vhosts.conf”该行前面的注释,让后进入conf/extra目录,打开httpd-vhosts.conf进行配置即可。
二、mysql6.0的安装:
由于mysql已经被sun收购,发布方式也有所变化了,目前官方网站上提供的了都是rpm的安装方式,及其方便:rpm -ivh ***.rpm即可。但是和以前自己编译的方式有点不一样,需要安装server,client,MySQL-devel-community-6.0.9-0.rhel5.x86_64.rpm,有可能还要share包。不然在和php结合使用时会有问题。
三、php5.2.9的安装配置
./configure --prefix=/usr/local/php --with-apxs2=/usr/local/apache2/bin/apxs --with-xml --with-gettext=/usr/local/php/lib/php/extensions/no-debug-non-zts-20060613 --with-mysql=/usr/lib/mysql
上面是我的配置,主要用来运行gallery2.3.这里需要说明的有gettext(多语言支持)的配置:
1.首先进入到php源码包中
cd /opt/php-5.1.2/ext/gettext
2. 在gettext文件夹下产生configure文件
/opt/php/bin/phpize
3. 配置编译
./configure --with-php-config=/opt/php/bin/php-config --with-gettext
make && make install
4. 在/usr/local/php/lib/php/extensions/no-debug-non-zts-20060613下产生一个gettext.so文件
5.重新配置编译安装php
mysql6.0配置:
安装php的时候,之前一直提示msyql client包找不到,由于我使用的是linux as 5 x86_64的操作信息,mysql client 包是存放在/usr/lib64下面,而php默认是在/usr/lib下寻找,所以需要如下解决:
1.做个软连接即刻解决 ln -s /usr/lib64/mysql /usr/lib
2.按上面的配置执行即可。
鸣谢:http://www.oschina.net/p/php/thread/87
posted @
2006-10-20 15:05 雪地孤鸿 阅读(15376) |
评论 (4) |
编辑 收藏本想使用打包后的war来控制发布的版本,但是在发布后,编译jsp文件时却出现编译错误:
Exception compiling Unable to find a javac compiler;
com.sun.tools.javac.Main is not on the classpath.
Perhaps JAVA_HOME does not point to the JDK
ERROR 09-14 14:07:56,726 [TP-Processor3] (ApplicationContext.java:675) - Exception:
Unable to find a javac compiler;
com.sun.tools.javac.Main is not on the classpath.
Perhaps JAVA_HOME does not point to the JDK
at org.apache.tools.ant.taskdefs.compilers.CompilerAdapterFactory.getCompiler(CompilerAdapterFactory.java:105)
at org.apache.tools.ant.taskdefs.Javac.compile(Javac.java:924)
at org.apache.tools.ant.taskdefs.Javac.execute(Javac.java:757)
at org.apache.jasper.compiler.Compiler.generateClass(Compiler.java:320)
at org.apache.jasper.compiler.Compiler.compile(Compiler.java:370)
at org.apache.jasper.JspCompilationContext.compile(JspCompilationContext.java:473)
at org.apache.jasper.servlet.JspServletWrapper.service(JspServletWrapper.java:190)
at org.apache.jasper.servlet.JspServlet.serviceJspFile(JspServlet.java:295)
at org.apache.jasper.servlet.JspServlet.service(JspServlet.java:241)
at javax.servlet.http.HttpServlet.service(HttpServlet.java:802)
at org.apache.catalina.core.ApplicationFilterChain.internalDoFilter(ApplicationFilterChain.java:252)
at org.apache.catalina.core.ApplicationFilterChain.doFilter(ApplicationFilterChain.java:173)
at org.apache.catalina.core.ApplicationDispatcher.invoke(ApplicationDispatcher.java:672)
at org.apache.catalina.core.ApplicationDispatcher.processRequest(ApplicationDispatcher.java:463)
at org.apache.catalina.core.ApplicationDispatcher.doForward(ApplicationDispatcher.java:398)
at org.apache.catalina.core.ApplicationDispatcher.forward(ApplicationDispatcher.java:301)
at com.mdcchina.util.Validates.FromFilter.doFilter(Unknown Source)
at org.apache.catalina.core.ApplicationFilterChain.internalDoFilter(ApplicationFilterChain.java:202)
at org.apache.catalina.core.ApplicationFilterChain.doFilter(ApplicationFilterChain.java:173)
at org.apache.catalina.core.StandardWrapperValve.invoke(StandardWrapperValve.java:213)
at org.apache.catalina.core.StandardContextValve.invoke(StandardContextValve.java:178)
at org.apache.catalina.valves.AccessLogValve.invoke(AccessLogValve.java:541)
at org.apache.catalina.core.StandardHostValve.invoke(StandardHostValve.java:126)
at org.apache.catalina.valves.ErrorReportValve.invoke(ErrorReportValve.java:105)
at org.apache.catalina.core.StandardEngineValve.invoke(StandardEngineValve.java:107)
at org.apache.catalina.connector.CoyoteAdapter.service(CoyoteAdapter.java:148)
at org.apache.jk.server.JkCoyoteHandler.invoke(JkCoyoteHandler.java:199)
at org.apache.jk.common.HandlerRequest.invoke(HandlerRequest.java:282)
at org.apache.jk.common.ChannelSocket.invoke(ChannelSocket.java:754)
at org.apache.jk.common.ChannelSocket.processConnection(ChannelSocket.java:684)
at org.apache.jk.common.ChannelSocket$SocketConnection.runIt(ChannelSocket.java:876)
at org.apache.tomcat.util.threads.ThreadPool$ControlRunnable.run(ThreadPool.java:684)
at java.lang.Thread.run(Thread.java:595)
ERROR 09-14 14:07:56,734 [TP-Processor3] (ApplicationDispatcher.java:704) - Servlet.service() for servlet jsp threw exception
org.apache.jasper.JasperException: Unable to compile class for JSP
An error occurred at line: -1 in the jsp file: null
Generated servlet error:
[javac] Compiling 1 source file
需要将jdk下面的tools.jar包加入到应用的classpath下面,或是将其copy到tomcat的/common/lib下
才能解决该问题:)
posted @
2006-09-14 16:59 雪地孤鸿 阅读(4461) |
评论 (2) |
编辑 收藏
最近,运行的tomcat服务器在正常运行将近2个月后,抛出如下错误:
警告: Reinitializing ServerSocket
2006-7-28 15:07:40 org.apache.tomcat.util.net.PoolTcpEndpoint acceptSocket
严重: Endpoint ServerSocket[addr=0.0.0.0/0.0.0.0,port=0,localport=80] ignored exception: java.net.SocketException: Too many open files
java.net.SocketException: Too many open files
at java.net.PlainSocketImpl.socketAccept(Native Method)
at java.net.PlainSocketImpl.accept(PlainSocketImpl.java:384)
at java.net.ServerSocket.implAccept(ServerSocket.java:450)
at java.net.ServerSocket.accept(ServerSocket.java:421)
at org.apache.tomcat.util.net.DefaultServerSocketFactory.acceptSocket(DefaultServerSocketFactory.java:60)
at org.apache.tomcat.util.net.PoolTcpEndpoint.acceptSocket(PoolTcpEndpoint.java:407)
at org.apache.tomcat.util.net.LeaderFollowerWorkerThread.runIt(LeaderFollowerWorkerThread.java:70)
at org.apache.tomcat.util.threads.ThreadPool$ControlRunnable.run(ThreadPool.java:684)
at java.lang.Thread.run(Thread.java:595)
原本以为是tomcat的配置或是应用本身的问题,"谷歌"一把后才发现,该问题的根本原因是由于系统文件资源的限制导致的。具体可以参考
http://www.bea.com.cn/support_pattern/Too_Many_Open_Files_Pattern.html的说明。具体的解决方式可以参考一下:
1。ulimit -a 查看系统目前资源限制的设定。
[root@test security]# umlimit -a
-bash: umlimit: command not found
[root@test security]# ulimit -a
core file size (blocks, -c) 0
data seg size (kbytes, -d) unlimited
file size (blocks, -f) unlimited
max locked memory (kbytes, -l) unlimited
max memory size (kbytes, -m) unlimited
open files (-n) 1024
pipe size (512 bytes, -p) 8
stack size (kbytes, -s) 8192
cpu time (seconds, -t) unlimited
max user processes (-u) 7168
virtual memory (kbytes, -v) unlimited
[root@test security]#
通过以上命令,我们可以看到open files 的最大数为1024
那么我们可以通过一下命令修改该参数的最大值
2. ulimit -n 4096
[root@test security]# ulimit -n 4096
[root@test security]# ulimit -a
core file size (blocks, -c) 0
data seg size (kbytes, -d) unlimited
file size (blocks, -f) unlimited
max locked memory (kbytes, -l) unlimited
max memory size (kbytes, -m) unlimited
open files (-n) 4096
pipe size (512 bytes, -p) 8
stack size (kbytes, -s) 8192
cpu time (seconds, -t) unlimited
max user processes (-u) 7168
virtual memory (kbytes, -v) unlimited
这样我们就修改了系统在同一时间打开文件资源的最大数,基本解决以上问题。
另外我们可以通过lsof -p [进程的 pid]来查看系统当前打开的文件资源,可以了解不同时期系统的文件资源的使用情况,可根据情况进行系统资源的配置。
posted @
2006-07-31 11:39 雪地孤鸿 阅读(4197) |
评论 (0) |
编辑 收藏这几天要用到一个简单的权限管理,本来想用struts-Menu简单搞定,但是很是郁闷的是不知道怎么样将tomcat的角色应用到struts-menu中,在网上搜了好久,终于在www.yahoo.com.cn中找了不知道是那位大侠的文章,在此感谢了,也希望能给他人方便,特转贴到此:
刚刚接触Struts Menu的时候,对Struts Menu基于角色的菜单显示很好理解,但是如何将Web应用中的角色管理映射到Struts Menu中,是困扰笔者良久的问题。经过摸索,在查阅了Tomcat的手册之后,笔者找到了答案。
Servlet容器和web应用都可以控制web应用资源的安全,因此Tomcat管理域有容器管理和应用程序管理两种,默认使用容器管理。通常web应用中使用的登陆Servlet和JSP则是应用程序管理。这就涉及到Realm的概念。
Tomcat在%CATALINA_HOME%/conf/server.XML文件中配置Realm,结合在%CATALINA_HOME%/WEB-INF/mywebapp/web.xml文件中配置的<security-constraint>,定义了存储用户和角色的信息,以及进行用户验证的方式。
Tomcat中定义的Realm有如下几种实现:UserDatabaseRealm、JDBCRealm、JNDIRealm和JAASRealm。下载Tomcat解压缩后默认使用的是UserDatabaseRealm。该Realm从%CATALINA_HOME%/conf/tomcat-users.xml静态文件中加载内存,Tomcat运行期间不会动态加载。因此所有的用户、角色和密码都是在Tomcat启动之前配置好的,只存在于内存中。修改tomcat-users.xml文件后必须重新启动Tomcat,该文件的具体配置请参考Tomcat手册。
本文要着重介绍的是JDBCRealm,该Realm使用关系数据库,能够动态访问数据。用户、角色和密码都保存在数据库中,一旦数据库有变化,JDBCRealm会立即访问。相应,JDBCRealm的设置需要数据库的访问参数。Tomcat5.0.28中给出了几种数据库的配置参数,示例如下:
<Realm className="org.apache.catalina.realm.JDBCRealm"
debug="99" digest="MD5"
driverName="Oracle.jdbc.driver.OracleDriver"
connectionURL="jdbc:oracle:thin:@ntserver:1521:ORCL"
connectionName="scott" connectionPassword="tiger"
userTable="users" userNameCol="user_name" userCredCol="user_pass"
userRoleTable="user_roles" roleNameCol="role_name" />
属性说明如下:
className是实现Realm的类名,对于JDBCRealm必须是org.apache.catalina.realm.JDBCRealm。
debug设置调试信息的详细程度等级,0表示不调试,数字越大越详细。
digest是数据库中密码字段的加密摘要算法名称,有SHA、MD2或MD5,默认是cleartext,即不加密。
driverName是数据库访问的JDBC驱动
connectionURL是数据库访问URL参数
connectionName和connectionPassword是访问数据库的名称和密码
userTable是web应用中存储用户信息的表名
userNameCol是用户信息表中存储用户登陆名称的字段名
userCredCol是用户信息表中存储用户登陆密码的字段名
userRoleTable是将用户角色映射表名
roleNameCol是角色表中存储角色名称的字段名
有了这些定义,web应用中定义的用户和角色就可以在Struts Menu中,用于配置基于角色可见与否的菜单。
posted @
2006-04-12 10:26 雪地孤鸿 阅读(827) |
评论 (0) |
编辑 收藏
在网上找了很久,看了很多的文档,终于将appfuse成功的编译,发布了:这样感谢广大网友的无私奉献了,好了,闲话少说了,具体的操作如下:
Appfuse1.9,JDK1.5,ANT1.6.2,Mysql5.0,Tomcat5.5
一.环境设置:
以下环境变量均按本机的安装路径设置即可。
ANT_HOME,
JAVA_HOME,
CATALINA_HOME,
MYSQL_HOME
Path中加入
%JAVA_HOME%bin;%ANT_HOME%bin;%CATALINA_HOME%bin;%MYSQL_HOME%bin;
二 在eclipse中使用ant编译,发布,测试appfuse
1.Create New Java Project in Eclipse
Open Eclipse (either with an existing or a new workspace) and to go File → New → Project. Then select "Java Project" and hit the Next button. In the Project Name field, enter the name of your project (i.e. appfuse) and the directory that your project lives (i.e. c:\source\appfuse) in the box below. If you're prompted to switch the Java Perspective, choose Yes.
If you try to build the project at this point, you'll likely get numerous errors. Most of them involve the fact that the UserForm class can not be found. This is because all of the ActionForms in AppFuse (if you're using the Struts version) are generated from POJOs with XDoclet.
All of the tasks for XDoclet are configured in the Ant build.xml file so the easiest thing to do is to run "ant gen-forms" to generate the ActionForms. If you have Ant 1.6.2+ installed and in your path, you can do this from the command line. The next step shows you how configure Eclipse to run your AppFuse build.xml.
2.Configuring Ant in Eclipse
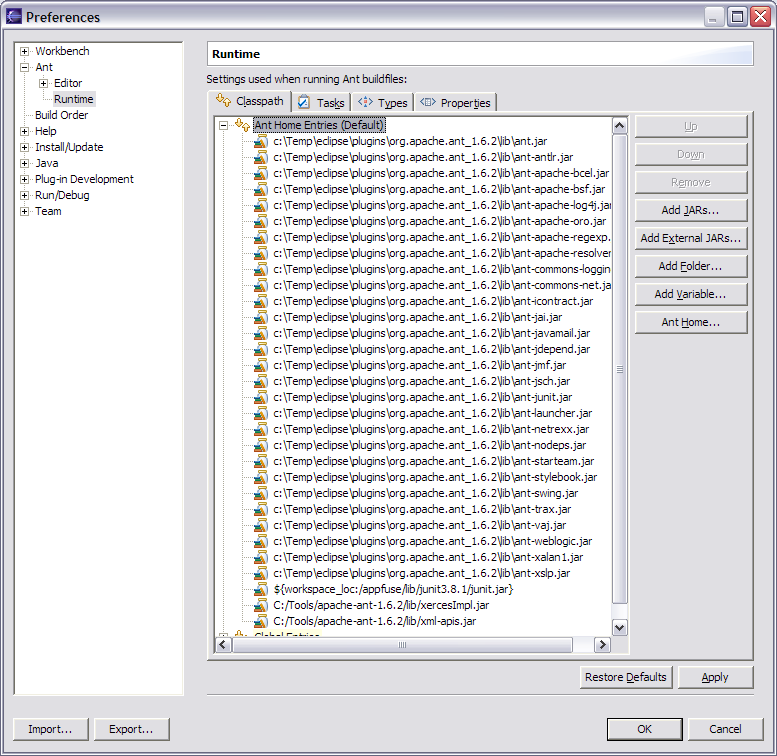
The easiest way to configure Eclipse for AppFuse is to install Ant on your hard drive (i.e. c:\Tools\apache-ant-1.6.2) and then point Eclipse's ANT_HOME to this directory. To do this, go to Window → Preferences → Ant → Runtime. Then click the "Ant Home" button and select the installation folder on your hard drive.
If you'd rather use Eclipse's built-in Ant, you'll need to add junit.jar to its classpath. To do this, go to Window → Preferences → Ant → Runtime. Then click the "Add JARs" button and select junit.jar from appfuse/lib/junit3.8.1/lib/junit.jar. Click OK until you arrive back at the workbench view.
Next, add the catalina-ant.jar (from $CATALINA_HOME/server/lib) to the ant classpath. Then in the property tab, add tomcatTasks.properties (in lib/ant-contrib) file as a global properties file.
Below is a screenshot of what your Ant Runtime classpath should look like after the above modifications:
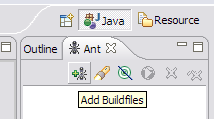
3.Add build.xml to Ant View
Now we need to add the build.xml to Eclipse's Ant View. To do this, go to Window → Show View → Ant. Then click on the first icon in this view (screenshot below) to add AppFuse's build file.
4.Run Ant
After adding the build.xml, you should be able to expand it in the Ant View and execute any of the targets. I usually do "test-all" to verify all the tests pass in my initial project. For a list of targets I use most often, see AppFuse Ant Targets.
Now if you run the "compile" target and then refresh the project (right-click on project → Refresh) you shouldn't see any errors in the "Problems" pane. You should now be able to compile and create classes as you normally would. Sometimes when my imports aren't resolving correctly in Eclipse, I do have to run Project → Clean in Eclipse.
NOTE: If you're using the internal version of Ant, you may get an error message like the one below:
BUILD FAILED: C:\source\appfuse\build.xml:802: The following error occurred while executing this line:
C:\source\appfuse\build.xml:780: The following error occurred while executing this line:
java.lang.NoClassDefFoundError: org/apache/xml/serialize/OutputFormat
This is because there are tasks that require Xerces to be in your Ant classpath [reference]. I added xercesImpl.jar and xml-apis.jar (from my self-installed version of Ant) to Eclipse's Ant classpath to solve this.
5.Run JUnit Tests in Eclipse
It's also possible to run your JUnit tests in Eclipse. But before running them, you need to run the "war" target. After this target completes, refresh your project.
After you have successfully done so, in Eclipse open a test you'd like to run (i.e. UserDaoTest) and go to Run → Debug As → JUnit Test. Note that you may have to run the "db-load" target before you run your tests every so often. I did have the following method in the Base*TestCase class for each layer, but this caused DBUnit to reload the database before every test in a Test class. Removing it reduces the execution time of "test-all" by more than 30 seconds.
protected void setUp() throws Exception {
DataSource ds = (DataSource) ctx.getBean("dataSource");
IDatabaseConnection conn = new DatabaseConnection(ds.getConnection());
IDataSet dataSet =
new XmlDataSet(new FileInputStream("metadata/sql/sample-data.xml"));
// clear table and insert only sample data
DatabaseOperation.CLEAN_INSERT.execute(conn, dataSet);
conn.close();
}
If the instructions above don't work for running JUnit tests in Eclipse, I suggest just using the command line - i.e. ant test-dao -Dtestcase=UserDAO. Running tests from the command line always works. ;-)
好了 ,在eclipse中基本按以上操作就可以成功了,等有时间,我来翻译一下,虽然我的e文比较烂,但是还是乐于让大家校正的
:)原文的地址:http://raibledesigns.com/wiki/Wiki.jsp?page=AppFuseEclipse
问题描述
1.刚开始的时候,我们的mysql的用户名和密码可能和appfuse的默认的用户和密码会不一样的,这个可以到properties.xml文件中修改为我们安装mysql是设置的用户名和密码,我的修改如下:
<!-- Defaults for database.properties -->
<property name="database.jar" location="${mysql.jar}"/>
<property name="database.type" value="mysql"/>
<property name="database.name" value="appfuse"/>
<property name="database.host" value="localhost"/>
<property name="database.username" value="root"/>
<property name="database.password" value="780121"/>
<!-- database URL for creating other dbs - used in db-create target -->
<property name="database.admin.url" value="jdbc:${database.type}://${database.host}/mysql"/>
<property name="database.admin.username" value="root"/>
<property name="database.admin.password" value="780121"/>
<property name="hibernate.dialect" value="org.hibernate.dialect.MySQLInnoDBDialect"/>
<property name="database.driver_class" value="com.mysql.jdbc.Driver"/>
<property name="database.url"
value="jdbc:${database.type}://${database.host}/${database.name}?useUnicode=true&amp;characterEncoding=utf-8"/>
<property name="database.show_sql" value="true"/>
我是修改了root用户的密码,当然你也可以建立test用户并给初始密码:)
2.连接数据库的问题解决后,另外一个问题有出来了,建立user_role表的时候出问题了:org.dbunit.dataset.NoSuchTableException: user_role
这个问题的解决方式如下:
setup-tomcat deploy
ant setup -Ddatabase.username=foo -Ddatabase.password=bar
这个主要是先执行以下build.xml中的setup-tomcate deploy指令就可以了:)
原载地址:http://b0r0j0.blogbus.com/logs/2005/12/1725103.html
posted @
2006-04-07 19:55 雪地孤鸿 阅读(1931) |
评论 (0) |
编辑 收藏