2010年8月12日
#
Throwable occurred: org.springframework.transaction.CannotCreateTransactionException: Could not open JDBC Connection for transaction; nested exception is com.mysql.jdbc.exceptions.jdbc4.CommunicationsException: The last packet successfully received from the server was 50,123,505 milliseconds ago. The last packet sent successfully to the server was 50,123,505 milliseconds ago. is longer than the server configured value of 'wait_timeout'. You should consider either expiring and/or testing connection validity before use in your application, increasing the server configured values for client timeouts, or using the Connector/J connection property 'autoReconnect=true' to avoid this problem.
这主要是由两个原因引起来的:
1.mysql 会自动关闭长时间不用的connection,一个连接如果处于sleep状态达到mysql的参数wait_timeout指定的时间(默认为8小时),就是自动关闭这个连接
2.common pool中没有指定相应的连接检查参数
解决办法:从common pool的配置参数来解决:
<bean id="dataSource" class="org.apache.commons.dbcp.BasicDataSource" destroy-method="close">
<property name="driverClassName">
<value>${db.driver}</value>
</property>
<property name="url">
<value>${db.url}</value>
</property>
<property name="username">
<value>${db.user}</value>
</property>
<property name="password">
<value>${db.password}</value>
</property>
<property name="maxActive">
<value>100</value>
</property>
<property name="maxIdle">
<value>50</value>
</property>
<property name="maxWait">
<value>10000</value>
</property>
<property name="timeBetweenEvictionRunsMillis">
<value>3600000</value><!--1 hours-->
</property>
<!--
<property name="minEvictableIdleTimeMillis">
<value>20000</value>
</property>
-->
<property name="testWhileIdle">
<value>true</value>
</property>
<property name="validationQuery">
<value>select 1 from dual</value>
</property>
</bean>
使用上述的三个红色的参数,就可以避免这个问题.这三个参数的意义:
timeBetweenEvictionRunsMillis:启动connection校验定时器,定时器运行时间间隔就是timeBetweenEvictionRunsMillis的值.默认为-1,表示不启动定时器,这里设定为1小时,只要小于mysql的wait_timeout就可以了
testWhileIdle: true,表示检查idle的connection,false为不检查
validationQuery:用于检查connection的sql语句.
这只是一种方法,另外的几种方法:
timeBetweenEvictionRunsMillis+minEvictableIdleTimeMillis:这种方式不检查Connection的有效性,而是检查连接的空闲时间,大于minEvictableIdleTimeMillis就清除.
<property name="timeBetweenEvictionRunsMillis">
<value>3600000</value><!--1 hours-->
</property>
<property name="minEvictableIdleTimeMillis">
<value>120000</value><!--connection的空闲时间大于这个值,就直接被关闭,并从连接池中删除-->
</property>
如果不喜欢用定时器,也可以配置testOnBorrow+validationQuery参数:每次从连接池取参数都会校验连接的有效性.实际上这种方式性能会比定时器差些.
<property name="testOnBorrow">
<value>true</value>
</property>
<property name="validationQuery">
<value>select 1 from dual</value>
</property>
另外,也可以用testOnReturn+validationQuery,不过未必会解决问题:这表示每次使用完连接,归还连接池的时候检查连接的有效性,这有可能导致使用一次无效的连接,最好不要用.
上面的几种方法可以合并使用,只是检查的点多了,未必是好事
另外,也可以使用Abandoned的那几个参数,来删除连接池中的连接.也能达到效果.我没测试.
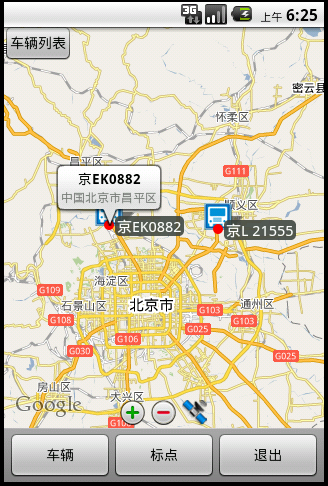
就是上面的样子
做这个过程中我碰到两个问题:
1:如何做带尾巴的气泡View
2:如何把这个View添加到MapView中.
1:如何做带尾巴的气泡View
我是采用背景图的方式来实现的.当然,普通的PNG在View 缩放的时候会失真,尤其是那个尖尖的尾巴.
后来采用9.png的格式,才完成了不变形的效果.9.png格式的Png可以用SDK\Tools\draw9patch.bat来处理,只要把普通的png的边上标志一下就可以了,具体draw9patch.bat如何使用这里就不说了,网上有很多文档,自己查查就知道了.
我生成的9.png就是下面这个样子,注意四周的黑线.就是9png拉伸时的标识

有了这个png,直接放到你的工程下的res/drawable目录就可以了,
然后在res/layout目录下建立你的view的xml文件,比如叫overlay_pop.xml,我的是这样的:
<?xml version="1.0" encoding="UTF-8"?>
<LinearLayout xmlns:android="http://schemas.android.com/apk/res/android"
android:orientation="vertical"
android:background="@drawable/bubble_background"
<!--这就是那个9.png-->
android:layout_width="wrap_content"
android:layout_height="wrap_content"
android:paddingLeft="5px"
android:paddingTop="5px"
android:paddingRight="5px"
android:paddingBottom="20px"
<!--注意加上padding,否则view里面的东西就画到边框上了-->
>
<TextView android:id="@+id/map_bubbleTitle"
android:ellipsize="marquee"
android:layout_width="match_parent"
android:layout_height="wrap_content"
android:gravity="center_horizontal"
android:singleLine="true"
style="@style/map_BubblePrimary" />
<!--style可以没有,我这里第一个TextView表示标题,用的是大字体-->
<TextView android:id="@+id/map_bubbleText"
android:layout_width="match_parent"
android:layout_height="wrap_content"
android:singleLine="false"
style="@style/map_BubbleSecondary" />
<!--style可以没有,我这里第二个TextView表示描述信息,用的是大字体-->
</LinearLayout>
这样popView就建立好了
2:如何把这个View添加到MapView中.
通常是在mapView中点击某个位置,弹出popView
或者点击某个Overlay弹出popView,这里用点击Overlay来说明,
overlay有onTap()方法,你可以实现自己的overlay,overideonTap()方法,弹出popView,
也可以使用setOnFocusChangeListener(),在listener中实现弹出popView,.
我是用的listener,因为setOnFocusChangeListener在失去焦点也会触发,我可以再失去焦点的时候隐藏popView.
MapView是
继承自ViewGroup的,因此,MapView有addView()方法,同时还有
MapView.LayoutParams
MapView.LayoutParams 可以根据GeoPoint来定位,我就是利用这个特性来定位弹出的popView的.
PointItemizedOverlay overlay = new PointItemizedOverlay(drawable); <!--这是我继承自ItemizedOverlay的overlay,主要就是画一个图片,写一个名称,很简单,这里不贴具体代码了-->
public class BaseMapActivity extends MapActivity {
/**
* 地图View
*/
protected MapView mapView;
/**
* 弹出的气泡View
*/
private View popView;
/**
监听器
*/
private final ItemizedOverlay.OnFocusChangeListener onFocusChangeListener = new ItemizedOverlay.OnFocusChangeListener() {
@Override
public void onFocusChanged(ItemizedOverlay overlay, OverlayItem newFocus) {
//创建气泡窗口
if (popView != null) {
popView.setVisibility(View.GONE);
}
if (newFocus != null) {
MapView.LayoutParams geoLP = (MapView.LayoutParams) popView.getLayoutParams();
geoLP.point = newFocus.getPoint();//这行用于popView的定位
TextView title = (TextView) popView.findViewById(R.id.map_bubbleTitle);
title.setText(newFocus.getTitle());
TextView desc = (TextView) popView.findViewById(R.id.map_bubbleText);
if (newFocus.getSnippet() == null || newFocus.getSnippet().length() == 0) {
desc.setVisibility(View.GONE);
} else {
desc.setVisibility(View.VISIBLE);
desc.setText(newFocus.getSnippet());
}
mapView.updateViewLayout(popView, geoLP);
popView.setVisibility(View.VISIBLE);
}
}
};
public void onCreate(Bundle savedInstanceState) {
super.onCreate(savedInstanceState);
/**
省略其他代码
**/
//初始化气泡,并设置为不可见
popView = inflater.inflate(R.layout.overlay_popup, null);
mapView.addView( popView,
new MapView.LayoutParams(MapView.LayoutParams.WRAP_CONTENT, MapView.LayoutParams.WRAP_CONTENT,
null, MapView.LayoutParams.BOTTOM_CENTER));
//由于我的气泡的尾巴是在下边居中的,因此要设置成MapView.LayoutParams.BOTTOM_CENTER.
//这里没有给GeoPoint,在onFocusChangeListener中设置
views.add(popView);
popView.setVisibility(View.GONE);
添加overlay
PointItemizedOverlay overlay = new PointItemizedOverlay(drawable);
//设置显示/隐藏泡泡的监听器
overlay.setOnFocusChangeListener(onFocusChangeListener);
overlay.addOverlay(/*你自己的overlayItem*/);
overlay.addOverlay(/*你自己的overlayItem*/);
overlay.addOverlay(/*你自己的overlayItem*/);
}
}
这样就基本完工了.
使用方法:
LineItemizedOverlay overlay = new LineItemizedOverlay();
overlay.addOverlay(/*起点的OverlayItem*/);
overlay.addOverlay(/*终点的OverlayItem*/);
overlay.addLinePoint(/*要画的轨迹的GeoPoint的List*/);
mapView.getOverlays().add(overlay);
/**
*
*/
package com.xtyon.tuola.truck.map;
import java.util.ArrayList;
import android.graphics.Canvas;
import android.graphics.Color;
import android.graphics.Paint;
import android.graphics.Point;
import android.graphics.drawable.Drawable;
import com.google.android.maps.GeoPoint;
import com.google.android.maps.ItemizedOverlay;
import com.google.android.maps.MapView;
import com.google.android.maps.OverlayItem;
import com.google.android.maps.Projection;
/**
* 地图上的线型图层:包括一个起点,一个终点,以及之间的曲线
* @author superwang
*/
public class LineItemizedOverlay extends ItemizedOverlay<OverlayItem> {
private static final int LAYER_FLAGS = Canvas.MATRIX_SAVE_FLAG | Canvas.CLIP_SAVE_FLAG
| Canvas.HAS_ALPHA_LAYER_SAVE_FLAG | Canvas.FULL_COLOR_LAYER_SAVE_FLAG | Canvas.CLIP_TO_LAYER_SAVE_FLAG;
/**
* 用于保存起点/终点数据
*/
private final ArrayList<OverlayItem> mOverlays = new ArrayList<OverlayItem>();
/**
* 用于保存构成曲线的点的数据
*/
private final ArrayList<GeoPoint> linePoints = new ArrayList<GeoPoint>();
/**
* @param defaultMarker
*/
public LineItemizedOverlay() {
super(null);
// TODO Auto-generated constructor stub
}
/* (non-Javadoc)
* @see com.google.android.maps.ItemizedOverlay#createItem(int)
*/
@Override
protected OverlayItem createItem(int i) {
return mOverlays.get(i);
}
/* (non-Javadoc)
* @see com.google.android.maps.ItemizedOverlay#size()
*/
@Override
public int size() {
// TODO Auto-generated method stub
return mOverlays.size();
}
/**
* 调价起点/终点
* description:
* @param overlay
*/
public void addOverlay(OverlayItem overlay) {
mOverlays.add(overlay);
populate();
}
/**
* 添加曲线中的点
* description:
* @param point
*/
public void addLinePoint(GeoPoint point) {
linePoints.add(point);
}
public ArrayList<GeoPoint> getLinePoints() {
return linePoints;
}
/**
* 画起点/终点/轨迹
*/
@Override
public void draw(Canvas canvas, MapView mapView, boolean shadow) {
if (!shadow) {
//System.out.println("!!!!!!!!!!!!!!");
canvas.save(LAYER_FLAGS);
//canvas.save();
Projection projection = mapView.getProjection();
int size = mOverlays.size();
Point point = new Point();
Paint paint = new Paint();
paint.setAntiAlias(true);
OverlayItem overLayItem;
//画起点/终点
for (int i = 0; i < size; i++) {
overLayItem = mOverlays.get(i);
Drawable marker = overLayItem.getMarker(0);
//marker.getBounds()
/* 象素点取得转换 */
projection.toPixels(overLayItem.getPoint(), point);
if (marker != null) {
boundCenterBottom(marker);
}
/* 圆圈 */
//Paint paintCircle = new Paint();
//paintCircle.setColor(Color.RED);
paint.setColor(Color.RED);
canvas.drawCircle(point.x, point.y, 5, paint);
/* 文字设置 */
/* 标题 */
String title = overLayItem.getTitle();
/* 简介 */
// String snippet = overLayItem.getSnippet();
//
// StringBuffer txt = new StringBuffer();
// if (title != null && !"".equals(title))
// txt.append(title);
//
// if (snippet != null && !"".equals(snippet)) {
// if (txt.length() > 0) {
// txt.append(":");
// }
// txt.append(snippet);
// }
//Paint paintText = new Paint();
if (title != null && title.length() > 0) {
paint.setColor(Color.BLACK);
paint.setTextSize(15);
canvas.drawText(title, point.x, point.y, paint);
}
}
//画线
boolean prevInBound = false;//前一个点是否在可视区域
Point prev = null;
int mapWidth = mapView.getWidth();
int mapHeight = mapView.getHeight();
//Paint paintLine = new Paint();
paint.setColor(Color.RED);
//paint.setPathEffect(new CornerPathEffect(10));
paint.setStrokeWidth(2);
int count = linePoints.size();
//Path path = new Path();
//path.setFillType(Path.FillType.INVERSE_WINDING);
for (int i = 0; i < count; i++) {
GeoPoint geoPoint = linePoints.get(i);
//projection.toPixels(geoPoint, point); //这一行似乎有问题
point = projection.toPixels(geoPoint, null);
if (prev != null) {
if (point.x >= 0 && point.x <= mapWidth && point.y >= 0 && point.y <= mapHeight) {
if ((Math.abs(prev.x - point.x) > 2 || Math.abs(prev.y - point.y) > 2)) {
//这里判断点是否重合,重合的不画线,可能会导致画线不在路上
canvas.drawLine(prev.x, prev.y, point.x, point.y, paint);
//path.lineTo(point.x, point.y);
prev = point;
prevInBound = true;
}
} else {
//在可视区与之外
if (prevInBound) {//前一个点在可视区域内,也需要划线
//path.lineTo(point.x, point.y);
canvas.drawLine(prev.x, prev.y, point.x, point.y, paint);
}
prev = point;
prevInBound = false;
}
} else {
//path.moveTo(point.x, point.y);
prev = point;
}
}
//canvas.drawPath(path, paint);
canvas.restore();
//DebugUtils.showMemory();
}
super.draw(canvas, mapView, shadow);
}
}