itstarting:IT进行时

想自己所想,做自己所爱

  BlogJava :: 首页 :: 新随笔 :: 联系 :: 聚合  :: 管理 ::
  28 随笔 :: 3 文章 :: 55 评论 :: 0 Trackbacks

2008年1月20日 #

     摘要: Buffalo是一个前后贯通的完整的Ajax框架,目前最新的版本是2.0.1,其主页是:
http://buffalo.sourceforge.net/,可通过该页面找到下载。
不过该版本自2007年来就没有更新了,有点遗憾,不管怎样,一出来就关注到了,早前通读过代码,是个好作品。
上周开始用了些零碎的时间,重新评估并进行了深入的研究,其目的在于通过深度掌握某个优秀的贯穿前后端的AJAX框架,以提高自己的整体认知感。

Buffalo最有价值之初,个人感觉有两点:
1、后端实现了较为完整的基于xml的xml<->object序列化反序列化协议;
2、前端提供了适配协议的调用封装和响应解析机制,并基于回调机制提供编码API。
  阅读全文
posted @ 2010-01-12 14:38 IT进行时 阅读(2983) | 评论 (0)编辑 收藏

经过几个晚上的奋战,Hadoop-0.20.1+Ubuntu9.10实战终于出炉。

目录:
一、环境准备 1
二、安装JDK6 1
三、配置SSH 2
四、安装配置hadoop 4
4.1下载及安装 4
4.2配置 4
4.2.1配置$HADOOP_HOME/conf/hadoop-env.sh 4
4.2.2配置$HADOOP_HOME/conf/core-site.xml 4
4.2.3配置$HADOOP_HOME/conf/mapred-site.xml 5
4.2.4格式化namenode 5
4.3启动及验证 5
五、跑第一个wordcount例子 7
4.1准备工作 7
4.2运行例子 8
4.3看结果 11
4.4在eclipse中调试/运行 12
4.5分析代码 15
六、改进的wordcount例子 17
参考 23
FAQ 23
1、xxx is not in the sudoers file解决方法 23
2、/etc/sudoers is mode 0640, should be 0440怎么回事? 24
3、如何增加ubuntu的SWAP空间? 24
4、bin/hadoop dfs到底有哪些命令? 25

原文和文档我放在了javaeye,这里给个链接吧:
http://itstarting.javaeye.com/blog/520985
posted @ 2009-12-15 22:46 IT进行时 阅读(1695) | 评论 (1)编辑 收藏


               1JDK安装配置

    选用最新的版本6.0.

    打开终端,执行以下命令:

        sudo apt-get install sun-java6-jdk

    按照提示做就是了。

    配置JAVA环境变量:

        sudo gedit /etc/environment

       在其中添加如下两行:

        CLASSPATH=.:/usr/lib/jvm/java-6-sun/lib

        JAVA_HOME=/usr/lib/jvm/java-6-sun

    执行命令:sudo gedit /etc/jvm,在最前面加入:

       /usr/lib/jvm/java-6-sun

               2Tomcat安装配置

    还是喜欢经典的Tomcat5.5,http://tomcat.apache.org去下载。

    文件为:apache-tomcat-5.5.28.zip

    解压缩:

    unzip /home/zhengxq/下载/apache-tomcat-5.5.28.zip -d $HOME/java

               3Eclipse安装配置

    下载最新的版本,并解压缩:

    zhengxq@zhengxq-desktop:~$ tar zxf $HOME/下载/eclipse-java-galileo-SR1-linux-gtk.tar.gz -C $HOME/java

    此时直接通过$HOME/java/eclipse/eclipse即可启动。

    Tomcat插件是必须的,下载并解压缩到eclipse/plugins下,重启eclipse即可。

    下面是高级篇:)。为了建立更方便的导航,可以这样:

    1、在/usr/bin目录下创建一个启动脚本eclipse

    sudo gedit /usr/bin/eclipse

   
然后在该文件中添加以下内容:

    #!/bin/sh
    export MOZILLA_FIVE_HOME="/usr/lib/mozilla/"
    export ECLIPSE_HOME="/home/zhengxq/java/eclipse"
    $ECLIPSE_HOME/eclipse $*

    2
、让修改该脚本的权限,让它变成可执行:

    sudo chmod +x /usr/bin/eclipse

    3
、在桌面或者gnome菜单中添加eclipse启动图标
   
1)在桌面或者启动面板上添加图标:
   
在桌面(右键单击桌面->创建启动器)或面板(右键单击面板->添加到面板 ->定制应用程序启动器)上创建一个新的启动器,然后添加下列数据:
   
名称:Eclipse Platform
   
命令:eclipse
   
图标: /home/zhengxq/java/eclipse/icon.xpm
   
2)在Applications(应用程序)菜单上添加一个图标
   
用文本编辑器在/usr/share/applications目录里新建一个名为eclipse.desktop的启动器,如下面的命令:
    sudo gedit /usr/share/applications/eclipse.desktop
   
然后在文件中添加下列内容:

[Desktop Entry]
Encoding=UTF-8
Name=Eclipse Platform
Comment=Eclipse IDE
Exec=eclipse
Icon=/home/zhengxq/java/eclipse/icon.xpm
Terminal=false
StartupNotify=true
Type=Application
Categories=Application;Development;

    保存文件,此时即可通过双击桌面eclipse的图标来运行eclipse

    注意: Type=Application后面绝对不能有空格,否则出不来可别抓狂。

posted @ 2009-12-15 22:44 IT进行时 阅读(2153) | 评论 (1)编辑 收藏

——IT 进行时(Email & MSN:zhengxianquan AT hotmail.com)

说在前面的话: 作为一名技术人员,喜欢通过自己的实战去学习,也养成了写学习笔记的习惯。个人做企业应用更多,也涉及TB级别的非结构化数据,对于Hadoop倒是第一次接触,分布式计算总归有用武之地。但这个笔记只能说是自己的盲学,就是简单的看看。

Keywords:Hadoop; HDFS; 学习笔记

目录:
1. 准备工作 2
1.1. Supported Platforms 2
1.2. Hadoop需要的基础东西 2
1.3. 安装Cygwin注意事项 2
2. 单机上配置过程 3
2.1. 配置SSH 3
2.1.1. 配置服务 3
2.1.2. 启动Cygwin sshd服务 4
2.1.3. Setup authorization keys 5
2.2. 修订/配置/conf/core-site.xml 7
2.3. 修订/配置/conf/mapred-site.xml 9
2.4. 修订/配置\conf\masters和slaves 9
2.5. 修订/配置\conf\hadoop-env.sh 9
2.6. 其他数据节点类似,重复即可 10
3. 格式化及启动 10
3.1. 启动命令 10
3.2. 如何验证启动成功 11
4. 使用及开发 12
4.1. 常用命令行使用方法 12
4.2. 可以通过浏览器访问 15
5. FAQ 16
5.1. 为什么启动不了? 16
5.2. 配置文件可能导致的问题 17
5.3. JobTracker一直有问题? 19
5.4. 如何验证配置并启动成功? 19
6. 常用命令 20
7. 参考 21

地址:http://itstarting.javaeye.com/blog/513659
posted @ 2009-12-15 22:43 IT进行时 阅读(2007) | 评论 (1)编辑 收藏

Aalst提出了工作流有20种基本模式。

如果不知道的可参考《Workflow Patterns-2002》

 工作流20种基本模式的理解(当然了,后人陆续扩展、变化,模式数量不断变化,但万变不离其宗,可从这些基本模式看起)


下面是我的初步分析:

模式名称

模式关键字

模式说明

Basic Control Patterns

Sequence

Sequence

1

Parallel Split

AND Split

2

Synchronization

AND Join

3

Exclusive Choice

XOR Split

4

Simple Merge

XOR Join

5

ADVANCED BRANCHING AND SYNCHRONIZATION PATTERNS

Multiple Choice

OR Split

6

Synchronizing Merge

AND Join

7

Multi-merge

OR Join(+Multi)

8

Discriminator

OR Join(+Reset/Ignore)

9

N-out-of-M-join

OR Join(+Multi M)

9aN分支,M聚合即可

STRUCTURAL PATTERNS 

Arbitrary Cycles[自由循环]

XOR Split

10

Implicit Termination

Multi(OR/AND) Split End

11

PATTERNS INVOLVING MULTIPLE INSTANCES

MI without synchronization

Runtime independent thread by condition

12,在运行期创建独立实例(线程、程序等)

MI with a priori known design time knowledge

Design time priori Instance

13,设计期多实例,且需全部完成

MI with a priori known runtime knowledge

Runtime multi Instance by condition/free

14,运行期可基于条件创建多实例

MI with no a priori runtime knowledge

Runtime multi Instance free by people

15,运行期可手工随意创建多实例

STATE-BASED PATTERNS 

Deferred Choice

XOR Split(By choice)

16,“推着走”流程,或基于既定条件分支

Interleaved Parallel Routing

OR Split + OR Join, Parallel

17,多分支聚合,分支执行顺序由运行期确定

Milestone

Wait by Milestone

18,在“里程碑”节点等待

CANCELLATION PATTERNS   

Cancel Activity

Cancel in specified Activity

19,在指定的活动取消

Cancel Case

Cancel Anywhere/Anytime

20,任意时候可取消


可以看到,其实很多是类似的,这为下一步的工作流引擎需求、设计打下基础。

抛砖引玉,供大家参考。

posted @ 2009-12-15 22:38 IT进行时 阅读(1642) | 评论 (0)编辑 收藏

1、基于现成的某个Style进行针对性的开发(这个开发说白了就是结合自己论文格式的要求不停的重复:修改<->验证),保存为自己的Style(如“郑式.ens”);
2、把Style文件(如“郑式.ens”)放到\EndNote9\Styles目录下;
3、重新启用EndNote;
4、打开Open Style Manager…
5、选中我的Style(如“郑式.ens”),此时通过选中“郑氏”启用样式:


附上样式文件,适合浙大硕士论文的编写要求(其他学校是否符合,未知):/Files/itstarting/zheng.rar

posted @ 2009-08-31 23:14 IT进行时 阅读(486) | 评论 (0)编辑 收藏

     摘要: 无论是商业化的还是开源的Portal产品,符合国际标准规范是必不可少的要求。有的Portal可能不支持WSRP(Web Services for Remote Portlets),但必须符合JSR-168标准。比较突出的开源Portal主要有JBoss Portal、Apache Jetspeet-2,Liferay Portal,还有两个属于欧洲的非美产品eXo Platform和GridSph...  阅读全文
posted @ 2009-04-15 13:19 IT进行时 阅读(973) | 评论 (0)编辑 收藏

Q:WORD莫名其妙的所有引用(如Endnote和插入PPT对象)都变成了域代码,怎么办?
A:工具->选项->视图;“域代码”,把它前面的对勾去掉即可!
备注:我居然尝试了一次一个一个选择“切换域代码”,累死了不说,居然重新打开又这样,晕死。

参考:http://zhidao.baidu.com/question/75336298.html
posted @ 2009-04-12 21:55 IT进行时 阅读(1534) | 评论 (1)编辑 收藏

AIX下用nmon进行监控和分析实战

nmon从这里下载:
http://www.ibm.com/developerworks/wikis/display/Wikiptype/nmonanalyser

1、准备
  1)用root用户登录到系统中
  2)建目录:#mkdir /nmon/script
  3)确定版本:#oslevel,以便确定用哪个脚本,我是用530
        # oslevel -s
            5300-09-01-0847
  4)把nmon12e_aix530用ftp上传到/nmon/script
  5)执行授权命令:#chmod +x nmon12e_aix530

2、使用
 1)直接使用:
 ./nmon/nmon12e_aix536 -f -N -m /nmon/log -s 30 -c 2880
 表示:
  -f 按标准格式输出文件:<hostname>_YYYYMMDD_HHMM.nmon
  -N include NFS sections
  -m 切换到路径去保存日志文件
  -s 每隔n秒抽样一次,这里为30
  -c 取出多少个抽样数量,这里为2880,即监控=2880*(30/60/60)=24小时
   根据小时计算这个数字的公式为:c=h*3600/s,比如要监控10小时,每隔30秒采样一次,则c=10*3600/30=1200
 
  2)用crontab定期使用:
 A、执行命令:#crontab -e
 B、在最后一行添加如下命令:
  0 8 * * 1,2,3,4,5 /nmon/script/nmon12e_aix530 -f -N -m /nmon/log -s 30 -c 1200
 表示:
  周一到周五,从早上08点开始,监控10个小时(到18:00整为止),输出到/nmon/log

3、分析
  1)会在/tmp/nmon生成*.nmon的文件把它下载到你的电脑上
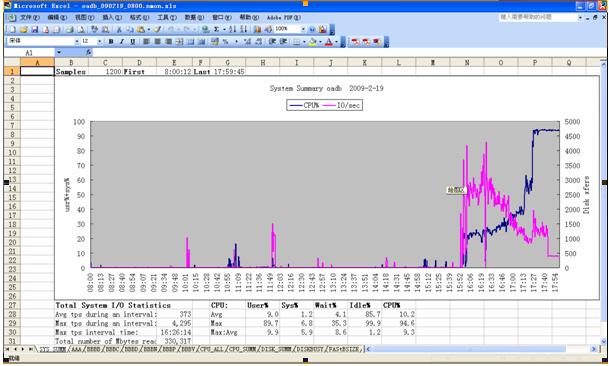
  2)打开nmon analyser v339.xls,把宏的安全性设成最低,打开下载好的*.nmon文件。
     并且保存为一个文件,生成的是视图模式的,非常直观!


参考:
附录一:crontab参数:
参考:http://tech.ddvip.com/2008-11/122629526990895.html
     f1 f2 f3 f4 f5 program
minute  hour  day_of_month  month  weekday  command这些字段接收以下值:
minute 0 到 59
hour 0 到 23
day_of_month 1 到 31
month 1 到 12
weekday 0 到 6(星期天到星期六)

 其中f1 是表示分钟,f2 表示小时,f3 表示一个月份中的第几日,f4 表示月份,f5 表示一个星期中的第几天。program 表示要执行的程序。
   当 f1 为 * 时表示每分钟都要执行 program,f2 为 * 时表示每小时都要执行程序,其馀类推
   当 f1 为 a-b 时表示从第 a 分钟到第 b 分钟这段时间内要执行,f2 为 a-b 时表示从第 a 到第 b 小时都要执行,其馀类推
   当 f1 为 */n 时表示每 n 分钟个时间间隔执行一次,f2 为 */n 表示每 n 小时个时间间隔执行一次,其馀类推
   当 f1 为 a, b, c,... 时表示第 a, b, c,... 分钟要执行,f2 为 a, b, c,... 时表示第 a, b, c...个小时要执行,其馀类推


附录二:nmon参数:
参考http://www.ibm.com/developerworks/wikis/display/Wikiptype/nmonanalyser
nmon:
-f            spreadsheet output format [note: default -s300 -c288]
           Output file is <hostname>_YYYYMMDD_HHMM.nmon

        -F <filename>  same as -f but user supplied filename
-c <number>    number of snapshots
-d      requests disk service and wait times (DISKSERV and DISKWAIT)
-i <percent>   Ignore processes using less than this amount of CPU when generating TOP section – useful for reducing data volumes
-g <filename> file containing disk group definitions
-l <dpl>  number of hdisks per sheet - defaults to 150, maximum 250.  See notes
-m <dir>    NMON changes to this directory before saving the file
-r <runname>   goes into spreadsheet file [default hostname]
-s <seconds>   interval between snap shots
-x   capacity planning (15 mins for 1 day = -fdt -s900 -c96) 
 -t           include top processes in the output
-T           as –t plus saves command line arguments in UARG section
-A          include data for async I/O (PROCAIO) sections
-D prevents DISK sections being produced (useful when Disk Groups are being used because there are too many hdisks to process)
-E          stops ESS sections being produced (necessary when Disk Groups are being used because there are too many vpaths to process)
-J  prevents JFS sections being produced (prevents Excel errors when you have more than 255 filesystems)
-L includes LARGEPAGE section
-N include NFS sections
-S include WLM sections with subclasses
-W include WLM sections without subclasses
-Y include SUMMARY section (very efficient alternative to –t if PID level data is not required)

        example: nmon_aix51 -F asterix.nmon -r Test1 -s6 -c12

posted @ 2009-02-19 20:24 IT进行时 阅读(24967) | 评论 (4)编辑 收藏

解决连接池泄漏步骤

登录weblogic console,  %Domain% -> Services -> JDBC -> Connection Pools -> jdbc/ioa


Configuration -> Connection, 点开Advanced Options, 修改以下配置项状态:


配置项名称

默认值

修改为

说明

Enable Connection Leak Profiling

禁用

启用

开启连接池泄漏的监控。

Enable Connection Profiling

禁用

启用

开启连接池监控。

Inactive Connection Timeout

0

100

连接在指定时间内(单位:秒)没有活动的话,WebLogic会将之释放并回收到连接池。


    以上配置项修改后不影响在跑的应用,不需要重启服务器或应用(配置项前没有黄色小图标 <!--[if !vml]--><!--[endif]-->WebLogic很明确的告诉我们这个配置是不需要重启的),所以大可放心设置。只是启用监控后会对性能有一些影响,具体影响会有多大,我没有测试过,但开启这些设置只是暂时的,得到日志后我们就可以把配置还原会默认值。

在没有解决连接池泄漏问题之前,如果没有请求时连接池将一直保持为0,不会再有连接池满造成请求无法响应的问题,我们也不用担心再挨客户骂,也为我们解决问题争取了宝贵到时间。


       好了,下面才是关键。


       过一段时间后,在bea\user_projects\domains\%domainname%\%servername%目录下,打开%servername%.log,查找,"A JDBC pool connection leak was detected",如果WebLogic已经监控到有连接池泄漏的话,就可以找到以下日志,并且很清楚的告诉我们在哪一个类的哪行代码创建了连接,但没有关闭(注意红色加粗字体):


2008-5-22 上午114720 CST       Warning     JDBC                A JDBC pool connection leak was detected. A connection leak occurs when a connection obtained from the pool was not closed explicitly by calling close() and then was disposed by the garbage collector and returned to the connection pool. The following stack trace at create shows where the leaked connection was created. Stack trace at connection create:

       at weblogic.jdbc.wrapper.PoolConnection.init(PoolConnection.java:75)

       at weblogic.jdbc.pool.Driver.allocateConnection(Driver.java:254)

       at weblogic.jdbc.pool.Driver.connect(Driver.java:84)

       at weblogic.jdbc.jts.Driver.getNonTxConnection(Driver.java:546)

       at weblogic.jdbc.jts.Driver.connect(Driver.java:140)

       at weblogic.jdbc.common.internal.RmiDataSource.getConnection(RmiDataSource.java:344)

       at com.cp.fw.dao.BaseDAO.getConnection(BaseDAO.java:78)

       at com.cp.fw.dao.dataset.DataSetOp.init(DataSetOp.java:78)

       at com.cp.fw.dao.dataset.DataSetOp.<init>(DataSetOp.java:45)

       at com.cp.ia.util.WorkFlowUtil.getNextWrokFlowId(WorkFlowUtil.java:93)

       at


……


       另外一种方法:

WebLogic Console,展开 %DomainName% -> Servers -> %ServerName%,选到Logging – Server页,在页面最下方点击 "View server log",同样查找 "A JDBC pool connection leak was detected",也可以找到同样的日志。


WebLogic对于日志事件的说明:


Message ID

BEA-001074

Subsystem

JDBC

Message

A JDBC pool connection leak was detected. A

connection leak occurs when a connection obtained

from the pool was not closed explicitly by calling

close() and then was disposed by the garbage

collector and returned to the connection pool. The

following stack trace at create shows where the

leaked connection was created.  Stack trace at

connection create:

Detail

A JDBC pool connection leak was detected. A

connection leak occurs when a connection obtained

from the pool was not closed explicitly by calling

close() and then was disposed by the garbage

collector and returned to the connection pool. A

stack trace is printed indicating where the leaked

connection was created.

Cause

A JDBC pool connection leak was detected. A

connection leak occurs when a connection obtained

from the pool was not closed explicitly by calling

close() and then was disposed by the garbage

collector and returned to the connection pool. A

stack trace is printed indicating where the leaked

connection was created.

Action

Close the connection appropriately.


原文:http://blog.csdn.net/esky2000/archive/2008/07/22/2689929.aspx
posted @ 2008-11-13 00:41 IT进行时 阅读(1943) | 评论 (0)编辑 收藏


ActiveMQ 5.0的文档实在是太少了,尤其是集成Spring2.x方面更少。

        下面是配置方面的心得:
        一、服务器端配置:

 总体参考官方网站进行整合,差点害死人,不停的出现各种配置错误,后来经过google查询各种邮件列表,才发现xsd使用不当。        

<?xml version="1.0" encoding="UTF-8"?>
<beans 
  
xmlns="http://www.springframework.org/schema/beans" 
  xmlns:amq
="http://activemq.org/config/1.0"
  xmlns:xsi
="http://www.w3.org/2001/XMLSchema-instance"
  xsi:schemaLocation
="http://www.springframework.org/schema/beans http://www.springframework.org/schema/beans/spring-beans-2.0.xsd
  http://activemq.org/config/1.0 http://activemq.apache.org/schema/core/activemq-core-5.0.0.xsd"
>


</beans>

这个才是正确的,两点:

1、去掉:

<!DOCTYPE beans PUBLIC "-//SPRING//DTD BEAN//EN" "http://www.springframework.org/dtd/spring-beans.dtd">

2、用这个而不是那个:

这个:

           http://activemq.apache.org/schema/core/activemq-core-5.0.0.xsd

那个:     
     http://activemq.apache.org/snapshot-schema/activemq-core-5.0-SNAPSHOT.xsd


        完整的配置如下:        
        applicationContext-activeMQ.xml

<?xml version="1.0" encoding="UTF-8"?>
<beans 
  
xmlns="http://www.springframework.org/schema/beans" 
  xmlns:amq
="http://activemq.org/config/1.0"
  xmlns:xsi
="http://www.w3.org/2001/XMLSchema-instance"
  xsi:schemaLocation
="http://www.springframework.org/schema/beans http://www.springframework.org/schema/beans/spring-beans-2.0.xsd
  http://activemq.org/config/1.0 http://activemq.apache.org/schema/core/activemq-core-5.0.0.xsd"
>

  
<amq:broker useJmx="true" persistent="true"> 
    
<amq:persistenceAdapter> 
        
<amq:jdbcPersistenceAdapter dataSource="#mysql-ds"/> 
      
</amq:persistenceAdapter> 
    
<amq:transportConnectors> 
       
<amq:transportConnector uri="tcp://localhost:0"/> 
    
</amq:transportConnectors> 
   
</amq:broker>
  
  
<!-- MySql DataSource Setup -->
  
<bean id="mysql-ds" class="org.apache.commons.dbcp.BasicDataSource" destroy-method="close">
    
<property name="driverClassName" value="com.mysql.jdbc.Driver"/>
    
<property name="url" value="jdbc:mysql://localhost/activemq?relaxAutoCommit=true"/>
    
<property name="username" value="activemq"/>
    
<property name="password" value="activemq"/>
    
<!--
    <property name="poolPreparedStatements" value="true"/>
-->
  
</bean>
</beans>


        二、web.xml配置: 

    <!--activeMQ-->
    
<context-param>
        
<param-name>contextConfigLocation</param-name>
        
<param-value>
            /WEB-INF/applicationContext-activeMQ.xml 
            /WEB-INF/applicationContext-jms.xml 
        
</param-value>
    
</context-param>

    
<listener>
        
<listener-class>org.springframework.web.context.ContextLoaderListener</listener-class>
    
</listener>


        三、客户端配置此处仅供参考,还未曾具体实战确认):
        applicationContext-jms.xml

<?xml version="1.0" encoding="UTF-8"?>
<beans 
  
xmlns="http://www.springframework.org/schema/beans" 
  xmlns:amq
="http://activemq.org/config/1.0"
  xmlns:xsi
="http://www.w3.org/2001/XMLSchema-instance"
  xsi:schemaLocation
="http://www.springframework.org/schema/beans http://www.springframework.org/schema/beans/spring-beans-2.0.xsd
  http://activemq.org/config/1.0 http://activemq.apache.org/schema/core/activemq-core-5.0.0.xsd"
>
  
<!-- ActiveMQ destinations to use  -->
  
<amq:queue id="destination"  physicalName="org.apache.activemq.spring.Test.spring.embedded"/>

  
<!-- JMS ConnectionFactory to use, configuring the embedded broker using XML -->
  
<amq:connectionFactory id="jmsFactory" brokerURL="vm://localhost"/>  
  
<!-- Spring JMS Template -->
  
<bean id="jmsTemplate" class="org.springframework.jms.core.JmsTemplate">
    
<property name="connectionFactory">
      
<!-- lets wrap in a pool to avoid creating a connection per send -->
      
<bean class="org.springframework.jms.connection.SingleConnectionFactory">
        
<property name="targetConnectionFactory">
          
<ref bean="jmsFactory" />
        
</property>
      
</bean>
    
</property>
    
<property name="messageConverter">
        
<ref bean="dynamicMessageConverter"/>
    
</property>
  
</bean>
  
  
<bean id="dynamicMessageConverter" class="com.tuanzi.message.mq.impl.DynamicMessageConverter"/>  

  
<bean id="consumerJmsTemplate" class="org.springframework.jms.core.JmsTemplate">
    
<property name="connectionFactory">
        
<ref bean="jmsFactory"/>
    
</property>
    
<property name="messageConverter">
        
<ref bean="dynamicMessageConverter"/>
    
</property>
    
<property name="receiveTimeout">
        
<value>10000</value>
    
</property>
  
</bean>

  
<!-- a sample POJO which uses a Spring JmsTemplate -->
  
<bean id="simpleMessageProducer" class="com.tuanzi.message.mq.impl.SimpleMessageProducer">
    
<property name="jmsTemplate">
      
<ref bean="jmsTemplate"></ref>
    
</property>
    
<property name="destination">
      
<ref bean="destination" />
    
</property>
  
</bean>

  
<!-- a sample POJO consumer -->
  
<bean id="simpleMessageConsumer" class="com.tuanzi.message.mq.impl.SimpleMessageConsumer">
    
<property name="jmsTemplate" ref="consumerJmsTemplate"/>
    
<property name="destination" ref="destination"/>
  
</bean>
</beans>


    TODO:
    1、客户端的配置需要实战后进行进一步的确认、更新;
    2、后期视情况增加一篇《Spring2.x与ActiveMQ5.0成功集成的心得(实战篇)》


    主要参考:

http://activemq.apache.org/spring-support.html

http://activemq.apache.org/xml-reference.html

posted @ 2008-01-20 23:41 IT进行时 阅读(3422) | 评论 (3)编辑 收藏