使用场景
- 内部网络,无法访问 Docker Hub
- 控制 image 的存储方式和存储位置
- 控制 image 的部署流程
- 内部开发流程需要集成控制 image 的部署和存储
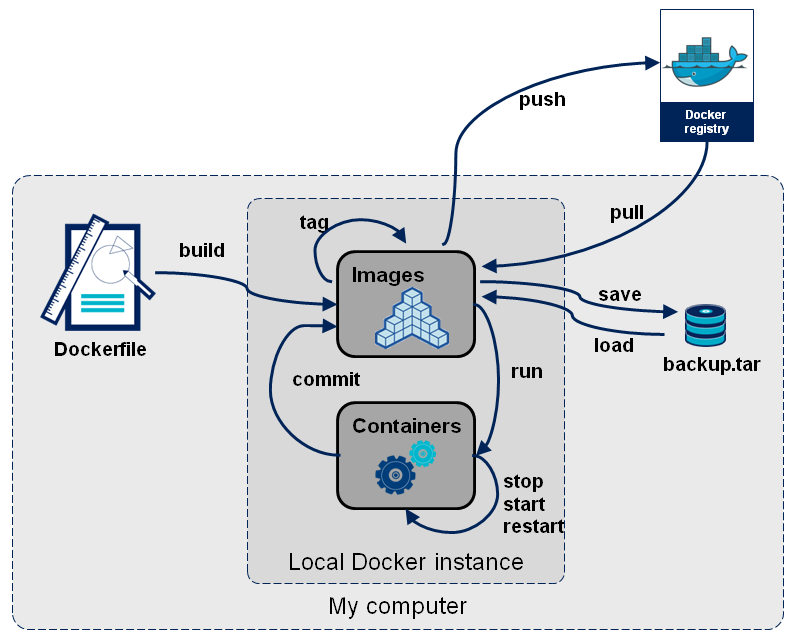
应用逻辑示意图:

安装 Registry 服务
概要
Docker Registry 在 docker hub 的名称是 registry。v1 版本的源码地址 github.com/docker/docker-registry 已经废弃,v2 版本源码地址在 github.com/docker/distribution,对应的 API 是 Docker Registry HTTP API V2。
以下安装没有使用 HTTPS 方式,启用 HTTPS 相关的证书配置参考这个文档:
官方文档参考:
最简安装(启动)
docker run -d -p 5000:5000 --name registry registry:2
以上命令未使用用户名密码登录策略。
启用登录密码
生成密码
登录密码可以通过 host 的文件传入,以下命令调用容器的 htpasswd 命令生成密码文件:
mkdir auth
docker run --entrypoint htpasswd registry:2 \
    -Bbn <USER_NAME> <PASSWORD> > auth/auth.htpasswd
启用密码
通过 –volume 参数传入密码文件:
docker run -d -p 5000:5000 --restart=always --name registry \
  --volume `PWD`/auth:/auth \
  --env "REGISTRY_AUTH=htpasswd" \
  --env "REGISTRY_AUTH_HTPASSWD_REALM=Registry Realm" \
  --env REGISTRY_AUTH_HTPASSWD_PATH=/auth/auth.htpasswd \
  registry:2
修改镜像存储
默认镜像数据存储在 Docker Volume 中,可以通过 bind mount 进行修改,参数信息参考 Volume文档。下面的例子将本机目录 PWD/images 绑定到容器的 /var/lib/registry
docker run -d -p 5000:5000 \
    --name auth-registry \
    -v `PWD`/images:/var/lib/registry \
    -e SQLALCHEMY_INDEX_DATABASE=sqlite:////opt/docker-image/docker-registry.db \
    -e STORAGE_PATH=/opt/docker-image \
    --restart=always \
    docker.onestch.com:5000/admin/registry:0.1
默认的存储引擎为本地文件系统,可以修改文件的存储引擎为 Amazon S3 bucket、Google Cloud Platform 或其他引擎,可以通过配置 config.yml 的方式修改存储配置,更多信息参考 Docker Registry 存储配置文档。
停止服务
停止 registry 容器并清理运行数据
docker stop registry && \
docker rm -v registry
验证
查看容器信息
docker ps --no-trunc
查看全部配置信息或部分信息
docker inspect <CONTAINER_ID>

docker inspect <CONTAINER_ID> | grep -C3 -e "Volumes\":"
docker inspect <CONTAINER_ID> | grep -C2 Binds
docker inspect -f '{{ .Mounts }}' <CONTAINER_ID>
查看映射的详细信息
docker volume inspect 4496b0a257b966052ef8d0743014a4f63fc9924251c8de0df0e9c70fde4c45e6
发布镜像
登录服务
如果安装(启动)的 registry 服务需要登录访问时,执行:
docker login <REGISTRY_HOST>:<REGISTRY_PORT>
输入安装时设定的用户名密码。
目标地址
使用 docker tag 设定镜像的目标地址,镜像的目标地址包括三部分
<HOST_NAME>[:<HOST_PORT>]/<IMAGE_NAME>:<IMAGE_VERSION>
例如:repo.company.com:3456/myapp:0.1
发布镜像
发布的镜像文件可以从 docker hub 中 Pull 或者本地使用 Dockerfile build 获得
Pull
docker pull registry
Build
docker build -t docker.onestch.com:5000/admin/registry:0.1 .
首先需要对镜像 tag 设定目标仓库,如果 build 的时候已经设置了目标地址,可以不用进行 tag 操作
docker tag registry:latest docker.onestch.com:5000/admin/registry:0.1
然后 Push
docker push docker.onestch.com:5000/admin/registry:0.1
验证
重新从私有仓库中获取镜像
docker pull localhost:5000/admin/registry:0.1

0.1: Pulling from admin/registry
Digest: sha256:d738e358b6910d3a53c9c7ff7bbb5eac490ab7a9b12ffb4c1c27f2c53aae9275
Status: Image is up to date for localhost:5000/admin/registry:0.1
安装 Registry UI
选择 registry ui,可选的有 atcol/docker-registry-ui、hyper/docker-registry-web、konradkleine/docker-registry-frontend等
安装运行
针对 hyper/docker-registry-web,使用 BASIC 认证,未使用 HTTPS的情况
docker run -it -p 8080:8080 \
    --rm \
    --name registry-web \
    --link auth-registry \
    -e REGISTRY_URL=http://auth-registry:5000/v2 \
    -e REGISTRY_AUTH_ENABLED=false \
    -e REGISTRY_BASIC_AUTH=YWRtaW46MTIzNDU2 \
    -e REGISTRY_NAME=docker.onestch.com:5000 hyper/docker-registry-web
命令中 auth-registry 是自定的 registry 镜像。
使用 HTTPS 时需要传入 /config/auth.key 文件,或自定义 config.xml 配置,例如:
docker run -it -p 8080:8080 –name registry-web \
–link auth-registry \
-v $(pwd)/config.yml:/conf/config.yml:ro \
hyper/docker-registry-web
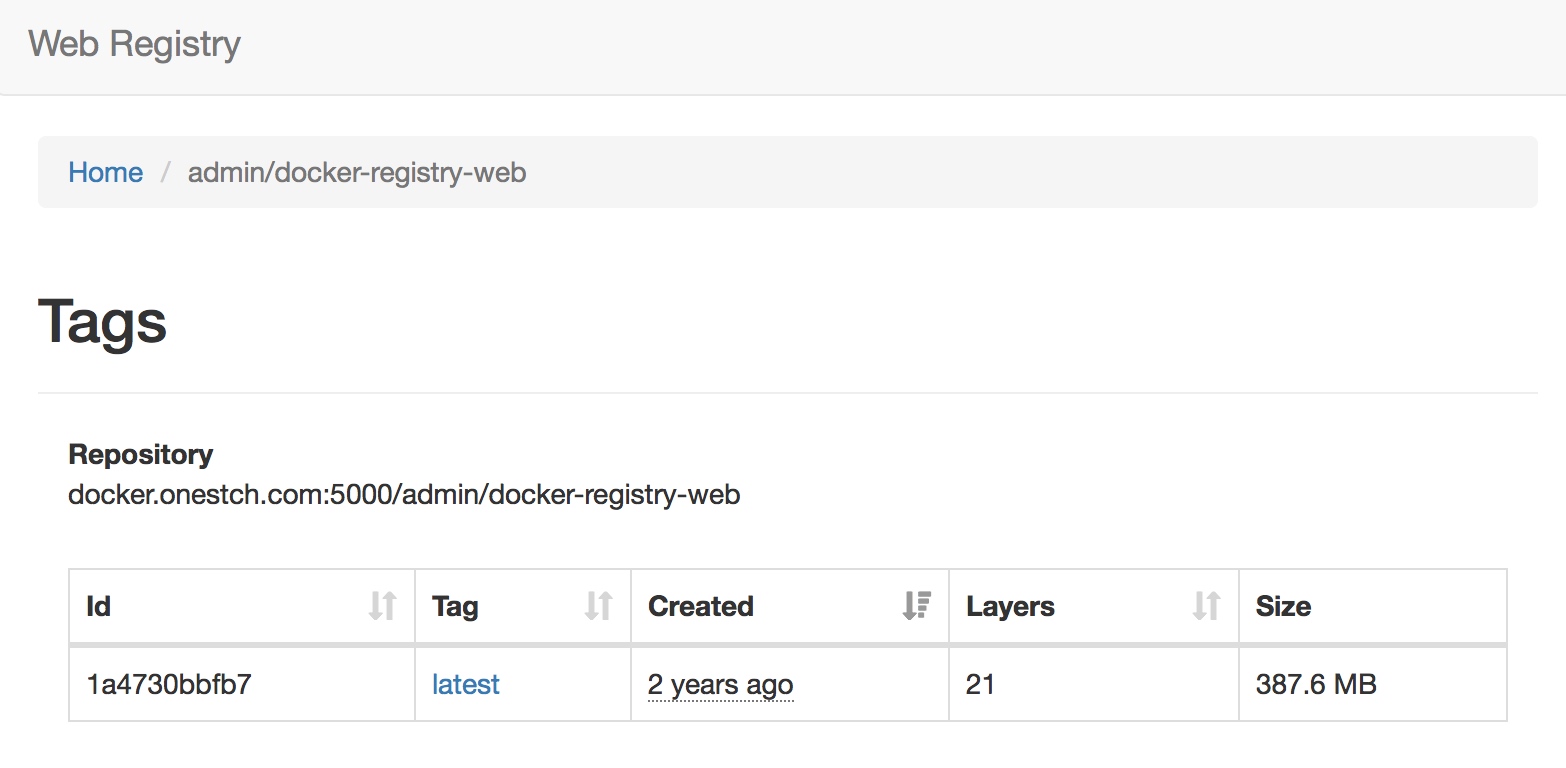
管理界面
建立了 registry 服务后,对 registry 的管理界面在本机的访问地址是http://localhost:8080,一般 ui 服务会和 registry 服务同样运行在私有网络,所以我们可以发布 registry ui 到 registry 服务器再运行。
docker tag docker.io/hyper/docker-registry-web docker.onestch.com:5000/admin/docker-registry-web

docker push docker.onestch.com:5000/admin/docker-registry-web
查看 UI 界面如下图