在窗口系统中,程序一般都是以事件驱动的。SWT的Control类实现了一些事件监听的注册方法,其子类都可以通过这些方法注册鼠标和键盘的监听器,通过实现这些监听器的接口,窗口组件就能响应相应的鼠标和键盘事件。
Control类是窗口组件类的基类,它定义了基本的事件监听方法,有如下一些:
addControlListener
addFocusListener
addHelpListener
addKeyListener
addMouseListener
addMouseTrackListener
addMouseMoveListener
addPaintListener
addTraverseListener
添加事件监听器步骤如下:
1. 创建事件监听器。例如:“new KeyListener()…”。
2. 通过Control类的子类添加事件监听器。例如:“text.addKeyListener()”。
常用事件有鼠标事件、键盘事件、焦点事件、窗口控制事件和选择事件,Control类的子类也可以定义添加相关的监听方法。
鼠标事件
在窗口系统中,鼠标基本上是必备的设备。一般来说,窗口中鼠标有鼠标单击、鼠标双击、鼠标进入窗口、鼠标退出窗口及鼠标移动等事件。
在SWT中,事件的响应是通过相应接口实现的,每个组件可以添加相应的事件响应实例来监听事件。例如“button.addMouseListener(listener)”,表示在button组件上添加鼠标的相应响应事件实例,其中,listener为实现监听器对象,下面就具体的鼠标事件进行介绍。
MouseListener接口
在SWT中,通过实现MouseListener接口来响应鼠标的按下、松开及双击事件,MouseListener接口如例程1所示。
例程1 MouseListener.java
package org.eclipse.swt.events;
import org.eclipse.swt.internal.SWTEventListener;
public interface MouseListener extends SWTEventListener {
public void mouseDoubleClick(MouseEvent e);
public void mouseDown(MouseEvent e);
public void mouseUp(MouseEvent e);
}
其中,mouseDoubleClick表示鼠标双击事件响应方法,mouseDown表示鼠标键按下事件的响应方法,mouseUp表示鼠标键起来事件的响应方法,MouseEvent为系统传入的鼠标事件的参数,MouseEvent中的button属性表示鼠标的按钮值,例如e.button等于1,表示鼠标左键按下,按钮值对应鼠标按钮如表1所示。
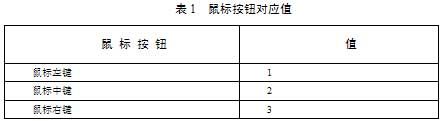
在程序中,开发人员可以根据e.button的值判断当前用户按的是哪一个鼠标键,从而确定采用什么操作。
MouseMoveListener接口
在SWT中,通过实现MouseMoveListener接口来响应鼠标的移动事件,MouseMoveListener接口如例程2所示。
例程2 MouseMoveListener.java
package org.eclipse.swt.events;
import org.eclipse.swt.internal.SWTEventListener;
public interface MouseMoveListener extends SWTEventListener {
public void mouseMove(MouseEvent e);
}
MouseMoveListener只有mouseMove方法,用来响应窗口中鼠标移动事件。
MouseTrackListener接口
在SWT中,通过实现MouseTrackListener接口来响应鼠标进入窗口、鼠标退出窗口和鼠标停放在窗口上的事件,MouseTrackListener接口如例程3所示。
例程3 MouseTrackListener.java
package org.eclipse.swt.events;
import org.eclipse.swt.internal.SWTEventListener;
public interface MouseTrackListener extends SWTEventListener {
public void mouseEnter(MouseEvent e);
public void mouseExit(MouseEvent e);
public void mouseHover(MouseEvent e);
}
其中,mouseEnter表示鼠标进入窗口事件的响应方法,mouseExit表示鼠标退出窗口事件的响应方法,mouseHover表示鼠标停放在窗口上事件的响应方法。
鼠标事件实例
为了更深入地理解鼠标事件,下面通过具体的实例演示如何响应鼠标事件。该程序只是当事件触发时简单地打印出相应信息,在具体的实例中,读者可以根据需要进行修改,代码如例程4所示。
例程4 MouseEventExample.java
/**
* 为了节省篇幅,所有的import类已经被注释
* 读者可以通过ctrl+shift+o快捷键,自动引入所依赖的类
* 如果有问题可发邮件到ganshm@gmail.com
* */
public class MouseEventExample implements MouseListener, MouseMoveListener,
MouseTrackListener {
//显示信息的标签
Label myLabel = null;
Shell shell = null;
public MouseEventExample() {
}
public void run() {
Display display = new Display();
Shell shell = new Shell(display);
shell.setLayout(new GridLayout());
shell.setSize(450, 200);
shell.setText("Mouse Event Example");
myLabel = new Label(shell, SWT.BORDER);
myLabel.setText("I ain't afraid of any old mouse");
//在当前窗口上添加鼠标响应事件
shell.addMouseListener(this);
shell.addMouseMoveListener(this);
shell.addMouseTrackListener(this);
shell.open();
while (!shell.isDisposed()) {
if (!display.readAndDispatch()) {
display.sleep();
}
}
display.dispose();
}
public static void main(String[] args) {
new MouseEventExample().run();
}
public void mouseDoubleClick(MouseEvent e) {
myLabel.setText("Double Click " + e.button + " at: " + e.x + "," + e.y);
System.out.println("Double Click " + e.button + " at: " + e.x + ","
+ e.y);
}
public void mouseDown(MouseEvent e) {
myLabel.setText("Button " + e.button + " Down at: " + e.x + "," + e.y);
System.out.println("Button " + e.button + " Down at: " + e.x + ","
+ e.y);
}
public void mouseUp(MouseEvent e) {
myLabel.setText("Button " + e.button + " Up at: " + e.x + "," + e.y);
System.out.println("Button " + e.button + " Up at: " + e.x + "," + e.y);
}
public void mouseMove(MouseEvent e) {
myLabel.setText("Mouse Move at: " + e.x + "," + e.y);
System.out.println("Mouse Move at: " + e.x + "," + e.y);
}
public void mouseEnter(MouseEvent e) {
myLabel.setText("Mouse Enter at: " + e.x + "," + e.y);
System.out.println("Mouse Enter at: " + e.x + "," + e.y);
}
public void mouseExit(MouseEvent e) {
myLabel.setText("Mouse Exit at: " + e.x + "," + e.y);
System.out.println("Mouse Exit at: " + e.x + "," + e.y);
}
public void mouseHover(MouseEvent e) {
myLabel.setText("Mouse Hover at: " + e.x + "," + e.y);
System.out.println("Mouse Hover at: " + e.x + "," + e.y);
}
}
MouseEventExample类实现了MouseListener、MouseMoveListener和MouseTrackListener 3个接口,并通过“shell.addMouseListener(this);”、“shell.addMouseMoveListener(this);”和“shell.addMouseTrackListener(this);”把自己作为监听器添加到了窗口中,程序运行效果如图1所示。

图1 鼠标事件实例
键盘事件
键盘事件是最简单,也是最常用的事件。一般来说,键盘事件有两种:键按下和键松开。SWT通过KeyListener响应键盘事件。
KeyListener接口
在SWT中,通过实现KeyListener接口来响应键按下和松开的事件。KeyListener接口如例程5所示。
例程5 KeyListener.java
package org.eclipse.swt.events;
import org.eclipse.swt.internal.SWTEventListener;
public interface KeyListener extends SWTEventListener {
public void keyPressed(KeyEvent e);
public void keyReleased(KeyEvent e);
}
其中,keyPressed表示键按下事件的响应方法,keyReleased表示键松开事件的响应方法,KeyEvent为系统传入的键盘事件的参数,用户可以通过KeyEvent参数找到相应的按键值。
键盘事件实例
为了更深入地了解键盘事件,下面通过具体的实例演示如何响应键盘事件。该程序只是当事件触发时简单地打印出相应信息,在具体的实例中,读者可以根据需要进行修改,代码如例程6所示。
例程6 KeyListenerExample.java
public class KeyListenerExample {
Display display;
Shell shell;
KeyListenerExample() {
display = new Display();
shell = new Shell(display);
shell.setSize(250, 200);
shell.setText("A KeyListener Example");
Text text = new Text(shell, SWT.BORDER);
text.setBounds(50 ,50 ,100, 20);
text.addKeyListener(new KeyListener() {
public void keyPressed(KeyEvent e) {
System.out.println("key Pressed -"+e.character);
}
public void keyReleased(KeyEvent e) {
System.out.println("key Released -"+e.character);
}
});
shell.open();
while (!shell.isDisposed()) {
if (!display.readAndDispatch())
display.sleep();
}
display.dispose();
}
public static void main(String[] args) {
new KeyListenerExample();
}
}
程序中通过匿名内部类实现监听器,这种方式在实例开发中会经常用到。另外可以通过KeyEvent取得按键的值,如上例的“e.character”得到按键的字符,程序运行效果如图2所示。
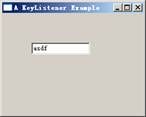
图2 键盘事件实例
焦点事件
在窗口系统中,当组件获得输入焦点或失去焦点时将触发相应的事件。SWT通过FocusListener监听焦点事件。
FocusListener接口
在SWT中,通过实现FocusListener接口来响应获得焦点和失去焦点的事件。FocusListener接口如例程7所示。
例程7 FocusListener.java
package org.eclipse.swt.events;
import org.eclipse.swt.internal.SWTEventListener;
public interface FocusListener extends SWTEventListener {
public void focusGained(FocusEvent e);
public void focusLost(FocusEvent e);
}
其中,focusGained表示组件获得焦点事件的响应方法,focusLost表示组件失去焦点事件的响应方法,FocusEvent为系统传入的焦点事件的参数,用户可以通过FocusEvent参数找到相应的组件。
焦点事件实例
为了更深入地理解焦点事件,下面通过具体的实例演示如何响应焦点事件。该程序只是简单地改变当前获得焦点和失去焦点组件的显示信息,在具体的实例中,读者可以根据需要进行修改,代码如例程8所示。
例程8 FocusListenerExample.java
public class FocusListenerExample {
public static void main(String[] args) {
Display display = new Display();
Shell shell = new Shell(display);
shell.setLayout(new GridLayout(3, true));
shell.setText("One Potato, Two Potato");
//新建焦点监听器
FocusListener listener = new FocusListener() {
public void focusGained(FocusEvent event) {
//获得触发事件的组件
Button button = (Button) event.getSource();
    //焦点获得时改变显示文本
button.setText("I'm It!");
}
public void focusLost(FocusEvent event) {
    //获得触发事件的组件
Button button = (Button) event.getSource();
//焦点获得时改变显示文本
button.setText("Pick Me!");
}
};
for (int i = 0; i < 6; i++) {
Button button = new Button(shell, SWT.PUSH);
button.setLayoutData(new GridData(GridData.FILL_HORIZONTAL));
button.setText("Pick Me!");
button.addFocusListener(listener);
}
shell.pack();
shell.open();
while (!shell.isDisposed()) {
if (!display.readAndDispatch()) {
display.sleep();
}
}
display.dispose();
}
}
程序中显示了6个按钮,并为按钮添加上了焦点监听器,程序运行效果如图3所示。
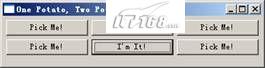
图3 焦点事件实例
窗口控制事件
在窗口系统中,当组件被移动或改变大小时将触发相应的事件。SWT通过ControlListener监听窗口控制事件。
ControlListener接口
在SWT中,通过实现ControlListener接口来响应组件被移动或改变大小的事件。ControlListener接口如例程9所示。
例程9 ControlListener.java
package org.eclipse.swt.events;
import org.eclipse.swt.internal.SWTEventListener;
public interface ControlListener extends SWTEventListener {
public void controlMoved(ControlEvent e);
public void controlResized(ControlEvent e);
}
其中,controlMoved表示组件被移动事件的响应方法,controlResized表示组件被改变大小事件的响应方法,ControlEvent为系统传入的窗口控制事件的参数,用户可以通过ControlEvent参数找到相应的组件。
窗口控制事件实例
为了更深入地理解窗口控制事件,下面通过具体的实例演示如何响应窗口控制事件。该程序只是简单地打印组件被移动或改变大小的信息,在具体的实例中,读者可以根据需要进行修改,代码如例程10所示。
例程10 ControlListenerExample.java
public class ControlListenerExample {
public void run() {
Display display = new Display();
Shell shell = new Shell(display);
shell.addControlListener(new ControlListener() {
public void controlMoved(ControlEvent e) {
System.out.println("control move");
}
public void controlResized(ControlEvent e) {
System.out.println("control resize");
}
}
);
shell.pack();
shell.open();
while (!shell.isDisposed()) {
if (!display.readAndDispatch()) {
display.sleep();
}
}
display.dispose();
}
public static void main(String[] args) {
new ControlListenerExample().run();
}
}
上例显示的只是一个空白的窗口,当用户移动窗口或改变窗口大小时,将会触发监听器所实现的事件。
选择事件
SWT的很多组件都实现了选择组件事件的监听机制,例如按钮、菜单项的选择,当选择了相关的菜单项或组件时,将触发相应的事件。
SelectionListener接口
在SWT中,通过实现SelectionListener接口来响应选择组件事件。SelectionListener接口如例程11所示。
例程11 SelectionListener.java
package org.eclipse.swt.events;
import org.eclipse.swt.internal.SWTEventListener;
public interface SelectionListener extends SWTEventListener {
public void widgetSelected(SelectionEvent e);
public void widgetDefaultSelected(SelectionEvent e);
}
其中,widgetSelected表示组件被选择事件的响应方法,widgetDefaultSelected表示组件默认选择事件的响应方法,SelectionEvent为系统传入的选择事件的参数。
选择组件事件实例
为了更深入地理解选择组件事件,下面通过具体的实例演示如何响应选择组件事件。该程序只是简单地打印组件被移动或改变大小的信息,在具体的实例中,读者可以根据需要进行修改,代码如例程12所示。
例程12 SelectonListenerExample.java
public class SelectonListenerExample {
public static void main(String[] args) {
Display display = new Display();
final Shell mainShell = new Shell(display);
Button button = new Button(mainShell, SWT.PUSH);
button.setText("Close Me!");
button.setBounds(10, 10, 100, 30);
// 添加选择组件事件
button.addSelectionListener(new SelectionListener() {
public void widgetSelected(SelectionEvent event) {
System.out.println("select button");
mainShell.close();
}
public void widgetDefaultSelected(SelectionEvent e) {
// 不执行任何操作
}
});
mainShell.open();
while (!mainShell.isDisposed()) {
if (!display.readAndDispatch()) {
display.sleep();
}
}
display.dispose();
}
}
上例中只是添加了一个按钮,当选择按钮时关闭当前窗口。
其他常用事件
SWT中为了实现特定的功能,很多组件都提供了特定事件的响应,本节将通过实例介绍HelpListener、VerifyListener和ModifyListener 3个特定的事件监听器。
HelpListener、VerifyListener和ModifyListener监听器的功能
HelpListener监听器通过helpRequested(HelpEvent e)方法响应用户的帮助请求事件,当用户在组件获得焦点后按【F1】键将触发此事件。
VerifyListener监听器通过verifyText(VerifyEvent e)方法响应校验输入事件。此监听器只对文本输入校验,当用户输入了数据后,verifyText方法将通过设置VerifyEvent中的doit属性判断输入是否正确,从而确定修改是否有效。doit属性为true时修改有效,即“e.doit = true;”。
ModifyListener监听器通过modifyText(ModifyEvent e)方法响应文本被修改的事件。此监听器只对文本输入校验。
提示:如果VerifyListener监听器和ModifyListener监听器同时存在的话,会先响应校验输入事件,如果校验成功再响应修改事件。
HelpListener、VerifyListener和ModifyListener监听器实例
在此实例中,用户可以输入华氏温度和摄氏温度,通过监听器判断输入是否正确及计算相应的摄氏温度和华氏温度,另外,还可以按【F1】键获得当前组件的信息,代码如例程13所示。
例程13 MultipleListenersExample.java
public class MultipleListenersExample implements HelpListener, VerifyListener,
ModifyListener {
private static final double FIVE_NINTHS = 5.0 / 9.0;
private static final double NINE_FIFTHS = 9.0 / 5.0;
private Text fahrenheit;
private Text celsius;
private Label help;
public void run() {
Display display = new Display();
Shell shell = new Shell(display);
shell.setText("Temperatures");
createContents(shell);
shell.pack();
shell.open();
while (!shell.isDisposed()) {
if (!display.readAndDispatch()) {
display.sleep();
}
}
display.dispose();
}
private void createContents(Shell shell) {
shell.setLayout(new GridLayout(3, true));
new Label(shell, SWT.LEFT).setText("Fahrenheit:");
fahrenheit = new Text(shell, SWT.BORDER);
GridData data = new GridData(GridData.FILL_HORIZONTAL);
data.horizontalSpan = 2;
fahrenheit.setLayoutData(data);
fahrenheit.setData("Type a temperature in Fahrenheit");
// 为华氏温度文本框添加监听器
fahrenheit.addHelpListener(this);
fahrenheit.addVerifyListener(this);
fahrenheit.addModifyListener(this);
new Label(shell, SWT.LEFT).setText("Celsius:");
celsius = new Text(shell, SWT.BORDER);
data = new GridData(GridData.FILL_HORIZONTAL);
data.horizontalSpan = 2;
celsius.setLayoutData(data);
celsius.setData("Type a temperature in Celsius");
//为摄氏温度文本框添加监听器
celsius.addHelpListener(this);
celsius.addVerifyListener(this);
celsius.addModifyListener(this);
help = new Label(shell, SWT.LEFT | SWT.BORDER);
data = new GridData(GridData.FILL_HORIZONTAL);
data.horizontalSpan = 3;
help.setLayoutData(data);
}
//响应帮助事件
public void helpRequested(HelpEvent event) {
help.setText((String) event.widget.getData());
}
 //响应校验事件
public void verifyText(VerifyEvent event) {
event.doit = false;
char myChar = event.character;
String text = ((Text) event.widget).getText();
if (myChar == '-' && text.length() == 0) event.doit = true;
if (Character.isDigit(myChar)) event.doit = true;
if (myChar == '\b') event.doit = true;
}
 //响应文本修改的事件
public void modifyText(ModifyEvent event) {
// 删除监听器,从而在modifyText过程中不会触发事件
celsius.removeVerifyListener(this);
celsius.removeModifyListener(this);
fahrenheit.removeVerifyListener(this);
fahrenheit.removeModifyListener(this);
Text text = (Text) event.widget;
try {
int temp = Integer.parseInt(text.getText());
if (text == fahrenheit) {
celsius.setText(String.valueOf((int) (FIVE_NINTHS * (temp - 32))));
} else {
fahrenheit.setText(String.valueOf((int) (NINE_FIFTHS * temp + 32)));
}
} catch (NumberFormatException e) { /* Ignore */ }
//添加监听器
celsius.addVerifyListener(this);
celsius.addModifyListener(this);
fahrenheit.addVerifyListener(this);
fahrenheit.addModifyListener(this);
}
public static void main(String[] args) {
new MultipleListenersExample().run();
}
}
程序运行效果如图4所示。
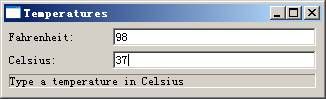
图4 文本监听器
提示:一般来说,监听器都有一个抽象的Adaper类实现监听器的方法,例如FocusAdapter实现了FocusListener的方法(方法为空)。如果读者不想实现监听器的全部方法则可以继承监听器的Adaper类,否则要实现监听器接口的所有方法。