|
|
2007年9月4日
一、软件准备:
IBM Lotus Domino Server 7.0.2 ;
IBM Lotus Notes Designer and Admin Client 7.0.2 ;
IBM Lotus Sametime Server 7.5.1 ;
IBM Lotus Sametime Connect 7.5.1 ;
二、安装顺序:
Domino Server->Sametime Server->Notes Admin Client->Sametime Client
三、Domino Server安装:
1.按照提示安装Domino Server,选择Domino Enterprise Server
2.运行Server Setup Program
3.选择Set up the first server or a new Domino domain.
4.填写Server name和Server title,Organization Name和Organization Certifier password
5.填写管理员的名称和密码,一定要记录该用户名和密码
6.选中Domino Server提供的Http Services
7.不必选中LDAP Service
四、Sametime Server安装:
1.按照提示安装Sametime Server,如果需要激活80端口,选中Enable HTTP tunneling。
2.启动Sametime欢迎界面, http://domain/stcenter.nsf,登录至管理页面,如果无法登录,可能是域名解析问题,将域名与ip的对应关系添加到windows/system32/drivers/etc/host文件中
3.如果欢迎界面没有用户注册选项,需管理员开启该功能。
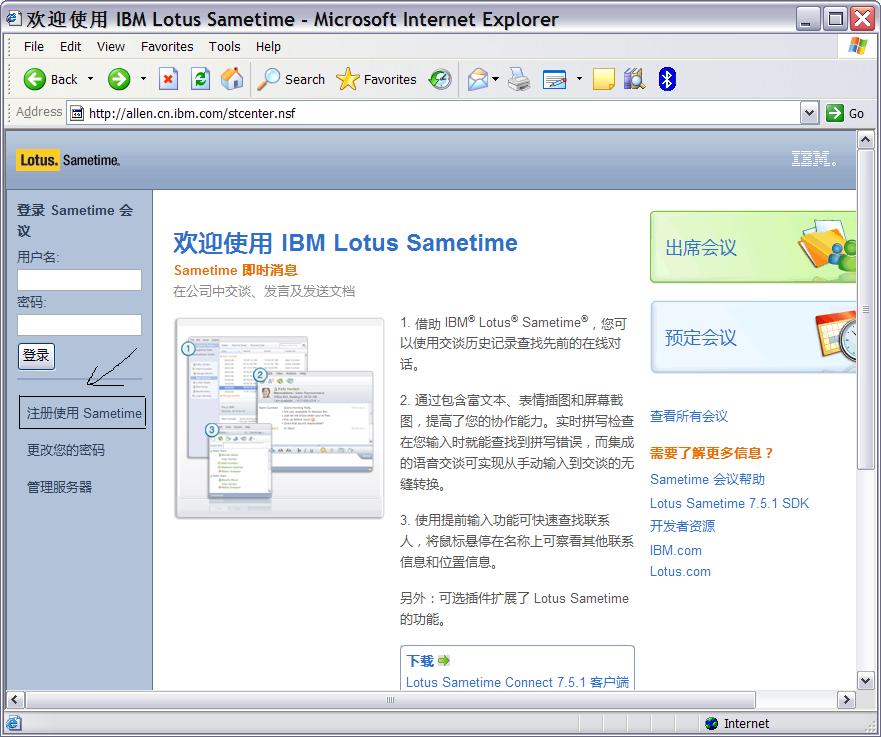
在管理页面中选择Domino目录->Domino,勾选
2007年1月4日
向已有的TreeViewer和TableViewer上添加编辑功能,可以使用CellEditor和CellModifier。
CellEditor定义了某个列被编辑时显示的外观,它可以是文本框、下拉列表框或单选框,也可以自己定义。
通常使用的CellEditor的子类就是:CheckboxCellEditor、ComboBoxCellEditor和TextCellEditor。
CellEditor一般用数组来保存,如果某个列不需要编辑,则可将该列的CellEditor设为null。
当CellEditor的数组定义完后,即可利用setCellEditors(CellEditor[] editors)方法将该数组设置到对应的TreeViewer或TableViewer中去。例如:
CellEditor[] cellEditors
=
new
CellEditor[
5
];
cellEditors[
0
]
=
new
TextCellEditor(tableViewer.getTable());
cellEditors[
1
]
=
null
;
cellEditors[
2
]
=
new
ComboBoxCellEditor(tableViewer.getTable(),
new
String[]{
"
first
"
,
"
second
"
,
"
third
"
,
"
forth
"
});
cellEditors[
3
]
=
new
CheckboxCellEditor(tableViewer.getTable());
cellEditors[
4
]
=
new
CustomizedTextCellEditor(tableViewer.getTable());
tableViewer.setCellEditors(cellEditors);
其中CustomizedTextCellEditor是自定义的CellEditor,避免了设置value时造成的空指针异常。   protected class CustomizedTextCellEditor extends TextCellEditor protected class CustomizedTextCellEditor extends TextCellEditor { {
  public CustomizedTextCellEditor(Composite parent){ public CustomizedTextCellEditor(Composite parent){
 super(parent); super(parent);
 } }
protected void doSetValue(Object value) {
if(value == null)
return;
super.doSetValue(value);
}
 } }
CellEditor负责外观,它对要编辑的模型信息一无所知。所以jface中引入了ICellModifier接口,将model与CellEditor联系在一起。为了确定在CellModifier中的列,需要定义columnProperties的String[]数组,用以区分不同列对应的不同属性。使用setColumnProperties(String[] columnProperties)设置该属性集。
ICellModifier定义了三个接口方法: public boolean canModify(Object element, String property);
该方法判断何时该列可以被编辑。其中element是对应的model。返回true表示此时该列可以被编辑。 public Object getValue(Object element, String property);
该方法一般在activateCellEditor()时调用,用于设定CellEditor的初始值。其中element是对应的model。 此处虽然可以返回Object类型的引用,但是使用时需小心,特定的CellEditor仅接受特定类型的Value。比如:
TextCellEditor对应String类型的Value;
ComboBoxCellEditor对应Integer类型的Value;
CheckBoxCellEditor对应Boolean类型的Value;
若返回了不适合的Value对象,则会抛出AssertionFailedException。 public void modify(Object element, String property, Object value);
该方法执行保存修改。一般在saveEditorValue之类的方法中调用。此处的element不再是model,而是Item类型的引用。取用对应的模型,需要使用((Item) element).getData()方法。一般此处的value值,也就是当前CellEditor的Value值,使用CellEditor.getValue()得到。另外,在执行完更改后,需要刷新对应的TableViewer或TreeViewer,使做出的更新可见。
org.eclipse.debug.internal.ui.elements.adapters.DefaultVariableCellModifier是ICellModifier的一个完整实现:  import org.eclipse.debug.core.DebugException; import org.eclipse.debug.core.DebugException;
import org.eclipse.debug.core.model.IVariable;
import org.eclipse.debug.internal.ui.DebugUIPlugin;
import org.eclipse.debug.internal.ui.DefaultLabelProvider;
import org.eclipse.debug.internal.ui.VariableValueEditorManager;
import org.eclipse.debug.ui.actions.IVariableValueEditor;
import org.eclipse.jface.viewers.ICellModifier;
/** *//**
* @since 3.2
*
*/
public class DefaultVariableCellModifier implements ICellModifier {
/**//* (non-Javadoc)
* @see org.eclipse.jface.viewers.ICellModifier#canModify(java.lang.Object, java.lang.String)
*/
public boolean canModify(Object element, String property) {
if (VariableColumnPresentation.COLUMN_VARIABLE_VALUE.equals(property)) {
if (element instanceof IVariable) {
return ((IVariable) element).supportsValueModification();
}
}
return false;
}
/**//* (non-Javadoc)
* @see org.eclipse.jface.viewers.ICellModifier#getValue(java.lang.Object, java.lang.String)
*/
public Object getValue(Object element, String property) {
if (VariableColumnPresentation.COLUMN_VARIABLE_VALUE.equals(property)) {
if (element instanceof IVariable) {
IVariable variable = (IVariable) element;
try {
return DefaultLabelProvider.escapeSpecialChars(variable.getValue().getValueString());
} catch (DebugException e) {
DebugUIPlugin.log(e);
}
}
}
return null;
}
/**//* (non-Javadoc)
* @see org.eclipse.jface.viewers.ICellModifier#modify(java.lang.Object, java.lang.String, java.lang.Object)
*/
public void modify(Object element, String property, Object value) {
Object oldValue = getValue(element, property);
if (!value.equals(oldValue)) {
if (VariableColumnPresentation.COLUMN_VARIABLE_VALUE.equals(property)) {
if (element instanceof IVariable) {
IVariable variable = (IVariable) element;
IVariableValueEditor editor = VariableValueEditorManager.getDefault().getVariableValueEditor(variable.getModelIdentifier());
if (value instanceof String) {
value = DefaultLabelProvider.encodeEsacpedChars((String)value);
}
if (editor != null) {
if (editor.saveVariable(variable, (String) value, DebugUIPlugin.getShell())) {
return;
}
}
try {
variable.setValue((String) value);
} catch (DebugException e) {
DebugUIPlugin.errorDialog(DebugUIPlugin.getShell(), Messages.VariableColumnPresentation_4, Messages.VariableColumnPresentation_5, e.getStatus());
}
}
}
}
}
}
2006年12月29日
GEF编辑器是构架在Draw2D的FigureCanvas上的,而FigureCanvas是swt中Canvas的子类.
当得到FigureCanvas之后,就可以得到GEF编辑器的区域和GEF编辑器内部画布的大小:
编辑器区域大小:FigureCanvas.getBounds();
这是运用了FigureCanvas是Canvas子类的特点,调用SWT的Canvas的getBounds()方法,即调用Control的getBounds()方法.
画布大小:FigureCanvas.getContents.getBounds();
这是运用了IFigure的getBounds()方法, 这两个区域矩形不可混淆.
若要触发GEF编辑器的滚动条操作,仅需调用FigureCanvas的scrollToX(int hOffset)和scrollToY(int vOffset)即可.
获取FigureCanvas的方法也比较简单.通过EditPart.getViewer()获得EditPartViewer,一般情况下EditPartViewer的Control就是FigureCanvas.
列出代码如下:
FigureCanvas canvas
=
(FigureCanvas)EditPart.getViewer().getControl();
canvas.scrollToX(
500
);
canvas.scrollToY(
600
);
System.out.println(canvas.getBounds());
System.out.println(canvas.getContents().getBounds());
这个函数用法经常忘..
(String[])ArrayList.toArray(new String[0]);
摘要: 树节点定义:class TreeNode { public TreeNode left; public TreeNode right; public int value; public TreeNode(TreeNode left, TreeNode right, int value) { this.left = left; this.right... 阅读全文
转换成相对坐标,要运用translateToRelative(Point point)方法.
例如,在Eclipse Editor视图中加入Figure,需要计算出相对于HostFigure的坐标,才能正确将figure放在鼠标点击的位置.可以如下这样做:
在getCreateCommand(CreateRequest request)方法中,加入如下语句:
Point location = request.getLocation().getCopy();
getHostFigure().translateToRelative(location);
如此获得的location就是相对于HostFigure的坐标.
能够获得当前光标绝对坐标的方法是:
Display.getDefault().getCursorLocation()
最近项目中出现了一个bug,提示是Resource can not sync with file system.是文件系统不同步的问题,需要手动刷新一下资源管理器.
刷新资源管理器调用方法:
RefreshLocal
public void refreshLocal(int depth, IProgressMonitor monitor)
throws CoreException
Refreshes the resource hierarchy from this resource and its children (to the specified depth) relative to the local file system. Creations, deletions, and changes detected in the local file system will be reflected in the workspace's resource tree. This resource need not exist or be local.
This method may discover changes to resources; any such changes will be reported in a subsequent resource change event.
If a new file or directory is discovered in the local file system at or below the location of this resource, any parent folders required to contain the new resource in the workspace will also be created automatically as required.
This method is long-running; progress and cancellation are provided by the given progress monitor.
Parameters:
depth - valid values are DEPTH_ZERO, DEPTH_ONE, or DEPTH_INFINITE
monitor - a progress monitor, or null if progress reporting is not desired
Throws:
CoreException - if this method fails. Reasons include:
Resource changes are disallowed during certain types of resource change event notification. See IResourceChangeEvent for more details.
OperationCanceledException - if the operation is canceled. Cancelation can occur even if no progress monitor is provided.
See Also:
DEPTH_ZERO, DEPTH_ONE, DEPTH_INFINITE, IResourceRuleFactory.refreshRule(IResource)
该方法位于org.eclipse.core.resources.IResource
我的调用方法是:
ResourcesPlugin.getWorkspace().getRoot().refreshLocal(IResource.DEPTH_INFINITE, monitor);
|