|
|
原代码:http://www.blogjava.net/Files/Good-Game/myAnt.rar
对一般开发 使用的ant <?xml version="1.0"?>
<project name="general" default="doc">
<!-- 使用说明:
需要设置的参数 : src.dir 、 classes.dir
-->
<!-- properies -->
<property name="src.dir" value="src" />
<property name="lib.dir" value="lib" />
<property name="report.dir" value="report" />
<property name="classes.dir" value="bin" />
<property name="dist.dir" value="dist" />
<property name="doc.dir" value="doc"/>
<!-- 定义classpath -->
<path id="master-classpath">
<fileset file="${lib.dir}/*.jar" />
<pathelement path="${classes.dir}"/>
</path>
<!-- 初始化任务 -->
<target name="init">
<copy todir ="${classes.dir}">
<fileset dir ="${src.dir}">
<exclude name="**/build.xml"/>
<exclude name="**/*.java" />
</fileset >
</copy >
</target>
<!-- 编译 -->
<target name="compile" depends="init" description="compile the source files">
<mkdir dir="${classes.dir}"/>
<javac srcdir="${src.dir}" destdir="${classes.dir}" target="1.4">
<classpath refid="master-classpath"/>
</javac>
</target>
<!-- 测试 -->
<target name="test" depends="compile" description="run junit test">
<mkdir dir="${report.dir}"/>
<junit printsummary="on"
haltonfailure="false"
failureproperty="tests.failed"
showoutput="true">
<classpath refid="master-classpath" />
<formatter type="plain"/>
<batchtest todir="${report.dir}">
<fileset dir="${classes.dir}">
<include name="**/Test*"/>
</fileset>
</batchtest>
</junit>
<fail if="tests.failed">
***********************************************************
**** One or more tests failed! Check the output  **** ****
***********************************************************
</fail>
</target>
<!-- 打包成jar -->
<target name="pack" depends="test" description="make .jar file">
<mkdir dir="${dist.dir}" />
<jar destfile="${dist.dir}/hello.jar" basedir="${classes.dir}">
<exclude name="**/*Test.*" />
<exclude name="**/Test*.*" />
</jar>
</target>
<!-- 输出api文档 -->
<target name="doc" depends="pack" description="create api doc">
<mkdir dir="${doc.dir}" />
<javadoc
destdir="${doc.dir}"
author="true"
version="true"
use="true"
windowtitle="Test API">
<fileset dir="src" defaultexcludes="yes">
<include name="**/**.java"/>
<exclude name="**/*Test.java" />
<exclude name="**/Test*.*" />
</fileset>
</javadoc>
</target>
<!-- clean doc -->
<target name="clean_doc" description="create api doc">
<delete includeEmptyDirs = "true">
<fileset dir="${doc.dir}"/>
</delete >
</target>
<!-- clean class and lib -->
<target name="clean_class_dist" description="create class dist">
<delete>
<fileset dir="${classes.dir}"/>
<fileset dir="${dist.dir}"/>
</delete >
</target>
</project> ant XDoclet Generation <?xml version="1.0" encoding="UTF-8"?>
<project name="ant XDoclet Generation" default="_xdoclet_generation_">
<property file="xdoclet-build.properties"/>
<!-- 使用说明:
需要设置的参数 : java.home 、 xdoclet.home
-->
<property environment="env"/>
<property name="java.home" value="${env.JAVA_HOME}"/>
<property name="xdoclet.home"
value="D:\hbn\hibernate-3.2\xdoclet-1.2.3"/>
<path id="xdoclet.classpath">
<pathelement location="${java.home}/**/*.jar"/>
<fileset dir="${xdoclet.home}">
<include name="**/*.jar"/>
</fileset>
</path>
<target name="_xdoclet_generation_" depends="N10004"/>
<target name="N10004" description="Standard Hibernate">
<taskdef classpathref="xdoclet.classpath"
classname="xdoclet.modules.hibernate.HibernateDocletTask"
name="hibernatedoclet"/>
<hibernatedoclet excludedTags="@version,@author,@todo,@see"
destDir="src"
addedTags="@xdoclet-generated at ${TODAY},@copyright The XDoclet Team,@author XDoclet,@version ${version}" >
<fileset dir="src" includes="**/*.java" >
</fileset>
<hibernate>
</hibernate>
</hibernatedoclet>
</target>
</project>
对hbn深入过程中,发现开发和设计持久层 到项目后期,越来越困难。在次仔细查分析。特总结一种开发方法。留下与大家分享,欢迎拍砖。
开发过程描述:1.使用 MyEclipes -> uml 创建类图 2.用 Generate java Code 根据类图生成 java文件 3.使用 Xdoclet 添加 Hbn 标签 4.配置myEclipes -> XDoclet 自动生成 mapping.hbn.xml 5.使用myEclipes 把项目转化成 hibernate 项目 6.使用 org.hibernate.tool.hbm2ddl.SchemaExport 建表
开发过程好处:1)完全是面向对象,不需要写xml配置文件(XDoclet); 2)项目后期修改容易面对uml 3)用myEclipes 这些都不用去找,直接拿来用(uml,XDoclet,hibernate ..) 下面就来个 小例把
1.MyEclipes 使用 uml 参考-> MyEclipse 5.5 UML 入门视频 ( 作者:BeanSoft) 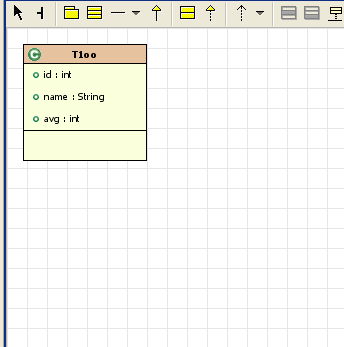 2.由uml生成类文件 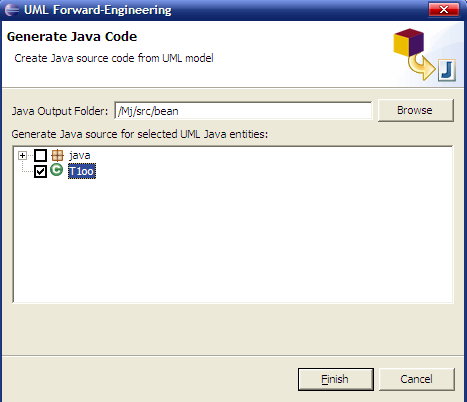 3.先使用 eclipes的 快键方法写 get/set 方法, 类文件文件添加 hbn XDoclet的注解 package bean;
/**
* @hibernate.class table="t1oo"
*/
public class T1oo {
public int id;
public String name;
public int avg;
/**
* @hibernate.property
* column="avg"
* length="4"
* not-null="true"
*/
public int getAvg() {
return avg;
}
public void setAvg(int avg) {
this.avg = avg;
}
/**
* @hibernate.id
* column="id"
* generator-class="hilo"
*/
public int getId() {
return id;
}
public void setId(int id) {
this.id = id;
}
/**
* @hibernate.property
* column="name"
* not-null="true"
* @return
*/
public String getName() {
return name;
}
public void setName(String name) {
this.name = name;
}
} 4.用myEclipes 生成 XDoclet 在项目点右键-> properties -> MyEclipse-XDoclet -> 在Configuration 空白初点右键 选 add standard -> ... hbn 后面不太好描述 可以查下很简单的 。配置好了运行后就可以看见 多了 个 T1oo.hbm.xml 文件; 5.myEclipes + hbn 就不多说了 6. hbn2java: public void testCreateTable()throws Exception{
HibernateSessionFactory.currentSession();
HibernateSessionFactory.closeSession();
Field[] ff = HibernateSessionFactory.class.getDeclaredFields();
Field fie = null ;
for(int i=0;i<ff.length;i++){
if( ff[i].getType().equals( Configuration.class ) ){
fie = ff[i];
}
}
fie.setAccessible(true);
Configuration cfg = (Configuration)fie.get(HibernateSessionFactory.class);
cfg.addInputStream( this.getClass().getResourceAsStream("/bean/T1oo.hbm.xml") );
//建表
SchemaExport dbExport = new SchemaExport(cfg);
dbExport.setOutputFile("c:\\db\\test.txt");
dbExport.create(true, true);
} sql: drop table if exists t1oo
drop table if exists hibernate_unique_key
create table t1oo (
id integer not null,
avg integer not null,
name varchar(255) not null,
primary key (id)
)
create table hibernate_unique_key (
next_hi integer
)
insert into hibernate_unique_key values ( 0 )
效果: mysql> show tables; +----------------------+ | Tables_in_hbn | +----------------------+ | hibernate_unique_key | | t1oo | +----------------------+ 2 rows in set (0.00 sec)
表关系 T1oo ->ont-to-many-> T2oo (t1oo.id-t2oo.aid) 1.单条select延迟加载 Iterator it = session.createQuery("from T1oo ").iterate();
while(it.hasNext()){
T1oo t1 = (T1oo)it.next();
t1.getName();
}
/*运行语句 n+1
这就只加载 id
Hibernate: select t1oo0_.id as col_0_0_ from t1oo t1oo0_
此是在 t1.getName(); 延迟加载的
Hibernate: select t1oo0_.id as id0_, t1oo0_.name as name0_0_ from t1oo t1oo0_ where t1oo0_.id=?
Hibernate: select t1oo0_.id as id0_, t1oo0_.name as name0_0_ from t1oo t1oo0_ where t1oo0_.id=?
*/ 2.级连查询: 1)set排序 <set ... order-by="avg desc" ...> 从大到小 2)batch-size="10" 用法是 select * from t2oo where aid in (?,?,?....) 3) 如果想忽略延迟,并有一定逻辑全部加载,这有两中解决办法: 1).内连 mysql> select *
-> from t1oo t1oo0_ inner join t2oo t2ooset1_ on t1oo0_.id=t2ooset1_.aid;
+----+-----------+----+-----+------+---------+
| id | name | id | avg | aid | version |
+----+-----------+----+-----+------+---------+
| 1 | liukaiyi | 1 | 23 | 1 | 1 |
| 1 | liukaiyi | 2 | 24 | 1 | 1 |
| 1 | liukaiyi | 3 | 25 | 1 | 1 |
| 2 | liukaiyi2 | 4 | 26 | 2 | 0 |
+----+-----------+----+-----+------+---------+
Iterator it = new HashSet(session.createQuery("from T1oo t1 inner join fetch t1.t2ooSet t2where t2.id<=3").list()).iterator();
while(it.hasNext()){
T1oo t1 = (T1oo)it.next();
System.out.println(t1.getName());
for(Iterator itr=t1.getT2ooSet().iterator();itr.hasNext(); ){
T2oo t2 = (T2oo)itr.next();
System.out.println(" "+ t2.getAvg() );
}
} 结果是: Hibernate: select t1oo0_.id as id0_, t2ooset1_.id as id1_, t1oo0_.name as name0_0_, t2ooset1_.version as version1_1_, t2ooset1_.avg as avg1_1_, t2ooset1_.aid as aid1_1_, t2ooset1_.aid as aid0__, t2ooset1_.id as id0__ from t1oo t1oo0_ inner join t2oo t2ooset1_ on t1oo0_.id=t2ooset1_.aid where t2ooset1_.id<=3
liukaiyi
24
23
25
在hibernate.cfg.xml 中添加缓存 t1oo 一对多 t2oo (t2ooSet) <property name="cache.provider_class">org.hibernate.cache.EhCacheProvider</property>
<property name="hibernate.cache.use_query_cache">true</property>
<mapping resource="hbn/bean/T1oo.hbm.xml" />
<mapping resource="hbn/bean/T2oo.hbm.xml" />
<class-cache class="hbn.bean.T1oo" usage="read-only" />
<collection-cache collection="hbn.bean.T1oo.t2ooSet" usage="read-only" />
<class-cache class="hbn.bean.T2oo" usage="read-only" /> 在src根目录下 ehcache.xml <?xml version="1.0" encoding="UTF-8"?>
<ehcache>
<diskStore path="java.io.tmpdir"/>
<defaultCache
maxElementsInMemory="10000" //最大缓存数目
eternal="false"<!-- 缓存是否持久 -->
timeToIdleSeconds="120" <!-- 当缓存闲置n秒后销毁 -->
timeToLiveSeconds="120"<!-- 当缓存存活n秒后销毁-->
overflowToDisk="true"<!-- 是否保存到磁盘,当系统当机时-->
diskPersistent="false"
diskExpiryThreadIntervalSeconds="120"/>
<cache
name="hbn.bean.T1oo"
maxElementsInMemory="450"
eternal="false"
timeToLiveSeconds="600"
overflowToDisk="true"/>
</ehcache> 测试: public void testCa()throws Exception{
System.out.println( getT1ooAll() );
Thread.sleep(2*1000);
System.out.println( getT1ooAll() );
} 控制台输出 Hibernate: select t1oo0_.id as id, t1oo0_.name as name0_ from t1oo t1oo0_ limit ?
Hibernate: select t2ooset0_.aid as aid1_, t2ooset0_.id as id1_, t2ooset0_.id as id0_, t2ooset0_.version as version1_0_, t2ooset0_.avg as avg1_0_, t2ooset0_.aid as aid1_0_ from t2oo t2ooset0_ where t2ooset0_.aid=?
Hibernate: select t2ooset0_.aid as aid1_, t2ooset0_.id as id1_, t2ooset0_.id as id0_, t2ooset0_.version as version1_0_, t2ooset0_.avg as avg1_0_, t2ooset0_.aid as aid1_0_ from t2oo t2ooset0_ where t2ooset0_.aid=?
24 : 23 : 25 : 2
//在这缓存成功 没向数据库提交 sql语句
24 : 23 : 25 : 2
在此特别感谢:sql技术群主 ☆蓝蓝心情★
谢谢在中午远程教我 EJB
原理参考:EJB原理学习_RMIC
这可能是我第一个EJB 和大家分享:
环境:jboss+ejb+jdk5.0
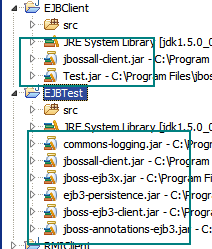
需要jar包
注:Client中 Test.jar 就是 EJBTest(服务器打的包)
EJB组件:
接口
package
org.test;
import
javax.ejb.Remote;
//在我的EJB原理中介绍
//是可以被
rmic 的接口
@Remote
public
interface
IHello {
public
String sayHello(String name);
}
实现类
package
org.test;
import
javax.ejb.Stateless;
import
org.jboss.annotation.ejb.RemoteBinding;
@Stateless
//设置远程JNDI名字(设置远程JNDI名字,客户端在通过JNDI lookup的时候,用的就是这个名字)
//不同中间件的实现,默认JNDI名字是不一样的,所以不一定是***/Remote或***/Local
//RemoteBinding是 jboss特有的
@RemoteBinding(jndiBinding
=
"
MclarenEJB
"
)
public
class
Hello
implements
IHello {
public
String sayHello(String name) {
return
"
Hello
"
+
name;
}
}
jdk编辑+打包成jar后热部署到%JBOSS_HOME%\server\default\deploy
客户端:
import
java.util.Properties;
import
javax.naming.Context;
import
javax.naming.InitialContext;
import
org.test.IHello;
public
class
Client {
public
static
void
main(String[] args) {
try
{
Properties props
=
new
Properties();
props.put(
"
java.naming.factory.initial
"
,
"
org.jnp.interfaces.NamingContextFactory
"
);
props.put(
"
java.naming.provider.url
"
,
"
jnp://localhost:1099
"
);
props.put(
"
java.naming.factory.url.pkgs
"
,
"
org.jboss.naming:org.jnp.interfaces
"
);
Context context
=
new
InitialContext(props);
IHello h
=
(IHello) context.lookup(
"
MclarenEJB
"
);
System.out.println(h.sayHello(
"
EJB 3.0 Test
"
));
}
catch
(Exception e) {
e.printStackTrace();
}
}
}
结果是:
Hello EJB 3.0 Test
EJB原理,有幸在 Q群上‘☆蓝蓝心情★’ 得以一教; 特在次郑重的道一声 谢谢了.大哥
在次我就分享给大家,本人语言组织能力有限,说的不好可别怪我大哥啊。(呵呵)
EJB技术对传输上进行封装,使程序员不需要关心太多网络问题。服务器都基于统一javabean操作的
在这就是基于 rmic 命令,和 rmiregistry 端口 来实现的。
rmic 和 rmiregistry 这些都在%JAVA_HOME%/bin下可以找到。
下面我就用大哥给写的一段 没用EJB容器 的代码来和大家分享EJB原理:
1.rmic命令介绍:
引用: http://www.iplab.cs.tsukuba.ac.jp/liuxj/jdk1.2/zh/docs/tooldocs/solaris/rmic.html
rmic 编译器根据编译后的 Java 类(含有远程对象实现)名,为远程对象生成 stub 和 skeleton(远程对象是指实现 java.rmi.Remote 接口的对象)。 在 rmic 命令中所给的类必须是经 javac 命令成功编译且是完全包限定的类。例如,按如下所示对类文件名 HelloImpl 运行 rmic:
2.EJB组建(服务器端)接口:
package org.rmi.test;
import java.rmi.Remote;
import java.rmi.RemoteException;
public interface IHello extends Remote {
public String sayHello(String name) throws RemoteException;
}
实现类:
package org.rmi.test;
import java.rmi.Naming;
import java.rmi.RemoteException;
import java.rmi.server.UnicastRemoteObject;
//取消显示指定的编译器警告!
//参考 : http://gceclub.sun.com.cn/Java_Docs/html/zh_CN/api/java/lang/SuppressWarnings.html
@SuppressWarnings("serial")
public class Hello extends UnicastRemoteObject implements IHello {
public Hello() throws RemoteException {
super();
}
public void rebind(String name) {
try {
Naming.rebind(name,this);
System.out.println("Server is running");
} catch(Exception e) {
e.printStackTrace();
}
}
public String sayHello(String name) throws RemoteException {
return "Hello "+name+" This is processed by RMI";
}
}
上面的继承 java.rmi.Remote 和可序列化的感觉是一样的;在网络中转成流格式后,便与传输。
3. jdk1.5编译和 rmic 编译后
1)javac .....
2)rmic rmic org.rmi.test.Hello(后得到 Hello_Stub.class)
4.服务器开启:
在项目根目录下加 rmi.policy
grant {
Permission java.security.AllPermission "","connect,listen,accept";
};
后运行:
package org.rmi.test;
import java.rmi.RMISecurityManager;
public class Start {
public static void main(String[] args) {
try {
System.setSecurityManager(new RMISecurityManager());
//这里还不太明白
new Hello().rebind("RMI/Mclaren");
} catch(Exception e) {
e.printStackTrace();
}
}
}
5.开端口:
rmiregistry 1099 (开 端口)
客户端:(另台电脑也可以了)
import java.rmi.Naming;
import org.rmi.test.IHello;
public final class Client {
public static void main(String[] args) {
try {
IHello hello = (IHello)Naming.lookup("rmi://localhost:1099/RMI/Mclaren");
System.out.println(hello.sayHello("Mclaren"));
} catch(Exception e) {
e.printStackTrace();
}
}
}
结果是:
Hello Mclaren This is processed by RMI
本文是本人实际开发中遇到,特留文记录。在次我花了3天的时间解决,这个问题还是点难度的。 所用到知识点:
一般jdk
|-私有属性反射
|-序列化
|-正则表达使用
|-多线程使用
|-dom4j的xml读取
|+hibernate
|-拦截器
|-一个Session工厂同时连接不同数据库(本文关键)
|-oracle Blob 存取
等........
需求功能介绍:
为性能考虑,单一服务器改成集群(每太服务器数据允许在一定时间内保持相步),给出的修改时间短,不过代码持久层比较统一(hibernate 感谢天还好是她! )。网络连接不稳定(铁路内网!)。
完成后效果:
当网络连接成功时,多数据库的同步。
当网络连接失败时,本地应用程序运用hibernate拦截器拦截正操作对象并记录下操作动作,序列化到本地时局库 z_jcyy_tb 表中。表数据属性为:id,inputdate(记录时间),object(序列对象),action(操作动作)。并安一定时间测试连接。如果成功,读取 z_jcyy_tb 表中数据 反序列化 再同步到 其他数据库中。
代码说明:
1.新Session 建立
hibernate.cfg.xml 在文件<session-factory>中添加
<property name="connection.url_b">jdbc:oracle:thin:@192.168.1.114:1521:JCYY</property>
<property name="connection.username_b">jcyy</property>
<property name="connection.password_b">jcyy</property>
TBDao -> OpenSession()
private static String url_b = null ;
private static String use_b = null ;
private static String pass_b = null ;
private static String dirver_b = null ;
static {try {
//取得hibernate.cfg.xml逻辑路径,和原来程序关联上
Field field = SessionManager.class.getDeclaredField("CONFIG_FILE_LOCATION");
field.setAccessible( true );
String path = (String) field.get(SessionManager. class );
//通过 dom4j 加载 配置文件
Document docT = new SAXReader().read( TBDao.class.getResourceAsStream(path) );
//正则+xpath读取 在hbn文件中加入的<property name="..._b"> 的属性
String xpath = "/hibernate-configuration/session-factory/property[@name='XPATH_I']" ;
Pattern p = Pattern.compile("(XPATH_I)");
Matcher ma = p.matcher(xpath);
url_b = DocumentHelper.createXPath( ma.replaceAll("connection.url_b") ).selectSingleNode(docT).getText();
use_b = DocumentHelper.createXPath( ma.replaceAll("connection.username_b")).selectSingleNode(docT).getText();
pass_b = DocumentHelper.createXPath( ma.replaceAll("connection.password_b")).selectSingleNode(docT).getText();
dirver_b = DocumentHelper.createXPath( ma.replaceAll("connection.driver_class")).selectSingleNode(docT).getText();
} catch (Exception e) {e.printStackTrace();}}
//利用hbn的SessionFactory得到 openSession(Connection); 打开异地数据库连接。
//利用私有反射得到 加载完成的SessionFactory
public Session openSessionb(){
try {
Class.forName(dirver_b);
Connection conn = DriverManager.getConnection(url_b,use_b,pass_b);
Field[] fields = SessionManager.class.getDeclaredFields();
Field field = null ;
for(int i=0;i<fields.length;i++){
if( SessionFactory.class.equals( fields[i].getType() ) )
field = fields[i];
}
field.setAccessible(true);
SessionFactory sessionFactory = (SessionFactory) field.get(SessionManager.class );
return sessionFactory.openSession(conn);
} catch (Exception e) {
System.out.println("--没有连接到总服务(openSessionb)--");
return null ;
}
}
2.异地数据同步失败后动作 TBDao->save() 冻结状态到数据库
public void save(Object obj,String action) {
Session session = null ;
try {
session = SessionManager.currentSession(null,null);
Transaction tr = session.beginTransaction();
ZJcyyTb zj = new ZJcyyTb();
zj.setAction(action);
zj.setInputdate(new Date());
session.save(zj);
session.flush();
session.refresh(zj,LockMode.UPGRADE);
//oracle Blob数据持久 请参考-->序列化和反序列化对象到 数据库 zj.setObject( new ObjectConvert().ObjectToBlob(obj) );
tr.commit();
} catch (Exception e) {
e.printStackTrace();
}finally{
if(session!=null&& session.isOpen() )session.close();
}
}
3,失败后又成功连接后 (线程实现) TBDao->action()
public int isSql(){
int is_count = 0 ;
Session session = null ;
try {
//得到本地Session 查看是否有连接失败后序列动作被保存
session = SessionManager.currentSession(null,null);
Transaction tr = session.beginTransaction();
Connection conn = session.connection();
Statement stat = conn.createStatement();
ResultSet rs = stat.executeQuery("select count(*) from z_jcyy_tb");
rs.next();
is_count = rs.getInt(1);
tr.commit();
} catch (Exception e) {
e.printStackTrace();
}finally{
if(session!=null&& session.isOpen() )session.close();
}
return is_count ;
}
public boolean action(){
int isSql = 0 ;
ObjectConvert oc = new ObjectConvert();
Session session = null ;
Session session_b = null ;
try {
//有失败连接动作后尝试 远程数据库
if( (isSql=isSql())>0 ){
session = SessionManager.currentSession(null,null);
//远程数据库连接
//如果成功连接:z_jcyy_tb表中数据同步到其他数据库中
session_b = openSessionb();
if(session_b!=null){
Transaction tr_b = session_b.beginTransaction();
Transaction tr = session.beginTransaction();
Query qu = session.createQuery(" from ZJcyyTb t order by t.inputdate");
for(int i=0;i<=isSql/10;i++){
qu.setFirstResult(i*10);
qu.setMaxResults(10);
List list = qu.list();
for(Iterator it=list.iterator();it.hasNext();){
ZJcyyTb tb = (ZJcyyTb)it.next();
Object obj = null ;
obj = oc.BlobToObject(tb.getObject(),obj);
if(obj!=null){
String action = tb.getAction();
if(action.equals( TBDao.DELETE )){
session_b.delete(obj);
}
if(action.equals( TBDao.INSERT )){
session_b.save(obj);
}
if(action.equals( TBDao.UPDATE )){
session_b.update(obj);
}
}
session.delete(tb);
tr.commit();
}
}
tr_b.commit();
}
} return true ;
} catch (Exception e) {
System.out.println("--没有连接到总服务(action)--");
}finally{
if(session_b!=null&&session_b.isOpen())session_b.close();
if(session!=null&& session.isOpen() )session.close();
SessionManager.closeSession();
}
return false ;
}
4.hbn 拦截器 ->Interceptor
package com.jjm.hibernate;
import java.io.File;
import java.io.FileInputStream;
import java.io.InputStream;
import java.io.Serializable;
import java.lang.reflect.Field;
import java.sql.Connection;
import java.sql.DriverManager;
import java.util.HashSet;
import java.util.Iterator;
import java.util.Set;
import org.dom4j.Document;
import org.dom4j.DocumentHelper;
import org.dom4j.XPath;
import org.dom4j.io.SAXReader;
import org.hibernate.CallbackException;
import org.hibernate.EntityMode;
import org.hibernate.Hibernate;
import org.hibernate.HibernateException;
import org.hibernate.Interceptor;
import org.hibernate.Session;
import org.hibernate.SessionFactory;
import org.hibernate.Transaction;
import org.hibernate.cfg.Configuration;
import org.hibernate.type.Type;
import com.jjm.rlzy.dao.TBDao;
public class TestInterceptor implements Interceptor,Serializable{
static private boolean isConn_b = false ;
static private TBDao tb = new TBDao();
//线程 一分钟 检测连接失败 同步
static{
new Thread(new Runnable(){
public void run() {
while(true){
isConn_b = tb.action();
try {
Thread.sleep(60*1000);
} catch (InterruptedException e) {e.printStackTrace();}
}
}
}).start();
}
public boolean onFlushDirty(Object entity, Serializable id, Object[] currentState, Object[] previousState, String[] propertyNames, Type[] types) throws CallbackException {
Session session = null ;
try {
if(isConn_b){
session = tb.openSessionb();
Transaction tr = session.beginTransaction();
session.update(entity);
tr.commit();
}else{
tb.save(entity,TBDao.UPDATE);
}
} catch (Exception e) {
e.printStackTrace() ;
tb.save(entity,TBDao.UPDATE);
isConn_b = false ;
}finally{
if(session!=null)session.close();
// 拦截器中 绝对不能有这句 -> SessionManager.closeSession();
}
return false;
}
public boolean onSave(Object entity, Serializable id, Object[] state, String[] propertyNames, Type[] types) throws CallbackException {
Session session = null ;
try {
if(isConn_b){
session = tb.openSessionb();
Transaction tr = session.beginTransaction();
session.save(entity);
tr.commit();
}else{
tb.save(entity,TBDao.INSERT);
}
} catch (Exception e) {
e.printStackTrace() ;
tb.save(entity,TBDao.INSERT);
isConn_b = false ;
}finally{
if(session!=null)session.close();
}
return false;
}
public void onDelete(Object entity, Serializable id, Object[] state, String[] propertyNames, Type[] types) throws CallbackException {
Session session = null ;
try {
if(isConn_b){
session = tb.openSessionb();
Transaction tr = session.beginTransaction();
session.delete(entity);
tr.commit();
}else{
tb.save(entity,TBDao.DELETE);
}
} catch (Exception e) {
e.printStackTrace() ;
tb.save(entity,TBDao.DELETE);
isConn_b = false ;
}finally{
if(session!=null)session.close();
}
}
................................
}
后记:
由于一些原因代码写的有些简陋,但功能实现,表达的的意思也还可以(自己有点 ‘买瓜了’哈哈!)。我写出来的目的希望大家能共同进步,这等大家拍砖了 :)
/*
* 将对象转化成java.sql.Blob
* 要求 对象是序列化的
*/
public
java.sql.Blob ObjectToBlob(Object obj)
throws
IOException{
try
{
ByteArrayOutputStream out
=
new
ByteArrayOutputStream();
ObjectOutputStream outputStream
=
new
ObjectOutputStream(out);
outputStream.writeObject(obj);
byte
[] bytes
=
out.toByteArray();
outputStream.close();
return
Hibernate.createBlob(bytes);
}
catch
(Exception e) {
//
TODO: handle exception
System.out.println(
"
ObjectToBlob
"
);
return
null
;
}
}
/*
* 将java.sql.Blob 转化成 对象 相应对象
* 要求 对象是序列化的
*/
public
Object BlobToObject(java.sql.Blob desblob,Object obj)
throws
IOException{
try
{
ObjectInputStream in
=
new
ObjectInputStream(desblob.getBinaryStream());
obj
=
in.readObject();
in.close();
return
obj;
}
catch
(Exception e) {
//
TODO: handle exception
System.out.println(
"
BlobToObject
"
);
e.printStackTrace();
return
null
;
}
}
拦截器
package
hbn.test.supper.Interceptor;
import
java.io.Serializable;
import
java.util.HashSet;
import
java.util.Iterator;
import
java.util.Set;
import
org.hibernate.CallbackException;
import
org.hibernate.EntityMode;
import
org.hibernate.Interceptor;
import
org.hibernate.Transaction;
import
org.hibernate.type.Type;
public
class
TestInterceptor
implements
Interceptor,Serializable{
private
Set inserts
=
new
HashSet();
private
Set updates
=
new
HashSet();
//
Session初化一个持久对象 如果这方法中改变了对象属性就返回true 否则null
public
boolean
onLoad(Object entity, Serializable id, Object[] state, String[] propertyNames, Type[] types)
throws
CallbackException {
return
false
;
}
//
Session flush()中检查到脏数据是调用 如:tr.commit() ....
public
boolean
onFlushDirty(Object entity, Serializable id, Object[] currentState, Object[] previousState, String[] propertyNames, Type[] types)
throws
CallbackException {
updates.add(entity);
return
false
;
}
//
Session Save() 当修改了对象属性返回true
public
boolean
onSave(Object entity, Serializable id, Object[] state, String[] propertyNames, Type[] types)
throws
CallbackException {
inserts.add(entity);
return
false
;
}
//
delete
public
void
onDelete(Object entity, Serializable id, Object[] state, String[] propertyNames, Type[] types)
throws
CallbackException {
}
//flush() 之前调用
public
void
preFlush(Iterator entities)
throws
CallbackException {
}
//
flush() 执行SQL语句之后调用
public
void
postFlush(Iterator entities)
throws
CallbackException {
try
{
for
(Iterator it
=
updates.iterator();it.hasNext();){
System.out.println(
"
update=
"
+
it.next() );
}
for
(Iterator it
=
inserts.iterator();it.hasNext();){
System.out.println(
"
insert
"
+
it.next() );
}
}
catch
(Exception e) {
e.printStackTrace();
}
}
public
Boolean isTransient(Object entity) {
//
TODO Auto-generated method stub
return
null
;
}
//决定Session中那些对象是脏数据 如果null Session使用默认处理脏数据
public
int
[] findDirty(Object entity, Serializable id, Object[] currentState, Object[] previousState, String[] propertyNames, Type[] types) {
return
null
;
}
// 当Session构造实体类对象前调用
public
Object instantiate(String entityName, EntityMode entityMode, Serializable id)
throws
CallbackException {
return
null
;
}
public
String getEntityName(Object object)
throws
CallbackException {
//
TODO Auto-generated method stub
return
null
;
}
public
Object getEntity(String entityName, Serializable id)
throws
CallbackException {
//
TODO Auto-generated method stub
return
null
;
}
public
void
afterTransactionBegin(Transaction tx) {
//
TODO Auto-generated method stub
}
public
void
beforeTransactionCompletion(Transaction tx) {
//
TODO Auto-generated method stub
}
public
void
afterTransactionCompletion(Transaction tx) {
//
TODO Auto-generated method stub
}
}
测试
package
hbn.test.supper.Interceptor;
import
java.lang.reflect.Field;
import
org.hibernate.Session;
import
org.hibernate.SessionFactory;
import
org.hibernate.Transaction;
import
hbn.HibernateSessionFactory;
import
hbn.bean.T2oo;
import
junit.framework.TestCase;
public
class
TestIC
extends
TestCase {
private
SessionFactory sessionFactory;
protected
void
setUp()
throws
Exception {
super
.setUp();
//
利用java反射得到 HibernateSessionFactory ->
//
private static org.hibernate.SessionFactory sessionFactory;
//
要模拟 并发 要 HibernateSessionFactory 得出的 有 threadLocal 不行
HibernateSessionFactory.currentSession();
HibernateSessionFactory.closeSession();
Field field
=
HibernateSessionFactory.
class
.getDeclaredField(
"
sessionFactory
"
);
field.setAccessible(
true
);
sessionFactory
=
(SessionFactory) field.get(HibernateSessionFactory.
class
);
}
public
void
testInc()
throws
Exception {
TestInterceptor intx
=
new
TestInterceptor();
//
加载拦截器
Session session
=
sessionFactory.openSession(intx);
Transaction tr
=
session.beginTransaction();
T2oo t2
=
new
T2oo(
23
);
session.save(t2);
t2.setAvg(
new
Integer(
99
));
tr.commit();
}
}
结果
Hibernate: insert into t2oo (version, avg, aid, id) values (?, ?, ?, ?)
Hibernate: update t2oo set version=?, avg=?, aid=? where id=? and version=?
//拦截到的
update=hbn.bean.T2oo@277
inserthbn.bean.T2oo@277
test.xls 中内容 -> <?xml version="1.0"?>
<Workbook xmlns="urn:schemas-microsoft-com:office:spreadsheet"
xmlns:o="urn:schemas-microsoft-com:office:office"
xmlns:x="urn:schemas-microsoft-com:office:excel"
xmlns:ss="urn:schemas-microsoft-com:office:spreadsheet"
xmlns:html="http://www.w3.org/TR/REC-html40">
<Worksheet ss:Name="xls1">
<Table>
<Row>
<Cell><Data ss:Type="String">cell a1</Data></Cell>
<Cell><Data ss:Type="String">cell b2</Data></Cell>
</Row>
<Row>
<Cell><Data ss:Type="String">cell a2</Data></Cell>
<Cell><Data ss:Type="String">cell b3</Data></Cell>
</Row>
</Table>
</Worksheet>
</Workbook> 展现的样子-> | cell a1 | cell b2 | | cell a2 | cell b3 |
|