2021年2月4日
#
步入 2024 年,在技术创新和不断变化的市场需求的推动下,软件开发格局继续呈指数级发展。对于企业和开发人员来说,紧跟这些趋势不仅有益,而且对于保持竞争力和成功至关重要。在本文中,我们探讨了预计将在 2024 年产生重大影响的关键软件开发趋势。
2024年软件工程通用原理
定义 2024 年 IT 行业的通用软件开发方法包括人工智能和机器学习技术的进一步集成、区块链的利用和多运行时微服务。AR和VR的扩展应用也将继续塑造该行业。此外,程序员将更加重视网络安全和可持续软件开发。我们将在本节中详细探讨这些趋势。
人工智能和机器学习集成
人工智能和机器学习不再是流行词;它们已经成为流行语。它们是现代软件开发不可或缺的组成部分,为功能和性能设定了新的标准。从预测算法到自动代码审查,人工智能/机器学习技术正在提高各个行业的效率和能力。
2023 年最引人注目的突破之一是引入了先进的 ChatGPT 功能,其中包括代码和文本生成功能,以及基于文本提示的人工智能驱动图像创建的重大发展。
开发人员越来越多地使用人工智能驱动的编码工具。这不仅加快了编码过程,还有助于减少人为错误。例如,GitHub 的Copilot使用人工智能向开发人员实时建议代码片段和整个功能。同样, Tableau等人工智能驱动的分析工具使企业能够比以往更有效地从数据中获取洞察。
毫无疑问,2024 年将是这些技术进一步发展和集成的一年,特别是在自动化文本、编码和可视化任务方面。
超越加密货币的区块链
区块链正在超越加密货币领域找到立足点。优先考虑增强安全性和卓越质量的移动应用程序激增,导致基于区块链的应用程序的采用增加。
面向区块链的软件(BOS)系统的基本特征包括:
- 数据复制:数据在数千个系统中复制和存储,显着增强数据安全性。
- 要求验证:在进行任何交易之前,BOS 系统会检查交易要求,以确保它们符合成功验证的标准。
- 顺序交易日志记录:BOS 将交易记录在按时间顺序排列的日志中,该日志由通过共识算法设置的互连块组成。
- 公钥加密:BOS中的交易过程基于公钥加密,确保交易安全、可验证。
然而,区块链也有其局限性:可扩展性和能源消耗仍然是其更广泛采用的障碍。
多运行时微服务
微服务架构是一种将软件应用程序开发为一套小型、可独立部署的模块化服务的方法,每个服务都在自己的进程中运行,并与轻量级机制(通常是基于 HTTP 的 API)进行通信。
到2024年,微服务架构预计将继续增长,逐步演进为多运行时微服务。这也称为 MACH 架构,该术语由 Microservices-based、API-first、Cloud-native 和 Headless 的首字母创建。MACH架构允许不同的服务用不同的编程语言编写,使用不同的数据存储技术,并部署在不同的运行环境上。运行时的多样性迎合根据每个服务的特定需求和特征,为应用程序的每个组件提供更加定制和优化的方法。
多运行时微服务架构的主要优势是能够利用各种技术和平台的优势。例如,需要高计算能力的服务可以部署在专门为此类任务设计的运行时环境上,而处理实时数据处理的另一个服务可以利用针对速度和低延迟进行优化的不同环境。这种方法不仅可以确保每项服务在其理想环境中运行,而且还可以简化更新和维护,因为一项服务的更改不一定会影响其他服务。
此外,多运行时微服务支持更敏捷的开发流程,允许团队同时处理不同的服务而无需依赖。
2024 年网络安全处于前沿
网络威胁的日益复杂性使安全性成为 2024 年软件开发的一个重要方面。集成先进的安全协议和利用人工智能进行威胁检测正在成为标准做法。重点正在从被动安全措施转向主动安全措施:
- 强调 DevSecOps:公司正在将安全性集成到其 DevOps 流程中,创建一种文化,让安全性成为所有利益相关者的共同责任。这种方法确保安全考虑成为整个软件开发生命周期不可或缺的一部分。
- 零信任架构:传统的基于边界的安全模型正在被零信任框架所取代,零信任框架的运行原则是“从不信任,始终验证”。这意味着验证每个用户和设备,无论它们是在组织网络内部还是外部。
- 加密的使用增加:随着数据泄露事件的增加,使用强大的加密方法来保护传输中和静态数据的趋势日益明显。先进的加密技术(例如同态加密)正在获得关注,允许在加密的情况下处理数据。
- 关注安全代码实践:越来越重视对开发人员进行安全编码实践培训。这包括定期代码审查、漏洞测试以及使用静态和动态分析工具来识别和减少开发阶段的安全缺陷。
- 网络安全网格的兴起:这个概念指的是一种灵活的、模块化的安全方法,其中每个设备都有自己的安全性,例如防火墙和网络防护措施。它有助于创建响应能力更强、适应性更强的安全基础设施,能够处理现代网络威胁的动态特性,使整个网络更加安全。
AR和VR的进一步采用
随着 AR 和 VR 技术变得越来越容易获得,多个行业对此类应用程序的需求正在猛增:
- 教育:VR 改变了教育,支持交互式历史、地理和科学课程,并通过虚拟手术模拟提供无风险的医疗培训。例如,通过 Google Expeditions 和其他教育 AR 应用程序,学生可以探索历史遗址、解剖虚拟动物或检查复杂主题的 3D 模型。
- 医疗保健:例如 AR 应用程序 AccuVein 可以帮助定位静脉,以便更轻松地插入针头,而手术规划工具则可以将 3D 模型叠加到患者的解剖结构上,以提供精确的手术指导。
- 商业:VR 在商业中越来越多地用于原型设计、员工培训和客户服务。在房地产行业,公司利用 VR/AR 提供虚拟财产游览和 AR 应用程序,以便在购买前直观地看到家具或装修在空间中的外观。
我们期待 2024 年出现的令人兴奋的发展包括:
- 超逼真的虚拟现实:VR 现在可以模拟现实世界的感觉,例如下雨的感觉或夏季草地的气味,模糊了虚拟与现实之间的界限。而且这种趋势将会继续增长。
- 社交 VR 平台的扩展:社交 VR 平台允许实时交互、举办虚拟派对、参加音乐会和参与多人游戏。
- 人工智能在 VR 中的集成:人工智能通过适应用户行为、创建响应个人偏好和行为的动态环境来个性化体验。
可持续软件开发
随着环境问题的日益严重,绿色计算和可持续软件实践越来越受到关注。开发人员越来越关注环保解决方案,支持绿色软件基金会和可持续网络宣言等促进节能编码实践的举措。这需要开发减少服务器处理、加载时间和数据请求的代码。
可持续软件开发的关键方面包括:
- 软件优化:简化代码以减少能源使用并提高性能。
- 部署:仅根据需要使用资源,例如惰性函数和基于云的应用程序,以最大限度地减少能源浪费。
- 集成:减少系统之间的数据处理,以避免不必要的数据使用。
- 存储的数据:限制存储的数据量及其在系统中保留的时间长度。
- 数据大小:尽可能使用较小尺寸的介质,以减少存储和处理需求。
- 重构:定期更新软件以删除过时或未使用的功能。
- 避免第三方组件:减少对消耗更多资源的大型外部组件的依赖。
- 软件架构:使用提高效率和降低能耗的架构。
- 数据中心选择:选择致力于绿色实践的托管服务。
计算
来年,我们预计关键计算领域将取得进展:功能即服务、云和边缘计算,尤其是量子计算。
无服务器计算 (FaaS)
无服务器计算或函数即服务 (FaaS) 正在兴起,其中 AWS Lambda、Azure Functions 和 Google Cloud Functions 处于领先地位。FaaS 允许开发人员构建和运行应用程序和服务,而无需管理基础设施,从而实现更高效、更具成本效益的开发流程。
- 一个值得注意的例子是Netflix在其流媒体平台中利用 AWS Lambda 实现各种目的。Netflix 利用 Lambda 来执行视频编码、处理用户身份验证和管理后端流程等任务。当用户上传视频时,Lambda 函数会被触发,将内容编码并处理为适合在不同设备上进行流式传输的各种格式。这使得 Netflix 能够根据需求动态扩展资源,而无需配置或管理服务器,从而确保为用户提供无缝的流媒体体验,同时优化成本。
- Spotify 利用 Google Cloud Functions处理其音乐流媒体平台内的各种后端任务。触发功能来管理用户身份验证、处理用户生成的内容并为其音乐推荐算法执行后端任务,从而确保为用户提供无缝且个性化的体验。
- IBM 的子公司 The Weather Company 使用IBM Cloud Functions来处理和分析大量天气数据。无服务器功能使他们能够执行实时数据处理、生成预报并根据用户的位置向用户提供个性化的天气警报,而无需管理底层基础设施。
这些FaaS解决方案以事件驱动架构为特点,根据请求自动触发执行,并根据需要调整资源使用。其可扩展性和响应能力简化了开发过程,特别适合高流量应用程序。无服务器计算越来越多地与物联网、聊天机器人和虚拟助手集成。
云计算的扩展
到 2024 年,云原生技术将发生重大演变。它们预计将变得更加用户友好,在其 IT 目标中提供增强的性能、节省成本和更大的灵活性。Amazon Web Services (AWS)、Microsoft Azure 和 Google Cloud Platform 扩展了其服务,提供更高级的分析、机器学习功能和更好的安全功能。
这促使公司迁移到云以实现更好的数据管理、增强协作并提高安全性。
边缘计算的浪潮
边缘计算是一种在网络边缘尽可能靠近数据源处理客户端数据的 IT 架构。通过使计算更接近数据源,边缘计算减少了延迟并增强了实时数据处理能力。
这种趋势对于需要即时数据分析的应用至关重要,例如自动驾驶汽车(例如,特斯拉的自动驾驶汽车依赖于边缘计算)和智能城市技术。在医疗保健领域,边缘计算可确保数据隐私,并实现基于人工智能的患者病情实时监控和分析。该技术还可以通过优化公交时刻表、调节交通车道以及潜在地引导自动驾驶车辆流量来改变城市交通管理,展示其在不同领域的多功能性和影响。边缘计算对于智能电网的采用至关重要,可以帮助企业有效管理能源消耗。
量子计算:新领域
量子计算是一种先进的计算形式,它使用量子比特而不是经典比特。利用叠加和纠缠等量子力学原理,它可以以传统计算机无法达到的速度处理数据。该技术对于密码学、优化和分子模拟等复杂任务特别有效,可提供指数级更快的解决方案。
虽然量子计算的广泛采用还有很长的路要走,但对软件开发的连锁反应已经开始显现。其中的领导者包括 IBM、微软、谷歌、D-Wave 和亚马逊等重量级公司。IBM 凭借其量子系统一号和二号成为领先者,具有高达 127 个量子位的强大处理器。微软专注于拓扑量子位,将其集成到其 Azure 云平台中以实现更广泛的可访问性。谷歌的量子人工智能实验室旨在开发实用的通用量子计算机,而 D-Wave 专门研究量子退火,解决复杂的优化挑战。亚马逊通过其 AWS 量子网络中心和 Amazon Braket 正在为量子计算创建广泛的基础设施。
编程语言
到 2024 年,编程将继续以 Python 为主,Rust 的采用率显着增加。
Python 占据主导地位
Python 仍然是一种占主导地位的编程语言,因其简单性、多功能性和强大的库支持而受到青睐。它广泛应用于网络开发、数据分析、人工智能和科学计算。
根据 PYPL 指数,Python 被列为最受欢迎的编程语言,增长率最高 (19%),该指数衡量语言教程在 Google 上的搜索频率。
2023 年 Stack Overflow 调查将 Python 确定为开发人员最想要学习的语言。自 2012 年以来,Python 首次超越 Java,不再只是排名前两位的 Web 应用程序开发语言之一。它还在五年内三次荣获TIOBE年度编程语言,这是对年度评分增幅最大的语言的认可。Python 广泛的库范围可以轻松集成到代码中并扩展到更大的应用程序,为 Web 和桌面应用程序开发(包括系统操作)提供了巨大的可能性。
Rust 采用率的增长
Rust 编程语言的采用正在增加,特别是在性能和安全性是关键优先事项的领域。其独特的功能使其成为系统级编程的理想选择。值得注意的是,Rust 越来越多地用于嵌入式系统,其防止内存错误和确保线程安全的能力至关重要。此外,其在云基础设施中的部署凸显了其处理高性能计算任务的可靠性和效率。
应用开发
在应用程序领域,重要趋势包括低代码和无代码平台的广泛采用、跨平台开发的进步以及渐进式 Web 应用程序的使用增加。
低代码和无代码平台的兴起
低代码和无代码平台的兴起正在推动软件开发的民主化。这些工具使个人能够以最少的编码知识构建和部署应用程序,从而显着缩短开发时间。
Microsoft Power Apps和Bubble等平台使非技术用户无需编写代码即可构建应用程序。这些工具在开发业务应用程序时特别受欢迎,允许公司在没有大型开发团队的情况下快速构建原型并部署解决方案。然而,此类平台无法解决复杂的定制开发任务。
渐进式 Web 应用程序 (PWA) 的增加
PWA(渐进式 Web 应用程序)比本机应用程序下载速度更快且资源占用更少。它们离线工作并在每次访问时自动刷新。从开发角度来看,它们具有成本效益和高效性,针对不同设备所需的版本较少,导致成本比原生应用低 3 至 4 倍。福布斯、星巴克和Pinterest等大公司都采用了这项技术。
PWA(渐进式 Web 应用程序)在开发人员中日益流行的一个关键因素是其平台独立性。这样就无需为移动设备、平板电脑和桌面创建单独的应用程序。开发的简单性并不是 PWA 节省成本的唯一好处。它们的创建速度也更快,维护成本也更低。
跨平台应用程序开发
自从移动应用程序出现以来,开发人员面临着是为 Android 和 iOS 创建两个本机应用程序还是创建单个跨浏览器应用程序的选择。原生应用程序由于其卓越的性能,在市场上占据主导地位。
2023 年的重大发展将在 2024 年继续获得动力,这是新工具的引入,这些工具能够交付用户友好的跨平台解决方案,同时降低开发成本。
跨平台应用程序具有多种优势:
- 更广泛的覆盖范围:可在多种操作系统(iOS、Android)上使用,增加潜在的用户群。
- 更快的开发时间:单个开发项目而不是多个本机应用程序可以加快流程。
- 一致的用户体验:跨平台应用程序在不同平台上具有统一的外观和感觉,增强用户熟悉度。
- 共享代码库:代码可重用性和开发效率。
- 更轻松的部署:更新在所有平台上同时推出。
- 资源效率:需要更少的资源和更小的开发团队。
- 成本效益:由于单个代码库用于多个平台,因此降低了开发和维护成本。
- 流行的跨平台框架包括:React Native、Flutter、Ionic 等。
结论
本文讨论的趋势将定义 2024 年及以后的软件开发领域。当我们应对这些变化时,负责任和道德的创新必须仍然是所有软件开发工作的基石。
我们收集最新趋势和最新发现,通过我们的博客分享。订阅我们的时事通讯并在社交媒体上关注我们,随时了解我们的帖子,以便在 2024 年保持在 IT 创新的最前沿。
本文开始前,问大家一个问题,你觉得一份业务代码,尤其是互联网业务代码,都有哪些特点?
我能想到的有这几点:
- 互联网业务迭代快,工期紧,导致代码结构混乱,几乎没有代码注释和文档。
- 互联网人员变动频繁,很容易接手别人的老项目,新人根本没时间吃透代码结构,紧迫的工期又只能让屎山越堆越大。
- 多人一起开发,每个人的编码习惯不同,工具类代码各用个的,业务命名也经常冲突,影响效率。
每当我们新启动一个代码仓库,都是信心满满,结构整洁。但是时间越往后,代码就变得腐败不堪,技术债务越来越庞大。
这种情况有解决方案吗?也是有的:
- 组内设计完善的应用架构,让代码的腐烂来得慢一些。(当然很难做到完全不腐烂)
- 设计尽量简单,让不同层级的开发都能快速看懂并上手开发,而不是在一堆复杂的没人看懂的代码上堆更多的屎山。
而COLA,我们今天的主角,就是为了提供一个可落地的业务代码结构规范,让你的代码腐烂的尽可能慢一些,让团队的开发效率尽可能快一些。
https://github.com/alibaba/COLA
https://blog.csdn.net/significantfrank/article/details/110934799
使用「磁碟工具程式」清除配備 Apple 晶片的 Mac
在 Mac 清除所有內容和設定
為 macOS 製作開機安裝程式
如何重新安裝 macOS
difference between homebrew and homebrew cask
install jdk11 on Mac:
SPRING 框架下 如果要做去重,在数据量大的时候会爆ERROR,可改用如下 写法:
private boolean needReorderCheck(String requestId) {
boolean result = false;
// try(MongoCursor<String> mongoCursor =
// mongoTemplate.getCollection(mongoTemplate.getCollectionName(AccountNumProductLineIndex.class))
// .distinct(KEY, Filters.eq(REQUEST_ID, requestId), String.class)
// .iterator()
// )
try(MongoCursor<Document> mongoCursor =
mongoTemplate.getCollection(mongoTemplate.getCollectionName(AccountNumProductLineIndex.class))
.aggregate(
Arrays.asList(
Aggregates.project(
Projections.fields(
Projections.excludeId(),
Projections.include(KEY),
Projections.include(REQUEST_ID)
)
),
Aggregates.match(Filters.eq(REQUEST_ID, requestId)),
Aggregates.group("$" + KEY)
)
)
.allowDiskUse(true)
.iterator();
)
{
String key = null;
boolean breakMe = false;
LOGGER.info("needReorderCheck.key --> start");
while(mongoCursor.hasNext()) {
if(breakMe) {
mongoCursor.close();
break;
}
Document keyDocument = mongoCursor.next();
key = keyDocument.getString("_id");
// key = mongoCursor.next().getString(KEY);
// LOGGER.info("needReorderCheck.keyDocument --> {}, key --> {}", keyDocument, key);
try(MongoCursor<Document> indexMongoCursor =
mongoTemplate.getCollection(AccountNumProductLineIndex.COLLECTION_NAME)
.find(Filters.and(Filters.eq(REQUEST_ID, requestId), Filters.eq(KEY, key)))
.iterator()
)
{
int preIndex = -1, currentIndex = -1;
Document preIndexDocument = null, currentIndexDocument;
while(indexMongoCursor.hasNext()) {
currentIndexDocument = indexMongoCursor.next();
// System.out.println(currentIndexDocument.toJson());
if(preIndexDocument != null) {
currentIndex = currentIndexDocument.getInteger(INDEX);
preIndex = preIndexDocument.getInteger(INDEX);
if(currentIndex - preIndex > 1) {
indexMongoCursor.close();
breakMe = true;
result = true;
break;
}
}
preIndexDocument = currentIndexDocument;
}
}
}
}
return result;
}
@JsonFormat(shape=JsonFormat.Shape.STRING, pattern="yyyy-MM-dd'T'HH:mm:ss.SSSZ", timezone="America/Phoenix")
private Date date;
https://www.amitph.com/spring-webclient-large-file-download/https://github.com/amitrp/spring-examples/blob/main/spring-webflux-webclient/src/main/java/com/amitph/spring/webclients/service/FileDownloaderWebClientService.javaimport lombok.RequiredArgsConstructor;
import org.springframework.core.io.buffer.DataBuffer;
import org.springframework.core.io.buffer.DataBufferUtils;
import org.springframework.stereotype.Service;
import org.springframework.web.reactive.function.client.WebClient;
import reactor.core.publisher.Flux;
import reactor.core.publisher.Mono;
import java.io.IOException;
import java.nio.file.Files;
import java.nio.file.Path;
import java.nio.file.StandardOpenOption;
import java.util.Objects;
@Service
@RequiredArgsConstructor
public class FileDownloaderWebClientService {
private final WebClient webClient;
/**
* Reads the complete file in-memory. Thus, only useful for very large file
*/
public void downloadUsingByteArray(Path destination) throws IOException {
Mono<byte[]> monoContents = webClient
.get()
.uri("/largefiles/1")
.retrieve()
.bodyToMono(byte[].class);
Files.write(destination, Objects.requireNonNull(monoContents.share().block()),
StandardOpenOption.CREATE);
}
/**
* Reading file using Mono will try to fit the entire file into the DataBuffer.
* Results in exception when the file is larger than the DataBuffer capacity.
*/
public void downloadUsingMono(Path destination) {
Mono<DataBuffer> dataBuffer = webClient
.get()
.uri("/largefiles/1")
.retrieve()
.bodyToMono(DataBuffer.class);
DataBufferUtils.write(dataBuffer, destination,
StandardOpenOption.CREATE)
.share().block();
}
/**
* Having using Flux we can download files of any size safely.
* Optionally, we can configure DataBuffer capacity for better memory utilization.
*/
public void downloadUsingFlux(Path destination) {
Flux<DataBuffer> dataBuffer = webClient
.get()
.uri("/largefiles/1")
.retrieve()
.bodyToFlux(DataBuffer.class);
DataBufferUtils.write(dataBuffer, destination,
StandardOpenOption.CREATE)
.share().block();
}
}
列出某个软件的所有版本号:
yum module list nginx
Red Hat Enterprise Linux 8 for x86_64 - AppStream (RPMs)
Name Stream Profiles Summary
nginx 1.14 [d] common [d] nginx webserver
nginx 1.16 common [d] nginx webserver
nginx 1.18 common [d] nginx webserver
nginx 1.20 [e] common [d] nginx webserver
Hint: [d]efault, [e]nabled, [x]disabled, [i]nstalled
设定某个版本为默认版本
yum module enable nginx:1.20
安装默认版本
yum install nginx
摘要: 签名
为防止request中的json在传输过程中被更改,
需要在传送双方保存一个字符串sinature-key
用SHA256 hash请求中的json字符串,结果为hash1
{"payload":hash1}以此为字符和sinature-key用JWS HS256算法进行签名,得到sinature1
在请求的json中加入字段:"sina...
阅读全文
下载KEYCLOAK与安装,可参见:
https://www.janua.fr/how-to-install-keycloak-with-mariadb/启动时配置不通过localhost访问控制台:
#! /bin/bash
BIN_PATH=$(cd `dirname $0`; pwd)
IP=10.10.27.69
KEYCLOAK_OPT="-b ${IP} -Djboss.bind.address.management=${IP} -Dkeycloak.profile.feature.upload_scripts=enabled"
KEYCLOAK_OPT="${KEYCLOAK_OPT} -Djboss.socket.binding.port-offset=100 -Dkeycloak.frontendUrl=http://${IP}:81/auth "
#-Dkeycloak.hostname=${IP} -Dkeycloak.httpPort=81 -Dkeycloak.httpsPort=82
nohup ${BIN_PATH}/bin/standalone.sh ${KEYCLOAK_OPT} > /dev/null &
更改KEYCLOAK的DATASOURCE时,可直接更改默认的而无需重新配置:
https://medium.com/@pratik.dandavate/setting-up-keycloak-standalone-with-mysql-database-7ebb614cc229KEYCLOAK的JBOSS管理界面地址改为非LOCALHOST:
-Djboss.bind.address.management=${IP}
如果是由NGINX过来的访问,这样前端的地址是和默认的不一样,需配置前端URL:
-Dkeycloak.frontendUrl=http://${IP}:81/auth
更改JVM大小standalone.conf:
#
# Specify options to pass to the Java VM.
#
JBOSS_JAVA_SIZING="-server -Xms3G -Xmx3G -Xmn512m -XX:MetaspaceSize=96M -XX:MaxMetaspaceSize=256m"
REFERENCE:
https://www.keycloak.org/docs/latest/server_installation/index.html#_hostname

This article assumes that you have a running Jenkins instance on your Linux machine with a valid domain (not localhost), GitLab and that you are familiar with the Angular framework.
For Jenkins, please install the GitLab and NodeJS plugins. For simplicity’s sake, this article is going to use simple shell commands to run automated tests and to deploy an app to production.
***Note. If you can’t decide where to test all this, there is an article I wrote that might help you: CI/CD Cloud Voyage with Jenkins.
Configuring Gitlab and Jenkins
Jenkins: Access Rights to GitLab
In order to use GitLab with Jenkins, you’ll need to generate an access token in GitLab, which you can do in User menu > Settings > Access tokens
and configure GitLab Connection on Jenkins by adding the newly generated token.
In Jenkins, go to Manage Jenkins > Configure system and find the GitLab section.
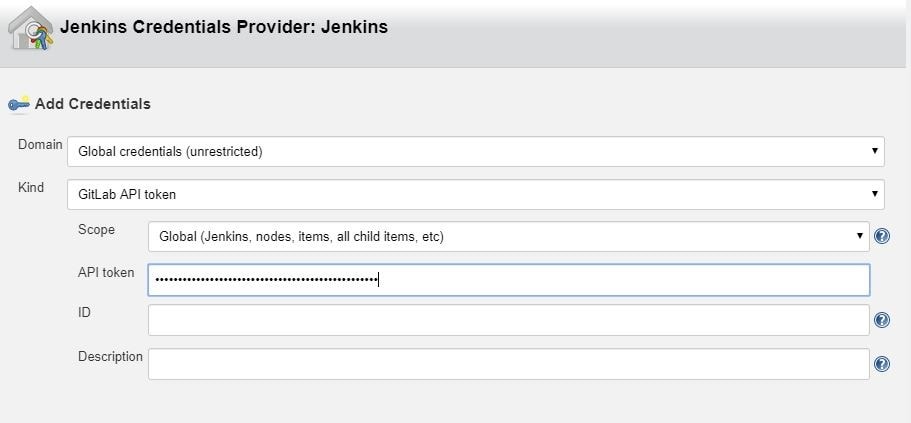
To add a token that you previously generated, click on Add by the Credentials input and choose Jenkins. In the credentials dialog, choose GitLab API token in the Kind input and paste your token from GitLab into the API token input field.
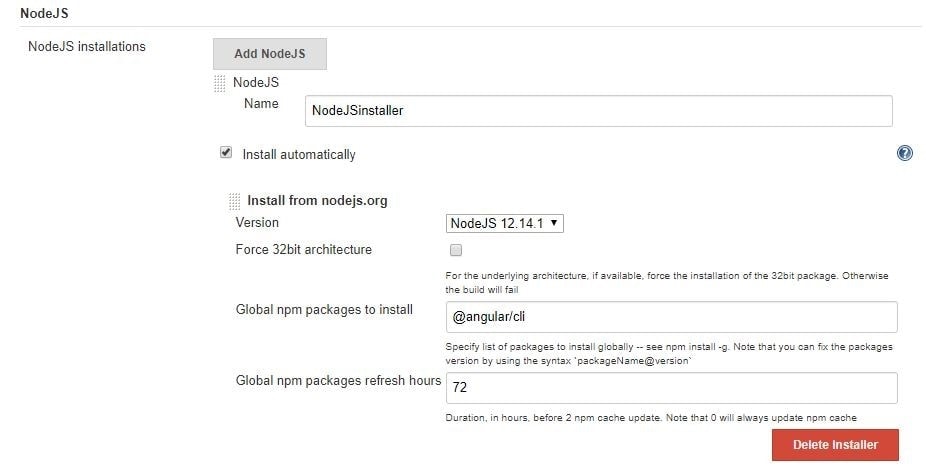
Jenkins: Configure NodeJSInstaller
In order to be able to run npm scripts, it is necessary to configure NodeJSInstaller. In Jenkins, go to Manage Jenkins > Global Tool Configuration > NodeJS installations.
Jenkins: Create CI build for Angular
In order to be able to run Angular tests and check your code style in Jenkins on the created merge request in GitLab you’ll have to:
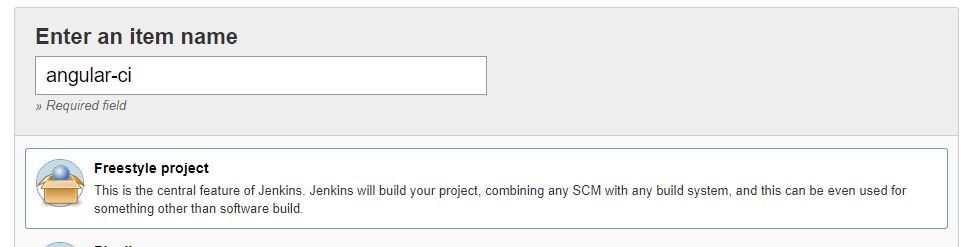
1. Click on the New item link in the Jenkins dashboard
2. Enter a job name and choose Freestyle project
3. Choose the GitLab Connection that we’ve just created in the Gitlab Connection section.

4. Choose Git as your source code management. Enter your repository URL. Create new credentials on Jenkins. These credentials are for cloning the project. You use them to log in to Gitlab.

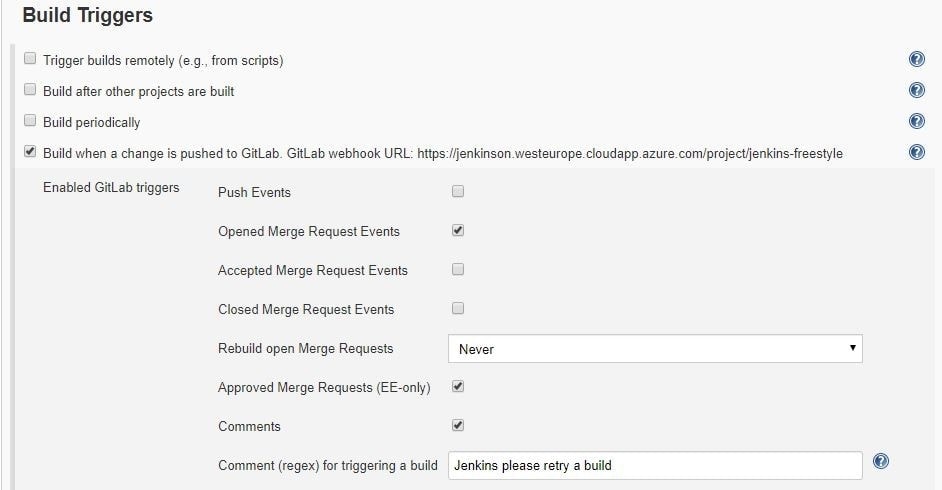
5. Next, configure build triggers, i.e. on which GitLab event to run a build. In this particular example, angular-ci-build is going to trigger when a new merge request gets created.

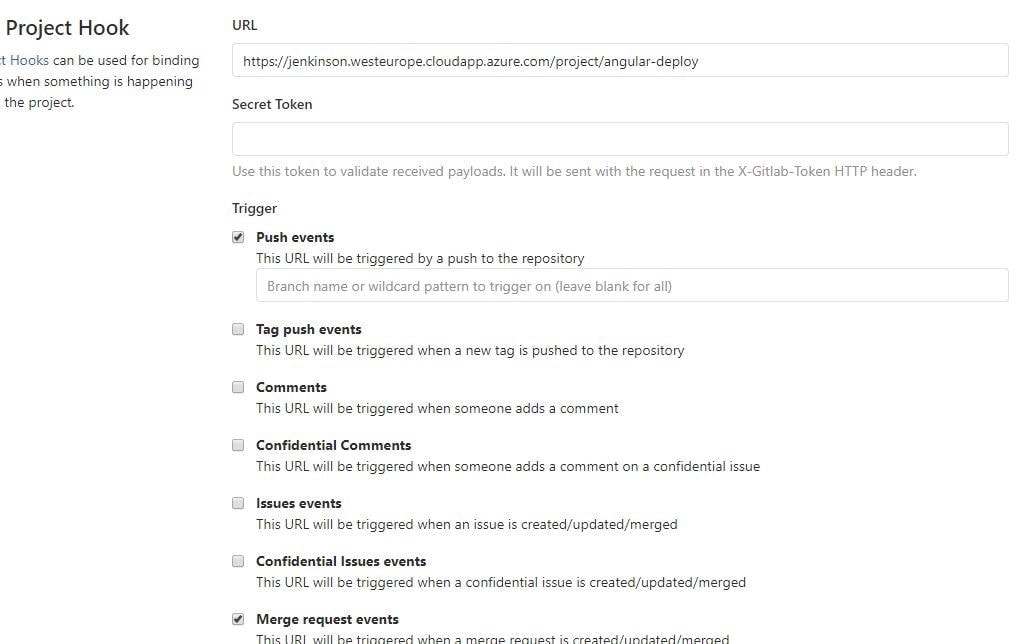
In this step, we need to go back to GitLab and create a hook that will trigger this build under Settings > Integrations. Copy the URL provided by Jenkins and paste it into the project hook form and finally click Add webhook.

6. Provide the configured NodeJsInstaller in the global configuration to be able to run npm commands.

7. And finally, in the Build section choose Add build step > Execute shell. Write shell scripts to test the Angular app code and run tests.

Click Save and we are good to go. At this point everything should work.
When you create a new merge request, GitLab should trigger angular-ci-build on Jenkins and you should see status pending on that particular merge request page.
When Jenkins is done, the status on GitLab should automatically be updated. Depending on whether the build passed or not, the merge button will change color.
Jenkins: Create CD Build for Angular
In order to be able to deploy Angular to another Linux machine, we need to:
Repeat steps 1–4 from Jenkins: Create CI Build for Angular, changing only the name of the build. This time, it can be angular-deploy.
5. For step five, we now choose a different configuration for deployment. We are going to run this build when a merge request gets accepted.
Just like for the CI build, we have to create a new GitLab hook that will hit the Jenkins build endpoint.
6. This step is also the same as in CI; we need to provide the NodeJSInstaller we already configured globally.
7. This step is different from CI; this time we don’t have to test and check linting, but only build the application and copy-paste it to another machine with ssh.

If we are going to do it with ssh like in the example, we need to create a private and public key pair for the Jenkins user on the machine Jenkins is running on. The private key needs to stay on the Jenkins machine, and the public key needs to be copied to the remote machine.
With the scp command we simply copy our build to the remote machine. In this case, Jenkins does not have permission to put it anywhere but in the user folder. In the last step, we need to ssh into the remote machine and move our files (in this case to /var/www/html).
Voila, our app is deployed to the production server when the merge request is accepted via Jenkins.
Angular: Karma Unit Test Runner Configuration
To run Angular tests on Jenkins, we need to configure some parts of the karma.conf file. Below is the configuration that adds a custom launcher that runs ChromeHeadles.
module.exports = function(config) { config.set({ basePath: "", frameworks: ["jasmine", "@angular-devkit/build-angular"], plugins: [ require("karma-jasmine"), require("karma-chrome-launcher"), require("karma-jasmine-html-reporter"), require("karma-coverage-istanbul-reporter"), require("@angular-devkit/build-angular/plugins/karma") ], client: { clearContext: false // leave Jasmine Spec Runner output visible in browser }, coverageIstanbulReporter: { dir: require("path").join(__dirname, "../coverage/jenkins-test-app"), reports: ["html", "lcovonly", "text-summary"], fixWebpackSourcePaths: true }, reporters: ["progress", "kjhtml"], port: 9876, colors: true, logLevel: config.LOG_INFO, autoWatch: true, browsers: ["Chrome", "ChromeHeadless"], singleRun: false, restartOnFileChange: true, customLaunchers: { ChromeHeadless: { base: "Chrome", flags: [ "--headless", "--disable-gpu", "--no-sandbox", "--remote-debugging-port=9222" ], }, } }); };
We can then simply store our command in the package.json scripts property.
On Jenkins, we would now run our tests with npm run test:ci.
"scripts": { "ng": "ng", "start": "ng serve", "build": "ng build", "test": "ng test", "test:ci": "ng test --browsers=ChromeHeadless --watch=false", "lint": "ng lint", "e2e": "ng e2e" },
I hope you enjoyed this article and that it was helpful in your quest for automating angular deployment and testing.
集群通常是有多个相同的实例,但对于定时任务场景,只希望有一个实例工作即可,如果这个实例挂了,其他实例可以顶替。
这个问题的方案则是集群选主,一个集群中,只有一个LEADER,由LEADER负责执行定时任务工作。当LEADER被取消时,会在剩下的实例中再选LEADER。
持有分布式锁的实例则是LEADER。
SPRING INTEGRATION JDBC 则已提供相关功能。
pom.xml
<dependency>
<groupId>org.springframework.integration</groupId>
<artifactId>spring-integration-jdbc</artifactId>
</dependency>
<dependency>
<groupId>org.springframework.boot</groupId>
<artifactId>spring-boot-starter-jdbc</artifactId>
</dependency>
<dependency>
<groupId>org.flywaydb</groupId>
<artifactId>flyway-core</artifactId>
</dependency>
<dependency>
<groupId>org.mariadb.jdbc</groupId>
<artifactId>mariadb-java-client</artifactId>
</dependency>
LeaderElectionIntegrationConfig.java
import java.util.List;
import java.util.concurrent.CopyOnWriteArrayList;
import javax.sql.DataSource;
import org.springframework.context.annotation.Bean;
import org.springframework.context.annotation.Configuration;
import org.springframework.integration.jdbc.lock.DefaultLockRepository;
import org.springframework.integration.jdbc.lock.JdbcLockRegistry;
import org.springframework.integration.jdbc.lock.LockRepository;
import org.springframework.integration.support.leader.LockRegistryLeaderInitiator;
import com.paul.integration.leader.ControlBusGateway;
import com.paul.integration.leader.MyCandidate;
@Configuration
public class LeaderElectionIntegrationConfig {
@Bean
public List<String> needToStartupAdapterList(){
return new CopyOnWriteArrayList<>();
}
@Bean
public DefaultLockRepository defaultLockRepository(DataSource dataSource){
DefaultLockRepository defaultLockRepository =
new DefaultLockRepository(dataSource);
// defaultLockRepository.setTimeToLive(60_000);
return defaultLockRepository;
}
@Bean
public JdbcLockRegistry jdbcLockRegistry(LockRepository lockRepository){
return new JdbcLockRegistry(lockRepository);
}
@Bean
public MyCandidate myCandidate(
ControlBusGateway controlBusGateway,
List<String> needToStartupAdapterList
) {
return new MyCandidate(controlBusGateway, needToStartupAdapterList);
}
@Bean
public LockRegistryLeaderInitiator leaderInitiator() {
return new LockRegistryLeaderInitiator(
jdbcLockRegistry(null), myCandidate(null, null)
);
}
}
MyCandidate.java
import java.util.List;
import org.slf4j.Logger;
import org.slf4j.LoggerFactory;
import org.springframework.integration.leader.Context;
import org.springframework.integration.leader.DefaultCandidate;
import com.novacredit.mcra.mcracommon.integration.gateway.ControlBusGateway;
public class MyCandidate extends DefaultCandidate{
private static final Logger LOG = LoggerFactory.getLogger(MyCandidate.class);
private List<String> needToStartupAdapterList;
private ControlBusGateway controlBusGateway;
public MyCandidate(
ControlBusGateway controlBusGateway,
List<String> needToStartupAdapterList
) {
this.controlBusGateway = controlBusGateway;
this.needToStartupAdapterList = needToStartupAdapterList;
}
@Override
public void onGranted(Context context) {
super.onGranted(context);
LOG.info("*** Leadership granted ***");
LOG.info("STARTING MONGODB POLLER");
needToStartupAdapterList
.forEach(
c -> {
// c = "@'testIntegrationFlow.org.springframework.integration.config."
// + "SourcePollingChannelAdapterFactoryBean#0'";
String command = c + ".start()";
LOG.info("-----{}", command);
controlBusGateway.sendCommand(command);
}
);
LOG.info("STARTUP MESSAGE SENT");
}
@Override
public void onRevoked(Context context) {
super.onRevoked(context);
LOG.info("*** Leadership revoked ***");
LOG.info("STOPPING MONGODB POLLER");
needToStartupAdapterList
.forEach(
c -> {
// c = "@'testIntegrationConfig.testIntegrationFlow."
// + "mongoMessageSource.inboundChannelAdapter'";
String command = c + ".stop()";
LOG.info("-----{}", command);
// controlBusGateway.sendCommand(command);
}
);
LOG.info("SHUTDOWN MESSAGE SENT");
}
}
ControlBusIntegrationConfig.java
import org.springframework.context.annotation.Bean;
import org.springframework.context.annotation.Configuration;
import org.springframework.integration.dsl.IntegrationFlow;
import org.springframework.integration.dsl.IntegrationFlows;
import org.springframework.integration.dsl.MessageChannels;
import org.springframework.integration.gateway.GatewayProxyFactoryBean;
import org.springframework.integration.handler.LoggingHandler;
import org.springframework.messaging.MessageChannel;
import com.paul.integration.gateway.ControlBusGateway;
@Configuration
public class ControlBusIntegrationConfig {
@Bean
public MessageChannel controlBusChannel() {
return MessageChannels.direct().get();
}
@Bean
public IntegrationFlow controlBusFlow() {
return IntegrationFlows.from(controlBusChannel())
.log(LoggingHandler.Level.INFO, "controlBusChannel")
.controlBus()
.get();
}
@Bean
public GatewayProxyFactoryBean controlBusGateway() {
GatewayProxyFactoryBean gateway = new GatewayProxyFactoryBean(ControlBusGateway.class);
gateway.setDefaultRequestChannel(controlBusChannel());
gateway.setDefaultRequestTimeout(300l);
gateway.setDefaultReplyTimeout(300l);
return gateway;
}
}
ControlBusGateway.java
public interface ControlBusGateway {
public void sendCommand(String command);
}
各个应用实例运行时,其中的LockRegistryLeaderInitiator会自动运行,抢夺LEADER数据,最终只有一个实例夺取。之后再执行MyCandidate中的代码。
mongo -u admin -p 123456 --authenticationDatabase admin
use admin
db.createUser({
user : "paul",
pwd : "123456",
roles : [{role : "readWrite", db : "batch"}]
})
#增加权限
db.grantRolesToUser(
"paul",
[
{ "role" : "dbOwner",
"db" : "mcra"
}
]
)
https://www.softwarecollections.org/en/不用再GOOGLE寻找安装方法。
安装MYSQL示例:
# 2. Install the collection:
$ sudo yum install rh-mariadb103
# 3. Start using software collections:
$ scl enable rh-mariadb103 bash
$ service rh-mariadb103-mariadb start
$ mysql
$ mysqld

#开机加载命令
cp /opt/rh/rh-mariadb103/enable /etc/profile.d/rh-mariadb103.sh
当CLIENT或用户在KEYCLOAK中成功登录后,会返回JWT字符串,其中默认含有权限的信息,但此信息以内嵌的方式呈现,非常不方便。
"resource_access": {
"app-springboot-confidential": {
"roles": [
"user"
]
},
"test-employee-service": {
"roles": [
"READ_EMPLOYEE"
]
},
"service-springboot": {
"roles": [
"READ_PRODUCTS"
]
},
"account": {
"roles": [
"manage-account",
"manage-account-links"
]
},
"test-department-service": {
"roles": [
"READ_DEPARTMENT"
]
}
}
- 需要将权限的信息输出到一个KEY中,这时可以新增自定义CLIENT SCOPE。Mapper中新增KEYCLOAK已内置的【realm roles/client roles】,定义输出到JTW的字段名:my-roles。
- 授权哪些CLIENT可以读取此CLIENT SCOPE.
- 在登录参数scope中,加入此值:my-roles,这样在输出的JWT就会以平面的方式输出所有roles
"my-roles": [
"user",
"READ_EMPLOYEE",
"READ_PRODUCTS",
"manage-account",
"manage-account-links",
"READ_DEPARTMENT",
"offline_access",
"user"
]
@Bean
public ReactiveJwtAuthenticationConverter jwtAuthenticationConverter(ObjectMapper objectMapper) {
JwtGrantedAuthoritiesConverter jwtGrantedAuthoritiesConverter = new JwtGrantedAuthoritiesConverter();
jwtGrantedAuthoritiesConverter.setAuthorityPrefix("ROLE_");
jwtGrantedAuthoritiesConverter.setAuthoritiesClaimName("my-roles");
// KeycloakRealmRoleConverter keycloakRealmRoleConverter = new KeycloakRealmRoleConverter(objectMapper);
ReactiveJwtGrantedAuthoritiesConverterAdapter reactiveJwtGrantedAuthoritiesConverterAdapter =
new ReactiveJwtGrantedAuthoritiesConverterAdapter(
// new KeycloakRealmRoleConverter(objectMapper);
jwtGrantedAuthoritiesConverter
);
ReactiveJwtAuthenticationConverter jwtConverter = new ReactiveJwtAuthenticationConverter();
jwtConverter.setJwtGrantedAuthoritiesConverter(reactiveJwtGrantedAuthoritiesConverterAdapter);
return jwtConverter;
}
ServerHttpSecurity
.authorizeExchange(
a -> a.pathMatchers("/", "/error").permitAll()
.matchers(PathRequest.toStaticResources().atCommonLocations()).permitAll()
.pathMatchers(HttpMethod.GET, "/protected/**").hasRole("READ_DEPARTMENT")
.anyExchange()
.authenticated()
)
添加依赖,pom.xml
<dependency>
<groupId>org.springframework.boot</groupId>
<artifactId>spring-boot-starter-webflux</artifactId>
</dependency>
<!-- spring session with mongodb -->
<dependency>
<groupId>org.springframework.session</groupId>
<artifactId>spring-session-data-mongodb</artifactId>
</dependency>
<dependency>
<groupId>org.springframework.boot</groupId>
<artifactId>spring-boot-starter-data-mongodb-reactive</artifactId>
</dependency>
配置文件,application.yaml
spring:
session:
store-type: mongodb
timeout: 30s
mongodb:
collection-name: WEB_SESSIONS
java配置,HttpSessionConfiguration.java:
package com.paul.testmicroservicecommon.config;
import org.springframework.boot.autoconfigure.session.MongoSessionProperties;
import org.springframework.boot.autoconfigure.session.SessionProperties;
import org.springframework.boot.context.properties.EnableConfigurationProperties;
import org.springframework.context.annotation.Bean;
import org.springframework.session.config.ReactiveSessionRepositoryCustomizer;
import org.springframework.session.data.mongo.ReactiveMongoSessionRepository;
import org.springframework.session.data.mongo.config.annotation.web.reactive.EnableMongoWebSession;
@EnableMongoWebSession
@EnableConfigurationProperties(MongoSessionProperties.class)
public class HttpSessionConfiguration {
@Bean
public ReactiveSessionRepositoryCustomizer<ReactiveMongoSessionRepository> customize(
SessionProperties sessionProperties,
MongoSessionProperties mongoSessionProperties
){
return c -> {
c.setMaxInactiveIntervalInSeconds((int)sessionProperties.getTimeout().getSeconds());
c.setCollectionName(mongoSessionProperties.getCollectionName());
};
}
}
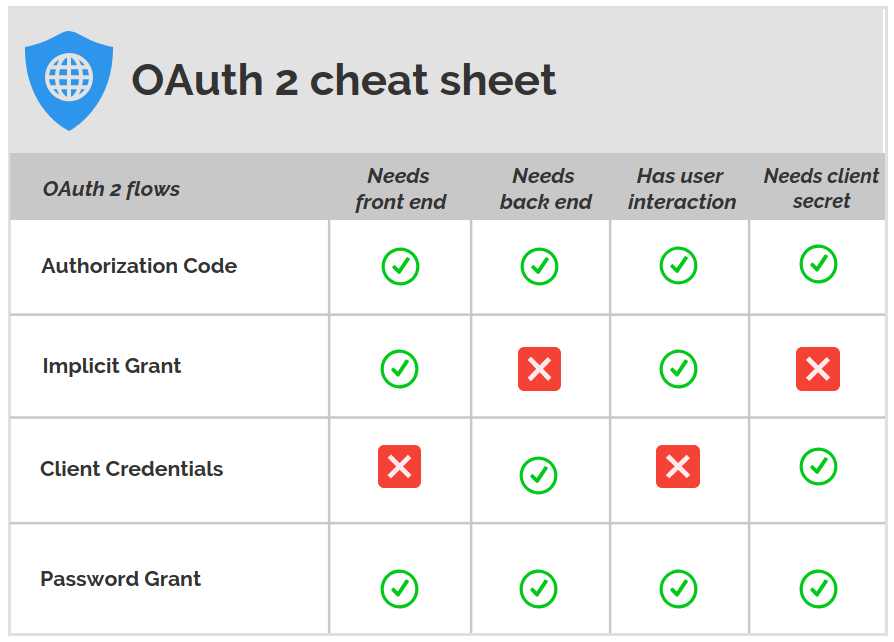
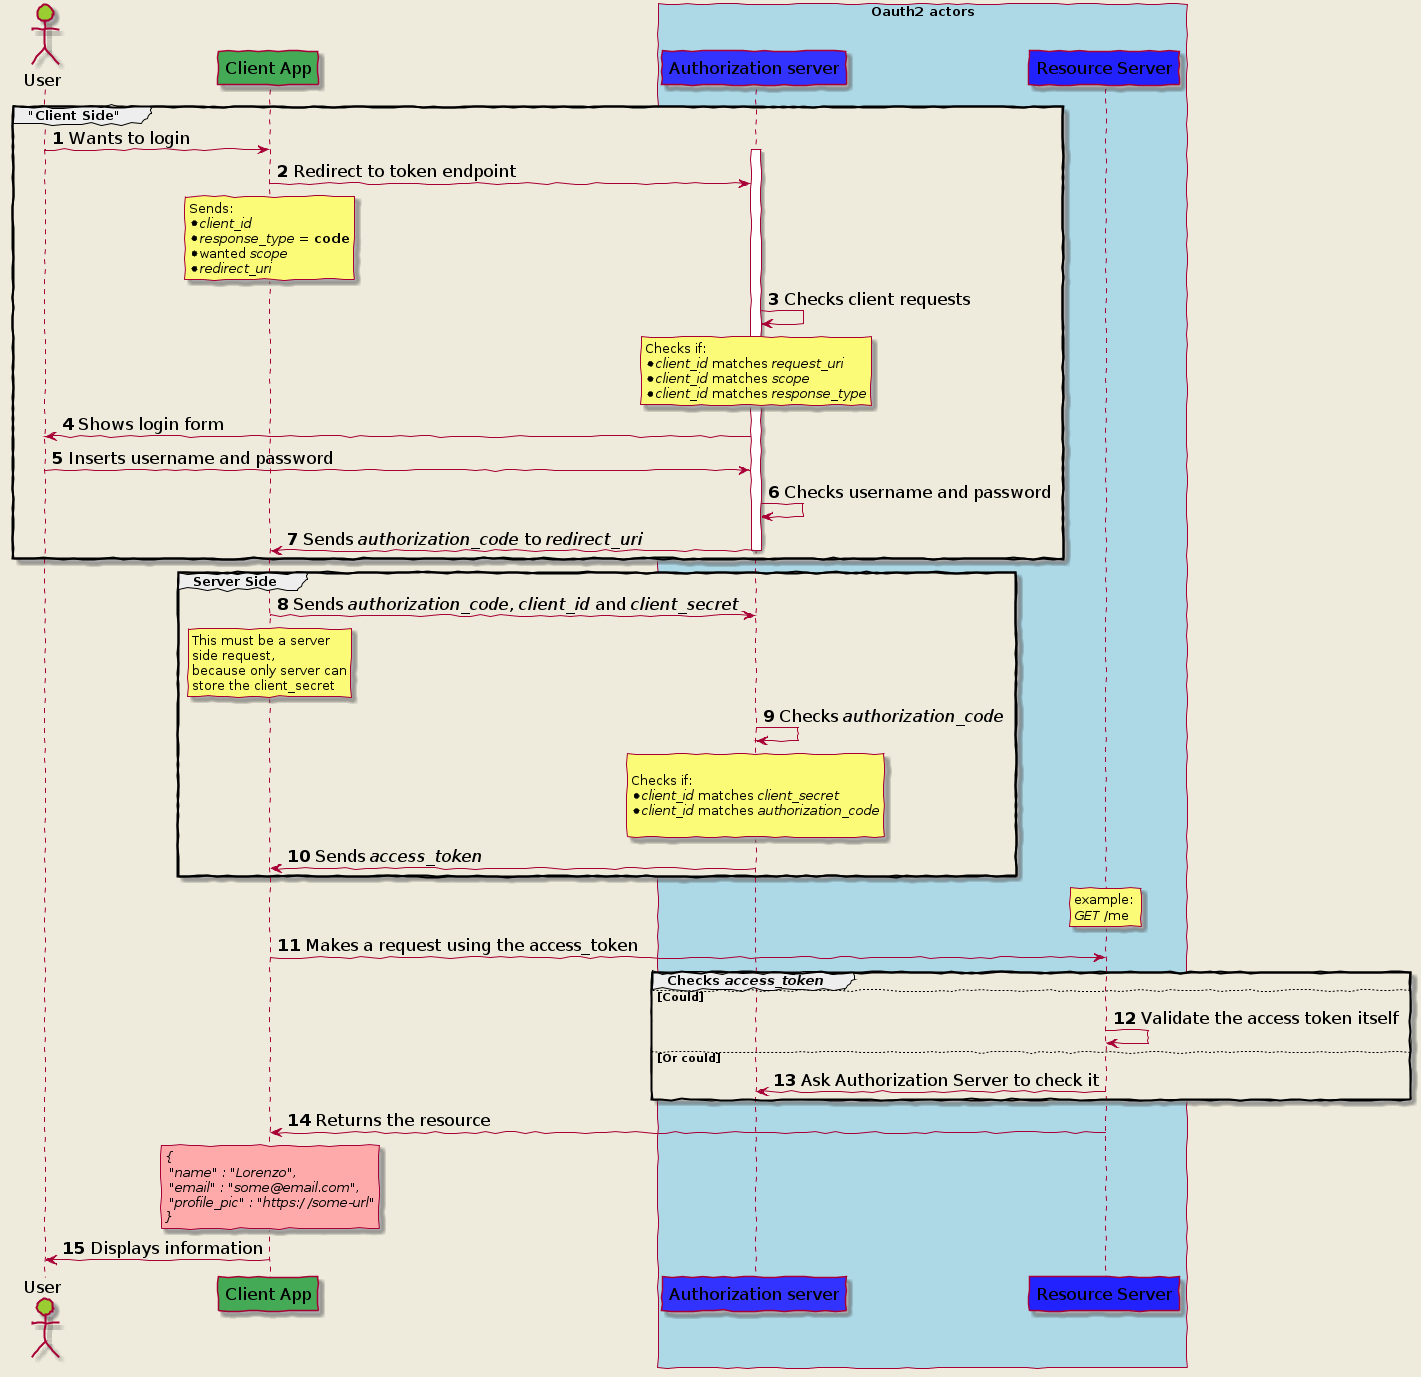
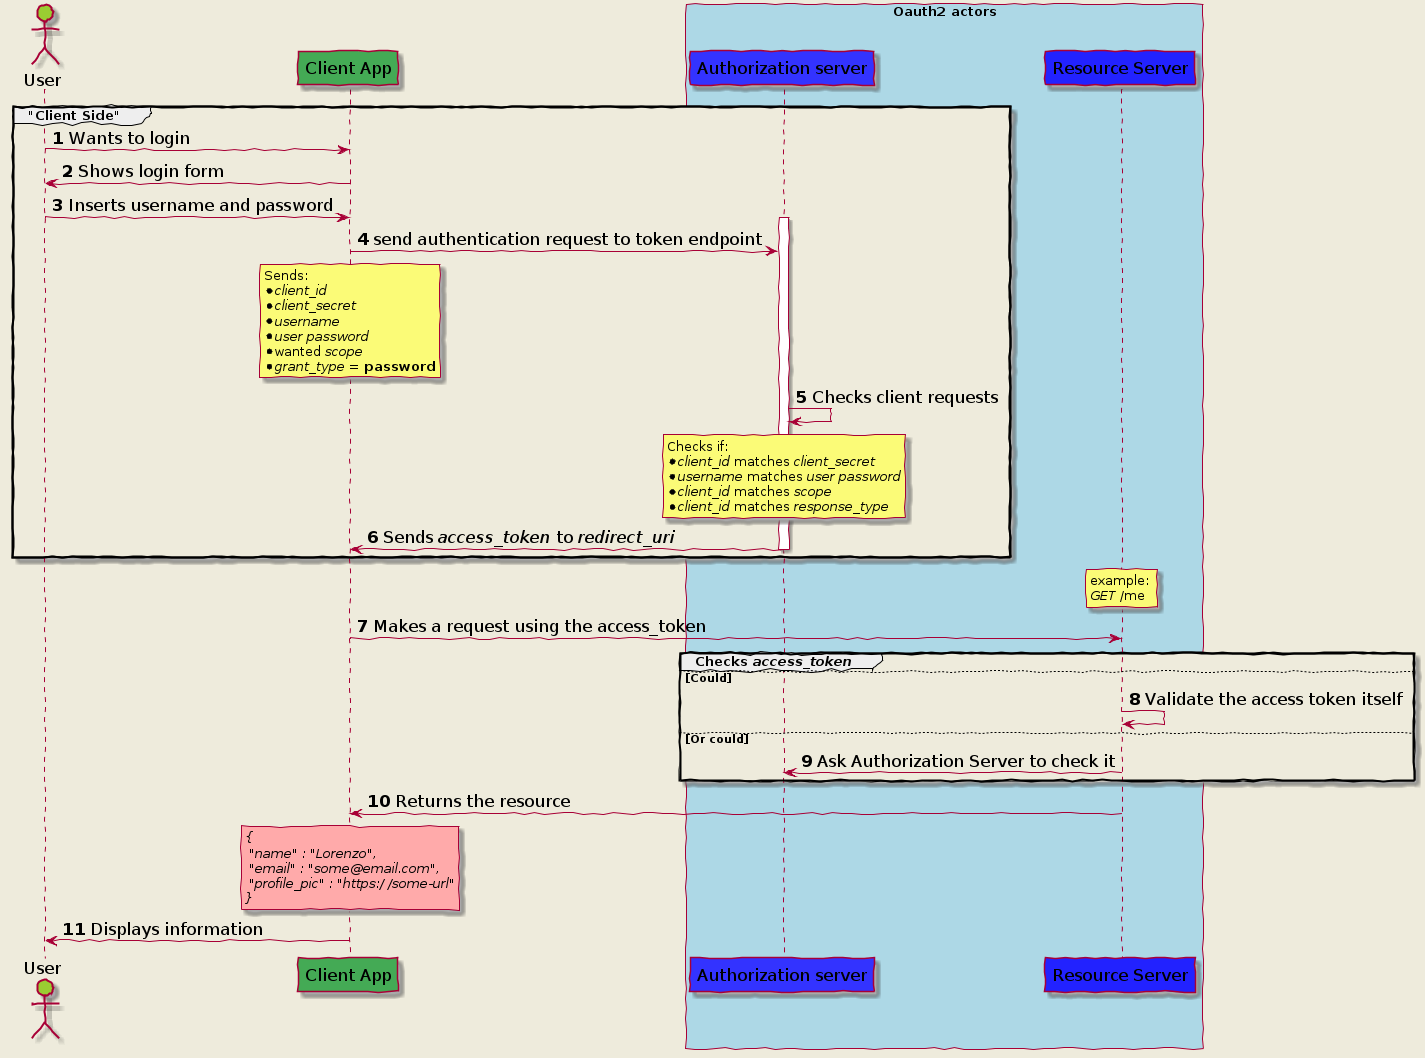
Authorization Code Grant
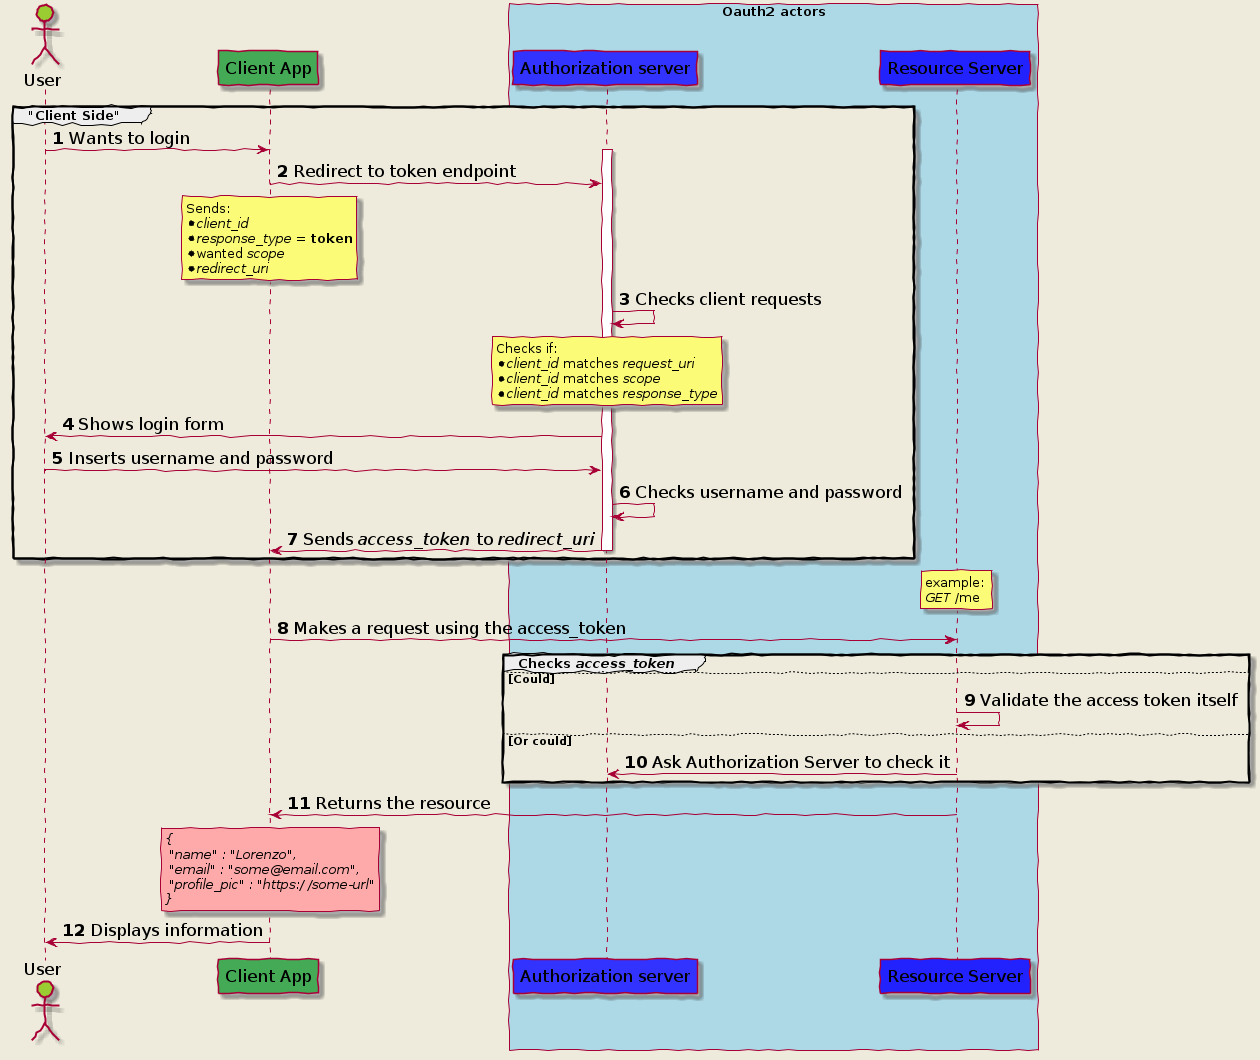
Implicit Grant Flow
Client Credential
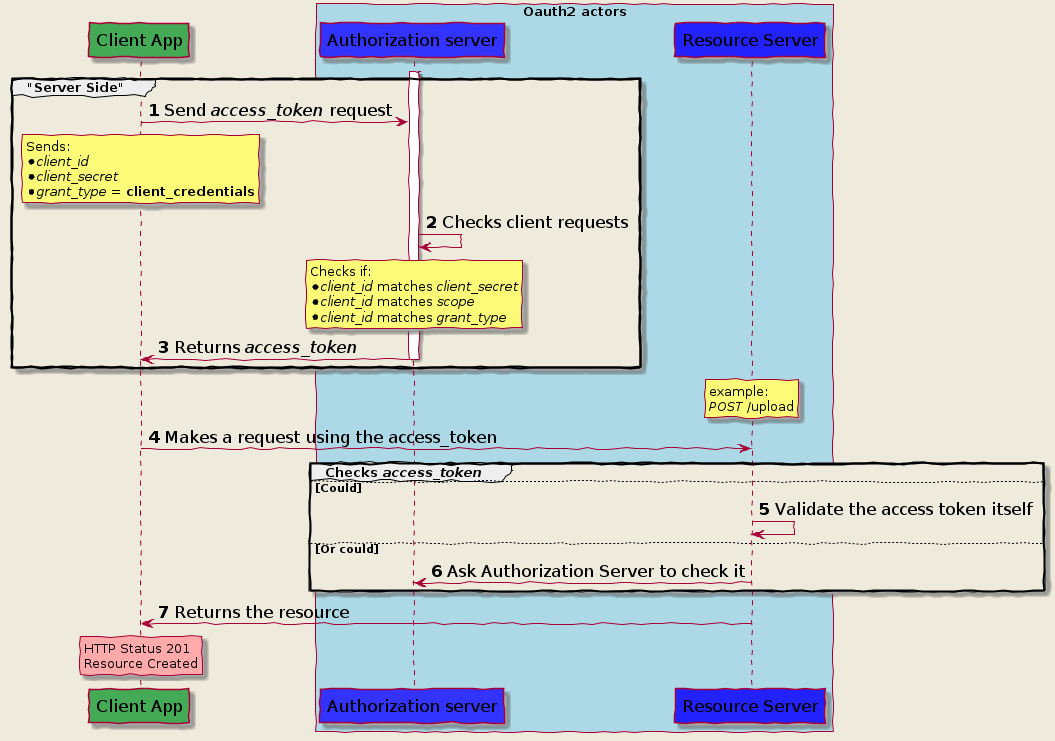
Password Grant flow
 https://itnext.io/an-oauth-2-0-introduction-for-beginners-6e386b19f7a9
目前SPRING CLOUD(2020)尚未支持REACTIVE FEIGN,但官方推荐使用feign-reactive。
pom.xml
<dependency>
<groupId>com.playtika.reactivefeign</groupId>
<artifactId>feign-reactor-spring-cloud-starter</artifactId>
<version>3.1.2</version>
<type>pom</type>
</dependency>
LoanDecisionClientReactive.java
package com.paul.testspringcloudstream.loancheck.service;
import org.springframework.web.bind.annotation.PostMapping;
import org.springframework.web.bind.annotation.RequestBody;
import com.paul.testspringcloudstream.common.model.Loan;
import reactivefeign.spring.config.ReactiveFeignClient;
import reactor.core.publisher.Mono;
@ReactiveFeignClient(name = "loan-decision")
public interface LoanDecisionClientReactive {
@PostMapping("/loan-decision")
public Mono<Loan> getDecision(@RequestBody Loan loan);
}
LoanCheckConfiguration.java
@Configuration
@Import({
MongoDbConsumerConfiguration.class,
})
@EnableDiscoveryClient
@EnableReactiveFeignClients("com.paul.testspringcloudstream.loancheck.service")
public class LoanCheckConfiguration {
}
使用同feign
@Autowired
private LoanDecisionClientReactive loanDecisionClientReactive;
Reference
https://blog.csdn.net/LCBUSHIHAHA/article/details/113817966官方SAMPLE
https://github.com/kptfh/feign-reactive-sample
升级spring cloud版本之后发现bootstrap.yml 失效了,阅读官方文档得知,需要新增一个引用来开启bootstrap.xml文件的读取,新版spring cloud默认是关闭读取了。
增加依赖如下即可:
<dependency>
<groupId>org.springframework.cloud</groupId>
<artifactId>spring-cloud-starter-bootstrap</artifactId>
</dependency>
官方文档:
https://docs.spring.io/spring-cloud-config/docs/current/reference/html/#config-first-bootstrap
SPRING REACTOR 之Flux和Mono,有点象SPRING INTEGRATION的IntegrationFlow,有如下特点
- 定义了针对某种类型数据的处理流程
- 可以进行类型转换
- 长期运行,除非被要求中止
- 流程中的每种操作可以在新的线程中执行
- 可以正常中止,如果中途有异常,则该流程也会中止
- 要subscribe,流程才开始被启动
- 可以分割成各个子流程
- 可以聚合子流程
- Mono发送一个数据,就发送中止信号
- Flux发送任意数据,由程序决定何时发送中止信号
编程则比较简单,先根据不同的数据类型定义不同的Flux或Mono,业务操作用Function包装后,放在map/flatmap中,再调用subscribe启动流程。
SpringReactorTest.java
package com.paul.testreactivestream.reactor;
import java.util.List;
import org.junit.jupiter.api.Test;
import reactor.core.publisher.Flux;
import reactor.core.publisher.Mono;
import reactor.core.scheduler.Schedulers;
public class SpringReactorTest {
private void subscribeAndEnd(Flux<?> flux) {
flux.map(c -> String.format("[%s] %s", Thread.currentThread().getName(), c))
.subscribe(System.out::println);
flux.blockLast();
}
@Test
public void createAFlux_just() throws InterruptedException {
Flux<String> fruitFlux =
Flux.just("Apple", "Orange", "Grape", "Banana", "Strawberry")
.log()
;
fruitFlux.subscribe(
f -> System.out.println(
String.format("[%s] Here's some fruit: %s", Thread.currentThread().getName(), f)
)
)
;
fruitFlux.blockLast();
// Thread.currentThread().join();
}
@Test
public void zipFluxesToObject() {
Flux<String> characterFlux =
Flux.just("Garfield", "Kojak", "Barbossa");
Flux<String> foodFlux =
Flux.just("Lasagna", "Lollipops", "Apples");
Flux<String> zippedFlux =
Flux.zip(characterFlux, foodFlux, (c, f) -> c + " eats " + f);
this.subscribeAndEnd(zippedFlux);
}
@Test
public void map() {
Flux<Player> playerFlux =
Flux.just("Michael Jordan", "Scottie Pippen", "Steve Kerr")
.map(n -> {
String[] split = n.split("\\s");
return new Player(split[0], split[1]);
})
;
this.subscribeAndEnd(playerFlux);
}
@Test
public void flatMap() {
Flux<Player> playerFlux =
Flux.just("Michael Jordan", "Scottie Pippen", "Steve Kerr")
.flatMap(
n -> Mono.just(n)
.map(p -> {
String[] split = p.split("\\s");
return new Player(split[0], split[1]);
})
.subscribeOn(Schedulers.parallel())
);
this.subscribeAndEnd(playerFlux);
}
@Test
public void buffer() {
Flux<List<String>> fruitFlux =
Flux.just(
"apple", "orange", "banana", "kiwi", "strawberry"
)
.buffer(3);
this.subscribeAndEnd(fruitFlux);
}
@Test
public void bufferAsyn() {
Flux<String> flux =
Flux.just(
"apple", "orange", "banana", "kiwi", "strawberry"
)
.buffer(3)
.flatMap(x ->
Flux.fromIterable(x)
.map(y -> y.toUpperCase())
.subscribeOn(Schedulers.parallel())
// .log()
);
this.subscribeAndEnd(flux);
}
@Test
public void all() {
Mono<Boolean> animalFlux =
Flux.just(
"aardvark", "elephant", "koala", "eagle", "kangaroo"
)
.all(c -> c.contains("a"))
;
animalFlux.map(c -> String.format("[%s] %s", Thread.currentThread().getName(), c))
.subscribe(System.out::println);
}
}
Supplier beans, or functions that only publish messages in Spring Cloud Stream, are a bit special in that they aren't triggered by the receiving of events like Function or Consumer beans. This means that you often need a way to trigger them to be executed periodically.
For imperative functions the framework by default "polls" a Supplier function every 1 second, but that duration is configurable using the spring.cloud.stream.poller.fixed-delay property.
However, for reactive functions supplying a Flux it is only triggered once by default. This is because a Flux itself is potentially an infinite stream of events so in many cases it will only need to be triggered once. But don't worry, if you want to periodically trigger a reactive Supplier because you are producing a finite stream of events you can still do so using @PollableBean. This annotation then allows you to configure how often the function is triggered using the same spring.cloud.stream.poller.fixed-delay property!
One example use case here could be periodically querying a data store and publishing each entry/row as an event. The number of rows in your data store is a finite number at any given time.
Example code:
@PollableBean
public Supplier<Flux<String>> stringSupplier() { return () -> Flux.just("foo","bar","baz"); }
Reference:
https://solace.community/discussion/360/pollablebean-for-reactive-suppliers-in-spring-cloud-stream
在SPRING INTEGRATION中,如果要从非SPRING INTEGRATION代码发送MESSAGE到SPRING INTEGRATION程序,通常用BUS GATEWAY。
那么在SPRING CLOUD STREAM中,如果要从非SPRING CLOUD STREAM代码发送MESSAGE到SPRING CLOUD STREAM程序,通常就要先通知框架自动生成一个SOURCE。
application.property
spring.cloud.stream.source=supplier
spring.cloud.stream.bindings.supplier-out-0.destination=notification-events
java
streamBridge.send("supplier-out-0", userDto);
Reference:
https://blog.devgenius.io/event-driven-microservices-with-spring-cloud-stream-e034eee3f394
如果Function中抛出异常,系统没有配置捕获异常,则异常消息会被丢弃。通常会进行配置。
@ServiceActivator(inputChannel = "my-destination.my-group.errors")
public void handleError(ErrorMessage message) {
Throwable throwable = message.getPayload();
log.error("截获异常", throwable);
Message<?> originalMessage = message.getOriginalMessage();
assert originalMessage != null;
log.info("原始消息体 = {}", new String((byte[]) originalMessage.getPayload()));
}
详情参考:
https://www.itmuch.com/spring-cloud/spring-cloud-stream-error-handling/
SPRING CLOUD STREAM内置了一个RoutingFunction,能将MESSAGE路由到应用的其他FUNCTION中。
对接RoutingFunction可发送消息到其外部DESTINATION中或用“|”连接符连接。
application.yaml
# This setting can increase or decrease the rate of message production (1000 = 1s)
# spring.cloud.stream.poller.fixed-delay=1000
# DefaultPollerProperties
# This setting can control which function method in our code will be triggered if there are multiple
# spring.cloud.function.definition=supplyLoan
# Give the autogenerated binding a friendlier name
spring:
application:
name: loan-check-rabbit
banner:
location: classpath:/banner-rabbit.txt
cloud:
#BindingServiceProperties
stream:
#StreamFunctionProperties
function:
definition: loadCheckerFunction;loanCheckerDecieder;loanCheckerConsumer;\
loanDeclinedConsumer;loanApprovedConsumer;loanCheckerProcessor|functionRouter
routing:
enabled: true
#BindingProperties
bindings:
loanCheckerProcessor|functionRouter-in-0:
destination: queue.pretty.log.messages
binder: local_rabbit
loanApprovedConsumer-in-0:
destination: load.approved
binder: local_rabbit
loanDeclinedConsumer-in-0:
destination: load.declined
binder: local_rabbit
loanCheckerDecieder-in-0:
destination: queue.pretty.log.messages.222
binder: local_rabbit
loanCheckerDecieder-out-0:
destination: queue.pretty.approved.messages
binder: local_rabbit
loanCheckerConsumer-in-0:
destination: queue.pretty.approved.messages
binder: local_rabbit
#BinderProperties
binders:
local_rabbit:
type: rabbit
environment:
spring:
rabbitmq:
host: 10.80.27.69
port: 5672
username: guest
password: guest
virtual-host: my-virtual-host
logging:
level:
root: info
org.springframework:
cloud.function: debug
#retry: debug
LoanCheckConfiguration.java
package com.paul.testspringcloudstream.loancheck.config;
import java.util.function.Consumer;
import java.util.function.Function;
import org.slf4j.Logger;
import org.slf4j.LoggerFactory;
import org.springframework.beans.factory.annotation.Autowired;
import org.springframework.cloud.function.context.MessageRoutingCallback;
import org.springframework.cloud.stream.function.StreamBridge;
import org.springframework.context.annotation.Bean;
import org.springframework.context.annotation.Configuration;
import org.springframework.integration.support.MessageBuilder;
import org.springframework.messaging.Message;
import com.paul.testspringcloudstream.common.model.Loan;
import com.paul.testspringcloudstream.common.model.Status;
import com.paul.testspringcloudstream.loancheck.router.LoanCheckerRouter;
import com.paul.testspringcloudstream.loancheck.service.LoanProcessor;
import com.paul.testspringcloudstream.loancheck.service.LoanService;
@Configuration
public class LoanCheckConfiguration {
private static final Logger log = LoggerFactory.getLogger(LoanCheckConfiguration.class);
private static final Long MAX_AMOUNT = 10000L;
private static final String LOG_PATTERN = "{} - {} {} for ${} for {}";
@Autowired
public void test(Consumer<Loan> loanCheckerConsumer) {
log.info("{}", loanCheckerConsumer.getClass());
}
@Bean
public Consumer<Loan> loanCheckerConsumer(){
return loan ->
log.info(LOG_PATTERN, "loanCheckerConsumer", loan.getStatus(), loan.getUuid(), loan.getAmount(), loan.getName());
}
@Bean
public Consumer<Loan> loanDeclinedConsumer(){
return loan ->
log.info(LOG_PATTERN, "loanDeclinedConsumer", loan.getStatus(), loan.getUuid(), loan.getAmount(), loan.getName());
}
@Bean
public Consumer<Loan> loanApprovedConsumer(){
return loan ->
log.info(LOG_PATTERN, "loanApprovedConsumer", loan.getStatus(), loan.getUuid(), loan.getAmount(), loan.getName());
}
@Bean
public MessageRoutingCallback loanCheckerRouter() {
return new LoanCheckerRouter();
}
@Bean
public Function<Loan, Loan> loanCheckerProcessor(
LoanService loanService
){
return loan -> loanService.check(loan);
}
@Bean
public Function<Loan, Message<Loan>> loanCheckerProcessorBak(
LoanService loanService
){
return loan -> {
Loan result = loanService.check(loan);
String sendTo = Status.DECLINED.name().equals(result.getStatus()) ?
LoanProcessor.DECLINED_OUT : LoanProcessor.APPROVED_OUT;
return MessageBuilder.withPayload(result)
.setHeader("spring.cloud.stream.sendto.destination", sendTo)
.build();
};
}
@Bean
public Consumer<Loan> loanCheckerDecieder(StreamBridge streamBridge){
return loan -> {
log.info(LOG_PATTERN, "loanCheckerDecieder", loan.getStatus(), loan.getUuid(), loan.getAmount(), loan.getName());
if (loan.getAmount() > MAX_AMOUNT) {
loan.setStatus(Status.DECLINED.name());
streamBridge.send(LoanProcessor.DECLINED_OUT, "local_rabbit", loan);
} else {
loan.setStatus(Status.APPROVED.name());
streamBridge.send(LoanProcessor.APPROVED_OUT, "local_rabbit", loan);
}
log.info(LOG_PATTERN, "loanCheckerDecieder", loan.getStatus(), loan.getUuid(), loan.getAmount(), loan.getName());
};
}
}
LoanCheckerRouter.java,将路由条件统一在此处
package com.paul.testspringcloudstream.loancheck.router;
import org.slf4j.Logger;
import org.slf4j.LoggerFactory;
import org.springframework.cloud.function.context.MessageRoutingCallback;
import org.springframework.messaging.Message;
import com.paul.testspringcloudstream.common.model.Loan;
import com.paul.testspringcloudstream.common.model.Status;
public class LoanCheckerRouter implements MessageRoutingCallback{
private static final Logger log = LoggerFactory.getLogger(LoanCheckerRouter.class);
@Override
public String functionDefinition(Message<?> message) {
// byte[] resultByte = (byte[])message.getPayload();
// String resultString = new String(resultByte);
//
// return "loanDeclinedConsumer";
Loan result = (Loan)message.getPayload();
log.info("Loan status: {}", result.getStatus());
return Status.DECLINED.name().equals(result.getStatus()) ?
"loanDeclinedConsumer" : "loanApprovedConsumer";
}
}
SPRING CLOUD STREAM 3.x 版本时,之前的一些编程模式,如@Enablebindding,@StreamListenner等注释被废弃了,这是由于一些框架的代码必需由用户编写,如配置框架用的Input MessageChannel,Output MessageChannel,连接MessageHandler与MessageChannel等,被视为不必要的动作。为了简化用户代码,于是推出Functional Programming Model。
引入了新名词:Supplier、Function与Consumer。实际上这几个类可视为Adapter,如果之前已经有存在的Service类,且方法名为各种各样,可以重新包装成Supplier、Function与Consumer,并在固定的方法名:apply/get/accept中调用Service的方法。
Supplier
当在配置文件中注入此类型的Bean,并在spring.cloud.stream.function.definition加入此Bean的名称,SPRING CLOUD STREAM就会帮你生成一个Output MessageChannel,并连接上此Bean,后续只需要在BINDDING中加入对应的Destination Name,即可向BROKER发消息了。
Consumer
当在配置文件中注入此类型的Bean,并在spring.cloud.stream.function.definition加入此Bean的名称,SPRING CLOUD STREAM就会帮你生成一个Input MessageChannel,并连接上此Bean,后续只需要在BINDDING中加入对应的Destination Name,即可收到BROKER推送关于此Destination的消息了。
Function
当在配置文件中注入此类型的Bean,并在spring.cloud.stream.function.definition加入此Bean的名称,SPRING CLOUD STREAM就会帮你生成一个Input和Output MessageChannel,并连接上此Bean,后续只需要在BINDDING中分别对Input和Output MessageChannel加入对应的Destination Name1/Name2,即可收到BROKER推送关于此Destination的消息,也可以向BROKER发消息了。
与SPRING INTEGRATION的整合
如果要对消息进行复杂处理,如拆分消息、聚合消息、IF ELSE消息等,就要借助SPRING INTEGRATION了。
@Bean
public IntegrationFlow upperCaseFlow(LoanService loanService) {
return IntegrationFlows
//turn this IntegrationFlow as a gateway, here is a Function interface
//with loadCheckerFunction as bean name
.from(LoadCheckerFunction.class, gateway -> gateway.beanName("loadCheckerFunction"))
.handle(loanService, "check")
.logAndReply(LoggingHandler.Level.WARN);
}
public interface LoadCheckerFunction extends Function<Loan, Loan>{
}
IntegrationFlows.from(Class<?> serviceInterface)是可以将本IntegrationFlow包装成serviceInterface的实现类,如果调用此接口,最终会返回IntegrationFlow最后一个步骤的实体,如果这个serviceInterface是Function的话,刚好和SPRING CLOUD STREAM对接上。
后续在spring.cloud.stream.function.definition加入此Bean的名称loadCheckerFunction,SPRING CLOUD STREAM就会帮你生成一个Input和Output MessageChannel,并连接上此Bean,再在BINDDING中分别对Input和Output MessageChannel加入对应的Destination Name1/Name2,即可收到BROKER推送关于此Destination的消息,也可以向BROKER发消息。
application.yaml
# This setting can increase or decrease the rate of message production (1000 = 1s)
# spring.cloud.stream.poller.fixed-delay=1000
# This setting can control which function method in our code will be triggered if there are multiple
# spring.cloud.function.definition=supplyLoan
# Give the autogenerated binding a friendlier name
spring:
application:
name: loan-check-rabbit
banner:
location: classpath:/banner-rabbit.txt
cloud:
stream:
function.definition: loadCheckerFunction
#BindingProperties
bindings:
loadCheckerFunction-in-0:
destination: queue.pretty.log.messages
binder: local_rabbit
loadCheckerFunction-out-0:
destination: queue.pretty.approved.messages
binder: local_rabbit
#BinderProperties
binders:
local_rabbit:
type: rabbit
environment:
spring:
rabbitmq:
host: 10.80.27.69
port: 5672
username: guest
password: guest
virtual-host: my-virtual-host
Reference
https://spring.io/blog/2019/10/25/spring-cloud-stream-and-spring-integration
安装ERLANG
从这里下载0依赖的ERLANG安装包:
https://github.com/rabbitmq/erlang-rpm/releases 象这种erlang-23.3.4.8-1.el7.x86_64.rpm含el7的是CENTOS7版本,含el8的是CENTOS8版本,安装脚本
yum install -y erlang-23.3.4.8-1.el7.x86_64.rpm
安装RABBITMQ
下载地址:
https://github.com/rabbitmq/rabbitmq-server/releases安装脚本:
yum install -y erlang-23.3.4.8-1.el7.x86_64.rpm拷贝配置文件
下载配置文件样例:
https://github.com/rabbitmq/rabbitmq-server/blob/master/deps/rabbit/docs/rabbitmq.conf.example粘贴并重命名文件:
/etc/rabbitmq/rabbitmq.conf开启WEB控制台
/lib/rabbitmq/bin/rabbitmq-plugins enable rabbitmq_management
配置guest可远程访问
## Uncomment the following line if you want to allow access to the
## guest user from anywhere on the network.
loopback_users.guest = false
配置开机启动
chkconfig rabbitmq-server on
启动实例
systemctl start rabbitmq-serve
systemctl stop rabbitmq-serve
访问控制台,guest/guest
http://10.80.27.69:15672/#/
Reference
https://www.cnblogs.com/ZhuChangwu/p/14093107.htmlhttps://juejin.cn/post/6933040530519506957
通常微服务应用之间的通信是通过HTTP调用,吞吐性不建都高,高并发的场景建议使用EVENT DRIVEN的框架,即使用MESSAGE通信。
即A微服务应用将数据发送到MESSAGE BROKER中的某个DESTINATION,此DESTINATION是广播型,非点对点型。B微服务应用订阅此DESTINATION,当有新MESSAGE到达此DESTINATION时,MESSAGE BROKER会将此MESSAGE推送给B应用。所有对此MESSAGE有需要的应用均可订阅,从而收到此MESSAGE。
SPRING CLOUD 中EVENT DRIVEN的框架就是SPRING CLOUD STREAM。其底层是使用SPRING INTEGRATION实现。
SPRING CLOUD STREAM有以下新名词:
是对MESSAGE BROKER操作方法的抽象,即应用通过此BINDER操作MESSAGE BROKER。目前只实现了RABITMQ和KAFKA。
MESSAGE从SPRING CLOUD STREAM传给应用或相反是通过CHANNEL传递的,这点和SPRING INTEGRATION是一样的。
MESSAGE从应用传给SPRING CLOUD STREAM的CHANNEL,叫@INPUT,包含这种CHANNEL的接口叫SOURCE。
MESSAGE从SPRING CLOUD STREAM传给应用的CHANNEL,叫@OUPUT,包含这种CHANNEL的接口叫SINK。
绑定哪个@INPUT或哪个@OUPUT与哪个DESTINATION发送或接收关系的MAPPING。
应用启动时就会建立EnableBinding指定的接口中的CHANNEL
默认下如果同一个应用部署了多个实例,则每个实例都会收到MESSAGE,这时如果设置了消费者群组名称,则同一个名称下的多个实例,只有一个能收到MESSAGE。
如果为MESSAGE指定规则,如MESSAGE某个字段值以A开头为一个规则,以B开头为一个规则,那么以A开头的MESSAGE会放到同一个分区中。
这样使用就很简单了,只要取得OUTPUT CHANNEL,就可以发送MESSAGE,将代码关联到INPUT CHANNEL,就能在收到MESSAGE时,相关代码就会被执行。
摘要: 根据OAUTH2协议,如果需要用户协助的,则使用authorization_code流程,此时需要用户登录页面、CLIENT SERVER、RESOURCE SERVER和AUTHORIZATION SERVER,其中CLIENT SERVER是通过http调用RESOURCE SERVER的api,AUTHORIZATION SERVER使用现成的KEYCLOAK。如果不需要用户协助的,即SER...
阅读全文
employee-service调用department-service,如果要按OAUTH2.0流程,只需要提供client-id和client-secrect即可。在KEYCLOAK中引入service-account,即配置该employee-service时,取消standard-flow,同时激活service-account。
employee-service的application.yaml文件,其中的public-key要从KEYCLOAK中取
server:
port: 8090
# Can be set to false to disable security during local development
rest:
security:
enabled: true
#issuer-uri: http://localhost:8080/auth/realms/dev
api-matcher: /api/**
cors:
allowed-origins: '*'
allowed-headers: '*'
allowed-methods: GET,POST,PUT,PATCH,DELETE,OPTIONS
max-age: 3600
security:
oauth2:
resource:
filter-order: 3
id: test-employee-service
token-info-uri: ${rest.security.issuer-uri}/protocol/openid-connect/token/introspect
user-info-uri: ${rest.security.issuer-uri}/protocol/openid-connect/userinfo
jwt:
key-value: |
-----BEGIN PUBLIC KEY-----
MIGfMA0GCSqGSIb3DQEBAQUAA4GNADCBiQKBgQCrVrCuTtArbgaZzL1hvh0xtL5mc7o0NqPVnYXkLvgcwiC3BjLGw1tGEGoJaXDuSaRllobm53JBhjx33UNv+5z/UMG4kytBWxheNVKnL6GgqlNabMaFfPLPCF8kAgKnsi79NMo+n6KnSY8YeUmec/p2vjO2NjsSAVcWEQMVhJ31LwIDAQAB
-----END PUBLIC KEY-----
# To access another secured micro-service
client:
client-id: test-employee-service
#client-secret: 25c33006-e1b9-4fc2-a6b9-c43dbc41ecd0
user-authorization-uri: ${rest.security.issuer-uri}/protocol/openid-connect/auth
access-token-uri: ${rest.security.issuer-uri}/protocol/openid-connect/token
scope: openid
grant-type: client_credentials
is-client-only: true
#Logging Configuration
logging:
level:
org.springframework.boot.autoconfigure.logging: INFO
org.springframework.security: DEBUG
org.arun: DEBUG
root: INFO
application-dev.yaml
rest:
security:
issuer-uri: http://10.80.27.69:8180/auth/realms/quickstart
department-service:
url: http://10.80.27.69:8095/api/departments/1
security:
oauth2:
client:
client-secret: db25cdbd-605b-429d-bd92-96705bdf1474
department-service的application.yaml
server:
port: 8095
# Can be set to false to disable security during local development
rest:
security:
enabled: true
#issuer-uri: http://localhost:8080/auth/realms/dev
api-matcher: /api/**
cors:
allowed-origins: '*'
allowed-headers: '*'
allowed-methods: GET,POST,PUT,PATCH,DELETE,OPTIONS
max-age: 3600
security:
oauth2:
resource:
filter-order: 3
id: test-department-service
token-info-uri: ${rest.security.issuer-uri}/protocol/openid-connect/token/introspect
user-info-uri: ${rest.security.issuer-uri}/protocol/openid-connect/userinfo
jwt:
key-value: |
-----BEGIN PUBLIC KEY-----
MIGfMA0GCSqGSIb3DQEBAQUAA4GNADCBiQKBgQCrVrCuTtArbgaZzL1hvh0xtL5mc7o0NqPVnYXkLvgcwiC3BjLGw1tGEGoJaXDuSaRllobm53JBhjx33UNv+5z/UMG4kytBWxheNVKnL6GgqlNabMaFfPLPCF8kAgKnsi79NMo+n6KnSY8YeUmec/p2vjO2NjsSAVcWEQMVhJ31LwIDAQAB
-----END PUBLIC KEY-----
#Logging Configuration
logging:
level:
org.springframework.boot.autoconfigure.logging: INFO
org.springframework.security: DEBUG
org.arun: DEBUG
root: INFO
application-dev.yaml
rest:
security:
issuer-uri: http://10.80.27.69:8180/auth/realms/quickstart
employee-service的pom.xml
<?xml version="1.0" encoding="UTF-8"?>
<project xmlns="http://maven.apache.org/POM/4.0.0"
xmlns:xsi="http://www.w3.org/2001/XMLSchema-instance"
xsi:schemaLocation="http://maven.apache.org/POM/4.0.0 http://maven.apache.org/xsd/maven-4.0.0.xsd">
<modelVersion>4.0.0</modelVersion>
<parent>
<groupId>org.springframework.boot</groupId>
<artifactId>spring-boot-starter-parent</artifactId>
<version>2.1.18.RELEASE</version>
<relativePath /> <!-- lookup parent from repository -->
</parent>
<groupId>org.arun.springoauth</groupId>
<artifactId>spring-oauth2-employee-service</artifactId>
<version>1.0.0</version>
<name>spring-oauth2-employee-service</name>
<description>Employee Service</description>
<properties>
<java.version>1.8</java.version>
<spring-boot.version>2.1.18.RELEASE</spring-boot.version>
</properties>
<dependencies>
<dependency>
<groupId>org.springframework.boot</groupId>
<artifactId>spring-boot-starter-security</artifactId>
</dependency>
<dependency>
<groupId>org.springframework.security.oauth.boot</groupId>
<artifactId>spring-security-oauth2-autoconfigure</artifactId>
<!-- <version>2.1.18.RELEASE</version> -->
<version>${spring-boot.version}</version>
</dependency>
<dependency>
<groupId>org.springframework.boot</groupId>
<artifactId>spring-boot-starter-web</artifactId>
</dependency>
<dependency>
<groupId>org.springframework.boot</groupId>
<artifactId>spring-boot-devtools</artifactId>
<scope>runtime</scope>
</dependency>
<dependency>
<groupId>org.springframework.boot</groupId>
<artifactId>spring-boot-configuration-processor</artifactId>
<optional>true</optional>
</dependency>
<dependency>
<groupId>org.projectlombok</groupId>
<artifactId>lombok</artifactId>
<optional>true</optional>
</dependency>
<dependency>
<groupId>org.springframework.boot</groupId>
<artifactId>spring-boot-starter-test</artifactId>
<scope>test</scope>
</dependency>
<dependency>
<groupId>org.springframework.security</groupId>
<artifactId>spring-security-test</artifactId>
<scope>test</scope>
</dependency>
</dependencies>
<build>
<plugins>
<plugin>
<groupId>org.springframework.boot</groupId>
<artifactId>spring-boot-maven-plugin</artifactId>
<configuration>
<layout>ZIP</layout>
<excludes>
<exclude>
<groupId>*</groupId>
<artifactId>*</artifactId>
</exclude>
</excludes>
<includes>
<include>
<groupId>com.paul</groupId>
</include>
</includes>
</configuration>
</plugin>
</plugins>
</build>
</project>
将jwt格式的access_token转成Authentication的类JwtAccessTokenCustomizer
package org.arun.springoauth.employee.config;
import com.fasterxml.jackson.databind.JsonNode;
import com.fasterxml.jackson.databind.ObjectMapper;
import java.util.HashSet;
import java.util.List;
import java.util.Map;
import java.util.Set;
import org.slf4j.Logger;
import org.slf4j.LoggerFactory;
import org.springframework.beans.factory.annotation.Autowired;
import org.springframework.boot.autoconfigure.security.oauth2.resource.JwtAccessTokenConverterConfigurer;
import org.springframework.context.annotation.Configuration;
import org.springframework.security.authentication.UsernamePasswordAuthenticationToken;
import org.springframework.security.core.Authentication;
import org.springframework.security.core.GrantedAuthority;
import org.springframework.security.core.authority.AuthorityUtils;
import org.springframework.security.oauth2.provider.OAuth2Authentication;
import org.springframework.security.oauth2.provider.OAuth2Request;
import org.springframework.security.oauth2.provider.token.DefaultAccessTokenConverter;
import org.springframework.security.oauth2.provider.token.store.JwtAccessTokenConverter;
@Configuration
public class JwtAccessTokenCustomizer extends DefaultAccessTokenConverter implements JwtAccessTokenConverterConfigurer {
private static final Logger LOG = LoggerFactory.getLogger(JwtAccessTokenCustomizer.class);
private static final String CLIENT_NAME_ELEMENT_IN_JWT = "resource_access";
private static final String ROLE_ELEMENT_IN_JWT = "roles";
private ObjectMapper mapper;
@Autowired
public JwtAccessTokenCustomizer(ObjectMapper mapper) {
this.mapper = mapper;
LOG.info("Initialized {}", JwtAccessTokenCustomizer.class.getSimpleName());
}
@Override
public void configure(JwtAccessTokenConverter converter) {
converter.setAccessTokenConverter(this);
LOG.info("Configured {}", JwtAccessTokenConverter.class.getSimpleName());
}
/**
* Spring oauth2 expects roles under authorities element in tokenMap, but
* keycloak provides it under resource_access. Hence extractAuthentication
* method is overriden to extract roles from resource_access.
*
* @return OAuth2Authentication with authorities for given application
*/
@Override
public OAuth2Authentication extractAuthentication(Map<String, ?> tokenMap) {
LOG.debug("Begin extractAuthentication: tokenMap = {}", tokenMap);
JsonNode token = mapper.convertValue(tokenMap, JsonNode.class);
Set<String> audienceList = extractClients(token); // extracting client names
List<GrantedAuthority> authorities = extractRoles(token); // extracting client roles
OAuth2Authentication authentication = super.extractAuthentication(tokenMap);
OAuth2Request oAuth2Request = authentication.getOAuth2Request();
OAuth2Request request = new OAuth2Request(oAuth2Request.getRequestParameters(), oAuth2Request.getClientId(),
authorities, true, oAuth2Request.getScope(), audienceList, null, null, null);
Authentication usernamePasswordAuthentication = new UsernamePasswordAuthenticationToken(
authentication.getPrincipal(), "N/A", authorities);
LOG.debug("End extractAuthentication");
return new OAuth2Authentication(request, usernamePasswordAuthentication);
}
private List<GrantedAuthority> extractRoles(JsonNode jwt) {
LOG.debug("Begin extractRoles: jwt = {}", jwt);
Set<String> rolesWithPrefix = new HashSet<>();
jwt.path(CLIENT_NAME_ELEMENT_IN_JWT).elements().forEachRemaining(e -> e.path(ROLE_ELEMENT_IN_JWT).elements()
.forEachRemaining(r -> rolesWithPrefix.add("ROLE_" + r.asText())));
final List<GrantedAuthority> authorityList = AuthorityUtils
.createAuthorityList(rolesWithPrefix.toArray(new String[0]));
LOG.debug("End extractRoles: roles = {}", authorityList);
return authorityList;
}
private Set<String> extractClients(JsonNode jwt) {
LOG.debug("Begin extractClients: jwt = {}", jwt);
if (jwt.has(CLIENT_NAME_ELEMENT_IN_JWT)) {
JsonNode resourceAccessJsonNode = jwt.path(CLIENT_NAME_ELEMENT_IN_JWT);
final Set<String> clientNames = new HashSet<>();
resourceAccessJsonNode.fieldNames().forEachRemaining(clientNames::add);
LOG.debug("End extractClients: clients = {}", clientNames);
return clientNames;
} else {
throw new IllegalArgumentException(
"Expected element " + CLIENT_NAME_ELEMENT_IN_JWT + " not found in token");
}
}
}
Reference
https://medium.com/@bcarunmail/securing-rest-api-using-keycloak-and-spring-oauth2-6ddf3a1efcc2
KEYCLOAK是一套用户、WEB API登录管理,授权管理的WEB应用。
如果要访问受KEYCLOAK保护的REST API服务,则需要夹带一个ACCESS_TOKEN。
前端页面:
- 前端页面一般是给用户使用的,则需要用户输入在KEYCLOAK中有效的用户名和密码,并提供CALL BAK的URL,提交给KEYCLOAK
http://10.80.27.69:8180/auth/realms/quickstart/protocol/openid-connect/auth?client_id=app-springboot-confidential&redirect_uri=http://10.80.27.69:8183/&response_type=code&scope=openid
- 如果KEYCLOAK验证通过,则通知页面重导向回调的URL,并附上code=xxx,此code则是AUTHORIZATION_CODE
http://10.80.27.69:8183/?session_state=2ad9ab98-6c39-43a8-872f-2112c27b74df&code=3f48ce19-58f9-45d9-8c09-30d492bf4b24.2ad9ab98-6c39-43a8-872f-2112c27b74df.bd7526ef-b1bf-447f-baef-b7dfd6f0df93
- 回调的URL对应的SERVELET,取得AUTHORIZATION_CODE,并加上client_id和client_secrect,调用KEYLOAK的取ACCESS_TOKEN的HTTP API,取得ACCESS_TOKEN,返回给页面
http://10.80.27.69:8180/auth/realms/quickstart/protocol/openid-connect/token
client_id=app-springboot-confidential&client_secret=3acf7692-49cb-4c45-9943-6f3dba512dae&redirect_uri=http://10.80.27.69:8183/&grant_type=authorization_code&code=cc7ac566-90f9-404e-b88e-fa28037b07d1.591311e1-5380-46a2-9363-834f17337922.bd7526ef-b1bf-447f-baef-b7dfd6f0df93
- 页面保存此ACCESS_TOKEN,就可以调用后台的各种API获取数据
{
"access_token": "eyJhbGciOiJSUzI1NiIsInR5cCIgOiAiSldUIiwia2lkIiA6ICJGSjg2R2NGM2pUYk5MT2NvNE52WmtVQ0lVbWZZQ3FvcXRPUWVNZmJoTmxFIn0.eyJleHAiOjE2MzQwMjA4ODksImlhdCI6MTYzNDAyMDU4OSwianRpIjoiNDAwOTQ4ZmQtMGU0MS00YWRjLTlhY2MtMzczZWM2NDVhNzM5IiwiaXNzIjoiaHR0cDovLzEwLjgwLjI3LjY5OjgxODAvYXV0aC9yZWFsbXMvcXVpY2tzdGFydCIsImF1ZCI6ImFjY291bnQiLCJzdWIiOiJkZGVkMDA2YS0xY2QxLTRjODUtOTQ1MS0wMjFlZmY3OTFiMmUiLCJ0eXAiOiJCZWFyZXIiLCJhenAiOiJhcHAtc3ByaW5nYm9vdC1jb25maWRlbnRpYWwiLCJzZXNzaW9uX3N0YXRlIjoiYzRlN2QzYTgtMDg2My00OTAwLTkxZmEtMGExYmFmYmRlNGU3IiwiYWNyIjoiMSIsInJlYWxtX2FjY2VzcyI6eyJyb2xlcyI6WyJvZmZsaW5lX2FjY2VzcyIsInVtYV9hdXRob3JpemF0aW9uIl19LCJyZXNvdXJjZV9hY2Nlc3MiOnsiYXBwLXNwcmluZ2Jvb3QtY29uZmlkZW50aWFsIjp7InJvbGVzIjpbInVtYV9wcm90ZWN0aW9uIl19LCJhY2NvdW50Ijp7InJvbGVzIjpbIm1hbmFnZS1hY2NvdW50IiwibWFuYWdlLWFjY291bnQtbGlua3MiLCJ2aWV3LXByb2ZpbGUiXX19LCJzY29wZSI6InByb2ZpbGUgZW1haWwiLCJlbWFpbF92ZXJpZmllZCI6ZmFsc2UsImNsaWVudElkIjoiYXBwLXNwcmluZ2Jvb3QtY29uZmlkZW50aWFsIiwiY2xpZW50SG9zdCI6IjEwLjEwLjIwLjU3IiwidXNlcl9uYW1lIjoic2VydmljZS1hY2NvdW50LWFwcC1zcHJpbmdib290LWNvbmZpZGVudGlhbCIsInByZWZlcnJlZF91c2VybmFtZSI6InNlcnZpY2UtYWNjb3VudC1hcHAtc3ByaW5nYm9vdC1jb25maWRlbnRpYWwiLCJjbGllbnRBZGRyZXNzIjoiMTAuMTAuMjAuNTcifQ.Ut6aZ6E1d4Esz0gRv2ubxdvrxmGvZLHHZepD5pnGxlqb_yZ4Q82TdGTG0iL4JJn2NH3QAU501dhzzuv6-OT9BUBKP-4ufyKv2DxSvt3GgdN30au5JsATHFyOWuuZGRBd3iWcynf9u3OJnSkHEnrIwRYatgndLzy8dy3AeqF12CI",
"expires_in": 300,
"refresh_expires_in": 600,
"refresh_token": "eyJhbGciOiJIUzI1NiIsInR5cCIgOiAiSldUIiwia2lkIiA6ICI2MTlhMmJjOS0yMWIwLTRmNGMtODI4OC1kNTJmMjA3OWEzY2EifQ.eyJleHAiOjE2MzQwMjExODksImlhdCI6MTYzNDAyMDU4OSwianRpIjoiYTM0NTQ1MTYtMzc3NC00YmRlLTgzOTMtN2QyMTdkZjdkZmJkIiwiaXNzIjoiaHR0cDovLzEwLjgwLjI3LjY5OjgxODAvYXV0aC9yZWFsbXMvcXVpY2tzdGFydCIsImF1ZCI6Imh0dHA6Ly8xMC44MC4yNy42OTo4MTgwL2F1dGgvcmVhbG1zL3F1aWNrc3RhcnQiLCJzdWIiOiJkZGVkMDA2YS0xY2QxLTRjODUtOTQ1MS0wMjFlZmY3OTFiMmUiLCJ0eXAiOiJSZWZyZXNoIiwiYXpwIjoiYXBwLXNwcmluZ2Jvb3QtY29uZmlkZW50aWFsIiwic2Vzc2lvbl9zdGF0ZSI6ImM0ZTdkM2E4LTA4NjMtNDkwMC05MWZhLTBhMWJhZmJkZTRlNyIsInNjb3BlIjoicHJvZmlsZSBlbWFpbCJ9.QhjkJBGz5UvwBF7xHM7_V_yjfF0lrA_EWzAVdFf-BRI",
"token_type": "bearer",
"not-before-policy": 0,
"session_state": "c4e7d3a8-0863-4900-91fa-0a1bafbde4e7",
"scope": "profile email"
}
- 这就是authorization_code流程
后端服务:
验证Access Token和获取Token元信息:
刷新Token:
http://10.80.27.69:8180/auth/realms/quickstart/protocol/openid-connect/token
client_id=app-springboot-confidential&client_secret=3acf7692-49cb-4c45-9943-6f3dba512dae&grant_type=refresh_token&refresh_token=asdfasd
- 返回
{
"access_token": "eyJhbGciOiJSUzI1NiIsIn",
"expires_in": 300,
"refresh_expires_in": 1800,
"refresh_token": "eyJhbGciOiJIUzI1NiIsInR5cCIgOi",
"token_type": "Bearer",
"not-before-policy": 1610728470,
"session_state": "c1273eb5-f922-420c-b23a-854be9735c1d",
"scope": "profile email"
}
Reference:
https://blog.csdn.net/nklinsirui/article/details/112706006https://www.baeldung.com/?s=keycloakhttps://www.doag.org/formes/pubfiles/11143470/2019-NN-Sebastien_Blanc-Easily_Secure_your_Microservices_with_Keycloak-Praesentation.pdf
enrich时可以发起一个子流程,取得结果后再设置回当前的对象中。
package org.springframework.integration.stackoverflow.enricher;
import java.util.List;
import java.util.Map;
import java.util.function.Function;
import java.util.stream.Collectors;
import org.springframework.boot.SpringApplication;
import org.springframework.boot.autoconfigure.SpringBootApplication;
import org.springframework.context.annotation.Bean;
import org.springframework.http.HttpMethod;
import org.springframework.integration.dsl.IntegrationFlow;
import org.springframework.integration.dsl.IntegrationFlows;
import org.springframework.integration.dsl.Transformers;
import org.springframework.integration.http.dsl.Http;
import org.springframework.web.client.RestTemplate;
@SpringBootApplication
public class SpringIntegrationEnricherApplication {
public static void main(String[] args) {
SpringApplication.run(SpringIntegrationEnricherApplication.class, args);
}
@Bean
public IntegrationFlow jsonEnricherFlow(RestTemplate restTemplate) {
return IntegrationFlows.from(Function.class)
.transform(Transformers.fromJson(Map.class))
.enrich((enricher) -> enricher
.<Map<String, ?>>requestPayload((message) ->
((List<?>) message.getPayload().get("attributeIds"))
.stream()
.map(Object::toString)
.collect(Collectors.joining(",")))
.requestSubFlow((subFlow) ->
subFlow.handle(
Http.outboundGateway("/attributes?id={ids}", restTemplate)
.httpMethod(HttpMethod.GET)
.expectedResponseType(Map.class)
.uriVariable("ids", "payload")))
.propertyExpression("attributes", "payload.attributes"))
.<Map<String, ?>, Map<String, ?>>transform(
(payload) -> {
payload.remove("attributeIds");
return payload;
})
.transform(Transformers.toJson())
.get();
}
}
https://stackoverflow.com/questions/58205432/spring-integration-enrich-transform-message-using-rest-callhttps://www.tabnine.com/web/assistant/code/rs/5c781b6ae70f87000197ab9f#L312
Java9之HttpClientAPI实战详解
https://blog.csdn.net/u014042066/article/details/78153653
Java 9 揭秘(14. HTTP/2 Client API)
https://www.cnblogs.com/IcanFixIt/p/7229611.html
Java JDK11(Java11)中设置HttpClient允许不安全的HTTPS连接
https://www.cjavapy.com/article/84/
通常如果rest服务支持https,需申请收费的ssl证书,但也可自制这种证书。
httpClient进行链接时要进行相应的设置, 主要是设置SSLContext中的
TrustSelfSignedStrategy:
import java.security.KeyManagementException;
import java.security.KeyStoreException;
import java.security.NoSuchAlgorithmException;
import java.util.concurrent.TimeUnit;
import javax.net.ssl.SSLContext;
import org.apache.http.client.config.RequestConfig;
import org.apache.http.conn.ssl.TrustSelfSignedStrategy;
import org.apache.http.impl.client.CloseableHttpClient;
import org.apache.http.impl.client.HttpClients;
import org.apache.http.impl.conn.PoolingHttpClientConnectionManager;
import org.apache.http.ssl.SSLContexts;
import org.springframework.context.annotation.Bean;
import org.springframework.context.annotation.Configuration;
@Configuration
public class HttpClientConfiguration {
@Bean
public PoolingHttpClientConnectionManager poolingHttpClientConnectionManager(AbstractProperties kycProperties) {
PoolingHttpClientConnectionManager result =
new PoolingHttpClientConnectionManager(
kycProperties.getHttpConnectionTimeToLiveMinu(),
TimeUnit.MINUTES
);
result.setMaxTotal(200);
result.setDefaultMaxPerRoute(20);
return result;
}
@Bean
public RequestConfig requestConfig(AbstractProperties kycProperties) {
return RequestConfig
.custom()
.setConnectionRequestTimeout(kycProperties.getHttpConnectionTimeout())
.setConnectTimeout(kycProperties.getHttpConnectionTimeout())
.setSocketTimeout(kycProperties.getHttpConnectionTimeout())
.build();
}
@Bean
public SSLContext sslContext() throws KeyManagementException, NoSuchAlgorithmException, KeyStoreException {
return SSLContexts
.custom()
.loadTrustMaterial(null, new TrustSelfSignedStrategy())
.build()
;
}
@Bean
public CloseableHttpClient httpClient(AbstractProperties kycProperties) throws KeyManagementException, NoSuchAlgorithmException, KeyStoreException {
return HttpClients
.custom()
// .setConnectionManager(poolingHttpClientConnectionManager(null))
.setDefaultRequestConfig(requestConfig(null))
.setKeepAliveStrategy(
new MyConnectionKeepAliveStrategy(
kycProperties.getHttpConnectionTimeToLiveMinu(),
TimeUnit.MINUTES
)
)
.setMaxConnTotal(200)
.setMaxConnPerRoute(20)
// .setConnectionTimeToLive(
// kycProperties.getHttpConnectionTimeToLiveMinu(),
// TimeUnit.MINUTES
// )
.setSSLContext(sslContext())
.build();
}
}
相应设置
http-connection-timeout: 30000
http-connection-time-to-live-minu: 5
一系列参数存于文本文件,需在LINUX下循环读取,之后以此参数进行CURL远程API调用,同时需记录每次CURL的总时间
参数文件,test1.json
{"ADDRESS_FREE":"XXX","NAME":{"SURNAME":"XXX","FIRST_NAME":"XXX"}}
{"ADDRESS_FREE":"XXX","NAME":{"SURNAME":"XXX","FIRST_NAME":"XXX"}}
{"ADDRESS_FREE":"XXX","NAME":{"SURNAME":"XXX","FIRST_NAME":"XXX"}}
test1.sh
#! /bin/bash
RESULT_FILE="result.csv"
echo "" > $RESULT_FILE
i=1
while read line || [[ "$line" ]] #In case the file has an incomplete (missing newline) last line, you could use this alternative:
do
echo "$i"
printf "$i;$line;" >> $RESULT_FILE
curl -w %{time_total} -o /dev/null -X POST -H "Content-Type:application/json" -d "$line" http://ip:port >> $RESULT_FILE
#printf "\n\r" >> $RESULT_FILE
echo "" >> $RESULT_FILE
#i=$(( $i + 1 ))
(( i++ ))
done < test1.json
Reference:
https://stackoverflow.com/questions/30988586/creating-an-array-from-a-text-file-in-bash
当使用httpOutBoundGateway时,有时会碰到网络抖动问题而出现连接异常,这时应该有个重试机制,如隔多少秒重试,重试多少次后放弃等。
默认是重试3次,每次重试间隔是20秒。
@SpringBootApplication
public class SpringIntegrationDslHttpRetryApplication {
@SuppressWarnings("unchecked")
public static void main(String[] args) {
ConfigurableApplicationContext applicationContext =
SpringApplication.run(SpringIntegrationDslHttpRetryApplication.class, args);
Function<Object, Object> function = applicationContext.getBean(Function.class);
function.apply("foo");
}
@Bean
public IntegrationFlow httpRetryFlow() {
return IntegrationFlows.from(Function.class)
.handle(Http.outboundGateway("http://localhost:11111")
.httpMethod(HttpMethod.GET)
.expectedResponseType(String.class),
e -> e.advice(retryAdvice()))
.get();
}
@Bean
public RequestHandlerRetryAdvice retryAdvice() {
return new RequestHandlerRetryAdvice();
}
}
#打印日志
logging.level.org.springframework.retry=debug
Reference:
https://docs.spring.io/spring-integration/reference/html/handler-advice.html#retry-advice
https://stackoverflow.com/questions/49784360/configure-error-handling-and-retry-for-http-outboundgateway-spring-dsl
https://stackoverflow.com/questions/50262862/requesthandlerretryadvice-with-httprequestexecutingmessagehandler-not-working
https://stackoverflow.com/questions/63689856/spring-integration-http-outbound-gateway-retry-based-on-reply-content
https://blog.csdn.net/cunfen8879/article/details/112552420
git的世界里有后悔药吗?
有的。不仅有,还不止一种:Reset 和 Revert。它们有什么区别呢?先说结论吧。
|
Reset | Revert |
| 作用 |
将某个commit之后的push全部回滚 |
将某个指定的commit回滚 |
| 历史记录(轨迹) |
无 |
有 |
| 是否可作用于单个文件 |
否(都是作用于commit,与文件无关) |
否 |
下面来说说具体例子。
Revert
试验步骤如下:
- 新建两个空白文件 Revert.txt 和 Common.txt,然后commit&push。
- 修改 Revert.txt 文件,内容为“commit 1”,然后commit&push,提交的备注为“commit 1 of Revert”
- 修改 Common.txt 文件,内容为“update for Revert(by commit 2)”
- 修改 Revert.txt 文件,新增一行,内容为“commit 2”
- 3 和 4的修改一起commit&push,提交备注为“commit 2 of Revert(Revert.txt + Common.txt)”
效果如下:
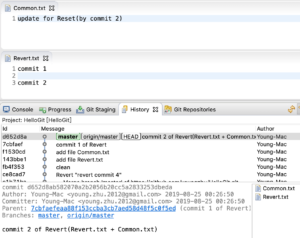
图1-revert之前
目的
保留3的修改,回滚4的修改。
操作
选中“ Revert.txt ”文件,然后在 History 里选中 “commit 2 of Revert…”,右键,找到“Revert Commit”菜单,如图:
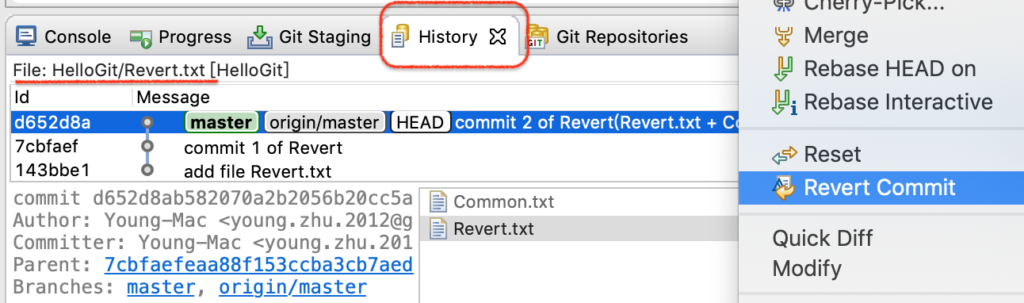
图2-revert操作
点击后,效果如图:
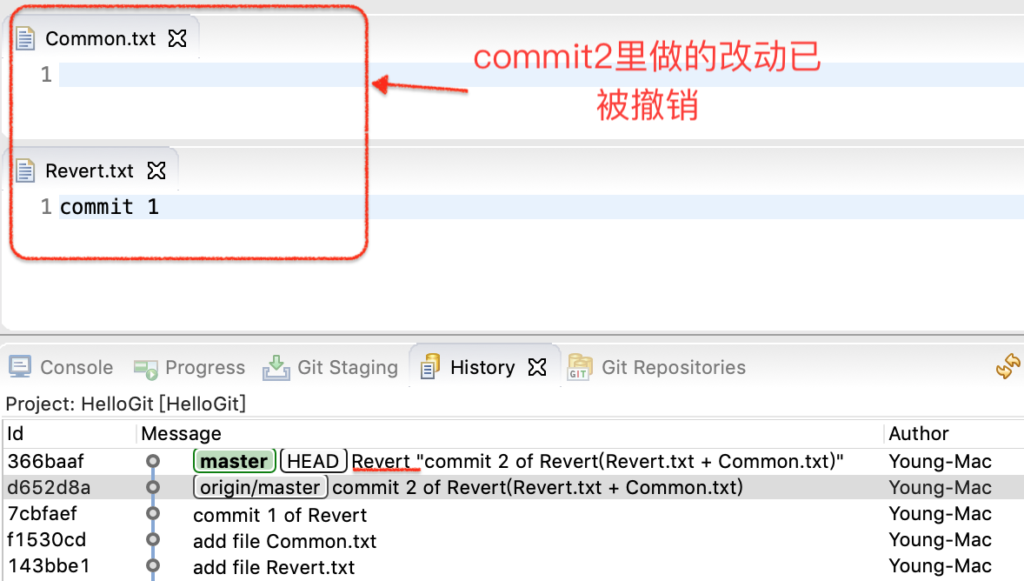
图3-revert之后
最后,push即可。
结果
未能达到预期效果,Revert.txt 和 Common.txt的修改都被撤销了。Revert的作用范围是一个commit(原子),跟文件的个数无关。
注:对最后一个commit做revert比较简单,两步:一,revert;二,push就可以了。对于较早的commit,因为中间间隔了其他的commit,文件会有冲突,需要处理完冲突才可以commit&push。
Reset
试验步骤如下:
- 新建空白文件 Reset.txt,然后commit&push。
- 修改 Reset.txt 文件,内容为“commit 1”
- 修改 Common.txt 文件,内容为“update for Reset(commit 1)”
- 2和3的修改一起commit&push,提交的备注为“commit 1 of Reset”
- 修改 Reset.txt 文件,新增一行,内容为“commit 2”,然后commit&push,提交的备注为“commit 2 of Reset”
- 修改 Reset.txt 文件,内容为“commit 3”
- 修改 Common.txt 文件,内容为“update for Reset(commit 3)”
- 6和7的修改一起commit&push,提交的备注为“commit 3 of Reset”
效果如下:
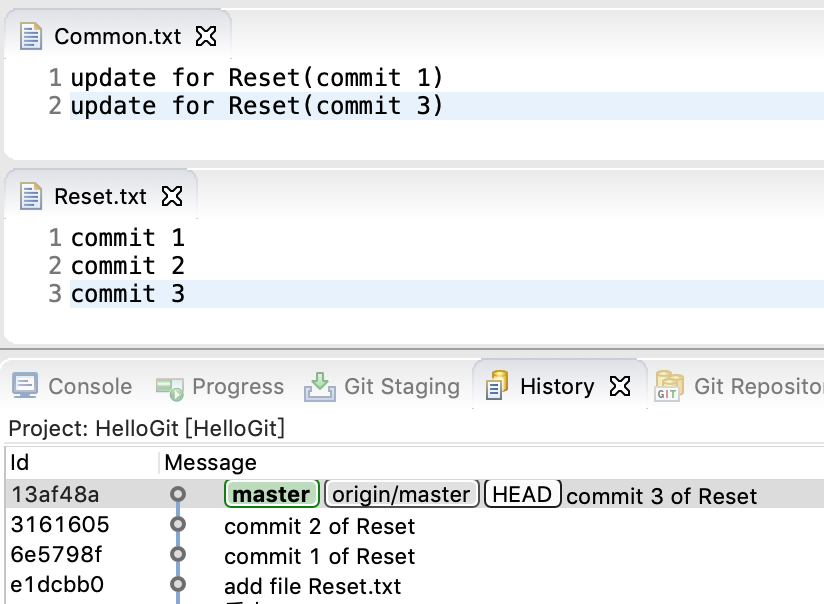
图4-reset之前
目的
将commit 1 之后的(即commit 2 和 3)改动全部回滚。
操作
在 History 里找到“commit 1”,选中后,右键,找到 Reset 菜单,选择 Hard 模式。
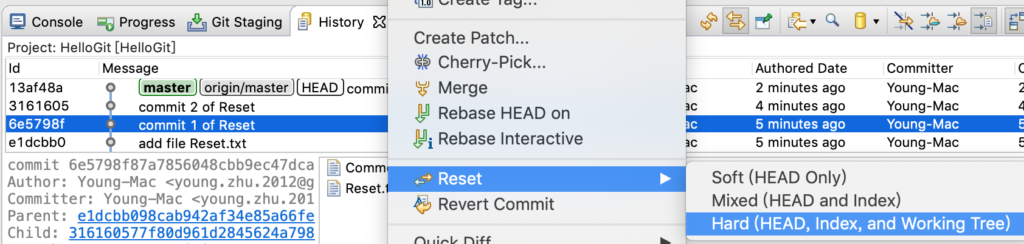
图5-reset
执行后,如下图所示,HEAD 已经指向里 commit 1,Common.txt 和 Reset.txt 的内容也已改变。注意左侧的项目栏,它已落后了服务器(GitHub)2个commit。怎么提交到服务器上呢?直接push,它会提示不是最新的,操作失败。这里要用到 push 的 force 属性。
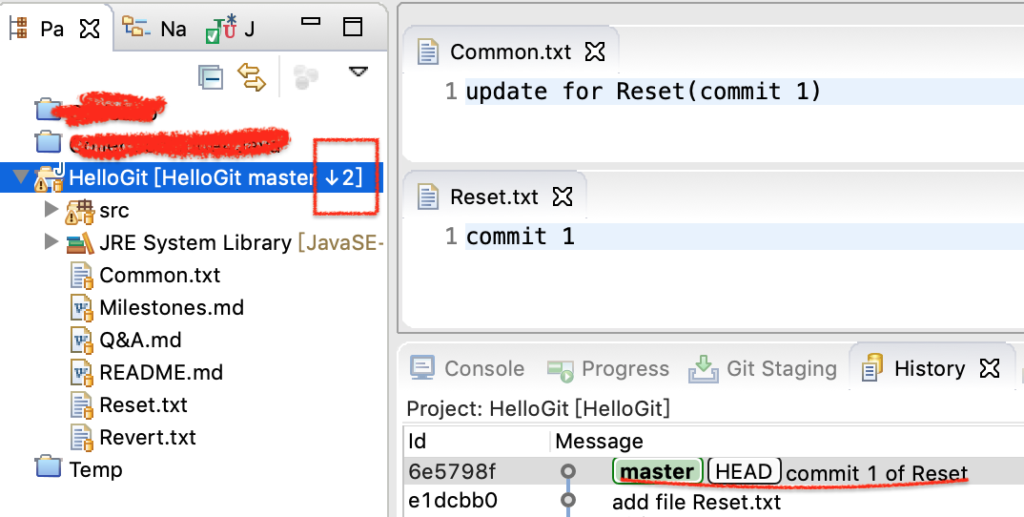
图6-reset之后
选中 项目,右键 – Team – Remote – Configure Push to Upstream,在打开的小窗口中找到 Advanced,如下图所示,这里的 Force Update 要勾上,表示强制覆盖。
重新push,就可以跟服务器保持同步了。
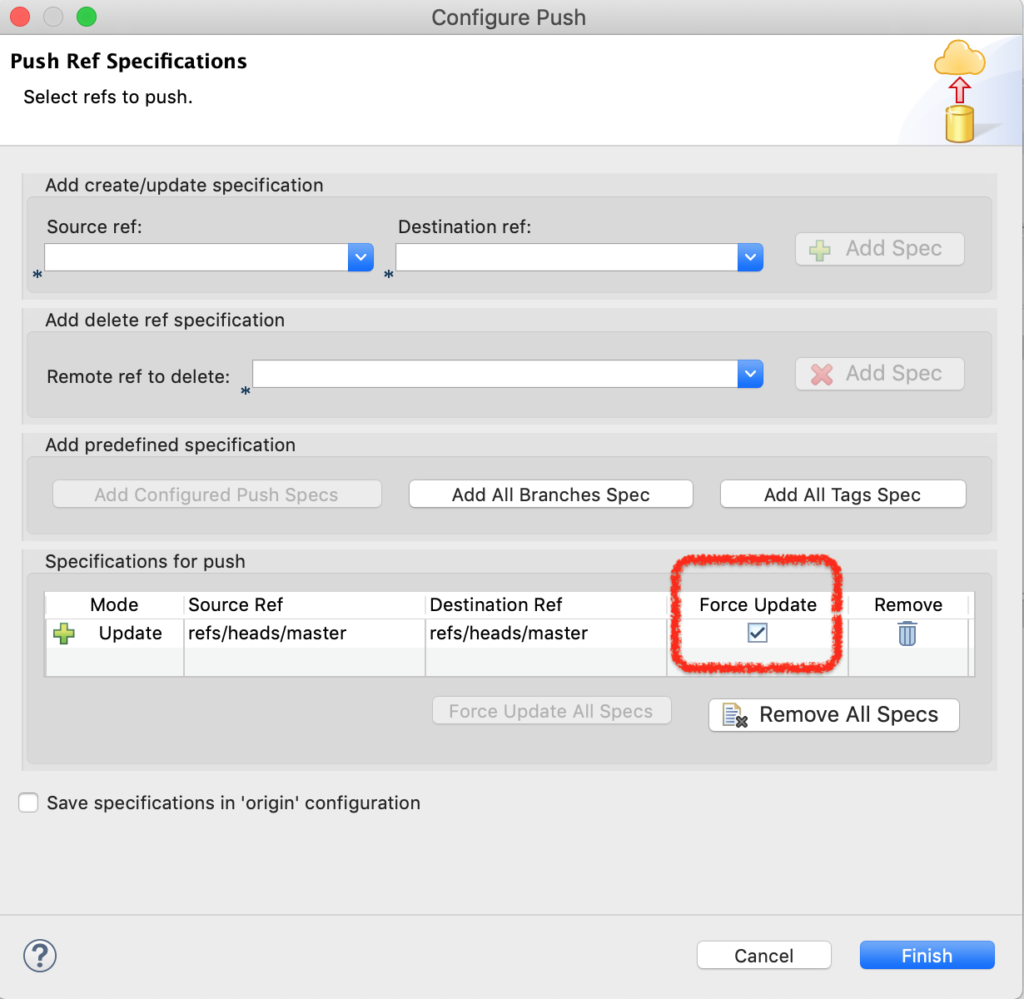
图7-push-force
要特别注意的是,Reset慎用,跟Linux的“rm -rf /”有异曲同工之妙。
http://www.youngzy.com/blog/2019/08/git-difference-between-reset-and-revert-using-eclipse/
@NotBlank(message = "Missing ID_IMG_CHECK.")
以上标签进行验证时是无条件验证,如果想在特定条件下才验证,则不适用。
于是才有如下设定:
@NotBlank(message = "Missing ID_IMG_CHECK.", groups = {GroupA.class} )
手动验证:
Class<?> [] classArray = classList.toArray(new Class<?>[0]);
LOGGER.info("subVersion : {}, Validate class : {}", subVersion, classNameList);
CompositeException compositeException = new CompositeException();
Set<ConstraintViolation<QueryKycResultDetail>> groupSet = validator.validate(queryKycResultDetail, classArray);
https://www.baeldung.com/javax-validation-groups
检查file的SHA512值:
sha512sum [OPTION] [FILE]
摘要: 如果多个ARTEMIS以单体的方式启动,则各个实例互不相关,不能实现高可用。集群因此需将多个实例组队--集群,以实现高可用,即集群内可实现实例的失败转移,消息的负载均衡,消息的重新分配。这需要在集群配置区指定所有所有实例的IP和PORT。但集群实例如果DOWN机,其保存的消息也会随之消失,因此需要实现高可用,有两种方式:共享存储及消息复制。共享存储共享存储是由master/slave对组成,指两个...
阅读全文
摘要: Grafana能够提供自定义的图形界面来展示监控数据,但由于被监控的应用五花八门,标准不一,因此Prometheus开发了各种client,应用程序只需引入该SDK,即可与Prometheus沟通,提供Prometheus格式的数据,同时Grafana也开发了能识别Prometheus类型的数据源的插件,Grafana能够展示Prometheus上的数据。
非JAVA版本的应用:
...
阅读全文
@Min and @Max are used for validating numeric fields which could be String(representing number), int, short, byte etc and their respective primitive wrappers.
@Size is used to check the length constraints on the fields.
As per documentation @Size supports String, Collection, Map and arrays while @Min and @Max supports primitives and their wrappers. See the documentation.
手动触发:
https://blog.csdn.net/justyman/article/details/89857577
如果是自动触发BUILD时,则可以以最新建立的TAG为基础进行BUILD,而无需人手选TAG进行BUILD。
配置,注意应取消参数化配置工程:
- Add the following refspec to the Git plugin:
+refs/tags/*:refs/remotes/origin/tags/*
- Add the following branch specifier:
*/tags/*
- Enable SCM polling, so that the job detects new tags.
定义一个事件,因SPRING中可以有不同的事件,需要定义一个类以作区分:
import lombok.Getter;
import org.springframework.context.ApplicationEvent;
@Getter
public class JavaStackEvent extends ApplicationEvent {
/**
* Create a new {@code ApplicationEvent}.
*
* @param source the object on which the event initially occurred or with
* which the event is associated (never {@code null})
*/
public JavaStackEvent(Object source) {
super(source);
}
}
定义一个此事件观察者,即感兴趣者:
import lombok.NonNull;
import lombok.RequiredArgsConstructor;
import org.springframework.context.ApplicationListener;
import org.springframework.scheduling.annotation.Async;
/**
* 观察者:读者粉丝
*/
@RequiredArgsConstructor
public class ReaderListener implements ApplicationListener<JavaStackEvent> {
@NonNull
private String name;
private String article;
@Async
@Override
public void onApplicationEvent(JavaStackEvent event) {
// 更新文章
updateArticle(event);
}
private void updateArticle(JavaStackEvent event) {
this.article = (String) event.getSource();
System.out.printf("我是读者:%s,文章已更新为:%s\n", this.name, this.article);
}
}
注册感兴趣者(将自身注入SPRING容器则完成注册),并制定发布机制(通过CONTEXT发布事件):
import lombok.extern.slf4j.Slf4j;
import org.springframework.boot.CommandLineRunner;
import org.springframework.context.ApplicationContext;
import org.springframework.context.annotation.Bean;
import org.springframework.context.annotation.Configuration;
@Slf4j
@Configuration
public class ObserverConfiguration {
@Bean
public CommandLineRunner commandLineRunner(ApplicationContext context) {
return (args) -> {
log.info("发布事件:什么是观察者模式?");
context.publishEvent(new JavaStackEvent("什么是观察者模式?"));
};
}
@Bean
public ReaderListener readerListener1(){
return new ReaderListener("小明");
}
@Bean
public ReaderListener readerListener2(){
return new ReaderListener("小张");
}
@Bean
public ReaderListener readerListener3(){
return new ReaderListener("小爱");
}
}
Excel 在读取 csv 的时候是通过读取文件头上的 bom 来识别编码的,这导致如果我们生成 csv 文件的平台输出无 bom 头编码的 csv 文件(例如 utf-8 ,在标准中默认是可以没有 bom 头的),Excel 只能自动按照默认编码读取,不一致就会出现乱码问题了。
掌握了这点相信乱码已经无法阻挡我们前进的步伐了:只需将不带 bom 头编码的 csv 文件,用文本编辑器(工具随意,推荐 notepad++ )打开并转换为带 bom 的编码形式(具体编码方式随意),问题解决。
当然,如果你是像我一样的码农哥哥,在生成 csv 文件的时候写入 bom 头更直接点,用户会感谢你的。
附录:对于 utf-8 编码,unicode 标准中是没有 bom 定义的,微软在自己的 utf-8 格式的文本文件之前加上了EF BB BF三个字节作为识别此编码的 bom 头,这也解释了为啥大部分乱码都是 utf-8 编码导致的原因
SPRING BATCH中生成CSV文件时的解决方案:
new FlatFileItemWriterBuilder<T>()
.name(itemWriterName)
.resource(outputResource)
.lineAggregator(lineAggregator)
.headerCallback(
h -> {
System.out.println(header);
h.write('\uFEFF');//只需加这一行
h.write(header);
}
)
.build();
https://stackoverflow.com/questions/48952319/send-csv-file-encoded-in-utf-8-with-bom-in-java
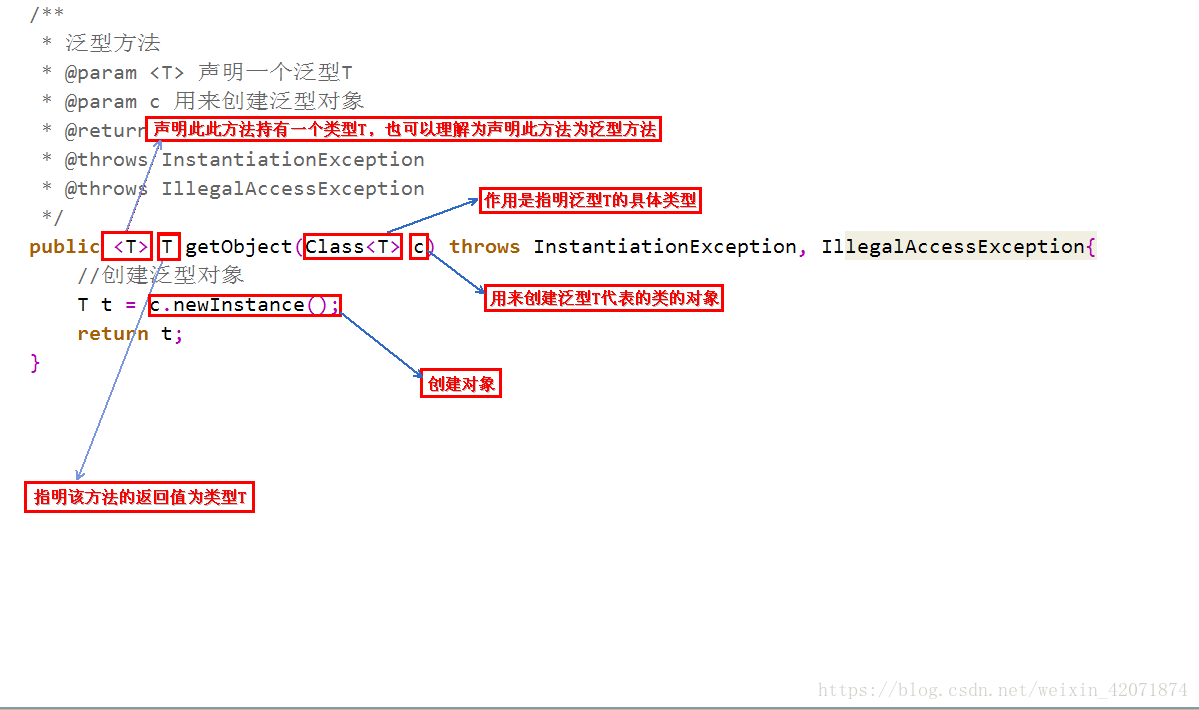
/**
*
* @param <T>声明此方法持有一个类型T,也可以理解为声明此方法为泛型方法
* @param clazz 作用是指明泛型T的具体类型
* @return 指明该方法的返回值为类型T
* @throws InstantiationException
* @throws IllegalAccessException
*/
public <T> T getObject(Class<T> clazz) throws InstantiationException, IllegalAccessException {
T t = clazz.newInstance();//创建对象
return t;
}
方法返回值前的<T>的左右是告诉编译器,当前的方法的值传入类型可以和类初始化的泛型类不同,也就是该方法的泛型类可以自定义,不需要跟类初始化的泛型类相同
领域驱动(DDD,Domain Driven Design)为软件设计提供了一套完整的理论指导和落地实践,通过战略设计和战术设计,将技术实现与业务逻辑分离,来应对复杂的软件系统。本系列文章准备以实战的角度来介绍 DDD,首先编写领域驱动的代码模型,然后再基于代码模型,引入 DDD 的各项概念,先介绍战术设计,再介绍战略设计。
> DDD 实战1 - 基础代码模型
> DDD 实战2 - 集成限界上下文(Rest & Dubbo)
> DDD 实战3 - 集成限界上下文(消息模式)
> DDD 实战4 - 领域事件的设计与使用
> DDD 实战5 - 实体与值对象
> DDD 实战6 - 聚合的设计
> DDD 实战7 - 领域工厂与领域资源库
> DDD 实战8 - 领域服务与应用服务
> DDD 实战9 - 架构设计
> DDD 实战10 - 战略设计
@Past @Future只针对Date类型的验证,如果是String类型的验证,则不适用。
其实可以新加一个方法返回Date类型,再配合@Future@Past 进行验证。
@Future(message = "Invalid CN_ID_INFO.EXPIRE_DATE.")
private LocalDate getValidExpireDate() {
try {
return LocalDate.parse(this.dateString, DateTimeFormatter.ofPattern("yyyy-MM-dd"));
} catch (Exception e) {
return null;
}
}
此方法对dateString进行解释,返回LocalDate,如果dateString为空或格式错误,则返回空,再配合@Future 进行是否未来日期的验证。
bean validation的注释是针对单个变量的,如果要针对多个变量的联动,则不行,需要用到这个注释。
这种方法避免了自定义校验器而增加类。
https://www.chkui.com/article/java/java_bean_validation
@AssertTrue(message = "Missing BANK_CARD_IMG_INFO.IMG")
private Boolean getValidImg() {
if(YNEnum.Y.code.equals(super.getNeedChecked())) {
return StringUtils.hasText(this.img);
}
return null;//igore checking.
}
这个是当needChecked为Y的时候才执行检查img变量是否为空。
有几点注意:
- 方法名称要以get开头
- 返回类型用Boolean,而不用boolean
- 返回值有三种:true,false,null如果是null则当成通过,与true的结果一样
SPRING BOOT单元测试中,因为测试时可能对应的服务器地址不同于SIT等别的环境,通常会将这些地址放于application-sit.yaml中。
在单元测试的代码中用这个标签指定用哪个profile,如
@ActiveProfiles({"embedded-mongodb","test"})
但这样做法,由于@ActiveProfiles这个标签是final的,如果要测试别的profile,只能复制另一份单元测试代码,再改此标签。
比较灵活的做法是用default profile,default profile是如果没指定任何profile,则会默认用这个。在application-default.yaml中再指定需激活的profile。
spring:
profiles:
active: test,embedded-mongodb
如果要测试别的profile,可以指定环境变量的方式覆盖:
-Dspring.profiles.active=error,embedded-mongodb
为了安全起见,将application-default.yaml放在测试目录中:src\test\resources。
Setting default Spring profile for tests with override option
https://blog.inspeerity.com/spring/setting-default-spring-profile-for-tests-with-override-option/