2017年2月19日
#
步入 2024 年,在技术创新和不断变化的市场需求的推动下,软件开发格局继续呈指数级发展。对于企业和开发人员来说,紧跟这些趋势不仅有益,而且对于保持竞争力和成功至关重要。在本文中,我们探讨了预计将在 2024 年产生重大影响的关键软件开发趋势。
2024年软件工程通用原理
定义 2024 年 IT 行业的通用软件开发方法包括人工智能和机器学习技术的进一步集成、区块链的利用和多运行时微服务。AR和VR的扩展应用也将继续塑造该行业。此外,程序员将更加重视网络安全和可持续软件开发。我们将在本节中详细探讨这些趋势。
人工智能和机器学习集成
人工智能和机器学习不再是流行词;它们已经成为流行语。它们是现代软件开发不可或缺的组成部分,为功能和性能设定了新的标准。从预测算法到自动代码审查,人工智能/机器学习技术正在提高各个行业的效率和能力。
2023 年最引人注目的突破之一是引入了先进的 ChatGPT 功能,其中包括代码和文本生成功能,以及基于文本提示的人工智能驱动图像创建的重大发展。
开发人员越来越多地使用人工智能驱动的编码工具。这不仅加快了编码过程,还有助于减少人为错误。例如,GitHub 的Copilot使用人工智能向开发人员实时建议代码片段和整个功能。同样, Tableau等人工智能驱动的分析工具使企业能够比以往更有效地从数据中获取洞察。
毫无疑问,2024 年将是这些技术进一步发展和集成的一年,特别是在自动化文本、编码和可视化任务方面。
超越加密货币的区块链
区块链正在超越加密货币领域找到立足点。优先考虑增强安全性和卓越质量的移动应用程序激增,导致基于区块链的应用程序的采用增加。
面向区块链的软件(BOS)系统的基本特征包括:
- 数据复制:数据在数千个系统中复制和存储,显着增强数据安全性。
- 要求验证:在进行任何交易之前,BOS 系统会检查交易要求,以确保它们符合成功验证的标准。
- 顺序交易日志记录:BOS 将交易记录在按时间顺序排列的日志中,该日志由通过共识算法设置的互连块组成。
- 公钥加密:BOS中的交易过程基于公钥加密,确保交易安全、可验证。
然而,区块链也有其局限性:可扩展性和能源消耗仍然是其更广泛采用的障碍。
多运行时微服务
微服务架构是一种将软件应用程序开发为一套小型、可独立部署的模块化服务的方法,每个服务都在自己的进程中运行,并与轻量级机制(通常是基于 HTTP 的 API)进行通信。
到2024年,微服务架构预计将继续增长,逐步演进为多运行时微服务。这也称为 MACH 架构,该术语由 Microservices-based、API-first、Cloud-native 和 Headless 的首字母创建。MACH架构允许不同的服务用不同的编程语言编写,使用不同的数据存储技术,并部署在不同的运行环境上。运行时的多样性迎合根据每个服务的特定需求和特征,为应用程序的每个组件提供更加定制和优化的方法。
多运行时微服务架构的主要优势是能够利用各种技术和平台的优势。例如,需要高计算能力的服务可以部署在专门为此类任务设计的运行时环境上,而处理实时数据处理的另一个服务可以利用针对速度和低延迟进行优化的不同环境。这种方法不仅可以确保每项服务在其理想环境中运行,而且还可以简化更新和维护,因为一项服务的更改不一定会影响其他服务。
此外,多运行时微服务支持更敏捷的开发流程,允许团队同时处理不同的服务而无需依赖。
2024 年网络安全处于前沿
网络威胁的日益复杂性使安全性成为 2024 年软件开发的一个重要方面。集成先进的安全协议和利用人工智能进行威胁检测正在成为标准做法。重点正在从被动安全措施转向主动安全措施:
- 强调 DevSecOps:公司正在将安全性集成到其 DevOps 流程中,创建一种文化,让安全性成为所有利益相关者的共同责任。这种方法确保安全考虑成为整个软件开发生命周期不可或缺的一部分。
- 零信任架构:传统的基于边界的安全模型正在被零信任框架所取代,零信任框架的运行原则是“从不信任,始终验证”。这意味着验证每个用户和设备,无论它们是在组织网络内部还是外部。
- 加密的使用增加:随着数据泄露事件的增加,使用强大的加密方法来保护传输中和静态数据的趋势日益明显。先进的加密技术(例如同态加密)正在获得关注,允许在加密的情况下处理数据。
- 关注安全代码实践:越来越重视对开发人员进行安全编码实践培训。这包括定期代码审查、漏洞测试以及使用静态和动态分析工具来识别和减少开发阶段的安全缺陷。
- 网络安全网格的兴起:这个概念指的是一种灵活的、模块化的安全方法,其中每个设备都有自己的安全性,例如防火墙和网络防护措施。它有助于创建响应能力更强、适应性更强的安全基础设施,能够处理现代网络威胁的动态特性,使整个网络更加安全。
AR和VR的进一步采用
随着 AR 和 VR 技术变得越来越容易获得,多个行业对此类应用程序的需求正在猛增:
- 教育:VR 改变了教育,支持交互式历史、地理和科学课程,并通过虚拟手术模拟提供无风险的医疗培训。例如,通过 Google Expeditions 和其他教育 AR 应用程序,学生可以探索历史遗址、解剖虚拟动物或检查复杂主题的 3D 模型。
- 医疗保健:例如 AR 应用程序 AccuVein 可以帮助定位静脉,以便更轻松地插入针头,而手术规划工具则可以将 3D 模型叠加到患者的解剖结构上,以提供精确的手术指导。
- 商业:VR 在商业中越来越多地用于原型设计、员工培训和客户服务。在房地产行业,公司利用 VR/AR 提供虚拟财产游览和 AR 应用程序,以便在购买前直观地看到家具或装修在空间中的外观。
我们期待 2024 年出现的令人兴奋的发展包括:
- 超逼真的虚拟现实:VR 现在可以模拟现实世界的感觉,例如下雨的感觉或夏季草地的气味,模糊了虚拟与现实之间的界限。而且这种趋势将会继续增长。
- 社交 VR 平台的扩展:社交 VR 平台允许实时交互、举办虚拟派对、参加音乐会和参与多人游戏。
- 人工智能在 VR 中的集成:人工智能通过适应用户行为、创建响应个人偏好和行为的动态环境来个性化体验。
可持续软件开发
随着环境问题的日益严重,绿色计算和可持续软件实践越来越受到关注。开发人员越来越关注环保解决方案,支持绿色软件基金会和可持续网络宣言等促进节能编码实践的举措。这需要开发减少服务器处理、加载时间和数据请求的代码。
可持续软件开发的关键方面包括:
- 软件优化:简化代码以减少能源使用并提高性能。
- 部署:仅根据需要使用资源,例如惰性函数和基于云的应用程序,以最大限度地减少能源浪费。
- 集成:减少系统之间的数据处理,以避免不必要的数据使用。
- 存储的数据:限制存储的数据量及其在系统中保留的时间长度。
- 数据大小:尽可能使用较小尺寸的介质,以减少存储和处理需求。
- 重构:定期更新软件以删除过时或未使用的功能。
- 避免第三方组件:减少对消耗更多资源的大型外部组件的依赖。
- 软件架构:使用提高效率和降低能耗的架构。
- 数据中心选择:选择致力于绿色实践的托管服务。
计算
来年,我们预计关键计算领域将取得进展:功能即服务、云和边缘计算,尤其是量子计算。
无服务器计算 (FaaS)
无服务器计算或函数即服务 (FaaS) 正在兴起,其中 AWS Lambda、Azure Functions 和 Google Cloud Functions 处于领先地位。FaaS 允许开发人员构建和运行应用程序和服务,而无需管理基础设施,从而实现更高效、更具成本效益的开发流程。
- 一个值得注意的例子是Netflix在其流媒体平台中利用 AWS Lambda 实现各种目的。Netflix 利用 Lambda 来执行视频编码、处理用户身份验证和管理后端流程等任务。当用户上传视频时,Lambda 函数会被触发,将内容编码并处理为适合在不同设备上进行流式传输的各种格式。这使得 Netflix 能够根据需求动态扩展资源,而无需配置或管理服务器,从而确保为用户提供无缝的流媒体体验,同时优化成本。
- Spotify 利用 Google Cloud Functions处理其音乐流媒体平台内的各种后端任务。触发功能来管理用户身份验证、处理用户生成的内容并为其音乐推荐算法执行后端任务,从而确保为用户提供无缝且个性化的体验。
- IBM 的子公司 The Weather Company 使用IBM Cloud Functions来处理和分析大量天气数据。无服务器功能使他们能够执行实时数据处理、生成预报并根据用户的位置向用户提供个性化的天气警报,而无需管理底层基础设施。
这些FaaS解决方案以事件驱动架构为特点,根据请求自动触发执行,并根据需要调整资源使用。其可扩展性和响应能力简化了开发过程,特别适合高流量应用程序。无服务器计算越来越多地与物联网、聊天机器人和虚拟助手集成。
云计算的扩展
到 2024 年,云原生技术将发生重大演变。它们预计将变得更加用户友好,在其 IT 目标中提供增强的性能、节省成本和更大的灵活性。Amazon Web Services (AWS)、Microsoft Azure 和 Google Cloud Platform 扩展了其服务,提供更高级的分析、机器学习功能和更好的安全功能。
这促使公司迁移到云以实现更好的数据管理、增强协作并提高安全性。
边缘计算的浪潮
边缘计算是一种在网络边缘尽可能靠近数据源处理客户端数据的 IT 架构。通过使计算更接近数据源,边缘计算减少了延迟并增强了实时数据处理能力。
这种趋势对于需要即时数据分析的应用至关重要,例如自动驾驶汽车(例如,特斯拉的自动驾驶汽车依赖于边缘计算)和智能城市技术。在医疗保健领域,边缘计算可确保数据隐私,并实现基于人工智能的患者病情实时监控和分析。该技术还可以通过优化公交时刻表、调节交通车道以及潜在地引导自动驾驶车辆流量来改变城市交通管理,展示其在不同领域的多功能性和影响。边缘计算对于智能电网的采用至关重要,可以帮助企业有效管理能源消耗。
量子计算:新领域
量子计算是一种先进的计算形式,它使用量子比特而不是经典比特。利用叠加和纠缠等量子力学原理,它可以以传统计算机无法达到的速度处理数据。该技术对于密码学、优化和分子模拟等复杂任务特别有效,可提供指数级更快的解决方案。
虽然量子计算的广泛采用还有很长的路要走,但对软件开发的连锁反应已经开始显现。其中的领导者包括 IBM、微软、谷歌、D-Wave 和亚马逊等重量级公司。IBM 凭借其量子系统一号和二号成为领先者,具有高达 127 个量子位的强大处理器。微软专注于拓扑量子位,将其集成到其 Azure 云平台中以实现更广泛的可访问性。谷歌的量子人工智能实验室旨在开发实用的通用量子计算机,而 D-Wave 专门研究量子退火,解决复杂的优化挑战。亚马逊通过其 AWS 量子网络中心和 Amazon Braket 正在为量子计算创建广泛的基础设施。
编程语言
到 2024 年,编程将继续以 Python 为主,Rust 的采用率显着增加。
Python 占据主导地位
Python 仍然是一种占主导地位的编程语言,因其简单性、多功能性和强大的库支持而受到青睐。它广泛应用于网络开发、数据分析、人工智能和科学计算。
根据 PYPL 指数,Python 被列为最受欢迎的编程语言,增长率最高 (19%),该指数衡量语言教程在 Google 上的搜索频率。
2023 年 Stack Overflow 调查将 Python 确定为开发人员最想要学习的语言。自 2012 年以来,Python 首次超越 Java,不再只是排名前两位的 Web 应用程序开发语言之一。它还在五年内三次荣获TIOBE年度编程语言,这是对年度评分增幅最大的语言的认可。Python 广泛的库范围可以轻松集成到代码中并扩展到更大的应用程序,为 Web 和桌面应用程序开发(包括系统操作)提供了巨大的可能性。
Rust 采用率的增长
Rust 编程语言的采用正在增加,特别是在性能和安全性是关键优先事项的领域。其独特的功能使其成为系统级编程的理想选择。值得注意的是,Rust 越来越多地用于嵌入式系统,其防止内存错误和确保线程安全的能力至关重要。此外,其在云基础设施中的部署凸显了其处理高性能计算任务的可靠性和效率。
应用开发
在应用程序领域,重要趋势包括低代码和无代码平台的广泛采用、跨平台开发的进步以及渐进式 Web 应用程序的使用增加。
低代码和无代码平台的兴起
低代码和无代码平台的兴起正在推动软件开发的民主化。这些工具使个人能够以最少的编码知识构建和部署应用程序,从而显着缩短开发时间。
Microsoft Power Apps和Bubble等平台使非技术用户无需编写代码即可构建应用程序。这些工具在开发业务应用程序时特别受欢迎,允许公司在没有大型开发团队的情况下快速构建原型并部署解决方案。然而,此类平台无法解决复杂的定制开发任务。
渐进式 Web 应用程序 (PWA) 的增加
PWA(渐进式 Web 应用程序)比本机应用程序下载速度更快且资源占用更少。它们离线工作并在每次访问时自动刷新。从开发角度来看,它们具有成本效益和高效性,针对不同设备所需的版本较少,导致成本比原生应用低 3 至 4 倍。福布斯、星巴克和Pinterest等大公司都采用了这项技术。
PWA(渐进式 Web 应用程序)在开发人员中日益流行的一个关键因素是其平台独立性。这样就无需为移动设备、平板电脑和桌面创建单独的应用程序。开发的简单性并不是 PWA 节省成本的唯一好处。它们的创建速度也更快,维护成本也更低。
跨平台应用程序开发
自从移动应用程序出现以来,开发人员面临着是为 Android 和 iOS 创建两个本机应用程序还是创建单个跨浏览器应用程序的选择。原生应用程序由于其卓越的性能,在市场上占据主导地位。
2023 年的重大发展将在 2024 年继续获得动力,这是新工具的引入,这些工具能够交付用户友好的跨平台解决方案,同时降低开发成本。
跨平台应用程序具有多种优势:
- 更广泛的覆盖范围:可在多种操作系统(iOS、Android)上使用,增加潜在的用户群。
- 更快的开发时间:单个开发项目而不是多个本机应用程序可以加快流程。
- 一致的用户体验:跨平台应用程序在不同平台上具有统一的外观和感觉,增强用户熟悉度。
- 共享代码库:代码可重用性和开发效率。
- 更轻松的部署:更新在所有平台上同时推出。
- 资源效率:需要更少的资源和更小的开发团队。
- 成本效益:由于单个代码库用于多个平台,因此降低了开发和维护成本。
- 流行的跨平台框架包括:React Native、Flutter、Ionic 等。
结论
本文讨论的趋势将定义 2024 年及以后的软件开发领域。当我们应对这些变化时,负责任和道德的创新必须仍然是所有软件开发工作的基石。
我们收集最新趋势和最新发现,通过我们的博客分享。订阅我们的时事通讯并在社交媒体上关注我们,随时了解我们的帖子,以便在 2024 年保持在 IT 创新的最前沿。
本文开始前,问大家一个问题,你觉得一份业务代码,尤其是互联网业务代码,都有哪些特点?
我能想到的有这几点:
- 互联网业务迭代快,工期紧,导致代码结构混乱,几乎没有代码注释和文档。
- 互联网人员变动频繁,很容易接手别人的老项目,新人根本没时间吃透代码结构,紧迫的工期又只能让屎山越堆越大。
- 多人一起开发,每个人的编码习惯不同,工具类代码各用个的,业务命名也经常冲突,影响效率。
每当我们新启动一个代码仓库,都是信心满满,结构整洁。但是时间越往后,代码就变得腐败不堪,技术债务越来越庞大。
这种情况有解决方案吗?也是有的:
- 组内设计完善的应用架构,让代码的腐烂来得慢一些。(当然很难做到完全不腐烂)
- 设计尽量简单,让不同层级的开发都能快速看懂并上手开发,而不是在一堆复杂的没人看懂的代码上堆更多的屎山。
而COLA,我们今天的主角,就是为了提供一个可落地的业务代码结构规范,让你的代码腐烂的尽可能慢一些,让团队的开发效率尽可能快一些。
https://github.com/alibaba/COLA
https://blog.csdn.net/significantfrank/article/details/110934799
使用「磁碟工具程式」清除配備 Apple 晶片的 Mac
在 Mac 清除所有內容和設定
為 macOS 製作開機安裝程式
如何重新安裝 macOS
difference between homebrew and homebrew cask
install jdk11 on Mac:
SPRING 框架下 如果要做去重,在数据量大的时候会爆ERROR,可改用如下 写法:
private boolean needReorderCheck(String requestId) {
boolean result = false;
// try(MongoCursor<String> mongoCursor =
// mongoTemplate.getCollection(mongoTemplate.getCollectionName(AccountNumProductLineIndex.class))
// .distinct(KEY, Filters.eq(REQUEST_ID, requestId), String.class)
// .iterator()
// )
try(MongoCursor<Document> mongoCursor =
mongoTemplate.getCollection(mongoTemplate.getCollectionName(AccountNumProductLineIndex.class))
.aggregate(
Arrays.asList(
Aggregates.project(
Projections.fields(
Projections.excludeId(),
Projections.include(KEY),
Projections.include(REQUEST_ID)
)
),
Aggregates.match(Filters.eq(REQUEST_ID, requestId)),
Aggregates.group("$" + KEY)
)
)
.allowDiskUse(true)
.iterator();
)
{
String key = null;
boolean breakMe = false;
LOGGER.info("needReorderCheck.key --> start");
while(mongoCursor.hasNext()) {
if(breakMe) {
mongoCursor.close();
break;
}
Document keyDocument = mongoCursor.next();
key = keyDocument.getString("_id");
// key = mongoCursor.next().getString(KEY);
// LOGGER.info("needReorderCheck.keyDocument --> {}, key --> {}", keyDocument, key);
try(MongoCursor<Document> indexMongoCursor =
mongoTemplate.getCollection(AccountNumProductLineIndex.COLLECTION_NAME)
.find(Filters.and(Filters.eq(REQUEST_ID, requestId), Filters.eq(KEY, key)))
.iterator()
)
{
int preIndex = -1, currentIndex = -1;
Document preIndexDocument = null, currentIndexDocument;
while(indexMongoCursor.hasNext()) {
currentIndexDocument = indexMongoCursor.next();
// System.out.println(currentIndexDocument.toJson());
if(preIndexDocument != null) {
currentIndex = currentIndexDocument.getInteger(INDEX);
preIndex = preIndexDocument.getInteger(INDEX);
if(currentIndex - preIndex > 1) {
indexMongoCursor.close();
breakMe = true;
result = true;
break;
}
}
preIndexDocument = currentIndexDocument;
}
}
}
}
return result;
}
@JsonFormat(shape=JsonFormat.Shape.STRING, pattern="yyyy-MM-dd'T'HH:mm:ss.SSSZ", timezone="America/Phoenix")
private Date date;
https://www.amitph.com/spring-webclient-large-file-download/https://github.com/amitrp/spring-examples/blob/main/spring-webflux-webclient/src/main/java/com/amitph/spring/webclients/service/FileDownloaderWebClientService.javaimport lombok.RequiredArgsConstructor;
import org.springframework.core.io.buffer.DataBuffer;
import org.springframework.core.io.buffer.DataBufferUtils;
import org.springframework.stereotype.Service;
import org.springframework.web.reactive.function.client.WebClient;
import reactor.core.publisher.Flux;
import reactor.core.publisher.Mono;
import java.io.IOException;
import java.nio.file.Files;
import java.nio.file.Path;
import java.nio.file.StandardOpenOption;
import java.util.Objects;
@Service
@RequiredArgsConstructor
public class FileDownloaderWebClientService {
private final WebClient webClient;
/**
* Reads the complete file in-memory. Thus, only useful for very large file
*/
public void downloadUsingByteArray(Path destination) throws IOException {
Mono<byte[]> monoContents = webClient
.get()
.uri("/largefiles/1")
.retrieve()
.bodyToMono(byte[].class);
Files.write(destination, Objects.requireNonNull(monoContents.share().block()),
StandardOpenOption.CREATE);
}
/**
* Reading file using Mono will try to fit the entire file into the DataBuffer.
* Results in exception when the file is larger than the DataBuffer capacity.
*/
public void downloadUsingMono(Path destination) {
Mono<DataBuffer> dataBuffer = webClient
.get()
.uri("/largefiles/1")
.retrieve()
.bodyToMono(DataBuffer.class);
DataBufferUtils.write(dataBuffer, destination,
StandardOpenOption.CREATE)
.share().block();
}
/**
* Having using Flux we can download files of any size safely.
* Optionally, we can configure DataBuffer capacity for better memory utilization.
*/
public void downloadUsingFlux(Path destination) {
Flux<DataBuffer> dataBuffer = webClient
.get()
.uri("/largefiles/1")
.retrieve()
.bodyToFlux(DataBuffer.class);
DataBufferUtils.write(dataBuffer, destination,
StandardOpenOption.CREATE)
.share().block();
}
}
列出某个软件的所有版本号:
yum module list nginx
Red Hat Enterprise Linux 8 for x86_64 - AppStream (RPMs)
Name Stream Profiles Summary
nginx 1.14 [d] common [d] nginx webserver
nginx 1.16 common [d] nginx webserver
nginx 1.18 common [d] nginx webserver
nginx 1.20 [e] common [d] nginx webserver
Hint: [d]efault, [e]nabled, [x]disabled, [i]nstalled
设定某个版本为默认版本
yum module enable nginx:1.20
安装默认版本
yum install nginx
摘要: 签名
为防止request中的json在传输过程中被更改,
需要在传送双方保存一个字符串sinature-key
用SHA256 hash请求中的json字符串,结果为hash1
{"payload":hash1}以此为字符和sinature-key用JWS HS256算法进行签名,得到sinature1
在请求的json中加入字段:"sina...
阅读全文
下载KEYCLOAK与安装,可参见:
https://www.janua.fr/how-to-install-keycloak-with-mariadb/启动时配置不通过localhost访问控制台:
#! /bin/bash
BIN_PATH=$(cd `dirname $0`; pwd)
IP=10.10.27.69
KEYCLOAK_OPT="-b ${IP} -Djboss.bind.address.management=${IP} -Dkeycloak.profile.feature.upload_scripts=enabled"
KEYCLOAK_OPT="${KEYCLOAK_OPT} -Djboss.socket.binding.port-offset=100 -Dkeycloak.frontendUrl=http://${IP}:81/auth "
#-Dkeycloak.hostname=${IP} -Dkeycloak.httpPort=81 -Dkeycloak.httpsPort=82
nohup ${BIN_PATH}/bin/standalone.sh ${KEYCLOAK_OPT} > /dev/null &
更改KEYCLOAK的DATASOURCE时,可直接更改默认的而无需重新配置:
https://medium.com/@pratik.dandavate/setting-up-keycloak-standalone-with-mysql-database-7ebb614cc229KEYCLOAK的JBOSS管理界面地址改为非LOCALHOST:
-Djboss.bind.address.management=${IP}
如果是由NGINX过来的访问,这样前端的地址是和默认的不一样,需配置前端URL:
-Dkeycloak.frontendUrl=http://${IP}:81/auth
更改JVM大小standalone.conf:
#
# Specify options to pass to the Java VM.
#
JBOSS_JAVA_SIZING="-server -Xms3G -Xmx3G -Xmn512m -XX:MetaspaceSize=96M -XX:MaxMetaspaceSize=256m"
REFERENCE:
https://www.keycloak.org/docs/latest/server_installation/index.html#_hostname

This article assumes that you have a running Jenkins instance on your Linux machine with a valid domain (not localhost), GitLab and that you are familiar with the Angular framework.
For Jenkins, please install the GitLab and NodeJS plugins. For simplicity’s sake, this article is going to use simple shell commands to run automated tests and to deploy an app to production.
***Note. If you can’t decide where to test all this, there is an article I wrote that might help you: CI/CD Cloud Voyage with Jenkins.
Configuring Gitlab and Jenkins
Jenkins: Access Rights to GitLab
In order to use GitLab with Jenkins, you’ll need to generate an access token in GitLab, which you can do in User menu > Settings > Access tokens
and configure GitLab Connection on Jenkins by adding the newly generated token.
In Jenkins, go to Manage Jenkins > Configure system and find the GitLab section.
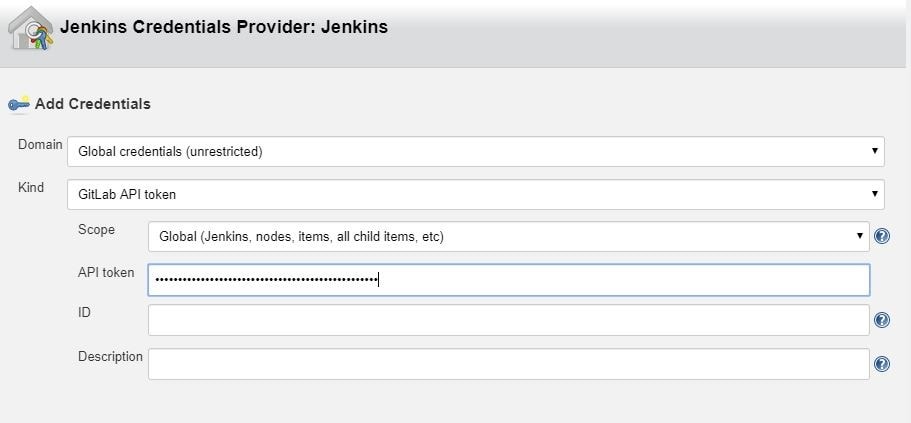
To add a token that you previously generated, click on Add by the Credentials input and choose Jenkins. In the credentials dialog, choose GitLab API token in the Kind input and paste your token from GitLab into the API token input field.
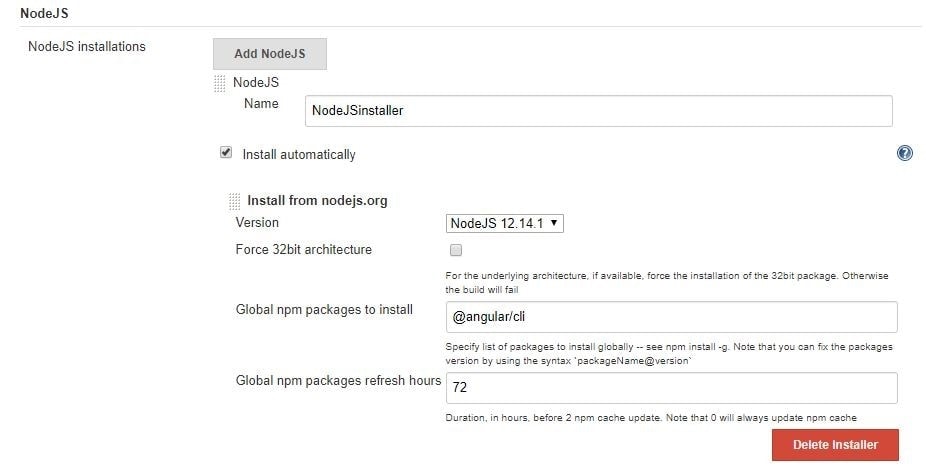
Jenkins: Configure NodeJSInstaller
In order to be able to run npm scripts, it is necessary to configure NodeJSInstaller. In Jenkins, go to Manage Jenkins > Global Tool Configuration > NodeJS installations.
Jenkins: Create CI build for Angular
In order to be able to run Angular tests and check your code style in Jenkins on the created merge request in GitLab you’ll have to:
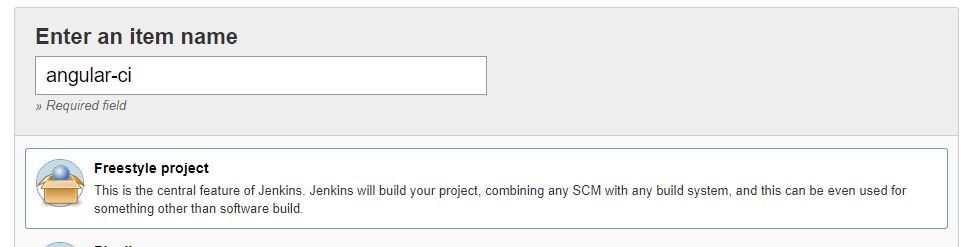
1. Click on the New item link in the Jenkins dashboard
2. Enter a job name and choose Freestyle project
3. Choose the GitLab Connection that we’ve just created in the Gitlab Connection section.

4. Choose Git as your source code management. Enter your repository URL. Create new credentials on Jenkins. These credentials are for cloning the project. You use them to log in to Gitlab.

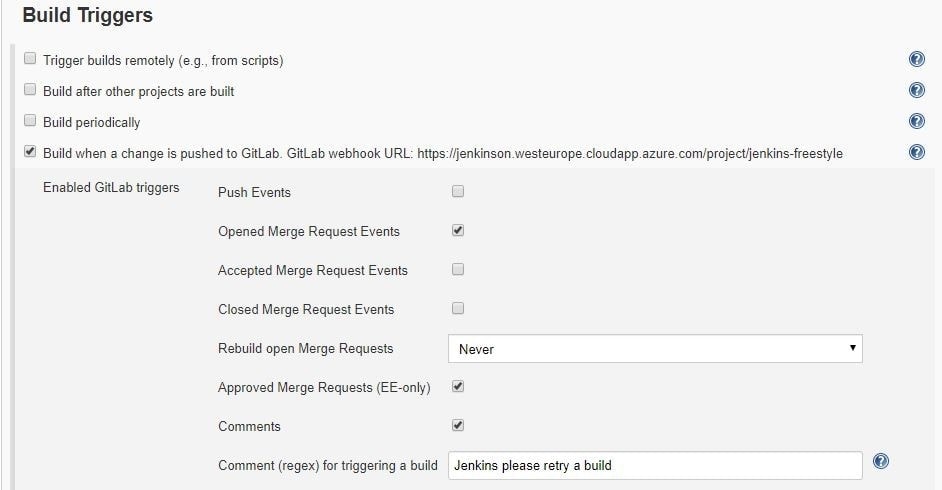
5. Next, configure build triggers, i.e. on which GitLab event to run a build. In this particular example, angular-ci-build is going to trigger when a new merge request gets created.

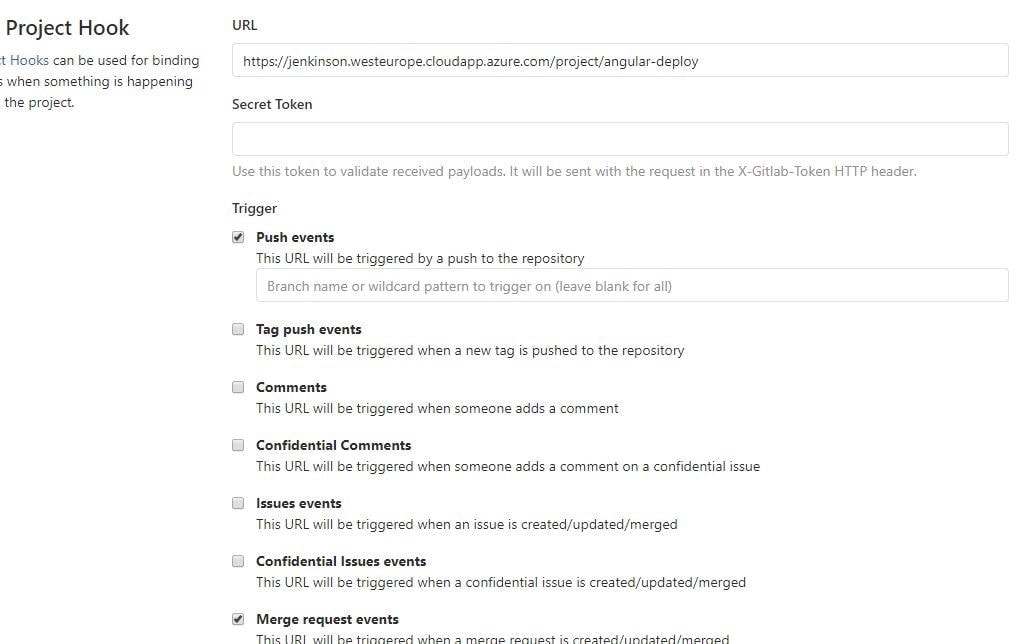
In this step, we need to go back to GitLab and create a hook that will trigger this build under Settings > Integrations. Copy the URL provided by Jenkins and paste it into the project hook form and finally click Add webhook.

6. Provide the configured NodeJsInstaller in the global configuration to be able to run npm commands.

7. And finally, in the Build section choose Add build step > Execute shell. Write shell scripts to test the Angular app code and run tests.

Click Save and we are good to go. At this point everything should work.
When you create a new merge request, GitLab should trigger angular-ci-build on Jenkins and you should see status pending on that particular merge request page.
When Jenkins is done, the status on GitLab should automatically be updated. Depending on whether the build passed or not, the merge button will change color.
Jenkins: Create CD Build for Angular
In order to be able to deploy Angular to another Linux machine, we need to:
Repeat steps 1–4 from Jenkins: Create CI Build for Angular, changing only the name of the build. This time, it can be angular-deploy.
5. For step five, we now choose a different configuration for deployment. We are going to run this build when a merge request gets accepted.
Just like for the CI build, we have to create a new GitLab hook that will hit the Jenkins build endpoint.
6. This step is also the same as in CI; we need to provide the NodeJSInstaller we already configured globally.
7. This step is different from CI; this time we don’t have to test and check linting, but only build the application and copy-paste it to another machine with ssh.

If we are going to do it with ssh like in the example, we need to create a private and public key pair for the Jenkins user on the machine Jenkins is running on. The private key needs to stay on the Jenkins machine, and the public key needs to be copied to the remote machine.
With the scp command we simply copy our build to the remote machine. In this case, Jenkins does not have permission to put it anywhere but in the user folder. In the last step, we need to ssh into the remote machine and move our files (in this case to /var/www/html).
Voila, our app is deployed to the production server when the merge request is accepted via Jenkins.
Angular: Karma Unit Test Runner Configuration
To run Angular tests on Jenkins, we need to configure some parts of the karma.conf file. Below is the configuration that adds a custom launcher that runs ChromeHeadles.
module.exports = function(config) { config.set({ basePath: "", frameworks: ["jasmine", "@angular-devkit/build-angular"], plugins: [ require("karma-jasmine"), require("karma-chrome-launcher"), require("karma-jasmine-html-reporter"), require("karma-coverage-istanbul-reporter"), require("@angular-devkit/build-angular/plugins/karma") ], client: { clearContext: false // leave Jasmine Spec Runner output visible in browser }, coverageIstanbulReporter: { dir: require("path").join(__dirname, "../coverage/jenkins-test-app"), reports: ["html", "lcovonly", "text-summary"], fixWebpackSourcePaths: true }, reporters: ["progress", "kjhtml"], port: 9876, colors: true, logLevel: config.LOG_INFO, autoWatch: true, browsers: ["Chrome", "ChromeHeadless"], singleRun: false, restartOnFileChange: true, customLaunchers: { ChromeHeadless: { base: "Chrome", flags: [ "--headless", "--disable-gpu", "--no-sandbox", "--remote-debugging-port=9222" ], }, } }); };
We can then simply store our command in the package.json scripts property.
On Jenkins, we would now run our tests with npm run test:ci.
"scripts": { "ng": "ng", "start": "ng serve", "build": "ng build", "test": "ng test", "test:ci": "ng test --browsers=ChromeHeadless --watch=false", "lint": "ng lint", "e2e": "ng e2e" },
I hope you enjoyed this article and that it was helpful in your quest for automating angular deployment and testing.
集群通常是有多个相同的实例,但对于定时任务场景,只希望有一个实例工作即可,如果这个实例挂了,其他实例可以顶替。
这个问题的方案则是集群选主,一个集群中,只有一个LEADER,由LEADER负责执行定时任务工作。当LEADER被取消时,会在剩下的实例中再选LEADER。
持有分布式锁的实例则是LEADER。
SPRING INTEGRATION JDBC 则已提供相关功能。
pom.xml
<dependency>
<groupId>org.springframework.integration</groupId>
<artifactId>spring-integration-jdbc</artifactId>
</dependency>
<dependency>
<groupId>org.springframework.boot</groupId>
<artifactId>spring-boot-starter-jdbc</artifactId>
</dependency>
<dependency>
<groupId>org.flywaydb</groupId>
<artifactId>flyway-core</artifactId>
</dependency>
<dependency>
<groupId>org.mariadb.jdbc</groupId>
<artifactId>mariadb-java-client</artifactId>
</dependency>
LeaderElectionIntegrationConfig.java
import java.util.List;
import java.util.concurrent.CopyOnWriteArrayList;
import javax.sql.DataSource;
import org.springframework.context.annotation.Bean;
import org.springframework.context.annotation.Configuration;
import org.springframework.integration.jdbc.lock.DefaultLockRepository;
import org.springframework.integration.jdbc.lock.JdbcLockRegistry;
import org.springframework.integration.jdbc.lock.LockRepository;
import org.springframework.integration.support.leader.LockRegistryLeaderInitiator;
import com.paul.integration.leader.ControlBusGateway;
import com.paul.integration.leader.MyCandidate;
@Configuration
public class LeaderElectionIntegrationConfig {
@Bean
public List<String> needToStartupAdapterList(){
return new CopyOnWriteArrayList<>();
}
@Bean
public DefaultLockRepository defaultLockRepository(DataSource dataSource){
DefaultLockRepository defaultLockRepository =
new DefaultLockRepository(dataSource);
// defaultLockRepository.setTimeToLive(60_000);
return defaultLockRepository;
}
@Bean
public JdbcLockRegistry jdbcLockRegistry(LockRepository lockRepository){
return new JdbcLockRegistry(lockRepository);
}
@Bean
public MyCandidate myCandidate(
ControlBusGateway controlBusGateway,
List<String> needToStartupAdapterList
) {
return new MyCandidate(controlBusGateway, needToStartupAdapterList);
}
@Bean
public LockRegistryLeaderInitiator leaderInitiator() {
return new LockRegistryLeaderInitiator(
jdbcLockRegistry(null), myCandidate(null, null)
);
}
}
MyCandidate.java
import java.util.List;
import org.slf4j.Logger;
import org.slf4j.LoggerFactory;
import org.springframework.integration.leader.Context;
import org.springframework.integration.leader.DefaultCandidate;
import com.novacredit.mcra.mcracommon.integration.gateway.ControlBusGateway;
public class MyCandidate extends DefaultCandidate{
private static final Logger LOG = LoggerFactory.getLogger(MyCandidate.class);
private List<String> needToStartupAdapterList;
private ControlBusGateway controlBusGateway;
public MyCandidate(
ControlBusGateway controlBusGateway,
List<String> needToStartupAdapterList
) {
this.controlBusGateway = controlBusGateway;
this.needToStartupAdapterList = needToStartupAdapterList;
}
@Override
public void onGranted(Context context) {
super.onGranted(context);
LOG.info("*** Leadership granted ***");
LOG.info("STARTING MONGODB POLLER");
needToStartupAdapterList
.forEach(
c -> {
// c = "@'testIntegrationFlow.org.springframework.integration.config."
// + "SourcePollingChannelAdapterFactoryBean#0'";
String command = c + ".start()";
LOG.info("-----{}", command);
controlBusGateway.sendCommand(command);
}
);
LOG.info("STARTUP MESSAGE SENT");
}
@Override
public void onRevoked(Context context) {
super.onRevoked(context);
LOG.info("*** Leadership revoked ***");
LOG.info("STOPPING MONGODB POLLER");
needToStartupAdapterList
.forEach(
c -> {
// c = "@'testIntegrationConfig.testIntegrationFlow."
// + "mongoMessageSource.inboundChannelAdapter'";
String command = c + ".stop()";
LOG.info("-----{}", command);
// controlBusGateway.sendCommand(command);
}
);
LOG.info("SHUTDOWN MESSAGE SENT");
}
}
ControlBusIntegrationConfig.java
import org.springframework.context.annotation.Bean;
import org.springframework.context.annotation.Configuration;
import org.springframework.integration.dsl.IntegrationFlow;
import org.springframework.integration.dsl.IntegrationFlows;
import org.springframework.integration.dsl.MessageChannels;
import org.springframework.integration.gateway.GatewayProxyFactoryBean;
import org.springframework.integration.handler.LoggingHandler;
import org.springframework.messaging.MessageChannel;
import com.paul.integration.gateway.ControlBusGateway;
@Configuration
public class ControlBusIntegrationConfig {
@Bean
public MessageChannel controlBusChannel() {
return MessageChannels.direct().get();
}
@Bean
public IntegrationFlow controlBusFlow() {
return IntegrationFlows.from(controlBusChannel())
.log(LoggingHandler.Level.INFO, "controlBusChannel")
.controlBus()
.get();
}
@Bean
public GatewayProxyFactoryBean controlBusGateway() {
GatewayProxyFactoryBean gateway = new GatewayProxyFactoryBean(ControlBusGateway.class);
gateway.setDefaultRequestChannel(controlBusChannel());
gateway.setDefaultRequestTimeout(300l);
gateway.setDefaultReplyTimeout(300l);
return gateway;
}
}
ControlBusGateway.java
public interface ControlBusGateway {
public void sendCommand(String command);
}
各个应用实例运行时,其中的LockRegistryLeaderInitiator会自动运行,抢夺LEADER数据,最终只有一个实例夺取。之后再执行MyCandidate中的代码。
mongo -u admin -p 123456 --authenticationDatabase admin
use admin
db.createUser({
user : "paul",
pwd : "123456",
roles : [{role : "readWrite", db : "batch"}]
})
#增加权限
db.grantRolesToUser(
"paul",
[
{ "role" : "dbOwner",
"db" : "mcra"
}
]
)
https://www.softwarecollections.org/en/不用再GOOGLE寻找安装方法。
安装MYSQL示例:
# 2. Install the collection:
$ sudo yum install rh-mariadb103
# 3. Start using software collections:
$ scl enable rh-mariadb103 bash
$ service rh-mariadb103-mariadb start
$ mysql
$ mysqld

#开机加载命令
cp /opt/rh/rh-mariadb103/enable /etc/profile.d/rh-mariadb103.sh
当CLIENT或用户在KEYCLOAK中成功登录后,会返回JWT字符串,其中默认含有权限的信息,但此信息以内嵌的方式呈现,非常不方便。
"resource_access": {
"app-springboot-confidential": {
"roles": [
"user"
]
},
"test-employee-service": {
"roles": [
"READ_EMPLOYEE"
]
},
"service-springboot": {
"roles": [
"READ_PRODUCTS"
]
},
"account": {
"roles": [
"manage-account",
"manage-account-links"
]
},
"test-department-service": {
"roles": [
"READ_DEPARTMENT"
]
}
}
- 需要将权限的信息输出到一个KEY中,这时可以新增自定义CLIENT SCOPE。Mapper中新增KEYCLOAK已内置的【realm roles/client roles】,定义输出到JTW的字段名:my-roles。
- 授权哪些CLIENT可以读取此CLIENT SCOPE.
- 在登录参数scope中,加入此值:my-roles,这样在输出的JWT就会以平面的方式输出所有roles
"my-roles": [
"user",
"READ_EMPLOYEE",
"READ_PRODUCTS",
"manage-account",
"manage-account-links",
"READ_DEPARTMENT",
"offline_access",
"user"
]
@Bean
public ReactiveJwtAuthenticationConverter jwtAuthenticationConverter(ObjectMapper objectMapper) {
JwtGrantedAuthoritiesConverter jwtGrantedAuthoritiesConverter = new JwtGrantedAuthoritiesConverter();
jwtGrantedAuthoritiesConverter.setAuthorityPrefix("ROLE_");
jwtGrantedAuthoritiesConverter.setAuthoritiesClaimName("my-roles");
// KeycloakRealmRoleConverter keycloakRealmRoleConverter = new KeycloakRealmRoleConverter(objectMapper);
ReactiveJwtGrantedAuthoritiesConverterAdapter reactiveJwtGrantedAuthoritiesConverterAdapter =
new ReactiveJwtGrantedAuthoritiesConverterAdapter(
// new KeycloakRealmRoleConverter(objectMapper);
jwtGrantedAuthoritiesConverter
);
ReactiveJwtAuthenticationConverter jwtConverter = new ReactiveJwtAuthenticationConverter();
jwtConverter.setJwtGrantedAuthoritiesConverter(reactiveJwtGrantedAuthoritiesConverterAdapter);
return jwtConverter;
}
ServerHttpSecurity
.authorizeExchange(
a -> a.pathMatchers("/", "/error").permitAll()
.matchers(PathRequest.toStaticResources().atCommonLocations()).permitAll()
.pathMatchers(HttpMethod.GET, "/protected/**").hasRole("READ_DEPARTMENT")
.anyExchange()
.authenticated()
)
添加依赖,pom.xml
<dependency>
<groupId>org.springframework.boot</groupId>
<artifactId>spring-boot-starter-webflux</artifactId>
</dependency>
<!-- spring session with mongodb -->
<dependency>
<groupId>org.springframework.session</groupId>
<artifactId>spring-session-data-mongodb</artifactId>
</dependency>
<dependency>
<groupId>org.springframework.boot</groupId>
<artifactId>spring-boot-starter-data-mongodb-reactive</artifactId>
</dependency>
配置文件,application.yaml
spring:
session:
store-type: mongodb
timeout: 30s
mongodb:
collection-name: WEB_SESSIONS
java配置,HttpSessionConfiguration.java:
package com.paul.testmicroservicecommon.config;
import org.springframework.boot.autoconfigure.session.MongoSessionProperties;
import org.springframework.boot.autoconfigure.session.SessionProperties;
import org.springframework.boot.context.properties.EnableConfigurationProperties;
import org.springframework.context.annotation.Bean;
import org.springframework.session.config.ReactiveSessionRepositoryCustomizer;
import org.springframework.session.data.mongo.ReactiveMongoSessionRepository;
import org.springframework.session.data.mongo.config.annotation.web.reactive.EnableMongoWebSession;
@EnableMongoWebSession
@EnableConfigurationProperties(MongoSessionProperties.class)
public class HttpSessionConfiguration {
@Bean
public ReactiveSessionRepositoryCustomizer<ReactiveMongoSessionRepository> customize(
SessionProperties sessionProperties,
MongoSessionProperties mongoSessionProperties
){
return c -> {
c.setMaxInactiveIntervalInSeconds((int)sessionProperties.getTimeout().getSeconds());
c.setCollectionName(mongoSessionProperties.getCollectionName());
};
}
}
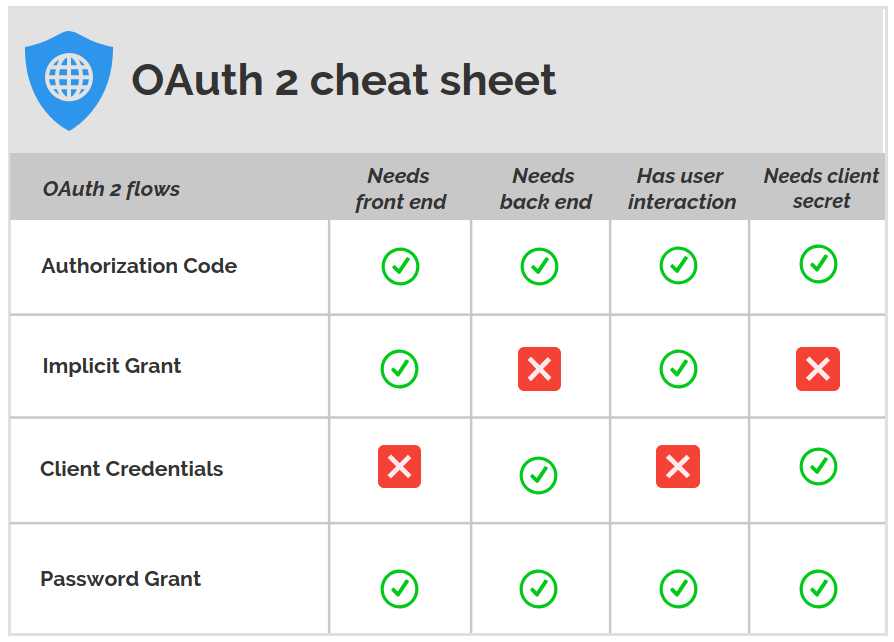
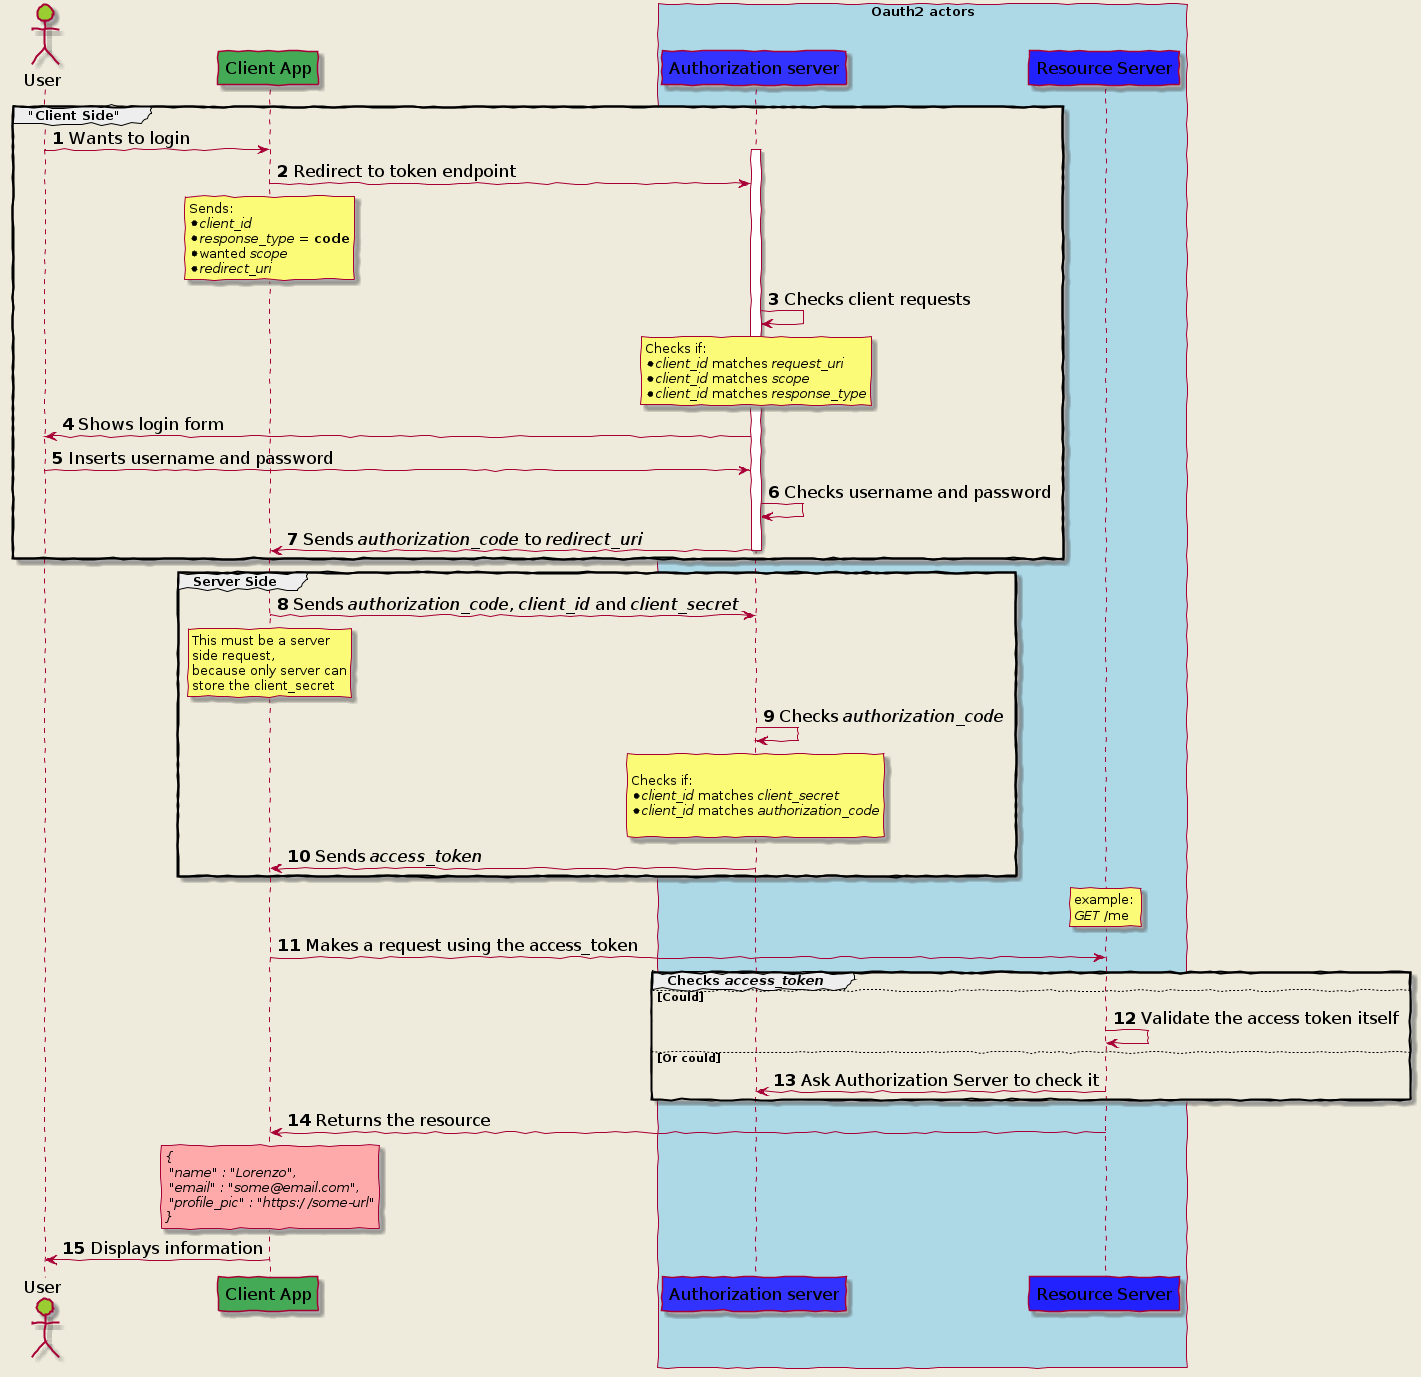
Authorization Code Grant
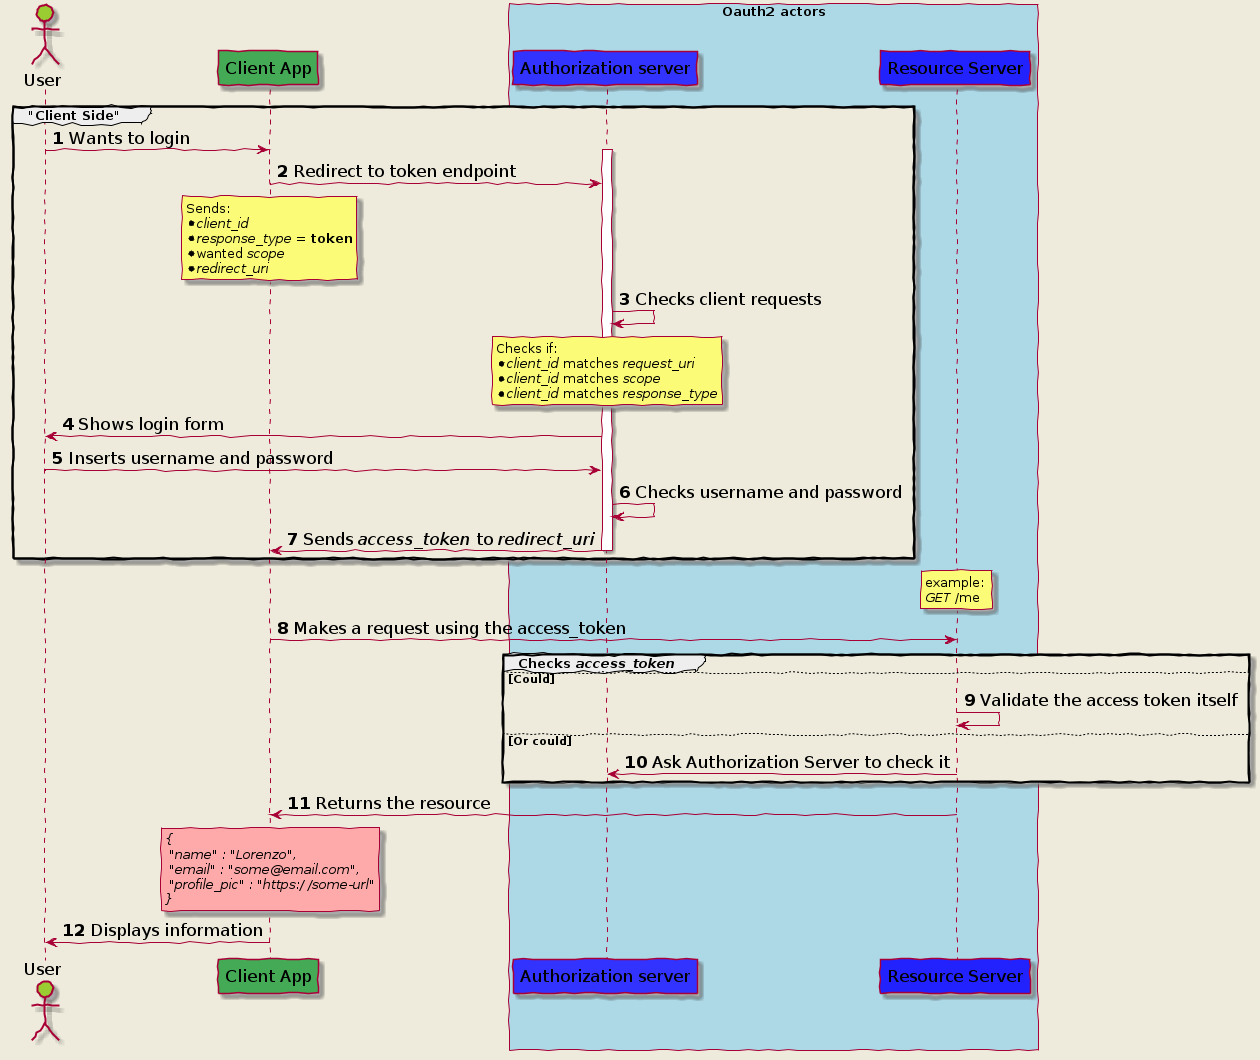
Implicit Grant Flow
Client Credential
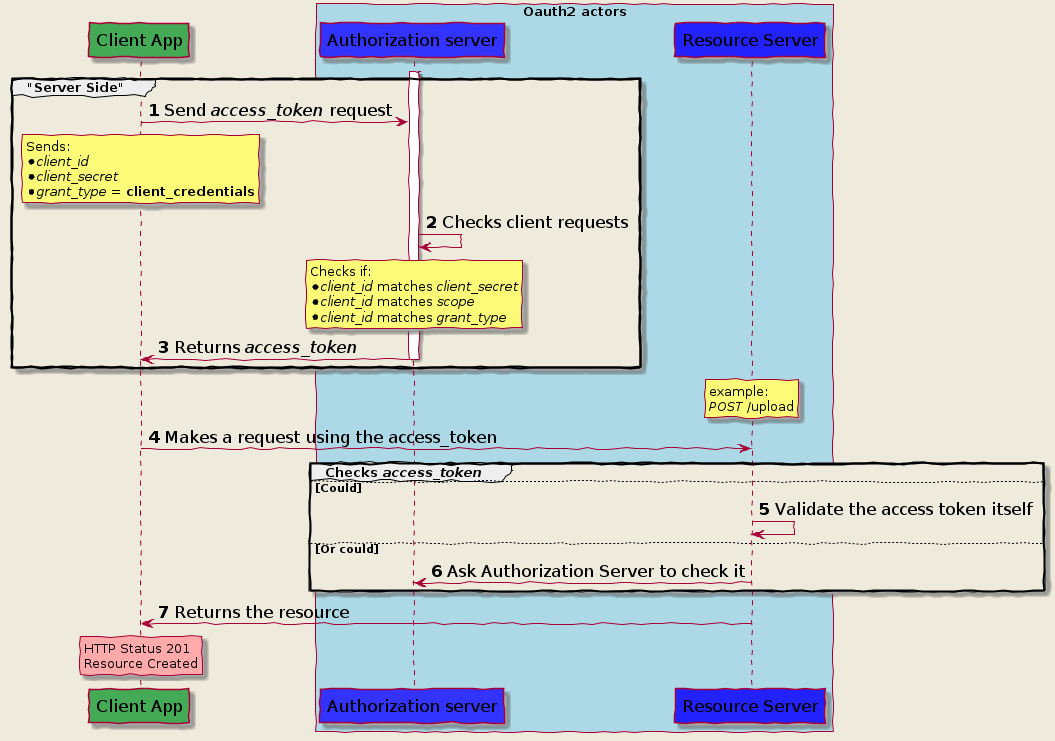
Password Grant flow
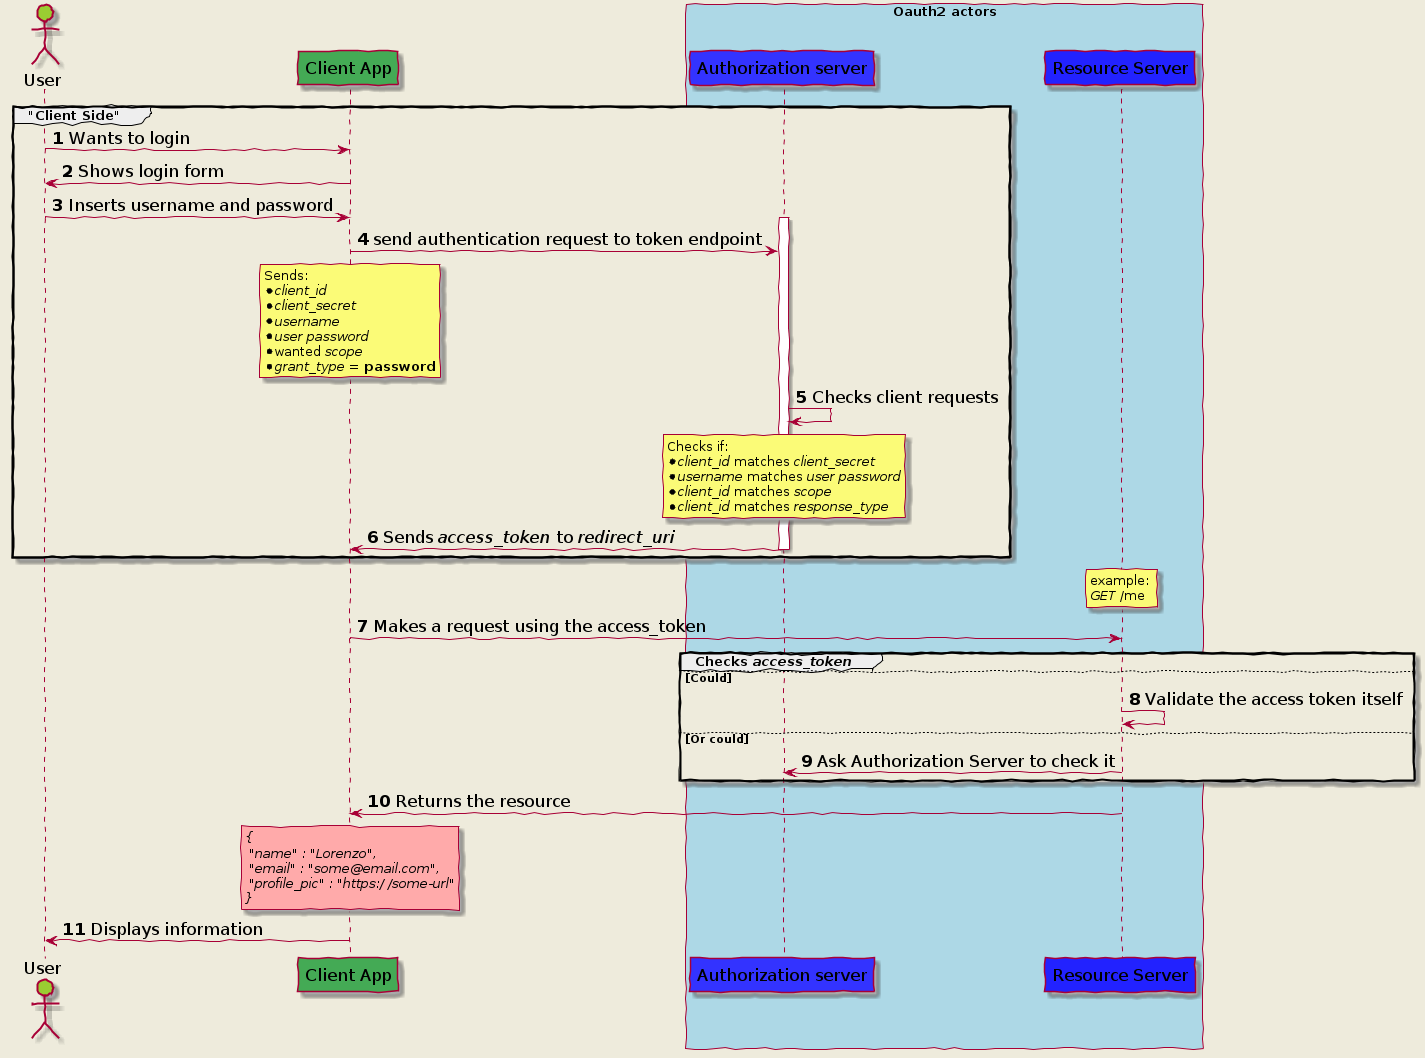 https://itnext.io/an-oauth-2-0-introduction-for-beginners-6e386b19f7a9
目前SPRING CLOUD(2020)尚未支持REACTIVE FEIGN,但官方推荐使用feign-reactive。
pom.xml
<dependency>
<groupId>com.playtika.reactivefeign</groupId>
<artifactId>feign-reactor-spring-cloud-starter</artifactId>
<version>3.1.2</version>
<type>pom</type>
</dependency>
LoanDecisionClientReactive.java
package com.paul.testspringcloudstream.loancheck.service;
import org.springframework.web.bind.annotation.PostMapping;
import org.springframework.web.bind.annotation.RequestBody;
import com.paul.testspringcloudstream.common.model.Loan;
import reactivefeign.spring.config.ReactiveFeignClient;
import reactor.core.publisher.Mono;
@ReactiveFeignClient(name = "loan-decision")
public interface LoanDecisionClientReactive {
@PostMapping("/loan-decision")
public Mono<Loan> getDecision(@RequestBody Loan loan);
}
LoanCheckConfiguration.java
@Configuration
@Import({
MongoDbConsumerConfiguration.class,
})
@EnableDiscoveryClient
@EnableReactiveFeignClients("com.paul.testspringcloudstream.loancheck.service")
public class LoanCheckConfiguration {
}
使用同feign
@Autowired
private LoanDecisionClientReactive loanDecisionClientReactive;
Reference
https://blog.csdn.net/LCBUSHIHAHA/article/details/113817966官方SAMPLE
https://github.com/kptfh/feign-reactive-sample
升级spring cloud版本之后发现bootstrap.yml 失效了,阅读官方文档得知,需要新增一个引用来开启bootstrap.xml文件的读取,新版spring cloud默认是关闭读取了。
增加依赖如下即可:
<dependency>
<groupId>org.springframework.cloud</groupId>
<artifactId>spring-cloud-starter-bootstrap</artifactId>
</dependency>
官方文档:
https://docs.spring.io/spring-cloud-config/docs/current/reference/html/#config-first-bootstrap
SPRING REACTOR 之Flux和Mono,有点象SPRING INTEGRATION的IntegrationFlow,有如下特点
- 定义了针对某种类型数据的处理流程
- 可以进行类型转换
- 长期运行,除非被要求中止
- 流程中的每种操作可以在新的线程中执行
- 可以正常中止,如果中途有异常,则该流程也会中止
- 要subscribe,流程才开始被启动
- 可以分割成各个子流程
- 可以聚合子流程
- Mono发送一个数据,就发送中止信号
- Flux发送任意数据,由程序决定何时发送中止信号
编程则比较简单,先根据不同的数据类型定义不同的Flux或Mono,业务操作用Function包装后,放在map/flatmap中,再调用subscribe启动流程。
SpringReactorTest.java
package com.paul.testreactivestream.reactor;
import java.util.List;
import org.junit.jupiter.api.Test;
import reactor.core.publisher.Flux;
import reactor.core.publisher.Mono;
import reactor.core.scheduler.Schedulers;
public class SpringReactorTest {
private void subscribeAndEnd(Flux<?> flux) {
flux.map(c -> String.format("[%s] %s", Thread.currentThread().getName(), c))
.subscribe(System.out::println);
flux.blockLast();
}
@Test
public void createAFlux_just() throws InterruptedException {
Flux<String> fruitFlux =
Flux.just("Apple", "Orange", "Grape", "Banana", "Strawberry")
.log()
;
fruitFlux.subscribe(
f -> System.out.println(
String.format("[%s] Here's some fruit: %s", Thread.currentThread().getName(), f)
)
)
;
fruitFlux.blockLast();
// Thread.currentThread().join();
}
@Test
public void zipFluxesToObject() {
Flux<String> characterFlux =
Flux.just("Garfield", "Kojak", "Barbossa");
Flux<String> foodFlux =
Flux.just("Lasagna", "Lollipops", "Apples");
Flux<String> zippedFlux =
Flux.zip(characterFlux, foodFlux, (c, f) -> c + " eats " + f);
this.subscribeAndEnd(zippedFlux);
}
@Test
public void map() {
Flux<Player> playerFlux =
Flux.just("Michael Jordan", "Scottie Pippen", "Steve Kerr")
.map(n -> {
String[] split = n.split("\\s");
return new Player(split[0], split[1]);
})
;
this.subscribeAndEnd(playerFlux);
}
@Test
public void flatMap() {
Flux<Player> playerFlux =
Flux.just("Michael Jordan", "Scottie Pippen", "Steve Kerr")
.flatMap(
n -> Mono.just(n)
.map(p -> {
String[] split = p.split("\\s");
return new Player(split[0], split[1]);
})
.subscribeOn(Schedulers.parallel())
);
this.subscribeAndEnd(playerFlux);
}
@Test
public void buffer() {
Flux<List<String>> fruitFlux =
Flux.just(
"apple", "orange", "banana", "kiwi", "strawberry"
)
.buffer(3);
this.subscribeAndEnd(fruitFlux);
}
@Test
public void bufferAsyn() {
Flux<String> flux =
Flux.just(
"apple", "orange", "banana", "kiwi", "strawberry"
)
.buffer(3)
.flatMap(x ->
Flux.fromIterable(x)
.map(y -> y.toUpperCase())
.subscribeOn(Schedulers.parallel())
// .log()
);
this.subscribeAndEnd(flux);
}
@Test
public void all() {
Mono<Boolean> animalFlux =
Flux.just(
"aardvark", "elephant", "koala", "eagle", "kangaroo"
)
.all(c -> c.contains("a"))
;
animalFlux.map(c -> String.format("[%s] %s", Thread.currentThread().getName(), c))
.subscribe(System.out::println);
}
}
Supplier beans, or functions that only publish messages in Spring Cloud Stream, are a bit special in that they aren't triggered by the receiving of events like Function or Consumer beans. This means that you often need a way to trigger them to be executed periodically.
For imperative functions the framework by default "polls" a Supplier function every 1 second, but that duration is configurable using the spring.cloud.stream.poller.fixed-delay property.
However, for reactive functions supplying a Flux it is only triggered once by default. This is because a Flux itself is potentially an infinite stream of events so in many cases it will only need to be triggered once. But don't worry, if you want to periodically trigger a reactive Supplier because you are producing a finite stream of events you can still do so using @PollableBean. This annotation then allows you to configure how often the function is triggered using the same spring.cloud.stream.poller.fixed-delay property!
One example use case here could be periodically querying a data store and publishing each entry/row as an event. The number of rows in your data store is a finite number at any given time.
Example code:
@PollableBean
public Supplier<Flux<String>> stringSupplier() { return () -> Flux.just("foo","bar","baz"); }
Reference:
https://solace.community/discussion/360/pollablebean-for-reactive-suppliers-in-spring-cloud-stream
在SPRING INTEGRATION中,如果要从非SPRING INTEGRATION代码发送MESSAGE到SPRING INTEGRATION程序,通常用BUS GATEWAY。
那么在SPRING CLOUD STREAM中,如果要从非SPRING CLOUD STREAM代码发送MESSAGE到SPRING CLOUD STREAM程序,通常就要先通知框架自动生成一个SOURCE。
application.property
spring.cloud.stream.source=supplier
spring.cloud.stream.bindings.supplier-out-0.destination=notification-events
java
streamBridge.send("supplier-out-0", userDto);
Reference:
https://blog.devgenius.io/event-driven-microservices-with-spring-cloud-stream-e034eee3f394
如果Function中抛出异常,系统没有配置捕获异常,则异常消息会被丢弃。通常会进行配置。
@ServiceActivator(inputChannel = "my-destination.my-group.errors")
public void handleError(ErrorMessage message) {
Throwable throwable = message.getPayload();
log.error("截获异常", throwable);
Message<?> originalMessage = message.getOriginalMessage();
assert originalMessage != null;
log.info("原始消息体 = {}", new String((byte[]) originalMessage.getPayload()));
}
详情参考:
https://www.itmuch.com/spring-cloud/spring-cloud-stream-error-handling/
SPRING CLOUD STREAM内置了一个RoutingFunction,能将MESSAGE路由到应用的其他FUNCTION中。
对接RoutingFunction可发送消息到其外部DESTINATION中或用“|”连接符连接。
application.yaml
# This setting can increase or decrease the rate of message production (1000 = 1s)
# spring.cloud.stream.poller.fixed-delay=1000
# DefaultPollerProperties
# This setting can control which function method in our code will be triggered if there are multiple
# spring.cloud.function.definition=supplyLoan
# Give the autogenerated binding a friendlier name
spring:
application:
name: loan-check-rabbit
banner:
location: classpath:/banner-rabbit.txt
cloud:
#BindingServiceProperties
stream:
#StreamFunctionProperties
function:
definition: loadCheckerFunction;loanCheckerDecieder;loanCheckerConsumer;\
loanDeclinedConsumer;loanApprovedConsumer;loanCheckerProcessor|functionRouter
routing:
enabled: true
#BindingProperties
bindings:
loanCheckerProcessor|functionRouter-in-0:
destination: queue.pretty.log.messages
binder: local_rabbit
loanApprovedConsumer-in-0:
destination: load.approved
binder: local_rabbit
loanDeclinedConsumer-in-0:
destination: load.declined
binder: local_rabbit
loanCheckerDecieder-in-0:
destination: queue.pretty.log.messages.222
binder: local_rabbit
loanCheckerDecieder-out-0:
destination: queue.pretty.approved.messages
binder: local_rabbit
loanCheckerConsumer-in-0:
destination: queue.pretty.approved.messages
binder: local_rabbit
#BinderProperties
binders:
local_rabbit:
type: rabbit
environment:
spring:
rabbitmq:
host: 10.80.27.69
port: 5672
username: guest
password: guest
virtual-host: my-virtual-host
logging:
level:
root: info
org.springframework:
cloud.function: debug
#retry: debug
LoanCheckConfiguration.java
package com.paul.testspringcloudstream.loancheck.config;
import java.util.function.Consumer;
import java.util.function.Function;
import org.slf4j.Logger;
import org.slf4j.LoggerFactory;
import org.springframework.beans.factory.annotation.Autowired;
import org.springframework.cloud.function.context.MessageRoutingCallback;
import org.springframework.cloud.stream.function.StreamBridge;
import org.springframework.context.annotation.Bean;
import org.springframework.context.annotation.Configuration;
import org.springframework.integration.support.MessageBuilder;
import org.springframework.messaging.Message;
import com.paul.testspringcloudstream.common.model.Loan;
import com.paul.testspringcloudstream.common.model.Status;
import com.paul.testspringcloudstream.loancheck.router.LoanCheckerRouter;
import com.paul.testspringcloudstream.loancheck.service.LoanProcessor;
import com.paul.testspringcloudstream.loancheck.service.LoanService;
@Configuration
public class LoanCheckConfiguration {
private static final Logger log = LoggerFactory.getLogger(LoanCheckConfiguration.class);
private static final Long MAX_AMOUNT = 10000L;
private static final String LOG_PATTERN = "{} - {} {} for ${} for {}";
@Autowired
public void test(Consumer<Loan> loanCheckerConsumer) {
log.info("{}", loanCheckerConsumer.getClass());
}
@Bean
public Consumer<Loan> loanCheckerConsumer(){
return loan ->
log.info(LOG_PATTERN, "loanCheckerConsumer", loan.getStatus(), loan.getUuid(), loan.getAmount(), loan.getName());
}
@Bean
public Consumer<Loan> loanDeclinedConsumer(){
return loan ->
log.info(LOG_PATTERN, "loanDeclinedConsumer", loan.getStatus(), loan.getUuid(), loan.getAmount(), loan.getName());
}
@Bean
public Consumer<Loan> loanApprovedConsumer(){
return loan ->
log.info(LOG_PATTERN, "loanApprovedConsumer", loan.getStatus(), loan.getUuid(), loan.getAmount(), loan.getName());
}
@Bean
public MessageRoutingCallback loanCheckerRouter() {
return new LoanCheckerRouter();
}
@Bean
public Function<Loan, Loan> loanCheckerProcessor(
LoanService loanService
){
return loan -> loanService.check(loan);
}
@Bean
public Function<Loan, Message<Loan>> loanCheckerProcessorBak(
LoanService loanService
){
return loan -> {
Loan result = loanService.check(loan);
String sendTo = Status.DECLINED.name().equals(result.getStatus()) ?
LoanProcessor.DECLINED_OUT : LoanProcessor.APPROVED_OUT;
return MessageBuilder.withPayload(result)
.setHeader("spring.cloud.stream.sendto.destination", sendTo)
.build();
};
}
@Bean
public Consumer<Loan> loanCheckerDecieder(StreamBridge streamBridge){
return loan -> {
log.info(LOG_PATTERN, "loanCheckerDecieder", loan.getStatus(), loan.getUuid(), loan.getAmount(), loan.getName());
if (loan.getAmount() > MAX_AMOUNT) {
loan.setStatus(Status.DECLINED.name());
streamBridge.send(LoanProcessor.DECLINED_OUT, "local_rabbit", loan);
} else {
loan.setStatus(Status.APPROVED.name());
streamBridge.send(LoanProcessor.APPROVED_OUT, "local_rabbit", loan);
}
log.info(LOG_PATTERN, "loanCheckerDecieder", loan.getStatus(), loan.getUuid(), loan.getAmount(), loan.getName());
};
}
}
LoanCheckerRouter.java,将路由条件统一在此处
package com.paul.testspringcloudstream.loancheck.router;
import org.slf4j.Logger;
import org.slf4j.LoggerFactory;
import org.springframework.cloud.function.context.MessageRoutingCallback;
import org.springframework.messaging.Message;
import com.paul.testspringcloudstream.common.model.Loan;
import com.paul.testspringcloudstream.common.model.Status;
public class LoanCheckerRouter implements MessageRoutingCallback{
private static final Logger log = LoggerFactory.getLogger(LoanCheckerRouter.class);
@Override
public String functionDefinition(Message<?> message) {
// byte[] resultByte = (byte[])message.getPayload();
// String resultString = new String(resultByte);
//
// return "loanDeclinedConsumer";
Loan result = (Loan)message.getPayload();
log.info("Loan status: {}", result.getStatus());
return Status.DECLINED.name().equals(result.getStatus()) ?
"loanDeclinedConsumer" : "loanApprovedConsumer";
}
}
SPRING CLOUD STREAM 3.x 版本时,之前的一些编程模式,如@Enablebindding,@StreamListenner等注释被废弃了,这是由于一些框架的代码必需由用户编写,如配置框架用的Input MessageChannel,Output MessageChannel,连接MessageHandler与MessageChannel等,被视为不必要的动作。为了简化用户代码,于是推出Functional Programming Model。
引入了新名词:Supplier、Function与Consumer。实际上这几个类可视为Adapter,如果之前已经有存在的Service类,且方法名为各种各样,可以重新包装成Supplier、Function与Consumer,并在固定的方法名:apply/get/accept中调用Service的方法。
Supplier
当在配置文件中注入此类型的Bean,并在spring.cloud.stream.function.definition加入此Bean的名称,SPRING CLOUD STREAM就会帮你生成一个Output MessageChannel,并连接上此Bean,后续只需要在BINDDING中加入对应的Destination Name,即可向BROKER发消息了。
Consumer
当在配置文件中注入此类型的Bean,并在spring.cloud.stream.function.definition加入此Bean的名称,SPRING CLOUD STREAM就会帮你生成一个Input MessageChannel,并连接上此Bean,后续只需要在BINDDING中加入对应的Destination Name,即可收到BROKER推送关于此Destination的消息了。
Function
当在配置文件中注入此类型的Bean,并在spring.cloud.stream.function.definition加入此Bean的名称,SPRING CLOUD STREAM就会帮你生成一个Input和Output MessageChannel,并连接上此Bean,后续只需要在BINDDING中分别对Input和Output MessageChannel加入对应的Destination Name1/Name2,即可收到BROKER推送关于此Destination的消息,也可以向BROKER发消息了。
与SPRING INTEGRATION的整合
如果要对消息进行复杂处理,如拆分消息、聚合消息、IF ELSE消息等,就要借助SPRING INTEGRATION了。
@Bean
public IntegrationFlow upperCaseFlow(LoanService loanService) {
return IntegrationFlows
//turn this IntegrationFlow as a gateway, here is a Function interface
//with loadCheckerFunction as bean name
.from(LoadCheckerFunction.class, gateway -> gateway.beanName("loadCheckerFunction"))
.handle(loanService, "check")
.logAndReply(LoggingHandler.Level.WARN);
}
public interface LoadCheckerFunction extends Function<Loan, Loan>{
}
IntegrationFlows.from(Class<?> serviceInterface)是可以将本IntegrationFlow包装成serviceInterface的实现类,如果调用此接口,最终会返回IntegrationFlow最后一个步骤的实体,如果这个serviceInterface是Function的话,刚好和SPRING CLOUD STREAM对接上。
后续在spring.cloud.stream.function.definition加入此Bean的名称loadCheckerFunction,SPRING CLOUD STREAM就会帮你生成一个Input和Output MessageChannel,并连接上此Bean,再在BINDDING中分别对Input和Output MessageChannel加入对应的Destination Name1/Name2,即可收到BROKER推送关于此Destination的消息,也可以向BROKER发消息。
application.yaml
# This setting can increase or decrease the rate of message production (1000 = 1s)
# spring.cloud.stream.poller.fixed-delay=1000
# This setting can control which function method in our code will be triggered if there are multiple
# spring.cloud.function.definition=supplyLoan
# Give the autogenerated binding a friendlier name
spring:
application:
name: loan-check-rabbit
banner:
location: classpath:/banner-rabbit.txt
cloud:
stream:
function.definition: loadCheckerFunction
#BindingProperties
bindings:
loadCheckerFunction-in-0:
destination: queue.pretty.log.messages
binder: local_rabbit
loadCheckerFunction-out-0:
destination: queue.pretty.approved.messages
binder: local_rabbit
#BinderProperties
binders:
local_rabbit:
type: rabbit
environment:
spring:
rabbitmq:
host: 10.80.27.69
port: 5672
username: guest
password: guest
virtual-host: my-virtual-host
Reference
https://spring.io/blog/2019/10/25/spring-cloud-stream-and-spring-integration
安装ERLANG
从这里下载0依赖的ERLANG安装包:
https://github.com/rabbitmq/erlang-rpm/releases 象这种erlang-23.3.4.8-1.el7.x86_64.rpm含el7的是CENTOS7版本,含el8的是CENTOS8版本,安装脚本
yum install -y erlang-23.3.4.8-1.el7.x86_64.rpm
安装RABBITMQ
下载地址:
https://github.com/rabbitmq/rabbitmq-server/releases安装脚本:
yum install -y erlang-23.3.4.8-1.el7.x86_64.rpm拷贝配置文件
下载配置文件样例:
https://github.com/rabbitmq/rabbitmq-server/blob/master/deps/rabbit/docs/rabbitmq.conf.example粘贴并重命名文件:
/etc/rabbitmq/rabbitmq.conf开启WEB控制台
/lib/rabbitmq/bin/rabbitmq-plugins enable rabbitmq_management
配置guest可远程访问
## Uncomment the following line if you want to allow access to the
## guest user from anywhere on the network.
loopback_users.guest = false
配置开机启动
chkconfig rabbitmq-server on
启动实例
systemctl start rabbitmq-serve
systemctl stop rabbitmq-serve
访问控制台,guest/guest
http://10.80.27.69:15672/#/
Reference
https://www.cnblogs.com/ZhuChangwu/p/14093107.htmlhttps://juejin.cn/post/6933040530519506957
通常微服务应用之间的通信是通过HTTP调用,吞吐性不建都高,高并发的场景建议使用EVENT DRIVEN的框架,即使用MESSAGE通信。
即A微服务应用将数据发送到MESSAGE BROKER中的某个DESTINATION,此DESTINATION是广播型,非点对点型。B微服务应用订阅此DESTINATION,当有新MESSAGE到达此DESTINATION时,MESSAGE BROKER会将此MESSAGE推送给B应用。所有对此MESSAGE有需要的应用均可订阅,从而收到此MESSAGE。
SPRING CLOUD 中EVENT DRIVEN的框架就是SPRING CLOUD STREAM。其底层是使用SPRING INTEGRATION实现。
SPRING CLOUD STREAM有以下新名词:
是对MESSAGE BROKER操作方法的抽象,即应用通过此BINDER操作MESSAGE BROKER。目前只实现了RABITMQ和KAFKA。
MESSAGE从SPRING CLOUD STREAM传给应用或相反是通过CHANNEL传递的,这点和SPRING INTEGRATION是一样的。
MESSAGE从应用传给SPRING CLOUD STREAM的CHANNEL,叫@INPUT,包含这种CHANNEL的接口叫SOURCE。
MESSAGE从SPRING CLOUD STREAM传给应用的CHANNEL,叫@OUPUT,包含这种CHANNEL的接口叫SINK。
绑定哪个@INPUT或哪个@OUPUT与哪个DESTINATION发送或接收关系的MAPPING。
应用启动时就会建立EnableBinding指定的接口中的CHANNEL
默认下如果同一个应用部署了多个实例,则每个实例都会收到MESSAGE,这时如果设置了消费者群组名称,则同一个名称下的多个实例,只有一个能收到MESSAGE。
如果为MESSAGE指定规则,如MESSAGE某个字段值以A开头为一个规则,以B开头为一个规则,那么以A开头的MESSAGE会放到同一个分区中。
这样使用就很简单了,只要取得OUTPUT CHANNEL,就可以发送MESSAGE,将代码关联到INPUT CHANNEL,就能在收到MESSAGE时,相关代码就会被执行。
摘要: 根据OAUTH2协议,如果需要用户协助的,则使用authorization_code流程,此时需要用户登录页面、CLIENT SERVER、RESOURCE SERVER和AUTHORIZATION SERVER,其中CLIENT SERVER是通过http调用RESOURCE SERVER的api,AUTHORIZATION SERVER使用现成的KEYCLOAK。如果不需要用户协助的,即SER...
阅读全文
employee-service调用department-service,如果要按OAUTH2.0流程,只需要提供client-id和client-secrect即可。在KEYCLOAK中引入service-account,即配置该employee-service时,取消standard-flow,同时激活service-account。
employee-service的application.yaml文件,其中的public-key要从KEYCLOAK中取
server:
port: 8090
# Can be set to false to disable security during local development
rest:
security:
enabled: true
#issuer-uri: http://localhost:8080/auth/realms/dev
api-matcher: /api/**
cors:
allowed-origins: '*'
allowed-headers: '*'
allowed-methods: GET,POST,PUT,PATCH,DELETE,OPTIONS
max-age: 3600
security:
oauth2:
resource:
filter-order: 3
id: test-employee-service
token-info-uri: ${rest.security.issuer-uri}/protocol/openid-connect/token/introspect
user-info-uri: ${rest.security.issuer-uri}/protocol/openid-connect/userinfo
jwt:
key-value: |
-----BEGIN PUBLIC KEY-----
MIGfMA0GCSqGSIb3DQEBAQUAA4GNADCBiQKBgQCrVrCuTtArbgaZzL1hvh0xtL5mc7o0NqPVnYXkLvgcwiC3BjLGw1tGEGoJaXDuSaRllobm53JBhjx33UNv+5z/UMG4kytBWxheNVKnL6GgqlNabMaFfPLPCF8kAgKnsi79NMo+n6KnSY8YeUmec/p2vjO2NjsSAVcWEQMVhJ31LwIDAQAB
-----END PUBLIC KEY-----
# To access another secured micro-service
client:
client-id: test-employee-service
#client-secret: 25c33006-e1b9-4fc2-a6b9-c43dbc41ecd0
user-authorization-uri: ${rest.security.issuer-uri}/protocol/openid-connect/auth
access-token-uri: ${rest.security.issuer-uri}/protocol/openid-connect/token
scope: openid
grant-type: client_credentials
is-client-only: true
#Logging Configuration
logging:
level:
org.springframework.boot.autoconfigure.logging: INFO
org.springframework.security: DEBUG
org.arun: DEBUG
root: INFO
application-dev.yaml
rest:
security:
issuer-uri: http://10.80.27.69:8180/auth/realms/quickstart
department-service:
url: http://10.80.27.69:8095/api/departments/1
security:
oauth2:
client:
client-secret: db25cdbd-605b-429d-bd92-96705bdf1474
department-service的application.yaml
server:
port: 8095
# Can be set to false to disable security during local development
rest:
security:
enabled: true
#issuer-uri: http://localhost:8080/auth/realms/dev
api-matcher: /api/**
cors:
allowed-origins: '*'
allowed-headers: '*'
allowed-methods: GET,POST,PUT,PATCH,DELETE,OPTIONS
max-age: 3600
security:
oauth2:
resource:
filter-order: 3
id: test-department-service
token-info-uri: ${rest.security.issuer-uri}/protocol/openid-connect/token/introspect
user-info-uri: ${rest.security.issuer-uri}/protocol/openid-connect/userinfo
jwt:
key-value: |
-----BEGIN PUBLIC KEY-----
MIGfMA0GCSqGSIb3DQEBAQUAA4GNADCBiQKBgQCrVrCuTtArbgaZzL1hvh0xtL5mc7o0NqPVnYXkLvgcwiC3BjLGw1tGEGoJaXDuSaRllobm53JBhjx33UNv+5z/UMG4kytBWxheNVKnL6GgqlNabMaFfPLPCF8kAgKnsi79NMo+n6KnSY8YeUmec/p2vjO2NjsSAVcWEQMVhJ31LwIDAQAB
-----END PUBLIC KEY-----
#Logging Configuration
logging:
level:
org.springframework.boot.autoconfigure.logging: INFO
org.springframework.security: DEBUG
org.arun: DEBUG
root: INFO
application-dev.yaml
rest:
security:
issuer-uri: http://10.80.27.69:8180/auth/realms/quickstart
employee-service的pom.xml
<?xml version="1.0" encoding="UTF-8"?>
<project xmlns="http://maven.apache.org/POM/4.0.0"
xmlns:xsi="http://www.w3.org/2001/XMLSchema-instance"
xsi:schemaLocation="http://maven.apache.org/POM/4.0.0 http://maven.apache.org/xsd/maven-4.0.0.xsd">
<modelVersion>4.0.0</modelVersion>
<parent>
<groupId>org.springframework.boot</groupId>
<artifactId>spring-boot-starter-parent</artifactId>
<version>2.1.18.RELEASE</version>
<relativePath /> <!-- lookup parent from repository -->
</parent>
<groupId>org.arun.springoauth</groupId>
<artifactId>spring-oauth2-employee-service</artifactId>
<version>1.0.0</version>
<name>spring-oauth2-employee-service</name>
<description>Employee Service</description>
<properties>
<java.version>1.8</java.version>
<spring-boot.version>2.1.18.RELEASE</spring-boot.version>
</properties>
<dependencies>
<dependency>
<groupId>org.springframework.boot</groupId>
<artifactId>spring-boot-starter-security</artifactId>
</dependency>
<dependency>
<groupId>org.springframework.security.oauth.boot</groupId>
<artifactId>spring-security-oauth2-autoconfigure</artifactId>
<!-- <version>2.1.18.RELEASE</version> -->
<version>${spring-boot.version}</version>
</dependency>
<dependency>
<groupId>org.springframework.boot</groupId>
<artifactId>spring-boot-starter-web</artifactId>
</dependency>
<dependency>
<groupId>org.springframework.boot</groupId>
<artifactId>spring-boot-devtools</artifactId>
<scope>runtime</scope>
</dependency>
<dependency>
<groupId>org.springframework.boot</groupId>
<artifactId>spring-boot-configuration-processor</artifactId>
<optional>true</optional>
</dependency>
<dependency>
<groupId>org.projectlombok</groupId>
<artifactId>lombok</artifactId>
<optional>true</optional>
</dependency>
<dependency>
<groupId>org.springframework.boot</groupId>
<artifactId>spring-boot-starter-test</artifactId>
<scope>test</scope>
</dependency>
<dependency>
<groupId>org.springframework.security</groupId>
<artifactId>spring-security-test</artifactId>
<scope>test</scope>
</dependency>
</dependencies>
<build>
<plugins>
<plugin>
<groupId>org.springframework.boot</groupId>
<artifactId>spring-boot-maven-plugin</artifactId>
<configuration>
<layout>ZIP</layout>
<excludes>
<exclude>
<groupId>*</groupId>
<artifactId>*</artifactId>
</exclude>
</excludes>
<includes>
<include>
<groupId>com.paul</groupId>
</include>
</includes>
</configuration>
</plugin>
</plugins>
</build>
</project>
将jwt格式的access_token转成Authentication的类JwtAccessTokenCustomizer
package org.arun.springoauth.employee.config;
import com.fasterxml.jackson.databind.JsonNode;
import com.fasterxml.jackson.databind.ObjectMapper;
import java.util.HashSet;
import java.util.List;
import java.util.Map;
import java.util.Set;
import org.slf4j.Logger;
import org.slf4j.LoggerFactory;
import org.springframework.beans.factory.annotation.Autowired;
import org.springframework.boot.autoconfigure.security.oauth2.resource.JwtAccessTokenConverterConfigurer;
import org.springframework.context.annotation.Configuration;
import org.springframework.security.authentication.UsernamePasswordAuthenticationToken;
import org.springframework.security.core.Authentication;
import org.springframework.security.core.GrantedAuthority;
import org.springframework.security.core.authority.AuthorityUtils;
import org.springframework.security.oauth2.provider.OAuth2Authentication;
import org.springframework.security.oauth2.provider.OAuth2Request;
import org.springframework.security.oauth2.provider.token.DefaultAccessTokenConverter;
import org.springframework.security.oauth2.provider.token.store.JwtAccessTokenConverter;
@Configuration
public class JwtAccessTokenCustomizer extends DefaultAccessTokenConverter implements JwtAccessTokenConverterConfigurer {
private static final Logger LOG = LoggerFactory.getLogger(JwtAccessTokenCustomizer.class);
private static final String CLIENT_NAME_ELEMENT_IN_JWT = "resource_access";
private static final String ROLE_ELEMENT_IN_JWT = "roles";
private ObjectMapper mapper;
@Autowired
public JwtAccessTokenCustomizer(ObjectMapper mapper) {
this.mapper = mapper;
LOG.info("Initialized {}", JwtAccessTokenCustomizer.class.getSimpleName());
}
@Override
public void configure(JwtAccessTokenConverter converter) {
converter.setAccessTokenConverter(this);
LOG.info("Configured {}", JwtAccessTokenConverter.class.getSimpleName());
}
/**
* Spring oauth2 expects roles under authorities element in tokenMap, but
* keycloak provides it under resource_access. Hence extractAuthentication
* method is overriden to extract roles from resource_access.
*
* @return OAuth2Authentication with authorities for given application
*/
@Override
public OAuth2Authentication extractAuthentication(Map<String, ?> tokenMap) {
LOG.debug("Begin extractAuthentication: tokenMap = {}", tokenMap);
JsonNode token = mapper.convertValue(tokenMap, JsonNode.class);
Set<String> audienceList = extractClients(token); // extracting client names
List<GrantedAuthority> authorities = extractRoles(token); // extracting client roles
OAuth2Authentication authentication = super.extractAuthentication(tokenMap);
OAuth2Request oAuth2Request = authentication.getOAuth2Request();
OAuth2Request request = new OAuth2Request(oAuth2Request.getRequestParameters(), oAuth2Request.getClientId(),
authorities, true, oAuth2Request.getScope(), audienceList, null, null, null);
Authentication usernamePasswordAuthentication = new UsernamePasswordAuthenticationToken(
authentication.getPrincipal(), "N/A", authorities);
LOG.debug("End extractAuthentication");
return new OAuth2Authentication(request, usernamePasswordAuthentication);
}
private List<GrantedAuthority> extractRoles(JsonNode jwt) {
LOG.debug("Begin extractRoles: jwt = {}", jwt);
Set<String> rolesWithPrefix = new HashSet<>();
jwt.path(CLIENT_NAME_ELEMENT_IN_JWT).elements().forEachRemaining(e -> e.path(ROLE_ELEMENT_IN_JWT).elements()
.forEachRemaining(r -> rolesWithPrefix.add("ROLE_" + r.asText())));
final List<GrantedAuthority> authorityList = AuthorityUtils
.createAuthorityList(rolesWithPrefix.toArray(new String[0]));
LOG.debug("End extractRoles: roles = {}", authorityList);
return authorityList;
}
private Set<String> extractClients(JsonNode jwt) {
LOG.debug("Begin extractClients: jwt = {}", jwt);
if (jwt.has(CLIENT_NAME_ELEMENT_IN_JWT)) {
JsonNode resourceAccessJsonNode = jwt.path(CLIENT_NAME_ELEMENT_IN_JWT);
final Set<String> clientNames = new HashSet<>();
resourceAccessJsonNode.fieldNames().forEachRemaining(clientNames::add);
LOG.debug("End extractClients: clients = {}", clientNames);
return clientNames;
} else {
throw new IllegalArgumentException(
"Expected element " + CLIENT_NAME_ELEMENT_IN_JWT + " not found in token");
}
}
}
Reference
https://medium.com/@bcarunmail/securing-rest-api-using-keycloak-and-spring-oauth2-6ddf3a1efcc2
KEYCLOAK是一套用户、WEB API登录管理,授权管理的WEB应用。
如果要访问受KEYCLOAK保护的REST API服务,则需要夹带一个ACCESS_TOKEN。
前端页面:
- 前端页面一般是给用户使用的,则需要用户输入在KEYCLOAK中有效的用户名和密码,并提供CALL BAK的URL,提交给KEYCLOAK
http://10.80.27.69:8180/auth/realms/quickstart/protocol/openid-connect/auth?client_id=app-springboot-confidential&redirect_uri=http://10.80.27.69:8183/&response_type=code&scope=openid
- 如果KEYCLOAK验证通过,则通知页面重导向回调的URL,并附上code=xxx,此code则是AUTHORIZATION_CODE
http://10.80.27.69:8183/?session_state=2ad9ab98-6c39-43a8-872f-2112c27b74df&code=3f48ce19-58f9-45d9-8c09-30d492bf4b24.2ad9ab98-6c39-43a8-872f-2112c27b74df.bd7526ef-b1bf-447f-baef-b7dfd6f0df93
- 回调的URL对应的SERVELET,取得AUTHORIZATION_CODE,并加上client_id和client_secrect,调用KEYLOAK的取ACCESS_TOKEN的HTTP API,取得ACCESS_TOKEN,返回给页面
http://10.80.27.69:8180/auth/realms/quickstart/protocol/openid-connect/token
client_id=app-springboot-confidential&client_secret=3acf7692-49cb-4c45-9943-6f3dba512dae&redirect_uri=http://10.80.27.69:8183/&grant_type=authorization_code&code=cc7ac566-90f9-404e-b88e-fa28037b07d1.591311e1-5380-46a2-9363-834f17337922.bd7526ef-b1bf-447f-baef-b7dfd6f0df93
- 页面保存此ACCESS_TOKEN,就可以调用后台的各种API获取数据
{
"access_token": "eyJhbGciOiJSUzI1NiIsInR5cCIgOiAiSldUIiwia2lkIiA6ICJGSjg2R2NGM2pUYk5MT2NvNE52WmtVQ0lVbWZZQ3FvcXRPUWVNZmJoTmxFIn0.eyJleHAiOjE2MzQwMjA4ODksImlhdCI6MTYzNDAyMDU4OSwianRpIjoiNDAwOTQ4ZmQtMGU0MS00YWRjLTlhY2MtMzczZWM2NDVhNzM5IiwiaXNzIjoiaHR0cDovLzEwLjgwLjI3LjY5OjgxODAvYXV0aC9yZWFsbXMvcXVpY2tzdGFydCIsImF1ZCI6ImFjY291bnQiLCJzdWIiOiJkZGVkMDA2YS0xY2QxLTRjODUtOTQ1MS0wMjFlZmY3OTFiMmUiLCJ0eXAiOiJCZWFyZXIiLCJhenAiOiJhcHAtc3ByaW5nYm9vdC1jb25maWRlbnRpYWwiLCJzZXNzaW9uX3N0YXRlIjoiYzRlN2QzYTgtMDg2My00OTAwLTkxZmEtMGExYmFmYmRlNGU3IiwiYWNyIjoiMSIsInJlYWxtX2FjY2VzcyI6eyJyb2xlcyI6WyJvZmZsaW5lX2FjY2VzcyIsInVtYV9hdXRob3JpemF0aW9uIl19LCJyZXNvdXJjZV9hY2Nlc3MiOnsiYXBwLXNwcmluZ2Jvb3QtY29uZmlkZW50aWFsIjp7InJvbGVzIjpbInVtYV9wcm90ZWN0aW9uIl19LCJhY2NvdW50Ijp7InJvbGVzIjpbIm1hbmFnZS1hY2NvdW50IiwibWFuYWdlLWFjY291bnQtbGlua3MiLCJ2aWV3LXByb2ZpbGUiXX19LCJzY29wZSI6InByb2ZpbGUgZW1haWwiLCJlbWFpbF92ZXJpZmllZCI6ZmFsc2UsImNsaWVudElkIjoiYXBwLXNwcmluZ2Jvb3QtY29uZmlkZW50aWFsIiwiY2xpZW50SG9zdCI6IjEwLjEwLjIwLjU3IiwidXNlcl9uYW1lIjoic2VydmljZS1hY2NvdW50LWFwcC1zcHJpbmdib290LWNvbmZpZGVudGlhbCIsInByZWZlcnJlZF91c2VybmFtZSI6InNlcnZpY2UtYWNjb3VudC1hcHAtc3ByaW5nYm9vdC1jb25maWRlbnRpYWwiLCJjbGllbnRBZGRyZXNzIjoiMTAuMTAuMjAuNTcifQ.Ut6aZ6E1d4Esz0gRv2ubxdvrxmGvZLHHZepD5pnGxlqb_yZ4Q82TdGTG0iL4JJn2NH3QAU501dhzzuv6-OT9BUBKP-4ufyKv2DxSvt3GgdN30au5JsATHFyOWuuZGRBd3iWcynf9u3OJnSkHEnrIwRYatgndLzy8dy3AeqF12CI",
"expires_in": 300,
"refresh_expires_in": 600,
"refresh_token": "eyJhbGciOiJIUzI1NiIsInR5cCIgOiAiSldUIiwia2lkIiA6ICI2MTlhMmJjOS0yMWIwLTRmNGMtODI4OC1kNTJmMjA3OWEzY2EifQ.eyJleHAiOjE2MzQwMjExODksImlhdCI6MTYzNDAyMDU4OSwianRpIjoiYTM0NTQ1MTYtMzc3NC00YmRlLTgzOTMtN2QyMTdkZjdkZmJkIiwiaXNzIjoiaHR0cDovLzEwLjgwLjI3LjY5OjgxODAvYXV0aC9yZWFsbXMvcXVpY2tzdGFydCIsImF1ZCI6Imh0dHA6Ly8xMC44MC4yNy42OTo4MTgwL2F1dGgvcmVhbG1zL3F1aWNrc3RhcnQiLCJzdWIiOiJkZGVkMDA2YS0xY2QxLTRjODUtOTQ1MS0wMjFlZmY3OTFiMmUiLCJ0eXAiOiJSZWZyZXNoIiwiYXpwIjoiYXBwLXNwcmluZ2Jvb3QtY29uZmlkZW50aWFsIiwic2Vzc2lvbl9zdGF0ZSI6ImM0ZTdkM2E4LTA4NjMtNDkwMC05MWZhLTBhMWJhZmJkZTRlNyIsInNjb3BlIjoicHJvZmlsZSBlbWFpbCJ9.QhjkJBGz5UvwBF7xHM7_V_yjfF0lrA_EWzAVdFf-BRI",
"token_type": "bearer",
"not-before-policy": 0,
"session_state": "c4e7d3a8-0863-4900-91fa-0a1bafbde4e7",
"scope": "profile email"
}
- 这就是authorization_code流程
后端服务:
验证Access Token和获取Token元信息:
刷新Token:
http://10.80.27.69:8180/auth/realms/quickstart/protocol/openid-connect/token
client_id=app-springboot-confidential&client_secret=3acf7692-49cb-4c45-9943-6f3dba512dae&grant_type=refresh_token&refresh_token=asdfasd
- 返回
{
"access_token": "eyJhbGciOiJSUzI1NiIsIn",
"expires_in": 300,
"refresh_expires_in": 1800,
"refresh_token": "eyJhbGciOiJIUzI1NiIsInR5cCIgOi",
"token_type": "Bearer",
"not-before-policy": 1610728470,
"session_state": "c1273eb5-f922-420c-b23a-854be9735c1d",
"scope": "profile email"
}
Reference:
https://blog.csdn.net/nklinsirui/article/details/112706006https://www.baeldung.com/?s=keycloakhttps://www.doag.org/formes/pubfiles/11143470/2019-NN-Sebastien_Blanc-Easily_Secure_your_Microservices_with_Keycloak-Praesentation.pdf
enrich时可以发起一个子流程,取得结果后再设置回当前的对象中。
package org.springframework.integration.stackoverflow.enricher;
import java.util.List;
import java.util.Map;
import java.util.function.Function;
import java.util.stream.Collectors;
import org.springframework.boot.SpringApplication;
import org.springframework.boot.autoconfigure.SpringBootApplication;
import org.springframework.context.annotation.Bean;
import org.springframework.http.HttpMethod;
import org.springframework.integration.dsl.IntegrationFlow;
import org.springframework.integration.dsl.IntegrationFlows;
import org.springframework.integration.dsl.Transformers;
import org.springframework.integration.http.dsl.Http;
import org.springframework.web.client.RestTemplate;
@SpringBootApplication
public class SpringIntegrationEnricherApplication {
public static void main(String[] args) {
SpringApplication.run(SpringIntegrationEnricherApplication.class, args);
}
@Bean
public IntegrationFlow jsonEnricherFlow(RestTemplate restTemplate) {
return IntegrationFlows.from(Function.class)
.transform(Transformers.fromJson(Map.class))
.enrich((enricher) -> enricher
.<Map<String, ?>>requestPayload((message) ->
((List<?>) message.getPayload().get("attributeIds"))
.stream()
.map(Object::toString)
.collect(Collectors.joining(",")))
.requestSubFlow((subFlow) ->
subFlow.handle(
Http.outboundGateway("/attributes?id={ids}", restTemplate)
.httpMethod(HttpMethod.GET)
.expectedResponseType(Map.class)
.uriVariable("ids", "payload")))
.propertyExpression("attributes", "payload.attributes"))
.<Map<String, ?>, Map<String, ?>>transform(
(payload) -> {
payload.remove("attributeIds");
return payload;
})
.transform(Transformers.toJson())
.get();
}
}
https://stackoverflow.com/questions/58205432/spring-integration-enrich-transform-message-using-rest-callhttps://www.tabnine.com/web/assistant/code/rs/5c781b6ae70f87000197ab9f#L312
Java9之HttpClientAPI实战详解
https://blog.csdn.net/u014042066/article/details/78153653
Java 9 揭秘(14. HTTP/2 Client API)
https://www.cnblogs.com/IcanFixIt/p/7229611.html
Java JDK11(Java11)中设置HttpClient允许不安全的HTTPS连接
https://www.cjavapy.com/article/84/
通常如果rest服务支持https,需申请收费的ssl证书,但也可自制这种证书。
httpClient进行链接时要进行相应的设置, 主要是设置SSLContext中的
TrustSelfSignedStrategy:
import java.security.KeyManagementException;
import java.security.KeyStoreException;
import java.security.NoSuchAlgorithmException;
import java.util.concurrent.TimeUnit;
import javax.net.ssl.SSLContext;
import org.apache.http.client.config.RequestConfig;
import org.apache.http.conn.ssl.TrustSelfSignedStrategy;
import org.apache.http.impl.client.CloseableHttpClient;
import org.apache.http.impl.client.HttpClients;
import org.apache.http.impl.conn.PoolingHttpClientConnectionManager;
import org.apache.http.ssl.SSLContexts;
import org.springframework.context.annotation.Bean;
import org.springframework.context.annotation.Configuration;
@Configuration
public class HttpClientConfiguration {
@Bean
public PoolingHttpClientConnectionManager poolingHttpClientConnectionManager(AbstractProperties kycProperties) {
PoolingHttpClientConnectionManager result =
new PoolingHttpClientConnectionManager(
kycProperties.getHttpConnectionTimeToLiveMinu(),
TimeUnit.MINUTES
);
result.setMaxTotal(200);
result.setDefaultMaxPerRoute(20);
return result;
}
@Bean
public RequestConfig requestConfig(AbstractProperties kycProperties) {
return RequestConfig
.custom()
.setConnectionRequestTimeout(kycProperties.getHttpConnectionTimeout())
.setConnectTimeout(kycProperties.getHttpConnectionTimeout())
.setSocketTimeout(kycProperties.getHttpConnectionTimeout())
.build();
}
@Bean
public SSLContext sslContext() throws KeyManagementException, NoSuchAlgorithmException, KeyStoreException {
return SSLContexts
.custom()
.loadTrustMaterial(null, new TrustSelfSignedStrategy())
.build()
;
}
@Bean
public CloseableHttpClient httpClient(AbstractProperties kycProperties) throws KeyManagementException, NoSuchAlgorithmException, KeyStoreException {
return HttpClients
.custom()
// .setConnectionManager(poolingHttpClientConnectionManager(null))
.setDefaultRequestConfig(requestConfig(null))
.setKeepAliveStrategy(
new MyConnectionKeepAliveStrategy(
kycProperties.getHttpConnectionTimeToLiveMinu(),
TimeUnit.MINUTES
)
)
.setMaxConnTotal(200)
.setMaxConnPerRoute(20)
// .setConnectionTimeToLive(
// kycProperties.getHttpConnectionTimeToLiveMinu(),
// TimeUnit.MINUTES
// )
.setSSLContext(sslContext())
.build();
}
}
相应设置
http-connection-timeout: 30000
http-connection-time-to-live-minu: 5
一系列参数存于文本文件,需在LINUX下循环读取,之后以此参数进行CURL远程API调用,同时需记录每次CURL的总时间
参数文件,test1.json
{"ADDRESS_FREE":"XXX","NAME":{"SURNAME":"XXX","FIRST_NAME":"XXX"}}
{"ADDRESS_FREE":"XXX","NAME":{"SURNAME":"XXX","FIRST_NAME":"XXX"}}
{"ADDRESS_FREE":"XXX","NAME":{"SURNAME":"XXX","FIRST_NAME":"XXX"}}
test1.sh
#! /bin/bash
RESULT_FILE="result.csv"
echo "" > $RESULT_FILE
i=1
while read line || [[ "$line" ]] #In case the file has an incomplete (missing newline) last line, you could use this alternative:
do
echo "$i"
printf "$i;$line;" >> $RESULT_FILE
curl -w %{time_total} -o /dev/null -X POST -H "Content-Type:application/json" -d "$line" http://ip:port >> $RESULT_FILE
#printf "\n\r" >> $RESULT_FILE
echo "" >> $RESULT_FILE
#i=$(( $i + 1 ))
(( i++ ))
done < test1.json
Reference:
https://stackoverflow.com/questions/30988586/creating-an-array-from-a-text-file-in-bash
当使用httpOutBoundGateway时,有时会碰到网络抖动问题而出现连接异常,这时应该有个重试机制,如隔多少秒重试,重试多少次后放弃等。
默认是重试3次,每次重试间隔是20秒。
@SpringBootApplication
public class SpringIntegrationDslHttpRetryApplication {
@SuppressWarnings("unchecked")
public static void main(String[] args) {
ConfigurableApplicationContext applicationContext =
SpringApplication.run(SpringIntegrationDslHttpRetryApplication.class, args);
Function<Object, Object> function = applicationContext.getBean(Function.class);
function.apply("foo");
}
@Bean
public IntegrationFlow httpRetryFlow() {
return IntegrationFlows.from(Function.class)
.handle(Http.outboundGateway("http://localhost:11111")
.httpMethod(HttpMethod.GET)
.expectedResponseType(String.class),
e -> e.advice(retryAdvice()))
.get();
}
@Bean
public RequestHandlerRetryAdvice retryAdvice() {
return new RequestHandlerRetryAdvice();
}
}
#打印日志
logging.level.org.springframework.retry=debug
Reference:
https://docs.spring.io/spring-integration/reference/html/handler-advice.html#retry-advice
https://stackoverflow.com/questions/49784360/configure-error-handling-and-retry-for-http-outboundgateway-spring-dsl
https://stackoverflow.com/questions/50262862/requesthandlerretryadvice-with-httprequestexecutingmessagehandler-not-working
https://stackoverflow.com/questions/63689856/spring-integration-http-outbound-gateway-retry-based-on-reply-content
https://blog.csdn.net/cunfen8879/article/details/112552420
git的世界里有后悔药吗?
有的。不仅有,还不止一种:Reset 和 Revert。它们有什么区别呢?先说结论吧。
|
Reset | Revert |
| 作用 |
将某个commit之后的push全部回滚 |
将某个指定的commit回滚 |
| 历史记录(轨迹) |
无 |
有 |
| 是否可作用于单个文件 |
否(都是作用于commit,与文件无关) |
否 |
下面来说说具体例子。
Revert
试验步骤如下:
- 新建两个空白文件 Revert.txt 和 Common.txt,然后commit&push。
- 修改 Revert.txt 文件,内容为“commit 1”,然后commit&push,提交的备注为“commit 1 of Revert”
- 修改 Common.txt 文件,内容为“update for Revert(by commit 2)”
- 修改 Revert.txt 文件,新增一行,内容为“commit 2”
- 3 和 4的修改一起commit&push,提交备注为“commit 2 of Revert(Revert.txt + Common.txt)”
效果如下:
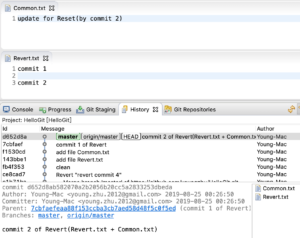
图1-revert之前
目的
保留3的修改,回滚4的修改。
操作
选中“ Revert.txt ”文件,然后在 History 里选中 “commit 2 of Revert…”,右键,找到“Revert Commit”菜单,如图:
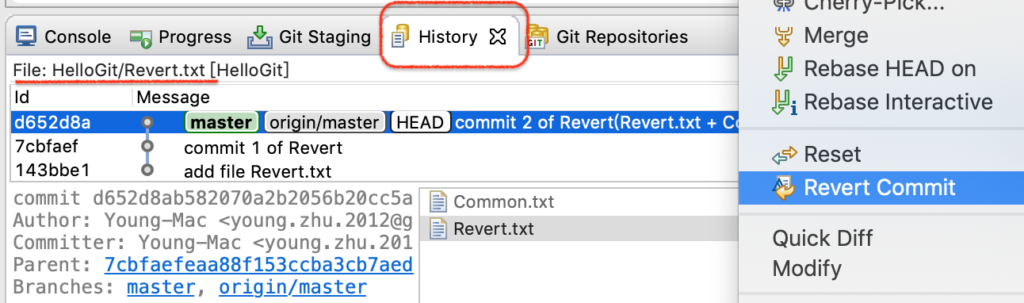
图2-revert操作
点击后,效果如图:
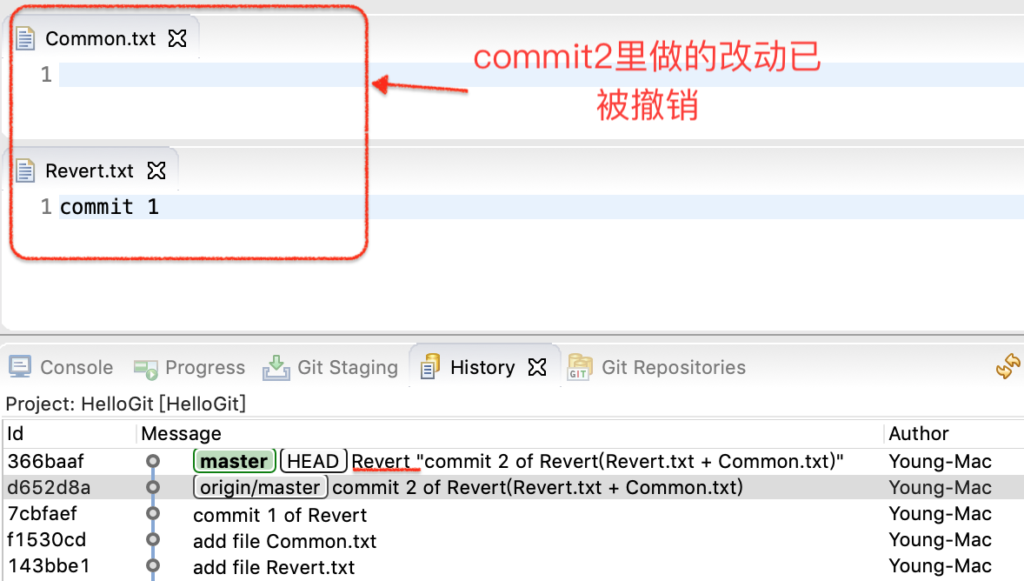
图3-revert之后
最后,push即可。
结果
未能达到预期效果,Revert.txt 和 Common.txt的修改都被撤销了。Revert的作用范围是一个commit(原子),跟文件的个数无关。
注:对最后一个commit做revert比较简单,两步:一,revert;二,push就可以了。对于较早的commit,因为中间间隔了其他的commit,文件会有冲突,需要处理完冲突才可以commit&push。
Reset
试验步骤如下:
- 新建空白文件 Reset.txt,然后commit&push。
- 修改 Reset.txt 文件,内容为“commit 1”
- 修改 Common.txt 文件,内容为“update for Reset(commit 1)”
- 2和3的修改一起commit&push,提交的备注为“commit 1 of Reset”
- 修改 Reset.txt 文件,新增一行,内容为“commit 2”,然后commit&push,提交的备注为“commit 2 of Reset”
- 修改 Reset.txt 文件,内容为“commit 3”
- 修改 Common.txt 文件,内容为“update for Reset(commit 3)”
- 6和7的修改一起commit&push,提交的备注为“commit 3 of Reset”
效果如下:
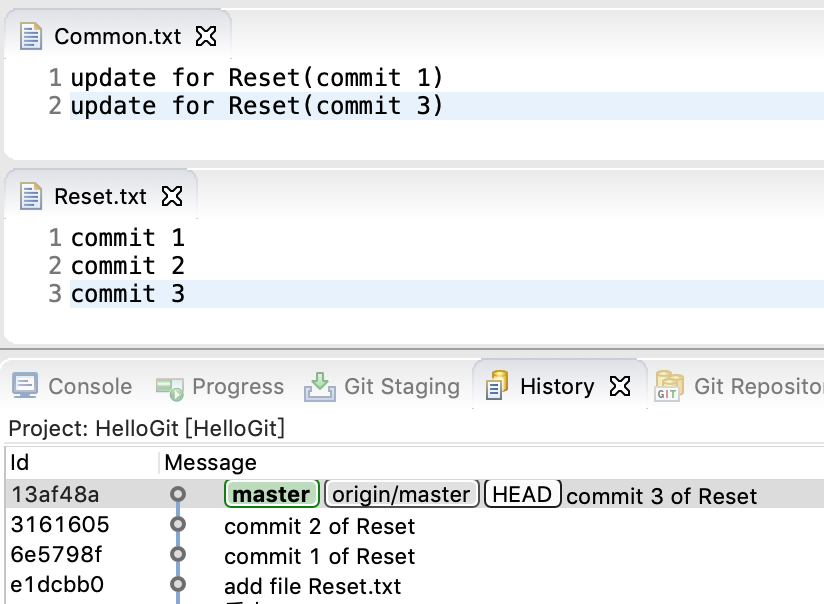
图4-reset之前
目的
将commit 1 之后的(即commit 2 和 3)改动全部回滚。
操作
在 History 里找到“commit 1”,选中后,右键,找到 Reset 菜单,选择 Hard 模式。
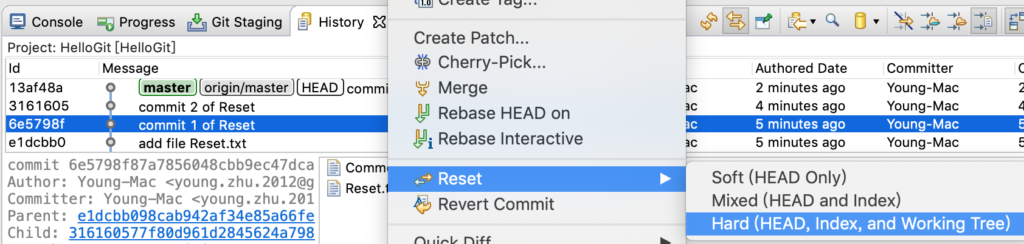
图5-reset
执行后,如下图所示,HEAD 已经指向里 commit 1,Common.txt 和 Reset.txt 的内容也已改变。注意左侧的项目栏,它已落后了服务器(GitHub)2个commit。怎么提交到服务器上呢?直接push,它会提示不是最新的,操作失败。这里要用到 push 的 force 属性。
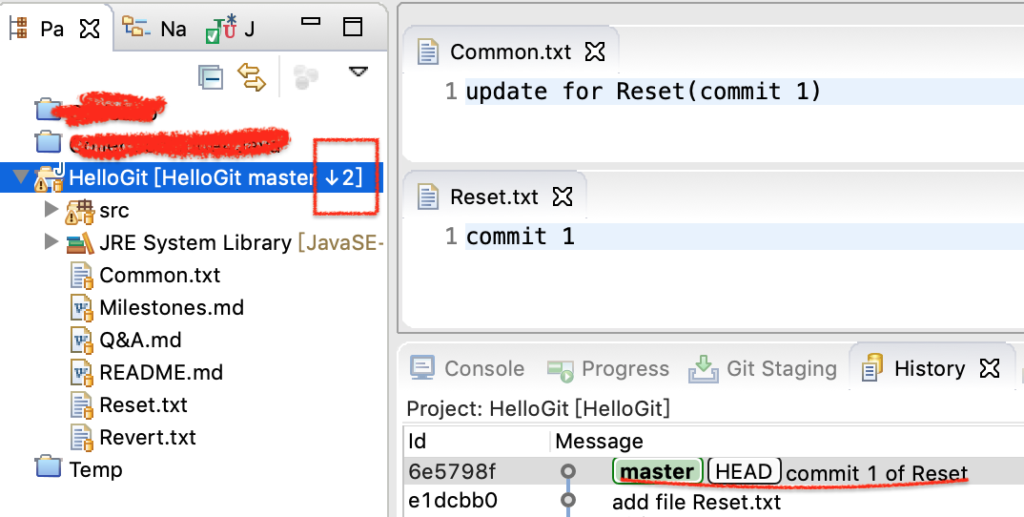
图6-reset之后
选中 项目,右键 – Team – Remote – Configure Push to Upstream,在打开的小窗口中找到 Advanced,如下图所示,这里的 Force Update 要勾上,表示强制覆盖。
重新push,就可以跟服务器保持同步了。
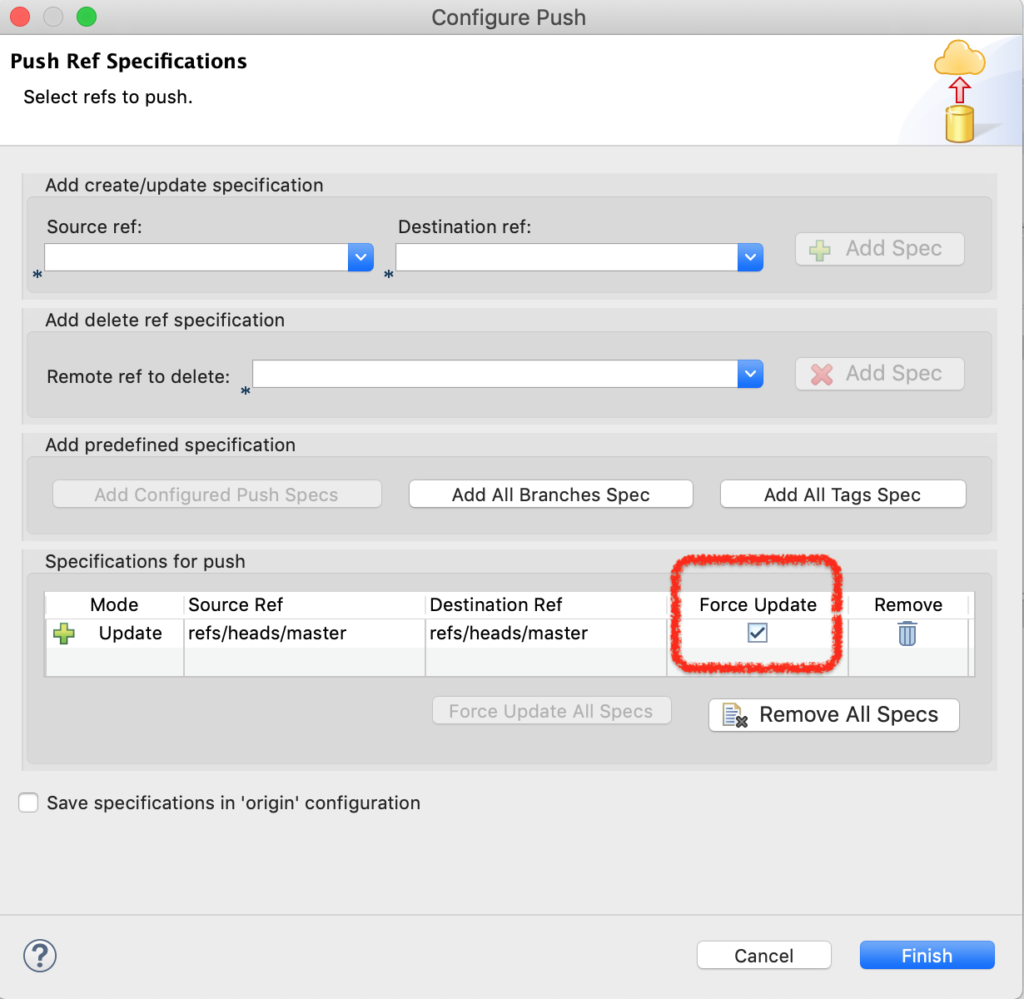
图7-push-force
要特别注意的是,Reset慎用,跟Linux的“rm -rf /”有异曲同工之妙。
http://www.youngzy.com/blog/2019/08/git-difference-between-reset-and-revert-using-eclipse/
@NotBlank(message = "Missing ID_IMG_CHECK.")
以上标签进行验证时是无条件验证,如果想在特定条件下才验证,则不适用。
于是才有如下设定:
@NotBlank(message = "Missing ID_IMG_CHECK.", groups = {GroupA.class} )
手动验证:
Class<?> [] classArray = classList.toArray(new Class<?>[0]);
LOGGER.info("subVersion : {}, Validate class : {}", subVersion, classNameList);
CompositeException compositeException = new CompositeException();
Set<ConstraintViolation<QueryKycResultDetail>> groupSet = validator.validate(queryKycResultDetail, classArray);
https://www.baeldung.com/javax-validation-groups
检查file的SHA512值:
sha512sum [OPTION] [FILE]
摘要: 如果多个ARTEMIS以单体的方式启动,则各个实例互不相关,不能实现高可用。集群因此需将多个实例组队--集群,以实现高可用,即集群内可实现实例的失败转移,消息的负载均衡,消息的重新分配。这需要在集群配置区指定所有所有实例的IP和PORT。但集群实例如果DOWN机,其保存的消息也会随之消失,因此需要实现高可用,有两种方式:共享存储及消息复制。共享存储共享存储是由master/slave对组成,指两个...
阅读全文
摘要: Grafana能够提供自定义的图形界面来展示监控数据,但由于被监控的应用五花八门,标准不一,因此Prometheus开发了各种client,应用程序只需引入该SDK,即可与Prometheus沟通,提供Prometheus格式的数据,同时Grafana也开发了能识别Prometheus类型的数据源的插件,Grafana能够展示Prometheus上的数据。
非JAVA版本的应用:
...
阅读全文
@Min and @Max are used for validating numeric fields which could be String(representing number), int, short, byte etc and their respective primitive wrappers.
@Size is used to check the length constraints on the fields.
As per documentation @Size supports String, Collection, Map and arrays while @Min and @Max supports primitives and their wrappers. See the documentation.
手动触发:
https://blog.csdn.net/justyman/article/details/89857577
如果是自动触发BUILD时,则可以以最新建立的TAG为基础进行BUILD,而无需人手选TAG进行BUILD。
配置,注意应取消参数化配置工程:
- Add the following refspec to the Git plugin:
+refs/tags/*:refs/remotes/origin/tags/*
- Add the following branch specifier:
*/tags/*
- Enable SCM polling, so that the job detects new tags.
定义一个事件,因SPRING中可以有不同的事件,需要定义一个类以作区分:
import lombok.Getter;
import org.springframework.context.ApplicationEvent;
@Getter
public class JavaStackEvent extends ApplicationEvent {
/**
* Create a new {@code ApplicationEvent}.
*
* @param source the object on which the event initially occurred or with
* which the event is associated (never {@code null})
*/
public JavaStackEvent(Object source) {
super(source);
}
}
定义一个此事件观察者,即感兴趣者:
import lombok.NonNull;
import lombok.RequiredArgsConstructor;
import org.springframework.context.ApplicationListener;
import org.springframework.scheduling.annotation.Async;
/**
* 观察者:读者粉丝
*/
@RequiredArgsConstructor
public class ReaderListener implements ApplicationListener<JavaStackEvent> {
@NonNull
private String name;
private String article;
@Async
@Override
public void onApplicationEvent(JavaStackEvent event) {
// 更新文章
updateArticle(event);
}
private void updateArticle(JavaStackEvent event) {
this.article = (String) event.getSource();
System.out.printf("我是读者:%s,文章已更新为:%s\n", this.name, this.article);
}
}
注册感兴趣者(将自身注入SPRING容器则完成注册),并制定发布机制(通过CONTEXT发布事件):
import lombok.extern.slf4j.Slf4j;
import org.springframework.boot.CommandLineRunner;
import org.springframework.context.ApplicationContext;
import org.springframework.context.annotation.Bean;
import org.springframework.context.annotation.Configuration;
@Slf4j
@Configuration
public class ObserverConfiguration {
@Bean
public CommandLineRunner commandLineRunner(ApplicationContext context) {
return (args) -> {
log.info("发布事件:什么是观察者模式?");
context.publishEvent(new JavaStackEvent("什么是观察者模式?"));
};
}
@Bean
public ReaderListener readerListener1(){
return new ReaderListener("小明");
}
@Bean
public ReaderListener readerListener2(){
return new ReaderListener("小张");
}
@Bean
public ReaderListener readerListener3(){
return new ReaderListener("小爱");
}
}
Excel 在读取 csv 的时候是通过读取文件头上的 bom 来识别编码的,这导致如果我们生成 csv 文件的平台输出无 bom 头编码的 csv 文件(例如 utf-8 ,在标准中默认是可以没有 bom 头的),Excel 只能自动按照默认编码读取,不一致就会出现乱码问题了。
掌握了这点相信乱码已经无法阻挡我们前进的步伐了:只需将不带 bom 头编码的 csv 文件,用文本编辑器(工具随意,推荐 notepad++ )打开并转换为带 bom 的编码形式(具体编码方式随意),问题解决。
当然,如果你是像我一样的码农哥哥,在生成 csv 文件的时候写入 bom 头更直接点,用户会感谢你的。
附录:对于 utf-8 编码,unicode 标准中是没有 bom 定义的,微软在自己的 utf-8 格式的文本文件之前加上了EF BB BF三个字节作为识别此编码的 bom 头,这也解释了为啥大部分乱码都是 utf-8 编码导致的原因
SPRING BATCH中生成CSV文件时的解决方案:
new FlatFileItemWriterBuilder<T>()
.name(itemWriterName)
.resource(outputResource)
.lineAggregator(lineAggregator)
.headerCallback(
h -> {
System.out.println(header);
h.write('\uFEFF');//只需加这一行
h.write(header);
}
)
.build();
https://stackoverflow.com/questions/48952319/send-csv-file-encoded-in-utf-8-with-bom-in-java
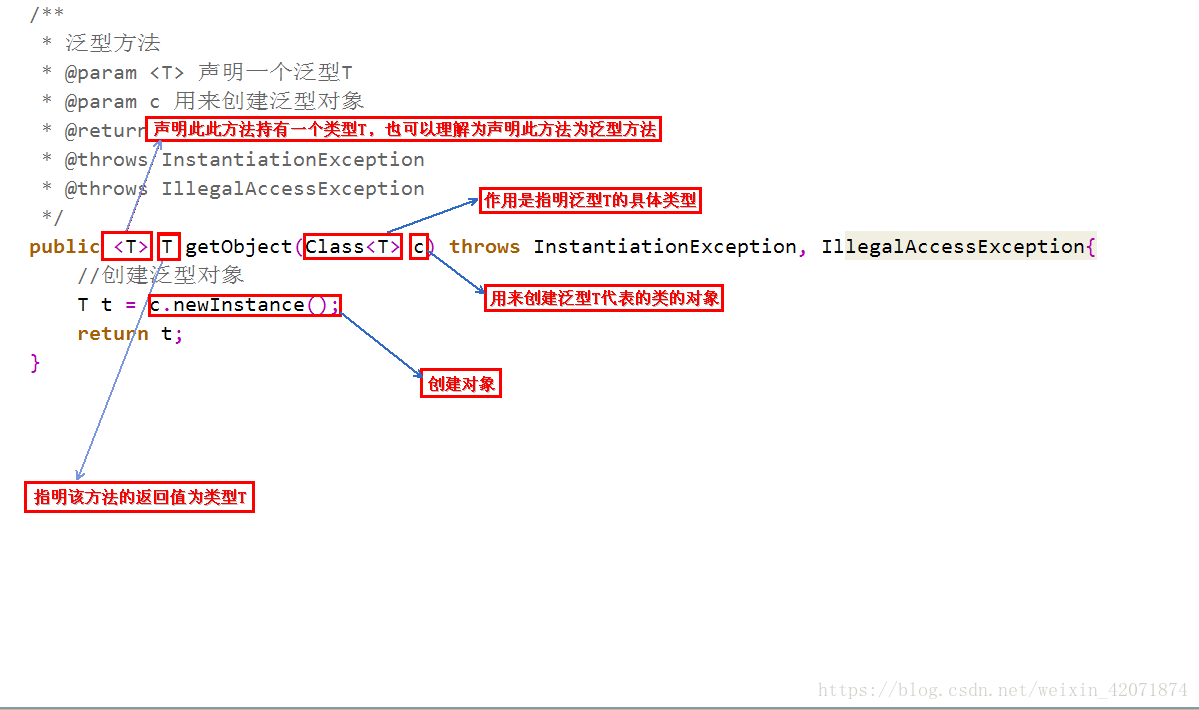
/**
*
* @param <T>声明此方法持有一个类型T,也可以理解为声明此方法为泛型方法
* @param clazz 作用是指明泛型T的具体类型
* @return 指明该方法的返回值为类型T
* @throws InstantiationException
* @throws IllegalAccessException
*/
public <T> T getObject(Class<T> clazz) throws InstantiationException, IllegalAccessException {
T t = clazz.newInstance();//创建对象
return t;
}
方法返回值前的<T>的左右是告诉编译器,当前的方法的值传入类型可以和类初始化的泛型类不同,也就是该方法的泛型类可以自定义,不需要跟类初始化的泛型类相同
领域驱动(DDD,Domain Driven Design)为软件设计提供了一套完整的理论指导和落地实践,通过战略设计和战术设计,将技术实现与业务逻辑分离,来应对复杂的软件系统。本系列文章准备以实战的角度来介绍 DDD,首先编写领域驱动的代码模型,然后再基于代码模型,引入 DDD 的各项概念,先介绍战术设计,再介绍战略设计。
> DDD 实战1 - 基础代码模型
> DDD 实战2 - 集成限界上下文(Rest & Dubbo)
> DDD 实战3 - 集成限界上下文(消息模式)
> DDD 实战4 - 领域事件的设计与使用
> DDD 实战5 - 实体与值对象
> DDD 实战6 - 聚合的设计
> DDD 实战7 - 领域工厂与领域资源库
> DDD 实战8 - 领域服务与应用服务
> DDD 实战9 - 架构设计
> DDD 实战10 - 战略设计
@Past @Future只针对Date类型的验证,如果是String类型的验证,则不适用。
其实可以新加一个方法返回Date类型,再配合@Future@Past 进行验证。
@Future(message = "Invalid CN_ID_INFO.EXPIRE_DATE.")
private LocalDate getValidExpireDate() {
try {
return LocalDate.parse(this.dateString, DateTimeFormatter.ofPattern("yyyy-MM-dd"));
} catch (Exception e) {
return null;
}
}
此方法对dateString进行解释,返回LocalDate,如果dateString为空或格式错误,则返回空,再配合@Future 进行是否未来日期的验证。
bean validation的注释是针对单个变量的,如果要针对多个变量的联动,则不行,需要用到这个注释。
这种方法避免了自定义校验器而增加类。
https://www.chkui.com/article/java/java_bean_validation
@AssertTrue(message = "Missing BANK_CARD_IMG_INFO.IMG")
private Boolean getValidImg() {
if(YNEnum.Y.code.equals(super.getNeedChecked())) {
return StringUtils.hasText(this.img);
}
return null;//igore checking.
}
这个是当needChecked为Y的时候才执行检查img变量是否为空。
有几点注意:
- 方法名称要以get开头
- 返回类型用Boolean,而不用boolean
- 返回值有三种:true,false,null如果是null则当成通过,与true的结果一样
SPRING BOOT单元测试中,因为测试时可能对应的服务器地址不同于SIT等别的环境,通常会将这些地址放于application-sit.yaml中。
在单元测试的代码中用这个标签指定用哪个profile,如
@ActiveProfiles({"embedded-mongodb","test"})
但这样做法,由于@ActiveProfiles这个标签是final的,如果要测试别的profile,只能复制另一份单元测试代码,再改此标签。
比较灵活的做法是用default profile,default profile是如果没指定任何profile,则会默认用这个。在application-default.yaml中再指定需激活的profile。
spring:
profiles:
active: test,embedded-mongodb
如果要测试别的profile,可以指定环境变量的方式覆盖:
-Dspring.profiles.active=error,embedded-mongodb
为了安全起见,将application-default.yaml放在测试目录中:src\test\resources。
Setting default Spring profile for tests with override option
https://blog.inspeerity.com/spring/setting-default-spring-profile-for-tests-with-override-option/
接收数据的JAVA BEAN通常需要验证其中字段的正确性,如不准为空,符合EMAIL格式等。
JSR-303 Bean Validation则提供了这样的便捷。
只要在JAVA BEAN中需要验证的字段加@NotNull这种标签,然后在SERVISE中的输入参数中加@Valid标签,则就激活验证流程。
也可以编程的方式自己验证:
@MessageEndpoint
//@Validated
public class MqMessageCcdValidator {
private static final Logger LOGGER = LoggerFactory.getLogger(MqMessageCcdValidator.class);
@Autowired
private Validator validator;
@ServiceActivator
public MqMessage<CcdRequest> validate(/* @Valid */ Message<MqMessage<CcdRequest>> requestMessage) {
Set<ConstraintViolation<MqMessage<CcdRequest>>> set = validator.validate(requestMessage.getPayload());
if(CollectionUtils.isNotEmpty(set)) {
CompositeException compositeException = new CompositeException();
set.forEach(
constraintViolation -> {
LOGGER.info("{}", constraintViolation);
ReqInfoValidationException exception =
new ReqInfoValidationException(constraintViolation.getMessage());
compositeException.addException(exception);
}
);
throw new MessageHandlingException(requestMessage, compositeException);
}
return requestMessage.getPayload();
}
}
自定义验证规则
可用标签来做,以下为验证手机号的规则:
import static java.lang.annotation.RetentionPolicy.RUNTIME;
import java.lang.annotation.ElementType;
import java.lang.annotation.Retention;
import java.lang.annotation.Target;
import javax.validation.Constraint;
import javax.validation.Payload;
import javax.validation.ReportAsSingleViolation;
import javax.validation.constraints.Pattern;
@Retention(RUNTIME)
@Target(value = { ElementType.FIELD, ElementType.PARAMETER, ElementType.ANNOTATION_TYPE })
@Constraint(validatedBy = {})
@ReportAsSingleViolation
@Pattern(regexp = "^1[3-9]\\d{9}$")
public @interface ChinaPhone {
String message() default "Invalid Chinese mobile No.";
Class<?>[] groups() default {};
Class<? extends Payload>[] payload() default {};
}
如果比较复杂的验证规则,则参见:
https://reflectoring.io/bean-validation-with-spring-boot/#implementing-a-custom-validatorHow to use Java Bean Validation in Spring Boot
https://nullbeans.com/how-to-use-java-bean-validation-in-spring-boot/Complete Guide to Validation With Spring Boot
https://reflectoring.io/bean-validation-with-spring-boot/Spring JMS Validate Messages using JSR-303 Bean Validation
https://memorynotfound.com/spring-jms-validate-messages-jsr-303-bean-validation/Spring REST Validation Example
https://mkyong.com/spring-boot/spring-rest-validation-example/
Spring Boot 整合 Bean Validation 校验数据
https://blog.csdn.net/wangzhihao1994/article/details/108403732
场景,餐厅:
- 食客下单,有饮品、食物、甜点
- 侍应接单,传送给厨房
- 厨房分三个子流程处理,即饮品、食物、甜点子流程
- 等待三个子流程处理完,合并成一份交付
- 如果厨房发现某食物欠缺,会通知侍应,展开错误处理,即通知食客更改食物,再交给厨房
- 侍应将交付品传送给食客
有一个主流程、三个子流程和一个聚合流程,聚合流程会聚合三个子流程的产物,通知主流程,再往下走。
并且主流程会感知子流程的错误,并会交给相应错误处理流程处理,且将结果再交给聚合流程。
对应SPRING INTEGRATION 的SCATTERGATHER模式:
@Bean
public IntegrationFlow scatterGatherAndExecutorChannelSubFlow(TaskExecutor taskExecutor) {
return f -> f
.scatterGather(
scatterer -> scatterer
.applySequence(true)
.recipientFlow(f1 -> f1.transform(p -> "Sub-flow#1"))
.recipientFlow(f2 -> f2
.channel(c -> c.executor(taskExecutor))
.transform(p -> {
throw new RuntimeException("Sub-flow#2");
})),
null,
s -> s.errorChannel("scatterGatherErrorChannel"));
}
@ServiceActivator(inputChannel = "scatterGatherErrorChannel")
public Message<?> processAsyncScatterError(MessagingException payload) {
return MessageBuilder.withPayload(payload.getCause().getCause())
.copyHeaders(payload.getFailedMessage().getHeaders())
.build();
}
https://github.com/adnanmamajiwala/spring-integration-sample/tree/master/dsl-scatter-gather/src/main/java/com/si/dsl/scattergatherhttps://docs.spring.io/spring-integration/docs/5.1.x/reference/html/#scatter-gather
当需要调用第三方HTTP接口时,别人的接口还没完成,可先根据接口定义文档,返回适当的数据,以便开发。
在LINUX上的部署结构为:
├── boot
│ ├── moco-runner-1.1.0-standalone.jar
│ └── .version
├── foo.json
├── logs
│ ├── back
│ └── moco.log
├── moco.sh
└── startup-moco.sh
.version文件:
/path/to/boot/moco-runner-1.1.0-standalone.jar 1.1.0
moco.sh
#!/usr/bin/env bash
# Ensure this file is executable via `chmod a+x moco`, then place it
# somewhere on your $PATH, like ~/bin. The rest of moco will be
# installed upon first run into the ~/.moco directory.
if [ `id -u` -eq 0 ] && [ "$MOCO_ROOT" = "" ]; then
echo "WARNING: You're currently running as root; probably by accident."
echo "Press control-C to abort or Enter to continue as root."
echo "Set MOCO_ROOT to disable this warning."
read _
fi
echo $*
#export MOCO_HOME="${
MOCO_HOME:
-"$HOME/.moco"}
"
export MOCO_HOME=$(cd `dirname $0`; cd boot; pwd)
VERSION_LOG_FILE="$MOCO_HOME/.version"
# Determine the Java command to use to start the JVM.
if [ -n "$JAVA_HOME" ] ; then
if [ -x "$JAVA_HOME/jre/sh/java" ] ; then
# IBM's JDK on AIX uses strange locations for the executables
JAVACMD="$JAVA_HOME/jre/sh/java"
else
JAVACMD="$JAVA_HOME/bin/java"
fi
if [ ! -x "$JAVACMD" ] ; then
die "ERROR: JAVA_HOME is set to an invalid directory: $JAVA_HOME
Please set the JAVA_HOME variable in your environment to match the
location of your Java installation."
fi
else
JAVACMD="java"
which java >/dev/null 2>&1 || die "ERROR: JAVA_HOME is not set and no 'java' command could be found in your PATH.
Please set the JAVA_HOME variable in your environment to match the
location of your Java installation."
fi
if [ "$HTTP_CLIENT" = "" ]; then
if type -p curl >/dev/null 2>&1; then
if [ "$https_proxy" != "" ]; then
CURL_PROXY="-x $https_proxy"
fi
HTTP_CLIENT="curl $CURL_PROXY -f -L -o"
else
HTTP_CLIENT="wget -O"
fi
fi
function download_failed_message {
echo "Failed to download $1"
echo "It's possible your HTTP client's certificate store does not have the"
echo "correct certificate authority needed. This is often caused by an"
echo "out-of-date version of libssl. Either upgrade it or set HTTP_CLIENT"
echo "to turn off certificate checks:
"
echo " export HTTP_CLIENT=\"wget --no-check-certificate -O\" # or"
echo " export HTTP_CLIENT=\"curl --insecure -f -L -o\""
echo "It's also possible that you're behind a firewall haven't yet"
echo "set HTTP_PROXY and HTTPS_PROXY."
}
function download {
$HTTP_CLIENT "$2.pending" "$1"
if [ $? == 0 ]; then
# TODO:
checksum
mv -f "$2.pending" "$2"
else
rm "$2.pending" 2> /dev/null
download_failed_message "$1"
exit 1
fi
}
function parse_tag {
tag_value=`grep "<$2>.*<.$2>" $1 | sed -e "s/^.*<$2/<$2/" | cut -f2 -d">"| cut -f1 -d"<"`
}
function parse_maven_metadata {
MOCO_METADATA_URL="http:
//repo1.maven.org/maven2/com/github/dreamhead/moco-runner/maven-metadata.xml"
MOCO_METADATA="/tmp/maven-metadata.xml"
download $MOCO_METADATA_URL $MOCO_METADATA
parse_tag $MOCO_METADATA latest
LATEST_VERSION=$tag_value
}
function parse_standalone_latest_url {
parse_maven_metadata
VERSION=${LATEST_VERSION%}
LATEST_MOCO_STANDALONE_JAR="moco-runner-$VERSION-standalone.jar"
MOCO_STANDLONE_URL="http://repo1.maven.org/maven2/com/github/dreamhead/moco-runner/$LATEST_VERSION/$LATEST_MOCO_STANDALONE_JAR"
}
function install {
echo "Install moco"
echo "Parse the latest version of moco"
parse_standalone_latest_url
echo "Download the latest moco:
$LATEST_VERSION"
MOCO_STANDALONE="$MOCO_HOME/$LATEST_MOCO_STANDALONE_JAR"
echo "$MOCO_STANDALONE $LATEST_VERSION" >> $VERSION_LOG_FILE
download $MOCO_STANDLONE_URL $MOCO_STANDALONE
}
function load_current_version {
read MOCO_STANDALONE CURRENT_VERSION < $VERSION_LOG_FILE
if [[ "$(uname)" -ne "Darwin" && "$(expr substr $(uname -s) 2 6)" == "CYGWIN" ]];then
MOCO_STANDALONE=`cygpath -m "$MOCO_STANDALONE"`
fi
}
function usage {
printf "
options:
help show help
start start server, e.g. moco start -p 12306 -c configfile.json
shutdown shutdown moco server
upgrade upgrade moco
"
}
if [ ! -e "$MOCO_HOME" ]
then
mkdir "$MOCO_HOME"
install
fi
if [ "$1" = "start" ]; then
echo "Starting "
"
load_current_version
exec "$JAVACMD" -jar "$MOCO_STANDALONE" $*
elif [ "$1" = "http" ]; then
echo "Starting HTTP server"
load_current_version
exec "$JAVACMD" -jar "$MOCO_STANDALONE" $*
elif [ "$1" = "https" ]; then
echo "Starting HTTPS server"
load_current_version
exec "$JAVACMD" -jar "$MOCO_STANDALONE" $*
elif [ "$1" = "socket" ]; then
echo "Starting Socket server"
load_current_version
exec "$JAVACMD" -jar "$MOCO_STANDALONE" $*
elif [ "$1" = "shutdown" ]; then
echo "Shutting down server"
load_current_version
exec "$JAVACMD" -jar "$MOCO_STANDALONE" $*
elif [ "$1" = "upgrade" ]; then
echo "Check the new version"
parse_maven_metadata
load_current_version
if [ "$LATEST_VERSION" = "$CURRENT_VERSION" ]; then
echo "The current version of moco is the latest"
else
echo "Upgrading"
rm $VERSION_LOG_FILE
install
fi
elif [ "$1" = "version" ]; then
load_current_version
echo "Moco version: $CURRENT_VERSION"
elif [ "$1" = "help" ]; then
usage
else
usage
fi
这是根据GIT上的原始文件作的修改。
startup-moco.sh
CMD_PATH=$(cd `dirname $0`; pwd)
# 项目日志输出绝对路径
LOG_DIR=${CMD_PATH}"/logs"
LOG_FILE="moco.log"
LOG_PATH="${LOG_DIR}/${LOG_FILE}"
# 当前时间
NOW=`date +'%Y-%m-%m-%H-%M-%S'`
NOW_PRETTY=`date +'%Y-%m-%m %H:%M:%S'`
# 启动日志
STARTUP_LOG="================================================ ${NOW_PRETTY} ================================================\n"
# 日志备份目录
LOG_BACK_DIR="${LOG_DIR}/back/"
# 如果logs文件夹不存在,则创建文件夹
if [[ ! -d "${LOG_DIR}" ]]; then
mkdir "${LOG_DIR}"
fi
# 如果logs/back文件夹不存在,则创建文件夹
if [[ ! -d "${LOG_BACK_DIR}" ]]; then
mkdir "${LOG_BACK_DIR}"
fi
# 如果项目运行日志存在,则重命名备份
if [[ -f "${LOG_PATH}" ]]; then
mv ${LOG_PATH} "${LOG_BACK_DIR}/${APPLICATION}_back_${NOW}.log"
fi
# 创建新的项目运行日志
echo "" > ${LOG_PATH}
# 可支持多个json配置文件
$CMD_PATH/moco.sh http -p 8088 -g "${CMD_PATH}/root.json" > ${LOG_PATH} 2>&1 &
# 打印启动日志
echo -e ${STARTUP_LOG}
root.json
[
{
"context": "/service-a",
"include": "foo.json"
},
{
"context": "/service-b",
"include": "bar.json"
}
]
foo.json
[
{
"request": {
"method": "post",
"forms": {
"method": "uploadKycInfo"
}
},
"response": {
"json": {
"response": {
"subcode": "10000",
"submsg": "Success",
"sndDt": "20210121101800",
"remark": "上传验证基本信息",
"msgBody": {
"merOrdrNo": "A00120210121654321",
"retCode": "00000",
"retMsg": "成功/处理完成",
"remark": "上传详情或上传信息的简要描述"
}
},
"code": "0000",
"msg": "处理完成",
"sign": "DF2659FE3EB8184561135D9F55F5EF5"
}
}
}
]
访问路径:
http://ip:port/service-a/
https://github.com/dreamhead/moco/blob/master/moco-doc/apis.md
https://zhuanlan.zhihu.com/p/60076337 https://www.programmersought.com/article/68272293688/
有几个项目中,都需要将图片或者数字证书的文件转为Base64,昨天写代码的时候,发现在jdk8中本就含有关于Base64的API。
从此后不再需要其他的jar包来转换Base64了!!!
据说是JDK8加入的。
先是将文件转为Base64:
public String encryptToBase64(String filePath) {
if (filePath == null) {
return null;
}
try {
byte[] b = Files.readAllBytes(Paths.get(filePath));
return Base64.getEncoder().encodeToString(b);
} catch (IOException e) {
e.printStackTrace();
}
return null;
}
Files、Paths类是JDK7里加入的,读取文件不再需要调用IO包里的FileInputStream,简单便捷。
字符串参数filePath是文件的路径。
首先是将文件读成二进制码,然后通过Base64.getEncoder().encodeToString()方法将二进制码转换为Base64值。
然后是将Base64转为文件:
public String decryptByBase64(String base64, String filePath) {
if (base64 == null && filePath == null) {
return "生成文件失败,请给出相应的数据。";
}
try {
Files.write(Paths.get(filePath), Base64.getDecoder().decode(base64),StandardOpenOption.CREATE);
} catch (IOException e) {
e.printStackTrace();
}
return "指定路径下生成文件成功!";
}
字符串参数base64指的是文件的Base64值,filePath是指的文件将要保存的位置。
通过Files.write()方法轻松将文件写入指定位置,不再调用FileOutStream方法。
第三个参数StandardOpenOption.CREATE是处理文件的方式,我设置的是不管路径下有或没有,都创建这个文件,有则覆盖。
在StandardOpenOption类中有很多参数可调用,不再累赘。
摘要: 2020年是最近历史上前所未有的一年。在过去的一百年中,人类没有经历过像COVID-19这样的全球性大流行。它影响了我们星球上的所有国家,部门和几乎所有个人。
好消息是,我们已经准备好疫苗,终于可以充满乐观和希望,迎接新的一年2021年。
2020年对于软件开发行业来说是重要的一年,在许多领域都取得了明显的突破。COVID-19大大加快了数字化转型,到2021年这种趋势将更加明显。
在软...
阅读全文
HTTP1.1的链接,默认是长链接,不会主动关闭。
LINUX会默认保留链接5天再关闭。
建立HTTP链接其实也是调用TCL的协议去建立,包括开始的时候有三次握手,关闭的时候有四次握手。关闭链接双方都可以发起。
但这些链接可能会被防火墙关掉而不通知建立链接的双方,因此设置需设置链接的存活期。
使用httpClient的链接池时,要设置池中的链接存活期或设置存活策略。
检测存活期只在每次发送数据时,才检测取出的链接是否超过存活期,如超过则关闭。
设置存活期的策略:
import java.util.concurrent.TimeUnit;
import org.apache.http.HeaderElement;
import org.apache.http.HeaderElementIterator;
import org.apache.http.HttpResponse;
import org.apache.http.conn.ConnectionKeepAliveStrategy;
import org.apache.http.message.BasicHeaderElementIterator;
import org.apache.http.protocol.HTTP;
import org.apache.http.protocol.HttpContext;
import org.apache.http.util.Args;
public class MyConnectionKeepAliveStrategy implements ConnectionKeepAliveStrategy{
private int timeToLive;
private TimeUnit timeUnit;
public MyConnectionKeepAliveStrategy(int timeToLive, TimeUnit timeUnit) {
this.timeToLive = timeToLive;
this.timeUnit = timeUnit;
}
@Override
public long getKeepAliveDuration(final HttpResponse response, final HttpContext context) {
Args.notNull(response, "HTTP response");
final HeaderElementIterator it = new BasicHeaderElementIterator(
response.headerIterator(HTTP.CONN_KEEP_ALIVE));
while (it.hasNext()) {
final HeaderElement he = it.nextElement();
final String param = he.getName();
final String value = he.getValue();
if (value != null && param.equalsIgnoreCase("timeout")) {
try {
return Long.parseLong(value) * 1000;
} catch(final NumberFormatException ignore) {
//do nothing
}
}
}
return timeUnit.toMillis(timeToLive);
}
}
《HttpClient官方文档》2.6 连接维持存活策略
http://ifeve.com/httpclient-2-6/httpclient连接池管理,你用对了?
http://ifeve.com/http-connection-pool/HttpClient连接池的一些思考
https://zhuanlan.zhihu.com/p/85524697HTTP协议的Keep-Alive 模式
https://www.jianshu.com/p/49551bda6619
通常要用到取某个时间段内的数据,那么时间段要如何定义?
取2020-12-01这天的数据,"2020-12-01 00:00:00" <= time < "2020-12-02 00:00:00"。
apache common3中提供了相应的方法:
startDate = DateUtils.parseDate(startDateStr, DATE_PATTERN);
String endDateStr = args.getOptionValues(END_DATE).get(0);
endDate = DateUtils.parseDate(endDateStr, DATE_PATTERN);
//清零开始日期,返回类似2020-12-01 00:00:00
startDate = DateUtils.truncate(startDate, Calendar.DATE);
//取结束日期的上限,返回隔天的时间,2020-12-02 00:00:00
endDate = DateUtils.ceiling(endDate, Calendar.DATE);"。
apache common3中提供了相应的方法:
https://dev.twsiyuan.com/2017/09/tcp-states.html
在開發基於 HTTP 的網路應用服務時,當有大量連線要求,或是與長連線 (Persistent connection) 要求時,常常遇到底層 TCP 的連線斷線錯誤,導致服務不穩定。因此研究了解 TCP 的連線狀態機制,並嘗試用自己的方式整理筆記,希望能從基礎知識中找到解決錯誤的線索,或是任何能更進一步優化服務的手段。
僅紀錄 TCP 連線狀態以及建立或是斷開連線流程,關於進一步的 TCP 封包協定可參考 Reference 連線。
TCP 建立連線 (Open)
通常的 TCP 連線建立流程與狀態,需要三次的訊息交換來建立連線 (three-way handshaking):

TCP 建立連線流程圖
其中左邊通常為 server,右邊則為 client,文字流程描述:
- Server 建立 TCB,開啟監聽連線,進入狀態 LISTENING
- Client 發出連線要求 SYN,進入狀態 SYN-SENT,等待回應
- Server 收到 SYN 要求,回應連線傳送 SYN+ACK,並進入狀態 SYN-RCVD (SYN-RECEIVED)
- Client 收到 SYN+ACK 確認完成連線進入狀態 ESTABLISHED,並送出 ACK
- Server 收到 ACK 確認連線完成,也進入狀態 ESTABLISHED
- 雙方開始傳送交換資料
該些名詞與狀態說明:
- CLOSED:連線關閉狀態
- LISTENING:監聽狀態,被動等待連線
- SYN-SENT:主動送出連線要求 SYN,並等待對方回應
- SYN-RCVD:收到連線要求 SYN,送出己方的 SYN+ACK 後,等待對方回應
- ESTABLISHED:確定完成連線,可開始傳輸資料
- TCB:Transmission Control Block,see wiki
- SYN:Synchronous,表示與對方建立連線的同步符號
- ACK:Acknowledgement,表示發送的數據已收到無誤
在建立連線時,可能會發生雙方同步建立連線的情形 (Simultaneous open),常見於 P2P 的應用中,其 TCP 建立連線的流程不太一樣:

TCP 同步建立連線流程圖
畫成 TCP 狀態流程圖會是這樣:

TCP Open 狀態圖
TCP 斷開連線 (Close)
TCP 關閉流程如下,比建立連線還要複雜一些,需要經過四次的訊息交換 (four-way handshaking),要注意的是可以是由 server 發起主動關閉,抑或是 client 發起主動關閉:

TCP 關閉連線流程圖
其中左邊通常為 client 狀態 (由 client 主動發起關閉連線),右邊則為 server 狀態,文字流程描述:
- Client 準備關閉連線,發出 FIN,進入狀態 FIN-WAIT-1
- Server 收到 FIN,發回收到的 ACK,進入狀態 CLOSE-WAIT,並通知 App 準備斷線
- Client 收到 ACK,進入狀態 FIN-WAIT-2,等待 server 發出 FIN
- Server 確認 App 處理完斷線請求,發出 FIN,並進入狀態 LAST-ACK
- Client 收到 FIN,並回傳確認的 ACK,進入狀態 TIME-WAIT,等待時間過後正式關閉連線
- Server 收到 ACK,便直接關閉連線
該些名詞與狀態說明:
- ESTABLISHED:連線開啟狀態
- CLOSE-WAIT:等待連線關閉狀態,等待 App 回應
- LAST-ACK:等待連線關閉狀態,等待遠端回應 ACK 後,便關閉連線
- FIN-WAIT-1:等待連線關閉狀態,等待遠端回應 ACK
- FIN-WAIT-2:等待連線關閉狀態,等待遠端回應 FIN
- TIME-WAIT:等待連線關閉狀態,等段一段時候,保證遠端有收到其 ACK 關閉連線 (網路延遲問題)
- CLOSED:連線關閉狀態
- FIN:表示關閉連線的同步符號
- ACK:Acknowledgement,表示發送的數據已收到無誤
有可能連線的雙方同時發起關閉,雖然機率還蠻低的:

TCP 同步關閉連線流程圖
這邊多一個狀態:
- CLOSING:等待連線關閉狀態,等待遠端回應 ACK
畫成 TCP 狀態流程圖會是這樣:

TCP Close 狀態圖
查詢現在電腦的 TCP 狀態
查詢目前所有的連線狀態 (Windows & Linux):
netstat -a
Reference
import java.util.concurrent.TimeUnit;
import org.apache.http.client.config.RequestConfig;
import org.apache.http.impl.client.CloseableHttpClient;
import org.apache.http.impl.client.HttpClients;
import org.apache.http.impl.conn.PoolingHttpClientConnectionManager;
import org.springframework.context.annotation.Bean;
import org.springframework.context.annotation.Configuration;
@Configuration
public class HttpClientConfiguration {
@Bean
public PoolingHttpClientConnectionManager poolingHttpClientConnectionManager() {
PoolingHttpClientConnectionManager result =
new PoolingHttpClientConnectionManager(5, TimeUnit.MINUTES);
result.setMaxTotal(20);
result.setDefaultMaxPerRoute(20);
return result;
}
@Bean
public RequestConfig requestConfig(KycProperties kycProperties) {
return RequestConfig
.custom()
.setConnectionRequestTimeout(kycProperties.getHttpConnectionTimeout())
.setConnectTimeout(kycProperties.getHttpConnectionTimeout())
.setSocketTimeout(kycProperties.getHttpConnectionTimeout())
.build();
}
@Bean
public CloseableHttpClient httpClient(PoolingHttpClientConnectionManager poolingHttpClientConnectionManager, RequestConfig requestConfig) {
return HttpClients
.custom()
.setConnectionManager(poolingHttpClientConnectionManager)
.setDefaultRequestConfig(requestConfig)
.build();
}
}
Troubleshooting Spring's RestTemplate Requests Timeout
https://tech.asimio.net/2016/12/27/Troubleshooting-Spring-RestTemplate-Requests-Timeout.html
a
httpclient超时重试记录
https://blog.csdn.net/wanghao112956/article/details/102967930
A/pom.xml:
<groupId>com.dummy.bla</groupId>
<artifactId>parent</artifactId>
<version>0.1-SNAPSHOT</version>
<packaging>pom</packaging>
B/pom.xml
<parent>
<groupId>com.dummy.bla</groupId>
<artifactId>parent</artifactId>
<version>0.1-SNAPSHOT</version>
</parent>
<groupId>com.dummy.bla.sub</groupId>
<artifactId>kid</artifactId>
B/pom.xml中需要显式注明父pom的版本号,但从MAVEN3.5之后,可以用变量表示了:
A/pom.xml:
<groupId>com.dummy.bla</groupId>
<artifactId>parent</artifactId>
<version>${revision}</version>
<packaging>pom</packaging>
<properties>
<revision>0.1-SNAPSHOT</revision>
</properties>
B/pom.xml
<parent>
<groupId>com.dummy.bla</groupId>
<artifactId>parent</artifactId>
<version>${revision}</version>
</parent>
<groupId>com.dummy.bla.sub</groupId>
<artifactId>kid</artifactId>
https://stackoverflow.com/questions/10582054/maven-project-version-inheritance-do-i-have-to-specify-the-parent-version/51969067#51969067
https://maven.apache.org/maven-ci-friendly.html
缘起
今天在看一个bug,之前一个分支的版本是正常的,在新的分支上上加了很多日志没找到原因,希望回溯到之前的版本,确定下从哪个提交引入的问题,但是还不想把现在的修改提交,也不希望在Git上看到当前修改的版本(带有大量日志和调试信息)。因此呢,查查Git有没有提供类似功能,就找到了git stash的命令。
综合下网上的介绍和资料,git stash(git储藏)可用于以下情形:
- 发现有一个类是多余的,想删掉它又担心以后需要查看它的代码,想保存它但又不想增加一个脏的提交。这时就可以考虑
git stash。 - 使用git的时候,我们往往使用分支(branch)解决任务切换问题,例如,我们往往会建一个自己的分支去修改和调试代码, 如果别人或者自己发现原有的分支上有个不得不修改的bug,我们往往会把完成一半的代码
commit提交到本地仓库,然后切换分支去修改bug,改好之后再切换回来。这样的话往往log上会有大量不必要的记录。其实如果我们不想提交完成一半或者不完善的代码,但是却不得不去修改一个紧急Bug,那么使用git stash就可以将你当前未提交到本地(和服务器)的代码推入到Git的栈中,这时候你的工作区间和上一次提交的内容是完全一样的,所以你可以放心的修Bug,等到修完Bug,提交到服务器上后,再使用git stash apply将以前一半的工作应用回来。 - 经常有这样的事情发生,当你正在进行项目中某一部分的工作,里面的东西处于一个比较杂乱的状态,而你想转到其他分支上进行一些工作。问题是,你不想提交进行了一半的工作,否则以后你无法回到这个工作点。解决这个问题的办法就是
git stash命令。储藏(stash)可以获取你工作目录的中间状态——也就是你修改过的被追踪的文件和暂存的变更——并将它保存到一个未完结变更的堆栈中,随时可以重新应用。
git stash用法
1. stash当前修改
git stash会把所有未提交的修改(包括暂存的和非暂存的)都保存起来,用于后续恢复当前工作目录。
比如下面的中间状态,通过git stash命令推送一个新的储藏,当前的工作目录就干净了。
$ git status
On branch master
Changes to be committed:

new file:   style.css

Changes not staged for commit:

modified:   index.html

$ git stash Saved working directory and index state WIP on master: 5002d47 our new homepage
HEAD is now at 5002d47 our new homepage

$ git status
On branch master nothing to commit, working tree clean
需要说明一点,stash是本地的,不会通过git push命令上传到git server上。
实际应用中推荐给每个stash加一个message,用于记录版本,使用git stash save取代git stash命令。示例如下:
$ git stash save "test-cmd-stash"
Saved working directory and index state On autoswitch: test-cmd-stash
HEAD 现在位于 296e8d4 remove unnecessary postion reset in onResume function
$ git stash list
stash@{0}: On autoswitch: test-cmd-stash
2. 重新应用缓存的stash
可以通过git stash pop命令恢复之前缓存的工作目录,输出如下:
$ git status
On branch master
nothing to commit, working tree clean
$ git stash pop
On branch master
Changes to be committed:
     new file:   style.css

Changes not staged for commit:
      modified:   index.html
Dropped refs/stash@{0} (32b3aa1d185dfe6d57b3c3cc3b32cbf3e380cc6a)
这个指令将缓存堆栈中的第一个stash删除,并将对应修改应用到当前的工作目录下。
你也可以使用git stash apply命令,将缓存堆栈中的stash多次应用到工作目录中,但并不删除stash拷贝。命令输出如下:
$ git stash apply
On branch master
Changes to be committed:
      new file:   style.css
Changes not staged for commit:
      modified:   index.html
3. 查看现有stash
可以使用git stash list命令,一个典型的输出如下:
$ git stash list
stash@{0}: WIP on master: 049d078 added the index file
stash@{1}: WIP on master: c264051 Revert "added file_size"
stash@{2}: WIP on master: 21d80a5 added number to log
在使用git stash apply命令时可以通过名字指定使用哪个stash,默认使用最近的stash(即stash@{0})。
4. 移除stash
可以使用git stash drop命令,后面可以跟着stash名字。下面是一个示例:
$ git stash list
stash@{0}: WIP on master: 049d078 added the index file
stash@{1}: WIP on master: c264051 Revert "added file_size"
stash@{2}: WIP on master: 21d80a5 added number to log
$ git stash drop stash@{0}
Dropped stash@{0} (364e91f3f268f0900bc3ee613f9f733e82aaed43)
或者使用git stash clear命令,删除所有缓存的stash。
5. 查看指定stash的diff
可以使用git stash show命令,后面可以跟着stash名字。示例如下:
$ git stash show
  index.html | 1 +
  style.css | 3 +++
  2 files changed, 4 insertions(+)
在该命令后面添加-p或--patch可以查看特定stash的全部diff,如下:
$ git stash show -p
diff --git a/style.css b/style.css
new file mode 100644
index 0000000..d92368b
--- /dev/null
+++ b/style.css @@ -0,0 +1,3 @@
+* {
+  text-decoration: blink;
+}
diff --git a/index.html b/index.html
index 9daeafb..ebdcbd2 100644
--- a/index.html
+++ b/index.html
@@ -1 +1,2 @@
+<link rel="stylesheet" href="style.css"/>
6. 从stash创建分支
如果你储藏了一些工作,暂时不去理会,然后继续在你储藏工作的分支上工作,你在重新应用工作时可能会碰到一些问题。如果尝试应用的变更是针对一个你那之后修改过的文件,你会碰到一个归并冲突并且必须去化解它。如果你想用更方便的方法来重新检验你储藏的变更,你可以运行 git stash branch,这会创建一个新的分支,检出你储藏工作时的所处的提交,重新应用你的工作,如果成功,将会丢弃储藏。
$ git stash branch testchanges
Switched to a new branch "testchanges"
# On branch testchanges
# Changes to be committed:
#   (use "git reset HEAD <file>..." to unstage)
#
#      modified:   index.html
#
# Changes not staged for commit:
#   (use "git add <file>..." to update what will be committed)
#
#      modified:   lib/simplegit.rb
#
Dropped refs/stash@{0} (f0dfc4d5dc332d1cee34a634182e168c4efc3359)
这是一个很棒的捷径来恢复储藏的工作然后在新的分支上继续当时的工作。
7. 暂存未跟踪或忽略的文件
默认情况下,git stash会缓存下列文件:
- 添加到暂存区的修改(staged changes)
- Git跟踪的但并未添加到暂存区的修改(unstaged changes)
但不会缓存一下文件:
- 在工作目录中新的文件(untracked files)
- 被忽略的文件(ignored files)
git stash命令提供了参数用于缓存上面两种类型的文件。使用-u或者--include-untracked可以stash untracked文件。使用-a或者--all命令可以stash当前目录下的所有修改。
至于git stash的其他命令建议参考Git manual。
小结
git提供的工具很多,恰好用到就可以深入了解下。更方便的开发与工作的。
参考资料
- 6.3 Git工具-储藏(Stashing)
- Git Stash 历险记
- Git Stash用法
- Git Stash
https://stackoverflow.com/questions/35312677/how-to-use-month-using-aggregation-in-spring-data-mongo-dbAggregation agg = newAggregation(
project("id")
.andExpression("month(createdDate)").as("month_joined")
.andExpression("year(createdDate)").as("year"),
match(Criteria.where("year").is(2016)),
group("month_joined").count().as("number"),
project("number").and("month_joined").previousOperation(),
sort(ASC, "number")
);
AggregationResults<JoinCount> results = mongoTemplate.aggregate(agg,
"collectionName", JoinCount.class);
List<JoinCount> joinCount = results.getMappedResults();
Syntax
public java.lang.String toString(int indentFactor) throws JSONException
Example
import org.json.*;
public class JSONPrettyPrintTest {
   public static void main(String args[]) throws JSONException {
      String json = "{" +
                    "Name : Jai," +
                    "Age : 25, " +
                    "Salary: 25000.00 " +
                    "}";
      JSONObject jsonObj = new JSONObject(json);
      System.out.println("Pretty Print of JSON:");
      System.out.println(jsonObj.toString(4)); // pretty print json
   }
}
Output
Pretty Print of JSON:
{
   "Salary": 25000,
   "Age": 25,
   "Name": "Jai"
}
# Install MariaDB 10.3
yum install rh-mariadb103-mariadb-server rh-mariadb103-mariadb-server-utils -y
# Add MariaDB 10.3 to $PATH
scl enable rh-mariadb103 bash
source /opt/rh/rh-mariadb103/enable
# start 10.3 server
chown -R mysql:mysql /var/opt/rh/rh-mariadb103/lib/mysql
;
systemctl start rh-mariadb103-mariadb
# Upgrade tables
mysql_upgrade -p
[PASSWORD]# Set 10.3 to start on boot
systemctl enable rh-mariadb103-mariadb
# Add 10.3 to paths on reboot (and remove 10.2)
rm /etc/profile.d/rh-mariadb102.sh
cp /opt/rh/rh-mariadb103/enable /etc/profile.d/rh-mariadb103.sh
# increase max connections number
systemctl edit rh-mariadb103-mariadb
[Service]LimitNOFILE=65535
LimitNPROC=65535
vi /etc/opt/rh/rh-mariadb103/my.cnf
[mysqld]max_connections=1000
open_files_limit=65535
# restart mariadb103
systemctl daemon-reload
systemctl restart rh-mariadb103-mariadb
# check result
mysql -e 'show variables like "max_connections"'
https://www.server-world.info/en/note?os=CentOS_7&p=mariadb103&f=4
Update: for production environment, to avoid exposing the password in the command line, since you can query the processes with ps, previous commands with history, etc etc. You could:
- Create a script like this:
touch setEnv.sh - Edit
setEnv.sh to export the JASYPT_ENCRYPTOR_PASSWORD variable#!/bin/bash
export JASYPT_ENCRYPTOR_PASSWORD=supersecretz
- Execute the file with
. setEnv.sh - Run the app in background with
mvn spring-boot:run & - Delete the file
setEnv.sh - Unset the previous environment variable with:
unset JASYPT_ENCRYPTOR_PASSWORD
https://stackoverflow.com/questions/37404703/spring-boot-how-to-hide-passwords-in-properties-file
当SPRING INTEGRATION的流程中从HTTP outboundGateway转成JmsGateway时,会报header的错误,这时就要把相关多余的header移除。
.headerFilter("Api-Key", "Content-Type", "X-Powered-By", "Content-Language", "Transfer-Encoding", "Cache-Control", "Keep-Alive", "Set-Cookie")
https://stackoverflow.com/questions/50608415/cwsia0112e-the-property-name-keep-alive-is-not-a-valid-java-identifier
RestTemplate是Spring提供的用于访问Rest服务的客户端,
RestTemplate提供了多种便捷访问远程Http服务的方法,能够大大提高客户端的编写效率。
调用RestTemplate的默认构造函数,RestTemplate对象在底层通过使用java.net包下的实现创建HTTP 请求,
可以通过使用ClientHttpRequestFactory指定不同的HTTP请求方式。
ClientHttpRequestFactory接口主要提供了两种实现方式
1、一种是SimpleClientHttpRequestFactory,使用J2SE提供的方式(既java.net包提供的方式)创建底层的Http请求连接。
2、一种方式是使用HttpComponentsClientHttpRequestFactory方式,底层使用HttpClient访问远程的Http服务,使用HttpClient可以配置连接池和证书等信息。
默认的 RestTemplate 有个机制是请求状态码非200 就抛出异常,会中断接下来的操作。如果不想中断对结果数据得解析,可以通过覆盖默认的 ResponseErrorHandler ,见下面的示例,示例中的方法中基本都是空方法,只要对hasError修改下,让他一直返回true,即是不检查状态码及抛异常了。
package com.example.demo.web.config;
import java.io.IOException;
import org.springframework.context.annotation.Bean;
import org.springframework.context.annotation.Configuration;
import org.springframework.http.client.ClientHttpRequestFactory;
import org.springframework.http.client.ClientHttpResponse;
import org.springframework.http.client.SimpleClientHttpRequestFactory;
import org.springframework.web.client.ResponseErrorHandler;
import org.springframework.web.client.RestTemplate;
@Configuration
public class RestTemplateConfig {
@Bean
public RestTemplate restTemplate(ClientHttpRequestFactory factory) throws Exception {
RestTemplate restTemplate = new RestTemplate(factory);
ResponseErrorHandler responseErrorHandler = new ResponseErrorHandler() {
@Override
public boolean hasError(ClientHttpResponse clientHttpResponse) throws IOException {
return true;
}
@Override
public void handleError(ClientHttpResponse clientHttpResponse) throws IOException {
}
};
restTemplate.setErrorHandler(responseErrorHandler);
return restTemplate;
}
@Bean
public ClientHttpRequestFactory simpleClientHttpRequestFactory(){
SimpleClientHttpRequestFactory factory = new SimpleClientHttpRequestFactory();
//读取超时5秒
factory.setReadTimeout(5000);
//连接超时15秒
factory.setConnectTimeout(15000);
return factory;
}
}
RestTemppate运用实例
package com.example.demo.web.controller;
import org.slf4j.Logger;
import org.slf4j.LoggerFactory;
import org.springframework.beans.factory.annotation.Autowired;
import org.springframework.http.ResponseEntity;
import org.springframework.web.bind.annotation.GetMapping;
import org.springframework.web.bind.annotation.RestController;
import org.springframework.web.client.RestTemplate;
import com.example.demo.domain.Book;
@RestController
public class TestBookController {
private Logger logger = LoggerFactory.getLogger(getClass());
@Autowired
private RestTemplate restTemplate;
@GetMapping("/testaddbook")
public Book testAddBook() {
Book book = new Book();
ResponseEntity<Book> responseEntity = restTemplate.postForEntity( "http://localhost:8061/book", book , Book.class);
return responseEntity.getBody();
}
}
其他方法,catch
HttpStatusCodeException ,
e.getResponseBodyAsString()try {
ResponseEntity<Component> response = restTemplate.exchange(webSvcURL,
HttpMethod.POST,
requestEntity,
Component.class);
} catch (HttpStatusCodeException e) {
List<String> customHeader = e.getResponseHeaders().get("x-app-err-id");
String svcErrorMessageID = "";
if (customHeader != null) {
svcErrorMessageID = customHeader.get(0);
}
throw new CustomException(e.getMessage(), e, svcErrorMessageID);
// You can get the body too but you will have to deserialize it yourself
// e.getResponseBodyAsByteArray()
// e.getResponseBodyAsString()
}
https://stackoverflow.com/questions/7878002/resttemplate-handling-response-headers-body-in-exceptions-restclientexceptionhttps://stackoverflow.com/questions/38093388/spring-resttemplate-exception-handling/51805956#51805956
在SPRING INTEGRATION中,如果exception发生在各种thread里时,如何将exception返回到指定的channel,之后再绕回到aggrator-channel中。
@Bean
public IntegrationFlow provisionUserFlow() {
return
IntegrationFlows.from("input.channel")
.publishSubscribeChannel(Executors.newCachedThreadPool(),
s -> s.applySequence(true)
.subscribe(f -> f.enrichHeaders(e -> e.header(MessageHeaders.ERROR_CHANNEL, "errorChannel", true))
.handle(provisionerA, "provision")
.channel("aggregatorChannel")
)
.subscribe(f -> f.enrichHeaders(e -> e.header(MessageHeaders.ERROR_CHANNEL, "errorChannel", true))
.handle(provisionerB, "provision")
.channel("aggregatorChannel"))
)
.get();
}
@Bean
public IntegrationFlow aggregateFlow() {
return IntegrationFlows.from("aggregatorChannel")
.channel( aggregatorChannel)
.aggregate( a -> a.processor( collect, "aggregatingMethod"))
.get();
}
@Transformer( inputChannel = "errorChannel", outputChannel = "aggregatorChannel")
public Message<?> errorChannelHandler(ErrorMessage errorMessage) throws RuntimeException {
Message<?> failedMessage = ((MessagingException) errorMessage.getPayload()).getFailedMessage();
Exception exception = (Exception) errorMessage.getPayload();
return MessageBuilder.withPayload( exception.getMessage())
.copyHeadersIfAbsent( failedMessage.getHeaders() )
.build();
}
https://stackoverflow.com/q/46495127/11790720
split-route-aggregate flow
split之后,可以将message分给不同的子flow处理,配置如下:
@Bean
public IntegrationFlow parallelSplitRouteAggregateFlow() {
return IntegrationFlows
.from(Http.inboundGateway("/trigger"))
.handle((p, h) -> Arrays.asList(1, 2, 3))
.split()
.channel(MessageChannels.executor(Executors.newCachedThreadPool()))
.<Integer, Boolean>route(o -> o % 2 == 0, m -> m
.subFlowMapping(true, sf -> sf.gateway(oddFlow()))
.subFlowMapping(false, sf -> sf.gateway(evenFlow())))
.aggregate()
.get();
}
@Bean
public IntegrationFlow oddFlow() {
return flow -> flow.<Integer>handle((payload, headers) -> "odd");
}
@Bean
public IntegrationFlow evenFlow() {
return flow -> flow.<Integer>handle((payload, headers) -> "even");
}
https://stackoverflow.com/questions/50121384/spring-integration-parallel-split-route-aggregate-flow-fails-due-to-one-way-mess
安装:
wget -O jq https://github.com/stedolan/jq/releases/download/jq-1.6/jq-linux64
chmod +x ./jq
cp jq /usr/bin
摘要: 最近在公司用JUP框架做项目,发现这个框架是别人基于SpringSide封装的,所以打算学习下,SpringSide,其中遇到了很多坑,做个记录,网上关于这方面的资料都有些老了,而且SpringSide最新的版本是SpringSide-Utils,老一点的版本为v4.2.2.GA,以下分别对这两个版本分别介绍下,主要内容来自于网上。一些资料:Github源码地址: https://gi...
阅读全文
| Spring Cloud |
你懂的 |
| Keycloak |
微服务认证授权 |
| Jenkins |
持续集成 |
| SonarQube |
代码质量控制 |
https://gitee.com/itmuch/spring-cloud-yes
Keycloak是Jboss出品的做认证和授权的WEB程序,根据OPENIDC协议,OPENID是做认证,OAUTH2.0是做授权,OPENIDC则将这两者整合。
有提供一套WEB界面维护用户、应用与角色。
Ream则可认为是多租户,每个租户的应用和用户数据是隔离的。
http://10.80.27.69:8180/auth/realms/quickstart/.well-known/openid-configuration 提供当前所有的API节点。
get_access_token_from_public_client:
curl --location --request POST 'http://10.80.27.69:8180/auth/realms/quickstart/protocol/openid-connect/token' \
--header 'Content-Type: application/x-www-form-urlencoded' \
--data-urlencode 'username=alice' \
--data-urlencode 'password=123456' \
--data-urlencode 'client_id=app-springboot-public' \
--data-urlencode 'grant_type=password' \
| jq
./get_access_token_from_confidential_client.sh
curl --location --request POST 'http://10.80.27.69:8180/auth/realms/quickstart/protocol/openid-connect/token' \
--header 'Content-Type: application/x-www-form-urlencoded' \
--data-urlencode 'client_id=app-springboot-confidential' \
--data-urlencode 'client_secret=3acf7692-49cb-4c45-9943-6f3dba512dae' \
--data-urlencode 'grant_type=client_credentials' \
| jq
访问一个ACCESS TYPE为Bare only的应用的一个API:
access_token=$(curl \
-d "client_id=app-springboot-public" \
-d "username=alice" \
-d "password=123456" \
-d "grant_type=password" \
"http://10.80.27.69:8180/auth/realms/quickstart/protocol/openid-connect/token" \
| jq -r '.access_token')
#echo $access_token
curl -H "Authorization: Bearer $access_token" 'http://10.80.27.69:8182/products' | jq
访问用户信息:
access_token=$(curl \
-d "client_id=app-springboot-public" \
-d "username=alice" \
-d "password=123456" \
-d "grant_type=password" \
"http://10.80.27.69:8180/auth/realms/quickstart/protocol/openid-connect/token" | jq -r '.access_token')
curl -H "Authorization: Bearer $access_token" http://10.80.27.69:8180/auth/realms/quickstart/protocol/openid-connect/userinfo | jq
编辑/etc/docker/daemon.json,加入以下节点:
{
"registry-mirrors": [
"https://hub-mirror.c.163.com",
"https://mirror.baidubce.com"
]
}
[root@dev69 ~]$ groupadd docker
[root@dev69 ~]$ usermod -aG docker $USER
[root@dev69 ~]$ reboot
[paul@dev69 ~]$ docker run hello-world
docker 安装:
[root@dev69 ~]$ yum install -y docker
[root@dev69 ~]$ systemctl enable docker
[root@dev69 ~]$ systemctl start docker
To check if a directory exists in a shell script, you can use the following:
if [ -d "$DIRECTORY" ]; then
# Control will enter here if $DIRECTORY exists.
fi
Or to check if a directory doesn't exist:
if [ ! -d "$DIRECTORY" ]; then
# Control will enter here if $DIRECTORY doesn't exist.
fi
function fun1(){
return 34
}
function fun2(){
local res=$(fun1)
echo $res
}
上面调用fun1时,打印结果却不返回34,这是为何?原来函数只是返回结果成功与否的值,并不能自定义。因此要改成下面这种写法
function fun1(){
echo 34
}
function fun2(){
local res=$(fun1)
echo $res
}
https://stackoverflow.com/questions/17336915/return-value-in-a-bash-function
如果已经在ECLIPSE中CLONE了GIT的项目,这时当GIT中又新建了项目,ECLIPSE无法切换到这新建的项目,解决办法:
In the Git Repositories view:
- Right-click the repository and choose Fetch from Upstream
- If the new branch will not shown up below Branches/Remote Tracking, you have to configure fetch:
- Right-click the fetch node below Remotes/origin and choose Configure Fetch...
- In the Configure Fetch make sure there is only the single Ref mapping (assuming the remote is named
origin) +refs/heads/*:refs/remotes/origin/*:

这时再次Fetch from upstream,则新建的项目再次重现:Git Repositories View-->Branches-->Remote Checking中。
双击新的分支,选:Check out as New Local Branch即可。
https://stackoverflow.com/questions/47390703/how-do-i-get-a-new-branch-to-show-up-in-eclipse-git-remote-tracking/47391183
先在主控机执行ssh-keygen,再向被控机传输key,
ssh-copy-id -i ~/.ssh/id_rsa.pub user1@ip
样例脚本transfer-artemis.sh如下:
#!/bin/bash
loop_server(){
for ((i=2; i<=8; i++))
do
ipd=10.10.31.1${i}2
echo ${ipd}
$1 ${ipd}
done
for ((i=1; i<=2; i++))
do
ipd=10.20.31.1${i}2
echo ${ipd}
$1 ${ipd}
done
}
start_artemis_cmd(){
echo "ssh user1@${1} '/opt/myapp/artemis/apache-artemis-2.15.0/instance/bin/artemis-service start'"
ssh user1@${1} '/opt/myapp/artemis/apache-artemis-2.15.0/instance/bin/artemis-service start'
}
stop_artemis_cmd(){
echo "ssh user1@${1} '/opt/myapp/apache-activemq-5.15.10/bin/activemq stop'"
echo "ssh user1@${1} '/opt/myapp/artemis/apache-artemis-2.15.0/instance/bin/artemis-service stop'"
ssh user1@${1} '/opt/myapp/apache-activemq-5.15.10/bin/activemq stop'
ssh user1@${1} '/opt/myapp/artemis/apache-artemis-2.15.0/instance/bin/artemis-service stop'
}
scp_artemis_cmd(){
echo "ssh user1@${1} 'rm -rf /opt/myapp/artemis'"
echo "scp -r /opt/myapp/artemis user1@${1}:/opt/myapp/"
ssh user1@${1} 'rm -rf /opt/myapp/artemis'
scp -r /opt/myapp/artemis user1@${1}:/opt/myapp/
}
stop_artemis(){
loop_server stop_artemis_cmd
}
start_artemis(){
loop_server start_artemis_cmd
}
scp_artemis(){
loop_server scp_artemis_cmd
}
#start_artemis "Hello start_artemis"
$1
执行命令:
./transfer-artemis.sh start_artemis
pom.xml:
<plugin>
<artifactId>maven-assembly-plugin</artifactId>
<version>3.1.1</version>
<executions>
<execution>
<id>make-assembly</id>
<phase>package</phase>
<goals>
<goal>single</goal>
</goals>
</execution>
</executions>
<configuration>
<descriptors>
<descriptor>src/main/assembly/descriptor.xml</descriptor>
</descriptors>
<archiverConfig>
<directoryMode>0755</directoryMode>
<defaultDirectoryMode>0755</defaultDirectoryMode>
<fileMode>0644</fileMode>
</archiverConfig>
</configuration>
</plugin>
src/main/assembly/descriptor.xml,在此文件覆盖:
<fileSets>
<fileSet>
<directory>src/conf</directory>
<outputDirectory>conf</outputDirectory>
<fileMode>0600</fileMode>
<directoryMode>0700</directoryMode>
</fileSet>
<fileSet>
<directory>src/db</directory>
<outputDirectory>db</outputDirectory>
</fileSet>
<fileSet>
<directory>src/bin</directory>
<outputDirectory>bin</outputDirectory>
<fileMode>0755</fileMode>
</fileSet>
nohup命令及其输出文件
nohup命令:如果你正在运行一个进程,而且你觉得在退出帐户时该进程还不会结束,那么可以使用nohup命令。该命令可以在你退出帐户/关闭终端之后继续运行相应的进程。nohup就是不挂起的意思( n ohang up)。
一般都是在linux下nohup格式:
nohup command
或者
nohup command &
这之间的差别是带&的命令行,即使terminal(终端)关闭,或者电脑死机程序依然运行(前提是你把程序递交到服务器上);
它把标准输出(STDOUT)和标准错误(STDERR)结果输出到nohup.txt文件这个看似很方便,但是当输出很大的时候,nohup.txt文件会非常大,或者多个后台命令的时候大家都会输出到nohup.txt文件,不利于查找结果和调试程序。
所以能够重定向输出会非常方便。下面要介绍标准输出,标准输入 和标准错误了。
其实我们一直都在用,只是没有注意到,
比如
>./command.sh > output
#这其中的>就是标准输出符号,其实是 1>output 的缩写
>./command.sh 2> output
#这里的2>就是将标准错误输出到output文件里。
而0< 则是标准输入了。
下面步入正题,重定向后台命令
>nohup ./command.sh > output 2>&1 &
解释:前面的nohup 和后面的&我想大家都能明白了把。
主要是中间的 2>&1的意思
这个意思是把标准错误(2)重定向到标准输出中(1),而标准输出又导入文件output里面, www.2cto.com
所以结果是标准错误和标准输出都导入文件output里面了。
至于为什么需要将标准错误重定向到标准输出的原因,那就归结为标准错误没有缓冲区,而stdout有。
这就会导致 >output 2>output 文件output被两次打开,而stdout和stderr将会竞争覆盖,这肯定不是我门想要的.
这就是为什么有人会写成:
nohup ./command.sh >output 2>output
出错的原因了
##########################
最后谈一下/dev/null文件的作用
这是一个无底洞,任何东西都可以定向到这里,但是却无法打开。
所以一般很大的stdou和stderr当你不关心的时候可以利用stdout和stderr定向到这里
>./command.sh >/dev/null 2>&1
When we want to do something later in our Java code, we often turn to the ScheduledExecutorService. This class has a method called schedule(), and we can pass it some code to be run later like this:
ScheduledExecutorService executor =
Executors.newScheduledThreadPool(4);
executor.schedule(
() -> {System.out.println("..later");},
1,
TimeUnit.SECONDS
);
System.out.println("do
");
// (Don't forget to shut down the executor later)The above code prints “do…” and then one second later it prints “…later”.
We can even write code that does some work and returns a result in a similar way:
// (Make the executor as above.)
ScheduledFuture future = executor.schedule(
() -> 10 + 25, 1, TimeUnit.SECONDS);
System.out.println("answer=" + future.get())
The above code prints “answer=35”. When we call get() it blocks waiting for the scheduler to run the task and mark the ScheduledFuture as complete, and then returns the answer to the sum (10 + 25) when it is ready.
This is all very well, but you may note that the Future returned from schedule() is a ScheduledFuture, and a ScheduledFuture is not a CompletableFuture.
Why do you care? Well, you might care if you want to do something after the scheduled task is completed. Of course, you can call get(), and block, and then do something, but if you want to react asynchronously without blocking, this won’t work.
The normal way to run some code after a Future has completed is to call one of the “then*” or “when*” methods on the Future, but these methods are only available on CompletableFuture, not ScheduledFuture.
Never fear, we have figured this out for you. We present a small wrapper for schedule that transforms your ScheduledFuture into a CompletableFuture. Here’s how to use it:
CompletableFuture<Integer> future =
ScheduledCompletable.schedule(
executor,
() -> 10 + 25,
1,
TimeUnit.SECONDS
);
future.thenAccept(
answer -> {System.out.println(answer);}
);
System.out.println("Answer coming
")
The above code prints “Answer coming…” and then “35”, so we can see that we don’t block the main thread waiting for the answer to come back.
So far, we have scheduled a synchronous task to run in the background after a delay, and wrapped its result in a CompletableFuture to allow us to chain more tasks after it.
In fact, what we often want to do is schedule a delayed task that is itself asynchronous, and already returns a CompletableFuture. In this case it feels particularly natural to get the result back as a CompletableFuture, but with the current ScheduledExecutorService interface we can’t easily do it.
It’s OK, we’ve figured that out too:
Supplier<CompletableFuture<Integer>> asyncTask = () ->
CompletableFuture.completedFuture(10 + 25);
CompletableFuture<Integer> future =
ScheduledCompletable.scheduleAsync(
executor, asyncTask, 1, TimeUnit.SECONDS);
future.thenAccept(
answer -> {System.out.println(answer);}
);
System.out.println("Answer coming
")
The above code prints “Answer coming…” and then “35”, so we can see that our existing asynchronous task was scheduled in the background, and we didn’t have to block the main thread waiting for it. Also, under the hood, we are not blocking the ScheduledExecutorService‘s thread (from its pool) while the async task is running – that task just runs in whatever thread it was assigned when it was created. (Note: in our example we don’t really run an async task at all, but just immediately return a completed Future, but this does work for real async tasks.)
I know you’re wondering how we achieved all this. First, here’s how we run a simple blocking task in the background and wrap it in a CompletableFuture:
public static <T> CompletableFuture<T> schedule(
ScheduledExecutorService executor,
Supplier<T> command,
long delay,
TimeUnit unit
) {
CompletableFuture<T> completableFuture = new CompletableFuture<>();
executor.schedule(
(() -> {
try {
return completableFuture.complete(command.get());
} catch (Throwable t) {
return completableFuture.completeExceptionally(t);
}
}),
delay,
unit
);
return completableFuture;
}
And here’s how we delay execution of an async task but still return its result in a CompletableFuture:
public static <T> CompletableFuture<T> scheduleAsync(
ScheduledExecutorService executor,
Supplier<CompletableFuture<T>> command,
long delay,
TimeUnit unit
) {
CompletableFuture<T> completableFuture = new CompletableFuture<>();
executor.schedule(
(() -> {
command.get().thenAccept(
t -> {completableFuture.complete(t);}
)
.exceptionally(
t -> {completableFuture.completeExceptionally(t);return null;}
);
}),
delay,
unit
);
return completableFuture;
}
Note that this should all work to run methods like exceptionally(), thenAccept(), whenComplete() etc.
Feedback and improvements welcome!
https://www.artificialworlds.net/blog/2019/04/05/scheduling-a-task-in-java-within-a-completablefuture/
有时查看LINUX时,会发现当前CPU消耗连续保持80%,如何找出是哪个应用呢?
top -i //输出应用列表,并隐藏IDEL的应用
P //在列表时,按P,则按CPU的使用排序
How To Check CPU Utilization In Linux With Command Line
https://phoenixnap.com/kb/check-cpu-usage-load-linux
很久以前多线程是这样创建:
Thread t1 = new Thread();
Thread t2 = new Thread();
t1.start(); // 启动新线程
t2.start(); // 启动新线程
由于创建和销毁线程是非常耗资源,因此改成线程建好后不销毁,可以重用,用户只需提供run方法的具体实现:
public static void main(String[] args) throws Exception {
ExecutorService executor = Executors.newSingleThreadExecutor();
Future<String> stringFuture = executor.submit(new Callable<String>() {
@Override
public String call() throws Exception {
Thread.sleep(2000);
return "async thread";
}
});
Thread.sleep(1000);
System.out.println("main thread");
System.out.println(stringFuture.get());
}
但如果很多线程被创建,并且线程间有依赖,即按流程和条件执行线程,实现起来就有点复杂,于是CompletableFuture横空出世。一共有50各方法可供使用。
CompletableFuture.supplyAsync(),相当于创建了ExecutorService,同时也创建了Callable,然后提交到线程池中执行。
CompletableFuture<String> futureA = CompletableFuture.supplyAsync(() -> "任务A");
CompletableFuture<String> futureB = CompletableFuture.supplyAsync(() -> "任务B");
CompletableFuture<String> futureC = futureB.thenApply(b -> {
System.out.println("执行任务C.");
System.out.println("参数:" + b);//参数:任务B
return "a";
});
!!How to use CompletableFuture and Callable in Java
https://ducmanhphan.github.io/2020-02-10-How-to-use-CompletableFuture-Callable-in-Java/使用CompletableFuture优化你的代码执行效率
https://www.cnblogs.com/fingerboy/p/9948736.htmlCompletableFuture 使用详解
https://www.jianshu.com/p/6bac52527ca4使用CompletableFuture
https://www.liaoxuefeng.com/wiki/1252599548343744/1306581182447650https://github.com/eugenp/tutorials/blob/master/core-java-modules/core-java-concurrency-basic/src/test/java/com/baeldung/completablefuture/CompletableFutureLongRunningUnitTest.java
/etc/my.cnf
[mysqld]
datadir=/var/lib/mysql
socket=/var/lib/mysql/mysql.sock
#symbolic-links=0
#vish start
open_files_limit = 8000
max_connections = 500
#set-variable=max_connections=500
thread_concurrency = 8
#concurrent_insert=2
thread_cache_size=2000
interactive_timeout=180
wait_timeout=180
max_allowed_packet = 32M
key_buffer_size = 3000M
read_buffer_size = 16M
read_rnd_buffer_size = 4M
bulk_insert_buffer_size = 256M
myisam_sort_buffer_size = 16M
myisam_max_sort_file_size = 256M
myisam_repair_threads = 1
#myisam_recover = 4
max_heap_table_size = 2048M
tmp_table_size = 1024M
table_open_cache = 2000
table_cache = 2000
sort_buffer_size = 128M
join_buffer_size = 128M
query_cache_size = 128M
query_cache_limit = 128M
#slow_query_log=1
log-slow-queries
long_query_time=2
#log_queries_not_using_indexes=1
slow_query_log_file = /var/log/mariadb/host_name-slow.log
[mysqldump]
user=root
password=*********
#max_allowed_packet = 1024M
[myisamchk]
key_buffer_size = 2500M
sort_buffer_size = 1024M
read_buffer = 32M
write_buffer = 32M
[innodb]
innodb_buffer_pool_size=3G
innodb_buffer_pool_instance=2
innodb_additional_mem_pool_size=20M
innodb_log_file_size= 512M
innodb_log_buffer_size=16M
innodb_flush_log_at_trx_commit=1
innodb_thread_concurrency=16
#innodb_read_io_threads=16
#innodb_write_io_threads=16
#innodb_io_capacity=2000
#innodb_lock_wait_timeout=120
innodb_flush_method=O_DIRECT
#vish end
[mysqld_safe]
log-error=/var/log/mariadb/mariadb.log
pid-file=/var/run/mariadb/mariadb.pid
#!includedir /etc/my.cnf.d
1、将当前目录下包含jack串的文件中,jack字符串替换为tom
sed -i "s/jack/tom/g" `grep "jack" -rl ./`
2、将某个文件中的jack字符串替换为tom
sed -i "s/jack/tom/g" test.txt
参考连接:http://blog.csdn.net/lizhi200404520/article/details/7968483
JMETER作为一个压力测试工具,可模拟上千用户进行登录之类的操作。
但一般图形界面只用来制作测试计划,真正运行是在LINUX上。
同时也可以作为压测MYSQL数据库等。
配置基本流程:添加测试计划-->添加线程组,在添加的线程组中-->添加JDBC配置组件-->添加JDBC访问的SQL语句的REQUEST组件-->配置REQUEST和配置组件相关联的变量值-->添加查看结果组件-->设定要运行的线程数-->执行。
执行期间如有问题,查看DOS窗口。
【JMeter】JMeter完成一个MySql压力测试
https://www.cnblogs.com/zhaoxd07/p/4895681.htmlJMeter 如何与 MySQL 进行整合测试
https://juejin.im/post/6844903728215162887JMeter JDBC连接MySql配置
https://www.jianshu.com/p/cde2729421d1jmeter(二十五)linux环境运行jmeter并生成报告
https://www.cnblogs.com/imyalost/p/9808079.html
MARIADB的默认最大连接数是100,当试图更改配置文件/etc/my.conf追加max_connections=1000,并重启服务时,发现最大连接数被重置为214,这是由于系统问题,open_files数为1024,如何正确地更改是个复杂的问题。
MARIADB中一些查当前连接数/最大连接数的命令为:
MariaDB [(none)]>
show variables like "max_connections";
show processlist;
show status where variable_name = 'threads_connected';
show status where variable_name = 'max_used_connections';
show variables like 'max_user_connections';
show variables like '%connection%';
正确方案:
RHEL\CentOS 7 下 MySQL 连接数被限制为214个
https://waylau.com/rhel-mysql-connections-limit-214/
Centos7.4下面mysql的max_connections不生效的问题。
https://blog.51cto.com/wangqh/2131340
为何要在SERVICE中添加允许打开的文件数?
Centos7下修改/etc/security/limits.conf文件只在用户登录后打开的进程有效,系统服务或通过rc.local启动的无效,系统服务修改文件/usr/lib/systemd/system/SOME_SERVICE.service添加:
[Service]
LimitNOFILE=65535
关于LINUX系统的最大打开文件数:
https://blog.51cto.com/as007012/1956222https://www.haiyun.me/archives/linux-file-limit.html
事不宜迟,我们马上来看这21道最受欢迎,提问率最高的系统设计+面向对象的面试题,这些问题的分析能让你轻松应对项目设计的面试。
1. 如何用Java设计自动售货机? (解决方案)
你需要编写代码来设计自动售货机,该自动售货机售卖如巧克力,糖果,冷饮之类的产品,需要投入硬币进行购买,例如5分、10分、25分,50分、1元等。确保插入硬币获得产品 ,然后退回零钱。 另外,编写单元测试以证明这些常见用例有效。 如果遇到困难,可以阅读有关解决这些经典系统设计问题的两部分文章(第1部分和第2部分)。
2. 如何设计类似Goo.gl或Bit.Ly的URL缩短服务?(解决方案)
这是一个常见的系统设计问题。 你给了一个普通长度的URL,你将如何设计为其生成较短且唯一的别名的服务? 如果你不熟悉URL缩短程序服务,请查看一些常用的例子,例如Google的goo.gl和Twitter使用的bit.ly。确保在一些设计决策后提供数据库模式和基本原理,例如保留数据多长时间,如何获取统计信息和分析等。如果遇到问题,可以参照关于Educative上“系统设计面试课程”中给出的解决方案。
3.你如何设计交通控制系统?
经典系统设计问题仍然提及频率。 确保你知道如何从一种状态过渡到另一种状态,例如从红色过渡到绿色,从绿色过渡到橙色再过渡到红色等。
4. 如何设计限价单? (解决方案)
限价订单簿在证券交易所中用于根据价格和时间优先级将买入订单与卖出订单进行匹配。 你会怎么做? 你将使用哪种数据结构? 请记住,匹配的速度是关键,也是可靠的。 如果你需要复习数据结构,则可以查看Java课程中的数据结构和算法,如果你遇到困难,可以在这里查看我的解决方案。
5. 你如何设计类似Pastebin的网站?
Pastebin允许你粘贴文本或代码,然后在任意位置共享指向该代码的链接。它不是在线代码编辑器,但是你可以使用它来存储任何类型的文本。
6. 你将如何创建自己的Instagram? (解决方案)
Instagram是一个照片共享应用程序,它提供了一些自定义滤镜以提高照片质量。你的应用程序应该具有照片上传功能,为搜索标记照片以及一些基本的过滤器。如果你可以添加共享或社交网络,那就太好不过了。顺便说一句,如果你遇到困难,还可以在Educative的如何准备系统设计面试课程中看到免费的解决方案。
7. 你如何设计像Google Drive或Dropbox这样的全局文件共享和存储应用程序?
这些用于存储和共享文件,照片和其他媒体。你如何设计诸如允许用户上传/查看/搜索/共享文件或照片之类的东西?跟踪文件共享的权限,并允许多个用户编辑同一文档?
8. 你如何设计类似Whatsapp或Facebook Messenger的聊天应用程序?
你肯定使用过WhatsApp和Facebook?没有?如果没有,我告诉你聊天应用程序允许你向你的朋友发送消息。这是点对点的连接。你保留一个朋友列表,查看他们的状态并聊天。在WhatsApp中,你也可以连接组,但适用于高级和经验丰富的开发人员。至少,你应该提供一种设计来保留好友列表并从中发送和接收消息。
9. 你如何设计Twitter克隆?
Twitter是一种流行的消息服务,可让你向所有关注者广播消息。你发布推文,你的关注者可以看到这些消息,他们可以喜欢或转发。确保实现了诸如粉丝关注,主题标签,发博,删除等常用功能。如果你觉得自己有点困难,则可以按照如何应对系统设计面试的课程解决方案进行操作。
10. 如何设计像YouTube或Netflix这样的全球视频流服务?
设计像NetFlix或YouTube这样的视频流服务时,关键是顺畅和缓冲以及在低带宽连接上的功能,如何应对这些挑战?
11. 如何设计ATM机?
ATM机允许用户存入和提取现金。它还允许用户查看其余额。你如何设计这样的系统?你面临的主要挑战是什么?
12. 如何设计API速率限制器?
13. 你如何设计Twitter搜索?
14. 如何设计类似于Google的网络爬虫?
网络搜寻器可以访问网站并像Google一样搜寻所有链接并将它们编入索引,以便它们以后可以出现在搜索结果中。爬网程序还可用于在一组目录中搜索特定文件,你如何设计此类文件?主要挑战是什么?
15. 如何设计Facebook的Newsfeed?你将使用哪种算法?
新闻源是Facebook的重要组成部分,它使用户可以查看他的世界正在发生的事情,包括朋友和家人,他喜欢的页面,他关注的组以及Facebook广告。
Newsfeed算法的作用是显示对用户来说最重要的消息,并且可以产生很高的参与度。显然,来自朋友和家人的消息应该优先处理。如果你觉得陷入困境,则可以按照如何做好系统设计面试的课程所提出解决答案。
16. 如何设计Yelp或Nearby Friends?
17. 如何设计全球乘车服务E.G. Uber,Grab或Ola后端?
优步(Uber)和奥拉(Ola)是最受欢迎的两种乘车服务,它将驾驶员和乘客都组合到一起。你如何设计让乘客看到附近的出租车并进行预订?
18. 如何设计BookMyShow?
一个允许你预订电影院和活动门票的网站。这实际上是一家运转良好的印度创业公司。
19. 如何设计Quora,Reddit或Hackernews等社交网络+留言板服务网站?
Reddit,Quora和HackerNews是一些最受欢迎的社交网站,用户可以在其中发布问题或共享链接。其他用户可以回答问题或对共享链接发表评论。
20. 你如何设计类似Airbnb的应用程序?
它允许某些用户上传房间出租,而其他用户则出租。某些功能仅适用于管理员,发布者和订阅者。
21. 你如何设计电梯系统?
我们大多数人都使用电梯,你在一些大型办公大楼中,你可以看到3到4部电梯。你需要为此设计软件,以便可以在不同楼层快速使用。你可以假设你有两部电梯和一栋10层楼的建筑。
如果你需要一些帮助,那么我建议你可在Udemy上学习如何做好系统设计面试课程,Rajat Mehta在那里有一个完整的案例研究来解决这个问题。你还将在那里学习高级系统设计,低级系统设计和数据库设计。
需添加如下PLUGIN:
File Operations
添加如下STEP:File Download Operation
NEXUS上的下载地址按如下模式:http://localhost:8081/service/rest/v1/search/assets/download?group=org.osgi&name=org.osgi.core&version=4.3.1&maven.extension=jar&maven.classifier
ssh-keygen 产生公钥与私钥对.
ssh-copy-id 将本机的公钥复制到远程机器的authorized_keys文件中,ssh-copy-id也能让你有到远程机器的home, ~./ssh , 和 ~/.ssh/authorized_keys的权利
第一步:在本地机器上使用ssh-keygen产生公钥私钥对
- zhz@zhz:~/$ ssh-keygen
Generating public/private rsa key pair.
Enter file in which to save the key (/home/zhz/.ssh/id_rsa): - Enter passphrase (empty for no passphrase): [Press enter key
- same passphrase again: [Pess enter key]
- Your identification has been saved in /home/zhz/.ssh/id_rsa.
- Your public key has been saved in /home/zhz/.ssh/id_rsa.pub.
- The key fingerprint is:
- 用cat命令查看是否生成产生公钥私钥对
- zhz@zhz:~$ cat .ssh/id_rsa.pub
ssh-rsa AAAAB3NzaC1yc2EAAAADAQABAAABAQCl9N5+xboqSIagBx02rdZ2fkROCPW8iW7hl6Gu+2hkBYYy/b1qcOm8RF/AMyas3i0QEK7Hcu9H51l2lulVbS5n9M9FaWIyYzssaS012x2mg9iA6MxPMlaXFsZ5jnVrGicndzf3VUu9kCErp5q0OzzMjsG3PKQevzWZJSBaFgc8NF5ZJ+VT54BN8ktMTHVwOo15I2Uai+bs4eP0NsuwIJmGyYIUOuvTuUtJxGV3hZ+tcjhupupqVCwYOE+cDz8VkFBGtnKsdE69hWoY2VUfEOAfHZptra7Ce9dXfDgx9jxuuNiJYtGo/bZDfe+UJ5HUv8wrL+hFeRIihdmP2CKJD8j5 zhz@zhz
第二步:用ssh-copy-id将公钥复制到远程机器中
- zhz@zhz:~$ ssh-copy-id -i .ssh/id_rsa.pub 用户名字@192.168.x.xxx
注意: ssh-copy-id 将key写到远程机器的 ~/ .ssh/authorized_key.文件中
第三步:
登录到远程机器不用输入密码
- zhz@zhz:~$ ssh 用户名字@192.168.x.xxx
- Last login: Sun Nov 16 17:22:33 2008 from 192.168.1.2
常见问题:
上述是给eucalyptus用户赋予无密码登陆的权利
- /usr/bin/ssh-copy-id: ERROR: No identities found
使用选项 -i ,当没有值传递的时候或者 如果 ~/.ssh/identity.pub 文件不可访问(不存在), ssh-copy-id 将显示上述的错误信息 ( -i选项会优先使用将ssh-add -L的内容)
ssh命令
1、复制SSH密钥到目标主机,开启无密码SSH登录
ssh-copy-id user@host
如果还没有密钥,请使用ssh-keygen命令生成。
2、从某主机的80端口开启到本地主机2001端口的隧道
ssh -N -L2001:localhost:80 somemachine
现在你可以直接在浏览器中输入http://localhost:2001访问这个网站。
3、将你的麦克风输出到远程计算机的扬声器
dd if=/dev/dsp | ssh -c arcfour -C username@host dd of=/dev/dsp
这样来自你麦克风端口的声音将在SSH目标计算机的扬声器端口输出,但遗憾的是,声音质量很差,你会听到很多嘶嘶声。
4、比较远程和本地文件
ssh user@host cat /path/to/remotefile | diff /path/to/localfile –
在比较本地文件和远程文件是否有差异时这个命令很管用。
5、通过SSH挂载目录/文件系统
sshfs name@server:/path/to/folder /path/to/mount/point
从http://fuse.sourceforge.net/sshfs.html下载sshfs,它允许你跨网络安全挂载一个目录。
6、通过中间主机建立SSH连接
ssh -t reachable_host ssh unreachable_host
Unreachable_host表示从本地网络无法直接访问的主机,但可以从reachable_host所在网络访问,这个命令通过到reachable_host的“隐藏”连接,创建起到unreachable_host的连接。
7、将你的SSH公钥复制到远程主机,开启无密码登录 – 简单的方法
ssh-copy-id username@hostname
8、直接连接到只能通过主机B连接的主机A
ssh -t hostA ssh hostB
当然,你要能访问主机A才行。
9、创建到目标主机的持久化连接
ssh -MNf <user>@<host>
在后台创建到目标主机的持久化连接,将这个命令和你~/.ssh/config中的配置结合使用:
Host host ControlPath ~/.ssh/master-%r@%h:%p ControlMaster no
所有到目标主机的SSH连接都将使用持久化SSH套接字,如果你使用SSH定期同步文件(使用rsync/sftp/cvs/svn),这个命令将非常有用,因为每次打开一个SSH连接时不会创建新的套接字。
10、通过SSH连接屏幕
ssh -t remote_host screen –r
直接连接到远程屏幕会话(节省了无用的父bash进程)。
11、端口检测(敲门)
knock <host> 3000 4000 5000 && ssh -p <port> user@host && knock <host> 5000 4000 3000
在一个端口上敲一下打开某个服务的端口(如SSH),再敲一下关闭该端口,需要先安装knockd,下面是一个配置文件示例。
[options] logfile = /var/log/knockd.log [openSSH] sequence = 3000,4000,5000 seq_timeout = 5 command = /sbin/iptables -A INPUT -i eth0 -s %IP% -p tcp –dport 22 -j ACCEPT tcpflags = syn [closeSSH] sequence = 5000,4000,3000 seq_timeout = 5 command = /sbin/iptables -D INPUT -i eth0 -s %IP% -p tcp –dport 22 -j ACCEPT tcpflags = syn
12、删除文本文件中的一行内容,有用的修复
ssh-keygen -R <the_offending_host>
在这种情况下,最好使用专业的工具。
13、通过SSH运行复杂的远程shell命令
ssh host -l user $(<cmd.txt)
更具移植性的版本:
ssh host -l user “`cat cmd.txt`”
14、通过SSH将MySQL数据库复制到新服务器
mysqldump –add-drop-table –extended-insert –force –log-error=error.log -uUSER -pPASS OLD_DB_NAME | ssh -C user@newhost “mysql -uUSER -pPASS NEW_DB_NAME”
通过压缩的SSH隧道Dump一个MySQL数据库,将其作为输入传递给mysql命令,我认为这是迁移数据库到新服务器最快最好的方法。
15、删除文本文件中的一行,修复“SSH主机密钥更改”的警告
sed -i 8d ~/.ssh/known_hosts
16、从一台没有SSH-COPY-ID命令的主机将你的SSH公钥复制到服务器
cat ~/.ssh/id_rsa.pub | ssh user@machine “mkdir ~/.ssh; cat >> ~/.ssh/authorized_keys”
如果你使用Mac OS X或其它没有ssh-copy-id命令的*nix变种,这个命令可以将你的公钥复制到远程主机,因此你照样可以实现无密码SSH登录。
17、实时SSH网络吞吐量测试
yes | pv | ssh $host “cat > /dev/null”
通过SSH连接到主机,显示实时的传输速度,将所有传输数据指向/dev/null,需要先安装pv。
如果是Debian:
apt-get install pv
如果是Fedora:
yum install pv
(可能需要启用额外的软件仓库)。
18、如果建立一个可以重新连接的远程GNU screen
ssh -t user@some.domain.com /usr/bin/screen –xRR
人们总是喜欢在一个文本终端中打开许多shell,如果会话突然中断,或你按下了“Ctrl-a d”,远程主机上的shell不会受到丝毫影响,你可以重新连接,其它有用的screen命令有“Ctrl-a c”(打开新的shell)和“Ctrl-a a”(在shell之间来回切换),请访问http://aperiodic.net/screen/quick_reference阅读更多关于screen命令的快速参考。
19、继续SCP大文件
rsync –partial –progress –rsh=ssh $file_source $user@$host:$destination_file
它可以恢复失败的rsync命令,当你通过VPN传输大文件,如备份的数据库时这个命令非常有用,需要在两边的主机上安装rsync。
rsync –partial –progress –rsh=ssh $file_source $user@$host:$destination_file local -> remote
或
rsync –partial –progress –rsh=ssh $user@$host:$remote_file $destination_file remote -> local
20、通过SSH W/ WIRESHARK分析流量
ssh root@server.com ‘tshark -f “port !22″ -w -' | wireshark -k -i –
使用tshark捕捉远程主机上的网络通信,通过SSH连接发送原始pcap数据,并在wireshark中显示,按下Ctrl+C将停止捕捉,但也会关闭wireshark窗口,可以传递一个“-c #”参数给tshark,让它只捕捉“#”指定的数据包类型,或通过命名管道重定向数据,而不是直接通过SSH传输给wireshark,我建议你过滤数据包,以节约带宽,tshark可以使用tcpdump替代:
ssh root@example.com tcpdump -w – ‘port !22′ | wireshark -k -i –
21、保持SSH会话永久打开
autossh -M50000 -t server.example.com ‘screen -raAd mysession’
打开一个SSH会话后,让其保持永久打开,对于使用笔记本电脑的用户,如果需要在Wi-Fi热点之间切换,可以保证切换后不会丢失连接。
22、更稳定,更快,更强的SSH客户端
ssh -4 -C -c blowfish-cbc
强制使用IPv4,压缩数据流,使用Blowfish加密。
23、使用cstream控制带宽
tar -cj /backup | cstream -t 777k | ssh host ‘tar -xj -C /backup’
使用bzip压缩文件夹,然后以777k bit/s速率向远程主机传输。Cstream还有更多的功能,请访问http://www.cons.org/cracauer/cstream.html#usage了解详情,例如:
echo w00t, i’m 733+ | cstream -b1 -t2
24、一步将SSH公钥传输到另一台机器
ssh-keygen; ssh-copy-id user@host; ssh user@host
这个命令组合允许你无密码SSH登录,注意,如果在本地机器的~/.ssh目录下已经有一个SSH密钥对,ssh-keygen命令生成的新密钥可能会覆盖它们,ssh-copy-id将密钥复制到远程主机,并追加到远程账号的~/.ssh/authorized_keys文件中,使用SSH连接时,如果你没有使用密钥口令,调用ssh user@host后不久就会显示远程shell。
25、将标准输入(stdin)复制到你的X11缓冲区
ssh user@host cat /path/to/some/file | xclip
你是否使用scp将文件复制到工作用电脑上,以便复制其内容到电子邮件中?xclip可以帮到你,它可以将标准输入复制到X11缓冲区,你需要做的就是点击鼠标中键粘贴缓冲区中的内容。
如果你还有其它SSH命令技巧,欢迎在本文评论中帖出。
原文:http://blog.urfix.com/25-ssh-commands-tricks/
子文件夹按字母排倒序,只保留前5个,其他的删除。
find path/to/folder/ -mindepth 1 -maxdepth 1 -type d | head -n -5 | xargs rm -rf
-find: the unix command for finding files / directories / links etc.
-/path/to/base/dir: the directory to start your search in.
-mindepth 1 -maxdepth 1 only search the first sub folder
-type d: only find directories
-head -n -5: Filter out all lines except the last 5
-xargs rm -rf: remove each given folder.
find /path/to/base -mindepth 1 -maxdepth 1 -type d -ctime +10 | xargs rm -rf
-find: the unix command for finding files / directories / links etc.
/path/to/base/dir: the directory to start your search in.
-type d: only find directories
-ctime +10: only consider the ones with modification time older than 10 days
-exec
\
;: for each such result found, do the following command in
-rm -rf dir1 dir2 dir3
例如有如下场景,新增一订单,同时为此订单的用户增加积分。场景对应场景表,积分对应积分表,如果要防止订单增加成功而积分增加不成功,则要将此两种操作放在一个事务下。
分布式的场景下,订单服务在一个JVM下,积分服务在另一个JVM下,两者要如何才能达到数据一致(原子)性?
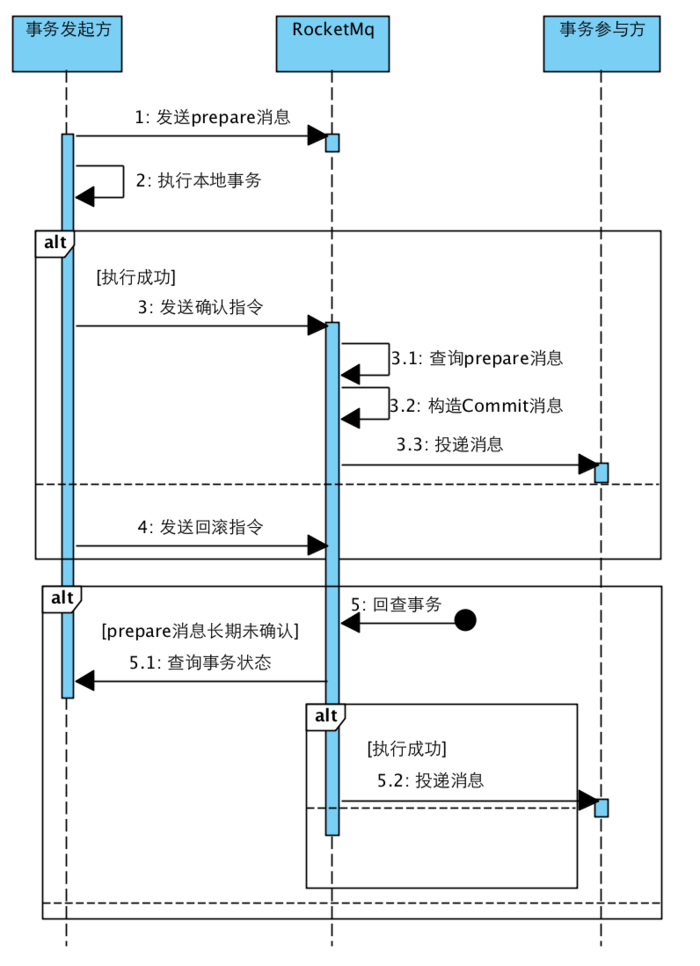
https://zlt2000.gitee.io/2019-09-23-rocketmq-transaction/
SPRING BATCH中的REMOTE CHUNKING JOB,由于是基于MASTER/SLAVE的架构,其中某个STEP是会在远程机器中执行,如果要停止这个JOB,需要考虑两个问题:
1、什么时候发出停止指令
2、如何等待远程STEP的完成
一般停止JOB,可用JobOperator.stop(long executionId)来停止,但这个无法确定什么时候发出停止指令,如果是在CHUNK的处理中途发出,则会出现回滚的现象。
BATCH_STEP_EXECUTION
thead tr {background-color: ActiveCaption; color: CaptionText;}
th, td {vertical-align: top; font-family: "Tahoma", Arial, Helvetica, sans-serif; font-size: 8pt; padding: 4px; }
table, td {border: 1px solid silver;}
table {border-collapse: collapse;}
thead .col0 {width: 173px;}
.col0 {text-align: right;}
thead .col1 {width: 82px;}
.col1 {text-align: right;}
thead .col2 {width: 282px;}
thead .col3 {width: 164px;}
.col3 {text-align: right;}
thead .col4 {width: 161px;}
thead .col5 {width: 161px;}
thead .col6 {width: 109px;}
thead .col7 {width: 127px;}
.col7 {text-align: right;}
thead .col8 {width: 109px;}
.col8 {text-align: right;}
thead .col9 {width: 118px;}
.col9 {text-align: right;}
thead .col10 {width: 117px;}
.col10 {text-align: right;}
thead .col11 {width: 142px;}
.col11 {text-align: right;}
thead .col12 {width: 150px;}
.col12 {text-align: right;}
thead .col13 {width: 166px;}
.col13 {text-align: right;}
thead .col14 {width: 137px;}
.col14 {text-align: right;}
thead .col15 {width: 109px;}
thead .col16 {width: 156px;}
thead .col17 {width: 161px;}
| STEP_EXECUTION_ID |
VERSION |
STEP_NAME |
JOB_EXECUTION_ID |
START_TIME |
END_TIME |
STATUS |
COMMIT_COUNT |
READ_COUNT |
FILTER_COUNT |
WRITE_COUNT |
READ_SKIP_COUNT |
WRITE_SKIP_COUNT |
PROCESS_SKIP_COUNT |
ROLLBACK_COUNT |
EXIT_CODE |
EXIT_MESSAGE |
LAST_UPDATED |
| 2304 |
169 |
step2HandleXXX |
434 |
2020-06-22 16:27:54 |
2020-06-22 16:32:46 |
STOPPED |
167 |
5010 |
0 |
4831 |
0 |
155 |
0 |
161 |
STOPPED |
org.springframework.batch.core.JobInterruptedException |
2020-06-22 16:32:46 |
另外SPRING BATCH也不会等远程STEP执行完成,就将JOB的状态设为Complete。
发出停止的指令应通过ChunkListener达成:
public class ItemMasterChunkListener extends ChunkListenerSupport{
private static final Logger log = LoggerFactory.getLogger(ItemMasterChunkListener.class);
@Override
public void beforeChunk(ChunkContext context) {
log.info("ItemMasterProcessor.beforeChunk");
}
@Override
public void afterChunk(ChunkContext context) {
log.info("ItemMasterProcessor.afterChunk");
if(XXXX.isStoppingOrPausing()) {
log.info("context.getStepContext().getStepExecution().setTerminateOnly()");
context.getStepContext().getStepExecution().setTerminateOnly();
}
}
@Override
public void afterChunkError(ChunkContext context) {
log.info("ItemMasterProcessor.afterChunkError");
}
}
配置BEAN:
@Bean
@StepScope
public ItemMasterChunkListener novaXItemMasterChunkListener() {
return new ItemMasterChunkListener();
}
this.masterStepBuilderFactory
.<X, X>get("step2Handle")
.listener(itemMasterChunkListener())
.build();
由于是在CHUNK完成的时候发出停止指令,就不会出现ROLLBACK的情况。
等待远程STEP完成,通过读取MQ上的MESSAGE是否被消费完成,PENDDING的MESSAGE为0的条件即可。
public class JobExecutionListenerSupport implements JobExecutionListener {
/* (non-Javadoc)
* @see org.springframework.batch.core.domain.JobListener#afterJob()
*/
@Override
public void afterJob(JobExecution jobExecution) {
Integer totalPendingMessages = 0;
String queueName = "";
String messageSelector = "JOB_EXECUTION_ID=" + jobExecution.getJobInstance().getInstanceId();
do{
totalPendingMessages =
this.jmsTemplate.browseSelected(queueName, messageSelector,
(session, browser) ->
Collections.list(browser.getEnumeration()).size()
);
String brokerURL = null;
if(jmsTemplate.getConnectionFactory() instanceof JmsPoolConnectionFactory) {
JmsPoolConnectionFactory connectionFactory =
(JmsPoolConnectionFactory)jmsTemplate.getConnectionFactory();
ActiveMQConnectionFactory activeMQConnectionFactory =
(ActiveMQConnectionFactory)connectionFactory.getConnectionFactory();
brokerURL = activeMQConnectionFactory.getBrokerURL();
} else if(jmsTemplate.getConnectionFactory() instanceof CachingConnectionFactory) {
CachingConnectionFactory connectionFactory =
(CachingConnectionFactory)jmsTemplate.getConnectionFactory();
ActiveMQConnectionFactory activeMQConnectionFactory =
(ActiveMQConnectionFactory)connectionFactory.getTargetConnectionFactory();
brokerURL = activeMQConnectionFactory.getBrokerURL();
}
LOGGER.info("queueName = {}, {}, totalPendingMessages = {}, url={}",
queueName, messageSelector, totalPendingMessages, brokerURL);
Assert.notNull(totalPendingMessages, "totalPendingMessages must not be null.");
try {
Thread.sleep(5_000);
} catch (InterruptedException e) {
LOGGER.error(e.getMessage(), e);
}
} while(totalPendingMessages.intValue() > 0);
}
/* (non-Javadoc)
* @see org.springframework.batch.core.domain.JobListener#beforeJob(org.springframework.batch.core.domain.JobExecution)
*/
@Override
public void beforeJob(JobExecution jobExecution) {
}
}
这样整个JOB就能无异常地停止,且会等待远程STEP完成。
Reference:
https://docs.spring.io/spring-batch/docs/4.1.3.RELEASE/reference/html/common-patterns.html#stoppingAJobManuallyForBusinessReasons
https://stackoverflow.com/questions/13603949/count-number-of-messages-in-a-jms-queue
https://stackoverflow.com/questions/55499965/spring-batch-stop-job-execution-from-external-class
https://stackoverflow.com/questions/34621885/spring-batch-pollable-channel-with-replies-contains-chunkresponses-even-if-job
根据分支1新建了功能分支1,并在此上开发一段时间,后来分支1被别人提交了代码,因此分支1比功能分支1要新,这时,可以将功能分支1与分支1进行合并,但会多出很多COMMIT,这时就出现了rebase,
GIT会将功能分支1上的所有COMMIT另存一个文件,回退到分支1原始状态,再更新至当前分支1的状态,再把另存文件的COMMIT执行一遍,就成了已经合并的新的功能分支1。
http://jartto.wang/2018/12/11/git-rebase/GIT使用rebase和merge的正确姿势
https://zhuanlan.zhihu.com/p/34197548git merge和git rebase的区别, 切记:永远用rebase
https://zhuanlan.zhihu.com/p/75499871
https://computingforgeeks.com/how-to-run-java-jar-application-with-systemd-on-linux/systemd自启动java程序
https://www.cnblogs.com/yoyotl/p/8178363.html------------------------------------------------------------
[Unit]
Description=TestJava
After=network.target
[Service]
Type=forking
ExecStart=/home/test/startTest.sh
ExecStop=/home/test/stopTest.sh
[Install]
WantedBy=multi-user.target
-------------------------------------------------------------
How to Autorun application at the start up in Linux
https://developer.toradex.com/knowledge-base/how-to-autorun-application-at-the-start-up-in-linuxHow to automatically run program on Linux startup
https://www.simplified.guide/linux/automatically-run-program-on-startupSystemd 入门教程:实战篇
https://www.ruanyifeng.com/blog/2016/03/systemd-tutorial-part-two.htmlSystemd 入门教程:命令篇
http://www.ruanyifeng.com/blog/2016/03/systemd-tutorial-commands.html
Nexus Repository Manager is a tool that allows us to store and use libraries we need in projects such as Maven project…
 In this tutorial, I summarize the tutorials of Huong Dan Java on the Nexus Repository Manager for your reference.
Installation
In this tutorial, I will guide you how to install Nexus Repository Manager.
Configuration
In order to create a new Maven Repository in the Nexus Repository Manager, you can refer to this tutorial.
We need to define a Role to define User rights in the Nexus Repository Manager.
To be able to do anything in the Nexus Repository Manager, you need to create and use the User.
Manipulation
Nexus Repository Manager supports us UI to upload any artifact to the Repository.
In addition to the UI, we can also use the RESTful API to upload an artifact.
Using a command
Option 1
show status where variable_name = 'threads_connected';
Columns
- Variable_name - Name of the variable shown
- Value - Number of active connections
Rows
- One row: Only one row is displayed
Sample results
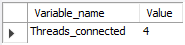
Option 2
show processlist;
Columns
- Id - The connection identifier
- User - The MariaDB user who issued the statement
- Host - Host name and client port of the client issuing the statement
- db - The default database (schema), if one is selected, otherwise NULL
- Command - The type of command the thread is executing
- Time - The time in seconds that the thread has been in its current state
- State - An action, event, or state that indicates what the thread is doing
- Info - The statement the thread is executing, or NULL if it is not executing any statement
- Progress - The total progress of the process (0-100%)
Rows
- One row: represents one active connection
- Scope of rows: total of active connections
Sample results

Using a query
Option 3
select id, user, host, db, command, time, state,
info, progress from information_schema.processlist;
Columns
- Id - The connection identifier
- User - The MariaDB user who issued the statement
- Host - Host name and client port of the client issuing the statement
- db - The default database (schema), if one is selected, otherwise NULL
- Command - The type of command the thread is executing
- Time - The time in seconds that the thread has been in its current state
- State - An action, event, or state that indicates what the thread is doing
- Info - The statement the thread is executing, or NULL if it is not executing any statement
- Progress - The total progress of the process (0-100%)
- memory_used - Amount of memory used by the active connection
Rows
- One row: represents one active connection
- Scope of rows: total of active connections
Sample results
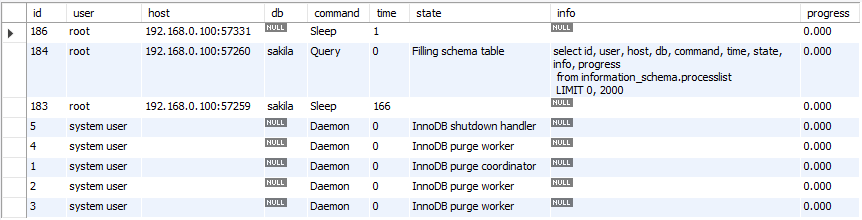
Using the GUI
Option 4
Click on the Client Connections option of the Management tab (left navigation pane)
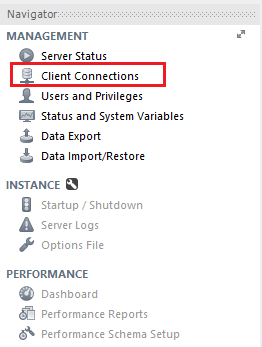
This action will show the Client Connections screen containing the current active connections
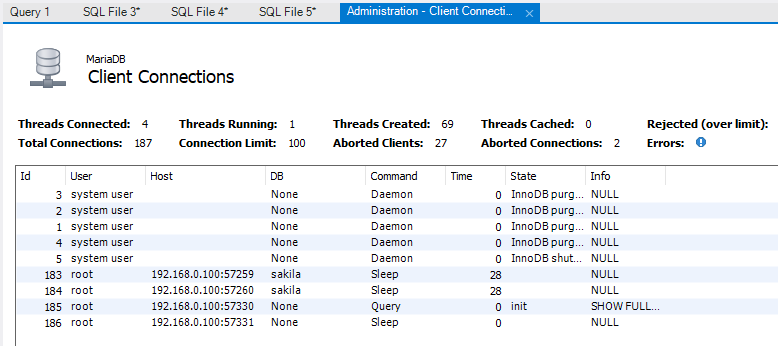
Database Profiling
MongoDB Profiler is a db profiling system that can help identify inefficient
or slow queries and operations.
Levels of profiles available are:
Level | Setting |
0 | Off. & No profiling |
1 | On & only includes slow operations |
2 | On & Includes all operations |
We can enable it by setting the Profile level value using the following
command in mongo shell :
"db.setProfilingLevel(1)"
By default, mongod records slow queries to its log, as defined by slowOpThresholdMs.
NOTE
Enabling database profiler puts negative impact on MongoDB’s performance.
It’s better to enable it for specific intervals & minimal on Production Servers.
We can enable profiling on a mongod basis but This setting will not propagate
across a replica set and sharded cluster.
We can view the output in the system.profile collection in mongo shell using show profile command, or using following:
db.system.profile.find( { millis : { $gt : 200 } } )
Command returns operations that took longer than 200 ms. Similarly we
can change the values as per our need.
Enabling profile for an entire mongod instance.
For the purpose of development in testing, we can enable database profiling/settings for an
entire mongod instance. The profiling level will be applied to all databases.
NOTE:
We can't enable the profiling settings on a mongos instance. To enable the profiling in
shard clusters, we have to enable/start profiling for each mongod instance in cluster.
Query for the recent 10 entries
db.system.profile.find().limit(10).sort( { ts : 1 } ).pretty()
Collection with the slowest queries(No. Of queries)
db.system.profile.group({key: {ns: true}, initial: {count: 0}, reduce: function(obj,prev){ prev.count++;}})
Collection with the slowest queries(No. Of millis spent)
db.system.profile.group({key: {ns: true}, initial: {millis: 0}, reduce: function(obj, prev){ prev.millis += obj.millis;}})
Most recent slow query
db.system.profile.find().sort({$natural: -1}).limit(1)
Single slowest query(Right now)
db.system.profile.find().sort({millis: -1}).limit(1)
基于LINUX的,也就是用yum install就可以使用。
1.echo "mount -t nfs -o nolock ${IP}:${remote_dir} ${local_dir}" >> /etc/rc.local
2.echo "${IP}:/home/logs /home/logs nfs defaults 0 0" >> /etc/fstab
关于/etc/rc.local
rc.local也是我经常使用的一个脚本。该脚本是在系统初始化级别脚本运行之后再执行的,因此可以安全地在里面添加你想在系统启动之后执行的脚本。常见的情况是你可以再里面添加nfs挂载/mount脚本。此外,你也可以在里面添加一些调试用的脚本命令。例如,我就碰到过这种情况:samba服务总是无法正常运行,而检查发现,samba是在系统启动过程中就该启动执行的,也就是说,samba守护程序配置保证了这种功能本应该正确执行。碰到这种类似情况,一般我也懒得花大量时间去查为什么,我只需要简单的在/etc/rc.local脚本里加上这么一行:
/etc/init.d/samba start
这样就成功的解决了samba服务异常的问题。
使用自定义CONNECTION FACTORY,这样会覆盖SPRING 的AUTO CONFIGURATION。
ActiveMQConnectionFactoryFactory.java
import java.lang.reflect.InvocationTargetException;
import java.util.Collections;
import java.util.List;
import org.apache.activemq.ActiveMQConnectionFactory;
import org.springframework.boot.autoconfigure.jms.activemq.ActiveMQConnectionFactoryCustomizer;
import org.springframework.boot.autoconfigure.jms.activemq.ActiveMQProperties;
import org.springframework.boot.autoconfigure.jms.activemq.ActiveMQProperties.Packages;
import org.springframework.util.Assert;
import org.springframework.util.StringUtils;
/**
* Factory to create a {@link ActiveMQConnectionFactory} instance from properties defined
* in {@link SecondaryActiveMQProperties}.
*
* @author Phillip Webb
* @author Venil Noronha
*/
class ActiveMQConnectionFactoryFactory {
private static final String DEFAULT_EMBEDDED_BROKER_URL = "vm://localhost?broker.persistent=false";
private static final String DEFAULT_NETWORK_BROKER_URL = "tcp://localhost:61616";
private final ActiveMQProperties properties;
private final List<ActiveMQConnectionFactoryCustomizer> factoryCustomizers;
ActiveMQConnectionFactoryFactory(ActiveMQProperties properties,
List<ActiveMQConnectionFactoryCustomizer> factoryCustomizers) {
Assert.notNull(properties, "Properties must not be null");
this.properties = properties;
this.factoryCustomizers = (factoryCustomizers != null) ? factoryCustomizers : Collections.emptyList();
}
public <T extends ActiveMQConnectionFactory> T createConnectionFactory(Class<T> factoryClass) {
try {
return doCreateConnectionFactory(factoryClass);
}
catch (Exception ex) {
throw new IllegalStateException("Unable to create " + "ActiveMQConnectionFactory", ex);
}
}
private <T extends ActiveMQConnectionFactory> T doCreateConnectionFactory(Class<T> factoryClass) throws Exception {
T factory = createConnectionFactoryInstance(factoryClass);
if (this.properties.getCloseTimeout() != null) {
factory.setCloseTimeout((int) this.properties.getCloseTimeout().toMillis());
}
factory.setNonBlockingRedelivery(this.properties.isNonBlockingRedelivery());
if (this.properties.getSendTimeout() != null) {
factory.setSendTimeout((int) this.properties.getSendTimeout().toMillis());
}
Packages packages = this.properties.getPackages();
if (packages.getTrustAll() != null) {
factory.setTrustAllPackages(packages.getTrustAll());
}
if (!packages.getTrusted().isEmpty()) {
factory.setTrustedPackages(packages.getTrusted());
}
customize(factory);
return factory;
}
private <T extends ActiveMQConnectionFactory> T createConnectionFactoryInstance(Class<T> factoryClass)
throws InstantiationException, IllegalAccessException, InvocationTargetException, NoSuchMethodException {
String brokerUrl = determineBrokerUrl();
String user = this.properties.getUser();
String password = this.properties.getPassword();
if (StringUtils.hasLength(user) && StringUtils.hasLength(password)) {
return factoryClass.getConstructor(String.class, String.class, String.class).newInstance(user, password,
brokerUrl);
}
return factoryClass.getConstructor(String.class).newInstance(brokerUrl);
}
private void customize(ActiveMQConnectionFactory connectionFactory) {
for (ActiveMQConnectionFactoryCustomizer factoryCustomizer : this.factoryCustomizers) {
factoryCustomizer.customize(connectionFactory);
}
}
String determineBrokerUrl() {
if (this.properties.getBrokerUrl() != null) {
return this.properties.getBrokerUrl();
}
if (this.properties.isInMemory()) {
return DEFAULT_EMBEDDED_BROKER_URL;
}
return DEFAULT_NETWORK_BROKER_URL;
}
}
TwinJmsConnectionFactoryConfiguration.java
import java.util.stream.Collectors;
import org.apache.activemq.ActiveMQConnectionFactory;
import org.messaginghub.pooled.jms.JmsPoolConnectionFactory;
import org.springframework.beans.factory.ObjectProvider;
import org.springframework.boot.autoconfigure.condition.ConditionalOnProperty;
import org.springframework.boot.autoconfigure.jms.JmsPoolConnectionFactoryFactory;
import org.springframework.boot.autoconfigure.jms.activemq.ActiveMQConnectionFactoryCustomizer;
import org.springframework.boot.autoconfigure.jms.activemq.ActiveMQProperties;
import org.springframework.boot.context.properties.ConfigurationProperties;
import org.springframework.context.annotation.Bean;
import org.springframework.context.annotation.Configuration;
import org.springframework.context.annotation.Primary;
import org.springframework.context.annotation.Profile;
@Configuration
@Profile({"local"})
public class TwinJmsConnectionFactoryConfiguration {
@Bean
@ConfigurationProperties(prefix = "spring.activemq.primary")
public ActiveMQProperties primaryActiveMQProperties() {
return new ActiveMQProperties();
}
@Bean(destroyMethod = "stop")
@Primary
@ConditionalOnProperty(prefix = "spring.activemq.pool", name = "enabled", havingValue = "true")
public JmsPoolConnectionFactory connectionFactory(ActiveMQProperties primaryActiveMQProperties,
ObjectProvider<ActiveMQConnectionFactoryCustomizer> factoryCustomizers) {
ActiveMQConnectionFactory connectionFactory = new ActiveMQConnectionFactoryFactory(primaryActiveMQProperties,
factoryCustomizers.orderedStream().collect(Collectors.toList()))
.createConnectionFactory(ActiveMQConnectionFactory.class);
return new JmsPoolConnectionFactoryFactory(primaryActiveMQProperties.getPool())
.createPooledConnectionFactory(connectionFactory);
}
////////////////////////////////////////////////////////////////////////////////
@Bean
@ConfigurationProperties(prefix = "spring.activemq.sescond")
public ActiveMQProperties sescondActiveMQProperties() {
return new ActiveMQProperties();
}
@Bean(destroyMethod = "stop")
@ConditionalOnProperty(prefix = "spring.activemq.pool", name = "enabled", havingValue = "true")
public JmsPoolConnectionFactory sescondPooledJmsConnectionFactory(ActiveMQProperties sescondActiveMQProperties,
ObjectProvider<ActiveMQConnectionFactoryCustomizer> factoryCustomizers) {
ActiveMQConnectionFactory connectionFactory = new ActiveMQConnectionFactoryFactory(sescondActiveMQProperties,
factoryCustomizers.orderedStream().collect(Collectors.toList()))
.createConnectionFactory(ActiveMQConnectionFactory.class);
return new JmsPoolConnectionFactoryFactory(sescondActiveMQProperties.getPool())
.createPooledConnectionFactory(connectionFactory);
}
}
From here:
The difference between the PooledConnectionFactory and the CachingConnectionFactory is a difference in implementation. Below are some of the characteristics that differ between them:
Although both the PooledConnectionFactory and the CachingConnectionFactory state that they each pool connections, sessions and producers, the PooledConnectionFactory does not actually create a cache of multiple producers. It simply uses a singleton pattern to hand out a single cached producer when one is requested. Whereas the CachingConnectionFactory actually creates a cache containing multiple producers and hands out one producer from the cache when one is requested.
The PooledConnectionFactory is built on top of the Apache Commons Pool project for pooling JMS sessions. This allows some additional control over the pool because there are features in Commons Pool that are not being used by the PooledConnectionFactory. These additional features include growing the pool size instead of blocking, throwing an exception when the pool is exhausted, etc. You can utilize these features by creating your own Commons Pool GenericObjectPool using your own customized settings and then handing that object to the PooledConnectionFactory via the setPoolFactory method. See the following for additional info: http://commons.apache.org/pool/api-1.4/org/apache/commons/pool/impl/GenericObjectPoolFactory.html
The CachingConnectionFactory has the ability to also cache consumers. Just need to take care when using this feature so that you know the consumers are cached according to the rules noted in the blog post.
But most importantly, the CachingConnectionFactory will work with any JMS compliant MOM. It only requires a JMS connection factory. This is important if you are using more than one MOM vendor which is very common in enterprise organizations (this is mainly due to legacy and existing projects). The important point is that the CachingConnectionFactory works very well with many different MOM implementations, not only ActiveMQ.
From here:
If you have clustered ActiveMQs, and use failover transport it has been reported that CachingConnectionFactory is not a right choice.
The problem I’m having is that if one box goes down, we should start sending messages on the other, but it seems to still be using the old connection (every send times out). If I restart the program, it’ll connect again and everything works. Source: Autoreconnect problem with ActiveMQ and CachingConnectionFactory
The problem is that cached connections to the failed ActiveMQ was still in use and that created the problem for the user. Now, the choice for this scenario is PooledConnectionFactory.
If you’re using ActiveMQ today, and chances are that you may switch to some other broker (JBoss MQ, WebSphere MQ) in future, do not use PooledConnectionFactory, as it tightly couples your code to ActiveMQ.
正好做Mongodb主从复制尝试使用Spring Boot Data Mongodb Starter插件链接访问Mongodb数据库集群。
遇到的坑:
- spring.data.mongodb.host和spring.data.mongodb.port形式不适合集群配置,会报host无法识别异常
- spring.data.mongodb.uri中经常抛出authentication failed异常
解决办法:
- 对于第一个坑,请使用spring.data.mongodb.uri。如果使用了uri,则其余的host/username/password/db/auth-db这些全部无效。
- 对于第二个坑,请在spring.data.mongodb.uri中指定replicaSet和authsource,另外记得把所有集群节点服务器地址都列全。
如果auth-db和db是同一个,则无需加authsource,如果不同,则加authsource=admin
我没有把authsource指定,所以一直报authentication failed异常。然后只好一点点去发掘问题点,最后查到在com.mongodb.ConnectionString类中的createCredentials中
private MongoCredential createCredentials(final Map<String, List<String>> optionsMap, final String userName,
final char[] password) {
AuthenticationMechanism mechanism = null;
String authSource = (database == null) ? "admin" : database;
String gssapiServiceName = null;
String authMechanismProperties = null;
for (final String key : AUTH_KEYS) {
String value = getLastValue(optionsMap, key);
if (value == null) {
continue;
}
if (key.equals("authmechanism")) {
mechanism = AuthenticationMechanism.fromMechanismName(value);
} else if (key.equals("authsource")) {
authSource = value;
} else if (key.equals("gssapiservicename")) {
gssapiServiceName = value;
} else if (key.equals("authmechanismproperties")) {
authMechanismProperties = value;
}
}
MongoCredential credential = null;
if (mechanism != null) {
switch (mechanism) {
case GSSAPI:
credential = MongoCredential.createGSSAPICredential(userName);
if (gssapiServiceName != null) {
credential = credential.withMechanismProperty("SERVICE_NAME", gssapiServiceName);
}
break;
case PLAIN:
credential = MongoCredential.createPlainCredential(userName, authSource, password);
break;
case MONGODB_CR:
credential = MongoCredential.createMongoCRCredential(userName, authSource, password);
break;
case MONGODB_X509:
credential = MongoCredential.createMongoX509Credential(userName);
break;
case SCRAM_SHA_1:
credential = MongoCredential.createScramSha1Credential(userName, authSource, password);
break;
default:
throw new UnsupportedOperationException(format("The connection string contains an invalid authentication mechanism'. "
+ "'%s' is not a supported authentication mechanism",
mechanism));
}
} else if (userName != null) {
credential = MongoCredential.createCredential(userName, authSource, password);
}
if (credential != null && authMechanismProperties != null) {
for (String part : authMechanismProperties.split(",")) {
String[] mechanismPropertyKeyValue = part.split(":");
if (mechanismPropertyKeyValue.length != 2) {
throw new IllegalArgumentException(format("The connection string contains invalid authentication properties. "
+ "'%s' is not a key value pair", part));
}
String key = mechanismPropertyKeyValue[0].trim().toLowerCase();
String value = mechanismPropertyKeyValue[1].trim();
if (key.equals("canonicalize_host_name")) {
credential = credential.withMechanismProperty(key, Boolean.valueOf(value));
} else {
credential = credential.withMechanismProperty(key, value);
}
}
}
return credential;
}
authSource默认会指向我们目标数据的数据库。然而在身份验证机制中我们通常需要指向admin。(非常想报粗口,代码作者在这里脑袋被men挤了么)。所以需要强制指定authSource中指定。具体指定方式如下:
mongodb://{用户名}:{密码}@{host1}:27017,{host2}:27017,{host3}:27017/{目标数据库}?replicaSet={复制集名称}&write=1&readPreference=primary&authsource={授权数据库}
这时发现如果处理总数足够大时,被处理的ITEMS总数会少于应该处理的总数。
+------------+--------------+-------------+-----------------+------------------+--------------------+----------------+-----------+-------------------------
| READ_COUNT | FILTER_COUNT | WRITE_COUNT | READ_SKIP_COUNT | WRITE_SKIP_COUNT | PROCESS_SKIP_COUNT | ROLLBACK_COUNT | EXIT_CODE | EXIT_MESSAGE
-+------------+--------------+-------------+-----------------+------------------+--------------------+----------------+-----------+-------------------------
| 1 | 0 | 1 | 0 | 0 | 0 | 0 | COMPLETED |
| 30006 | 0 | 29947 | 0 | 59 | 0 | 61 | COMPLETED | Waited for 101 results.
To see how many connections are configured for your DB to use:
select @@max_connections;
To change it:
set global max_connections = 200;
To see how many are connected at the current time:
show processlist;
vi /etc/my.cnf
[mysqld]
max_connections = 500
MongDB Client请求查询数据,需要包括五个阶段:
MongoDB Client需要找到可用的MongoDB Server
MongoDB Client需要和MongoDB Server建立(new)Connection
应用程序处理线程从Connection Pool中获取Connection
数据传输(获取连接后,进行Socket通信,获取数据)
断开Collection
那么,MongoDB Client驱动设置中网络相关等待超时参数serverSelectionTimeout、connectTimeout、maxWaitTime和socketTimeout分别对应上面哪个环节呢?
参数serverSelectionTimeout:对应第1个环节,即MongoDB Client需要找到可用的MongoDB Server所需要的等待时间, MongDB部署的生产一般由多个服务器组成,要么作为一个复制集或者作为一个分片集群,参数 serverSelectionTimeout的值即为多长时间内找不到合适服务器时候就决定放弃的时间间隔;
参数connectTimeout:对应第2个环节,每次创建Connection,对应的网络等待。单位毫秒数, 0表示没有限制;
参数maxWaitTime:对应第3个环节,应用程序处理线程从连接池中获取Collection,对应的网络等待时间。单位毫秒数,0表示 不等待,负数表示等待时间不确定;
参数socketTimeout:对应第4个环节,获取Connection后,就有了Socket通信,获取数据,即在MonogoDB Client 和MonogoDB Server的Socket通信过程中的网络等待时间。单位毫秒数,默认配置为0,也就是没有限制, 没有超 时限制,系统出了问题也不容易发现,应该根据实际情况,给出合理的超时时间。
其他相关参数如下:
connectionsPerHost:对mongo实例来说,每个host允许链接的最大链接数,这些链接空闲时会放入池中,如果链接被耗尽,任何请求链接的操作会被阻塞等待链接可用,推荐配置10
minPoolsSize:当Connection空闲时,Connection Pool中最少Connection保有量;
threadsAllowedToBlockForConnectionMultiplier:每个Connection的可以阻塞等待的线程队列数,它以上面connectionsPerHost值相乘的结果就是阻塞等待的线程队列最大值。如果连接线程排满了队列就会抛出“Out of semaphores to get db”错误。
socketKeepAlive:该标志用于控制socket保持活动的功能,通过防火墙保持连接活着
socketKeepAlive=false
autoConnectRetry:这个控制是否在一个Connection时,系统会自动重试
#true:假如Connection不能建立时,驱动将重试相同的server,有最大的重试次数,默认为15次,这样可以避免一些server因为一些阻塞操作零时down而驱动抛出异常,这个对平滑过度到一个新的master,也是很有用的,注意:当集群为复制集时,驱动将在这段时间里,尝试链接到旧的master上,而不会马上链接到新master上
#false 当在进行socket读写时,不会阻止异常抛出,驱动已经有自动重建破坏链接和重试读操作. 推荐配置false
autoConnectRetry=false
#重新打开链接到相同server的最大毫秒数,推荐配置为0,如果 autoConnectRetry=true,表示时间为15s
#com.jd.mongodbclient2.mongo.JDClientMongo.maxAutoConnectRetryTime=false
————————————————
版权声明:本文为CSDN博主「pursuer211」的原创文章,遵循 CC 4.0 BY-SA 版权协议,转载请附上原文出处链接及本声明。
原文链接:https://blog.csdn.net/pursuer211/article/details/82994027
摘要: 前言在本系列文章的第 1 部分,我们搭建了一个用户缴费通知的批处理任务。尽管这个简单的应用展现了 Spring Batch 的基本功能,但是它与真实的应用相去甚远。在实际应用中,我们的 Job 可能必须要包含多个 Step,为了提高性能,我们可能需要考虑 Job 的并发问题。Spring Batch 在这些方面又提供了哪些好的特性呢?让我们继续。Step Flow通过前文我们已经知道,Step 是...
阅读全文
摘要: 引言总述本系列文章旨在通过示例搭建以及特性介绍,详细讲述如何利用 Spring Batch 开发企业批处理应用。本系列文章共分为三部分,第一部分初步介绍了批处理以及 Spring Batch 的相关概念,同时搭建了一个简单的基于 Spring Batch 的批处理应用。第二部分介绍了 Step Flow 以及并发支持。第三部分则主要介绍了 Spring Batch 对任务监控的支持。下面让我们进入...
阅读全文
JVM 的线程堆栈 dump 也称 core dump,内容为文本,主要包含当时 JVM 的线程堆栈,堆 dump 也称 heap dump,内容为二进制格式,主要包含当时 JVM 堆内存中的内容。由于各个操作系统、各个 JVM 实现不同,即使同一 JVM 实现,各个版本也有差异,本文描述的方法都基于 64 位 Linux 操作系统环境,Java 8 Oracle HotSpot JVM 实现。
堆栈和堆的内容在定位问题的时候,都是非常重要的信息。线程堆栈 dump 可以了解当时 JVM 中所有线程的运行情况,比如线程的状态和当前正在运行的代码行。堆 dump 可以了解当时堆的使用情况,各个类实例的数量及各个实例所占用的空间大小。
线程堆栈
使用 jstack
jstack 是 JDK 自带的工具,用于 dump 指定进程 ID(PID)的 JVM 的线程堆栈信息。
# 打印堆栈信息到标准输出 jstack PID
# 打印堆栈信息到标准输出,会打印关于锁的信息 jstack -l PID
强制打印堆栈信息到标准输出,如果使用 jstack PID 没有响应的情况下(此时 JVM 进程可能挂起),
加 -F 参数 jstack -F PID
使用 jcmd
jcmd 是 JDK 自带的工具,用于向 JVM 进程发送命令,根据命令的不同,可以代替或部分代替 jstack、jmap 等。可以发送命令 Thread.print 来打印出 JVM 的线程堆栈信息。
# 下面的命令同等于 jstack PID
jcmd PID Thread.print

# 同等于 jstack -l PID
jcmd PID Thread.print -l
使用 kill -3
kill 可以向特定的进程发送信号(SIGNAL),缺省情况是发送终止(TERM) 的信号 ,即 kill PID 与 kill -15 PID 或 kill -TERM PID 是等价的。JVM 进程会监听 QUIT 信号(其值为 3),当收到这个信号时,会打印出当时的线程堆栈和堆内存使用概要,相比 jstack,此时多了堆内存的使用概要情况。但 jstack 可以指定 -l 参数,打印锁的信息。
kill -3 PID
# 或 kill -QUIT PID
堆
-XX:+HeapDumpOnOutOfMemoryError
添加 JVM 参数 -XX:+HeapDumpOnOutOfMemoryError 后,当发生 OOM(OutOfMemory)时,自动堆 dump。缺省情况下,JVM 会创建一个名称为 java_pidPID.hprof 的堆 dump 文件在 JVM 的工作目录下。但可以使用参数 -XX:HeapDumpPath=PATH 来指定 dump 文件的保存位置。
# JVM 发生 OOM 时,会自动在 /var/log/abc 目录下产生堆 dump 文件 java_pidPID.hprof
java -XX:+HeapDumpOnOutOfMemoryError -XX:HeapDumpPath=/var/log/abc/
jmap
jmap 也是 JDK 自带的工具,主要用于获取堆相关的信息。
堆 dump
# 将 JVM 的堆 dump 到指定文件,如果堆中对象较多,需要的时间会较长,子参数 format 只支持 b,
即二进制格式
jmap -dump:format=b,file=FILE_WITH_PATH

# 如果 JVM 进程未响应命令,可以加上参数 -F 尝试
jmap -F -dump:format=b,file=FILE_WITH_PATH

# 可以只 dump 堆中的存活对象,加上 live 子参数,但使用 -F 时不支持 live
jmap -dump:live,format=b,file=FILE_WITH_PATH
获取堆概要信息
# -heap 参数用于查看指定 JVM 进程的堆的信息,包括堆的各个参数的值,堆中新生代、年老代的内存大小、使用率等
jmap -heap PID

# 同样,如果 JVM 进程未响应命令,可以加上参数 -F 尝试
jmap -F -heap PID
一个实例输出如下:
Attaching to process ID 68322, please wait
Debugger attached successfully.
Server compiler detected.
JVM version is 25.112-b16

using thread-local object allocation.
Parallel GC with 4 thread(s)

Heap Configuration:
   MinHeapFreeRatio         = 0
   MaxHeapFreeRatio         = 100
   MaxHeapSize              = 268435456 (256.0MB)
   NewSize                  = 8388608 (8.0MB)
   MaxNewSize               = 89128960 (85.0MB)
   OldSize                  = 16777216 (16.0MB)
   NewRatio                 = 2
   SurvivorRatio            = 8
   MetaspaceSize            = 21807104 (20.796875MB)
   CompressedClassSpaceSize = 1073741824 (1024.0MB)
   MaxMetaspaceSize         = 17592186044415 MB
   G1HeapRegionSize         = 0 (0.0MB)

Heap Usage:
PS Young Generation
Eden Space:
   capacity = 41943040 (40.0MB)
   used     = 1701504 (1.6226806640625MB)
   free     = 40241536 (38.3773193359375MB)
   4.05670166015625% used
From Space:
   capacity = 4194304 (4.0MB)
   used     = 0 (0.0MB)
   free     = 4194304 (4.0MB)
   0.0% used
To Space:
   capacity = 5242880 (5.0MB)
   used     = 0 (0.0MB)
   free     = 5242880 (5.0MB)
   0.0% used
PS Old Generation
   capacity = 30408704 (29.0MB)
   used     = 12129856 (11.56793212890625MB)
   free     = 18278848 (17.43206787109375MB)
   39.889421134159484% used

16658 interned Strings occupying 1428472 bytes.
获取堆中的类实例统计
# 打印 JVM 堆中的类实例统计信息,以占用内存的大小排序,同样,如果 JVM 未响应命令,也可以使用 -F 参数
jmap -histo PID

# 也可以只统计堆中的存活对象,加上 live 子参数,但使用 -F 时不支持 live
jmap -histo:live PID
使用 jcmd
# 等同 jmap -dump:live,format=b,file=FILE_WITH_PATH
jcmd PID GC.heap_dump FILE_WITH_PATH

# 等同 jmap -dump:format=b,file=FILE_WITH_PATH
jcmd PID GC.heap_dump -all FILE_WITH_PATH

# 等同 jmap -histo:live PID
jcmd PID GC.class_histogram

# 等同 jmap -histo PID
jcmd PID GC.class_histogram -all
var bookIds = db.likes.find({userId:100}).map(function(like) {
return like.bookId;
});
var books = db.books.find({_id:{$in:bookIds}});
db.REPORT_ITEM.count({REQUEST_ID : db.BATCH_CONTROL.find({ FILE_NAME : "20200218_100000.file" }).map(function(like) {
return like._id;
})[0].str, JOB_TYPE_ENUM:"CHECK"})
LINUX通常有个OOM KILLER进程,对于他认为吃内存的进程,会根据一定的算分,执行kill -9杀掉,查看日志如下:
#less /tmp/messages
Feb 20 03:55:09 ip kernel: Out of memory: Kill process 5974 (java) score 494 or sacrifice child
Feb 20 03:55:09 ip kernel: Killed process 5974 (java), UID 1001, total-vm:23674020kB, anon-rss:17503912kB, file-rss:0kB, shmem-rss:0kB
那如何屏蔽呢?
#/etc/cron.d/oom_disable
*/1**** root pgrep -f "java" | while read PID
;do echo -17 > /proc/$PID/oom_adj;done参考文档:
Linux内核OOM机制的详细分析
http://blog.chinaunix.net/uid-29242873-id-3942763.html
In this video I explain some 21 JVM parameters which are suited for most server applications. If you have any questions, you can read those links below for more information or just ask in the comments section.

I run several Java enterprise server applications. I often wondered – what are the best „default“ JVM settings for a server application to start with in production? I read a lot on the web and tried several things myself and wanted to share what I found out, so far. Links containing more information about JVM optimization can be found here:
http://blog.sokolenko.me/2014/11/javavm-options-production.html
http://www.petefreitag.com/articles/gctuning/
http://stas-blogspot.blogspot.de/2011/07/most-complete-list-of-xx-options-for.html
So let’s start:
-server
Use „-server“: All 64-bit JVMs use the server VM as default anyway. This setting generally optimizes the JVM for long running server applications instead of startup time. The JVM will collect more data about the Java byte code during program execution and generate the most efficient machine code via JIT.
-Xms=<heap size>[g|m|k] -Xmx=<heap size>[g|m|k]
The „-Xmx/-Xms“ settings specify the maximum and minimum values for the JVM heap memory. For servers, both params should have the same value to avoid heap resizing during runtime. I’ve applications running with 16GB heap sizes without an issue.
Depending on your application, you will have to try out how much memory will be best suited for your use case.
-XX:MaxMetaspaceSize=<metaspace size>[g|m|k]
Java 8 has no „Permanent Generation“ (PermGen) anymore but requires additional „Metaspace“ memory instead. This memory is used, in addition to the heap memory we specified before, for storing class meta data information.
The default size will be unlimited – I tend to limit MaxMetaspaceSize with a somewhat high value. Just in case something goes wrong with the application, the JVM will not hog all the memory of the server.
I suggest: Let your application run for a couple of days to get a feeling for how much Metaspace Size it uses normally. Upon next restart of the application set the limit to e.g. double the value.
-XX:+CMSClassUnloadingEnabled
Additionally, you might want to allow the JVM to unload classes which are held in memory but no code is pointing to them any more. If your application generates lots of dynamic classes, this is what you want.
-XX:+UseConcMarkSweepGC
This option makes the JVM use the ConcurrentMarkSweepGC – It can do much work in parallel to program execution but in some circumstances a „full GC“ with a „STW pause“ might still occur. I’ve read many articles and came to the conclusion that this GC is still the best one for server workloads.
-XX:+CMSParallelRemarkEnabled
The option CMSParallelRemarkEnabled means the remarking is done in parallel to program execution – which is what you want if your server has many cores (and most servers do).
-XX:+UseCMSInitiatingOccupancyOnly -XX:CMSInitiatingOccupancyFraction=<percent>
Normally the GC will use heuristics to know when it’s time to clear memory. GC might kick in too late with default settings (causing full-Gcs).
Some sources say it might be a good idea to disable heuristics altogether and just use generation occupancy to start a CMS collection cycle. Setting values around 70% worked fine for all of my applications and use cases.
-XX:+ScavengeBeforeFullGC
The first option tells the GC to first free memory by clearing out the „young generation“ or fairly new objects before doing a full GC.
-XX:+CMSScavengeBeforeRemark
CMSScavengeBeforeRemark does attempt a minor collection before the CMS remark phase – thus keeping the remark pause afterwards short.
-XX:+CMSClassUnloadingEnabled
The option „-XX:+CMSClassUnloadingEnabled“ here tells the JVM to unload classes, which are not needed any more by the running application. If you deploy war files to an application server like wildfly, tomcat or glassfish without restarting the server after the deployment, this flag is for you.
-XX:+ExplicitGCInvokesConcurrentAndUnloadsClasses
The option „-XX:+ExplicitGCInvokesConcurrentAndUnloadsClasses“ is especially important if your application uses RMI (remote method invocation). The usage of RMI will cause the JVM to do a FULL-GC EVERY HOUR! This might be a very bad idea for large heap sizes because the FULL-GC pause might take up to several seconds. It would be better to do a concurrent GC and try to unload unused classes to free up more memory – which is exactly what the second option does.
-XX:+PrintGCDateStamps -verbose:gc -XX:+PrintGCDetails -Xloggc:"<path to log>"
These options shown here will write out all GC related information to a specified log file. You can see how well your GC configuration works by looking into it.
I personally prefer to use the „Visual GC“ plug in for the „Visual VM“ tool to monitor the general JVM and GC behavior.
-XX:+HeapDumpOnOutOfMemoryError -XX:HeapDumpPath=<path to dump>`date`.hprof
When your JVM runs out of memory, you will want to know why. Since the OOM error might be hard to reproduce and you want to get your production server up and running again – you should specify a path for a heap dump. When things have settled down, you can analyze the dump afterwards.
-Djava.rmi.server.hostname=<external IP> -Dcom.sun.management.jmxremote.port=<port>
These options will help you to specify an IP and port for JMX – you will need those ports open to connect remotely to a JVM running on a server for tools like VisualVM. You can gain deep insights over cpu and memory usage, gc behaviour, class loading, thread count and usage of your application this way.

Lastly, I would like to recommend to you the VisualVM tool which is bundled with the Java 8 JDK. You can use it to gain more insights about your specific application behaviour on the JVM – like cpu and memory usage, thread utilisation and much more.
 VisualVM can be extended with a plug in called „Visual GC“. It will briefly show you VERY detailed information about the usage of the young and old generation object spaces. You can easily spot problems with garbage collection simply by analyzing these graphs during application runtime.
Thank you very much for watching! If you liked the video you might consider giving it a „thumbs up“. If you have any questions – just put them in the comments section. I will reply as quickly as possible.
-------------------------------------------------------
-XX:+UseCompressedOops [If Max Heap allocation is less than 32GB]
This can save a significant amount of memory and this option should already be enabled by default on recent java 8 versions. This option allowes object references to be stored as 32-bit values instead of 64-bit on 64-bit JVMs. This leads to before mentioned memory savings.
-XX:+AggressiveOpts
This option will enable performance options which are hoped to become enabled by default in upcoming released of the JVM. This option sets some performance settings but is marked as experimental! So you should only enable it, when you have to possibility to test your application thoroughly before enabling this flag on an production server.
-XX:+UseStringDeduplication
Since Java 8 update 20 you can use this option to reduce the memory usage of your application. The JVM will spot identical strings in memory, remove the duplicated and point all references to the remaining, single instance of the string.
-XX:+UseG1GC
Will tell the JVM to use the most recent G1 garbage collector. You are trading better application response times (due to shorter gc times with G1) against lower throughput (compared against good old ConcMarkSweepGC / CMS). If your application can deliver more value through short gc times, then G1 is definately better suited. Otherwise on Java 8, I’d recommend sticking with CMS.
Concerning your Tomcat 8 question, I’d suggest you have a look into it with the „VisualVM“ tool. Look at memory usage, GC times (visual GC plugin), pull and analyse stack traces or thread dumps to find the weak spot. You might also consider attaching a debugger to tomcat to find the bug.
https://www.maknesium.de/21-most-important-java-8-vm-options-for-servers
由于jenkins是调用windows的git取代码,因此是git的问题,进行如下配置即可:
git config --global core.longpaths true
SPRING BOOT 环境下,测试有时会依赖于外部的中间件,如Mysql,Activemq,Mongodb等,那如何能减少这种依赖呢?
SPRING BOOT其实已经实现了自动化配置。
Mongodb
SPRING BOOT的自动化配置文件:org.springframework.boot.autoconfigure.mongo.embeddedEmbedded.MongoAutoConfiguration.java
在pom.xml中新增一test profile,并添加相应jar包,这样可防止对其他profile的影响,如果是在Eclipse跑测试,需在Project的属性中指定Active Profile为test,以覆盖pom.xml的定义。
这种方式即使是使用SPRING DATA MONGODB的REPOSITORY也是适用的。
<profile>
<id>test</id>
<dependencies>
<dependency>
<groupId>de.flapdoodle.embed</groupId>
<artifactId>de.flapdoodle.embed.mongo</artifactId>
<scope>test</scope>
</dependency>
</dependencies>
<activation>
<activeByDefault>false</activeByDefault>
</activation>
</profile>
在application-test.yaml中添加端口,其他如IP那些信息都不需要
spring:
data:
mongodb:
port: 27017
unit test config
import java.io.FileNotFoundException;
import java.io.IOException;
import java.io.InputStreamReader;
import java.io.Reader;
import java.io.UncheckedIOException;
import java.nio.charset.StandardCharsets;
import java.util.List;
import javax.annotation.PostConstruct;
import javax.sql.DataSource;
import org.bson.Document;
import org.springframework.beans.factory.annotation.Autowired;
import org.springframework.beans.factory.annotation.Value;
import org.springframework.context.annotation.Configuration;
import org.springframework.context.annotation.Profile;
import org.springframework.core.io.Resource;
import org.springframework.core.io.ResourceLoader;
import org.springframework.data.mongodb.core.MongoTemplate;
import org.springframework.data.mongodb.repository.config.EnableMongoRepositories;
import org.springframework.jdbc.datasource.init.DatabasePopulatorUtils;
import org.springframework.jdbc.datasource.init.ResourceDatabasePopulator;
import org.springframework.util.FileCopyUtils;
@Configuration
@Profile({"test", "integrationTest"})
@EnableMongoRepositories(
basePackages = {"paul.com.repository"
}
)
public class EmbeddedDataSourceConfiguration {
@Value("classpath:/initdata/USER.json")
private Resource userResource;
@Value("classpath:/initdata/MEMBERS.json")
private Resource membersResource;
@Autowired
private ResourceLoader resourceLoader;
@Autowired
private DataSource dataSource;
@Autowired
private MongoTemplate mongoTemplate;
@PostConstruct
protected void initialize() throws FileNotFoundException, IOException {
this.initializeHsqldb();
this.initializeMongodb();
}
private void initializeHsqldb() {
ResourceDatabasePopulator populator = new ResourceDatabasePopulator();
populator.addScript(resourceLoader.getResource("classpath:/org/springframework/batch/core/schema-hsqldb.sql"));
populator.setContinueOnError(true);
DatabasePopulatorUtils.execute(populator , dataSource);
}
private void initializeMongodb() throws FileNotFoundException, IOException {
this.saveResource(userResource, "USER");
this.saveDocumentList(membersResource, "MEMBER");
}
private void saveResource(Resource resource, String collectionName) {
String resourceJson = this.asString(resource);
Document resourceDocument = Document.parse(resourceJson);
this.mongoTemplate.save(resourceDocument, collectionName);
}
private void saveDocumentList(Resource resource, String collectionName) {
String resourceJson = this.asString(resource);
Document resourceDocument = Document.parse("{ \"list\":" + resourceJson + "}");
List<Document> documentList = resourceDocument.get("list", List.class);
documentList.forEach(document -> this.mongoTemplate.save(document, collectionName));
}
private String asString(Resource resource) {
try (Reader reader = new InputStreamReader(resource.getInputStream(), StandardCharsets.UTF_8)) {
return FileCopyUtils.copyToString(reader);
} catch (IOException e) {
throw new UncheckedIOException(e);
}
}
// @Bean(destroyMethod="close")
// public DataSource dataSource() {
// BasicDataSource dataSource = new BasicDataSource();
// dataSource.setDriverClassName(environment.getProperty("batch.jdbc.driver"));
// dataSource.setUrl(environment.getProperty("batch.jdbc.url"));
// dataSource.setUsername(environment.getProperty("batch.jdbc.user"));
// dataSource.setPassword(environment.getProperty("batch.jdbc.password"));
// return dataSource;
// }
}
ActiveMQ
只需更改application-test.yml中的brokerUrl为vm://embedded即可
spring:
activemq:
broker-url: vm://embedded?broker.persistent=false,useShutdownHook=false
in-memory: true
non-blocking-redelivery: true
#packages:
#trust-all: false
#trusted: com.memorynotfound
pool:
block-if-full: true
block-if-full-timeout: -1
create-connection-on-startup: true
enabled: false
expiry-timeout: 0
idle-timeout: 30000
max-connections: 1
maximum-active-session-per-connection: 500
reconnect-on-exception: true
time-between-expiration-check: -1
use-anonymous-producers: true
user: admin
#password: ENC(hWJHuMyhydTqyF32neasTw==)
password: admin
关系型数据库
将在application-test.yml中的数据库信息删除,同时在pom.xml中添加jar包依赖,这边是采用HSQL数据库
<profile>
<id>test</id>
<dependencies>
<dependency>
<groupId>org.hsqldb</groupId>
<artifactId>hsqldb</artifactId>
<scope>test</scope>
</dependency>
</dependencies>
<activation>
<activeByDefault>false</activeByDefault>
</activation>
</profile>
非SPRING BOOT/SPRING的纯JDK环境可参考
https://github.com/yandex-qatools/embedded-services
https://github.com/flapdoodle-oss/de.flapdoodle.embed.mongo
https://github.com/jonyfs/spring-boot-data-embedded-mongodb/blob/master/src/main/java/br/com/jonyfs/spring/boot/data/embedded/mongodb/config/MongoConfig.java
ActiveMQ:
https://memorynotfound.com/spring-boot-embedded-activemq-configuration-example/
关键是JobLauncherTestUtils的配置:
@Configuration
public class BatchTestConfiguration {
@Bean
public JobLauncherTestUtils stoppedReportJobLauncherTestUtils(
JobLauncher stoppedReportJobLauncher
) {
return new JobLauncherTestUtils() {
@Autowired
public void setJobLauncher(JobLauncher stoppedReportJobLauncher) {
super.setJobLauncher(stoppedReportJobLauncher);
}
@Autowired
public void setJob(Job stoppedReportJob) {
super.setJob(stoppedReportJob);
}
};
}
}
Spring Batch Remote Chunk模式下,远程执行JOB时,传输的对象是ChunkRequest/ChunkResponse,无法转成JSON格式传输。
注意此处使用的是SPRING JACKSON,而不是JACKSON。一般是在SPRING INTEGRATIONA框架下转的。
需要自定义Transformer:
JsonToChunkRequestTransformer.java
package com.frandorado.springbatchawsintegrationslave.transformer;
import java.io.IOException;
import java.util.Collection;
import java.util.Map;
import java.util.stream.IntStream;
import org.springframework.batch.core.ExitStatus;
import org.springframework.batch.core.StepContribution;
import org.springframework.batch.core.StepExecution;
import org.springframework.batch.integration.chunk.ChunkRequest;
import org.springframework.beans.factory.annotation.Autowired;
import org.springframework.integration.aws.support.AwsHeaders;
import org.springframework.integration.json.JsonToObjectTransformer;
import org.springframework.messaging.Message;
import org.springframework.stereotype.Component;
import com.amazonaws.services.sqs.AmazonSQSAsync;
import com.fasterxml.jackson.databind.ObjectMapper;
@Component
public class JsonToChunkRequestTransformer extends JsonToObjectTransformer {
private static final String MESSAGE_GROUP_ID_HEADER = "message-group-id";
@Autowired
AmazonSQSAsync amazonSQSAsync;
@Override
protected Object doTransform(Message<?> message) throws Exception {
// ACK
ack(message);
return this.getMessageBuilderFactory().withPayload(buildChunkRequest(message)).setHeader(MESSAGE_GROUP_ID_HEADER, "unique").build();
}
private ChunkRequest buildChunkRequest(Message<?> message) throws IOException {
Map map = new ObjectMapper().readValue(message.getPayload().toString(), Map.class);
Map stepContributionMap = (Map) map.get("stepContribution");
Map exitStatusMap = (Map) stepContributionMap.get("exitStatus");
StepContribution stepContribution = new StepContribution(new StepExecution("null", null));
ExitStatus exitStatus = new ExitStatus((String) exitStatusMap.get("exitCode"), (String) exitStatusMap.get("exitDescription"));
IntStream.range(0, (Integer) stepContributionMap.get("readCount")).forEach(e -> stepContribution.incrementReadCount());
stepContribution.incrementWriteCount((Integer) stepContributionMap.get("writeCount"));
stepContribution.incrementFilterCount((Integer) stepContributionMap.get("filterCount"));
stepContribution.incrementReadSkipCount((Integer) stepContributionMap.get("readSkipCount"));
IntStream.range(0, (Integer) stepContributionMap.get("writeSkipCount")).forEach(e -> stepContribution.incrementWriteSkipCount());
IntStream.range(0, (Integer) stepContributionMap.get("processSkipCount"))
.forEach(e -> stepContribution.incrementProcessSkipCount());
stepContribution.setExitStatus(exitStatus);
return new ChunkRequest((Integer) map.get("sequence"), (Collection) map.get("items"), (Integer) map.get("jobId"), stepContribution);
}
private void ack(Message<?> message) {
String receiptHandle = message.getHeaders().get(AwsHeaders.RECEIPT_HANDLE, String.class);
String queue = message.getHeaders().get(AwsHeaders.QUEUE, String.class);
String queueUrl = amazonSQSAsync.getQueueUrl(queue).getQueueUrl();
amazonSQSAsync.deleteMessage(queueUrl, receiptHandle);
}
}
JsonToChunkResponseTransformer.java
package com.frandorado.springbatchawsintegrationmaster.transformer;
import java.io.IOException;
import java.util.Map;
import org.springframework.batch.core.StepContribution;
import org.springframework.batch.core.StepExecution;
import org.springframework.batch.integration.chunk.ChunkResponse;
import org.springframework.integration.json.JsonToObjectTransformer;
import org.springframework.messaging.Message;
import org.springframework.stereotype.Component;
import com.fasterxml.jackson.databind.ObjectMapper;
@Component
public class JsonToChunkResponseTransformer extends JsonToObjectTransformer {
@Override
protected Object doTransform(Message<?> message) throws Exception {
return buildChunkResponse(message);
}
private ChunkResponse buildChunkResponse(Message<?> message) throws IOException {
Map map = new ObjectMapper().readValue(message.getPayload().toString(), Map.class);
Integer jobId = (Integer) map.get("jobId");
Integer sequence = (Integer) map.get("sequence");
String messageContent = (String) map.get("message");
Boolean status = (Boolean) map.get("successful");
StepContribution stepContribution = new StepContribution(new StepExecution("-", null));
return new ChunkResponse(status, sequence, Long.valueOf(jobId), stepContribution, messageContent);
}
}
还有一种方式,就是如果第三类不支持转JSON,即代码里没有JACKSON的注解,可以采用MIXIN的方式:
StepExecutionJacksonMixIn.java
package org.springframework.cloud.dataflow.rest.client.support;
import com.fasterxml.jackson.annotation.JsonCreator;
import com.fasterxml.jackson.annotation.JsonIgnoreProperties;
import com.fasterxml.jackson.annotation.JsonProperty;
import org.springframework.batch.core.StepExecution;
/**
* Jackson MixIn for {@link StepExecution} de-serialization.
*
* @author Gunnar Hillert
* @since 1.0
*/
@JsonIgnoreProperties({ "jobExecution", "jobParameters", "jobExecutionId", "skipCount", "summary" })
public abstract class StepExecutionJacksonMixIn {
@JsonCreator
StepExecutionJacksonMixIn(@JsonProperty("stepName") String stepName) {
}
}
在配置文件中注册才能使用:
JacksonConfiguration.java
import java.util.Locale;
import java.util.TimeZone;
import org.springframework.batch.core.ExitStatus;
import org.springframework.batch.core.JobExecution;
import org.springframework.batch.core.JobInstance;
import org.springframework.batch.core.JobParameter;
import org.springframework.batch.core.JobParameters;
import org.springframework.batch.core.StepExecution;
import org.springframework.batch.item.ExecutionContext;
import org.springframework.boot.autoconfigure.jackson.Jackson2ObjectMapperBuilderCustomizer;
import org.springframework.context.annotation.Bean;
import org.springframework.context.annotation.Configuration;
import org.springframework.integration.support.json.Jackson2JsonObjectMapper;
import com.fasterxml.jackson.databind.ObjectMapper;
import com.fasterxml.jackson.datatype.jdk8.Jdk8Module;
import com.fasterxml.jackson.datatype.jsr310.JavaTimeModule;
import com.novacredit.bmb.batchmonitor.springbatch.common.batch.jackson.ISO8601DateFormatWithMilliSeconds;
import com.novacredit.bmb.batchmonitor.springbatch.common.batch.jackson.mixin.ExecutionContextJacksonMixIn;
import com.novacredit.bmb.batchmonitor.springbatch.common.batch.jackson.mixin.ExitStatusJacksonMixIn;
import com.novacredit.bmb.batchmonitor.springbatch.common.batch.jackson.mixin.JobExecutionJacksonMixIn;
import com.novacredit.bmb.batchmonitor.springbatch.common.batch.jackson.mixin.JobInstanceJacksonMixIn;
import com.novacredit.bmb.batchmonitor.springbatch.common.batch.jackson.mixin.JobParameterJacksonMixIn;
import com.novacredit.bmb.batchmonitor.springbatch.common.batch.jackson.mixin.JobParametersJacksonMixIn;
import com.novacredit.bmb.batchmonitor.springbatch.common.batch.jackson.mixin.StepExecutionJacksonMixIn;
@Configuration
public class JacksonConfiguration {
@Bean
public Jackson2JsonObjectMapper jackson2JsonObjectMapper(ObjectMapper objectMapper) {
return new Jackson2JsonObjectMapper(objectMapper);
}
@Bean
public Jackson2ObjectMapperBuilderCustomizer dataflowObjectMapperBuilderCustomizer() {
return (builder) -> {
builder.dateFormat(new ISO8601DateFormatWithMilliSeconds(TimeZone.getDefault(), Locale.getDefault(), true));
// apply SCDF Batch Mixins to
// ignore the JobExecution in StepExecution to prevent infinite loop.
// https://github.com/spring-projects/spring-hateoas/issues/333
builder.mixIn(StepExecution.class, StepExecutionJacksonMixIn.class);
builder.mixIn(ExecutionContext.class, ExecutionContextJacksonMixIn.class);
builder.mixIn(JobExecution.class, JobExecutionJacksonMixIn.class);
builder.mixIn(JobParameters.class, JobParametersJacksonMixIn.class);
builder.mixIn(JobParameter.class, JobParameterJacksonMixIn.class);
builder.mixIn(JobInstance.class, JobInstanceJacksonMixIn.class);
// builder.mixIn(StepExecutionHistory.class, StepExecutionHistoryJacksonMixIn.class);
builder.mixIn(ExecutionContext.class, ExecutionContextJacksonMixIn.class);
builder.mixIn(ExitStatus.class, ExitStatusJacksonMixIn.class);
// objectMapper.setDateFormat(new ISO8601DateFormatWithMilliSeconds());
builder.modules(new JavaTimeModule(), new Jdk8Module());
};
}
}
@Bean
public IntegrationFlow flow4Contribution(
ConnectionFactory connectionFactory,
JobProperties jobProperties,
Jackson2JsonObjectMapper jackson2JsonObjectMapper
) {
return IntegrationFlows
.from(request4ContributionMaster())
.enrichHeaders(headerEnricherConfigurer())
.transform(Transformers.toJson(jackson2JsonObjectMapper))
.handle(jmsOutboundGateway4Contribution(connectionFactory, jobProperties))
.transform(Transformers.fromJson(StepExecution.class, jackson2JsonObjectMapper))
.channel(replies4ContributionMaster(null))
.get();
}
https://github.com/spring-cloud/spring-cloud-dataflow/tree/master/spring-cloud-dataflow-rest-client/src/main/java/org/springframework/cloud/dataflow/rest/client/support
https://frandorado.github.io/spring/2019/07/29/spring-batch-aws-series-introduction.html
https://github.com/frandorado/spring-projects/tree/master/spring-batch-aws-integration/spring-batch-aws-integration-master/src/main/java/com/frandorado/springbatchawsintegrationmaster/transformer
https://github.com/frandorado/spring-projects/tree/master/spring-batch-aws-integration/spring-batch-aws-integration-slave/src/main/java/com/frandorado/springbatchawsintegrationslave/transformer
https://shapeshed.com/unix-du/查询>100M的文件,倒序排列,文件大小以K/M/G等显示:
-h: 以可读方式显示,-t 排除小于100m的文件,sort排序,less: 分页
du -ah -t 100m / | sort -n -r | less
https://github.com/zakyalvan/spring-integration-java-dsl-learnpackage com.jwebs.learn.errorhandling;
import java.util.Random;
import javax.jms.ConnectionFactory;
import org.springframework.beans.factory.annotation.Autowired;
import org.springframework.beans.factory.annotation.Qualifier;
import org.springframework.boot.autoconfigure.SpringBootApplication;
import org.springframework.boot.builder.SpringApplicationBuilder;
import org.springframework.context.ConfigurableApplicationContext;
import org.springframework.context.annotation.Bean;
import org.springframework.integration.annotation.IntegrationComponentScan;
import org.springframework.integration.channel.PublishSubscribeChannel;
import org.springframework.integration.core.MessageSource;
import org.springframework.integration.dsl.IntegrationFlow;
import org.springframework.integration.dsl.IntegrationFlows;
import org.springframework.integration.dsl.core.Pollers;
import org.springframework.integration.dsl.jms.Jms;
import org.springframework.integration.support.MessageBuilder;
import org.springframework.messaging.MessagingException;
/**
* Show how to handle error in spring integration flow.
* Please note, errorChannel in spring integration only applicable to
* error thrown in asynch component.
*
* @author zakyalvan
*/@SpringBootApplication
@IntegrationComponentScan
public class ErrorHandlingApplication {
public static void main(String[] args)
throws Exception {
ConfigurableApplicationContext applicationContext =
new SpringApplicationBuilder(ErrorHandlingApplication.
class)
.web(
false)
.run(args);
Runtime.getRuntime().addShutdownHook(
new Thread(() -> applicationContext.close()));
System.out.println("Pres enter key to exit
");
System.in.read();
System.exit(0);
}
@Autowired
private ConnectionFactory connectionFactory;
@Bean
public MessageSource<Integer> randomIntegerMessageSource() {
return () -> MessageBuilder.withPayload(
new Random().nextInt()).build();
}
@Bean
public IntegrationFlow withErrorFlow() {
return IntegrationFlows.from(randomIntegerMessageSource(), spec -> spec.poller(Pollers.fixedDelay(1000)))
.handle(Jms.outboundGateway(connectionFactory)
.requestDestination("processor.input")
.replyContainer(spec -> spec.sessionTransacted(
true)))
.get();
}
@Autowired
@Qualifier("errorChannel")
private PublishSubscribeChannel errorChannel;
@Bean
public IntegrationFlow errorHandlingFlow() {
return IntegrationFlows.from(errorChannel)
.handle(message -> System.out.println("@@@@@@@@@@@@@@@@@@@@@" + ((MessagingException) message.getPayload()).getFailedMessage().getPayload()))
.get();
}
}
基础设施:条条道路通云端
对于云厂商来说,2019 年是硕果累累的一年。不仅初创公司在使用云计算,那些很注重安全的“保守派”公司(如政府机构、医疗保健机构、银行、保险公司,甚至是美国五角大楼)也在迁移到云端。这种趋势在 2020 年将会继续,大大小小的公司都将(或者至少有计划)迁移到云端。Gartner 公司最近发布了一个数字:
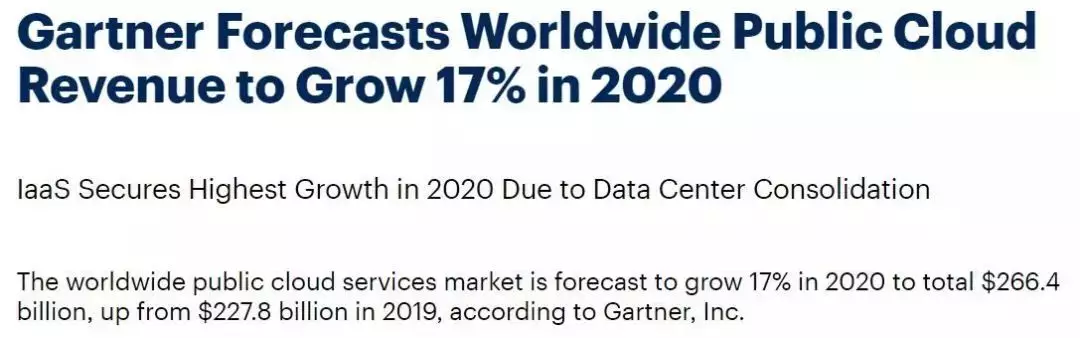
如果你是一个还在考虑要不要迁移到云端的决策者,不妨重新审视一下你的策略。如果你是一个独立开发者,并且还没使用过云基础设施,那么完全可以在 2020 年尝试一下。很多大型的云厂商(如亚马逊、微软、谷歌)都提供了免费的体验机会。谷歌在这方面做得特别大方,它提供了价值 300 美元的一年免费服务。

策划注:阿里、腾讯、华为等国内云厂商同样有免费云服务试用产品。
云平台:亚马逊领头,其他跟上
作为第一大云厂商,亚马逊在 2019 年可谓风生水起。凭借其丰富的产品组合,亚马逊将把它的优势延续到 2020 年。Canalys 发布的 2019 年第三季度报告指出,大型云厂商(AWS、Azure、GCP)占据 56% 的市场份额,其中 AWS 独享 32.6%。

其他云厂商也在努力缩短与 AWS 之间的差距。微软把主要目标转向了大型企业。最近,微软打败了亚马逊,从美国五角大楼拿到了一个 100 亿美元的大单子。这个单子将提升 Azure 的声誉,同时削弱 AWS 的士气。

谷歌一直在推动 CNCF,实现云计算运维的标准化。谷歌的长期目标是让云迁移变得更容易,方便企业从 AWS 迁移到 GCP。IBM 之前斥资 360 亿美元收购了 RedHat,也想要在云计算市场占有一席之地。
在亚太地区,阿里云市场规模超过了 AWS、Azure 的总和,全球排名第三。中国国内腾讯云等企业的增长势头也十分迅猛。
2020 年将出现更多的并购。当然,很多初创公司将会带来新的想法和创新,例如多云服务。因为竞争激烈,这些公司只能从降价和推出更多的创新产品来获取利润。
容器化:Kubernetes 将会更酷
在容器编排领域,虽然一度出现了“三足鼎立”(Kubernetes、Docker Swarm 和 Mesos),但 Kubernetes 最终脱颖而出,成为绝对的赢家。云是一个分布式系统,而 Kubernetes 是它的 OS(分布式的 Linux)。2019 年北美 KubeCon+CloudNativeCon 大会的参会者达到了 12000 名,比 2018 年增长了 50%。以下是过去 4 年参会人数的增长情况。
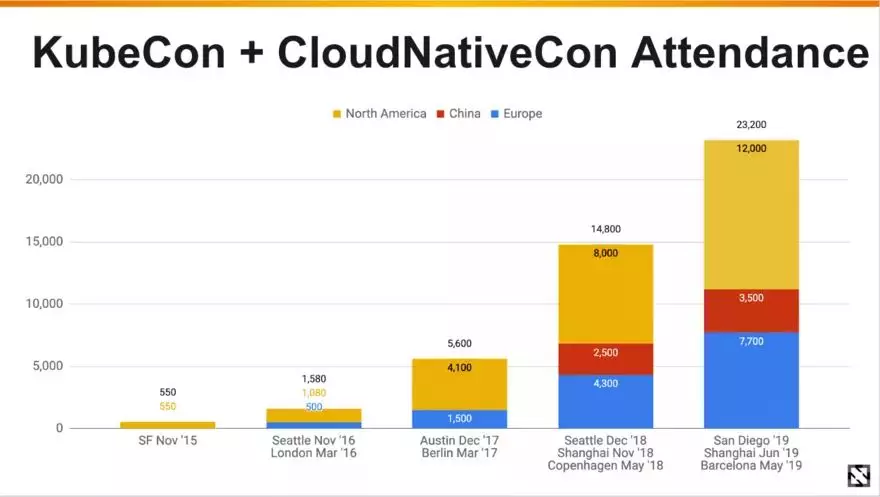
在 2020 年,Kubernetes 不仅不会后退,只会变得越来越强,你完全可以把赌注压在 Kubernetes 身上。另外值得一提的是,Migrantis 最近收购了 Docker Enterprise,不过收购数额不详。
几年前,人们张口闭口说的都是 Docker,而现在换成了 Kubernetes。Docker 在它的全盛时期未能盈利,反而在优势渐退几年之后才尝试变现。这再次说明,在现代技术世界,时机就是一切。
软件架构:微服务将成为主流
谷歌趋势表明,微服务架构范式在 2019 年持续增长了一整年。

随着软件行业整体逐步迁移到云端,微服务也将成为占主导地位的架构范式。微服务架构崛起的一个主要原因是它与云原生完美契合,可以实现快速的软件开发。我在之前的一篇博文中解释了微服务架构的基本原则及其优势和劣势。
https://towardsdatascience.com/microservice-architecture-a-brief-overview-and-why-you-should-use-it-in-your-next-project-a17b6e19adfd
我假设现在也存在一种回归到单体架构的趋势,因为在很多情况下,微服务架构有点过头了,而且做好微服务架构设计其实很难。微服务架构有哪些好的实践?在之前的另一篇博文中,我也给出了一些大概,希望对读者有用。
https://towardsdatascience.com/effective-microservices-10-best-practices-c6e4ba0c6ee2
编程语言(整体):Python 将吞噬世界
机器学习、数据分析、数据处理、Web 开发、企业软件开发,甚至是拼接黑洞照片,Python 的影子无处不在。
在著名的编程语言排行榜网站 TIOBE 上,Python 位居最流行编程语言第三位,仅次于 Java 和 C 语言。
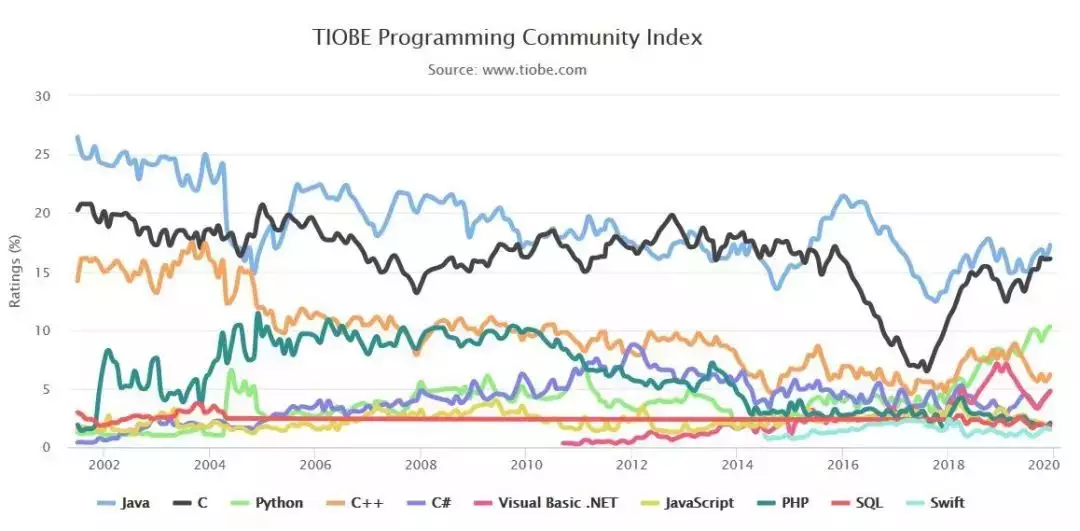
更有意思的是,在 2019 年,Python 的流行度翻了一番(从 5% 到 10%)。
Python 的崛起将在 2020 年延续,并缩短与 Java 和 C 语言之间的差距。另一门无所不在的编程语言 JavaScript 正面临下行的风险。为什么 Python 的势头会如此强劲?因为它的入手门槛低,有一个优秀的社区在支持,并受到数据科学家和新生代开发者的喜爱。
编程语言(企业方面):Java 将占主导
之前的 TIOBE 网站截图显示,Java 仍然是一门占主导地位的编程语言,并将在 2020 年继续保持这种地位。JVM 是 Java 的基石,其他编程语言(如 Kotlin、Scala、Clojure、Groovy)也将 JVM 作为运行时。最近,Oracle 修改了 JVM 的许可协议。
新的许可协议意味着使用 Java、Kotlin、Scala 或其他 JVM 编程语言的公司需要向 Oracle 支付大额费用。所幸的是,OpenJDK 让 JVM 继续免费。另外,还有其他一些公司为 JVM 提供企业支持。
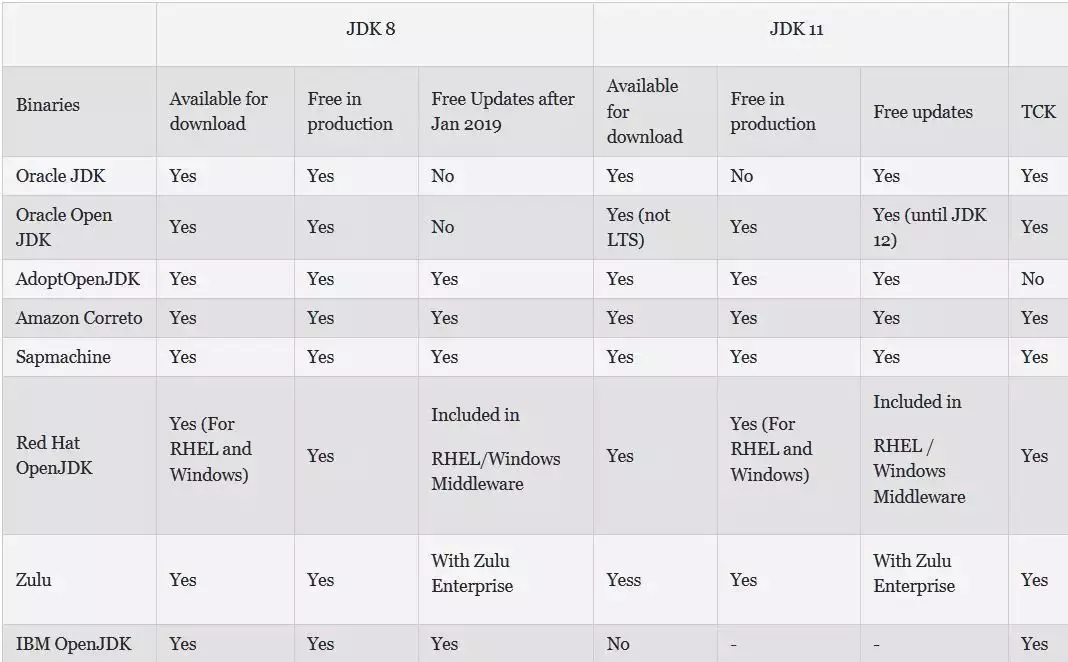
因为体积和速度方面的问题,基于 JVM 的编程语言并不适合用在今天的无服务器环境中。Oracle 正在推动 GraalVM 计划,旨在让 Java 变得更加敏捷和快速,让它更适合用在无服务器环境中。因为除了 Java,没有其他编程语言可以提供企业级的稳定性和可靠性,所以 Java 将在 2020 年继续占主导地位。
企业版 Java:Spring 继续发力
曾几何时,在企业开发领域,Spring 和 JavaEE 之间存在着白热化的竞争。但因为 Oracle 在 JavaEE 方面没有作为,在竞争中惨败,这导致了“MicroProfile”计划的形成,并最终促成了 JakartaEE。
虽然所有的政策和活动都是围绕 JavaEE 展开,但 Spring 事实上已经赢得了这场企业 JVM 之争。2020 年,Spring 将成为 JVM 生态系统的头牌。
有两个正在进展中的项目,它们旨在减小 Java 的体积,让它更适合用在无服务器环境中。
其中一个是 Micronaut(https://micronaut.io/)。

另一个是 Quarkus(https://quarkus.io/)。
这两个项目都使用了 GraalVM,它们在 2020 年将会得到 Java 社区更多的关注。
编程语言:后起之秀的突破
2000 年代,编程语言的发展出现了停滞。大多数人认为没有必要再去开发新的编程语言,Java、C 语言、C++、JavaScript 和 Python 已经可以满足所有的需求。但是,谷歌的 Go 语言为新编程语言大门打开了一扇大门。在过去十年出现了很多有趣的编程语言,比如 Rust、Swift、Kotlin、TypeScript。导致这种情况的一个主要原因是已有的编程语言无法充分利用硬件优势(例如多核、更快的网络、云)。另一个原因是现代编程语言更加关注开发者经济,即实现更快速更容易的开发。在 Stackoverflow 提供的一份开发者报告中,排名靠前的现代编程语言如下所示(Rust 连续 4 年名列第一)。
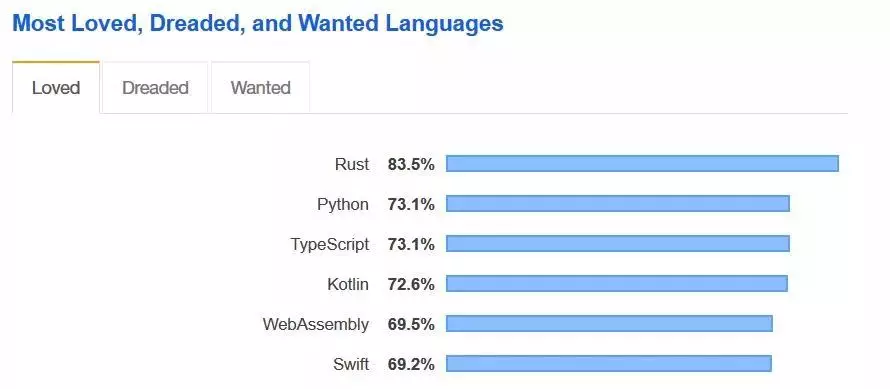
在之前的一篇博文中,我深入探讨了现代编程语言,对比 Rust 和 Go 语言,并说明了为什么现在是采用这些语言的好时机。
https://towardsdatascience.com/back-to-the-metal-top-3-programming-language-to-develop-big-data-frameworks-in-2019-69a44a36a842
最近,微软宣布他们在探索使用 Rust 来开发更安全的软件。

亚马逊最近也宣布要赞助 Rust。
谷歌宣布将 Kotlin 作为 Android 官方开发语言,所以,在 JVM 领域,Kotlin 成了 Java 的主要竞争对手。

Angular 使用 TypeScript 代替 JavaScript,将其作为主要的编程语言,其他 JavaScript 框架(如 React 和 Vue)也开始为 TypeScript 提供更多的支持。
这种趋势将在 2020 年延续下去,很多巨头公司将会深入了解新一代编程语言(如 Rust、Swift、TypeScript、Kotlin),它们会站出来公开表示支持。
Web:JavaScript 继续占主导地位
曾几何时,JavaScript 并不被认为是一门强大的编程语言。在当时,前端内容主要通过后端框架在服务器端进行渲染。2014 年,AngularJS 的出现改变了这种局面。从那个时候开始,更多的 JavaScript 框架开始涌现(Angular 2+、React、Vue、Meteor),JavaScript 已然成为主流的 Web 开发语言。随着 JavaScript 框架不断创新以及微服务架构的崛起,JavaScript 框架在 2020 年将继续主导前端开发。
JavaScript 框架:React 闪耀
虽然 React 是在 AngularJS 之后出现的,但在过去十年对 Web 开发产生了巨大的影响,这也让 Facebook 在与 Google+ 的竞争中打了一场胜战。React 为前端开发带来了一些新的想法,比如事件溯源、虚拟 DOM、单向数据绑定、基于组件的开发,等等。它对开发者社区产生了重大影响,以至于谷歌放弃了 AngularJS,并借鉴 React 的想法推出了彻底重写的 Angular 2+。React 是目前为止最为流行的 JavaScript 框架,下图显示了相关的 NPM 下载统计信息。
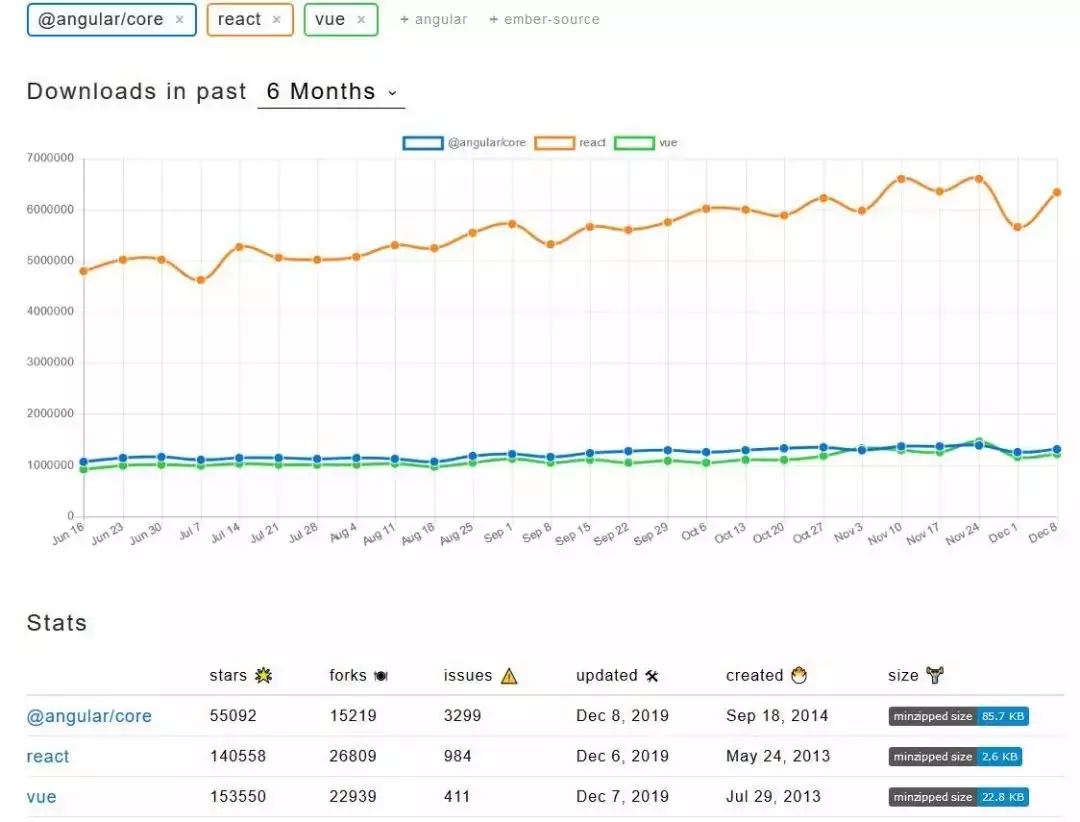
为了获得更好的并发和用户体验,Facebook 宣布完全重写 React 的核心算法,推出了 React-Fiber 项目。
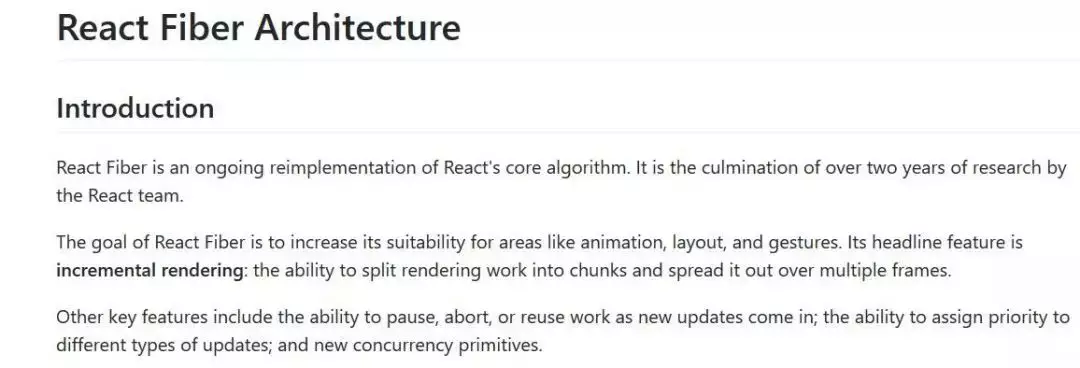
2020 年,React 仍然是你开发新项目的首选 Web 框架。其他框架(如 Angular/Angular 2+ 或 Vue)呢?Angular 仍然是一个不错的 Web 开发框架,特别适合企业开发。我敢肯定谷歌在未来几年会在 Angular 上加大投入。Vue 是另一个非常流行的 Web 框架,由中国的巨头公司阿里巴巴提供支持。如果你已经在使用 Angular 或 Vue,就没必要再迁移到 React 了。
App 开发:原生应用
在移动 App 开发方面,有关混合应用开发的炒作有所消停。混合开发提供了更快的开发速度,因为只需要一个开发团队,而不是多个。但原生应用提供了更好的用户体验和性能。另外,混合应用需要经过调整才能使用一些高级特性。对于企业来说,原生应用仍然是首选的解决方案,这种趋势将在 2020 年延续。Airbnb 在一篇博文中非常详细地说明了为什么他们要放弃混合应用开发平台 React Native。
https://medium.com/airbnb-engineering/sunsetting-react-native-1868ba28e30a
尽管 Facebook 尝试改进 React Native,谷歌也非常努力地推动混合 App 开发平台 Flutter,但它们仍然只适合用于原型、POC、MVP 或轻量级应用的开发。所以,原生应用在 2020 年仍将继续占主导地位。
在原生应用开发方面,谷歌和苹果分别将 Kotlin 和 Swift 作为各自平台主要的编程语言。谷歌最近再次重申了对 Kotlin 的支持,这对于 Kotlin 用户来说无疑是个好消息。
混合应用开发:React Native
在很多情况下,混合应用是个不错的选择。在这方面也有很多选择:Xamarin、Inoic、React Native 和 Flutter。Facebook 基于成熟的 React 框架推出了 React Native。就像 React 在 Web 框架领域占据主导地位一样,React Native 在混合应用领域也占据着主导地位,如下图所示。
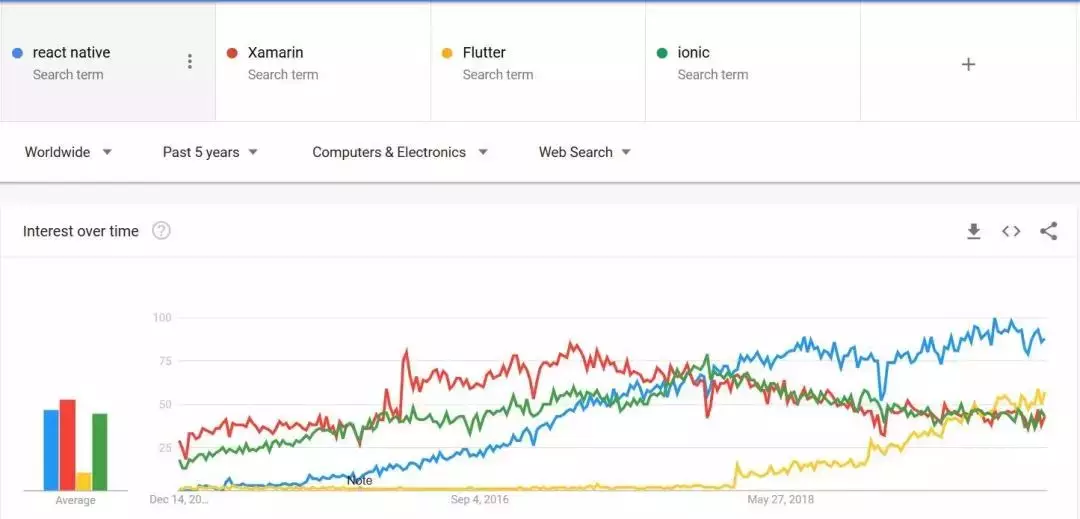
React Native 和 React 有共同的基因,都提供了高度的代码重用性以及“一次开发,到处运行”的能力。React Native 的另一个优势是 Facebook 本身也用它来开发移动应用。谷歌在这个领域起步较晚,但在去年,谷歌的混合应用开发框架 Flutter 获得了不少关注。Flutter 提供了更好的性能,但需要使用另一门不是那么流行的编程语言 Dart。React Native 在 2020 年将继续占主导地位。
API:REST 将占主导地位
REST 是 API 领域事实上的标准,被广泛用在基于 API 的服务间通信上。当然,除了 REST,我们还有其他选择,比如来自谷歌的 gRPC 和来自 Facebook 的 GraphQL。
它们提供了不同的能力。谷歌开发的 gRPC 作为远程过程调用(如 SOAP)的化身,使用 Protobuf 代替 JSON 作为消息格式。Facebook 开发的 GraphQL 作为一个集成层,避免频繁的 REST 调用。gRPC 和 GraphQL 都在各自的领域取得了成功。2020 年,REST 仍然是占主导地位的 API 技术,而 GraphQL 和 gRPC 将作为补充技术。
人工智能:Tensorflow 2.0 将占主导地位
谷歌和 Facebook 也是深度学习 / 神经网络领域的主要玩家。谷歌基于深度学习框架 Theano 推出了 TensorFlow,它很快就成为深度学习 / 神经网络的主要开发库。谷歌还推出了特别设计的 GPU(TPU)来加速 TensorFlow 的计算。
Facebook 在深度学习领域也不甘落后,他们拥有世界上最大的图像和视频数据集合。Facebook 基于另一个深度学习库 Torch 推出了深度学习库 PyTorch。TensorFlow 和 PyTorch 之间有一些区别,前者使用的是静态图进行计算,而 PyTorch 使用的是动态图。使用动态图的好处是可以在运行时纠正自己。另外,PyTorch 对 Python 支持更好,而 Python 是数据科学领域的一门主要编程语言。
随着 PyTorch 变得越来越流行,谷歌也赶紧在 2019 年 10 月推出了 TensorFlow 2.0,也使用了动态图,对 Python 的支持也更好。
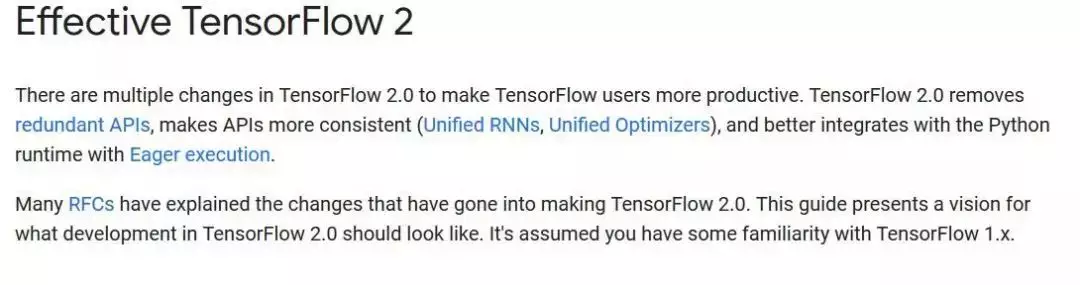
2020 年,TensorFlow 2.0 和 PyTorch 将齐头并进。考虑到 TensorFlow 拥有更大的社区,我估计 TensorFlow 2.0 将成为占主导地位的深度学习库。
数据库:SQL是王者,分布式SQL是王后
在炒作 NoSQL 的日子里,人们嘲笑 SQL,还指出了 SQL 的种种不足。有很多文章说 NoSQL 有多么的好,并将要取代 SQL。但等到炒作的潮水褪去,人们很快就意识到,我们的世界不能没有 SQL。以下是最流行的数据库的排名。
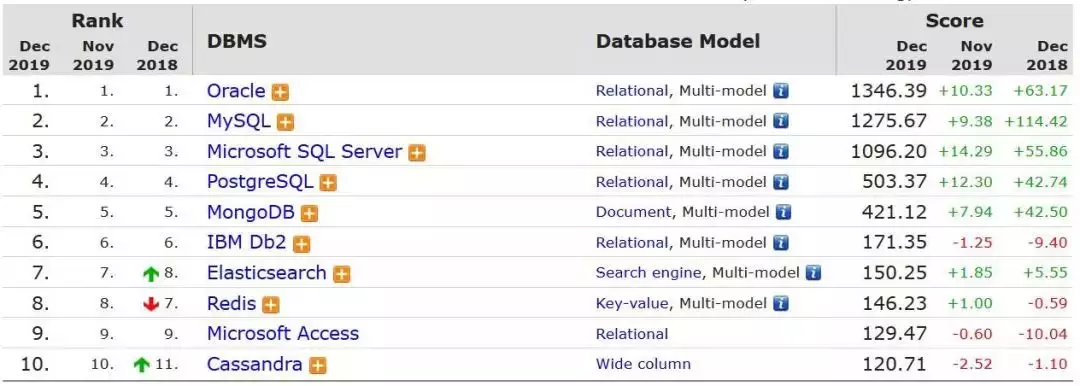
可以看到,SQL 数据库占据了前四名。SQL 之所以占主导地位,是因为它提供了 ACID 事务保证,而 ACID 是业务系统最潜在的需求。NoSQL 数据库提供了横向伸缩能力,但代价是不提供 ACID 保证。
互联网公司一直在寻找“大师级数据库”,也就是既能提供 ACID 保证又能像 NoSQL 那样可横向伸缩的数据库。目前有两个解决方案可以部分满足对“大师级数据库”的要求,一个是亚马逊的 Aurora,一个是谷歌的 Spanner。Aurora 提供了几乎所有的 SQL 功能,但不支持横向写伸缩,而 Spanner 提供了横向写伸缩能力,但对 SQL 支持得不好。
2020 年,但愿这两个数据库能够越走越近,或者有人会带来一个“分布式 SQL”数据库。如果真有人做到了,那一定要给他颁发图灵奖。
数据湖:MinIO 将要崛起
现代数据平台非常的复杂。企业一般都会有支持 ACID 事务的 OLTP 数据库(SQL),也会有用于数据分析的 OLAP 数据库(NoSQL)。除此之外,它们还有其他各种数据存储系统,比如用于搜索的 Solr、ElasticSearch,用于计算的 Spark。企业基于数据库构建自己的数据平台,将 OLTP 数据库的数据拷贝到数据湖中。各种类型的数据应用程序(比如 OLAP、搜索)将数据湖作为它们的事实来源。
HDFS 原本是事实上的数据湖,直到亚马逊推出了对象存储 S3。S3 可伸缩,价格便宜,很快就成为很多公司事实上的数据湖。使用 S3 唯一的问题是数据平台被紧紧地绑定在亚马逊的 AWS 云平台上。虽然微软 Azure 推出了 Blob Storage,谷歌也有类似的对象存储,但都不是 S3 的对手。
对于很多公司来说,MinIO 或许是它们的救星。MinIO 是一个开源的对象存储,与 S3 兼容,提供了企业级的支持,并专门为云原生环境而构建,提供了与云无关的数据湖。
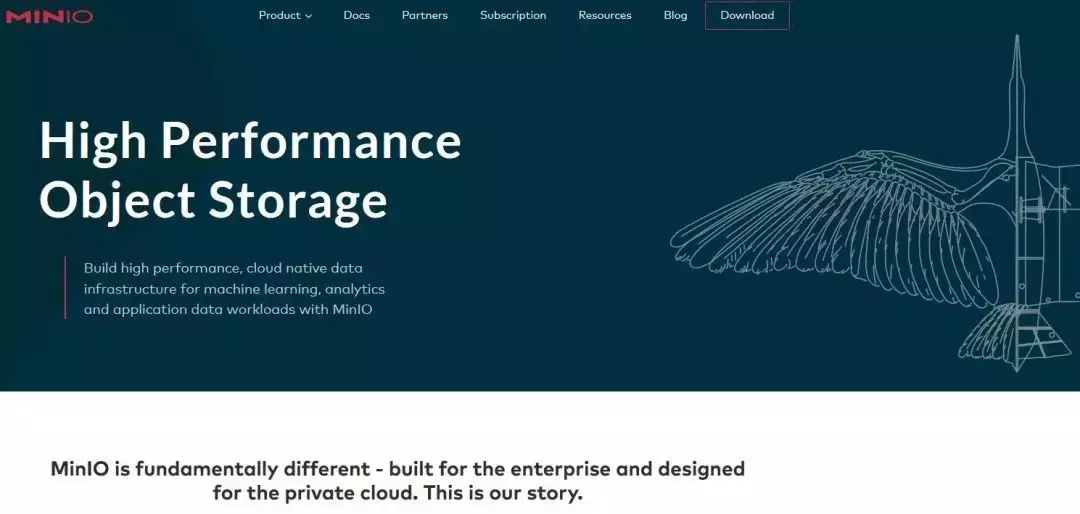
微软在 Azure Marketplace 是这么描述 MinIO 的:“为 Azure Blog Storage 服务提供与亚马逊 S3 API 兼容的数据访问”。如果谷歌 GCP 和其他云厂商也提供 MinIO,那么我们将会向多云迈出一大步。
大数据批处理:Spark 将继续闪耀
现如今,企业通常需要基于大规模数据执行计算,所以需要分布式的批处理作业。Hadoop 的 Map-Reduce 是第一个分布式批处理平台,后来 Spark 取代了 Hadoop 的地位,成为真正的批处理之王。Spark 是怎样提供了比 Hadoop 更好的性能的?我之前写了另一篇文章,对现代数据平台进行了深入分析。
https://towardsdatascience.com/programming-language-that-rules-the-data-intensive-big-data-fast-data-frameworks-6cd7d5f754b0
Spark 解决了 Hadoop Map-Reduce 的痛点,它将所有东西放在内存中,而不是在完成每一个昂贵的操作之后把数据保存在存储系统中。尽管 Spark 重度使用 CPU 和 JVM 来执行批处理作业,但这并不妨碍它成为 2020 年批处理框架之王。我希望有人能够使用 Rust 开发出一个更加高效的批处理框架,取代 Spark,并为企业省下大量的云资源费用。
大数据流式处理:Flink 是未来
几年前,实现实时的流式处理几乎是不可能的事情。一些微批次处理框架(比如 Spark Streaming)可以提供“几近”实时的流式处理能力。不过,Flink 改变了这一状况,它提供了实时的流式处理能力。
2019 年之前,Flink 未能得到足够的关注,因为它无法撼动 Spark。直到 2019 年 1 月份,中国巨头公司阿里巴巴收购了 Data Artisan(Flink 背后的公司)。

在 2020 年,企业如果想要进行实时流式处理,Flink 应该是不二之选。不过,跟 Spark 一样,Flink 同样重度依赖 CPU 和 JVM,并且需要使用大量的云资源。
字节码:WebAssembly将被广泛采用
我从 JavaScript 作者 Brandon Eich 的一次访谈中知道了 WebAssembly 这个东西。现代 JavaScript(ES5 之后的版本)是一门优秀的编程语言,但与其他编程语言一样,都有自己的局限性。最大的局限性是 JavaScript 引擎在执行 JavaScript 时需要读取、解析和处理“抽象语法树”。另一个问题是 JavaScript 的单线程模型无法充分利用现代硬件(如多核 CPU 或 GPU)。正因为这些原因,很多计算密集型的应用程序(如游戏、3D 图像)无法运行在浏览器中。
一些公司(由 Mozilla 带领)开发了 WebAssembly,一种底层字节码格式,让任何一门编程语言都可以在浏览器中运行。目前发布的 WebAssembly 版本可以支持 C++、Rust 等。
WebAssembly 让计算密集型应用程序(比如游戏和 AutoCAD)可以在浏览器中运行。不过,WebAssembly 的目标不仅限于此,它还要让应用程序可以在浏览器之外运行。WebAssembly 可以被用在以下这些“浏览器外”的场景中。
- 移动设备上的混合原生应用。
- 没有冷启动问题的无服务器计算。
- 在服务器端执行不受信任的代码。
我预测,2020 年将是 WebAssembly 取得突破的一年,很多巨头公司(包括云厂商)和社区将会拥抱 WebAssembly。
代码:低代码 / 无代码将更进一步
快速的数字化和工业 4.0 革命意味着软件开发者的供需缺口巨大。由于缺乏开发人员,很多企业无法实现它们的想法。为了降低进入软件开发的门槛,可以尝试无代码(No Code)或低代码(Low Code)软件开发,也就是所谓的 LCNC(Low-Code No-Code)。它已经在 2019 年取得了一些成功。

LCNC 的目标是让没有编程经验的人也能开发软件,只要他们想要实现自己的想法。
虽然我对在正式环境中使用 LCNC 框架仍然心存疑虑,但它为其他公司奠定了良好的基础,像亚马逊和谷歌这样的公司可以基于这个基础构建出有用的产品,就像 AWS Lambda 的蓬勃发展是以谷歌 App Engine 为基础。
2020 年,LCNC 将会获得更多关注。
在执行shell脚本时提示这样的错误主要是由于shell脚本文件是dos格式,即每一行结尾以\r\n来标识,而unix格式的文件行尾则以\n来标识。
查看脚本文件是dos格式还是unix格式的几种办法。
(1)cat -A filename 从显示结果可以判断,dos格式的文件行尾为^M$,unix格式的文件行尾为$。
(2)od -t x1 filename 如果看到输出内容中存在0d 0a的字符,那么文件是dos格式,如果只有0a,则是unix格式。
(3)vi filename打开文件,执行 : set ff,如果文件为dos格式在显示为fileformat=dos,如果是unxi则显示为fileformat=unix。
解决方法:
(1)使用linux命令dos2unix filename,直接把文件转换为unix格式
(2)使用sed命令sed -i -e 's/\r$//' filename 或者 sed -i "s/^M//" filename直接替换结尾符为unix格式
(3)vi filename打开文件,执行 : set ff=unix 设置文件为unix,然后执行:wq,保存成unix格式。
GIT中的tag 相当于是一个快照,是不能更改它的代码的。
如果要在 tag 代码的基础上做修改,你需要一个分支:
通常TAG与软件版本相对应,即TAG名称用软件版本号来表示。
软件版本的格式规范:
版本格式:主版本号.次版本号.修订号,版本号递增规则如下:
主版本号:当你做了不兼容的 API 修改,
次版本号:当你做了向下兼容的功能性新增,
修订号:当你做了向下兼容的问题修正。
先行版本号及版本编译信息可以加到“主版本号.次版本号.修订号”的后面,作为延伸。
Git打标签与版本控制规范
https://juejin.im/post/5b0531c6f265da0b7f44eb8cgit切换到某个tag
https://blog.csdn.net/DinnerHowe/article/details/79082769git cherry-pick 把提交到A分支的部分commit 再提交到B分支上
http://yijiebuyi.com/blog/0e65f4a59a1cfa05c5b30ccb6c2f413d.html
通常配置文件是放在src/main/resources下,build完之后会放在classes文件夹下,最终会打进jar包中。
如果是SPRING BOOT工程,部署时,要求配置文件不打进jar包中,要有sh启动命令文件,最终产生一个ZIP包,包含所有需要的东西。这时就需要善用MAVEN的resource插件、assembly插件和jar插件了。
resource插件能重定义配置文件在output时的文件夹路径,用profile的变量值替换配置文件中的占位符。
但要更改点位符的默认定义:
<properties>
<resource.delimiter>${}</resource.delimiter>
</properties>
jar插件能排除生成在classes文件夹中不要的文件被打进jar包中。
assembly插件能定义ZIP包中需要包含哪些文件。
<resources>
<resource>
<directory>src/main/bin</directory>
<!--表明此文件夹中如有占位符,则会取pom中的profile中的值代替-->
<filtering>true</filtering>
<includes>
<include>*.sh</include>
</includes>
</resource>
</resources>
<plugin>
<artifactId>maven-jar-plugin</artifactId>
<configuration>
<!--bin/文件夹不会被打进jar包-->
<excludes>
<exclude>bin/</exclude>
</excludes>
</configuration>
</plugin>
<fileSet>
<!--定义bin/文件夹被打进zip包-->
<directory>${build.outputDirectory}/bin</directory>
<outputDirectory>bin</outputDirectory>
<fileMode>0755</fileMode>
</fileSet>
maven打包加时间戳
https://blog.csdn.net/z410970953/article/details/50680603
当程序中使用LOGGER.INFO("MESSAGE");要求打印日志时,LOGBACK会获取该行代码所在类的全名,和打印等级(INFO/DEBUG等),再在配置文件的<logger>中查找对应logger,使用其配置的appender组件打印日志,如无法找到对应的logger,则使用<root>对应的appender打印日志。
其中appender是用来输出日志,有file和console两个实现,console则是向控制台输出日志,而file则是向文件输出日志。
rolling file appender中,有rollingPolicy和triggerPolicy两个主要属性,rollingPolicy是确定如何处理日志文件,而triggerPolicy则是确定何时处理日志文件。
如果要使用SPRING针对LOGBACK的一些功能,如profile等,则要将logback.xml的配置文件命名为logback-spring.xml,并在SPRING中配置,logging.config= logback-spring.xml。
SPRING会将logging.file、logging.path这些配置转成系统变量LOG_FILE、LOG_PATH,可在配置文件中直接引用,如${LOG_FILE}。
如果logback配置文件要SPRING的其他属性,则要使用如下标签:
<springProperty scope="context" name="logLevel" source="log.level"/>
如果要使用LOGBACK的一些常用属性,可引入:
<include resource="org/springframework/boot/logging/logback/defaults.xml"/>
<include resource="org/springframework/boot/logging/logback/console-appender.xml"/>
如CONSOLE APPENDER,此resource在spring-boot-version.jar中。
=========================================
看完这个不会配置 logback ,请你吃瓜!
https://juejin.im/post/5b51f85c5188251af91a7525logback解析——Appender
https://juejin.im/post/5a39c91cf265da4327185d10SpringBoot中logback.xml使用application.yml中属性
https://www.cnblogs.com/jianliang-Wu/p/8945343.htmlspringboot使用logback-spring.xml配置讲解
https://blog.csdn.net/heguiliang_123/article/details/80296745Logback配置
https://www.cnblogs.com/cjsblog/p/9113131.htmlLogback中如何自定义灵活的日志过滤规则
https://www.jianshu.com/p/d6360c517264Spring Boot中的日志
http://loveshisong.cn/%E7%BC%96%E7%A8%8B%E6%8A%80%E6%9C%AF/2016-11-03-Spring-Boot%E4%B8%AD%E7%9A%84%E6%97%A5%E5%BF%97.htmlSpring Boot与logback总结
https://blog.csdn.net/u014527058/article/details/79667458SpringBoot Logback 配置参数迁移到配置中心 Apollo
https://blog.csdn.net/shuaizai88/article/details/83027262
In a typical enterprise applications, we often need messaging and asynchronous processing.
To satisfy this need, we need a reliable as well as scalable messaging infrastructure. In currently available messaging infrastructures
Apache ActiveMQ stands out in terms of features and simplicity.
Apache ActiveMQ comes with lot of features in built and also provides a way to configure or tweak as per the needs of an application.
In this post , we will explore how to enable network of activeMQ brokers so that we achieve HA(High Availability) as well as load balance between consumers & producers.
I carried out my experiment on local machine with ACtiveMQ 5.8.0, but this can be easily upgraded to latest versions of ActiveMQ viz. 5.10.0
To have network of brokers, we need multiple brokers. So, I changed tcp and admin ports of brokers so that I can run multiple brokers on single machine.
To get brief background on network of broker, please visit this
linkIn this post we will setup below topology, we will mix failover and NOB to get work done,
1. Producer1 is configured to send messages to broker3 with failover to broker2
2. Producer2 is configured to send messages to broker2 with failover to broker3
3. Broker3, Broker2 are networked with Broker1as below

4. Broker1 is connected with broker4 with NOB.
5. Make sure you enable "advisorySupport" on the broker, which is essential for transparent routing of messages across brokers.
Dry Run:
1. Producer1 sends messages to queue "input.q" on broker3, where there are no active consumers, but it see subscriptions from broker1
2. Broker1 and broker 4 are has consumers which are looking at "input.q".
3. When broker3 receives a message it forwards it to broker1, as its in networked and has active consumers for "input.q"
4. When broker1 receives a messages on "input.q", it gets load balanced between broker1 and broker4 as both has consumers looking for "input.q".
5. Whenever broker3 goes down, producer1 switches transparently to broker2, as its configured with failover.
6. I used prefetch size as 1, so that you can load balancing on consumers
Sample activemq configurations can be downloaded from
here.
组建ACTIVEMQ CLUSTER,使得其中一个ACTIVE MQ DOWN掉时,能自动切换到其他节点。
ACTIVEMQ 只有MASTER-SLAVE模式,集群中的多个节点共享消息的存储,多个节点同时启动时,竞争消息存储的锁,谁先取得,谁就是MASTER,当MASTER DOWN掉时,锁被释放,SALVE中马上又竞争锁,取得者成为MASTER。
方案:
- 安装NFSV4
- 修改消息存储路径
<persistenceAdapter>
<kahaDB directory="/sharedFileSystem/sharedBrokerData"/>
</persistenceAdapter>
- 客户端修改连接字符串
failover://(tcp://master:61616,tcp://slave:61616)?randomize=false
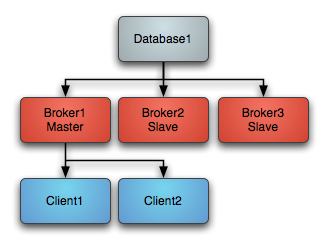
--》
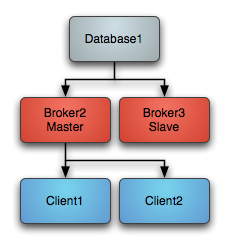 https://my.oschina.net/hzchenyh/blog/716424
https://www.iteye.com/blog/shift-alt-ctrl-2069250
https://stackoverflow.com/questions/53542928/activemq-ha-on-failover
https://activemq.apache.org/shared-file-system-master-slave
https://my.oschina.net/hzchenyh/blog/716424
https://www.iteye.com/blog/shift-alt-ctrl-2069250
https://stackoverflow.com/questions/53542928/activemq-ha-on-failover
https://activemq.apache.org/shared-file-system-master-slaveActiveMQ(6)-基于networkConnector的Broker-Cluster方案
https://blog.csdn.net/jinjin603/article/details/78657387Multi Data Centre Message Brokers with ActiveMQ
https://medium.com/thg-tech-blog/multi-data-centre-message-brokers-with-activemq-28495046370eActiveMQ中的NetworkConnector(网络连接器)详解
https://www.iteye.com/blog/manzhizhen-2116920a
当ACTIVEMQ的某个QUEUE有多个消费者,为避免某个消息者取了更多个消息处理,而造成其他消费者无消息可处理的情况,可以设置每个消费者不预取消息,即每个消费者消费完单个消息后,再去取消息,这样其他消费者就能平均的有消息可处理。
https://stackoverflow.com/questions/35928089/activemq-how-to-prevent-message-from-going-to-dispatched-queue
设置方法,在CONNECT STRING中设置:
tcp://localhost:61616?jms.prefetchPolicy.all=0
tcp://localhost:61616?jms.prefetchPolicy.queuePrefetch=0
queue = new ActiveMQQueue("TEST.QUEUE?consumer.prefetchSize=10");
consumer = session.createConsumer(queue);
http://activemq.apache.org/what-is-the-prefetch-limit-for.html
Lessons
In our first lesson, you will get introduced to the concepts of Enterprise Application Integration. You will learn about the and Enterprise integration patterns that can be applied to simplify integration between different platforms and the Integration strategies that can be followed for this purpose. Finally, we will discuss how and why to implement a Message driven architecture and how to achieve both Synchronous and asynchronous communication among nodes.
In this lesson, you will get to understand how Spring Integration works under the hood. The core concepts of Spring Integration messaging system (like message channels and endpoints) will be introduced. Additionally, the components that build the framework will be discussed, including the channel adapters, transformers, filters, routers etc. Finally, the two distinct methods of communication (synchronous and asynchronous) are explained and the lesson ends with a discussion on error handling.
In this lesson, we will focus on the integration with external web services. Spring Integration comes with the necessary functionality (adapters, channels etc.) to support web services out of the box. A full example is built from scratch in order to better understand the topic.
In this lesson, we will focus on integrating our application with JMS messaging. For this purpose, we will use Active MQ, which will be our broker. We will show examples of sending and receiving JMS messages by using the Spring Integration JMS channel adapters. Following these examples, we will see some ways of customizing these invocations by configuring message conversion and destination resolution.
In this lesson, we will wrap everything up by providing a complete application that uses several of the components provided by Spring Integration in order to provide a service to its users. We will discuss the system architecture, the actual implementation and the relevant error handling.
In this lesson, we will examine different mechanisms of monitoring or gathering more information about what is going on within the messaging system. Some of these mechanisms consist of managing or monitoring the application through MBeans, which are part of the JMX specification. Another mechanism discussed in this chapter is how we will implement the EIP idempotent receiver pattern using a metadata store. Finally, the last mechanism described is the control bus. This will let us send messages that will invoke operations on components in the application context.
vi /etc/resolv.conf
nameserver 8.8.8.8
如果要对JMS BROKER生产和消费MESSAGE,一种方式是用JmsTemplate发送和消费消息,另一种方式是SPRING INTEGRATION。
SPRING INTEGRATION是实现了EIP模式的一种框架,即使用CHANNEL和JMS-INBOUND-ADAPTER、JMS-OUTBOUND-ADAPTER,完全脱离了JmsTemplate的API。
如果需要实现这种场景:从BROKER取一条消息,处理消息,且处理途中不要再从BROKER再取消息,处理完后再取消息,再处理。
这样要求手动开始和停止JMS LISTENER,即手动开始和停止JMS-INBOUND-ADAPTER、JMS-OUTBOUND-ADAPTER。
@Bean
@InboundChannelAdapter(value = "loaderResponseChannel")
public MessageSource loaderResponseSource() throws Exception {
return Jms
.inboundAdapter(oracleConnectionFactory())
.configureJmsTemplate(
t -> t.deliveryPersistent(true)
.jmsMessageConverter(jacksonJmsMessageConverter())
).destination(jmsInbound).get();
}
当使用@InboundChannelAdapter时,会自动注册一个SourcePollingChannelAdapter ,但这个名字比较长:configrationName.loaderResponseSource.inboundChannelAdapter。
呼叫这个实例的start()和stop()方法即可。
@Bean
public IntegrationFlow controlBusFlow() {
return IntegrationFlows.from("controlBus")
.controlBus()
.get();
}
Message operation = MessageBuilder.withPayload("@configrationName.loaderResponseSource.inboundChannelAdapter.start()").build();
operationChannel.send(operation)
https://stackoverflow.com/questions/45632469/shutdown-spring-integration-with-jms-inboundadapterhttps://docs.spring.io/spring-integration/docs/5.0.7.RELEASE/reference/html/system-management-chapter.html#control-bushttps://github.com/spring-projects/spring-integration-java-dsl/blob/master/src/test/java/org/springframework/integration/dsl/test/jms/JmsTests.javahttps://stackoverflow.com/questions/50428552/how-to-stop-or-suspend-polling-after-batch-job-fail
CountDownLatch、CyclicBarrier和Semaphore这三个并发辅助类,可以在线程中呼叫,使得线程暂停等,但各有不同。
1、初始化,并传入计数器
2、向不同的线程传入CountDownLatch实例
3、如果在某一线程中呼叫await(),则此线程被挂起,直到计数器为0,才往下执行
4、如果在某一线程中呼叫countDown(),计数器减1
5、最终如果计数器值为0时,则CountDownLatch实例不再起作用了,即为一次性的
1、初始化,并传入计数器值,也可传入一个Runnable类,会在计数器为0时,被执行
2、向不同的线程传入CyclicBarrier实例
3、如果在某一线程中呼叫await(),则此线程被挂起,直到计数器为0,才往下执行
4、其他线程呼叫await(),则此线程被挂起,直到计数器为0,才往下执行
5、最终如果计数器值为0时,则CyclicBarrier实例会将计数器值恢复,又可重用
1、初始化,并传入计数器值
2、向不同的线程传入Semaphore实例
3、如果在某一线程中呼叫acquire(),则Semaphore实例会将计数器值减1,如果计数器值为-1,则将计数器值置为0,此线程被挂起,直到计数器值大于1时,才往下执行
4、此线程需呼叫release(),使得计数器值+1,以便其他线程在计数器值为0时不受阻
CountDownLatch 例子:
public class Test {
public static void main(String[] args) {
final CountDownLatch latch =
new CountDownLatch(2);
new Thread(){
public void run() {
try {
System.out.println("子线程"+Thread.currentThread().getName()+"正在执行");
Thread.sleep(3000);
System.out.println("子线程"+Thread.currentThread().getName()+"执行完毕");
latch.countDown();
}
catch (InterruptedException e) {
e.printStackTrace();
}
};
}.start();
new Thread(){
public void run() {
try {
System.out.println("子线程"+Thread.currentThread().getName()+"正在执行");
Thread.sleep(3000);
System.out.println("子线程"+Thread.currentThread().getName()+"执行完毕");
latch.countDown();
}
catch (InterruptedException e) {
e.printStackTrace();
}
};
}.start();
try {
System.out.println("等待2个子线程执行完毕
");
latch.await();
System.out.println("2个子线程已经执行完毕");
System.out.println("继续执行主线程");
}
catch (InterruptedException e) {
e.printStackTrace();
}
}
}
结果:
线程Thread-0正在执行
线程Thread-1正在执行
等待2个子线程执行完毕
线程Thread-0执行完毕
线程Thread-1执行完毕
2个子线程已经执行完毕
继续执行主线程
CyclicBarrier例子:
public class Test {
public static void main(String[] args) {
int N = 4;
CyclicBarrier barrier =
new CyclicBarrier(N,
new Runnable() {
@Override
public void run() {
System.out.println("当前线程"+Thread.currentThread().getName());
}
});
for(
int i=0;i<N;i++)
new Writer(barrier).start();
}
static class Writer
extends Thread{
private CyclicBarrier cyclicBarrier;
public Writer(CyclicBarrier cyclicBarrier) {
this.cyclicBarrier = cyclicBarrier;
}
@Override
public void run() {
System.out.println("线程"+Thread.currentThread().getName()+"正在写入数据
");
try {
Thread.sleep(5000);
//以睡眠来模拟写入数据操作
System.out.println("线程"+Thread.currentThread().getName()+"写入数据完毕,等待其他线程写入完毕");
cyclicBarrier.await();
}
catch (InterruptedException e) {
e.printStackTrace();
}
catch(BrokenBarrierException e){
e.printStackTrace();
}
System.out.println("所有线程写入完毕,继续处理其他任务
");
}
}
}
执行结果:
线程Thread-0正在写入数据
线程Thread-1正在写入数据
线程Thread-2正在写入数据
线程Thread-3正在写入数据
线程Thread-0写入数据完毕,等待其他线程写入完毕
线程Thread-1写入数据完毕,等待其他线程写入完毕
线程Thread-2写入数据完毕,等待其他线程写入完毕
线程Thread-3写入数据完毕,等待其他线程写入完毕
当前线程Thread-3
所有线程写入完毕,继续处理其他任务
所有线程写入完毕,继续处理其他任务
所有线程写入完毕,继续处理其他任务
所有线程写入完毕,继续处理其他任务
Semaphore例子:
public class Test {
public static void main(String[] args) {
int N = 8;
//工人数
Semaphore semaphore =
new Semaphore(5);
//机器数目
for(
int i=0;i<N;i++)
new Worker(i,semaphore).start();
}
static class Worker
extends Thread{
private int num;
private Semaphore semaphore;
public Worker(
int num,Semaphore semaphore){
this.num = num;
this.semaphore = semaphore;
}
@Override
public void run() {
try {
semaphore.acquire();
System.out.println("工人"+
this.num+"占用一个机器在生产
");
Thread.sleep(2000);
System.out.println("工人"+
this.num+"释放出机器");
semaphore.release();
}
catch (InterruptedException e) {
e.printStackTrace();
}
}
}
}
执行结果:
工人0占用一个机器在生产
工人1占用一个机器在生产
工人2占用一个机器在生产
工人4占用一个机器在生产
工人5占用一个机器在生产
工人0释放出机器
工人2释放出机器
工人3占用一个机器在生产
工人7占用一个机器在生产
工人4释放出机器
工人5释放出机器
工人1释放出机器
工人6占用一个机器在生产
工人3释放出机器
工人7释放出机器
工人6释放出机器
前言
有人喜欢小而美的工具,有人喜欢大集成工具。这里推荐一款增强型的Windows终端工具MobaXterm,它提供所有重要的远程网络工具(SSH,X11,RDP,VNC,FTP,MOSH ......)和Unix命令(bash,ls,cat,sed,grep,awk,rsync等)。使用MobaXterm工具,可以替代SSH客户端工具(xshell、putty、securecrt等)、sftp/ftp工具(winscp、filezilla)、远程桌面访问工具(RDO等)等等,可以极大降低你windows系统上的软件安装数量。

MobaXterm使用体会&优点
1、工具获取简单、免安装(绿色版)、免费(不用到处找license)、可个性化配置(字体、前景色、背景色、语法高亮等)。
2、可以替代xshell、putty、securecrt等SSH客户端、winscp、filezilla等ftp传输工具、替代RDO远程桌面访问工具等。减少windows系统软件安装和资源占用。我的系统已经超负荷运转
3、可以替代CMD窗口。CMD命令行字体太丑。。并且配置还麻烦。实在不想用。
4、支持Unix/Linux常用命令使用。满足在windows上学习操作linux命令的需求以及利用linux命令快速处理文本文件。
5、可以支持丰富的组件,减少部分软件的安装。如Cygwin。
工具使用建议:每个人对工具使用的要求和场景不尽相同。需要了解MobaXterm特性可以进入MobaXterm官网或者阅读MobaXterm帮助手册(启动工具--> 菜单栏"help" -> "document")。
MobaXterm主要功能
1、远程会话管理器:单个应用程序中的SSH,SFTP,telnet,VNC,Mosh,RDP连接

2、Windows上的许多Unix/Linux命令:基本Cygwin命令(bash,grep,awk,sed,rsync,...)。

3、丰富的组件和插件,可以自由选择。详情查看MobaXterm Plugins
4、远程桌面:使用RDP,VNC或XDMCP在计算机上显示完整的远程桌面

5、嵌入式Xserver:在Windows计算机上显示远程应用程序
6、....
MobaXterm工具下载
MobaXterm工具分为便携版(绿色免安装版,免费)和专业版(收费)。对于大部分开发测试人员,免费的绿色免安装版本就可以满足日常工作的需求。下载路径:MobaXterm

MobaXterm使用技巧
1、执行cmd命令快速切换执行DOS指令。可以执行exit退回原界面。
2、MobaXterm界面风格、主体、字体以及相关快捷方式设置。MobaXterm --> Settings --> Configuration
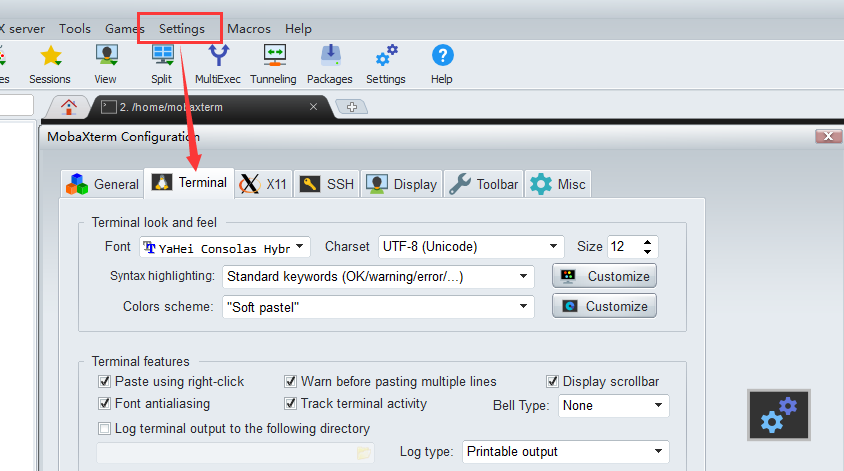
3、MobaXterm取消自动断开SSH会话。

https://stackoverflow.com/questions/2065928/maven-2-assembly-with-dependencies-jar-under-scope-system-not-included
在pom.xml中加入REPOSITRY:
<repositories>
<repository>
<id>my</id>
<url>file://${basedir}/my-repo</url>
</repository>
</repositories>
file://${basedir}/my-repo 中放JAR包的结构要和MAVEN库.m2中保持一致。
DEPENDENCY还是按正常的来,不加SYSTEM SCOPE:
<dependency>
<groupId>sourceforge.jchart2d</groupId>
<artifactId>jchart2d</artifactId>
<version>3.1.0</version>
</dependency>
这里涉及到一个问题:如何将JAR比较优雅地放到file://${basedir}/my-repo 中,可以使用deploy,如果JAR包不是由MAVEN打出来的,命令如下:
mvn deploy:deploy-file
-DgroupId={yourProject} \
-DartifactId={yourProject}\
-Dfile={yourFile}\ // jar 包路径
-Durl={URL} \// 私服URL
-DrepositoryId=releases\
-Dpackaging=jar\ // 指定格式,如果不写,一句 pom 文件中
-DpomFile=pom.xml // 指定该 jar 包的 pom 文件,如不指定,将生成一个默认的 pom——导致不可用
如果JAR包是由MAVEN打出来的,命令如下:
mvn deploy:deploy-file
-Dfile={yourFile}\ // jar 包路径
-Durl=file://${basedir}/my-repo
-DpomFile=pom.xml // 指定该 jar 包的 pom 文件,如不指定,将生成一个默认的 pom——导致不可用
MAVEN DEPLOY PLUGIN:
<plugin>
<groupId>org.apache.maven.plugins</groupId>
<artifactId>maven-deploy-plugin</artifactId>
<version>2.8.2</version>
<executions>
<execution>
<id>default-cli</id>
<phase>package</phase>
<goals>
<goal>deploy-file</goal>
</goals>
<configuration>
<file>target/COMPOSANT-A-1.0.tar.gz</file>
<repositoryId>nexus</repositoryId>
<groupId>COMPOSANTS</groupId>
<artifactId>COMPOSANT-A</artifactId>
<version>1.0</version>
<generatePom>false</generatePom>
<packaging>tar.gz</packaging>
<url>http://urlRepo:8080/nexus/content/repositories/snapshots</url>
</configuration>
</execution>
</executions>
</plugin>
一、概述
本文以淘宝作为例子,介绍从一百个并发到千万级并发情况下服务端的架构的演进过程,同时列举出每个演进阶段会遇到的相关技术,让大家对架构的演进有一个整体的认知,文章最后汇总了一些架构设计的原则。
二、基本概念
在介绍架构之前,为了避免部分读者对架构设计中的一些概念不了解,下面对几个最基础的概念进行介绍:
1)分布式
系统中的多个模块在不同服务器上部署,即可称为分布式系统,如Tomcat和数据库分别部署在不同的服务器上,或两个相同功能的Tomcat分别部署在不同服务器上。
2)高可用
系统中部分节点失效时,其他节点能够接替它继续提供服务,则可认为系统具有高可用性。
3)集群
一个特定领域的软件部署在多台服务器上并作为一个整体提供一类服务,这个整体称为集群。如Zookeeper中的Master和Slave分别部署在多台服务器上,共同组成一个整体提供集中配置服务。
在常见的集群中,客户端往往能够连接任意一个节点获得服务,并且当集群中一个节点掉线时,其他节点往往能够自动的接替它继续提供服务,这时候说明集群具有高可用性。
4)负载均衡
请求发送到系统时,通过某些方式把请求均匀分发到多个节点上,使系统中每个节点能够均匀的处理请求负载,则可认为系统是负载均衡的。
5)正向代理和反向代理
- 系统内部要访问外部网络时,统一通过一个代理服务器把请求转发出去,在外部网络看来就是代理服务器发起的访问,此时代理服务器实现的是正向代理;
- 当外部请求进入系统时,代理服务器把该请求转发到系统中的某台服务器上,对外部请求来说,与之交互的只有代理服务器,此时代理服务器实现的是反向代理。
简单来说,正向代理是代理服务器代替系统内部来访问外部网络的过程,反向代理是外部请求访问系统时通过代理服务器转发到内部服务器的过程。
三、架构演进
单机架构

以淘宝作为例子。在网站最初时,应用数量与用户数都较少,可以把Tomcat和数据库部署在同一台服务器上。浏览器往www.taobao.com发起请求时,首先经过DNS服务器(域名系统)把域名转换为实际IP地址10.102.4.1,浏览器转而访问该IP对应的Tomcat。
随着用户数的增长,Tomcat和数据库之间竞争资源,单机性能不足以支撑业务。
第一次演进:Tomcat与数据库分开部署

Tomcat和数据库分别独占服务器资源,显著提高两者各自性能。
随着用户数的增长,并发读写数据库成为瓶颈。
第二次演进:引入本地缓存和分布式缓存

在Tomcat同服务器上或同JVM中增加本地缓存,并在外部增加分布式缓存,缓存热门商品信息或热门商品的html页面等。通过缓存能把绝大多数请求在读写数据库前拦截掉,大大降低数据库压力。
其中涉及的技术包括:使用memcached作为本地缓存,使用Redis作为分布式缓存,还会涉及缓存一致性、缓存穿透/击穿、缓存雪崩、热点数据集中失效等问题。
缓存抗住了大部分的访问请求,随着用户数的增长,并发压力主要落在单机的Tomcat上,响应逐渐变慢。
第三次演进:引入反向代理实现负载均衡

在多台服务器上分别部署Tomcat,使用反向代理软件(Nginx)把请求均匀分发到每个Tomcat中。
此处假设Tomcat最多支持100个并发,Nginx最多支持50000个并发,那么理论上Nginx把请求分发到500个Tomcat上,就能抗住50000个并发。
其中涉及的技术包括:Nginx、HAProxy,两者都是工作在网络第七层的反向代理软件,主要支持http协议,还会涉及session共享、文件上传下载的问题。
反向代理使应用服务器可支持的并发量大大增加,但并发量的增长也意味着更多请求穿透到数据库,单机的数据库最终成为瓶颈。
第四次演进:数据库读写分离

把数据库划分为读库和写库,读库可以有多个,通过同步机制把写库的数据同步到读库,对于需要查询最新写入数据场景,可通过在缓存中多写一份,通过缓存获得最新数据。
其中涉及的技术包括:Mycat,它是数据库中间件,可通过它来组织数据库的分离读写和分库分表,客户端通过它来访问下层数据库,还会涉及数据同步,数据一致性的问题。
业务逐渐变多,不同业务之间的访问量差距较大,不同业务直接竞争数据库,相互影响性能。
第五次演进:数据库按业务分库

把不同业务的数据保存到不同的数据库中,使业务之间的资源竞争降低,对于访问量大的业务,可以部署更多的服务器来支撑。
这样同时导致跨业务的表无法直接做关联分析,需要通过其他途径来解决,但这不是本文讨论的重点,有兴趣的可以自行搜索解决方案。
随着用户数的增长,单机的写库会逐渐会达到性能瓶颈。
第六次演进:把大表拆分为小表

比如针对评论数据,可按照商品ID进行hash,路由到对应的表中存储;针对支付记录,可按照小时创建表,每个小时表继续拆分为小表,使用用户ID或记录编号来路由数据。
只要实时操作的表数据量足够小,请求能够足够均匀的分发到多台服务器上的小表,那数据库就能通过水平扩展的方式来提高性能。其中前面提到的Mycat也支持在大表拆分为小表情况下的访问控制。
这种做法显著的增加了数据库运维的难度,对DBA的要求较高。数据库设计到这种结构时,已经可以称为分布式数据库,但是这只是一个逻辑的数据库整体,数据库里不同的组成部分是由不同的组件单独来实现的。
如分库分表的管理和请求分发,由Mycat实现,SQL的解析由单机的数据库实现,读写分离可能由网关和消息队列来实现,查询结果的汇总可能由数据库接口层来实现等等,这种架构其实是MPP(大规模并行处理)架构的一类实现。
目前开源和商用都已经有不少MPP数据库,开源中比较流行的有Greenplum、TiDB、Postgresql XC、HAWQ等,商用的如南大通用的GBase、睿帆科技的雪球DB、华为的LibrA等等。
不同的MPP数据库的侧重点也不一样,如TiDB更侧重于分布式OLTP场景,Greenplum更侧重于分布式OLAP场景。
这些MPP数据库基本都提供了类似Postgresql、Oracle、MySQL那样的SQL标准支持能力,能把一个查询解析为分布式的执行计划分发到每台机器上并行执行,最终由数据库本身汇总数据进行返回。
也提供了诸如权限管理、分库分表、事务、数据副本等能力,并且大多能够支持100个节点以上的集群,大大降低了数据库运维的成本,并且使数据库也能够实现水平扩展。
数据库和Tomcat都能够水平扩展,可支撑的并发大幅提高,随着用户数的增长,最终单机的Nginx会成为瓶颈。
第七次演进:使用LVS或F5来使多个Nginx负载均衡

由于瓶颈在Nginx,因此无法通过两层的Nginx来实现多个Nginx的负载均衡。
图中的LVS和F5是工作在网络第四层的负载均衡解决方案,其中LVS是软件,运行在操作系统内核态,可对TCP请求或更高层级的网络协议进行转发,因此支持的协议更丰富,并且性能也远高于Nginx,可假设单机的LVS可支持几十万个并发的请求转发;F5是一种负载均衡硬件,与LVS提供的能力类似,性能比LVS更高,但价格昂贵。
由于LVS是单机版的软件,若LVS所在服务器宕机则会导致整个后端系统都无法访问,因此需要有备用节点。可使用keepalived软件模拟出虚拟IP,然后把虚拟IP绑定到多台LVS服务器上,浏览器访问虚拟IP时,会被路由器重定向到真实的LVS服务器,当主LVS服务器宕机时,keepalived软件会自动更新路由器中的路由表,把虚拟IP重定向到另外一台正常的LVS服务器,从而达到LVS服务器高可用的效果。
此处需要注意的是,上图中从Nginx层到Tomcat层这样画并不代表全部Nginx都转发请求到全部的Tomcat。
在实际使用时,可能会是几个Nginx下面接一部分的Tomcat,这些Nginx之间通过keepalived实现高可用,其他的Nginx接另外的Tomcat,这样可接入的Tomcat数量就能成倍的增加。
由于LVS也是单机的,随着并发数增长到几十万时,LVS服务器最终会达到瓶颈,此时用户数达到千万甚至上亿级别,用户分布在不同的地区,与服务器机房距离不同,导致了访问的延迟会明显不同。
第八次演进:通过DNS轮询实现机房间的负载均衡

在DNS服务器中可配置一个域名对应多个IP地址,每个IP地址对应到不同的机房里的虚拟IP。
当用户访问www.taobao.com时,DNS服务器会使用轮询策略或其他策略,来选择某个IP供用户访问。此方式能实现机房间的负载均衡,至此,系统可做到机房级别的水平扩展,千万级到亿级的并发量都可通过增加机房来解决,系统入口处的请求并发量不再是问题。
随着数据的丰富程度和业务的发展,检索、分析等需求越来越丰富,单单依靠数据库无法解决如此丰富的需求。
第九次演进:引入NoSQL数据库和搜索引擎等技术

当数据库中的数据多到一定规模时,数据库就不适用于复杂的查询了,往往只能满足普通查询的场景。
对于统计报表场景,在数据量大时不一定能跑出结果,而且在跑复杂查询时会导致其他查询变慢,对于全文检索、可变数据结构等场景,数据库天生不适用。
因此需要针对特定的场景,引入合适的解决方案。如对于海量文件存储,可通过分布式文件系统HDFS解决,对于key value类型的数据,可通过HBase和Redis等方案解决,对于全文检索场景,可通过搜索引擎如ElasticSearch解决,对于多维分析场景,可通过Kylin或Druid等方案解决。
当然,引入更多组件同时会提高系统的复杂度,不同的组件保存的数据需要同步,需要考虑一致性的问题,需要有更多的运维手段来管理这些组件等。
引入更多组件解决了丰富的需求,业务维度能够极大扩充,随之而来的是一个应用中包含了太多的业务代码,业务的升级迭代变得困难。
第十次演进:大应用拆分为小应用

按照业务板块来划分应用代码,使单个应用的职责更清晰,相互之间可以做到独立升级迭代。这时候应用之间可能会涉及到一些公共配置,可以通过分布式配置中心Zookeeper来解决。
不同应用之间存在共用的模块,由应用单独管理会导致相同代码存在多份,导致公共功能升级时全部应用代码都要跟着升级。
第十一次演进:复用的功能抽离成微服务

如用户管理、订单、支付、鉴权等功能在多个应用中都存在,那么可以把这些功能的代码单独抽取出来形成一个单独的服务来管理,这样的服务就是所谓的微服务。
应用和服务之间通过HTTP、TCP或RPC请求等多种方式来访问公共服务,每个单独的服务都可以由单独的团队来管理。此外,可以通过Dubbo、SpringCloud等框架实现服务治理、限流、熔断、降级等功能,提高服务的稳定性和可用性。
不同服务的接口访问方式不同,应用代码需要适配多种访问方式才能使用服务,此外,应用访问服务,服务之间也可能相互访问,调用链将会变得非常复杂,逻辑变得混乱。
第十二次演进:引入企业服务总线ESB屏蔽服务接口的访问差异

通过ESB统一进行访问协议转换,应用统一通过ESB来访问后端服务,服务与服务之间也通过ESB来相互调用,以此降低系统的耦合程度。这种单个应用拆分为多个应用,公共服务单独抽取出来来管理,并使用企业消息总线来解除服务之间耦合问题的架构,就是所谓的SOA(面向服务)架构,这种架构与微服务架构容易混淆,因为表现形式十分相似。
个人理解,微服务架构更多是指把系统里的公共服务抽取出来单独运维管理的思想,而SOA架构则是指一种拆分服务并使服务接口访问变得统一的架构思想,SOA架构中包含了微服务的思想。
业务不断发展,应用和服务都会不断变多,应用和服务的部署变得复杂,同一台服务器上部署多个服务还要解决运行环境冲突的问题,此外,对于如大促这类需要动态扩缩容的场景,需要水平扩展服务的性能,就需要在新增的服务上准备运行环境,部署服务等,运维将变得十分困难。
第十三次演进:引入容器化技术实现运行环境隔离与动态服务管理

目前最流行的容器化技术是Docker,最流行的容器管理服务是Kubernetes(K8S),应用/服务可以打包为Docker镜像,通过K8S来动态分发和部署镜像。
Docker镜像可理解为一个能运行你的应用/服务的最小的操作系统,里面放着应用/服务的运行代码,运行环境根据实际的需要设置好。把整个“操作系统”打包为一个镜像后,就可以分发到需要部署相关服务的机器上,直接启动Docker镜像就可以把服务起起来,使服务的部署和运维变得简单。
在大促的之前,可以在现有的机器集群上划分出服务器来启动Docker镜像,增强服务的性能,大促过后就可以关闭镜像,对机器上的其他服务不造成影响(在3.14节之前,服务运行在新增机器上需要修改系统配置来适配服务,这会导致机器上其他服务需要的运行环境被破坏)。
使用容器化技术后服务动态扩缩容问题得以解决,但是机器还是需要公司自身来管理,在非大促的时候,还是需要闲置着大量的机器资源来应对大促,机器自身成本和运维成本都极高,资源利用率低。
第十四次演进:以云平台承载系统

系统可部署到公有云上,利用公有云的海量机器资源,解决动态硬件资源的问题,在大促的时间段里,在云平台中临时申请更多的资源,结合Docker和K8S来快速部署服务,在大促结束后释放资源,真正做到按需付费,资源利用率大大提高,同时大大降低了运维成本。
所谓的云平台,就是把海量机器资源,通过统一的资源管理,抽象为一个资源整体。在之上可按需动态申请硬件资源(如CPU、内存、网络等),并且之上提供通用的操作系统,提供常用的技术组件(如Hadoop技术栈,MPP数据库等)供用户使用,甚至提供开发好的应用。用户不需要关系应用内部使用了什么技术,就能够解决需求(如音视频转码服务、邮件服务、个人博客等)。在云平台中会涉及如下几个概念:
- IaaS:基础设施即服务。对应于上面所说的机器资源统一为资源整体,可动态申请硬件资源的层面;
- PaaS:平台即服务。对应于上面所说的提供常用的技术组件方便系统的开发和维护;
- SaaS:软件即服务。对应于上面所说的提供开发好的应用或服务,按功能或性能要求付费。
至此,以上所提到的从高并发访问问题,到服务的架构和系统实施的层面都有了各自的解决方案,但同时也应该意识到,在上面的介绍中,其实是有意忽略了诸如跨机房数据同步、分布式事务实现等等的实际问题,这些问题以后有机会再拿出来单独讨论。
四、 架构设计总结
架构的调整是否必须按照上述演变路径进行?
不是的,以上所说的架构演变顺序只是针对某个侧面进行单独的改进,在实际场景中,可能同一时间会有几个问题需要解决,或者可能先达到瓶颈的是另外的方面,这时候就应该按照实际问题实际解决。
如在政府类的并发量可能不大,但业务可能很丰富的场景,高并发就不是重点解决的问题,此时优先需要的可能会是丰富需求的解决方案。
对于将要实施的系统,架构应该设计到什么程度?
对于单次实施并且性能指标明确的系统,架构设计到能够支持系统的性能指标要求就足够了,但要留有扩展架构的接口以便不备之需。对于不断发展的系统,如电商平台,应设计到能满足下一阶段用户量和性能指标要求的程度,并根据业务的增长不断的迭代升级架构,以支持更高的并发和更丰富的业务。
服务端架构和大数据架构有什么区别?
所谓的“大数据”其实是海量数据采集清洗转换、数据存储、数据分析、数据服务等场景解决方案的一个统称。
在每一个场景都包含了多种可选的技术,如数据采集有Flume、Sqoop、Kettle等,数据存储有分布式文件系统HDFS、FastDFS,NoSQL数据库HBase、MongoDB等,数据分析有Spark技术栈、机器学习算法等。
总的来说大数据架构就是根据业务的需求,整合各种大数据组件组合而成的架构,一般会提供分布式存储、分布式计算、多维分析、数据仓库、机器学习算法等能力。而服务端架构更多指的是应用组织层面的架构,底层能力往往是由大数据架构来提供。
有没有一些架构设计的原则?
1)N+1设计
系统中的每个组件都应做到没有单点故障。
2)回滚设计
确保系统可以向前兼容,在系统升级时应能有办法回滚版本。
3)禁用设计
应该提供控制具体功能是否可用的配置,在系统出现故障时能够快速下线功能。
4)监控设计
在设计阶段就要考虑监控的手段。
5)多活数据中心设计
若系统需要极高的高可用,应考虑在多地实施数据中心进行多活,至少在一个机房断电的情况下系统依然可用
6)采用成熟的技术
刚开发的或开源的技术往往存在很多隐藏的bug,出了问题没有商业支持可能会是一个灾难。
7)资源隔离设计
应避免单一业务占用全部资源。
8)架构应能水平扩展
系统只有做到能水平扩展,才能有效避免瓶颈问题
9)非核心则购买
非核心功能若需要占用大量的研发资源才能解决,则考虑购买成熟的产品。
10)使用商用硬件
商用硬件能有效降低硬件故障的机率。
11)快速迭代
系统应该快速开发小功能模块,尽快上线进行验证,早日发现问题大大降低系统交付的风险。
12)无状态设计
服务接口应该做成无状态的,当前接口的访问不依赖于接口上次访问的状态。
设计到此结束,其实,解决方案有很多,但是这个只是我采用的,觉得最轻便的一个。
JVM内存主要分为两个部分,分别是PermanentSapce和HeapSpace。
PermantSpace主要负责存放加载的Class类级对象如class本身,method,field等反射对象,一般不用配置。
JVM的Heap区可以通过-X参数来设定。HeapSpace= {Old + NEW {= Eden , from, to } }
当一个URL被访问时,内存申请过程如下:
- JVM会试图为相关Java对象在Eden中初始化一块内存区域
- 当Eden空间足够时,内存申请结束。否则到下一步
- JVM试图释放在Eden中所有不活跃的对象(这属于1或更高级的垃圾回收), 释放后若Eden空间仍然不足以放入新对象,则试图将部分Eden中活跃对象放入Survivor区
- Survivor区被用来作为Eden及OLD的中间交换区域,当OLD区空间足够时,Survivor区的对象会被移到Old区,否则会被保留在Survivor区
- 当OLD区空间不够时,JVM会在OLD区进行完全的垃圾收集(0级)
- 完全垃圾收集后,若Survivor及OLD区仍然无法存放从Eden复制过来的部分对象,导致JVM无法在Eden区为新对象创建内存区域,则出现”out of memory错误”
Xms/Xmx:定义NEW+OLD段的总尺寸,ms为JVM启动时NEW+OLD的内存大小;mx为最大可占用的NEW+OLD内存大小。。在用户生产环境上一般将这两个值设为相同,以减少运行期间系统在内存申请上所花的开销;
NewSize/MaxNewSize:定义单独NEW段的尺寸,NewSize为JVM启动时NEW的内存大小;MaxNewSize为最大可占用的NEW的内存大小。在用户生产环境上一般将这两个值设为相同,以减少运行期间系统在内存申请上所花的开销;
Xms/Xmx和NewSize/MaxNewSize定义好后,OLD区间也自然定义完毕了,即OLD区初始大小=(Xms-NewSize),OLD区最大可占用大小=(Xmx-MaxNewSize);
PermSize/MaxPermSize:定义Perm段的尺寸,PermSize为JVM启动时Perm的内存大小;MaxPermSize为最大可占用的Perm内存大小。在用户生产环境上一般将这两个值设为相同,以减少运行期间系统在内存申请上所花的开销。
https://stackoverflow.com/questions/34217101/spring-batch-junit-test-for-multiple-jobs@Configuration
public class TestBatchConfiguration implements MergedBeanDefinitionPostProcessor {
@Autowired
@Qualifier("JobA")
private Job job;
@Bean(name="jtestl")
public JobLauncherTestUtils jobLauncherTestUtils() {
JobLauncherTestUtils jobLauncherTestUtils = new JobLauncherTestUtils();
jobLauncherTestUtils.setJob(job);
return jobLauncherTestUtils;
}
/**
* https://stackoverflow.com/questions/22416140/autowire-setter-override-with-java-config
* This is needed to inject the correct job into JobLauncherTestUtils
*/
@Override
public void postProcessMergedBeanDefinition(RootBeanDefinition beanDefinition, Class<?> beanType, String beanName) {
if(beanName.equals("jtestl")) {
beanDefinition.getPropertyValues().add("job", getMyBeanFirstAImpl());
}
}
private Object getMyBeanFirstAImpl() {
return job;
}
@Override
public Object postProcessBeforeInitialization(Object bean, String beanName) throws BeansException {
return bean;
}
@Override
public Object postProcessAfterInitialization(Object bean, String beanName) throws BeansException {
return bean;
}
}
sshd (the server) closes the connection if it doesn't hear anything from the client for a while. You can tell your client to send a sign-of-life signal to the server once in a while.
The configuration for this is in the file "~/.ssh/config", create it if the configuration file does not exist. To send the signal every four minutes (240 seconds) to the remote host, put the following in your "~/.ssh/config" file.
Host remotehost: HostName remotehost.com ServerAliveInterval 240
This is what I have in my "~/.ssh/config":
To enable it for all hosts use:
Host * ServerAliveInterval 240
Also make sure to run:
chmod 600 ~/.ssh/config
because the config file must not be world-readable.
Jenkins远程部署,一开始没有任何头绪,想了很多方案. 因为两台机器都是windows系统,所以想到publish over cifs, 但是这个网上资料太少,貌似只能内网使用。又想到了Jenkins 分布式构建,但是Jenkins构建的代码和产物最后自动拷贝到主节点。而远程机器其实是客户方的机器,所以这个分布式构建并不适用。最后还是选定publish over ssh来实现远程部署。
请注意:在进行远程部署操作前,先要确保客户机能ssh 登录到远程机器。如果不知道SSH怎么登陆,请参考http://blog.csdn.net/flyingshuai/article/details/72897692
1. 安装publish over ssh 插件,安装很简单,在此不表。
2. 在Jenkins系统设置里找到Publish over SSH模块
3. 用户名/密码方式登录的,系统设置里设置如下:
4. 如果是证书登录的,系统设置里设置如下:
5. Job设置,点击增加构建后操作步骤,选择send build artifacts over ssh, 设置如下:
6. 文件上传到远程服务器后,还有一些后续操作,比如,替换数据库配置文件。可以把bat命令写到一个批处理文件中,存到服务器上。Exec command填写批处理文件的绝对路径。如上图所示。
关于bat脚本:
如果每次都需要替换同样的文件,用copy /y 是无条件覆盖,不会询问。而xcopy可以实现批量拷贝文件和文件夹。如果文件较多可用此命令
注意脚本运行失败,构建也会显示蓝色成功图标,所以一定要打开控制台输出,看是否真的成功。
---------------------
作者:flyingshuai
来源:CSDN
版权声明:本文为博主原创文章,转载请附上博文链接!
摘要: 问题:I recently updated the configuration of one of my hudson builds. The build history is out of sync. Is there a way to clear my build history?Please and thank you回答1:If you click Manage Hudson / Relo...
阅读全文
@Configuration
@DependsOn(value="cachingConnectionFactory")
public class JmsTemplateConfiguration {
@Value("${wechat.sendmessage.queue}")
private String queueName;
@Value("${wechat.sendmessage.topic}")
private String topicName;
@Value("${spring.jms.pub-sub-domain}")
private boolean isPubSubDomain;
/**
* 定义点对点队列
* @return
*/
@Bean
public Queue queue() {
return new ActiveMQQueue(queueName);
}
/**
* 定义一个主题
* @return
*/
@Bean
public Topic topic() {
return new ActiveMQTopic(topicName);
}
private final ObjectProvider<DestinationResolver> destinationResolver;
private final ObjectProvider<MessageConverter> messageConverter;
private final CachingConnectionFactory cachingConnectionFactory;
@Autowired
public JmsTemplateConfiguration(ObjectProvider<DestinationResolver> destinationResolver,
ObjectProvider<MessageConverter> messageConverter,
CachingConnectionFactory cachingConnectionFactory) {
this.destinationResolver = destinationResolver;
this.messageConverter = messageConverter;
this.cachingConnectionFactory = cachingConnectionFactory;
}
/**
* 配置队列生产者的JmsTemplate
* @return JmsTemplate
*/
@Bean(name="jmsQueueTemplate")
public JmsTemplate jmsQueueTemplate() {
//设置创建连接的工厂
//JmsTemplate jmsTemplate = new JmsTemplate(connectionFactory);
//优化连接工厂,这里应用缓存池 连接工厂就即可
JmsTemplate jmsTemplate = new JmsTemplate(cachingConnectionFactory);
//设置默认消费topic
//jmsTemplate.setDefaultDestination(topic());
//设置P2P队列消息类型
jmsTemplate.setPubSubDomain(isPubSubDomain);
DestinationResolver destinationResolver = (DestinationResolver) this.destinationResolver.getIfUnique();
if (destinationResolver != null) {
jmsTemplate.setDestinationResolver(destinationResolver);
}
MessageConverter messageConverter = (MessageConverter) this.messageConverter.getIfUnique();
if (messageConverter != null) {
jmsTemplate.setMessageConverter(messageConverter);
}
//deliveryMode, priority, timeToLive 的开关,要生效,必须配置为true,默认false
jmsTemplate.setExplicitQosEnabled(true);
//DeliveryMode.NON_PERSISTENT=1:非持久 ; DeliveryMode.PERSISTENT=2:持久
//定义持久化后节点挂掉以后,重启可以继续消费.
jmsTemplate.setDeliveryMode(DeliveryMode.PERSISTENT);
//默认不开启事务
System.out.println("默认是否开启事务:"+jmsTemplate.isSessionTransacted());
//如果不启用事务,则会导致XA事务失效;
//作为生产者如果需要支持事务,则需要配置SessionTransacted为true
//jmsTemplate.setSessionTransacted(true);
//消息的应答方式,需要手动确认,此时SessionTransacted必须被设置为false,且为Session.CLIENT_ACKNOWLEDGE模式
//Session.AUTO_ACKNOWLEDGE 消息自动签收
//Session.CLIENT_ACKNOWLEDGE 客户端调用acknowledge方法手动签收
//Session.DUPS_OK_ACKNOWLEDGE 不必必须签收,消息可能会重复发送
jmsTemplate.setSessionAcknowledgeMode(Session.CLIENT_ACKNOWLEDGE);
return jmsTemplate;
}
/**
* 配置发布订阅生产者的JmsTemplate
* @return JmsTemplate
*/
@Bean(name="jmsTopicTemplate")
public JmsTemplate jmsTopicTemplate() {
//设置创建连接的工厂
//JmsTemplate jmsTemplate = new JmsTemplate(connectionFactory);
//优化连接工厂,这里应用缓存池 连接工厂就即可
JmsTemplate jmsTemplate = new JmsTemplate(cachingConnectionFactory);
//设置默认消费topic
//jmsTemplate.setDefaultDestination(topic());
//设置发布订阅消息类型
jmsTemplate.setPubSubDomain(isPubSubDomain);
//deliveryMode, priority, timeToLive 的开关,要生效,必须配置为true,默认false
jmsTemplate.setExplicitQosEnabled(true);
//DeliveryMode.NON_PERSISTENT=1:非持久 ; DeliveryMode.PERSISTENT=2:持久
jmsTemplate.setDeliveryMode(DeliveryMode.PERSISTENT);
//默认不开启事务
System.out.println("是否开启事务"+jmsTemplate.isSessionTransacted());
//如果session带有事务,并且事务成功提交,则消息被自动签收。如果事务回滚,则消息会被再次传送。
//jmsTemplate.setSessionTransacted(true);
//不带事务的session的签收方式,取决于session的配置。
//默认消息确认方式为1,即AUTO_ACKNOWLEDGE
System.out.println("是否消息确认方式"+jmsTemplate.getSessionAcknowledgeMode());
//消息的应答方式,需要手动确认,此时SessionTransacted必须被设置为false,且为Session.CLIENT_ACKNOWLEDGE模式
//Session.AUTO_ACKNOWLEDGE 消息自动签收
//Session.CLIENT_ACKNOWLEDGE 客户端调用acknowledge方法手动签收
//Session.DUPS_OK_ACKNOWLEDGE 不必必须签收,消息可能会重复发送
jmsTemplate.setSessionAcknowledgeMode(Session.CLIENT_ACKNOWLEDGE);
return jmsTemplate;
}
}
Why Enterprise Integration Patterns?
Enterprise integration is too complex to be solved with a simple 'cookbook' approach. Instead, patterns can provide guidance by documenting the kind of experience that usually lives only in architects' heads: they are accepted solutions to recurring problems within a given context. Patterns are abstract enough to apply to most integration technologies, but specific enough to provide hands-on guidance to designers and architects. Patterns also provide a vocabulary for developers to efficiently describe their solution.
Patterns are not 'invented'; they are harvested from repeated use in practice. If you have built integration solutions, it is likely that you have used some of these patterns, maybe in slight variations and maybe calling them by a different name. The purpose of this site is not to "invent" new approaches, but to present a coherent collection of relevant and proven patterns, which in total form an integration pattern language.
Despite the 700+ pages, our book covers only a fraction of patterns (and the problems to be solved) in the integration space. The current patterns focus on Messaging, which forms the basis of most other integration patterns. We have started to harvest more patterns but are realizing (once again) how much work documenting these patterns really is. So please stay tuned.
Messaging Patterns
We have documented 65 messaging patterns, organized as follows:
https://www.enterpriseintegrationpatterns.com/patterns/messaging/index.html
A detailed step-by-step tutorial on how to connect to a JMS broker using a Spring Integration Gateway and Spring Boot.
A detailed step-by-step tutorial on how to connect to Apache ActiveMQ Artemis using Spring JMS and Spring Boot.
A detailed step-by-step tutorial on how to publish/subscribe to a JMS topic using Spring JMS and Spring Boot.
A detailed step-by-step tutorial on how to connect to an ActiveMQ JMS broker using Spring Integration and Spring Boot.
A detailed step-by-step tutorial on how a Spring JMS listener works in combination with Spring Boot.
A detailed step-by-step tutorial on how to use JmsTemplate in combination with Spring JMS and Spring Boot.
A detailed step-by-step tutorial on how to implement a message selector using Spring JMS and Spring Boot.
A detailed step-by-step tutorial on how to implement a message converter using Spring JMS and Spring Boot.
A detailed step-by-step tutorial on how to use a Spring Boot admin UI to manage Spring Batch jobs.
A detailed step-by-step tutorial on how to implement a Spring Batch Tasklet using Spring Boot.
A detailed step-by-step tutorial on how to implement a Hello World Spring Batch job using Spring Boot.
This time I decided to play a little bit with Spring Integration Java DSL. Which has been merged directly into Spring Integration Core 5.0, which is smart and obvious move because:
- Everyone starting the new Spring projects based on Java Config uses that
- SI Java DSL enables you to use new powerfull Java 8 features like Lambdas
- You can build your flow using the Builder pattern based on IntegrationFlowBuilder
Let's take a look on the samples howto use that based on ActiveMQ JMS.
https://bitbucket.org/tomask79/spring-integration-java-dsl/src/master/
SPRING BATCH remote chunking模式下,如果要同一时间处理多个文件,按DEMO的默认配置,是会报错的,这是由于多个文件的处理的MASTER方,是用同一个QUEUE名,这样SLAVE中处理多个JOB INSTANCE时,会返回不同的JOB-INSTANCE-ID,导致报错。
这时需更改SPRING BATCH使用SPRING INTEGRATION的模式中的GATEWAY组件。
GATEWAY组件是工作在REQUEST/RESPONSE模式下,即发一个MESSAGE到某一QUEUE时,要从REPLY QUEUE等到CONSUMER返回结果时,才往下继续。
OUTBOUND GATEWAY:从某一CHANNEL获取MESSAGE,发往REQUEST QUEUE,从REPLY QUEUE等到CONSUMER返回结果,将此MESSAGE发往下一CHANNEL。
INBOUND GATEWAY:从某一QUEUE获取MESSAGE,发往某一REQUEST CHANNEL,从REPLY CHANNEL等到返回结果,将此MESSAGE发往下一QUEUE。
详情参见此文:
https://blog.csdn.net/alexlau8/article/details/78056064。
<!-- Master jms -->
<int:channel id="MasterRequestChannel">
<int:dispatcher task-executor="RequestPublishExecutor"/>
</int:channel>
<task:executor id="RequestPublishExecutor" pool-size="5-10" queue-capacity="0"/>
<!-- <int-jms:outbound-channel-adapter
connection-factory="connectionFactory"
destination-name="RequestQueue"
channel="MasterRequestChannel"/> -->
<int:channel id="MasterReplyChannel"/>
<!-- <int-jms:message-driven-channel-adapter
connection-factory="connectionFactory"
destination-name="ReplyQueue"
channel="MasterReplyChannel"/> -->
<int-jms:outbound-gateway
connection-factory="connectionFactory"
correlation-key="JMSCorrelationID"
request-channel="MasterRequestChannel"
request-destination-name="RequestQueue"
receive-timeout="30000"
reply-channel="MasterReplyChannel"
reply-destination-name="ReplyQueue"
async="true">
<int-jms:reply-listener />
</int-jms:outbound-gateway>
<!-- Slave jms -->
<int:channel id="SlaveRequestChannel"/>
<!-- <int-jms:message-driven-channel-adapter
connection-factory="connectionFactory"
destination-name="RequestQueue"
channel="SlaveRequestChannel"/> -->
<int:channel id="SlaveReplyChannel"/>
<!-- <int-jms:outbound-channel-adapter
connection-factory="connectionFactory"
destination-name="ReplyQueue"
channel="SlaveReplyChannel"/> -->
<int-jms:inbound-gateway
connection-factory="connectionFactory"
correlation-key="JMSCorrelationID"
request-channel="SlaveRequestChannel"
request-destination-name="RequestQueue"
reply-channel="SlaveReplyChannel"
default-reply-queue-name="ReplyQueue"/>
MASTER配置
package com.paul.testspringbatch.config.master;
import javax.jms.ConnectionFactory;
import org.springframework.beans.factory.config.CustomScopeConfigurer;
//import org.springframework.batch.core.configuration.annotation.StepScope;
import org.springframework.context.annotation.Bean;
import org.springframework.context.annotation.Configuration;
import org.springframework.context.annotation.Profile;
import org.springframework.context.annotation.Scope;
import org.springframework.context.support.SimpleThreadScope;
import org.springframework.integration.channel.DirectChannel;
import org.springframework.integration.channel.QueueChannel;
import org.springframework.integration.config.EnableIntegration;
import org.springframework.integration.dsl.IntegrationFlow;
import org.springframework.integration.dsl.IntegrationFlows;
import org.springframework.integration.jms.JmsOutboundGateway;
import com.paul.testspringbatch.common.constant.IntegrationConstant;
@Configuration
@EnableIntegration
@Profile("batch-master")
public class IntegrationMasterConfiguration {
// @Value("${broker.url}")
// private String brokerUrl;
// @Bean
// public ActiveMQConnectionFactory connectionFactory() {
// ActiveMQConnectionFactory connectionFactory = new ActiveMQConnectionFactory();
// connectionFactory.setBrokerURL(this.brokerUrl);
// connectionFactory.setTrustAllPackages(true);
// return connectionFactory;
// }
/*
* Configure outbound flow (requests going to workers)
*/
@Bean
// @Scope(ConfigurableBeanFactory.SCOPE_PROTOTYPE)
public DirectChannel requests() {
return new DirectChannel();
}
// @Bean
// public IntegrationFlow outboundFlow(ConnectionFactory connectionFactory) {
// return IntegrationFlows
// .from(requests())
// .handle(Jms.outboundAdapter(connectionFactory).destination(IntegrationConstant.MASTER_REQUEST_DESTINATION))
// .get();
// }
@Bean
public CustomScopeConfigurer customScopeConfigurer() {
CustomScopeConfigurer customScopeConfigurer = new CustomScopeConfigurer();
customScopeConfigurer.addScope("thread", new SimpleThreadScope());
return customScopeConfigurer;
}
// @Bean
// public static BeanFactoryPostProcessor beanFactoryPostProcessor() {
// return new BeanFactoryPostProcessor() {
//
// @Override
// public void postProcessBeanFactory(ConfigurableListableBeanFactory beanFactory) throws BeansException {
// beanFactory.registerScope("thread", new SimpleThreadScope());
// }
// };
// }
/*
* Configure inbound flow (replies coming from workers)
*/
@Bean
@Scope(value = "thread"/* , proxyMode = ScopedProxyMode.NO */)
// @Scope(ConfigurableBeanFactory.SCOPE_PROTOTYPE)
public QueueChannel replies() {
return new QueueChannel();
}
// @Bean
// public IntegrationFlow inboundFlow(ConnectionFactory connectionFactory) {
// return IntegrationFlows
// .from(Jms.messageDrivenChannelAdapter(connectionFactory).destination(IntegrationConstant.MASTER_REPLY_DESTINATION))
// .channel(replies())
// .get();
// }
@Bean
public JmsOutboundGateway jmsOutboundGateway(ConnectionFactory connectionFactory) {
JmsOutboundGateway jmsOutboundGateway = new JmsOutboundGateway();
jmsOutboundGateway.setConnectionFactory(connectionFactory);
jmsOutboundGateway.setRequestDestinationName(IntegrationConstant.MASTER_REQUEST_DESTINATION);//2. send the message to this destination
jmsOutboundGateway.setRequiresReply(true);
jmsOutboundGateway.setCorrelationKey(IntegrationConstant.JMS_CORRELATION_KEY);//3. let the broker filter the message
jmsOutboundGateway.setAsync(true);//must be async, so that JMS_CORRELATION_KEY work
jmsOutboundGateway.setUseReplyContainer(true);
jmsOutboundGateway.setReplyDestinationName(IntegrationConstant.MASTER_REPLY_DESTINATION);//4. waiting the response from this destination
jmsOutboundGateway.setReceiveTimeout(30_000);
return jmsOutboundGateway;
}
@Bean
public IntegrationFlow jmsOutboundGatewayFlow(ConnectionFactory connectionFactory) {
return IntegrationFlows
.from(requests())//1. receive message from this channel
.handle(jmsOutboundGateway(connectionFactory))
.channel(replies())//5. send back the response to this channel
.get();
}
}
SLAVE配置:
package com.paul.testspringbatch.config.slave;
import javax.jms.ConnectionFactory;
import org.springframework.context.annotation.Bean;
import org.springframework.context.annotation.Configuration;
import org.springframework.context.annotation.Profile;
import org.springframework.integration.channel.DirectChannel;
import org.springframework.integration.config.EnableIntegration;
import org.springframework.integration.dsl.IntegrationFlow;
import org.springframework.integration.dsl.IntegrationFlows;
import org.springframework.integration.jms.dsl.Jms;
import com.paul.testspringbatch.common.constant.IntegrationConstant;
@Configuration
@EnableIntegration
@Profile("batch-slave")
public class IntegrationSlaveConfiguration {
/*
* Configure inbound flow (requests coming from the master)
*/
@Bean
public DirectChannel requests() {
return new DirectChannel();
}
// @Bean
// public IntegrationFlow inboundFlow(ConnectionFactory connectionFactory) {
// return IntegrationFlows
// .from(Jms.messageDrivenChannelAdapter(connectionFactory).destination("requests"))
// .channel(requests())
// .get();
// }
/*
* Configure outbound flow (replies going to the master)
*/
@Bean
public DirectChannel replies() {
return new DirectChannel();
}
// @Bean
// public IntegrationFlow outboundFlow(ConnectionFactory connectionFactory) {
// return IntegrationFlows
// .from(replies())
// .handle(Jms.outboundAdapter(connectionFactory).destination("replies"))
// .get();
// }
@Bean
public IntegrationFlow inboundGatewayFlow(ConnectionFactory connectionFactory) {
return IntegrationFlows
.from(Jms
.inboundGateway(connectionFactory)
.destination(IntegrationConstant.SLAVE_HANDLE_MASTER_REQUEST_DESTINATION)//1. receive message from this channel.
.correlationKey(IntegrationConstant.JMS_CORRELATION_KEY)//2. let the broker filter the message
.requestChannel(requests())//3. send the message to this channel
.replyChannel(replies())//4. waitting the result from this channel
.defaultReplyQueueName(IntegrationConstant.SLAVE_RETURN_RESULT_DESTINATION)//5.send back the result to this destination to the master.
)
.get();
}
}
在SPRING BATCH中,通常ROUTER是针对STEP的,但是如果在一个STEP中有多个WRITER,每个WRITER是写不同文件的,因此需要一个STEP内的ROUTER,以便能ROUTE到不同的WRITER中。
https://gist.github.com/benas/bfe2be7386b99ce496425fac9ff35fb8
在SPRING BATCH REMOTE CHUNKING的模式下:
SPRING BATCH 读文件时,是按一行一行来读取数据,再按CHUNKSIZE提交到REMOTE操作,有时要整合当前行和下几行,再决定CHUNKSIZE,以便相关的数据能在远程同一个PROCESSOR中按顺序进行处理,因为相关的数据被拆成几个CHUNK来处理的话,就有可能不按顺序来处理。这样就需要动态调整CHUNKSIZE。
参照如下:
https://stackoverflow.com/questions/37390602/spring-batch-custom-completion-policy-for-dynamic-chunk-size
并结合SingleItemPeekableItemReader(装饰者,允许查看下一条数据,真正的操作委托给代理)。
Request-Response is a message-exchange-pattern. In some cases, a message producer may want the consumers to reply to a message. The JMSReplyTo header indicates which destination, if any, a JMS consumer should reply to. The JMSReplyTo header is set explicitly by the JMS client; its contents will be a javax.jms.Destination object (either Topic or Queue).
In some cases, the JMS client will want the message consumers to reply to a temporary topic or queue set up by the JMS client. When a JMS message consumer receives a message that includes a JMSReplyTo destination, it can reply using that destination. A JMS consumer is not required to send a reply, but in some JMS applications, clients are programmed to do so.
For simplicity, this pattern is typically implemented in a purely synchronous fashion, as in web service calls over HTTP, which holds a connection open and waits until the response is delivered or the timeout period expires. However, request–response may also be implemented asynchronously, with a response being returned at some unknown later time.
For more information, check here.
Now, let’s jump into the code. In Spring, there are 2 ways to implement this (at least I know of).
- Using JMSTemplate
- Using Spring Integration
For demo purpose, I used ActiveMQ. However, you can implement this in other messaging systems like IBM MQ, Rabbit MQ, Tibco EMS, etc. In this demo, I send an ObjectMessage of type Order and reply with a Shipment object.
Using JMSTemplate
First, we include the required dependencies. Replace the activemq dependency with your messaging system’s jars if not using ActiveMQ
<dependencies>
<dependency>
<groupId>org.springframework.boot</groupId>
<artifactId>spring-boot-starter-activemq</artifactId>
</dependency>
<dependency>
<groupId>org.apache.activemq.tooling</groupId>
<artifactId>activemq-junit</artifactId>
<version>${activemq.version}</version>
<scope>test</scope>
</dependency>
<dependency>
<groupId>org.springframework.boot</groupId>
<artifactId>spring-boot-starter-test</artifactId>
<scope>test</scope>
</dependency>
</dependencies>
Using the default spring.activemq. properties to configure the application with the ActiveMQ. However, you can do this inside a @Configuration class as well.
spring:
activemq:
broker-url: tcp://localhost:61616
non-blocking-redelivery: true
packages:
trust-all: true
- Note in the above configuration spring.activemq.packages.trust-all can be changed to spring.activemq.packages.trusted with the appropriate packages.
Now spring will do it’s magic and inject all the required Beans as usual :) However, in our code, we need to EnableJms
import org.springframework.context.annotation.Configuration;
import org.springframework.jms.annotation.EnableJms;
@EnableJms
@Configuration
public class ActiveMQConfig {
public static final String ORDER_QUEUE = "order-queue";
public static final String ORDER_REPLY_2_QUEUE = "order-reply-2-queue";
}
First, we will configure the Producer
@Slf4j
@Service
public class Producer {
@Autowired
JmsMessagingTemplate jmsMessagingTemplate;
@Autowired
JmsTemplate jmsTemplate;
private Session session;
@PostConstruct
public void init(){
jmsTemplate.setReceiveTimeout(1000L);
jmsMessagingTemplate.setJmsTemplate(jmsTemplate);
session = jmsMessagingTemplate.getConnectionFactory().createConnection()
.createSession(false, Session.AUTO_ACKNOWLEDGE);
}
public Shipment sendWithReply(Order order) throws JMSException {
ObjectMessage objectMessage = session.createObjectMessage(order);
objectMessage.setJMSCorrelationID(UUID.randomUUID().toString());
objectMessage.setJMSReplyTo(new ActiveMQQueue(ORDER_REPLY_2_QUEUE));
objectMessage.setJMSCorrelationID(UUID.randomUUID().toString());
objectMessage.setJMSExpiration(1000L);
objectMessage.setJMSDeliveryMode(DeliveryMode.NON_PERSISTENT);
return jmsMessagingTemplate.convertSendAndReceive(new ActiveMQQueue(ORDER_QUEUE),
objectMessage, Shipment.class); //this operation seems to be blocking + sync
}
}
- Note in the above code that, JmsMessagingTemplate is used instead of JmsTemplatebecause, we are interested in the method convertSendAndReceive. As seen in the method signature, it waits to receive the Shipment object from the consumer.
Next, we can see the Receiver
@Component
public class Receiver implements SessionAwareMessageListener<Message> {
@Override
@JmsListener(destination = ORDER_QUEUE)
public void onMessage(Message message, Session session) throws JMSException {
Order order = (Order) ((ActiveMQObjectMessage) message).getObject();
Shipment shipment = new Shipment(order.getId(), UUID.randomUUID().toString());
// done handling the request, now create a response message
final ObjectMessage responseMessage = new ActiveMQObjectMessage();
responseMessage.setJMSCorrelationID(message.getJMSCorrelationID());
responseMessage.setObject(shipment);
// Message sent back to the replyTo address of the income message.
final MessageProducer producer = session.createProducer(message.getJMSReplyTo());
producer.send(responseMessage);
}
}
- Using the javax.jms.Session the javax.jms.MessageProducer is created and used to send the reply message to the JMSReplyTo queue. In real life, this receiver could be a different application altogether.
Using Spring Integration
First, we include the required dependencies in addition to the above dependencies
<dependency>
<groupId>org.springframework.integration</groupId>
<artifactId>spring-integration-jms</artifactId>
</dependency>
Using the default spring.activemq. properties to configure the application with the ActiveMQ. However, you can do this inside a @Configuration class as well.
spring:
activemq:
broker-url: tcp://localhost:61616
non-blocking-redelivery: true
packages:
trust-all: true
- Note in the above configuration spring.activemq.packages.trust-all can be changed to spring.activemq.packages.trusted with the appropriate packages.
Next we create the required Beans for the Spring Integration.
@EnableIntegration
@IntegrationComponentScan
@Configuration
public class ActiveMQConfig {
public static final String ORDER_QUEUE = "order-queue";
public static final String ORDER_REPLY_2_QUEUE = "order-reply-2-queue";
@Bean
public MessageConverter messageConverter() {
MappingJackson2MessageConverter converter = new MappingJackson2MessageConverter();
converter.setTargetType(MessageType.TEXT);
converter.setTypeIdPropertyName("_type");
return converter;
}
@Bean
public MessageChannel requests() {
return new DirectChannel();
}
@Bean
@ServiceActivator(inputChannel = "requests")
public JmsOutboundGateway jmsGateway(ActiveMQConnectionFactory activeMQConnectionFactory) {
JmsOutboundGateway gateway = new JmsOutboundGateway();
gateway.setConnectionFactory(activeMQConnectionFactory);
gateway.setRequestDestinationName(ORDER_QUEUE);
gateway.setReplyDestinationName(ORDER_REPLY_2_QUEUE);
gateway.setCorrelationKey("JMSCorrelationID");
gateway.setSendTimeout(100L);
gateway.setReceiveTimeout(100L);
return gateway;
}
@Autowired
Receiver receiver;
@Bean
public DefaultMessageListenerContainer responder(ActiveMQConnectionFactory activeMQConnectionFactory) {
DefaultMessageListenerContainer container = new DefaultMessageListenerContainer();
container.setConnectionFactory(activeMQConnectionFactory);
container.setDestinationName(ORDER_QUEUE);
MessageListenerAdapter adapter = new MessageListenerAdapter(new Object() {
@SuppressWarnings("unused")
public Shipment handleMessage(Order order) {
return receiver.receiveMessage(order);
}
});
container.setMessageListener(adapter);
return container;
}
}
Next, we will configure the MessagingGateway
@MessagingGateway(defaultRequestChannel = "requests")
public interface ClientGateway {
Shipment sendAndReceive(Order order);
}
We then Autowire this gateway in our Component class when we want to send and receive the message. A sample is shown below.
@Slf4j
@Component
public class Receiver {
public Shipment receiveMessage(@Payload Order order) {
Shipment shipment = new Shipment(order.getId(), UUID.randomUUID().toString());
return shipment;
}
}
- Next we configure the Componen to process the Order message. After successful execution, this component will send the Shipment message to the JMSReplyTo queue. In real life, this receiver could be a different application altogether.
For those, who just want to clone the code, head out to aniruthmp/jms
- 安裝 nfs-utils 套件。
[root@kvm5 ~]# yum install -y nfs-utils
- 建立 NFS 分享目錄。
[root@kvm5 ~]# mkdir /public /protected
- 修改 NFS 分享目錄的 SELinux 檔案 context。
[root@kvm5 ~]# semanage fcontext -a -t public_content_t "/public(/.*)?"
[root@kvm5 ~]# semanage fcontext -a -t public_content_t "/protected(/.*)?"
[root@kvm5 ~]# restorecon -Rv /public /protected
- 考試時不用自行產生 kerberos keytab,只要依照指定的位置下載,存放在目錄 /etc/ 下,且檔名必須為 krb5.keytab。
[root@kvm5 ~]# wget http://deyu.wang/kvm5.keytab -O /etc/krb5.keytab
- kerberos keytab 的驗證跟時間有關,server 與 client 都必須校時。
[root@kvm5 ~]# date
Sun Jan  7 14:50:04 CST 2018
[root@kvm5 ~]# chronyc -a makestep
200 OK
200 OK
[root@kvm5 ~]# date
Mon Nov 20 15:53:22 CST 2017
- 在 /protected 下建立次目錄 restricted,並將其擁有者設定為 deyu3,讓 deyu3 可以寫入資料。
[root@kvm5 ~]# mkdir -p  /protected/restricted
[root@kvm5 ~]# chown deyu3 /protected/restricted
- 編輯設定檔 /etc/exports,分享 /protected 及 /public 兩個目錄給網域 192.168.122.0/24。
[root@kvm5 ~]# echo '/protected 192.168.122.0/24(rw,sync,sec=krb5p)' > /etc/exports
[root@kvm5 ~]# echo '/public 192.168.122.0/24(ro,sync)' >> /etc/exports
[root@kvm5 ~]# vim /etc/exports
[root@kvm5 ~]# cat /etc/exports
/protected 192.168.122.0/24(rw,sync,sec=krb5p)
/public 192.168.122.0/24(ro,sync)
- NFS 掛載參數說明如下,詳細說明請參考 man 5 nfs 手冊。
- rw:read-write,可讀寫的權限;
- ro:read-only,唯讀的權限;
- sec=mode:安全認證模式;
- sec=sys 預設,使用本地 UNIX UIDs 及 GIDs 進行身份認證。
- sec=krb5 使用 Kerberos V5 取代本地 UNIX UIDs 及 GIDs 進行身份認證。
- sec=krb5i 使用 Kerberos V5 進行身份認證,資料完整性檢查,以防止數據被篡改。
- sec=krb5p 使用 Kerberos V5 進行身份認證,資料完整性檢查及 NFS 傳輸加密,以防止數據被篡改,這是最安全的方式。
- sync:資料同步寫入到記憶體與硬碟當中;
[root@kvm5 ~]# man 5 nfs
- 設定使用 4.2 版本,以匯出分享 SELinux context。無適合的版本 client 端掛載時會出現 mount.nfs: Protocol not supported 的訊息。
[root@kvm5 ~]# vim /etc/sysconfig/nfs  sed -i 's/^\(RPCNFSDARGS=\).*$/\1\"-V 4.2\"/' /etc/sysconfig/nfs
[root@kvm5 ~]# grep ^RPCNFSDARGS /etc/sysconfig/nfs  RPCNFSDARGS="-V 4.2"
- 設定開機啟動 nfs 服務,NFS server 端的服務為 nfs-server 及 nfs-secure-server,本版本只要啟動 nfs-server 就同時啟動 nfs-secure-server,而且使用 tab 鍵也不會出現 nfs-secure-server 服務,但有些版本則是兩者分開,必須確認是不是兩種服務都啟動。
[root@kvm5 ~]# systemctl enable nfs-server.service nfs-secure-server.service
- 啟動 nfs 服務
[root@kvm5 ~]# systemctl start nfs-server.service nfs-secure-server.service
- 查看目前啟動的 nfs 版本,因 server 指定使用 4.2,若出現 -4.2 表示 nfs server 沒有成功啟動。
[root@kvm5 ~]# cat /proc/fs/nfsd/versions -2 +3 +4 +4.1 +4.2
- 要確定 nfs-secure-server nfs-server 服務都正常運作。
[root@kvm5 ~]# systemctl status nfs-secure-server.service nfs-server.service
nfs-secure-server.service - Secure NFS Server
   Loaded: loaded (/usr/lib/systemd/system/nfs-secure-server.service; enabled)
   Active: active (running) since Mon 2015-09-21 20:04:10 CST; 8s ago
  Process: 3075 ExecStart=/usr/sbin/rpc.svcgssd $RPCSVCGSSDARGS (code=exited, status=0/SUCCESS)
 Main PID: 3077 (rpc.svcgssd)
   CGroup: /system.slice/nfs-secure-server.service
           └─3077 /usr/sbin/rpc.svcgssd

Sep 21 20:04:10 kvm5.deyu.wang systemd[1]: Starting Secure NFS Server
Sep 21 20:04:10 kvm5.deyu.wang systemd[1]: Started Secure NFS Server.

nfs-server.service - NFS Server
   Loaded: loaded (/usr/lib/systemd/system/nfs-server.service; enabled)
   Active: active (exited) since Mon 2015-09-21 20:04:10 CST; 8s ago
  Process: 3078 ExecStopPost=/usr/sbin/exportfs -f (code=exited, status=0/SUCCESS)
  Process: 3076 ExecStop=/usr/sbin/rpc.nfsd 0 (code=exited, status=0/SUCCESS)
  Process: 3087 ExecStart=/usr/sbin/rpc.nfsd $RPCNFSDARGS $RPCNFSDCOUNT (code=exited, status=0/SUCCESS)
  Process: 3084 ExecStartPre=/usr/sbin/exportfs -r (code=exited, status=0/SUCCESS)
  Process: 3083 ExecStartPre=/usr/libexec/nfs-utils/scripts/nfs-server.preconfig (code=exited, status=0/SUCCESS)
 Main PID: 3087 (code=exited, status=0/SUCCESS)
   CGroup: /system.slice/nfs-server.service

Sep 21 20:04:10 kvm5.deyu.wang systemd[1]: Starting NFS Server
Sep 21 20:04:10 kvm5.deyu.wang systemd[1]: Started NFS Server.
- 建議不論是否 TAB 有沒有出現提示,都同時啟動這兩個服務。CentOS 安裝版本
nfs-utils-1.3.0-8.el7.x86_64 啟動 nfs-secure-server 出現錯誤訊息,請執行 yum downgrade nfs-utils 換成 nfs-utils-1.3.0-0.el7.x86_64 套件。[root@kvm5 ~]# rpm -qa | grep nfs-utils
nfs-utils-1.3.0-8.el7.x86_64
[root@kvm5 ~]# yum downgrade nfs-utils -y
[root@kvm5 ~]# rpm -qa | grep nfs-utils
nfs-utils-1.3.0-0.el7.x86_64
- 再重新啟動 nfs 服務,並查看是否正常運作。
[root@kvm5 ~]# systemctl restart nfs-server.service nfs-secure-server.service
- 輸出所有設定的 nfs 分享目錄。
[root@kvm5 ~]# exportfs -arv
exporting 192.168.122.0/24:/public
exporting 192.168.122.0/24:/protected
1.spring integration 's architecture
主要提供两个功能:
在系统内提供实现轻量级、事件驱动交互行为的框架
在系统间提供一种基于适配器的平台,以支持灵活的系统间交互
2.spring integration对于企业集成模式的支持
2.1Message:一个信息的单元,通常有消息头(header)和消息内容(payload)组成
2.2Message channel:消息处理节点之间的连接,负责将Message从生产者传输到消费者。
根据消费者的多少,可分为point to point和publish-subscribe两种
根据消息传输方式的不同,分为同步和异步两种
2.3Message Endpoint:消息处理节点,消息从节点进入通道,也是从节点离开通道
几个常见的Message EndPoint:
CHANNEL ADAPTER,用于连接该适配器的特点是单向消息流的,要么是消息通过该适配器进入通道,要么是消息通过该适配器离开通道
MESSAGING GATEWAY,处理的消息流和Channel Adapter不同,不是单向的,即有进入该节点的消息,也会从该节点发出消息。
SERVICE ACTIVATOR,该节点调用服务来处理输入的消息,并将服务返回的数据发送到输出通道。在spring integration中,调用的方法被限定为本地方法调用。
ROUTER,路由器,将输入的消息路由到某个输出通道中
SPLITTER,将输入的消息拆分成子消息
AGGREGATOR,将输入的多个消息合并为一个消息
3.观看书中例子hello-world思考
测试gateway时,下面代码向通道names内放入消息world?
然后service-activator从names通道中获得消息world,调用方法sayHello返回值到给gateway?
解释:gateway有一个service-interface的属性,这个属性指向一个interface。当我们用一个接口声明一个gateway时,spring integration会自动帮我们生成该接口的代理类,这样当我们往gateway发送消息时,spring integration会通过代理类把消息转发到default-request-channel中去
作者:马国标
链接:https://www.jianshu.com/p/bf1643539f99
来源:简书
简书著作权归作者所有,任何形式的转载都请联系作者获得授权并注明出处。
加上此配置:
MongodbConfiguration.java
import org.springframework.beans.factory.annotation.Autowired;
import org.springframework.context.annotation.Bean;
import org.springframework.context.annotation.Configuration;
import org.springframework.data.mongodb.MongoDbFactory;
import org.springframework.data.mongodb.core.convert.DbRefResolver;
import org.springframework.data.mongodb.core.convert.DefaultDbRefResolver;
import org.springframework.data.mongodb.core.convert.DefaultMongoTypeMapper;
import org.springframework.data.mongodb.core.convert.MappingMongoConverter;
import org.springframework.data.mongodb.core.mapping.MongoMappingContext;
@Configuration
public class AppMongoConfig {
@Autowired private MongoDbFactory mongoDbFactory;
@Autowired private MongoMappingContext mongoMappingContext;
@Bean
public MappingMongoConverter mappingMongoConverter() {
DbRefResolver dbRefResolver = new DefaultDbRefResolver(mongoDbFactory);
MappingMongoConverter converter = new MappingMongoConverter(dbRefResolver, mongoMappingContext);
converter.setTypeMapper(new DefaultMongoTypeMapper(null));
return converter;
}
}
https://www.ngdata.com/parsing-a-large-json-file-efficiently-and-easily/
https://sites.google.com/site/gson/streaming
http://www.acuriousanimal.com/2015/10/23/reading-json-file-in-stream-mode-with-gson.html
public static void main(String [] args) throws IOException {
String filePath = "C:big-data.json";
FileInputStream in = new FileInputStream(new File(filePath));
JsonReader reader = new JsonReader(new InputStreamReader(in, "UTF-8"));
Gson gson = new GsonBuilder().create();
// reader.beginObject();
// reader.nextName();
reader.beginObject();//跳过"{"
while (reader.hasNext()) {
// Read data into object model
JsonToken jsonToken = reader.peek();
if(jsonToken.equals(JsonToken.NAME)) {
String name = reader.nextName();
if(name.equalsIgnoreCase("SUMMARY")) {
// reader.beginObject();
Summary summary = gson.fromJson(reader, Summary.class);
logger.info(summary.toString());
break;
// reader.endObject();//跳过"}"
}
} /*else if(jsonToken.equals(JsonToken.BEGIN_OBJECT)) {
reader.beginObject();
} else if(jsonToken.equals(JsonToken.STRING)) {
logger.info(reader.nextString());
} else if(jsonToken.equals(JsonToken.NUMBER)) {
logger.info(reader.nextInt() + "");
} else if(jsonToken.equals(JsonToken.END_OBJECT)) {
reader.endObject();
} */
// Summary summary = gson.fromJson(reader, Summary.class);
// break;
}
reader.close();
}
https://www.oschina.net/news/91924/10-open-source-technology-trends-2018
http://www.iteye.com/news/32843
JAX-RS 2比JAX-RS 1增加了过滤器、拦截器、异步处理等特性。@import url(http://www.blogjava.net/CuteSoft_Client/CuteEditor/Load.ashx?type=style&file=SyntaxHighlighter.css);@import url(/css/cuteeditor.css);
JAXRSClientSpringBoot
CXFSpringBoot
Restfull Webservice书源码
JAX-RS 2.0 REST客户端编程实例
本人的DEMO
设计文档模板:
- 系统背景和定位
- 业务需求描述
- 领域语言整理,主要是整理领域中的各种术语的定义,名词解释
- 领域划分(分析出子域、核心域、支撑域)
- 系统用例图
- 每个子域的领域模型设计(实体、值对象、聚合、领域事件,需要注意的是:领域模型是需要抽象的,要分析业务本质,而不是简单的直接对需求进行建模)
- 领域模型详细说明(如为什么这样设计的原因、模型内对象的关系、各种业务规则、数据一致性规则等)
- 领域服务、仓储、工厂设计
- Saga业务流程设计
- 关键聚合根的状态流转图
- 场景走查(讲述如何通过领域模型、领域服务、仓储、Saga流程等完成系统用例以及关键业务流程的)
- 架构设计(如传统三层架构、经典四层架构、CQRS/ES架构)
一些其他的思考:
- 去除一切花俏的建模技巧,我觉得最重要的方向就是去努力分析问题和事物的本质,针对这个本质进行领域建模。这个领域建模,最主要的还是锻炼的人的事物抽象能力。10个人,建出来的领域模型都不同。本质原因就是大家对同一个问题的理解不同,对事物的本质的理解不同。虽然最终都能解决当前的问题,但是对适应未来需求变化的能力却是不同。
- 所以,我们要把时间花在多理解业务上,让自己成为领域专家,只有这样,才能充分理解业务。多理解一点业务,你才能更好的抽象出业务本质背后的领域模型。很少有人能做到很快理解业务,并很快针对业务设计出正确的领域模型,至少我是不行。
- 领域建模需要时间,是一个迭代的过程,人无完人。而时间很多时候也不会很充足,所以,不太可能一步到位把领域设计做的很完美。我们在整体项目规划的时候可能会有个大的架构设计、业务大图(边界思维),但是不可能达到领域设计的粒度,只能是一期一期的完善,到最后可能才会有完整的上面的目录内容。每一期都需要考虑支持的场景约束、上下文、系统边界、持续集成的相关设计。设计product, not project。
从遇到问题开始
当人们要做一个软件系统时,一般总是因为遇到了什么问题,然后希望通过一个软件系统来解决。
比如,我是一家企业,然后我觉得我现在线下销售自己的产品还不够,我希望能够在线上也能销售自己的产品。所以,自然而然就想到要做一个普通电商系统,用于实现在线销售自己企业产品的目的。
再比如,我是一家互联网公司,公司有很多系统对外提供服务,面向很多客户端设备。但是最近由于各种原因,导致服务经常出故障。所以,我们希望通过各种措施提高服务的质量和稳定性。其中的一个措施就是希望能做一个灰度发布的平台,这个平台可以提供灰度发布的服务。然后,当某个业务系统做了一些修改并需要发布时,可以使用我们的灰度发布平台来非常方便的实现灰度发布的功能。比如在灰度发布平台上方便的定制允许哪些特定的客户端才会访问新服务,哪些客户端继续使用老服务。灰度发布平台可以提供各种灰度的策略。有了这样的灰度发布机制,那即便系统的新逻辑有什么问题,受影响的面也不会很大,在可控范围内。所以,如果公司里的所有对外提供服务的系统都接入了灰度平台,那这些系统的发布环节就可以更加有保障了。
总之,我们做任何一个软件系统,都是有原因的,否则就没必要做这个系统,而这个原因就是我们遇到的问题。所以,通过问题,我们就知道了我们需要一个什么样的系统,这个系统解决什么样的问题。最后,我们就很自然的得出了一个目标,即知道了自己要什么。比如我要做一个论坛、一个博客系统、一个电商平台、一个灰度发布系统、一个IDE、一个分布式消息队列、一个通信框架,等等。
DDD切入点1 - 理解概念
DDD的全称为Domain-driven Design,即领域驱动设计。下面我从领域、问题域、领域模型、设计、驱动这几个词语的含义和联系的角度去阐述DDD是如何融入到我们平时的软件开发初期阶段的。要理解什么是领域驱动设计,首先要理解什么是领域,什么是设计,还有驱动是什么意思,什么驱动什么。
什么是领域(Domain)?
前面我们已经清楚的知道我们现在要做一个什么样的系统,这个系统需要解决什么问题。我认为任何一个系统都会属于某个特定的领域,比如论坛是一个领域,只要你想做一个论坛,那这个论坛的核心业务是确定的,比如都有用户发帖、回帖等核心基本功能。比如电商平台、普通电商系统,这种都属于网上电商领域,只要是这个领域的系统,那都有商品浏览、购物车、下单、减库存、付款交易等核心环节。所以,同一个领域的系统都具有相同的核心业务,因为他们要解决的问题的本质是类似的。
因此,我们可以推断出,一个领域本质上可以理解为就是一个问题域,只要是同一个领域,那问题域就相同。所以,只要我们确定了系统所属的领域,那这个系统的核心业务,即要解决的关键问题、问题的范围边界就基本确定了。通常我们说,要成为一个领域的专家,必须要在这个领域深入研究很多年才行。因为只有你研究了很多年,你才会遇到非常多的该领域的问题,同时你解决这个领域中的问题的经验也非常丰富。很多时候,领域专家比技术专家更加吃香,比如金融领域的专家。
什么是设计(Design)?
DDD中的设计主要指领域模型的设计。为什么是领域模型的设计而不是架构设计或其他的什么设计呢?因为DDD是一种基于模型驱动开发的软件开发思想,强调领域模型是整个系统的核心,领域模型也是整个系统的核心价值所在。每一个领域,都有一个对应的领域模型,领域模型能够很好的帮我们解决复杂的业务问题。
从领域和代码实现的角度来理解,领域模型绑定了领域和代码实现,确保了最终的代码实现就一定是解决了领域中的核心问题的。因为:1)领域驱动领域模型设计;2)领域模型驱动代码实现。我们只要保证领域模型的设计是正确的,就能确定领域模型可以解决领域中的核心问题;同理,我们只要保证代码实现是严格按照领域模型的意图来落地的,那就能保证最后出来的代码能够解决领域的核心问题的。这个思路,和传统的分析、设计、编码这几个阶段被割裂(并且每个阶段的产物也不同)的软件开发方法学形成鲜明的对比。
什么是驱动(Driven)?
上面其实已经提到了,就是:1)领域驱动领域模型设计;2)领域模型驱动代码实现。这个就和我们传统的数据库驱动开发的思路形成对比了。DDD中,我们总是以领域为边界,分析领域中的核心问题(核心关注点),然后设计对应的领域模型,再通过领域模型驱动代码实现。而像数据库设计、持久化技术等这些都不是DDD的核心,而是外围的东西。
领域驱动设计(DDD)告诉我们的最大价值我觉得是:当我们要开发一个系统时,应该尽量先把领域模型想清楚,然后再开始动手编码,这样的系统后期才会很好维护。但是,很多项目(尤其是互联网项目,为了赶工)都是一开始模型没想清楚,一上来就开始建表写代码,代码写的非常冗余,完全是过程是的思考方式,最后导致系统非常难以维护。而且更糟糕的是,出来混总是要还的,前期的领域模型设计的不好,不够抽象,如果你的系统会长期需要维护和适应业务变化,那后面你一定会遇到各种问题维护上的困难,比如数据结构设计不合理,代码到处冗余,改BUG到处引入新的BUG,新人对这种代码上手困难,等。而那时如果你再想重构模型,那要付出的代价会比一开始重新开发还要大,因为你还要考虑兼容历史的数据,数据迁移,如何平滑发布等各种头疼的问题。所以,就导致我们最后天天加班。
虽然,我们都知道这个道理,但是我也明白,人的习惯很难改变的,大部分人都很难从面向过程式的想到哪里写到哪里的思想转变为基于系统化的模型驱动的思维。我想,这或许是DDD很难在中国或国外流行起来的原因吧。但是,我想这不应该成为我们放弃学习DDD的原因,对吧!
概念总结:
- 领域就是问题域,有边界,领域中有很多问题;
- 任何一个系统要解决的那个大问题都对应一个领域;
- 通过建立领域模型来解决领域中的核心问题,模型驱动的思想;
- 领域建模的目标针对我们在领域中所关心的问题,即只针对核心关注点,而不是整个领域中的所有问题;
- 领域模型在设计时应考虑一定的抽象性、通用性,以及复用价值;
- 通过领域模型驱动代码的实现,确保代码让领域模型落地,代码最终能解决问题;
- 领域模型是系统的核心,是领域内的业务的直接沉淀,具有非常大的业务价值;
- 技术架构设计或数据存储等是在领域模型的外围,帮助领域模型进行落地;
DDD切入点2 - 理解领域、拆分领域、细化领域
理解领域知识是基础
上面我们通过第一步,虽然我们明确了要做一个什么样的系统,该系统主要解决什么问题,但是就这样我们还无法开始进行实际的需求分析和模型设计,我们还必须将我们的问题进行拆分,需求进行细化。有些时候,需求方,即提出问题的人,很可能自己不清楚具体想要什么。他只知道一个概念,一个大的目标。比如他只知道要做一个股票交易系统,一个灰度发布系统,一个电商平台,一个开发工具,等。但是他不清楚这些系统应该具体做成什么样子。这个时候,我认为领域专家就非常重要了,DDD也非常强调领域专家的重要性。因为领域专家对这个领域非常了解,对领域内的各种业务场景和各种业务规则也非常清楚,总之,对这个领域内的一切业务相关的知识都非常了解。所以,他们自然就有能力表达出系统该做成什么样子。所以,要知道一个系统到底该做成什么样子,到底哪些是核心业务关注点,只能靠沉淀领域内的各种知识,别无他法。因此,假设你现在打算做一个电商平台,但是你对这个领域没什么了解,那你一定得先去了解下该领域内主流的电商平台,比如淘宝、天猫、京东、亚马逊等。这个了解的过程就是你沉淀领域知识的过程。如果你不了解,就算你领域建模的能力再强,各种技术架构能力再强也是使不上力。领域专家不是某个固定的角色,而是某一类人,这类人对这个领域非常了解。比如,一个开发人员也可以是一个领域专家。假设你在一个公司开发和维护一个系统已经好几年了,但是这个系统的产品经理(PD)可能已经换过好几任了,这种情况下,我相信这几任产品经理都没有比你更熟悉这个领域。
拆分领域
上面我们明白了,领域建模的基础是要先理解领域,让自己成为领域专家。如果做到了这点,我们就打好了坚实的基础了。但是,有时一个领域往往太复杂,涉及到的领域概念、业务规则、交互流程太多,导致我们没办法直接针对这个大的领域进行领域建模。所以,我们需要将领域进行拆分,本质上就是把大问题拆分为小问题,然后各个击破的思路。然后既然把一个大的领域划分为了多个小的领域(子域),那最关键的就是要理清每个子域的边界;然后要搞清楚哪些子域是核心子域,哪些是非核心子域,哪些是公共支撑子域;然后,还要思考子域之间的联系是什么。那么,我们该如何划分子域呢?我的个人看法是从业务相关性的角度去思考,也就是我们平时说的按业务功能为出发点进行划分。还是拿经典的电商系统来分析,通常一个电商系统都会包含好几个大块,比如:
- 会员中心:负责用户账号登录、用户信息的管理;
- 商品中心:负责商品的展示、导航、维护;
- 订单中心:负责订单的生成和生命周期管理;
- 交易中心:负责交易相关的业务;
- 库存中心:负责维护商品的库存;
- 促销中心:负责各种促销活动的支持;
上面这些中心看起来很自然,因为大家对电子商务的这个领域都已经非常熟悉了,所以都没什么疑问,好像很自然的样子。所以,领域划分是不是就是没什么挑战了呢?显然不是。之所以我们觉得子域划分很简单,是因为我们对整个大领域非常了解了。如果我们遇到一个冷门的领域,就没办法这么容易的去划分子域了。这就需要我们先去努力理解领域内的知识。所以,我个人从来不相信什么子域划分的技巧什么的东西,因为我觉得这个工作没有任何诀窍可以使用。当我们不了解一个东西的时候,如何去拆解它?当我们对整个领域有一定的熟悉了,了解了领域内的相关业务的本质和关系,我们就自然而然的能划分出合理的子域了。不过并不是所有的系统都需要划分子域的,有些系统只是解决一个小问题,这个问题不复杂,可能只有一两个核心概念。所以,这种系统完全不需要再划分子域。但不是绝对的,当一个领域,我们的关注点越来越多,每个关注点我们关注的信息越来越多的时候,我们会不由自主的去进一步的划分子域。比如,也许我们一开始将商品和商品的库存都放在商品中心里,但是后来由于库存的维护越来越复杂,导致揉在一起对我们的系统维护带来一定的困难时,我们就会考虑将两者进行拆分,这个就是所谓的业务垂直分割。
细化子域
通过上面的两步,我们了解了领域里的知识,也对领域进行了子域划分。但这样还不够,凭这些我们还无法进行后续的领域模型设计。我们还必须再进一步细化每个子域,进一步明确每个子域的核心关注点,即需求细化。我觉得我们需要细化的方面有以下几点:
- 梳理领域概念:梳理出领域内我们关注的概念、概念的关系,并统一交流词汇,形成统一语言;
- 梳理业务规则:梳理出领域内我们关注的各种业务规则,DDD中叫不变性(invariants),比如唯一性规则,余额不能小于零等;
- 梳理业务场景:梳理出领域内的核心业务场景,比如电商平台中的加入购物车、提交订单、发起付款等核心业务场景;
- 梳理业务流程:梳理出领域内的关键业务流程,比如订单处理流程,退款流程等;
从上面这4个方面,我们从领域概念、业务规则、交互场景、业务流程等维度梳理了我们到底要什么,整理了整个系统应该具备的功能。这个工作我觉得是一个非常具有创造性和有难度的工作。我们一方面会主观的定义我们想要什么;另一方面,我们还会思考我们要的东西的合理性。我认为这个就是产品经理的工作,产品经理必须要负起职责,把他的产品充分设计好,从各个方面去考虑,如何设计一个产品,才能更好的解决用户的核心诉求,即领域内的核心问题。如果对领域不够了解,如果想不清楚用户到底要什么,如果思考问题不够全面,谈何设计出一个合理的产品呢?
关于领域概念的梳理,我觉得可以采用四色原型分析法,这个分析法通过系统的方法,将概念划分为不同的种类,为不同种类的概念标注不同的颜色。然后将这些概念有机的组合起来,从而让我们可以清晰的分析出概念和概念之间的关系。有兴趣的同学可以在网上搜索下四色原型。
注意:上面我说的这四点,重点是梳理出我们要什么功能,而不是思考如何实现这些功能,如何实现是软件设计人员的职责。
DDD切入点3 - 领域模型设计
这部分内容,我想学习DDD的人都很熟悉了。DDD原著中提出了很多实用的建模工具:聚合、实体、值对象、工厂、仓储、领域服务、领域事件。我们可以使用这些工具,来设计每一个子域的领域模型。最终通过领域模型图将设计沉淀下来。要使用这些工具,首先就要理解每个工具的含义和使用场景。不要以为很简单哦,比如聚合的划分就是一个非常具有艺术的活。同一个系统,不同的人设计出来的聚合是完全不同的。而且很有可能高手之间的最后设计出来的差别反而更大,实际上我认为是世界观的相互碰撞,呵呵。所以,要领域建模,我觉得每个人都应该去学学哲学知识,这有助于我们更好的认识世界,更好的理解事物的本质。
关于这些建模工具的概念和如何运用我就不多展开了,我博客里也有很多这方面的介绍。下面我再讲一下我认为比较重要的东西,比如到底该如何领域建模?步骤应该是怎么样的?
领域建模的方法
通过上面我介绍的细化子域的内容,现在再来谈该如何领域建模,我觉得就方便很多了。我的主要方法是:
- 划分好边界上下文,通常每个子域(sub domain)对应一个边界上下文(bounded context),同一个边界上下文中的概念是明确的,没有任何歧义;
- 在每个边界上下文中设计领域模型,具体的领域模型设计方法有很多种,如以场景为出发点的四色原型分析法,或者我早期写的这篇文章;这个步骤最核心的就是找出聚合根,并找出每个聚合根包含的信息;关于如何设计聚合,可以看一下我写的这篇文章;
- 画出领域模型图,圈出每个模型中的聚合边界;
- 设计领域模型时,要考虑该领域模型是否满足业务规则,同时还要综合考虑技术实现等问题,比如并发问题;领域模型不是概念模型,概念模型不关注技术实现,领域模型关心;所以领域模型才能直接指导编码实现;
- 思考领域模型是如何在业务场景中发挥作用的,以及是如何参与到业务流程的每个环节的;
- 场景走查,确认领域模型是否能满足领域中的业务场景和业务流程;
- 模型持续重构、完善、精炼;
领域模型的核心作用:
- 抽象了领域内的核心概念,并建立概念之间的关系;
- 领域模型承担了领域内的状态的维护;
- 领域模型维护了领域内的数据之间的业务规则,数据一致性;
下图是我最近做个一个普通电商系统的商品中心的领域模型图,给大家参考:
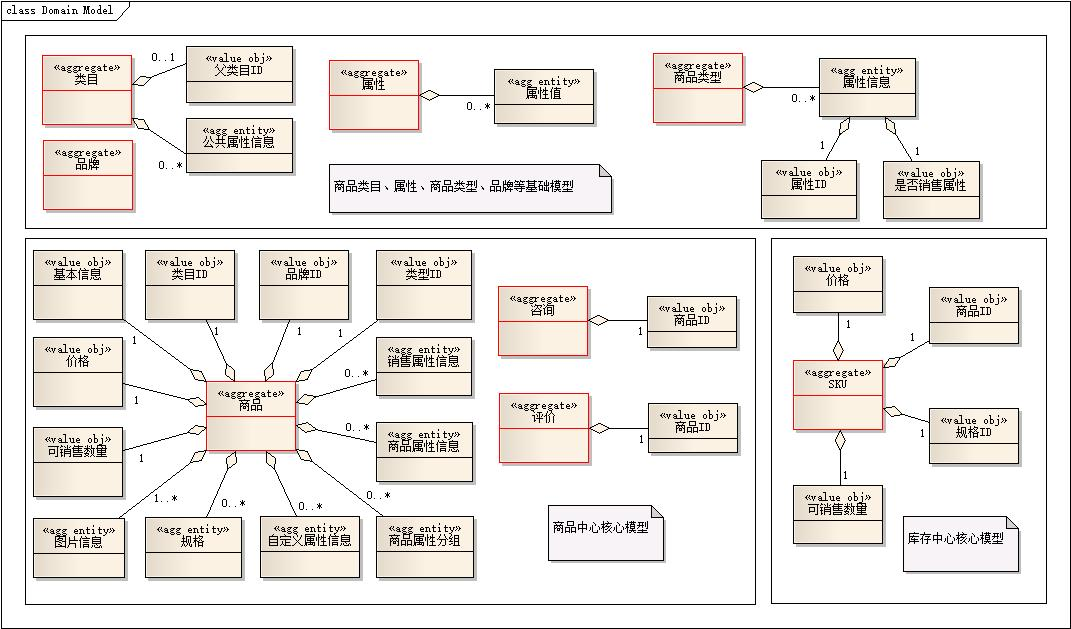
领域模型设计只是软件设计中的一小部分
需要特别注意的是,领域模型设计只是整个软件设计中的很小一部分。除了领域模型设计之外,要落地一个系统,我们还有非常多的其他设计要做,比如:
- 容量规划
- 架构设计
- 数据库设计
- 缓存设计
- 框架选型
- 发布方案
- 数据迁移、同步方案
- 分库分表方案
- 回滚方案
- 高并发解决方案
- 一致性选型
- 性能压测方案
- 监控报警方案
等等。上面这些都需要我们平时的大量学习和积累。作为一个合格的开发人员或架构师,我觉得除了要会DDD领域驱动设计,还要会上面这么多的技术能力,确实是非常不容易的。所以,千万不要以为会DDD了就以为自己很牛逼,实际上你会的只是软件设计中的冰山一角而已。
总结
本文的重点是基于我个人对DDD的一些理解,希望能整理出一些自己总结出来的一些感悟和经验,并分享给大家。我相信很多人已经看过太多DDD书上的东西,我总是感觉书上的东西看似都太”正规“,很多时候我们读了之后很难消化,就算理解了书里的内容,当我们想要运用到实践中时,总是感觉无从下手。本文希望通过通俗易懂的文字,介绍了一部分我对DDD的学习感悟和实践心得,希望能给大家一些启发和帮助。
最近几年,在DDD的领域,我们经常会看到CQRS架构的概念。我个人也写了一个ENode框架,专门用来实现这个架构。CQRS架构本身的思想其实非常简单,就是读写分离。是一个很好理解的思想。就像我们用MySQL数据库的主备,数据写到主,然后查询从备来查,主备数据的同步由MySQL数据库自己负责,这是一种数据库层面的读写分离。关于CQRS架构的介绍其实已经非常多了,大家可以自行百度或google。我今天主要想总结一下这个架构相对于传统架构(三层架构、DDD经典四层架构)在数据一致性、扩展性、可用性、伸缩性、性能这几个方面的异同,希望可以总结出一些优点和缺点,为大家在做架构选型时提供参考。
前言
CQRS架构由于本身只是一个读写分离的思想,实现方式多种多样。比如数据存储不分离,仅仅只是代码层面读写分离,也是CQRS的体现;然后数据存储的读写分离,C端负责数据存储,Q端负责数据查询,Q端的数据通过C端产生的Event来同步,这种也是CQRS架构的一种实现。今天我讨论的CQRS架构就是指这种实现。另外很重要的一点,C端我们还会引入Event Sourcing+In Memory这两种架构思想,我认为这两种思想和CQRS架构可以完美的结合,发挥CQRS这个架构的最大价值。
数据一致性
传统架构,数据一般是强一致性的,我们通常会使用数据库事务保证一次操作的所有数据修改都在一个数据库事务里,从而保证了数据的强一致性。在分布式的场景,我们也同样希望数据的强一致性,就是使用分布式事务。但是众所周知,分布式事务的难度、成本是非常高的,而且采用分布式事务的系统的吞吐量都会比较低,系统的可用性也会比较低。所以,很多时候,我们也会放弃数据的强一致性,而采用最终一致性;从CAP定理的角度来说,就是放弃一致性,选择可用性。
CQRS架构,则完全秉持最终一致性的理念。这种架构基于一个很重要的假设,就是用户看到的数据总是旧的。对于一个多用户操作的系统,这种现象很普遍。比如秒杀的场景,当你下单前,也许界面上你看到的商品数量是有的,但是当你下单的时候,系统提示商品卖完了。其实我们只要仔细想想,也确实如此。因为我们在界面上看到的数据是从数据库取出来的,一旦显示到界面上,就不会变了。但是很可能其他人已经修改了数据库中的数据。这种现象在大部分系统中,尤其是高并发的WEB系统,尤其常见。
所以,基于这样的假设,我们知道,即便我们的系统做到了数据的强一致性,用户还是很可能会看到旧的数据。所以,这就给我们设计架构提供了一个新的思路。我们能否这样做:我们只需要确保系统的一切添加、删除、修改操作所基于的数据是最新的,而查询的数据不必是最新的。这样就很自然的引出了CQRS架构了。C端数据保持最新、做到数据强一致;Q端数据不必最新,通过C端的事件异步更新即可。所以,基于这个思路,我们开始思考,如何具体的去实现CQ两端。看到这里,也许你还有一个疑问,就是为何C端的数据是必须要最新的?这个其实很容易理解,因为你要修改数据,那你可能会有一些修改的业务规则判断,如果你基于的数据不是最新的,那意味着判断就失去意义或者说不准确,所以基于老的数据所做的修改是没有意义的。
扩展性
传统架构,各个组件之间是强依赖,都是对象之间直接方法调用;而CQRS架构,则是事件驱动的思想;从微观的聚合根层面,传统架构是应用层通过过程式的代码协调多个聚合根一次性以事务的方式完成整个业务操作。而CQRS架构,则是以Saga的思想,通过事件驱动的方式,最终实现多个聚合根的交互。另外,CQRS架构的CQ两端也是通过事件的方式异步进行数据同步,也是事件驱动的一种体现。上升到架构层面,那前者就是SOA的思想,后者是EDA的思想。SOA是一个服务调用另一个服务完成服务之间的交互,服务之间紧耦合;EDA是一个组件订阅另一个组件的事件消息,根据事件信息更新组件自己的状态,所以EDA架构,每个组件都不会依赖其他的组件;组件之间仅仅通过topic产生关联,耦合性非常低。
上面说了两种架构的耦合性,显而易见,耦合性低的架构,扩展性必然好。因为SOA的思路,当我要加一个新功能时,需要修改原来的代码;比如原来A服务调用了B,C两个服务,后来我们想多调用一个服务D,则需要改A服务的逻辑;而EDA架构,我们不需要动现有的代码,原来有B,C两订阅者订阅A产生的消息,现在只需要增加一个新的消息订阅者D即可。
从CQRS的角度来说,也有一个非常明显的例子,就是Q端的扩展性。假设我们原来Q端只是使用数据库实现的,但是后来系统的访问量增大,数据库的更新太慢或者满足不了高并发的查询了,所以我们希望增加缓存来应对高并发的查询。那对CQRS架构来说很容易,我们只需要增加一个新的事件订阅者,用来更新缓存即可。应该说,我们可以随时方便的增加Q端的数据存储类型。数据库、缓存、搜索引擎、NoSQL、日志,等等。我们可以根据自己的业务场景,选择合适的Q端数据存储,实现快速查询的目的。这一切都归功于我们C端记录了所有模型变化的事件,当我们要增加一种新的View存储时,可以根据这些事件得到View存储的最新状态。这种扩展性在传统架构下是很难做到的。
可用性
可用性,无论是传统架构还是CQRS架构,都可以做到高可用,只要我们做到让我们的系统中每个节点都无单点即可。但是,相比之下,我觉得CQRS架构在可用性方面,我们可以有更多的回避余地和选择空间。
传统架构,因为读写没有分离,所以可用性要把读写合在一起综合考虑,难度会比较更大。因为传统架构,如果一个系统的高峰期的并发写入很大,比如为2W,并发读取也很大,比如为10W。那该系统必须优化到能同时支持这种高并发的写入和查询,否则系统就会在高峰时挂掉。这个就是基于同步调用思路的系统的缺点,没有一个东西去削峰填谷,保存瞬间多出来的请求,而必须让系统不管遇到多少请求,都必须能及时处理完,否则就会造成雪崩效应,造成系统瘫痪。但是一个系统,不会一直处在高峰,高峰可能只有半小时或1小时;但为了确保高峰时系统不挂掉,我们必须使用足够的硬件去支撑这个高峰。而大部分时候,都不需要这么高的硬件资源,所以会造成资源的浪费。所以,我们说基于同步调用、SOA思想的系统的实现成本是非常昂贵的。
而在CQRS架构下,因为CQRS架构把读和写分离了,所以可用性相当于被隔离在了两个部分去考虑。我们只需要考虑C端如何解决写的可用性,Q端如何解决读的可用性即可。C端解决可用性,我觉得是更加容易的,因为C端是消息驱动的。我们要做任何数据修改时,都会发送Command到分布式消息队列,然后后端消费者处理Command->产生领域事件->持久化事件->发布事件到分布式消息队列->最后事件被Q端消费。这个链路是消息驱动的。相比传统架构的直接服务方法调用,可用性要高很多。因为就算我们处理Command的后端消费者暂时挂了,也不会影响前端Controller发送Command,Controller依然可用。从这个角度来说,CQRS架构在数据修改上可用性要更高。不过你可能会说,要是分布式消息队列挂了呢?呵呵,对,这确实也是有可能的。但是一般分布式消息队列属于中间件,一般中间件都具有很高的可用性(支持集群和主备切换),所以相比我们的应用来说,可用性要高很多。另外,因为命令是先发送到分布式消息队列,这样就能充分利用分布式消息队列的优势:异步化、拉模式、削峰填谷、基于队列的水平扩展。这些特性可以保证即便前端Controller在高峰时瞬间发送大量的Command过来,也不会导致后端处理Command的应用挂掉,因为我们是根据自己的消费能力拉取Command。这点也是CQRS C端在可用性方面的优势,其实本质也是分布式消息队列带来的优势。所以,从这里我们可以体会到EDA架构(事件驱动架构)是非常有价值的,这个架构也体现了我们目前比较流行的Reactive Programming(响应式编程)的思想。
然后,对于Q端,应该说和传统架构没什么区别,因为都是要处理高并发的查询。这点以前怎么优化的,现在还是怎么优化。但是就像我上面可扩展性里强调的,CQRS架构可以更方便的提供更多的View存储,数据库、缓存、搜索引擎、NoSQL,而且这些存储的更新完全可以并行进行,互相不会拖累。理想的场景,我觉得应该是,如果你的应用要实现全文索引这种复杂查询,那可以在Q端使用搜索引擎,比如ElasticSearch;如果你的查询场景可以通过keyvalue这种数据结构满足,那我们可以在Q端使用Redis这种NoSql分布式缓存。总之,我认为CQRS架构,我们解决查询问题会比传统架构更加容易,因为我们选择更多了。但是你可能会说,我的场景只能用关系型数据库解决,且查询的并发也是非常高。那没办法了,唯一的办法就是分散查询IO,我们对数据库做分库分表,以及对数据库做一主多备,查询走备机。这点上,解决思路就是和传统架构一样了。
性能、伸缩性
本来想把性能和伸缩性分开写的,但是想想这两个其实有一定的关联,所以决定放在一起写。
伸缩性的意思是,当一个系统,在100人访问时,性能(吞吐量、响应时间)很不错,在100W人访问时性能也同样不错,这就是伸缩性。100人访问和100W人访问,对系统的压力显然是不同的。如果我们的系统,在架构上,能够做到通过简单的增加机器,就能提高系统的服务能力,那我们就可以说这种架构的伸缩性很强。那我们来想想传统架构和CQRS架构在性能和伸缩性上面的表现。
说到性能,大家一般会先思考一个系统的性能瓶颈在哪里。只要我们解决了性能瓶颈,那系统就意味着具有通过水平扩展来达到可伸缩的目的了(当然这里没有考虑数据存储的水平扩展)。所以,我们只要分析一下传统架构和CQRS架构的瓶颈点在哪里即可。
传统架构,瓶颈通常在底层数据库。然后我们一般的做法是,对于读:通常使用缓存就可以解决大部分查询问题;对于写:办法也有很多,比如分库分表,或者使用NoSQL,等等。比如阿里大量采用分库分表的方案,而且未来应该会全部使用高大上的OceanBase来替代分库分表的方案。通过分库分表,本来一台数据库服务器高峰时可能要承受10W的高并发写,如果我们把数据放到十台数据库服务器上,那每台机器只需要承担1W的写,相对于要承受10W的写,现在写1W就显得轻松很多了。所以,应该说数据存储对传统架构来说,也早已不再是瓶颈了。
传统架构一次数据修改的步骤是:1)从DB取出数据到内存;2)内存修改数据;3)更新数据回DB。总共涉及到2次数据库IO。
然后CQRS架构,CQ两端加起来所用的时间肯定比传统架构要多,因为CQRS架构最多有3次数据库IO,1)持久化命令;2)持久化事件;3)根据事件更新读库。为什么说最多?因为持久化命令这一步不是必须的,有一种场景是不需要持久化命令的。CQRS架构中持久化命令的目的是为了做幂等处理,即我们要防止同一个命令被处理两次。那哪一种场景下可以不需要持久化命令呢?就是当命令时在创建聚合根时,可以不需要持久化命令,因为创建聚合根所产生的事件的版本号总是为1,所以我们在持久化事件时根据事件版本号就能检测到这种重复。
所以,我们说,你要用CQRS架构,就必须要接受CQ数据的最终一致性,因为如果你以读库的更新完成为操作处理完成的话,那一次业务场景所用的时间很可能比传统架构要多。但是,如果我们以C端的处理为结束的话,则CQRS架构可能要快,因为C端可能只需要一次数据库IO。我觉得这里有一点很重要,对于CQRS架构,我们更加关注C端处理完成所用的时间;而Q端的处理稍微慢一点没关系,因为Q端只是供我们查看数据用的(最终一致性)。我们选择CQRS架构,就必须要接受Q端数据更新有一点点延迟的缺点,否则就不应该使用这种架构。所以,希望大家在根据你的业务场景做架构选型时一定要充分认识到这一点。
另外,上面再谈到数据一致性时提到,传统架构会使用事务来保证数据的强一致性;如果事务越复杂,那一次事务锁的表就越多,锁是系统伸缩性的大敌;而CQRS架构,一个命令只会修改一个聚合根,如果要修改多个聚合根,则通过Saga来实现。从而绕过了复杂事务的问题,通过最终一致性的思路做到了最大的并行和最少的并发,从而整体上提高系统的吞吐能力。
所以,总体来说,性能瓶颈方面,两种架构都能克服。而只要克服了性能瓶颈,那伸缩性就不是问题了(当然,这里我没有考虑数据丢失而带来的系统不可用的问题。这个问题是所有架构都无法回避的问题,唯一的解决办法就是数据冗余,这里不做展开了)。两者的瓶颈都在数据的持久化上,但是传统的架构因为大部分系统都是要存储数据到关系型数据库,所以只能自己采用分库分表的方案。而CQRS架构,如果我们只关注C端的瓶颈,由于C端要保存的东西很简单,就是命令和事件;如果你信的过一些成熟的NoSQL(我觉得使用文档性数据库如MongoDB这种比较适合存储命令和事件),且你也有足够的能力和经验去运维它们,那可以考虑使用NoSQL来持久化。如果你觉得NoSQL靠不住或者没办法完全掌控,那可以使用关系型数据库。但这样你也要付出努力,比如需要自己负责分库分表来保存命令和事件,因为命令和事件的数据量都是很大的。不过目前一些云服务如阿里云,已经提供了DRDS这种直接支持分库分表的数据库存储方案,极大的简化了我们存储命令和事件的成本。就我个人而言,我觉得我还是会采用分库分表的方案,原因很简单:确保数据可靠落地、成熟、可控,而且支持这种只读数据的落地,框架内置要支持分库分表也不是什么难事。所以,通过这个对比我们知道传统架构,我们必须使用分库分表(除非阿里这种高大上可以使用OceanBase);而CQRS架构,可以带给我们更多选择空间。因为持久化命令和事件是很简单的,它们都是不可修改的只读数据,且对kv存储友好,也可以选择文档型NoSQL,C端永远是新增数据,而没有修改或删除数据。最后,就是关于Q端的瓶颈,如果你Q端也是使用关系型数据库,那和传统架构一样,该怎么优化就怎么优化。而CQRS架构允许你使用其他的架构来实现Q,所以优化手段相对更多。
结束语
我觉得不论是传统架构还是CQRS架构,都是不错的架构。传统架构门槛低,懂的人也多,且因为大部分项目都没有什么大的并发写入量和数据量。所以应该说大部分项目,采用传统架构就OK了。但是通过本文的分析,大家也知道了,传统架构确实也有一些缺点,比如在扩展性、可用性、性能瓶颈的解决方案上,都比CQRS架构要弱一点。大家有其他意见,欢迎拍砖,交流才能进步,呵呵。所以,如果你的应用场景是高并发写、高并发读、大数据,且希望在扩展性、可用性、性能、可伸缩性上表现更优秀,我觉得可以尝试CQRS架构。但是还有一个问题,CQRS架构的门槛很高,我认为如果没有成熟的框架支持,很难使用。而目前据我了解,业界还没有很多成熟的CQRS框架,java平台有axon framework, jdon framework;.NET平台,ENode框架正在朝这个方向努力。所以,我想这也是为什么目前几乎没有使用CQRS架构的成熟案例的原因之一。另一个原因是使用CQRS架构,需要开发者对DDD有一定的了解,否则也很难实践,而DDD本身要理解没个几年也很难运用到实际。还有一个原因,CQRS架构的核心是非常依赖于高性能的分布式消息中间件,所以要选型一个高性能的分布式消息中间件也是一个门槛(java平台有RocketMQ),.NET平台我个人专门开发了一个分布式消息队列EQueue,呵呵。另外,如果没有成熟的CQRS框架的支持,那编码复杂度也会很复杂,比如Event Sourcing,消息重试,消息幂等处理,事件的顺序处理,并发控制,这些问题都不是那么容易搞定的。而如果有框架支持,由框架来帮我们搞定这些纯技术问题,开发人员只需要关注如何建模,实现领域模型,如何更新读库,如何实现查询,那使用CQRS架构才有可能,因为这样才可能比传统的架构开发更简单,且能获得很多CQRS架构所带来的好处。
